Introduction
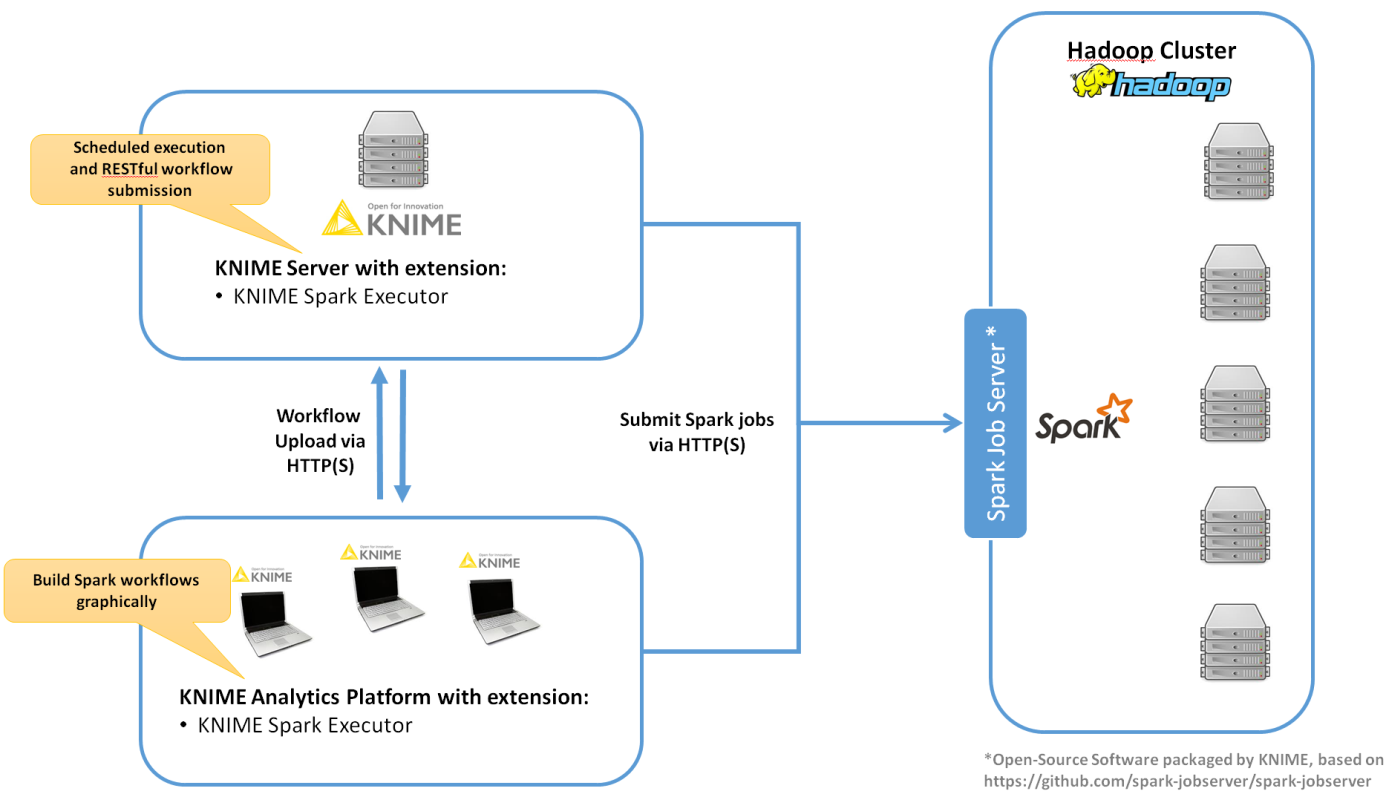
This document describes the installation procedure of the KNIME Extension for Apache Spark™ to be used with KNIME Analytics Platform and KNIME Server.
As depicted below, KNIME Extension for Apache Spark consists of:
-
a client-side extension for KNIME Analytics Platform/KNIME Server
-
a cluster-side REST service, that needs to be installed on an edge node of your Hadoop cluster or a node that can execute the
spark-submitcommand. The service must be one of:-
Spark Job Server (recommended)
-
Apache Livy (preview)
-
Supported Hadoop distributions
-
Supported with Kerberos security:
-
Hortonworks HDP 2.4.2 with Spark 1.6
-
Hortonworks HDP 2.4.3 with Spark 1.6
-
Hortonworks HDP 2.5.x with Spark 1.6 and 2.0
-
Hortonworks HDP 2.6.x with Spark 1.6 and 2.1
-
Hortonworks HDP 2.6.3 with Spark 1.6 and 2.2
-
Hortonworks HDP 2.6.4 with Spark 1.6 and 2.2
-
Hortonworks HDP 2.6.5 with Spark 1.6 and 2.3
-
Cloudera CDH 5.7 with Spark 1.6, 2.0 and 2.1
-
Cloudera CDH 5.8 with Spark 1.6, 2.0, 2.1 and 2.2
-
Cloudera CDH 5.9 with Spark 1.6, 2.0, 2.1, 2.2 and 2.3
-
Cloudera CDH 5.10 with Spark 1.6, 2.0, 2.1, 2.2 and 2.3
-
Cloudera CDH 5.11 with Spark 1.6, 2.0, 2.1, 2.2 and 2.3
-
Cloudera CDH 5.12 with Spark 1.6, 2.1, 2.2 and 2.3
-
Cloudera CDH 5.13 with Spark 1.6, 2.1, 2.2 and 2.3
-
Cloudera CDH 5.14 with Spark 1.6, 2.1, 2.2 and 2.3
-
Cloudera CDH 5.15 with Spark 1.6, 2.1, 2.2 and 2.3
-
-
In addition, supported without Kerberos security:
-
Hortonworks HDP 2.2 with Spark 1.2
-
Hortonworks HDP 2.3.0 with Spark 1.3
-
Hortonworks HDP 2.3.4 with Spark 1.5
-
Hortonworks HDP 2.4.x with Spark 1.6
-
Cloudera CDH 5.3 with Spark 1.2
-
Cloudera CDH 5.4 with Spark 1.3
-
Cloudera CDH 5.5 with Spark 1.5
-
Cloudera CDH 5.6 with Spark 1.5
-
Supported Spark Job Server versions
KNIME Extension for Apache Spark is compatible with the following Spark Job Server versions (provided by KNIME):
-
0.6.2.3-KNIME (for Spark 1.x)
-
0.7.0.3-KNIME (for Spark 2.x).
Supported Apache Livy versions
KNIME Extension for Apache Spark is compatible with Apache Livy 0.4.0 (not provided by KNIME). This version is shipped as part of:
-
0.4.0 shipped with Hortonworks HDP 2.6.3 and higher
-
Amazon EMR 5.9.0 and higher
|
Support for Apache Livy is currently in preview status. |
Supported versions of KNIME software
KNIME Extension for Apache Spark is compatible with the following versions of KNIME software:
-
KNIME Analytics Platform 3.6
-
KNIME Server 4.7
Spark Job Server setup
This section describes how to install Spark Job Server on a Linux machine. Spark Job Server provides a RESTful interface for submitting and managing Apache Spark jobs, jars, and job contexts. KNIME Extension for Apache Spark requires Spark Job Server to execute and manage Spark jobs.
Background
Spark Job Server was originally developed at Ooyala, but the main development repository is now on GitHub. For more information please consult the GitHub repository, including licensing conditions, contributors, mailing lists and additional documentation.
In particular, the README of the Job Server contains dedicated sections about HTTPS / SSL Configuration and Authentication. The GitHub repository also contains general Troubleshooting and Tips as well as YARN Tips section. All Spark Job Server documentation is available in the doc folder of the GitHub repository.
KNIME packages the official Spark Job Server and — if necessary — adapts it for the supported Hadoop distributions. These packages can be downloaded on the KNIME Extension for Apache Spark product website. We strongly recommend using these packages as they contain additional bugfixes and improvements and have been tested and verified by KNIME.
Versions
The current versions of Spark Job Server provided by KNIME are:
-
0.6.2.3-KNIME (for Spark 1.x)
-
0.7.0.3-KNIME (for Spark 2.x).
Updating Spark Job Server
If you are updating an existing 0.6.2.1-KNIME or older installation, there may be changes required to some of its configuration files. The README of the Spark Job Server packaged by KNIME highlights any necessary changes to those files.
If you are updating an existing 0.7.0.1-KNIME or older installation, it is strongly recommended to make a fresh installation based on this guide. Due to the number of changes to the server’s default configuration and directory layout, copying an old configuration will not work.
Due to different default installation locations between 0.6.2.x-KNIME (for Spark 1.x) and 0.7.0.x-KNIME (for Spark 2.x), it is possible to install both versions of Spark Job Server at the same time on the same machine.
Requirements
Spark Job Server uses the spark-submit command to run the Spark driver program and executes Spark jobs submitted via REST. Therefore, it must be installed on a machine that
-
runs Linux (RHEL 6.x/7.x recommended, Ubuntu 14 .x is also supported)
-
has full network connectivity to all your Hadoop cluster nodes,
-
can be connected to via HTTP (default port TCP/8090) from KNIME Analytics Platform and/or KNIME Server,
-
has all libraries and cluster-specific configuration for Spark, Hadoop and Hive libraries set up.
This can for example be the Hadoop master node or a cluster edge node.
Installation
|
The installation of Spark Job Server needs to be performed as the Linux |
-
Locate the Spark Job Server package that matches your Hadoop distribution on the KNIME Extension for Apache Spark product website under Installation Steps > KNIME Analytics Platform X.Y > Supplementary download links for the Spark Job Server.
Note: Due to different default installation locations between Spark Job Server versions 0.6.2.x-KNIME (for Spark 1.x) and 0.7.0.x-KNIME (for Spark 2.x), it is possible to install both versions of Spark Job Server at the same time on the same machine. If you choose to do this, walk through steps 2. — 7. once for each version.
-
Download the file on the machine where you want to install Spark Job Server.
-
Log in as
rooton that machine and install the Job Server as follows (replace xxx with the version of your download). First, define a shell variable which we will be using in the remainder of the installation:For 0.6.2.x-KNIME_xxx (Spark 1.x)LINKNAME=spark-job-serverFor 0.7.0.x-KNIME_xxx (Spark 2.x)LINKNAME=spark2-job-serverFor all versions of Spark Job Server proceed with
useradd -d /opt/${LINKNAME}/ -M -r -s /bin/false spark-job-server su -l -c "hdfs dfs -mkdir -p /user/spark-job-server ; hdfs dfs -chown -R \ spark-job-server /user/spark-job-server" hdfs cp /path/to/spark-job-server-xxx.tar.gz /opt cd /opt tar xzf spark-job-server-xxx.tar.gz ln -s spark-job-server-xxx ${LINKNAME} chown -R spark-job-server:spark-job-server ${LINKNAME} spark-job-server-xxx/ -
If you are installing on RedHat Enterprise Linux (RHEL), CentOS or Ubuntu 14.x then run the following commands to make Spark Job Server start during system boot:
On RHEL 6.x/CentOS 6.xln -s /opt/${LINKNAME}/spark-job-server-init.d /etc/init.d/${LINKNAME} chkconfig --levels 2345 ${LINKNAME} onOn RHEL 7.x/CentOS 7.xln -s /opt/${LINKNAME}/spark-job-server-init.d /etc/init.d/${LINKNAME} systemctl daemon-reload systemctl enable ${LINKNAME}On Ubuntu 14.xln -s /opt/${LINKNAME}/spark-job-server-init.d-ubuntu-sysv /etc/init.d/${LINKNAME} update-rc.d ${LINKNAME} start 20 2 3 4 5 . stop 20 0 1 6 .The boot script will run the Job Server as the
spark-job-serversystem user. If you have installed Job Server to a different location, or wish to run it with a different user, you will have to change theJSDIRandUSERvariables in the boot script. -
Edit
environment.confin the server’s installation directory as appropriate. The most important settings are:-
master:
-
Set
master = yarn-clientfor running Spark in YARN-client mode -
Set
master = spark://localhost:7077for standalone mode -
Set
master = local[4]for local debugging. -
Note: yarn-cluster mode is currently not supported by Spark Job Server.
-
-
Settings for predefined contexts: Under
context-settings, you can predefine Spark settings for the default Spark context. Please note that these settings can be overwritten by the client-side configuration of the KNIME Extension for Apache Spark. Undercontextsyou can predefine Spark settings for non-default Spark contexts.
-
-
Optional: Edit
settings.shas appropriate:-
SPARK_HOME, please change if Spark is not installed under the given location. -
LOG_DIR, please change if you want to log to a non-default location.
-
-
Optional: Edit
log4j-server.propertiesas appropriate. This should not be necessary unless you wish to change the defaults.
Starting Spark Job Server
Notes:
-
In the following, replace
${LINKNAME}with eitherspark-job-serverorspark2-job-serverdepending on which value you have been using in the previous section. -
It is not recommended to start Spark Job Server with the
server_start.shin its installation directory. -
You can verify that Spark Job Server has correctly started via the WebUI (see Spark Job Server web UI).
/etc/init.d/${LINKNAME} startsystemctl start ${LINKNAME}Stopping Spark Job Server
Notes:
-
Replace
${LINKNAME}with eitherspark-job-serverorspark2-job-serverdepending on which value you have been using in the previous section. -
It is not recommended to stop the server with the
server_stop.shscript.
/etc/init.d/${LINKNAME} stopsystemctl stop ${LINKNAME}Installation on a Kerberos-secured cluster
In a Kerberos-secured cluster, Spark Job Server requires a Ticket Granting Ticket (TGT) to access Hadoop services and provide user impersonation. To set this up, please first follow the installation steps in the previous section. Then proceed with the following steps:
-
Create a service principal and a keytab file for the
spark-job-serverLinux user. By default this is assumed to bespark-job-server/host@REALM, where-
hostis the fully qualified hostname (FQDN) of the machine where you are installing Job Server, -
REALMis the Kerberos realm of your cluster.
-
-
Upload the keytab file to the machine where Job Server is installed and limit its accessibility to only the spark-job-server system user:
chown spark-job-server:spark-job-server /path/to/keytab chmod go= /path/to/keytab -
Now you have to tell Job Server about the keytab file and, optionally, about the service principal you have created. In
/opt/spark-job-server-xxx/settings.shuncomment and edit the following lines:export JOBSERVER_KEYTAB=/path/to/keytab export JOBSERVER_PRINCIPAL=user/host@REALMNote: You only need to set the principal, if it is different from the assumed default principal
spark-job-server/$(hostname -f)/<default realm from /etc/krb5.conf> -
In
environment.confset the following properties:spark { jobserver { context-per-jvm = true } } shiro { authentication = on config.path = "shiro.ini" use-as-proxy-user = on }
The effect of these settings is that Job Server will authenticate all of its users, and each user will have its own Spark context, that can access Hadoop resources in the name of this user.
-
Configure the authentication mechanism of Job Server in the
shiro.inifile. Instructions for authenticating against LDAP or ActiveDirectory are covered in the Setting up LDAP authentication section of this guide. Some example templates can also be found in the Spark Job Server installation folder. -
Add the following properties to the
core-site.xmlof your Hadoop cluster:hadoop.proxyuser.spark-job-server.hosts = * hadoop.proxyuser.spark-job-server.groups = *
This must be done either via Ambari (on HDP) or Cloudera Manager (on CDH). A restart of the affected Hadoop services is required.
Setting up LDAP authentication
Spark Job Server uses the the Apache Shiro™ framework to authenticate its users, which can delegate authentication to an LDAP server, e.g. OpenLDAP or Microsoft ActiveDirectory®.
Set up LDAP authentication as follows:
-
Activate shiro authentication in
environment.conf:shiro { authentication = on config.path = "shiro.ini" [...other settings may be here...] }
-
Create an empty
shiro.ini. -
Configure
shiro.iniusing one of the templates from the following sections, depending on whether you want to authenticate against OpenLDAP or ActiveDirectory and with or without group membership checking.-
Do not change the order of the lines in the templates.
-
Do not use single or double quotes unless you want them to be part of the configuration values. The
inifile format does not support quoting.
-
-
Activate the shiro authentication cache by appending the following lines to
shiro.ini:cacheManager = org.apache.shiro.cache.MemoryConstrainedCacheManager securityManager.cacheManager = $cacheManager
Template: OpenLDAP without group membership checking
myRealm = org.apache.shiro.realm.ldap.JndiLdapRealm
myRealm.contextFactory.url = ldap://ldapserver.company.com
myRealm.userDnTemplate = uid={0},ou=people,dc=company,dc=com
Notes:
-
In
myRealm.userDnTemplatethe placeholder{0}is replaced with the login name the user enters.
Template: ActiveDirectory without group membership checking
myRealm = org.apache.shiro.realm.ldap.JndiLdapRealm
myRealm.contextFactory.url = ldap://ldapserver.company.com
myRealm.userDnTemplate = {0}@COMPANY.COM
Notes:
-
In
myRealm.userDnTemplatethe placeholder{0}is replaced with the login name the user enters. ActiveDirectory then authenticates against the user record with a matchingsAMAccountName.
Template: OpenLDAP with group membership checking
myRealm = spark.jobserver.auth.LdapGroupRealm
myRealm.contextFactory.url = ldap://ldapserver.company.com
myRealm.userDnTemplate = uid={0},ou=people,dc=company,dc=com
myRealm.contextFactory.systemUsername = uid=systemuser,dc=company,dc=com
myRealm.contextFactory.systemPassword = theSystemUserPassword
myRealm.userSearchFilter = (&(objectClass=inetOrgPerson)(uid={0}))
myRealm.contextFactory.environment[ldap.searchBase] = dc=company.com,dc=com
myRealm.contextFactory.environment[ldap.allowedGroups] = group1,group2
myRealm.groupSearchFilter = (&(member={2})(objectClass=posixGroup)(cn={0}))
Notes:
-
In
myRealm.userDnTemplatethe placeholder{0}is replaced with the login name the user enters. -
myRealm.contextFactory.systemUsernameis a technical user account that must be allowed to list all user DNs and determine their group membership. -
myRealm.userSearchFilterandmyRealm.groupSearchFilterare only used to determine group membership, which takes place after successful user/password authentication. -
In
myRealm.contextFactory.environment[ldap.allowedGroups]you list all group names separated by commas, without spaces. These group names will be put into the{0}placeholder of themyRealm.groupSearchFilterwhen trying to find the LDAP record of a group. The DN of the user, which is determined withmyRealm.userSearchFilter, is put into the{2}placeholder.
Template: ActiveDirectory with group membership checking
myRealm = spark.jobserver.auth.LdapGroupRealm
myRealm.contextFactory.url = ldap://ldapserver.company.com
myRealm.userDnTemplate = {0}@COMPANY.COM
myRealm.contextFactory.systemUsername = systemuser@COMPANY.COM
myRealm.contextFactory.systemPassword = theSystemUserPassword
myRealm.userSearchFilter = (&(objectClass=person)(sAMAccountName={0}))
myRealm.contextFactory.environment[ldap.searchBase] = dc=company.com,dc=com
myRealm.contextFactory.environment[ldap.allowedGroups] = group1,group2
myRealm.groupSearchFilter = (&(member={2})(objectClass=group)(cn={0}))
Notes:
-
In
myRealm.userDnTemplatethe placeholder{0}is replaced with the login name the user enters. ActiveDirectory then authenticates against the user record with a matchingsAMAccountName. -
myRealm.contextFactory.systemUsernameis a technical user account that must be allowed to list all user DNs and determine their group membership. -
myRealm.userSearchFilterandmyRealm.groupSearchFilterare only used to determine group membership, which takes place after successful user/password authentication. -
In
myRealm.contextFactory.environment[ldap.allowedGroups]you list all group names separated by commas, without spaces. These group names will be put into the{0}placeholder of themyRealm.groupSearchFilterwhen trying to find the LDAP record of a group. The DN of the user, which is determined withmyRealm.userSearchFilter, is put into the{2}placeholder.
Maintenance
Clean up temporary files
It is advisable to restart Spark Job Server occasionally, and clean up its temporary files. Remove either the entire directory or only the jar files under /tmp/spark-job-server, or whichever file system locations you have set in environment.conf.
Spark Job Server web UI
Point your browser to http://server:port to check out the status of the Spark Job Server. The default port is 8090. Three different tabs provide information about active and completed jobs, contexts and jars.
Troubleshooting
Retrieving Spark logs
By default, Spark Job Server logs to the following directories:
-
/var/log/spark-job-server/(0.6.2.3-KNIME for Spark 1.x) -
/var/log/spark2-job-server/(0.7.0.3-KNIME for Spark 2.x)
This directory contains the following files:
-
spark-job-server.logandspark-job-server.outwhich contain the logs of the part of Spark Job Server that runs the REST interface. -
Per created Spark context, a directory
jobserver-<user>~<ctxname><randomnumber>/will be created. It contains aspark-job-server.logandspark-job-server.outthat the respectivespark-submitprocess logs to.
In some situations, it is helpful to obtain the full YARN container logs. These can be obtained using the yarn logs shell command or using the means of your Hadoop distribution:
-
Cloudera CDH: Monitoring Spark Applications
-
Hortonworks HDP: Using the YARN CLI to View Logs for Running Applications
Spark Job Server fails to restart
At times, Spark Job Server cannot be restarted when large tables were serialized from KNIME to Spark. It fails with a message similar to java.io.UTFDataFormatException: encoded string too long: 6653559 bytes. In that case, it is advisable to delete /tmp/spark-job-server, or whichever file system locations you have set in environment.conf.
Spark Collaborative Filtering node fails
If the Spark Collaborative Filtering node fails with a Job canceled because SparkContext was shutdown exception the cause might be missing native libraries on the cluster. If you find the error message java.lang.UnsatisfiedLinkError: org.jblas.NativeBlas.dposv in your Job Server log the native JBlas library is missing on your cluster. To install the missing library execute the following command as root on all cluster nodes:
-
On RHEL-based systems
yum install libgfortran
-
On Debian-based systems
apt-get install libgfortran3
For detailed instructions on how to install the missing libraries go to the JBlas Github page. For information about the MLlib dependencies see the Dependencies section of the MLlib Guide.
The issue is described in SPARK-797.
Request to Spark Job Server failed, because the uploaded data exceeded that allowed by the Spark Job Server
Spark Job Server limits how much data can be submitted in a single REST request. For Spark nodes that submit large amounts of data to Spark Job Server, e.g. a large MLlib model, this can result in a request failure with an error as above. This problem can be addressed by adding and adjusting the following section in environment.conf:
spray.can.server {
      request-chunk-aggregation-limit = 200m
}

spray.can.server.parsing {
      max-content-length = 200m
}
Spark job execution failed because no free job slots were available on Spark Job Server
Spark Job Server limits how much jobs can run at the same time within the same context. This limit can be changed by adjusting the following setting in environment.conf:
spark {
  jobserver {
    max-jobs-per-context = 100
  }
}
Setting up KNIME Extension for Apache Spark
This section describes how to install the client-side KNIME Extension for Apache Spark in KNIME Analytics Platform or KNIME Server. The extension provides all the necessary KNIME nodes to create workflows that execute on Apache Spark.
Requirements
Required Software: A compatible version of KNIME Analytics Platform or KNIME Server (see Supported versions of KNIME software).
Network Connectivity Requirements: KNIME Extension for Apache Spark (the client) needs to be able to make a network connection to the Spark Job Server service. There are two ways to make this connection:
-
Direct connection (recommended): Client → Spark Job Server (default port 8090).
-
Proxied connection: Client → TTP/HTTPS/SOCKS Proxy → Spark Job Server (default port 8090). Currently, only proxies that do not require any authentication are supported. Note that KNIME does not provide the proxy software itself.
Installation
The extension can be installed via the KNIME Update Manager:
-
Go to File > Install KNIME Extensions.
-
Open the category KNIME Big Data Extensions.
-
Select KNIME Extension for Apache Spark.
-
Click on Next and follow the subsequent dialog steps to install the extension.
If you don’t have direct internet access you can also install the extension from a zipped update site:
-
Download the zipped KNIME Analytics Platform update site from here.
-
Register the update site in KNIME Analytics Platform via File > Preferences > Install/Update > Available Software Sites.
-
Follow the installation steps for the KNIME Update Manager as above.
Managing Spark contexts
After installing the client-side extension, you should configure it to work with your environment e.g. your Spark Job Server or Apache Livy server.
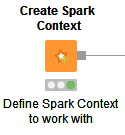
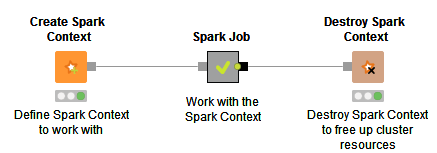
To work with Spark you first need to create a new Spark Context, which can be done using one of the Create Spark Context and Create Spark Context via Livy nodes.
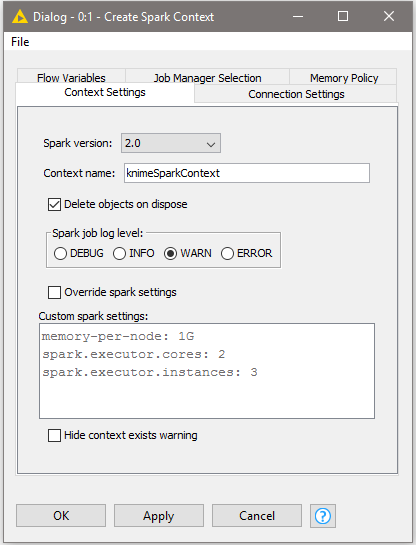
Create Spark Context node
This node connects to Spark Job Server to create a new Spark context.
Its node dialog has two main tabs. The first tab is the Context Settings tab which allows you to specify the following Spark Context settings:
-
Spark version: Please choose the Spark version of the Hadoop cluster you are connecting to.
-
Context name: A unique name for the Spark context.
-
Delete objects on dispose: KNIME workflows with Spark nodes create objects such as DataFrames/RDDs during execution. This setting specifies whether those objects shall be deleted when closing a workflow.
-
Override Spark settings: Custom settings for the Spark context, e.g. the amount of memory to allocate per Spark executor. These settings override those from Job Server’s
environment.conf. -
Hide context exists warning: If not enabled the node will show a warning if a Spark Context with the defined name already exists.
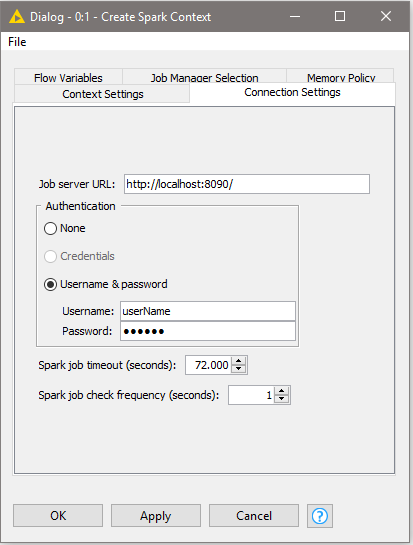
The second tab is the Connection Settings tab which allows you to specify the following connection settings:
-
Job server URL: This is the HTTP/HTTPS URL under which the Spark Job Server WebUI can be reached. The default URL is
http://localhost:8090/. -
Credentials: If you have activated user authentication, you need to enter a username and password here.
-
Job timeout in seconds/Job check frequency: These settings specify how long a single Spark job can run before being considered failed, and, respectively, in which intervals the status of a job shall be polled.
Create Spark Context via Livy node
This node connects to an Apache Livy server to create a new Spark context. This node is a preview and may change in future releases.
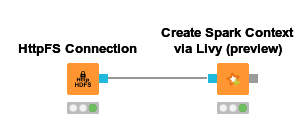
This node requires access to a remote file system to exchange temporary files between KNIME and the Spark context (running on the cluster). Supported file systems are:
-
HDFS, webHDFS and httpFS. Note that here KNIME must access the remote file system with the same user as Spark, otherwise Spark context creation fails. When authenticating with Kerberos against both HDFS/webHDFs/httpFS and Livy, then usually the same user will be used. Otherwise, this must be ensured manually.
-
Amazon S3 and Azure Blob Store, which is recommended when using Spark on Amazon EMR/Azure HDInsight. Note that for these file systems a staging area must be specified in the Advanced tab.
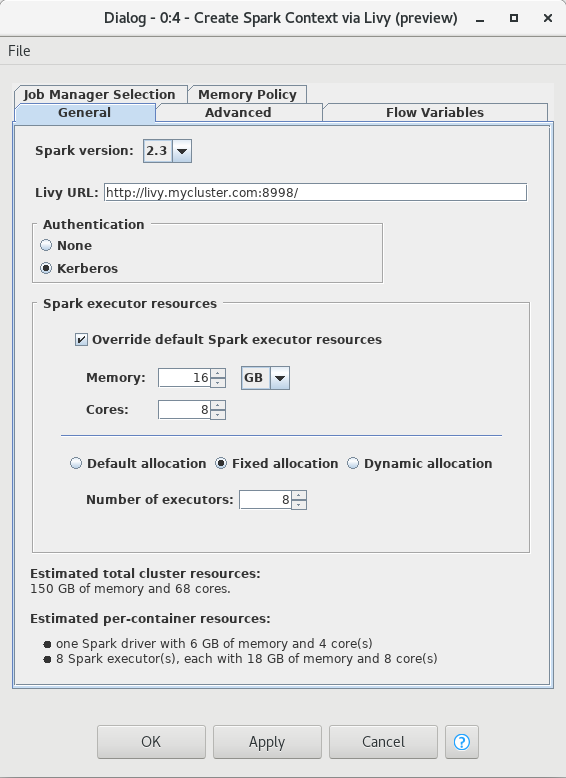
Its node dialog has two tabs. The first tab provides the most commonly used settings when working with Spark:
-
Spark version: Please choose the Spark version of the Hadoop cluster you are connecting to.
-
Livy URL: The URL of Livy including protocol and port e.g.
http://localhost:8998/. -
Authentication: How to authenticate against Livy. Supported mechanism are Kerberos and None.
-
Spark Executor resources: Sets the resources to be request for the Spark executors. If enabled, you can specify the amount of memory and the number of cores for each executor. In addition you can specify the Spark executor allocation strategy.
-
Estimated resources: An estimation of the resources that are allocated in your cluster by the Spark context. The calculation uses default settings for memory overheads etc and is thus only an estimate. The exact resources might be different depending on your specific cluster settings.
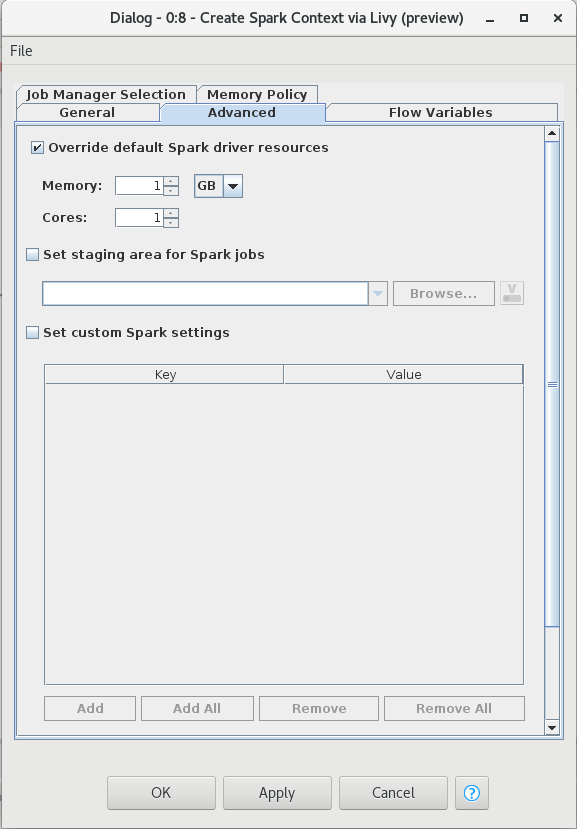
The second tab provides the advanced settings that are sometimes useful when working with Spark:
-
Override default Spark driver resources: If enabled, you can specify the amount of memory and number of cores to be allocated for the Spark driver process.
-
Set staging area for Spark jobs: If enabled, you can specify a directory in the connected remote file system, that will be used to transfer temporary files between KNIME and the Spark context. If no directory is set, then a default directory will be chosen, e.g. the HDFS user home directory. However, if the remote file system is Amazon S3 or Azure Blob Store, then a staging directory must be provided.
-
Set custom Spark settings: If enabled, you can specify additional Spark settings. A tooltip is provided for the keys if available. For further information about the Spark settings refer to the Spark documentation.
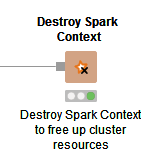
Destroy Spark Context node
Once you have finished your Spark job, you should destroy the created context to free up the resources your Spark Context has allocated on the cluster. To do so you can use the Destroy Spark Context node.
Adapting default settings for the Create Spark Context node
The default settings of the Create Spark Context node can be specified via a preference page. The default settings are applied whenever the node is added to a KNIME workflow. To change the default settings, open File > Preferences > KNIME > Big Data > Spark and adapt them to your environment (see Create Spark Context node).
Proxy settings
If your network requires you to connect to Spark Job Server via a proxy, please open File > Preferences > Network Connections. Here you can configure the details of your HTTP/HTTPS/SOCKS proxies. Please consult the official Eclipse documentation on how to configure proxies.