What is KNIME Software?
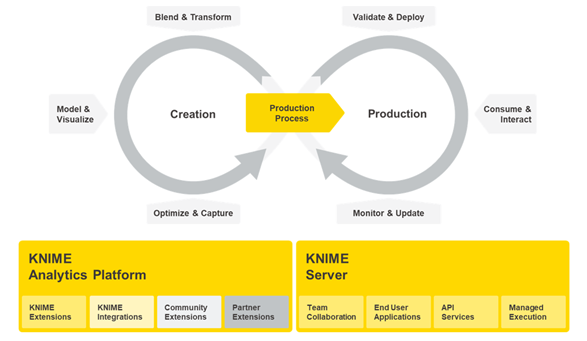
One enterprise-grade software platform, two complementary tools: the open source KNIME Analytics Platform for creating data science, and the commercial KNIME Server for productionizing data science.
If you are new to KNIME, you can download KNIME Analytics Platform via your internal catalog or directly on the KNIME website. We suggest you look at our guide to getting started to build your first workflow.
Workflow design process: From KNIME Analytics Platform to KNIME Server
As mentioned before, these are complementary tools.
KNIME Analytics Platform is our open source software for creating data science. Intuitive, open, and continuously integrating new developments, it makes understanding data and designing workflows and reusable components accessible to everyone.
KNIME Server is an enterprise software for team-based collaboration, automation, management, and deployment of data science workflows as KNIME WebPortal applications, Data Apps, REST APIs, and more.
As you start your data project with KNIME, you will create a workflow that can then be uploaded to KNIME Server. KNIME Analytics Platform is how you’ll design your data process via a workflow. Once your workflow is ready, it can be easily automated or deployed when you upload it to KNIME Server.
Before building a KNIME Workflow: project prerequisites
As with any project, prior to building your workflow, it’s important to understand the scope of what you’re working with. This checklist can guide you:
-
Is there a clearly defined goal that is measurable and achievable?
For example: We want to reduce the churn rate by 15%. -
What data sources are required to reach the goal? Do you have access to these sources?
-
Who should consume your deployed data science application, and how? For instance are you making:
-
A scheduled workflow that regularly creates and sends a report?
-
A scheduled workflow that gets executed regularly to process new data or apply a predictive model?
-
A Data App that gets deployed to KNIME WebPortal?
-
A predictive model that is accessible via REST API?
-
-
What kind of workflows do you need to achieve your goal?
-
What is the task of each individual workflow that you want to build?
-
What is the input and output of each individual workflow?
-
Do your workflows share some parts?
-
-
Define the requirements for the created workflows (how fast the execution should be, how often should it be executed, etc.).
-
What hardware and software do you need to meet all these requirements?
Best practices when working with KNIME Analytics Platform
Use proper naming for your workflows or groups
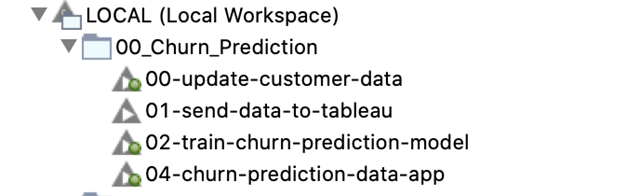
Use a clear naming convention for your workflows. From the workflow name, it should be clear what the workflow is doing (e.g. “Project_1” vs. “Read and Preprocess Customer Data”). If one of your workflows is followed by another workflow, you might want to introduce an order by using numbers as prefixes.
Design your workflow in a secure, reusable, and efficient way
Avoid using local file paths
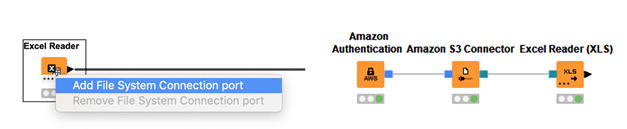
To make your workflow able to access the data sources whether it is executed on your machine or on any other machine, it is important to avoid local file paths. Instead use relative paths or, if your data is already available in a remote files system, manage your files and folders there directly. To do so, you can use a dynamic file system connection port and one of the many different connector nodes, e.g. the SMB Connector or the S3 Connector node.
Use credential nodes
It is not recommended that you save any credentials or confidential data in your nodes and workflows. Instead use the Credentials Configuration or Credentials Widget node to let the user specify credentials at runtime.

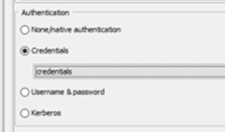
If the workflow is shared via KNIME Server, the person who executes it can provide the credentials when starting or scheduling the execution, either via the WebPortal or the “Configuration” options in the execution window. (Right-click a workflow in the KNIME Explorer and select “Execute” to open it).
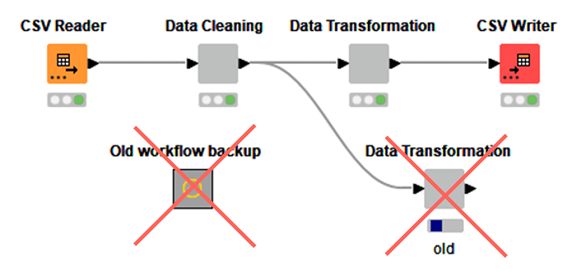
Document your workflow
To make your workflow reusable, you and your team need to be able to quickly understand what it’s doing. It is therefore important to document your workflow — and if it’s large, you should structure it into different parts.
To structure a large workflow, you can use metanodes and components for the different parts and nest them. To document the workflows, you can:
-
Change the node labels to define what individual nodes do by double-clicking on their labels.
-
Create an annotation box. Just right-click anywhere in the workflow editor and select "New Workflow Annotation." Then type in your explanatory comment, resize the annotation window to make clear which group of nodes it refers to, and format the text using the context menu.
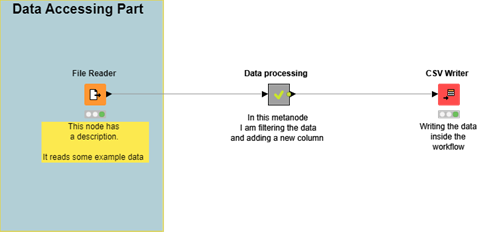 This workflow is an example of how to document workflows and add descriptions and annotations to them.
 -
Attach a workflow description by clicking on an empty spot in the workflow, then go into the Node Description view and click the edit button on the top-right.
Design your workflow to be efficient
To make the execution of your workflow efficient, it is good to follow some best practices and take into consideration how compute-intensive it is to execute each individual node.
-
Exclude superfluous columns before reading. In case not all columns of a dataset are actually used, you can avoid reading these columns by excluding them via the “Transformation” tab of the reader node.

-
To make the data access part of your workflow efficient, you should avoid reading the same file multiple times, but instead connect one reader node to multiple nodes.
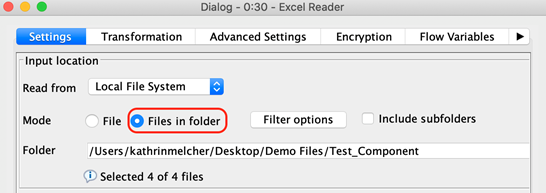
-
Use the “Files in Folder” option to read multiple files with the same structure.
-
Remove redundant rows and columns early before performing expensive operations like joining or data aggregation.
-
Only use loops if it is absolutely necessary. Executing loops is normally expensive. Try to avoid them by using other nodes, e.g. String Manipulation (Multi Column) or Math Formula (Multi Column) nodes.
-
Push as much computation as possible to the database. In case you are working with databases, you can speed up the execution of your workflow by pushing as much of the preprocessing of the data as possible to the database server by using the DB preprocessing nodes before reading the data into KNIME Analytics Platform.
-
Close database connections with the DB Connection Closer node.
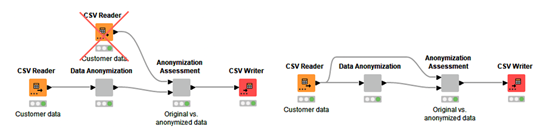
-
Delete disconnected nodes or workflow branches that are not actively needed.
To further improve the performance of your workflow, you can use the Timer Info node to find out how long it takes to execute individual nodes.
Best practices when working with KNIME Server
Versioning
When working in a team, building and modifying workflows together, it is easy to lose progress by overwriting a colleague’s work. Sometimes you also make changes that you later discover to be wrong, and you’ll want to roll back your work to a previous version. When writing code, you usually use a version control system like GIT for this task. Such a system boosts productivity by tracking changes and ensuring that no important work is lost. A video about the versioning functionality of KNIME Server is available on YouTube.
Snapshots
KNIME Server provides its own version control mechanism (see our documentation) that is based on Snapshots.
A snapshot is simply a copy of a workflow at a certain point in time. Snapshots of items in the server repository can be taken at any point by selecting the option in the items context menu in the KNIME Explorer.
Additionally, a user can select to create a snapshot when overwriting an item. If necessary, the server administrator can also enable mandatory snapshots with every overwrite action.
An important part of a snapshot is the comment you write for it. Here KNIME differs a bit from other version control systems, which is why you need to be careful what to put there. When creating the snapshot KNIME asks you to provide a small snippet of text that describes the snapshot. This means that the text you write should not describe the changes done, but the actual state of the workflow in the snapshot, before the changes.
Version History
In addition to the snapshots, a repository item always has exactly one current state. This is the item that you see in the KNIME Explorer. If you want to access the snapshots, you need to view the item’s history.
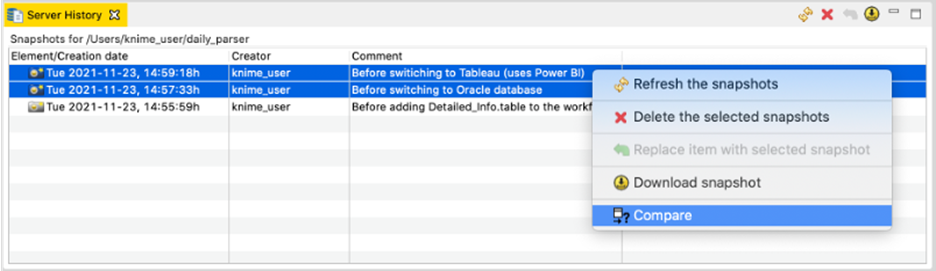
Here you see a list of snapshots, with the dates and times they were created and their comments. From here you can compare two workflow snapshots by selecting them, then right-clicking and choosing “Compare.”
If you only select a single snapshot of a workflow for comparison, it is being compared to the current version. Apart from comparison, you can also download a snapshot into your local repository, delete snapshots, and overwrite the current state with the snapshot.
Managing access to KNIME server items
When multiple teams are working on the same KNIME Server, it is important to control who has access to which items in the server’s repository.
Not every colleague should be able to see what you are working on, and some other colleagues may see your workflows, but you do not want them to change anything. Other people again should only be able to execute your workflows without seeing what exactly is going on underneath. KNIME Server comes with comprehensive access control, based on groups and individual users.
Permissions
Every item in the repository, be it workflows, workflow groups, or data files, can be assigned permissions. For workflows and workflow groups, those permissions cover reading, writing, and executing rights. For data files, only the former two are relevant.
You might wonder why anyone would need execute permissions on a workflow group. This is because by default, items in a workflow group inherit the permissions set on that group.
So if you give a person execute permissions on a certain workflow group and then upload a workflow into that group, the workflow will be executable by that person. Permission inheritance can be disabled on a per-item basis and replaced by permissions specific to that item.
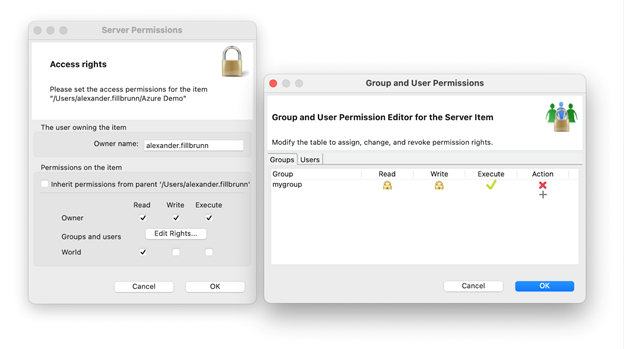
Reading, writing, and executing can be controlled not only for every user at once, but also for individual users and groups. For that, the permissions dialog has multiple options: “Owner,” “Users & Groups,” and “World.”
The owner of an item is the original uploader, but this can be changed by the owner or an administrator later. The owner is the person who is in charge of the item and can always change the permissions. Even if you disable reading and writing permissions for the owner, they will still be able to perform these actions. However, when execution permissions are denied, the owner won’t be able to execute the workflow.
The World permissions are permissions that apply to every user who is able to access the KNIME Server. If you want to tightly control who has access, it is best to disable all checkboxes in this row and then enable access for individual users and groups. You can do this by clicking on the “View rights…” button. Here a new window will open to let you enter custom users and groups (in the corresponding tab) and their permissions. Simply enter a user or group in a new line, then click the columns for granting permissions to perform read, write, and execute actions.
Best practices for assigning permissions
Usually it makes sense to set the permissions as narrowly as possible, but the permission to guard most closely is the write permission. With that, a user can change and overwrite your data and workflows, easily causing havoc if they have no business doing so.
Ideally your team has a folder in the server repository that only they have write access for. Permission inheritance will then make sure that by default, no one else can change anything.
But sometimes you also want to protect your IP, or you want to avoid people copying your workflows and deploying them with modifications elsewhere on the server, leading to a fragmentation of your project. In that case it is better to completely close down your project folder and even disable read access for people outside of your team: unselect all checkboxes for “World” and then explicitly enable access for your team in the “Users & Groups” settings.
Remote workflow editor
KNIME Workflows are often developed locally in KNIME Analytics platform, where it is easy to check after each step if the expected result was produced and every node is green. But once a workflow is completely done, it is deployed to KNIME Server to be executed in a schedule, either via REST API or from the WebPortal.
If the workflow is built perfectly and never fails, there’s not much reason to check the node status or the intermediate output of a node. Alas, nodes do fail occasionally, for a variety of reasons — be it unexpected data, network failures, or a million other things. To quickly alleviate these problems, KNIME provides a way of looking into a running job on KNIME Server as if it were running locally. The extension to allow this is called Remote Workflow Editor.
Installing the Remote Workflow Editor
The Remote Workflow Editor needs to be installed manually via “File → Install KNIME Extension…” Just enter “remote workflow editor” in the search box and check the corresponding extension for installation. Once the editor is installed, you can double-click on any job (an executing workflow) in the KNIME Explorer to open it in the workflow editor.
You will note a banner at the top of the editor informing you that this is a job running on KNIME Server. You can now look at node settings and outputs, as well as error and warning messages. If the job was not started from KNIME WebPortal, you can even reset and re-execute nodes, change connections, and add completely new nodes. For WebPortal jobs this is not possible, because it would interfere with a user who accesses the same job in their browser.
Use Cases for the Remote Workflow Editor
KNIME customers use the Remote Workflow Editor for a variety of things. Some do not have access to databases and file shares on their local devices, so they upload a partially done workflow to the server, execute a job via right-click → “Open” → “As new job on Server,” and then make the necessary configuration changes to let it read the data. Once the data is loaded, the job, including the data, can be persisted on the server by right-clicking on it in the KNIME Explorer and selecting “Save as Workflow…” This saved workflow can then be downloaded for further editing.
How to work as a team?
Working on the same project using components
When working on a larger project, you might want multiple team members to work on the same project and/or workflow at the same time. To do so, you can split the overall workflow into multiple parts, where each part is implemented within a component, for which you define the task/scope as well as the expected input and output columns.
For example, if you work on a prediction project (e.g. churn prediction
or lead scoring) where you have multiple data sources (e.g. an activity
protocol, interaction on your website, email data, or contract
information), you might want to generate some features based on each
data table. In this case, you can split the preprocessing into multiple
components with a clear description — which features should be created
based on an input dataset, and which output is expected (“ID Column
generated features,” or similar).
Then each team member can work on one of these tasks individually, encapsulate the work into a component, and share it with the team. In the end, the different steps can be combined into one workflow that uses the shared components in the right order.
Another nice side effect is that the individual components can be reused by other workflows. So if you have shared components that prepare your customer data for a churn prediction model, you can reuse them when working on a next best step model.
Best practice when building (shared) components
There are a few things to keep in mind when building shared components to make them easily reusable. It is best to build your shared component in a way that it behaves like you would expect a KNIME node to. This means it should be configurable via the configuration window, have an informative description, and give you meaningful error messages when something fails.
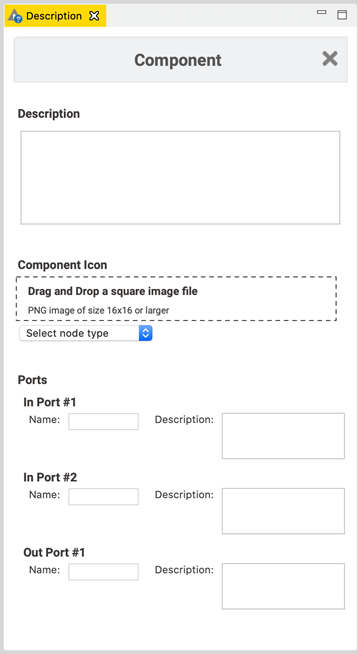
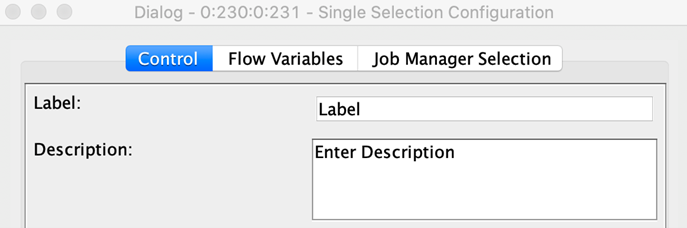
Create a component description
When configuring a KNIME node, the description gives you information about the general functionality of the node, the input and output ports, and the different setting options. You can create something similar for your component.
|
|
|
|
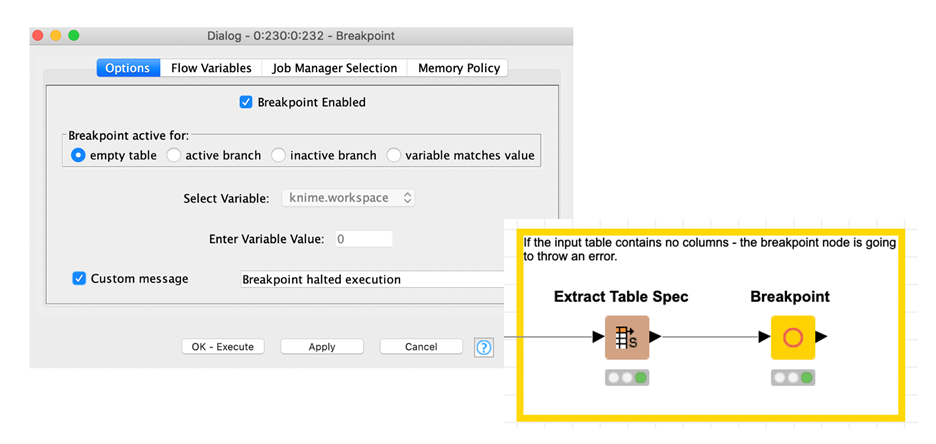
Create custom error messages
The Breakpoint node allows you to halt execution and output a custom error message, in case the incoming data fulfills a specified condition. So, for example, if the input table is empty or some selected settings lead to a table that will let you component fail, you can stop the execution beforehand and inform the user of your component via the custom message.
In the configuration window, you can define when the execution of your component should be stopped, like in case the input table is empty, the node is an active or inactive branch, or a flow variable matches a defined value. Optionally, in the lower part you can define a custom message which should be displayed.
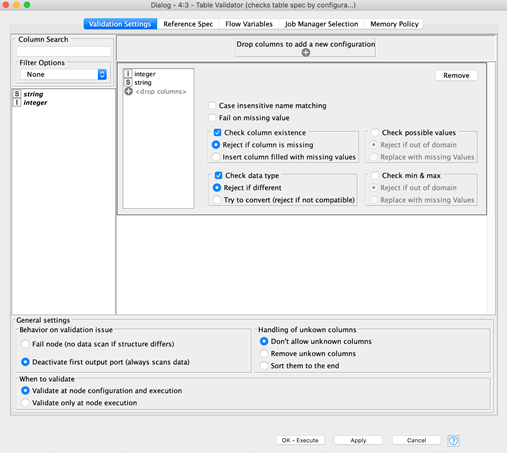
Validate the input data
The Table Validator node allows you to check whether all necessary columns are in a table. In a component, this node can be used to check whether all necessary input columns are present, as well as to output a custom error message via a Breakpoint node, in case necessary columns are missing.
In the configuration window, you can specify the necessary columns and which specification each column needs to fulfill, like whether it is sufficient that it exists or if it needs to have an additional data type, if it’s not allowed to have any new values, or if the range must be the same as in the template table used when setting up the node.
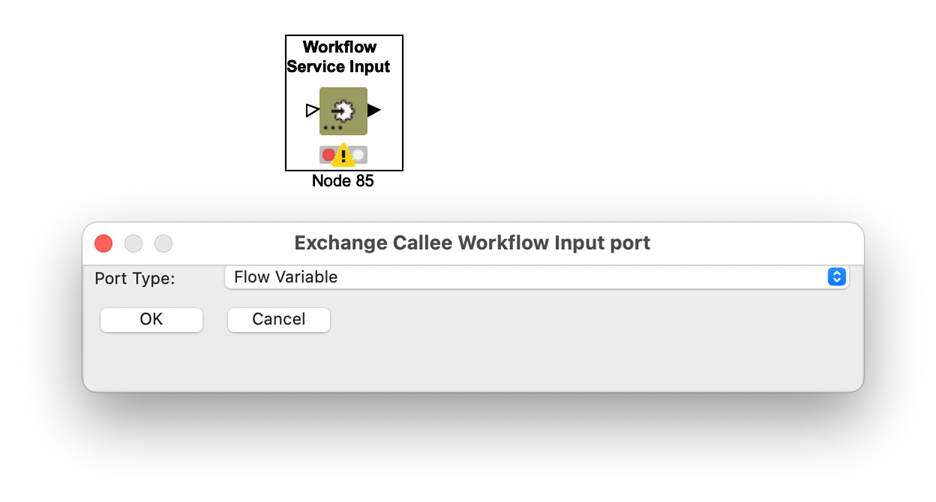
Workflow services (call a workflow from another workflow)
A newly introduced feature in KNIME Analytics Platform are the so-called workflow services. Like a component, a workflow service has clearly defined inputs and outputs. Unlike a component, however, a workflow service stands alone, and each input and output is defined by placing a Workflow Service Input or Workflow Service Output node into the workflow. The nodes have dynamic ports so that you can change their type by clicking on the three dots inside the node body. To make use of a workflow service, you can use a Call Workflow Service node. Once you point it to a workflow that has Workflow Service In- and Output nodes, the Call Workflow Service node can adapt to the present inputs and outputs and adjusts its own ports correspondingly. Now you just need to connect it, and when you run it, the workflow it points to will be executed. Data from your workflow is transferred to the callee workflow, and that in turn sends back its results.
Workflow Services vs. Components
So when should you use workflow services, and when should you use components? The latter is copied to a workflow when added to it. All the nodes the component is composed of are now inside your workflow with their own configuration. Deleting the component from the repository does not change the behavior of your workflow at all. A workflow service, on the other hand, is merely referenced — the Call Workflow Service node tells the workflow what to call, but the exact nodes that will be executed are hidden within the workflow service. This has advantages and disadvantages: your workflow will be smaller because it contains fewer nodes, but the publisher of the workflow service can change their implementation without you noticing at all. When using shared components, you can decide whether you want to update them or not if something has changed in the referenced component. This is not possible with workflow services.
A component will also be executed as part of the workflow it is part of. A workflow service, on the other hand, is executed where it is located. A workflow service in your local repository will be executed locally, but if it resides in a KNIME Server, this is where the service will run. This means that you can offload work from your local workflow to a server, or you can trigger multiple workflow services at the same time, and if the server has distributed executors for running workflows in parallel, those workflow services can process your data very quickly.
Workflow Services vs. Call Workflow and Container In- and Outputs
In addition to workflow services, the Call Workflow and various Container Input and Output nodes have been around for a while. The difference between those and the new workflow services is that the latter are meant for usage within KNIME, while the former can be called from third-party applications via the KNIME Server’s REST API. So why not use Call Workflow for everything? Those nodes transfer data by first converting it into JSON format, a text-based format that cannot deal with all KNIME data types and is rather large. Workflow services, on the other hand, use the proprietary binary format KNIME uses internally to represent its data. This means no conversion is necessary and data size is very small. This leads to faster execution at the expense of shutting third-party applications out, as they do not understand the data formats.
Use Cases for Workflow Services
Workflow services are always a good idea when you want to split a project up into smaller reusable workflows. When using many components inside a workflow, this can make the workflow rather huge, resulting in slow workflow loading. Putting the logic into workflows that are called can decrease the workflow size and therefore loading time considerably.
A particular use case for workflow services is providing other users of KNIME Analytics Platform with the ability to offload compute intensive tasks to a KNIME Server. When someone builds a workflow locally but would like to train something like a deep learning model but does not have a powerful GPU to do so efficiently, they may send their data to a workflow service that receives the data and hyperparameters as an input, trains the model, and outputs the final result.
But workflow services can also be used to provide access to additional data sources. Data only available from the server may be exposed to clients by a workflow service. Because the service can do checks and transformations within the workflow, it is easy to build it in a way that does not send out any confidential data. You could, for example, anonymize data before giving it to clients, or you could filter out certain rows or columns. The workflow service essentially acts as an abstraction layer between the actual data source and the client.
Glossary
Workflow Annotation
A box with colored borders and optional text that can be placed in a workflow to highlight an area and provide additional information. Right-click on an empty spot in a workflow and select “New Workflow Annotation” to create a new workflow annotation at that position.
Node Annotation
The text underneath a node. By default this only shows “Node <id>,” where <id> is a running number given to nodes placed in a workflow. By clicking on the text, the user can edit it and add a description of what the node does.
Workflow Description
A description of a workflow that can be edited by the user. Shown in place of the node description when no node is selected. Click on the pencil icon at the top-right to edit it. The workflow description is also shown in the KNIME Server WebPortal when a user opens the workflow’s page.
Server Repository
The place on the server where workflows, components, and data files are stored. Items in the repository can be protected from unauthorized access using permissions.
Job
A copy of a workflow meant for execution. A job can only be accessed by its owner, the user who started it. More information about jobs can be found here.
Data App
A workflow comprising one or more components that contain view and widget nodes a user can interact with in the browser. A Data App is deployed on KNIME Server and started via the WebPortal. A guide on building Data Apps can be found here.
Schedule
A plan of when to execute a particular workflow. Once set up, KNIME Server will make sure that a workflow is executed at the configured times, either only once or repeatedly. More information is available here.
REST API
An interface for access to KNIME Server functionality using HTTP calls (GET, POST, PUT, DELETE, etc.). REST stands for Representational State Transfer and constrains how an interface in the world wide web should behave. API stands for Application Programming Interface and is generally used to allow machines to communicate with each other. On KNIME Server, the REST API can be used to manage workflows and other files (up- and download, move, delete), create schedules, and trigger the execution of workflows. KNIME Analytics Platform also communicates with KNIME Server via the REST API, so essentially everything you can do in the AP, you can also do via REST. More information can be found here.
Workflow Service
A workflow with Workflow Service Input and Workflow Service Output nodes that can be called from other workflows using the Call Workflow Service node.