Installing KNIME Analytics Platform
-
Go to the download page on the KNIME.com website to start installing KNIME Analytics Platform.
-
The download page shows three tabs which can be opened individually:
-
Register for Help and Updates: here you can optionally provide some personal information and sign up to our mailing list to receive the latest KNIME news
-
Download KNIME: this is where you can download the software
-
Getting Started: this tab gives you information and links about what you can do after you have installed KNIME Analytics Platform
-
-
Now open the Download KNIME tab and click the installation option that fits your operating system. KNIME Analytics Platform can be installed on Windows, Linux, or macOS.
Notes on the different options for Windows:
-
The Windows installer extracts the compressed installation folder, adds an icon to your desktop, and suggests suitable memory settings.
-
The self-extracting archive simply creates a folder containing the KNIME installation files. You don’t need any software to manage archiving.
-
The zip archive can be downloaded, saved, and extracted in your preferred location on a system to which you have full access rights.
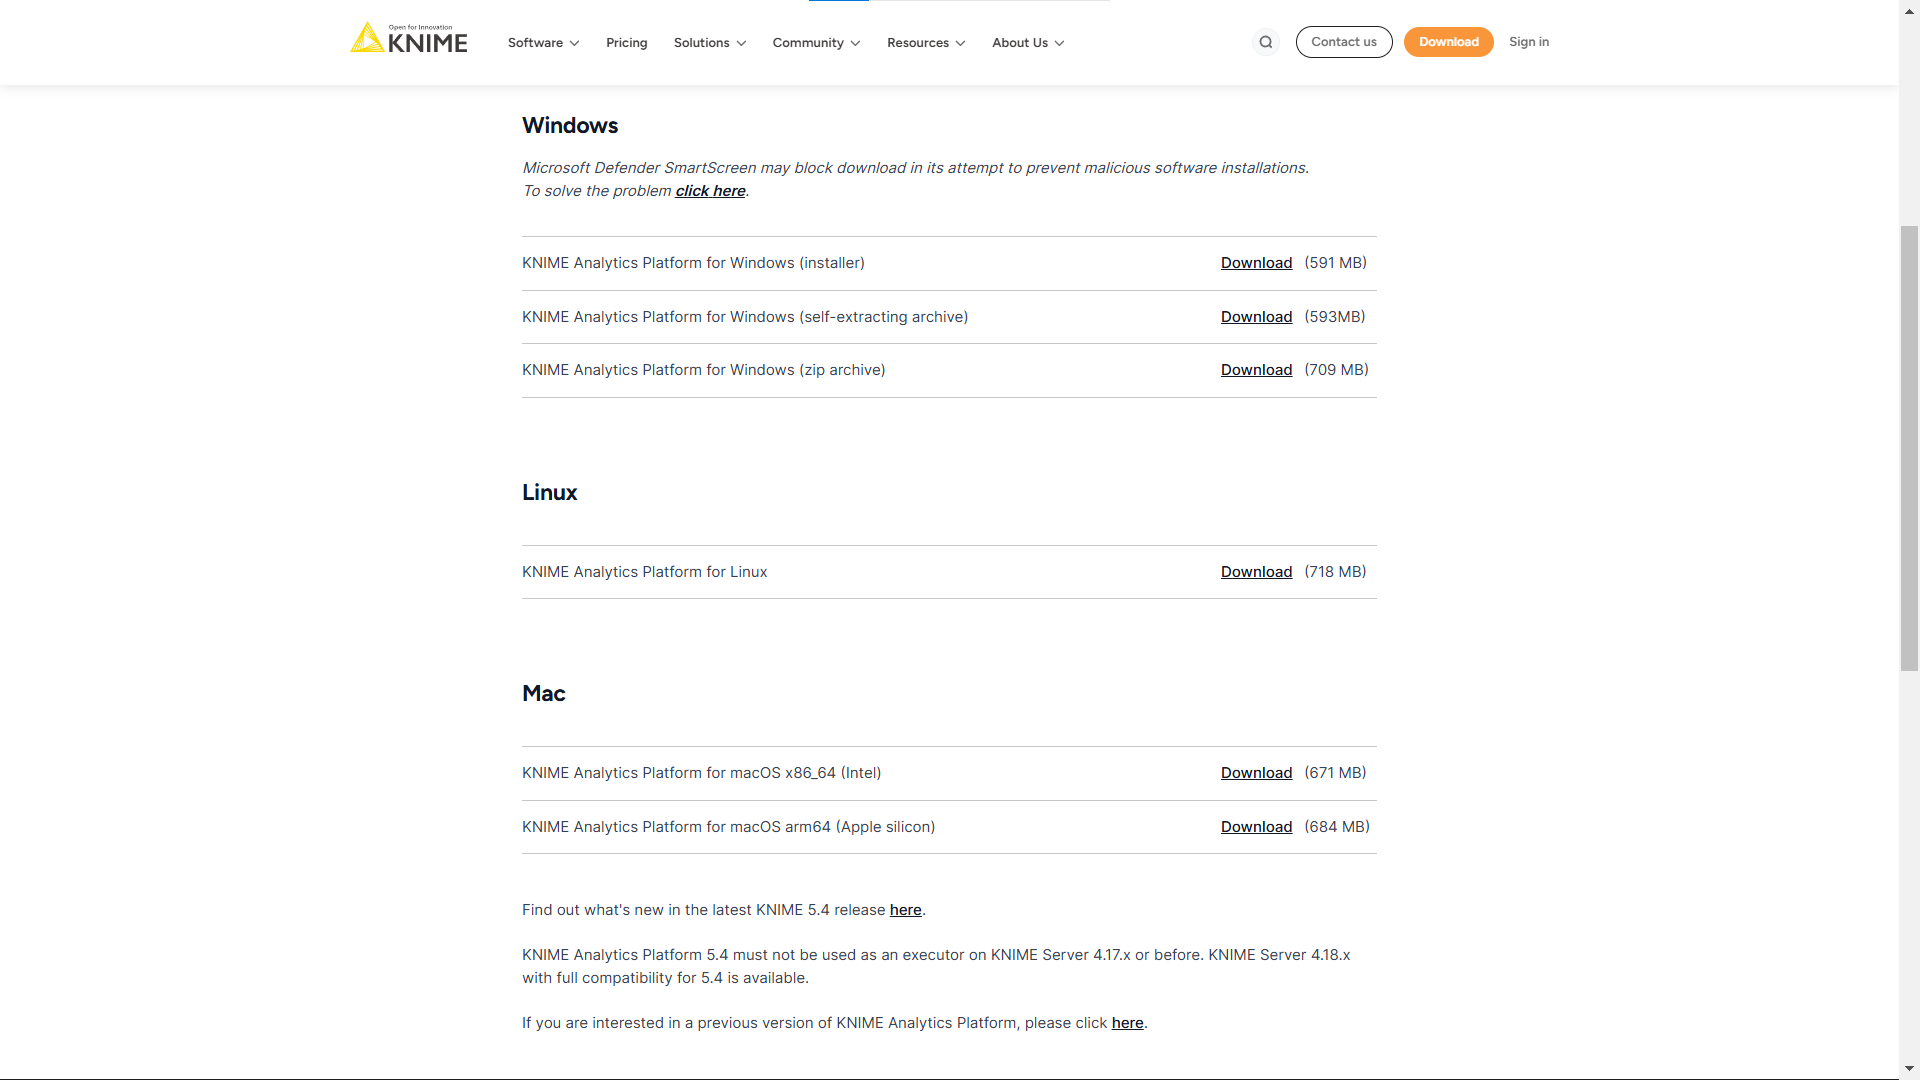 Figure 1. KNIME Analytics Platform available installers
-
-
Read and accept the privacy policy and terms and conditions. Then click Download.
-
Once downloaded, proceed with installing KNIME Analytics Platform:
-
Windows: Run the downloaded installer or self-extracting archive. If you have chosen to download the zip archive instead, unpack it to a location of your choice. Run
knime.exeto start KNIME Analytics Platform.With KNIME Analytics Platform version 5.3 you have the possibility to start KNIME Analytics Platform in high-resolution mode. To do so, go to the installation folder and run knime-hidpi.bat. Please notice that the batch file to start the KNIME Analytics Platform in the high-resolution mode is an experimental feature designed exclusively for Modern UI. This feature aims to enhance visual fidelity but is not yet fully supported across the classic user interface and the Modern UI. So, users should be aware of potential limitations and compatibility issues when switching between Modern UI and Classic UI contexts. -
Linux: Extract the downloaded tarball to a location of your choice. Run the
knimeexecutable to start KNIME Analytics Platform. -
Mac: Double click the downloaded dmg file and wait for the verification to finish. Then move the KNIME icon to Applications. Double click the KNIME icon in the list of applications to launch KNIME Analytics Platform.
-
The following operating systems versions are supported:
-
Windows
-
Windows 10, 11
-
Windows Server - 2016, 2019, 2022,
-
-
Ubuntu 20.04 LTS and 22.04 LTS and derivatives
-
RHEL/CentOS/Rocky Linux 8, 9
-
macOS (12 and above - macOS x86_64 Intel) and M1 (macOS arm64 - Apple silicon) (only the last two major versions are supported)
-
macOS 12: Monterey
-
macOS 13: Ventura
-
| Also check the KNIME Getting Started Guide and the KNIME Analytics Platform User Guide. |
Configuration settings and knime.ini file
When installing KNIME Analytics Platform, configuration settings are set to their defaults, and they can later be changed in the knime.ini file.
The configuration settings, i.e. options used by the Java Virtual Machine when KNIME Analytics Platform is launched, range from memory settings to system properties required by some extensions.
You can find knime.ini in the installation folder of KNIME Analytics Platform.
On macOS: To locate knime.ini on macOS, open Finder and navigate to your installed Applications.
Next, right click the KNIME application, select Show Package Contents in the menu, and navigate to Contents → Eclipse.
|
The knime.ini file can be edited with any plaintext editor, such as Notepad (Windows), TextEdit (macOS) or gedit (Linux).
Allocating memory in knime.ini file
The entry -Xmx1024m in the knime.ini file specifies how much memory KNIME Analytics Platform is allowed to use.
The setting for this value will depend on how much memory is available in your machine.
KNIME recommends setting it to approximately one half of your available memory, but you can modify the value based on your needs.
For example, if your computer has 16 GB of memory, you might set the entry to -Xmx8192m.
Installing Extensions and Integrations
If you want to add capabilities to KNIME Analytics Platform, you can install extensions and integrations. The available extensions range from free open source extensions and integrations provided by KNIME to free extensions contributed by the community and commercial extensions including novel technology nodes provided by our partners.
The KNIME extensions and integrations developed and maintained by KNIME contain deep learning algorithms provided by Keras, high performance machine learning provided by H2O, big data processing provided by Apache Spark, and scripting provided by Python and R, just to mention a few.
Install extensions from:
-
-
Search for the Extension or Integration you want to install in the search bar
-
Click Extensions on the results page
-
Click the extension you want to install, and from the extension page and drag and drop the squared yellow icon, shown in Figure 2, to the KNIME Analytics Platform. A window will open asking if you want to search and install the extension or integration. Click Yes and follow the instructions.
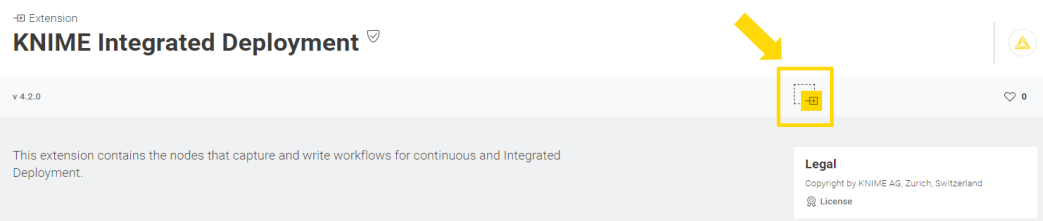 Figure 2. Install the KNIME Integrated Deployment Extension from KNIME Hub
 -
Restart KNIME Analytics Platform.
-
-
KNIME Analytics Platform:
-
Go to the Menu in the top right corner of the KNIME Analytics Platform.
-
Select Install Extensions. The dialog shown in Figure 3 opens.
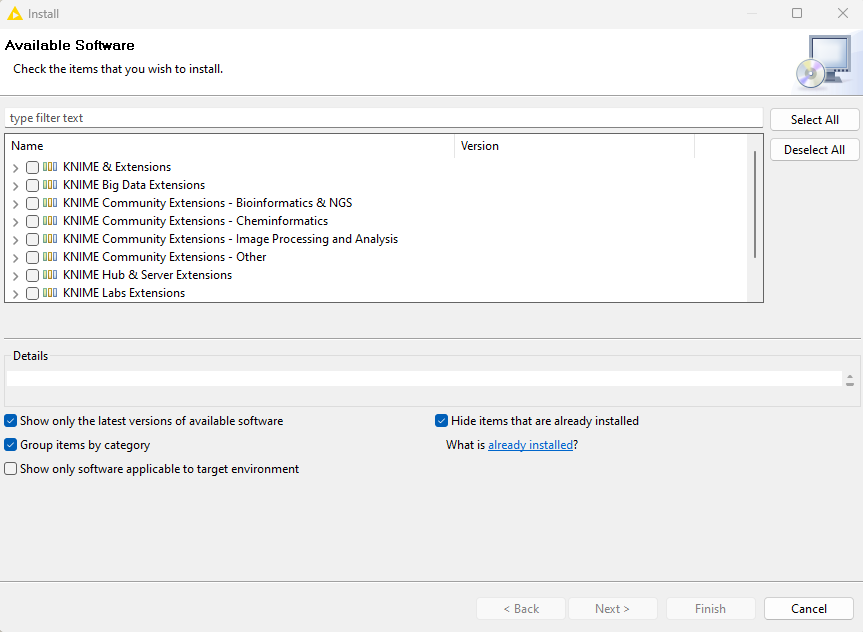 Figure 3. Installing Extensions and Integrations from KNIME Analytics Platform
 -
Select the extensions you want to install
-
Click Next and follow the instructions
-
Restart KNIME Analytics Platform.
-
The Install Extensions menu provides the extensions that are available via the update sites you have enabled.
| If you encounter issues during the installation of Python based extensions, these might be related to challenges specific to this type of extensions. Find here information about how to troubleshoot these issues. |
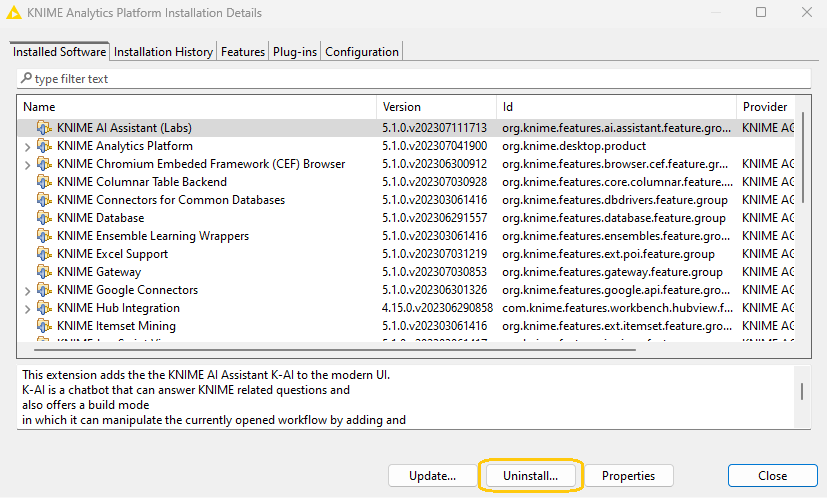
To uninstall an extension, go to the Help menu in the top right corner of the user interface and select the About KNIME Analytics Platform. In the window that opens click Installation Details. A dialog shown in Figure 4 opens. Now, select the extension that you want to uninstall, and click Uninstall….
Updating KNIME Analytics Platform and Extensions
It is good to make sure that you always use the latest version of KNIME Analytics Platform and its extensions.
To do so:
-
Go to the Menu in the top right corner of the KNIME Analytics Platform.
-
Select Check for updates. In the dialog that opens, select the available updates you want to install and then click Next.
-
Proceed by following the instructions. KNIME Analytics Platform has to be restarted in order to apply the updates.
Update Sites
The Update Sites are where KNIME retrieves additional software in the form of extensions as well as updates. To see or edit the available update sites, click Preferences in the top right corner of the user interface. This opens the Preferences dialog. Select Install/Update → Available Software Sites.
Default Update Sites
These four updates sites are provided by KNIME and are always available:
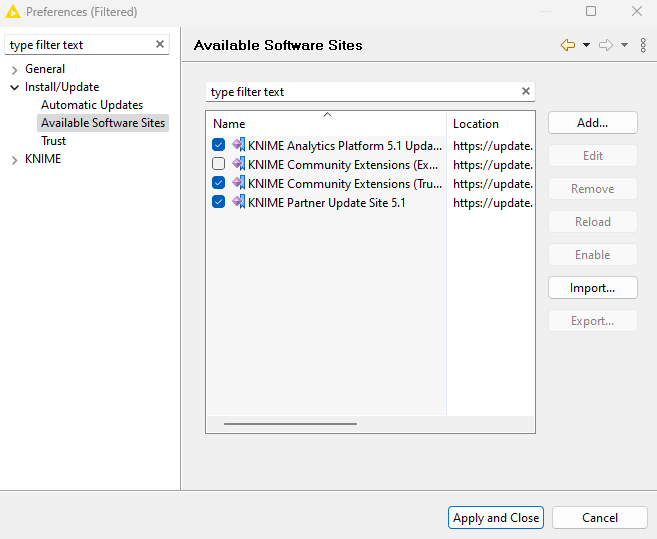
Figure 5. Available Update Sites
|
|
KNIME Analytics Platform 5.8 Update Site, KNIME Community Extensions (Trusted), and KNIME Partner Update Site 5.8 are enabled by default.
Adding External Update Sites
To install extensions that are not part of the above update sites, click Add to manually add the relevant update site, inserting the Name and Location as shown in Figure 6.
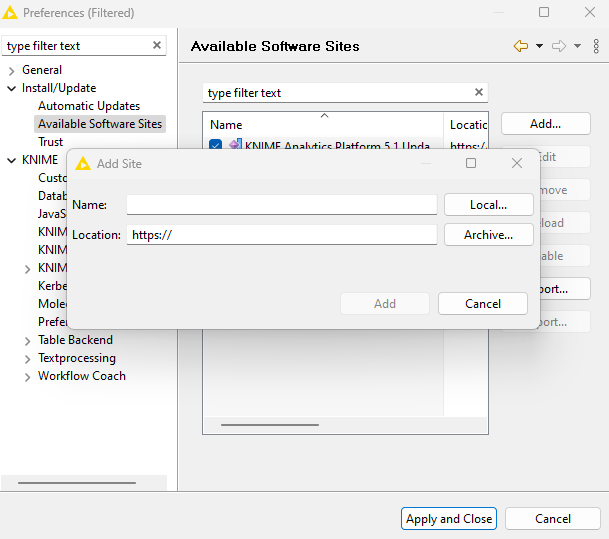
After adding a new update site you will see it listed in the Available Software Sites. You must now enable it by selecting it from the list.
Adding Local Update Sites
If your working environment has limited internet access or you receive an error message “Proxy Authentication Required” when connecting to a remote update site (provided by a URL), you can install extensions from a local zip file.
-
Download KNIME update sites as zip files at the following links:
-
For KNIME Analytics Platform latest standard update sites:
-
For KNIME Analytics Platform LTS update sites:
-
-
Save the zip file containing the extensions to your local system
-
Click Preferences in the top right corner of the user interface. This opens the Preferences dialog. Select Install/Update → Available Software Sites and enter the path to the zip file by clicking Add → Archive… as shown in Figure 7.
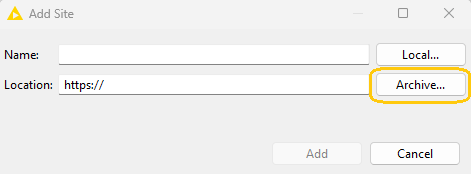 Figure 7. Adding Update Sites from Zip Archive
If the same extensions are provided by a URL, you will first have to disable the update site by disabling it in the list. -
Now click Apply and Close
If the same extensions are also provided by a remote update site, you will first have to disable that update site by deselecting its entry in the Available Software Sites dialog and confirming via Apply and Close.
Working with the Nightly Builds
Once a night, a new version of KNIME Analytics Platform is created directly from our development branch. The Nightly Build versions available here provide insight into what’s coming up in the next regular release. However, for real work, always use a version of a standard KNIME release. Also read the following disclaimer before proceeding:
|
Really, really, really important disclaimer This is most definitely not production quality code. These nightly builds are what we use internally to validate and test recent developments, so they are not tested as thoroughly as standard KNIME releases. Furthermore new nodes or functionality may change substantially (or disappear entirely) from one build to the next. It’s even possible that workflows you edit or create with nightly builds stop being readable by future (or past) versions… These nightlies are a great way to get a sneak peek at what may be coming in the next version of KNIME and provide feedback and suggestions. They are not a particularly safe way to do real work. |
Changelog KNIME Analytics Platform
Changelog (KNIME Analytics Platform 5.8)
Release date: October 15, 2025
Important notes
Components views: HTML Content Sanitization in Advanced Layout
Starting with KNIME Analytics Platform 5.8, HTML code entered in the Advanced Layout section of a component view layout is now sanitized before rendering.
This change prevents the use of unsafe HTML elements and attributes. If your component views and data apps include custom HTML content, verify that they display correctly after the upgrade.
Default behavior for encrypt JDBC parameter
With the update of Microsoft SQL Server driver to version 1.13.2.0 (see ticket AP-24218 in the Enhancements section), the default behavior for handling the encrypt JDBC parameter has changed to true in the Microsoft SQL Server Connector node.
See the release notes for Microsoft SQL Server JDBC Driver 13.2.0 for more details.
New nodes
-
AP-22699: HF Hub LLM Selector now uses Hugging Face SDK directly
Enhancements
-
AP-25084: WebUI-Migration X-Aggregator
-
AP-25076: Bump Python packages to resolve CVEs
-
AP-25071: Support new S/4 ABAP data types in SAP Reader (Theobald)
-
AP-25049: WebUI-Migration for Column to Grid
-
AP-25048: WebUI-Migration for Catch Errors (Data Ports, Var Ports, Generic Ports)
-
AP-25046: WebUI-Migration for for String to URI
-
AP-25038: WebUI-Migration for IF Switch
-
AP-25036: WebUI-Migration for Constant Value Row Appender (previously Add Empty Rows)
-
AP-25018: WebUI-Migration for Image to Table
-
AP-24987: WebUI-Migration for Google Sheets Writer
-
AP-24986: Add a
knime.iniargument to provide a list ofknime.ymlinstead of aconfig.ymlto register a python extension in debug mode -
AP-24925: WebUI-Migration for Table Difference Finder
-
AP-24924: Enable/disable "repository fetcher" when switching to ClassicUI/ModernUI
-
AP-24904: WebUI-Migration for Domain Calculator
-
AP-24901: WebUI-Migration for One to Many
-
AP-24900: WebUI-Migration for String to JSON
-
AP-24898: WebUI-Migration for Target Shuffling
-
AP-24897: WebUI-Migration for Cell Splitter
-
AP-24887: WebUI-Migration for Many to One node
-
AP-24885: WebUI-Migration for Entropy Scorer
-
AP-24884: WebUI-Migration for Moving Average node
-
AP-24883: WebUI-Migration for Column Auto Type Cast
-
AP-24871: WebUI-Migration for Loop End
-
AP-24870: WebUI-Migration for Naive Bayes Predictor
-
AP-24869: WebUI-Migration for Naive Bayes Learner
-
AP-24841: WebUI-Migration for Data Generator
-
AP-24840: WebUI-Migration for OldToNewTime node
-
AP-24835: WebUI-Migration for Ungroup node
-
AP-24826: WebUI-Migration for Case Converter
-
AP-24825: Add GPT 5 to OpenAI LLM Selector
-
AP-24823: WebUI-Migration for Salesforce Nodes (Simple Query)
-
AP-24815: WebUI-Migration for Cross Joiner
-
AP-24684: More information and recommendations on OpenAI models
-
AP-24349: Support Inference Providers in Hugging Face Hub Connectors
-
AP-24218: Update Microsoft SQL Server driver to version 13.2.0
-
NXT-4048: Update Equo Chromium 128.0.18
-
NXT-3939: Introduce soft delete from AP (trahsbin)
-
NXT-693: Pan by dragging canvas items / rectangle selection to edges of canvas
-
UIEXT-2944: Enable depending on output ports in node parameters
-
UIEXT-2943: DB Connectors with added Auth input port should hide auth settings
-
UIEXT-2476: WebUI-Migration for DB Table Selector
-
UIEXT-2435: WebUI-Migration for Oracle Connector
-
UIEXT-1668: WebUI-Migration for Binner (aka Auto-Binner)
Bug Fixes
-
AP-23443: Tempdir not set to KNIME configured temp for Python nodes and Python Script (kudos to @Ellison for reporting 1)
-
AP-24982: (Legacy) Jython scripting nodes no longer working when using "AppendedColumnRow" (kudos to @s.roughley for reporting 1)
-
UIEXT-2909: Right-clicking expression editor crashes it (kudos to @daniela_digles for reporting 1)
-
AP-25026: Locally-cached customization profiles are not applied if their source is unreachable
-
AP-24952: Input ports are not shown in Scripting Editors anymore
-
NXT-4116: DateTimeWidget in PageBuilder throws error when selecting different day
-
NXT-4103: Text Output Widget is suddenly wrapped inside iFrame
-
UIEXT-2969: Agent Chat View doesn’t show in browser editor and data apps
-
UIEXT-2961: Column Name Replacer loses column due to name collision
-
AP-25027: OpenAI reasoning models sometimes return a blank response
-
AP-25017: Agent Prompter fails if input conversation contains tools with spaces
-
AP-25003: Dialog in OpenAI LLM Selector breaks when API key no longer exists
-
AP-24949: Workflow state may stay EXECUTING even when job has been swapped
-
AP-24943: Data from Captured Workflow Segment is Not Output in Workflow Executor
-
AP-24939: CHub executor doesn’t have a working R installation
-
AP-24936: Memory Leak: Columnar Table Backend might not remove tables from data repository
-
AP-24928: Normalized Levenshtein distance is incorrect (NaN) for empty, non-interned Java strings (Java 21+)
-
AP-24879: NPE in AP can break K-AI node search
-
AP-24681: Configure errors are not propagated to agents
-
AP-24564: Tools can’t read Excel files in the workflow data area
-
NXT-4132: User Profile not saved if app quit before debounce interval
-
NXT-4117: Re-execution fails in embedded composite view if widgets are connected to each other
-
NXT-4108: Sanitize HTML view nodes in new layout editor
-
NXT-4104: SVG image value fails to render in table
Changelog (KNIME Analytics Platform 5.7)
Release date: September 11, 2025
New nodes
-
AP-24919: Gemini Image Generator node
Enhancements
-
AP-24773: Salesforce Query nodes with new option to also retrieve deleted and archived items (kudos to @digDataAnalytics for reporting 1)
-
UIEXT-696: Indicate types by icons in column selections (kudos to @mwiegand for reporting 1)
-
AP-24908: Display AI usage in scripting editors
-
AP-24838: Enforce package consistency across Python-based extensions to reduce installation size
-
AP-24768: Workflow logging: exclude
knime.logfrom workflow upload and export -
AP-24682: Show tool calls and AI reasoning inside a timeline in Agent Chat View
-
AP-24673: Allow Conda environment creation during KNIME startup not during installation
-
AP-24629: Custom headers in OpenAI Authenticator
-
AP-24627: Optional credential input port for OpenAI Authenticator
-
AP-24578: Support results in DB SQL Executor via Advanced flag (Dremio compatibility)
-
AP-24376: Deprecate Snowflake driver 3.14 which support ended on August 1st 2025
-
AP-24348: File Handling to use new mount point and Hub sdk API
-
AP-24253: Update Redshift driver to version 2.1.0.34 (fixes CVE-2024-32888)
-
AP-22058: Include jinja2 in bundled Python environment
-
AP-22034: Enable reporting for Image Python Views
-
NXT-4025: Display AI usage in AP
-
NXT-4023: Limit workflow versions for free users
-
UIEXT-2915: Add missing legacy persistors for easy node migrations
-
UIEXT-2483: WebUI for Vertica Connector
-
UIEXT-2477: WebUI for DB Table Deleter (aka DB Table Remover)
-
UIEXT-2464: WebUI for DB Updater (aka DB Update)
-
UIEXT-2462: WebUI for DB Writer
-
UIEXT-2458: WebUI for DB Reference Row Deleter (aka DB Delete (Table))
-
UIEXT-2445: WebUI for DB Merger (aka DB Merge)
-
UIEXT-2442: WebUI for DB Row Inserter (aka DB Insert)
-
UIEXT-2438: WebUI for MySQL Connector
Bug Fixes
-
AP-24827: Python nodes: DateTimeParameter does not show configured value in dialog
-
AP-24868: Generic ECharts View shows error and empty UI if input table is inactive
-
AP-24836: Using DateTimeParameter with timezone causes time-shifts related to the system timezone in Python-based dialogs
-
AP-24834: Python dialog ParameterArray cannot be advanced
-
AP-24833: Call Workflow nodes try to update read-only fields of a job
-
AP-24794: Call Workflow Service provides wrong load timeout as a query parameter
-
AP-24781: Tool processing JSON with Python Script node fails with KnimeUserError in object_to_string
-
AP-24778: Fix ZonedDateTime reading in columnar backend for days with 25 hours (daylight saving time transitions)
-
AP-24763: Call Workflow Service dialog silently swaps input parameters
-
AP-24750: Tools producing large JSON cells fail due to TableBackend conversions
-
AP-24720: K-AI disclaimer appears every time regardless of user preference
-
AP-24713: Reasoning models on Azure OpenAI fail
-
AP-24707: Handle non-existing job log file in 5.5+ executors
-
AP-24648: Expression node dialogs do not show up with inactive data table inputs
-
NXT-4028: Shift+scroll doesn’t scroll horizontally for new WebGL renderer
-
NXT-3643: Nodes can become unresettable if downstream executions are on a different nesting level
-
NXT-3331: Workflow can’t be deleted when run as a 'workflow service' before
Changelog (KNIME Analytics Platform 5.6)
Release date: August 12, 2025
New nodes
Enhancements
-
AP-24036: Add "now" and "today" Expression functions that returns the current zoned date time (kudos to @HansS for reporting 1)
-
AP-24704: Add conversion function for chemistry type to RDKit for python extensions
-
AP-24675: Support OAuth2 Credentials in Email Connector node
-
AP-24543: Agent Chat View with tool node views
-
AP-24524: Make Tool Message Output node aware of message cells
-
NXT-3551: Minimap
-
UIEXT-2798: (Extension Development) New API to define KNIME nodes, retiring swing-based dialogs and views
-
UIEXT-2474: WebUI for DB Table Partitioner (aka DB Partitioning)
-
UIEXT-2457: WebUI for DB Type Mapper
-
UIEXT-2447: WebUI for DB Row Sampler (aka DB Row Sampling)
-
UIEXT-2441: WebUI for SQLite Connector
-
UIEXT-2440: WebUI for Microsoft Access Connector
-
UIEXT-2602: DB Joiner - Polishing
-
AP-24670: Updated Jakarta Mail Library (in Email Extension) to latest version, 2.0.3
-
AP-24655: Create example for the experimental Python to Java PortObject conversion
-
AP-24338: Update Google SDK to latest version
-
AP-24273: Workflow Reader to output flag if workflow was reset during load
-
AP-23580: Deprecate legacy file handling nodes
-
NXT-3775: Nodelabel editing exits on pointer-up on empty canvas
Bug Fixes
-
AP-24726: Loops with "missing nodes" cause bad exceptions to be thrown when loaded (partially executed) (kudos to @mwiegand for reporting 1)
-
NXT-3849: Execution progress percentage shown in white (kudos to @trj for reporting 1)
-
AP-24741: Workflow becomes unloadable if variable name in Credential Configuration is empty
-
AP-24615: (Internals) Workflow lock is held indefinitely in case holder has OutOfMemory error in lock/unlock
-
AP-24568: Component update check never discards loaded components
Community Extensions
Partner Extensions
Extension |
Contributor |
Changes |
INFOCOM CORPORATION |
Available |
|
INFOCOM CORPORATION |
Available |
|
Schrödinger LLC |
Available soon |
|
Chemical Computing Group ULC |
Available |
|
Pharmacelera S.L. |
Available |
|
TIBCO Spotfire |
Available |
|
Symanto |
Available |
|
Decision Ready, LLC |
Available |
|
GRAU DATA GmbH |
Available |
|
De Villiers Walton Ltd. |
Available |
|
H2O.ai |
Not available anymore since 5.0 |
|
Inte:Ligand GmbH |
Not available anymore since 5.4 |
|
exorbyte GmbH |
Not available anymore since 5.4 |
Trusted Community Extensions
| Extension | Status |
|---|---|
RDKit Nodes Feature |
Available |
Vernalis KNIME Nodes |
Available |
Generic Workflow Nodes for KNIME |
Available |
Lhasa |
Available |
Slack Integration |
Available |
AF Utility Nodes |
Available |
KNIME Groovy Scripting extension |
Available |
KNIME HCS Tools |
Available |
KNIME Python Scripting extension |
Available |
KNIME R Scripting extension |
Available |
KNIME Matlab Scripting extension |
Available |
Genentech |
Available |
Geospatial Analytics Extension |
Available |
Neo4J |
Available |
KNIME Image Processing |
Available |
OpenMS |
Available |
Redfield NLP Nodes |
Available |
Redfield Privacy Nodes |
Available |
Redfield Conformal Prediction Nodes |
Available |
XLS Formatting & Utilities (former Continental Nodes for KNIME) |
Available |
Experimental Community Extensions
| Extension | Changes |
|---|---|
CIR KNIME Integration |
Available |
Process Mining Extension |
Available |
Apprise Nodes |
Available |
Erlwood KNIME Open Source |
Available |
KNIME Shapefile Support |
Available |
Indigo KNIME integration |
Available - Not working on macOS because of a bug in Indigo |
AI.Associates Signal Processing |
Available |
Enalos Nodes for KNIME |
Available |
FSK-Lab |
Available |
PIA |
Available |
Redfield BERT Nodes |
Available soon |
Visualization for supply chains |
Available - New since 2023 |
BIM - Building Information Modelling Extension for KNIME (IFC) |
Available - New since 2023 |
Smartsheet extension |
Available - New since 2024 |
Chem AI Extension |
Available soon - New since 2024 |
Salesforce Extension |
Available - New since 2024 |
SATELLiTES Extension |
Available - New since 2024 |
FMI KNIME Plugins |
Available - Revived in 2024 |
Vision transformers extension |
Available - New since 2025 |
FCL Data Converter |
Available - New since 2025 |
Social Science Nodes |
Available - New since 2025 |
Memgraph extension |
Available - New since 2025 |
Search Analytics Node |
Available - New since 2025 |
Redfield Personal Storage Table |
Available soon - New since 2025 |
KNIME-CDK |
Available - Moved to Experimental 2024 - ChemSpider node deprecated due to API change |
Word2Vec |
Not available anymore since 5.3 |
3D-e-Chem KNIME nodes |
Not available anymore since 5.3 |
AIA Insights Bioactivity Predictor |
Not available anymore since 5.1 - New since 2023 |
MMI Data Analytics Nodes |
Not available anymore since 5.2 |
OrientDB |
Not available anymore since 5.1 |