
Validate Workflows for Business Hub
Introduction
Workflow validation lets you govern workflow quality on your Hub. It ensures that only compliant and well-reviewed workflows are used in production on KNIME Business Hub. It provides a framework for applying automated checks and enforcing review steps. You control which workflow versions run on restricted execution contexts.
Workflow validation builds on the version labels feature. Labels can be assigned to workflow versions to indicate whether they are approved for production use, require review, or are not approved. Restricting execution contexts to specific labels ensures that only validated workflows are executed in production.
Validation supports developing and enforcing best practices across your organization. Examples include the “four eyes” principle for peer review, automated checks for common issues, or combinations of manual and automated steps.
The approach is designed to be flexible. A set of building blocks—data apps, triggers, and components—can be combined to create a workflow validation process that fits your organization’s needs.
Use Cases
- Governance: Ensure workflows meet organizational standards before deployment
- Control: Restricted execution contexts to run only approved workflows
- Quality Assurance: Maintain high-quality workflows by implementing review processes
- Automated Validation: Automatically check if a workflow complies with custom rules
- Human-in-the-loop: Workflow builders request review of a workflow, and reviewers manually decide if it is compliant
- Customize rules: Combine building blocks to create a custom validation process
- Customized process: Add as many manual or automated steps as your process requires
Example Validation Flows
Basic Approval Flow
Let’s set up an example validation flow. This can be used as the basis of your custom flow. A trigger deployment automatically assigns the label Approved or Not approved, depending on the checks you run.
The flow covers the following cases:
⚠️ Non-compliant workflow
- A workflow without a description is uploaded.
- The workflow receives the label
Not approved. - The workflow cannot be executed.
✅ Compliant workflow
- A workflow without issues is uploaded.
- The workflow receives the label
Approved. - The workflow and its deployments can be executed.
The following steps allow you to set up a basic validation flow, best done as a Hub admin user:
1. Prerequisites
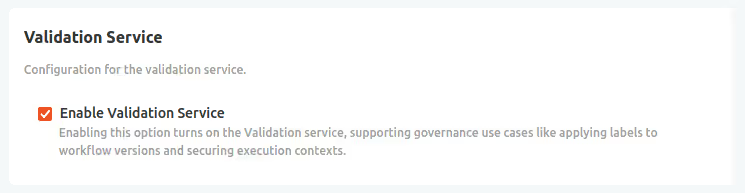
Enable version labels by enabling the Validation Service in the KOTS Admin Console, under Config > Validation Service, check Validation Service (see details below).
Next, upload the relevant workflows.
- Choose or create a team to set up workflow validation in.
- Choose or create a space or folder in which to store the relevant admin workflows.
- Upload the required workflows:
Create the version labels which are used to indicate the status of a workflow.
- Run the Manage Version Labels data app as a Hub admin and follow the instructions on screen to create the labels. Adjust the names and description of the labels to your needs. The IDs of these labels are displayed in the table at the far right, note them down as we will use them later. In this example, we’ll use:
Approved: This workflow is approved to run in Production.Not approved: This workflow requires improvements and is not yet ready for execution in a production environment.
- Run the Manage Version Labels data app as a Hub admin and follow the instructions on screen to create the labels. Adjust the names and description of the labels to your needs. The IDs of these labels are displayed in the table at the far right, note them down as we will use them later. In this example, we’ll use:
2. Workflow Validator Trigger
Set up the Workflow Validator Trigger that enables automatic workflow validation.
- Optional and recommended: Open the workflow in your KNIME Analytics Platform and adjust the checker components to your needs.
- Create a version of the Workflow Validator and create a trigger deployment as the Hub admin. Use these settings:
Select an execution context that is readily available, preferably "On" most of the time people are uploading workflows.
In the trigger options, set it to listen to the spaces you want to have monitored. Select "All teams" and "All spaces" if you want to monitor any workflow that is uploaded to your Hub.
File type: Workflow. Actions: Added, Modified, New version created. No additional filters needed.
Optionally and recommended: enable email notifications on failure. Append workflow messages to the notification to provide more context in case of errors.
Configuration options:
- Enter the IDs of the labels for
ApprovedandNot approvedyou created earlier.
- Enter the IDs of the labels for
Select "User" as the execution scope from the advanced settings, as it needs Hub admin permissions to apply a label, and the trigger should have permissions to read metadata of all workflows.
3. Restricting execution
Use the Assign Version Label to assign the
Approvedlabel to the admin workflows before you restrict the execution context. This ensures that the admin workflows are not affected by the restriction.- Run the workflow ad-hoc on your Hub as a Hub admin and follow the instructions on screen to assign the
Approvedlabel to the admin workflows, so they will be able to run on the restricted execution context. - Assign the
Approvedlabel to any other workflows that should be able to run on the restricted execution context. - Alternatively, run Validate Existing Workflows - download, docs workflow to apply the validation to workflows that are already on your Hub.
- Run the workflow ad-hoc on your Hub as a Hub admin and follow the instructions on screen to assign the
As a last step, put the restriction of the production execution context in place with the Restrict Execution Contexts data app.
- Run it ad-hoc on your Hub as a Hub admin and follow the instructions on screen. To follow this example, restrict your production execution context to run only workflow versions with the
Approved-label created above.
- Run it ad-hoc on your Hub as a Hub admin and follow the instructions on screen. To follow this example, restrict your production execution context to run only workflow versions with the
Your basic workflow validation is now set up and active. Test it by uploading workflows that cover the different cases described above.
Approval with a Human in the Loop
With a reviewer persona, this example adds a human in the loop and a notification service that send out emails to the workflow builder and the reviewer. Workflows are checked against multiple rules, and based on the outcome they are either restricted, labeled for review, or approved. The production execution context is restricted to only run workflows with the label Approved.
The flow covers the following cases:
⚠️ Non-compliant workflow
- A workflow without a description is uploaded by the workflow builder.
- The workflow receives the label
Not approved. - The workflow cannot be executed.
🔍 Workflow requiring review
- A workflow with many nodes on one level is uploaded by the workflow builder.
- The workflow receives the label
Approval requiredand cannot be executed. - The workflow builder receives an email with instructions on how to request approval.
- The workflow builder requests approval via a Data App (link included in the email).
- The reviewer receives an email with a link to the review.
- The reviewer approves the workflow.
- The workflow can now be executed.
✅ Compliant workflow
- A workflow without issues is uploaded.
- The workflow receives the label
Approved. - The workflow and its deployments can be executed.
The following steps allow you to set up a validation flow with a human in the loop, best done as a Hub admin user:
1. Prerequisites
Enable version labels by enabling the Validation Service in the KOTS Admin Console, under Config > Validation Service, check Validation Service (see details below).
Next, upload the relevant workflows.
- Choose or create a team to set up workflow validation in.
- Choose or create a space or folder in which to store the relevant admin workflows.
- Upload the required workflows:
Create the version labels which are used to indicate the status of a workflow.
- Run the Manage Version Labels data app as a Hub admin and follow the instructions on screen to create the labels. Adjust the names and description of the labels to your needs. The IDs of these labels are displayed in the table at the far right, note them down as we will use them later. In this example, we’ll use:
Approved: This workflow is approved to run in Production.Not approved: This workflow requires improvements and is not yet ready for execution in a production environment.Approval required: Manual approval is needed for this workflow to run in Production.Approval in progress: Manual approval is needed for this workflow to run in Production. The request has been submitted and is awaiting review.
- Run the Manage Version Labels data app as a Hub admin and follow the instructions on screen to create the labels. Adjust the names and description of the labels to your needs. The IDs of these labels are displayed in the table at the far right, note them down as we will use them later. In this example, we’ll use:
2. Notify User service deployment
Now set up the Notify User Service deployment for the notification action component used in the workflow validator. This allows the trigger and the data apps we configure below to send email notifications. The details of the mail server should be provided by your IT department.
Create a version of the Notify User Service workflow.
As a Hub admin, create a new service deployment from the version.
- Select an execution context that is readily available, preferably "On" most of the time people are uploading workflows.
- (Recommended) Enable failure notifications.
For each deployment in this example, it is recommended to enable email notifications on failure. Append workflow messages to the notification to provide more context in case of errors.
Add the details of your mail server in the configuration options.
If your mail server allows it, it is recommended to put the "Sender address" to something that lets the recipient easily identify where the email comes from, e.g. "Notify user service deployment for workflow validation"
Select "User" as the execution scope from the advanced settings, as it needs Hub admin permissions.
Share the deployment with the users or teams that should be able to send email notifications via this deployment, e.g. the workflow builders and reviewers. Most conveniently, this is every user on the Hub, and you can specify "Any signed-in user" in the "Manage access" dialog of the deployment.
Identify the deployment ID of the Notify User Service deployment. You can find it in the URL when you open the OpenAPI spec of the deployment and has the form
rest:00000000-0000-0000-0000-000000000000. Every character in this pattern is alphanumeric.
3. Data app deployments
Next, create the data app deployments, one for workflow builders to request review, and one for reviewers to approve or disapprove a workflow version.
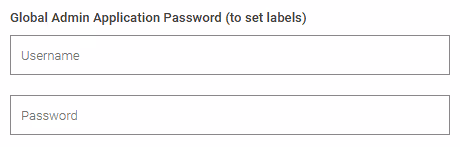
The data apps will run with the permissions of the user that runs them. However, Hub admin permissions are required to set labels. Therefore, the data apps have a credentials configuration, which will be used by the data app to set the users. Please create an application password of a Hub admin user and have Application Password ID and Password ready to configure the deployments.
Create a version of the Review Workflow Data App and deploy it as a data app deployment with the following configuration:
Select an execution context that is readily available.
(Recommended) Enable failure notifications as described above.
Configuration options:
- Enter the Application Password ID and Password in the Hub admin Application Password field to allow the data app to assign labels.
- Enter the IDs of the labels for
Approval in progress,Not approvedandApprovedyou created earlier. - Enter the service deployment ID in the format
rest:00000000-0000-0000-0000-000000000000of the Notify User Service deployment you created earlier.
Select "User" as the execution scope from the advanced settings. This will ensure that it runs with the permissions of the reviewer, and they will be able to do so only for the workflows they have access to.
Share the deployment with the reviewers, i.e. the people that should be able to decide if a workflow version is
ApprovedorNot approved, via "Manage access" in the context menu of the deployment.
"Run" the Review Workflow deployment once to ensure everything is set up correctly. From the URL in your browser, identify the deployment ID of the Review Workflow deployment: it has the form
data-app:00000000-0000-0000-0000-000000000000. The characters in this pattern are alphanumeric. Note down this deployment ID, as we will need it to set up the "Request Approval" data app.Create a version of the Request Approval Data App and deploy it as a data app deployment with the following configuration:
Select an execution context that is readily available.
(Recommended) Enable failure notifications as described above.
Configuration options:
- Enter the Application Password ID and Password in the Hub admin Application Password field to allow the data app to assign labels.
- Enter the IDs of the labels for
Approval requiredandApproval in progressyou created earlier. - For the "Review workflow" deployment, enter the data app deployment ID in the format
data-app:00000000-0000-0000-0000-000000000000you noted down earlier. - For the "Notify User" service deployment, enter ID in the format
rest:00000000-0000-0000-0000-000000000000you created earlier.
Select "User" as the execution scope from the advanced settings. This will ensure that it runs with the permissions of the workflow builder that requests approval, and they will be able to do so only for the workflows they have access to.
Share the deployment with the workflow builders, i.e. the people that should be able to request approval for a workflow version, via "Manage access" in the context menu of the deployment.
"Run" the Review Workflow deployment once to ensure everything is set up correctly. From the URL in your browser, identify the deployment ID of the Review Workflow deployment: it has the form
data-app:11111111-1111-1111-1111-111111111111. The characters in this pattern are alphanumeric. Note down this deployment ID, as we will need it to set up the "Workflow Validator" trigger deployment.
4. Workflow Validator Trigger
Set up the Workflow Validator Trigger that enables automatic workflow validation.
- Create a version of the Workflow Validator and
- Create a trigger deployment as the Hub admin. Use these settings:
Select an execution context that is readily available, preferably "On" most of the time people are uploading workflows.
In the trigger options, set it to listen to the spaces you want to have monitored. Select "All teams" and "All spaces" if you want to monitor any workflow that is uploaded to your Hub.
File type: Workflow. Actions: Added, Modified, New version created. No additional filters needed.
(Recommended) Enable failure notifications as described above.
Configuration options:
- Enter the IDs of the labels for
Approved,Not approved, andApproval requiredyou created earlier. - For the "Request approval" deployment, enter the data app deployment ID in the format
data-app:11111111-1111-1111-1111-111111111111you noted down earlier. - Enter the service deployment ID in the format
rest:00000000-0000-0000-0000-000000000000of the Notify User Service deployment you created earlier.
- Enter the IDs of the labels for
Select "User" as the execution scope from the advanced settings, as it needs Hub admin permissions to apply a label, and the trigger should have permissions to read metadata of all workflows.
5. Restricting execution
Use the Assign Version Label to assign the
Approvedlabel to the admin workflows before you restrict the execution context. This ensures that the admin workflows are not affected by the restriction.- Run the workflow ad-hoc on your Hub as a Hub admin and follow the instructions on screen to assign the
Approvedlabel to the admin workflows, so they will be able to run on the restricted execution context. - Assign the
Approvedlabel to any other workflows that should be able to run on the restricted execution context. Alternatively, run Validate Existing Workflows - download, docs workflow to apply the validation to workflows that are already on your Hub.
- Run the workflow ad-hoc on your Hub as a Hub admin and follow the instructions on screen to assign the
As a last step, put the restriction of the production execution context in place with the Restrict Execution Contexts data app.
- Run it ad-hoc on your Hub as a Hub admin and follow the instructions on screen. To follow this example, restrict your production execution context to run only workflow versions with the
Approved-label created above.
- Run it ad-hoc on your Hub as a Hub admin and follow the instructions on screen. To follow this example, restrict your production execution context to run only workflow versions with the
Your workflow validation flow with a human in the loop is now set up and active. Test it by uploading workflows that cover the different cases described above.
Variants
These two examples illustrate what is possible. The approach is designed to be flexible, so you can adapt it to your organization’s needs. One use case may be to deal with non-compliant workflows by deleting them:
🗑️ Delete strictly non-compliant workflows: Use a slightly modified version of the Workflow Validator Trigger: Workflow Validator Trigger (Custom) - download, docs. This enables the following scenario:
- A workflow with stored credentials is uploaded by the workflow builder.
- The workflow is immediately deleted.
- The workflow builder receives an email explaining the deletion and the reason.
👥 Multi-team Hubs: Some Hubs with several teams share an execution context, but only specific teams use workflow validation.
- Restrict an execution context to block workflows that have a specific label (for example,
Approval pending). - Modify the Workflow Validator Trigger to assign this label to all uploads from teams under validation.
- Approved workflows have the label removed (by the trigger and/or the Review Workflow). Other teams remain unaffected.
- Restrict an execution context to block workflows that have a specific label (for example,
🌐 Public spaces: Restrict validation to public spaces by filtering non-public ones in the Workflow Validator Trigger.
🧩 Centralized action components: Host action components such as label assignment or removal as service deployments, similar to the Notify User Service. This makes teams without access to Hub admin permissions more independent.
🔁 Review stages: Add more review stages by adding more labels, e.g.
Second review required,Second review in progress,Not approved by second review,Approved by second review, and chain another set of the Request Approval Data App and Review Workflow Data App deployments, configured with these labels, for an additional level of reviews.
Building Blocks: Workflows
Here, the building blocks of the workflow validation approach are described in more detail. Use them to set up your own validation flow.
Core Service: Validation Service
The core of the workflow validation approach is the Validation Service, which provides the workflow version labels and the possibility to restrict execution contexts based on them. Administrating the labels and restricting execution contexts is done via data apps which are described in this section.
The validation service allows you to assign labels to component and workflow versions, and restrict execution contexts. It takes care e.g. of the label check each time a version is attempted to be executed and enables version labels in the first place.
Version labels link information to specific versions of components or workflows. For example, they can indicate that a particular workflow has passed quality control. They can also enforce workflow execution restrictions, ensuring that a production execution context only runs workflows that have successfully passed quality control.
The Validation Service can be enabled in the KOTS Admin Console under > Config > Validation Service_ check Validation Service as shown here:
Manage version labels
The Manage Version Labels data app covers the following use cases:
- Create version labels: Create a new version label and provide its name and a description, both of which are displayed to users when the label is assigned to a version.
- Update existing version labels: Update a label in case you want to change the display name of an existing label or fix a typo in its description.
- Delete version labels: Delete an existing label if it’s not used anymore. Deleting a label will remove it from all versions it was assigned to.
- Identify Label details: Some workflows or deployments need the label ID to reference e.g. the
ApprovedorNot approvedlabel. The data app allows you to look up the ID.
This data app can only be executed by Hub admin users.
Setup
- Download the workflow
- Navigate to the space on your Hub where you want to upload the workflow to
- Use the upload button to upload the workflow (learn more)
- Run the workflow to start an ad hoc execution (learn more)
- Follow the instructions on screen to assign, update, or remove version labels
Restrict Execution Contexts
The Restrict Execution Contexts data app supports the following use cases:
- Restrict execution by workflow version labels: Control which execution contexts can run which workflow by allowing or preventing execution based on the presence or absence of specific version labels. However, any restrictions applied do not impact deployments that are already active.
- Enforce governance policies: Ensure that only approved workflow versions are executed in production environments.
- Monitor and manage context restrictions: View and update existing restrictions applied to each execution context.
This data app can only be executed by Hub admin users.
When a restriction is added to an execution context, existing deployments will continue running, even if the workflow version does not have the required label assigned. This ensures uninterrupted operation for existing deployments.
Setup
- Download the workflow
- Navigate to the space on your Hub where you want to upload the workflow
- Use the upload button to upload the workflow (learn more)
- Run the workflow to start an ad hoc execution
- Follow the instructions on screen to restrict execution contexts
Workflow Validator Trigger
The Workflow Validator Trigger covers the following use cases:
- Automated workflow validation on upload or modification: Listens for changes in monitored team spaces and validates workflows immediately.
- Customizable governance checks: Use or extend checker components to define your own validation logic for workflow compliance.
- Automated governance actions: Map check results to actions such as labeling, moving, deleting, or notifying users.
- Blueprint for custom governance: Adapt the workflow structure and logic to your organization’s governance requirements.
This workflow is part of the basic approval flow, approval flow with a human in the loop, and variants thereof.
In most cases (depending on your customization), a deployment of this data app needs to be created by a Hub admin users.
Setup
This workflow comes in three flavors, and you can choose one of them. If in doubt, start with the basic one and upgrade later if needed.
- Download the Workflow Validator Trigger (Basic), which labels workflow versions with
ApprovedandNot approved. - Download the Workflow Validator Trigger, which additionally may assign the label
Approval required, employing the Request Approval Data App and Review Workflow Data App. - Download the Workflow Validator Trigger (Custom), which in addition to the above deletes workflows with stored credentials right away.
- Download the Workflow Validator Trigger (Basic), which labels workflow versions with
Open the Workflow Validator workflow in your local KNIME Analytics Platform to review and adapt governance logic as needed. Follow the instructions in the annotations from left to right in the workflow.
- Configure the "Generate Workflow Info" component with the URL (copied from a browser) to a workflow on your Hub. The checks downstream will be executed on this workflow when you run the workflow locally. This allows you to test and adapt the checks and actions before deploying it as a trigger.
- Add, edit, or remove any of the green checker components.
- Add new "Check Evaluation Switch" components to create new branches if you want to have a different consequence for a specific check, or remove branches you don’t need.
- Configure the "Check Evaluation Switch" components to route the result of the checker components to their respective action branch.
- Add, adjust, or remove the action components to your needs.
Upload the customized Workflow Validator to a space on your Hub
Create a version
As a Hub admin, deploy the workflow as a trigger deployment.
- Configure the trigger to listen for workflow additions or updates in the relevant team spaces.
- Select an execution context that is readily available, preferably "On" most of the time people are uploading workflows.
- In the trigger options, set it to listen to the spaces you want to have monitored. Select "All teams" and "All spaces" if you want to monitor any workflow that is uploaded to your Hub.
- File type: Workflow. Actions: Added, Modified, New version created. No additional filters needed.
- (Recommended) Enable failure notifications with the attached workflow messages to provide more context in case of errors.
- The configuration options depend on the flavor and the customizations you choose. For guidance, follow the basic setup instructions or the setup with a human in the loop instructions above.
- Select "User" as the execution scope from the advanced settings, as it needs Hub admin permissions to apply a label, and the trigger should have permissions to read metadata of all workflows.
How it works
The workflow is structured in four main steps:
- Collect workflow details: Processes metadata received from workflow events or manual input (when developing or testing).
- Checker components: Runs governance checks on the workflow metadata, producing pass/fail results and messages.
- Map checks to actions: Maps check outcomes to governance actions such as labeling, moving, deleting, or notifying.
- Perform actions: Executes the mapped actions in the given order (transfer, delete, label, notify).
The Check Evaluation Switch components let you configure actions for your desired outcomes. In its configuration dialog, you decide which check is evaluated and it is routed to the desired action branch.
You can extend or modify each step to match your organization’s governance requirements.
Request Approval Data App
The Request Approval Data App covers the following use cases:
- Request review: Workflow builders can request a review for a workflow version labeled
Approval required. - Advance status: Updates the workflow version label to
Approval in progress. - Notify reviewers: Notifies reviewers and links to the Review Workflow Data App.
- Track requests: Record of all workflow versions labeled
Approval in progress.
Reviewers act on these requests in the Review Workflow Data App.
Both workflows are part of the approval flow with a human in the loop and variants thereof.
Setup
Download the workflow
Navigate to the space on your Hub where you want to upload the workflow to
Use the upload button to upload the workflow (learn more)
- Optional: Run the workflow to start an ad hoc execution (learn more) and explore how it works
Create a data app deployment. Learn how.
- Add an application password of a Hub admin in the configuration panel.
- Select "User" as the execution scope from the advanced settings. Learn more. This ensures that the data app will only allow users to request review for the workflows they have access to.
- Make the deployment available to the workflow builders by sharing the deployment. Learn how.
Review Workflow Data App
The Review Workflow Data App covers the following use cases:
- Review and approve workflow versions: Reviewers can inspect workflow versions submitted for approval, approve or reject them, and add comments for workflow builders.
- Advance status: Updates the workflow version label to
ApprovedorNot approvedbased on the review outcome. - Notify workflow builders: Sends notifications to workflow builders about the review decision and any comments provided.
- Track review history: Record of approved and rejected versions.
Workflow builders request reviews with the Request Approval Data App.
Both workflows are part of the approval flow with a human in the loop and variants thereof.
Setup
Download the workflow
Navigate to the space on your Hub where you want to upload the workflow to
Use the upload button to upload the workflow (learn more)
- Optional: Run the workflow to start an ad hoc execution (learn more) and explore how it works
Create a data app deployment. Learn how.
- Add an application password of a Hub admin in the configuration panel shown in Figure 2.
- Select "User" as the execution scope from the advanced settings. Learn more. This ensures that the data app will only allow users to review workflows they have access to.
- Make the deployment available to the reviewers by sharing the deployment. Learn how.
Assign Version Label
The Assign Version Label data app covers the following use cases:
- Testing version labels: This data app allows to set, remove or update any labels to any workflow or component version you have access to. This is great for testing version labels on selected workflows.
- Assign version label: Assign any label to a component or workflow version. This can be used to indicate that a workflow has passed quality control, is ready for production, or needs review.
- Update version label: Change the message associated to a label to fix simple typos or add context for a workflow builder.
- Remove version label: Remove a label from a workflow version to make it available for execution in case it erroneously assigned to the version.
Setup
Download the workflow
Navigate to the space on your Hub where you want to upload the workflow to
Use the upload button to upload the workflow (learn more)
Run the workflow to start an ad hoc execution (learn more)
- Optional: allow non-Hub admin users to assign labels via this data app.
Create a data app deployment (learn how) with the advanced setting "Execution scope" set to "User" (learn more). If deployed in execution scope "Team" (default), the data app will only be able to assign labels to workflows in spaces of the team.
Add an application password of a Hub admin in the configuration panel shown in here.
Make it available to others by sharing the deployment (learn how).
- Optional: allow non-Hub admin users to assign labels via this data app.
Follow the instructions on screen to assign, update, or remove labels from workflow versions
The data app will only allow you to assign labels to the workflows you have access to. This is also the case for you as a non-Hub admin when the shared data app deployment is configured with a Hub admin’s application password. The Hub admin permissions are only used to assign labels, not for granting access to workflow or component versions.
Validate Existing Workflows
The Validate Existing Workflows data app supports the following use cases:
- Validate existing workflows: Run validation checks and assign labels to workflows that are already on the Hub. This complements the workflow validator which is intended for new workflows.
- Assign labels to deployed or all workflow versions: Apply validation labels to all workflow versions or restrict labeling to deployed versions
- Automate label application based on validation outcome: Assign a predefined label to workflows directly or apply labels conditionally based on validation checks.
This data app helps enforce workflow governance policies for workflows already in production and is useful for bulk updating labeling tasks.
Setup
- Download the workflow
- Open the workflow in KNIME Analytics Platform and configure it manually:
Fill the default values of the Approved and Not approved label IDs in the respective configuration node. You can look up the IDs of the labels in the Manage Version Labels data app.
In the interactive view of the first (blue) view component, specify your validation settings
Teams: Configure which teams should be included in the validation process.
Affected versions: Choose whether to validate only deployed workflow versions or all versions.
Validation logic: Select whether to run validation checks or directly assign a predefined label to all workflows.
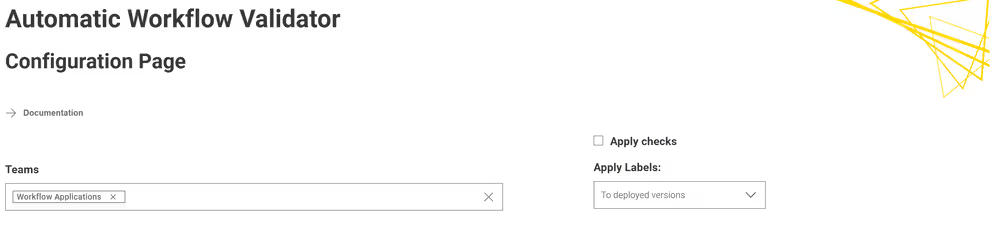
In the second component, select the spaces to validate workflows in. You can choose to validate all spaces or restrict it to specific ones
Similar to the Workflow Validator Trigger:
Extend or reduce the performed checks by adding, editing, or removing checker components in the workflow
Route failing checks via the Check Evaluation Switch component to the desired branches
Adjust the check evaluation by by adding, editing, or removing action components (or their complementary action components as service deployments) in the workflow
Execute all nodes in the workflow to validate existing workflows according to your configuration
Observe the results in the interactive views of the components in the final "Display" component
Building Blocks: Components
Checker Components
Checker components evaluate (meta-) data of a workflow, like the workflow summary as extracted with the Workflow Summary Extractor . They are used for example in the Workflow Validator Trigger and Validate Existing Workflows.
- Deprecated Nodes Checker: Checks if the workflow contains any deprecated nodes.
- Legacy Nodes Checker: Checks if the workflow contains any legacy nodes that may require updates.
- Empty Workflow Description Checker: Checks if the workflow description is empty.
- Nodes per Workflow Level Checker: Checks the number of nodes at each workflow level to identify complexity.
- Password Checker:Checks if there are any credentials stored in the workflow, as most of the time these should not be shared on the Hub. Use the KNIME Hub secret store to handle secrets instead.
- Request Node Settings Checker: Checks if required settings are present and correctly configured in Request nodes (GET Request, POST Request, …).
- Scripting Nodes Checker: Checks if the workflow contains scripting nodes (such as Python, R, or Java Snippet nodes) that may require special attention for maintenance or deployment.
- Tag Checker: Checks if the workflow contains the required tags for proper categorization and discoverability.
- Workflow Size Checker: Checks if the workflow exceeds recommended size limits to optimize space usage.
Action Components
Based on the results of the checker components, action components perform the next step and act on the check results, for example assigning labels or notifying users. They are used for example in the Workflow Validator Trigger and Validate Existing Workflows, but may be used in completely different contexts as well.
They each take a Hub credentials input, e.g. provided by the Hub Authenticator node, KNIME Hub Connector component, or KNIME Hub admin Connector component, and are configured in their configuration dialog. Their output are flow variables with the results of the action, a table containing any potential errors (which is empty in the case of success), and the same credentials as where input for convenient chaining of actions.
- Assign Label to Version: Assigns a specified label to a selected workflow version on the KNIME Hub for governance with workflow version labels.
- Assign Label to multiple Versions: Assigns a specified label to multiple selected workflow versions on the KNIME Hub for governance with workflow version labels.
- Copy Workflow: Copy a workflow version to another location, for example to a backup space or to a "Production"-space.
- Delete Workflow Version: Delete a workflow version, for example if it violates compliance rules.
- Notify User: Send an email to a user to notify them on the validation state of the workflow.
- Remove Labels from Version: Remove a specific or all labels from a workflow version.
Action Components as Service Deployments
Some of the action components require a lot of configuration, most notably the Notify User action component with the configuration of the mail server. Others, like the action components that modify labels, may require (Hub admin) permissions that not all users have. To make these actions available more conveniently to the desired users, they can be deployed as service deployments on your KNIME Hub, and shared with the respective users or teams. When given the ID of the deployment, the users can use accompanying service caller components to call the service deployment from their workflows. Learn more about service deployments here.
This motif is described in the use case of the validation flow with a human in the loop on the example of the Notify User service deployment. For the most common use cases, we provide the following service deployments and their accompanying service caller components:
Assign Label to Version Service: Wrapper for the Assign Label to Version component, as Hub admin permissions are required to set labels: configure the deployment with the application password of a Hub admin, and share the deployment with anyone you want to be able to set labels.
- Assign Label to Version (Service caller): Service caller component that calls the above service when configured with the ID of the service deployment. Find the ID in the Open API docs of the deployment.
Assign Label to multiple Versions Service: Wrapper for the Assign Label to multiple Versions component, as Hub admin permissions are required to set labels: configure the deployment with the application password of a Hub admin, and share the deployment with anyone you want to be able to set labels.
- Assign Label to multiple Versions (Service caller): Service caller component that calls the above service when configured with the ID of the service deployment. Find the ID in the Open API docs of the deployment.
Notify User Service: Wrapper for the Notify User component, to configure the mail server in one central position. Share the deployment with anyone you want to be able to send emails through your Hub via a KNIME workflow.
- Notify User (Service caller): Service caller component that calls the above service when configured with the ID of the service deployment. Find the ID in the Open API docs of the deployment.
Remove Labels from Version Service: Wrapper for the Remove Labels from Version component, as Hub admin permissions are required to remove labels: configure the deployment with the application password of a Hub admin, and share the deployment with anyone you want to be able to set labels.
- Remove Labels from Version (Service caller): Service caller component that calls the above service when configured with the ID of the service deployment. Find the ID in the Open API docs of the deployment.
Helper Components
Helper components are used in various places, and this list provides an overview of their capabilities.
- List Version Labels on KNIME Hub: List all version labels available on your KNIME Hub, including their IDs, names, and descriptions. This is useful for managing and referencing labels in workflows and deployments.
- List Version IDs with Version Label on KNIME Hub: List all workflows that have a specific version label assigned. This helps identify which versions are marked with certain labels.
- Get Assigned Version Labels: Retrieve all labels currently assigned to a given workflow version.
- Get Version Details: Fetch metadata about a workflow version, such as author, creation time, and description.
- Get Workflow Details: Fetch metadata about a workflow itself (independent of versions), such as workflow name, team, and space location.
- List Workflow Versions with Labels: List all versions of a given workflow together with their assigned labels to the data app user. Useful for tracking the validation status across versions.
- Version ID to Version Number: Convert a workflow version ID to its version number (integer, or the special values
most-recentalways pointing to the latest version, orcurrent-statepointing to the draft). - Workflow Version Selector: Helper UI to select a specific workflow version, typically used in Data Apps where a user chooses which version to act on.
- Hub admin Connector: Given the current user or an application password, ensure a Hub admin connection or raise an error if no such connection could be established. Required for actions that need elevated permissions.
- Message with Affected Nodes: Create detailed messages listing the nodes affected by a validation check, to provide clear feedback in emails or Data Apps. Used in the checker components for preparing the message in the labels.
- Checker Input Validation: Ensure that checker components receive valid and complete inputs, avoiding errors further downstream. Acts on the name of the column, so please make sure to name the column according to the selection.
- Craft Hub Notification: Build a formatted notification message for Hub users, typically used together with the Notify User component or the Notify User service deployment. The resulting HTML-formatted message resembles messages from the Hub.
- Craft Workflow Validator Message: Assemble structured messages with details from the Workflow Validator. Specialized component used in the Workflow Validator Trigger.
- Check Evaluation Switch: Evaluate the results of checker components and route them to the desired actions.