Introduction
KNIME Business Hub is a customer-managed KNIME Hub instance.
Once you have a license for it and proceed with installation you will have access to Hub resources and will be able to customize specific features, as well as give access to these resources to your employees, organize them into Teams and give them the ability to manage specific resources.
Once you have access to a KNIME Business Hub instance available at your company, you can use KNIME Business Hub to perform a number of tasks such as:
-
collaborate with your colleagues,
-
test execution of workflows,
-
create and share data apps, schedules, and API services
-
keep track of changes with versioning.
The following is a guide for installing KNIME Business Hub into a single-node Kubernetes cluster running on a supported Linux distribution.
To administrate a KNIME Business Hub instance please refer instead to the following guide:
Installation planning
KNIME Business Hub supports the following types of installations:
-
Installation by downloading container images from public image registries: This type of installation requires an environment with externally accessible networks. This is a standard installation process and is documented in the KNIME Business Hub installation section. Just follow the steps here, after making sure you fulfill the prerequisites in the next section.
-
Air gap installation: This type of installation is required for installing into air gap environments, or into an environment that, even though has a network with external access, is not allowed to download container images from public image registries. If your environment does not have access to external networks you can follow the steps in the air gap installation section.
Kubernetes
Since KNIME Business Hub is a product based on microservices that are orchestrated and managed via Kubernetes, a Kubernetes cluster is needed when installing KNIME Business Hub.
KNIME Business Hub 1.7 supports the following versions of Kubernetes:
-
1.25
-
1.26
-
1.27
Software prerequisites
Hardware prerequisites
This guide covers the installation of KNIME Business Hub.
The following Operating Systems are supported:
-
Ubuntu Server 20.04 LTS
-
Ubuntu Server 22.04 LTS
-
RHEL 8.1, 8.2, 8.3, 8.4, 8.5, 8.6, 8.7, 8.8, 9.0, 9.1, 9.2
-
Amazon Linux 2
Note that only x86 processors are supported.
The following sections cover the prerequisities for single node and multi node installations.
Here are some recurrent terms used in the next sections:
-
Hub core: Refers to Hub core services that are responsible for all functionalities of Business Hub besides execution. Including authentication services, UI, database services, etc.
-
Hub execution: Refers to executor resources, e.g. executor pod resources.
-
Disk: The attached storage size requirement for the persistent components of Business Hub. Used to provide storage to databases, store data files for KNIME workflows, etc.
| The CPU and Memory requirement amounts shown in the following chapters of this document refer to the “Total Capacity” of the nodes. Hence not all of these resources are allocatable for Kubernetes workloads, some needs to be available or reserved for system-related-services and should not be allocated, or reserved for Kubernetes related workloads. By default usually only some Memory is reserved from the total capacity, therefore if there are no reservation for CPU vCores, it is advised to either reserve or leave some vCores un-reserved by Kubernetes workloads. The reserved Memory for system-related-services is usually 100 MB by default for Kurl installations. |
| The "vCore" term used in this guide stands for virtual cores. They are a measure of the processing power allocated to a virtual machine (VM) or a computing instance in cloud computing environments. KNIME makes no representation about how the vCores licensed for execution are correlated or mapped onto the physical system where the software is running. The same principle also extends to the vCores necessary for operating core services. |
Single node installation
Here we provide recommended and minimal installation requirements for single node installations with both Basic and Standard plans.
KNIME’s advice is to strive to meet the recommended system requirements for better performance and more scalability.
Find the advanced install option for installation on host machines with smaller sized root volumes in the Installation on hosts with undersized root volumes section.
Basic Plan
Using a Basic license automatically provides 4 vCores for execution. Extra execution vCores can be purchased, but in such cases, the available vCores for the system must be calculated accordingly.
Recommended
-
CPU: 16+ vCores total
-
Hub Core: 10 vCores
-
Hub Execution: 4 vCores (included in the license)
-
-
Memory: 32 GB+
-
Hub Core: 20 GB
-
Hub Execution: 12 GB+ available memory to allocate for executors
-
-
Disk: 500 GB+
Minimal
-
CPU: 12 vCores total
-
Hub Core: 7 vCores
-
Hub Execution: 4 vCores (included in the license)
-
-
Memory: 32 GB
-
Hub Core: 20 GB
-
Hub Execution: 12 GB available memory to allocate for executors
-
-
Disk: 500 GB
Examples for setting up executors based on available resources with Basic license:
Limitations:
-
at least 1 vCore per executor
-
at least 2 GB Memory per executor
| Allocatable RAM for executors in case of a 32 GB Ram installation is 12 GB. |
Examples with 4 execution vCores included in the Basic license for an installation with recommended system requirements:
-
Scenario 1:
-
4 executors. Each executor running on 1 vCore and 3 GB of Memory.
-
-
Scenario 2:
-
1 executor. Running with 4 vCores and 12 GB of Memory.
-
Standard Plan
Using a Standard license automatically provides 8 vCores for execution. Extra execution vCores can be purchased, but in such cases, the available CPU cores for the system must be calculated accordingly.
Recommended
-
CPU: 20+ vCores total
-
Hub Core: 10 vCores
-
Hub Execution: 8 vCores (included in the license)
-
-
Memory: 64 GB+
-
Hub Core: 20 GB
-
Hub Execution: 44 GB+ available memory to be allocated for executors
-
-
Disk: 500GB+
Minimal
-
CPU: 16 vCores total
-
Hub Core: 7 vCores
-
Hub Execution: 8 vCores (included in the license)
-
-
Memory: 36 GB
-
Hub Core: 20 GB
-
Hub Execution: 16 GB available memory to be allocated for executors
-
-
Disk: 500GB
Examples for setting up executors based on available resources with Standard license:
Limitations:
-
at least 1 vCore per executor
-
at least 2 GB Memory per executor
| Allocatable RAM for executors in case of a 64 GB Ram installation is 44 GB. |
Examples with 8 execution vCores included in the Standard license for an installation with recommended resource requirements:
-
Scenario 1:
-
8 executors. Each executor running on 1 vCore and 2+ GB of Memory. (total of 44 GB RAM can be shared amongst executors)
-
-
Scenario 2:
-
2 executors. Each executor running with 4 vCores and 2+ GB of Memory. (total of 44 GB RAM can be shared amongst executors)
-
-
Scenario 3:
-
1 executor. Running with 8 vCores and 2+ GB of Memory. (total of 44 GB RAM can be shared amongst executors)
-
Multi-node installation
Here we provide installation requirements for multi node installations.
See the advanced install options section for configuring highly available clusters and installing on instances with smaller sized root volumes.
Also we distinguish two cases based on whether or not nodeAffinity and nodeSelection is used.
Read more about nodeAffinity and nodeSelection in the KNIME Business Hub Admin Guide.
Highly-available Multinode installation without nodeAffinity and nodeSelection
-
Node count: 3+ (Shared between Hub Core services and Execution services)
-
The cluster needs to have at least three nodes with at least:
-
16 vCores and
-
32 GB RAM per instance
-
-
Disk: 100GB+ per instance for the root volume
-
Additional Attached Disks: 1 or more additional, attached, unformatted disks are required for multinode installations to handle data replication between nodes
-
See the advanced install options for configuring highly available clusters and installing on instances with smaller sized root volumes
Example
3 nodes. 16 vCores and 32 GB RAM each. (Shared between Hub Core services and Execution services)
Running the installation on the above resources will allow the user to allocate 8 vCores and 16 GB RAM for execution.
Highly-available Multinode installation with nodeAffinity and nodeSelection
-
Node count: 3+ (Allocated for Hub Core services only)
-
For Hub Core workloads the cluster needs to have at least three nodes with at least:
-
12 vCores and
-
32 GB RAM per instance.
-
-
For execution workloads: additional nodes need to be added to the cluster depending on the performance needs for execution.
-
Disk: 100GB+ per instance for the root volume
-
Additional Attached Disks: 1 or more additional, attached, unformatted disks are required for multinode installations to handle data replication between nodes
-
See the advanced install options for configuring highly available clusters and installing on instances with smaller sized root volumes
Example
3 nodes for Hub Core services.
1 node for Execution services.
3 nodes with nodeAffinity or nodeSelection set to "core", 12 vCores each, with 32 GB RAM.
At least 1 node with nodeAffinity or nodeSelection set to "execution",
-
8 vCores and 32 GB RAM (Basic)
-
12 vCores and 32 GB RAM (Standard)
-
16+ vCores and 64+ GB RAM (Enterprise)
| Nodes annotated with nodeAffinity or nodeSelection set to “execution” can use approximately 75% of the total allocatable resources for execution resources, due to some resource being allocated to system-related-services, some to default Kubernetes workloads running on the node and some to certain kurl add-ons, achieving high availability. |
Networking prerequisites
Network Ports:
-
80 (HTTP)
-
443 (HTTPS)
-
22 (SSH) ADMIN USE ONLY
-
6443 (kubectl) ADMIN USE ONLY
-
8800 (KOTS Admin Console) ADMIN USE ONLY
Security Warnings:
-
Ports 22, 6443, and 8800 are vulnerable access points for a KNIME Hub installation. If a malicious actor gained access to any of those ports, they would be able to perform destructive actions on the cluster and/or gain access to sensitive configuration. Access to these ports must be restricted to only the IP address(es) of the machine(s) which will administer the installation.
-
Security-Enhanced Linux (SELinux) is not currently supported. If enabled, the installer script will notify the user via a prompt and disable SELinux before proceeding.
The following domains need to be accessible from servers performing online installations:
| Trusted Host | Domain |
|---|---|
KNIME |
|
Replicated |
See the Firewall Openings for Online Installations guide. |
Also, in order to be able to pull Docker images the following Docker registries need to be accessible from servers performing online installations:
docker.elastic.co
docker.io
ghcr.io
quay.io
registry.k8s.io (for this domain image layers are pulled from the domain below)
*.pkg.dev
registry.opensource.zalan.do
proxy.replicated.com
KNIME Business Hub installation
For the commands demonstrated below, replace anything shown in
<brackets> with real values.
| If your environment does not have access to external networks you can follow the steps in the air gap installation section. |
Connect to your host VM
The first step is to connect to your host VM and update it. If
you are connecting via SSH, ensure that the machine you are using is
permitted to connect to port 22 of the instance. Also ensure that the
user you connect to the instance with has permissions to run commands as
the superuser (i.e. sudo).
# Connect to your instance. This process/command may differ depending on OS.
ssh -i "some-identity-key.pem" ubuntu@<instance-ip-address>

# Update the instance. This process/command may differ depending on OS.
sudo apt-get update && sudo apt-get upgrade
In some (single node) installations the limit for allowed open files needs to be increased for Business Hub to function properly. We recommend to increase the limit by running the following command on the host VM.
sudo sysctl fs.inotify.max_user_instances=8192
This value needs to be set again after VM restarts. Alternatively you can persist it by adding it to /etc/sysctl.conf.
If the limit was not increased you might encounter the following error, appearing after the Business Hub installation is completed.
In this case the istio-proxy container in the keycloak-proxy and s3-proxy pods isn’t able to start up with a "too many open files" error.
An example error log can be seen below. Replace keycloak-proxy-7ff44f845f-jrh9s with an appropriate pod id in your cluster.
$ kubectl logs -n hub keycloak-proxy-7ff44f845f-jrh9s -c istio-proxy
{"level":"fatal","time":"2023-03-01T22:07:13.738069Z","msg":"Agent start up errorfailed to start workload secret manager too many open files"}
To solve this problem please increase the limit for allowed open files as suggested above.
Install the embedded cluster for KNIME Business Hub
The command below executes a hands-free installation of all of the supporting Kubernetes architecture required to host KNIME Business Hub. It will take circa 10-15 minutes to run in its entirety and will output a significant amount of logs as the process installs all necessary dependencies.
curl -sSL https://kurl.sh/knime-hub | sudo bash
For more advanced installation options with kURL please consult the kURL documentation. Please note: if you execute this command with any additional flags or environment variables set then please note them down in a document. The same flags and environment variables need to be present again when you update the kubernetes cluster version or KOTS Admin Console.
Once the process is complete, you should see something similar to the following output. The output will contain the KOTS Admin Console URL and password.
| This output contains very important URLs, usernames, passwords, and commands for your instance. Ensure that you save this output somewhere secure before proceeding. |
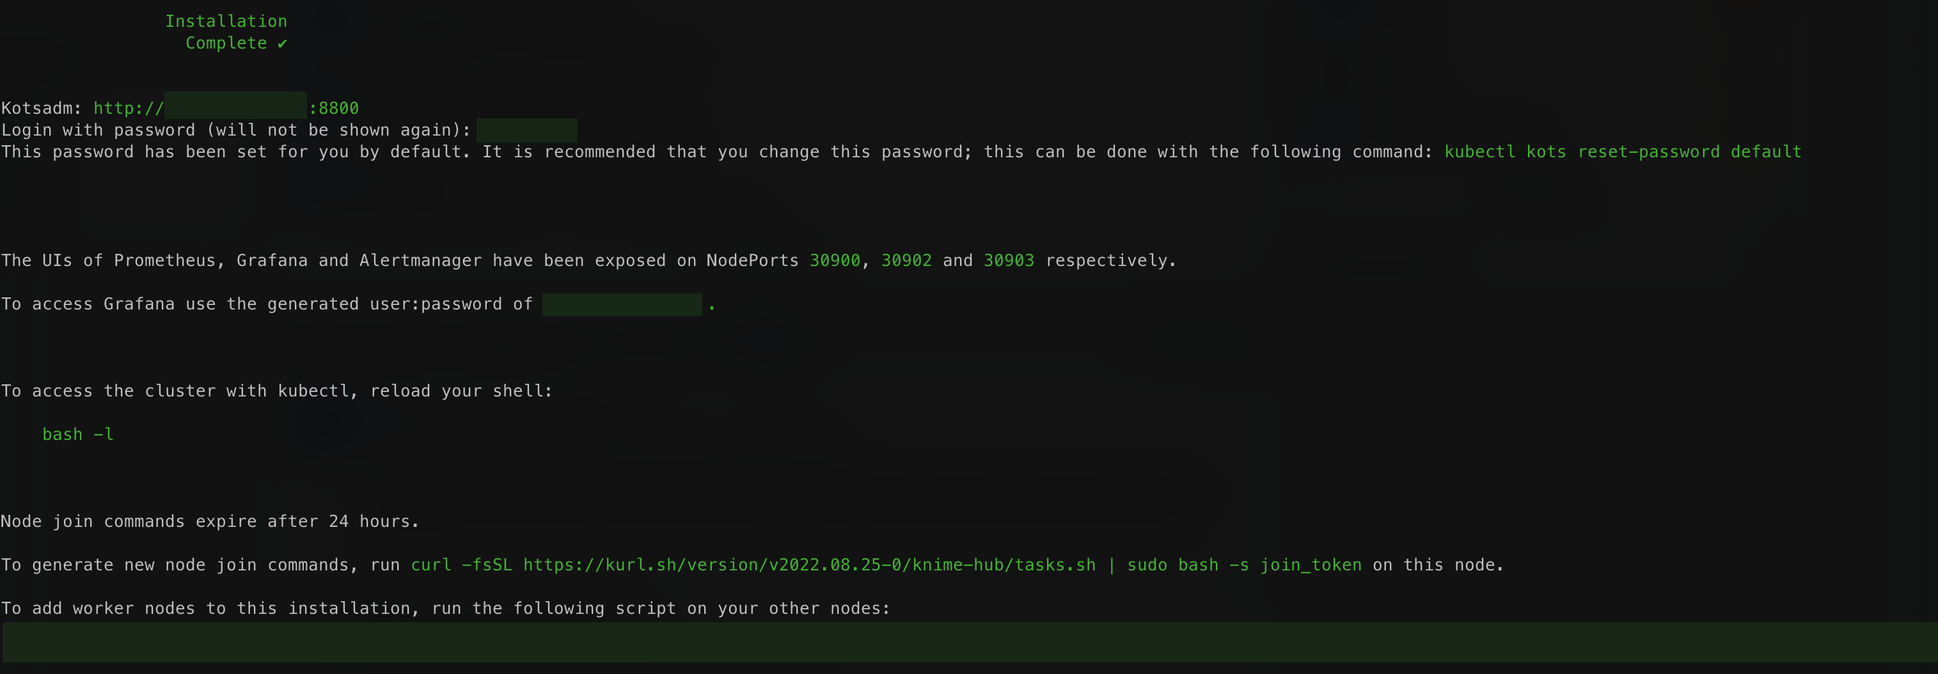
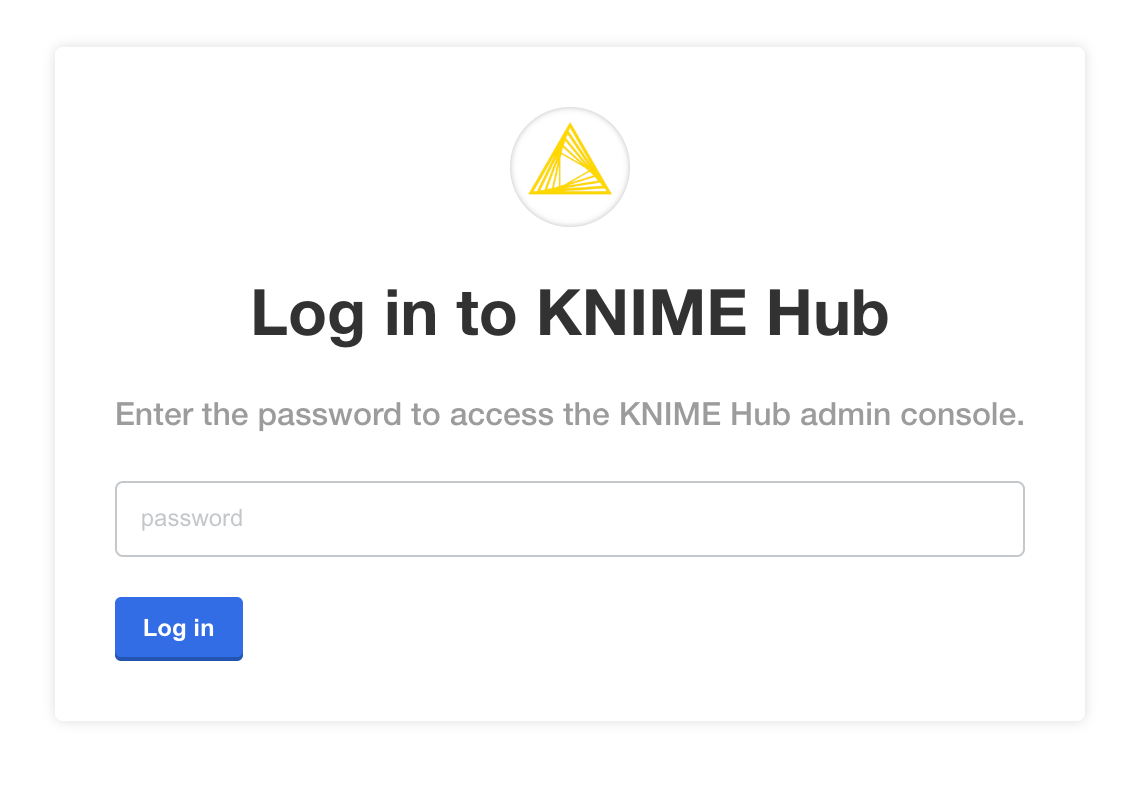
Access the KOTS Admin Console
Navigate to the KOTS Admin Console URL provided in the previous step in the embedded cluster installation output and take note of the password.
The first page that will display is a warning regarding Transport Layer Security (TLS) configuration. Follow the on-screen instructions to proceed.
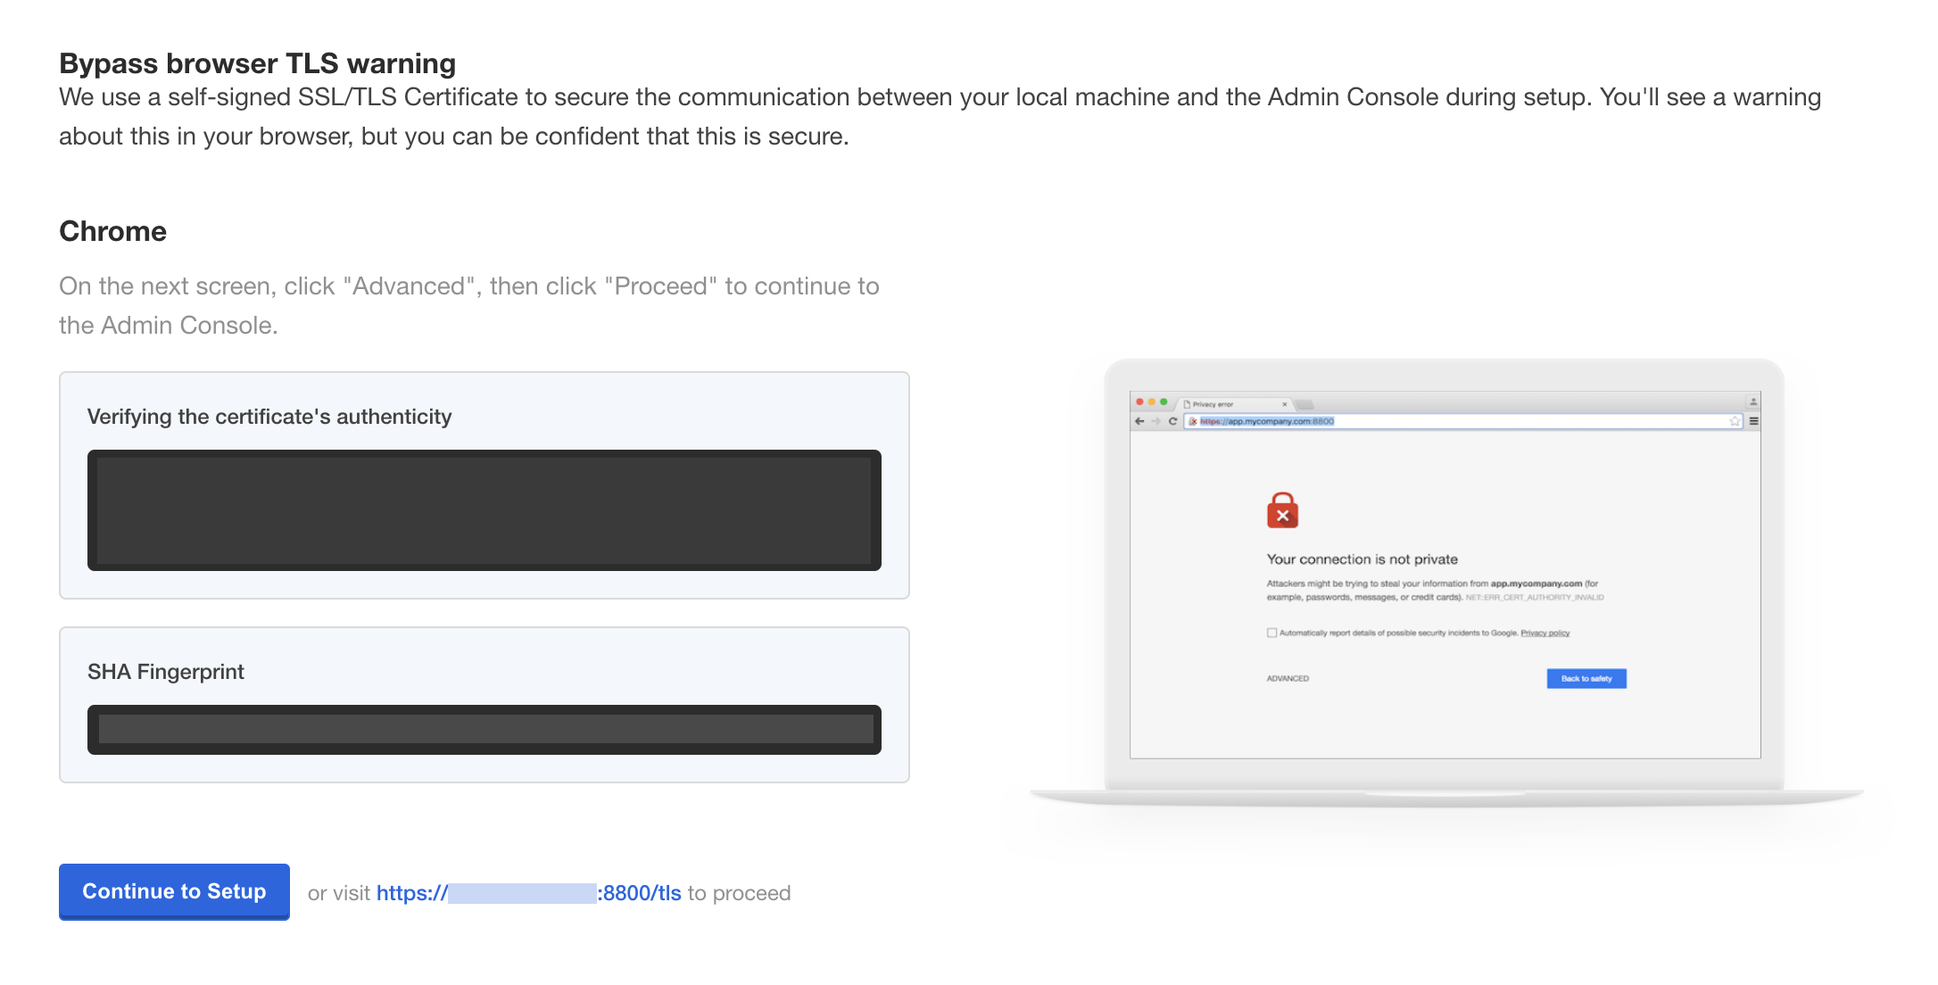
You will then be prompted to provide your own TLS cert to secure traffic to the admin console, if desired.
You should then see a prompt for a password. Enter the admin console password from the embedded cluster installation output to proceed (this password can be changed later).
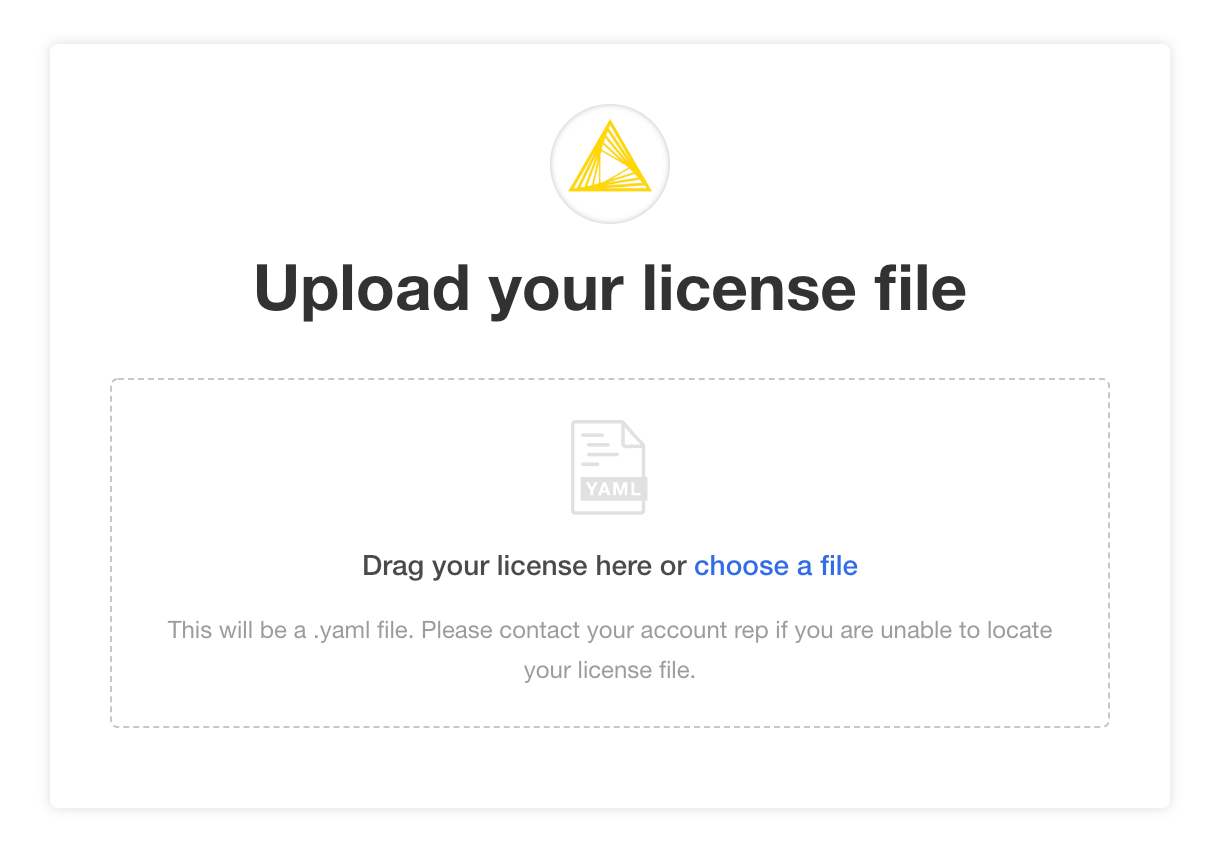
Provide a Replicated .yaml license file
After logging in, you should be prompted for a license file. This is the Replicated license file
that your KNIME customer care representative has provided to you and has a .yaml extension.
Please contact your customer care representative if you need assistance with your license.
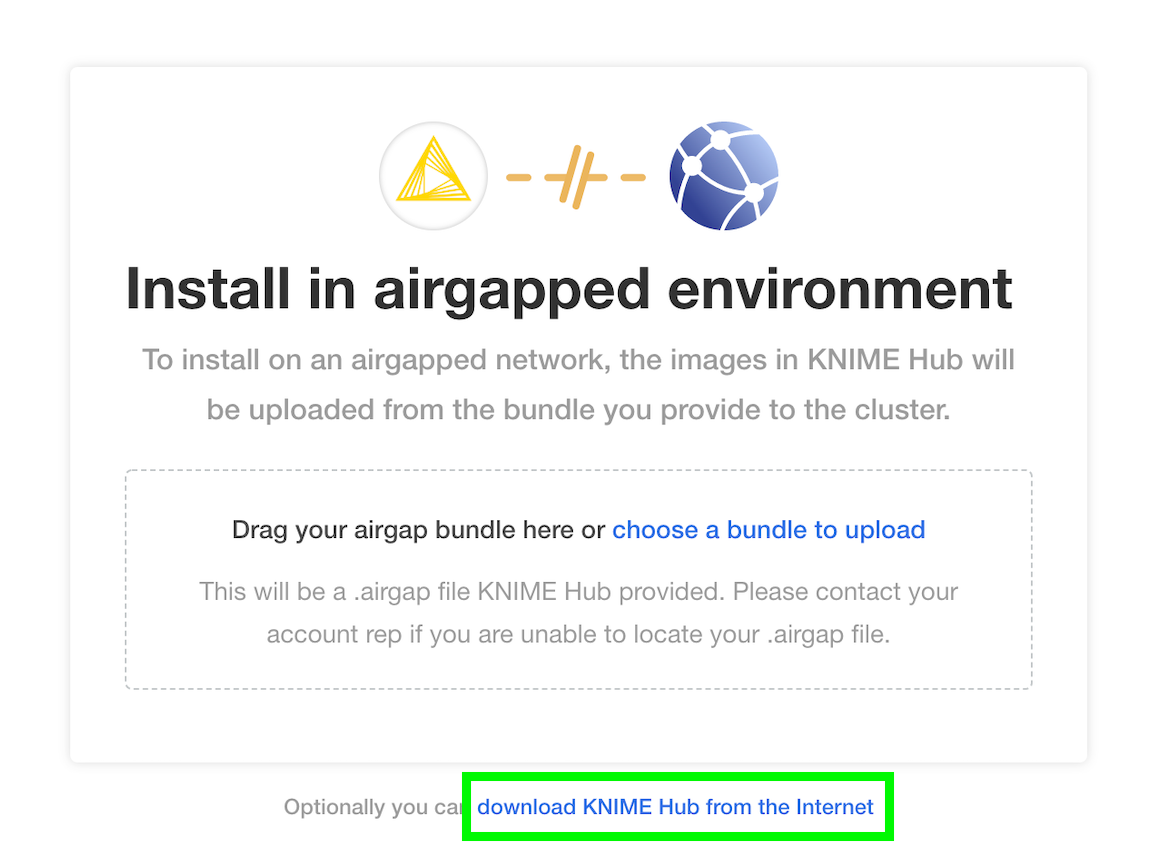
You may be prompted to install KNIME Business Hub into an “airgapped environment” if airgap installations are enabled on your license. This feature is particularly useful for installing KNIME Hub onto a machine that has no outbound internet access. Follow the instructions in the KNIME Business Hub air gap installation section.
In most cases, it is fine to click the Download KNIME Hub from the Internet button if this prompt appears.
Configure the installation
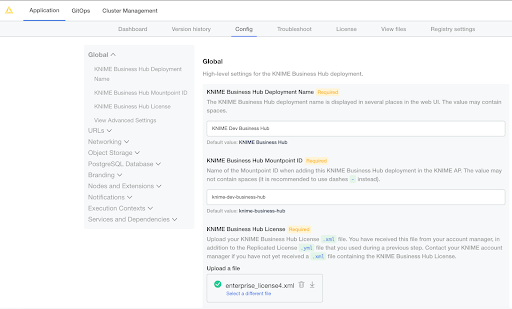
If all prior steps were successful, you should now be prompted to configure your KNIME Business Hub installation. A number of settings will display for you to customize. Please note that all configuration settings in this view can be changed post-installation, except for the settings under “Initialization of KNIME Business Hub”.
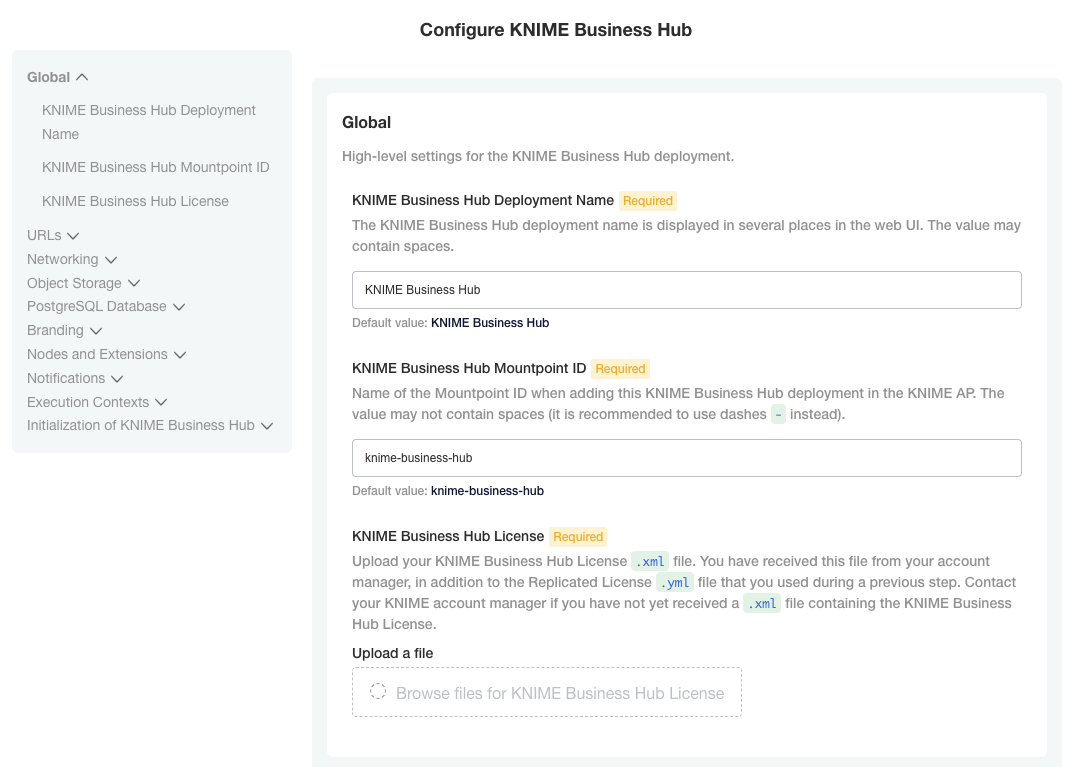
Provide a KNIME Business Hub .xml license file
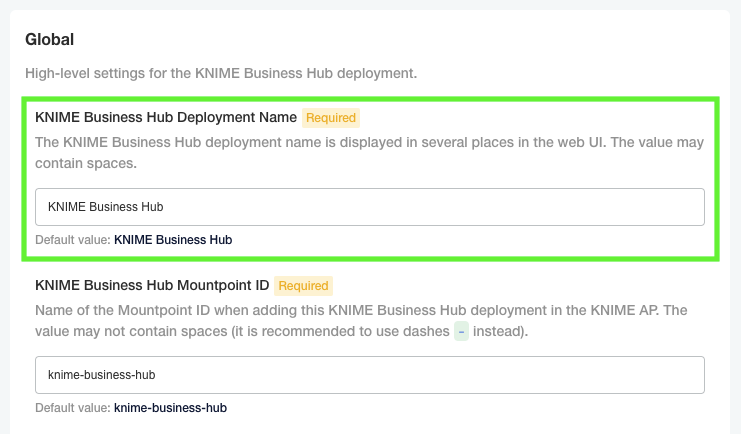
In the "Global" section you can choose your KNIME Business Hub Deployment Name and Mountpoint ID,
or leave the default values.
Here you are also required to upload your KNIME Business Hub license.
This is a different file than the Replicated .yaml license file.
The KNIME Business Hub license file is a .xml file that is also provided to you by your KNIME customer care representative.
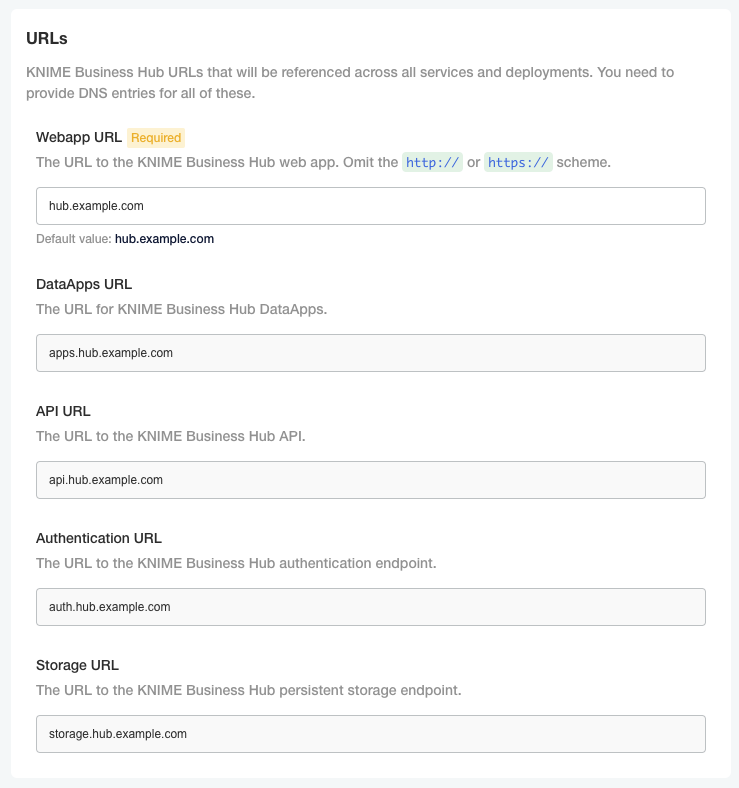
Configure KNIME Business Hub URLs
URLs for KNIME Business Hub need to have the structure of:
-
Base URL
-
<base-url>(e.g.hub.example.com). -
The URL scheme (
http://orhttps://) should not be included in the Base URL. -
The
<base-url>must include the top-level domain (e.g..com), and cannot be an IP address. -
This is the URL you use to view the KNIME Business Hub in your browser.
-
Valid examples:
-
hub.example.com -
example.com
-
-
Invalid examples:
-
example.com/hub -
myhub -
12.34.56.78
-
-
Subdomains
-
api.<base-url> -
apps.<base-url> -
auth.<base-url> -
storage.<base-url> -
registry.<base-url>
-
The Base URL is the only URL that can be customized. The rest of the URLs are generated automatically.
If you are testing KNIME Business Hub without DNS configured, it is
recommended to create /etc/hosts entries on your local machine pointing
to the public IPv4 address of the instance running the cluster. This
will redirect traffic from your local machine to the appropriate IPv4
address when you enter URLs such as http://hub.example.com/ into your
browser.
Notice that the values in /etc/hosts below are for hub.example.com. The
values must match the config in the URLs section of the Config tab in
the KOTS Admin Console, as demonstrated above. You can
always use hub.example.com as the Base URL for local test installations.
<public ip> hub.example.com
<public ip> api.hub.example.com
<public ip> auth.hub.example.com
<public ip> storage.hub.example.com
<public ip> apps.hub.example.com
<public ip> registry.hub.example.com
On Windows machines you can find the /etc/hosts file in <windows dir>\system32\drivers\etc\hosts.
Configure networking
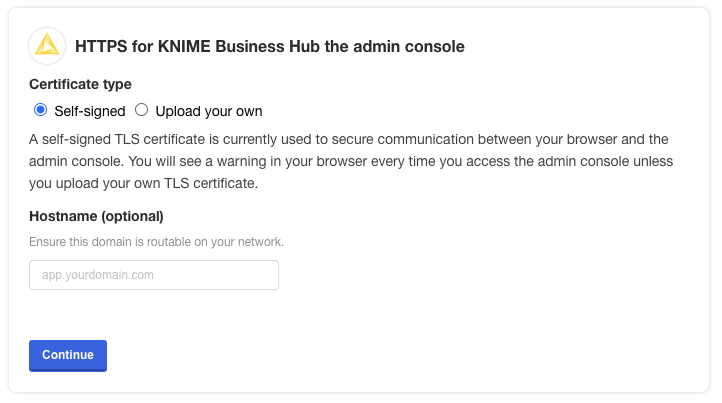
In the section "Networking" of the Admin Console you can deploy an external load balancer and enable and configure the Transport Layer Security (TLS). It is anyways possible to configure this section in a second step.
To have more information on how to configure the networking section read the KNIME Business Hub Admin Guide.
Configure Embedded Docker Registry
| The Embedded Docker Registry is only available on the kURL embedded cluster. |
Enabling the Embedded Docker Registry exposes the registry URL defined in the KNIME Business Hub URLs (e.g. registry.hub.example.com). The user can use
Docker to login and push execution images to the embedded registry with the defined credentials. All images present in the registry are available to be used
in an Execution Context.
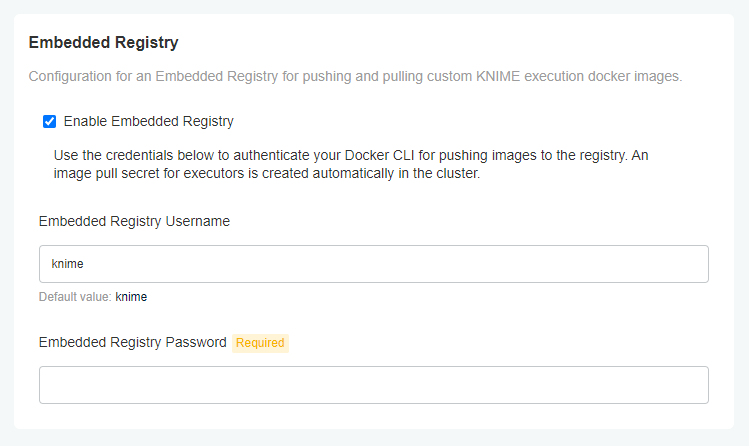
# Authenticate with the registry.
docker login --username <username> registry.<base-url>

# Push an image to the registry.
docker push registry.<base-url>/<execution-image>:<tag>| If TLS is not configured, the registry URL must be added as an insecure registry. |
#!/bin/bash

# exit when any command fails
set -e

registry='registry.<base-url>'

# concatenates all images listed in json file into single line string seperated with blank
echo "Image Name:"
read images
echo "Image Tag (Space seperated for multiple tags or leave empty if all should be deleted):"
read tags
echo "Registry User:"
read user
echo "Registry Password:"
read -s password

for image in $images; do

    if [[ -z $tags ]]
    then
        # get tag list of image, with fallback to empty array when value is null
        tags=$(curl --user $user:$password "https://${registry}/v2/${image}/tags/list" | jq -r '.tags // [] | .[]' | tr '\n' ' ')
    fi

    echo "DELETING image: " $image
    echo "DELETING tags: " $tags

    # check for empty tag list, e.g. when already cleaned up
    if [[ -n $tags ]]
    then
        for tag in $tags; do
            curl --user $user:$password -X DELETE "https://${registry}/v2/${image}/manifests/$(
                curl --user $user:$password -I \
                    -H "Accept: application/vnd.docker.distribution.manifest.v2+json" \
                    "https://${registry}/v2/${image}/manifests/${tag}" \
                | awk '$1 == "docker-content-digest:" { print $2 }' \
                | tr -d $'\r' \
            )"
            echo "DELETED:" $image "with tag" $tag
        done
        echo "Deleted images. To free disk space run the garbage collection command inside the registry pod: 'bin/registry garbage-collect --delete-untagged /
etc/docker/registry/config.yml'"
    else
        echo "SKIP:" $image
    fi
done
Initialization of KNIME Business Hub
During the very first installation of KNIME Business Hub a number of one-time initializations are made, like creating an admin user, team, space, and execution context. Changing fields in this section after installation won’t have any effect on the deployed application. The admin user can change these after the installation in the browser.
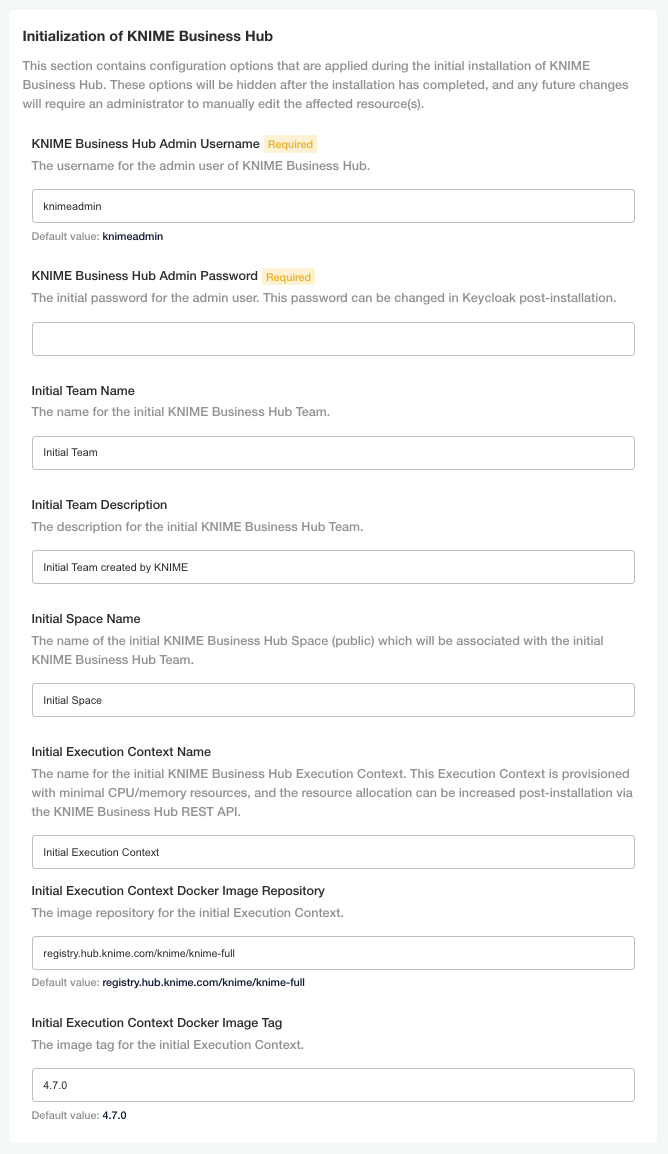
The execution context has minimal resources (1CPU, 2GB memory) and a default executor provided by KNIME, to enable basic execution. For any production use of execution you should configure the execution context and assign more resources or use a different executor docker image.
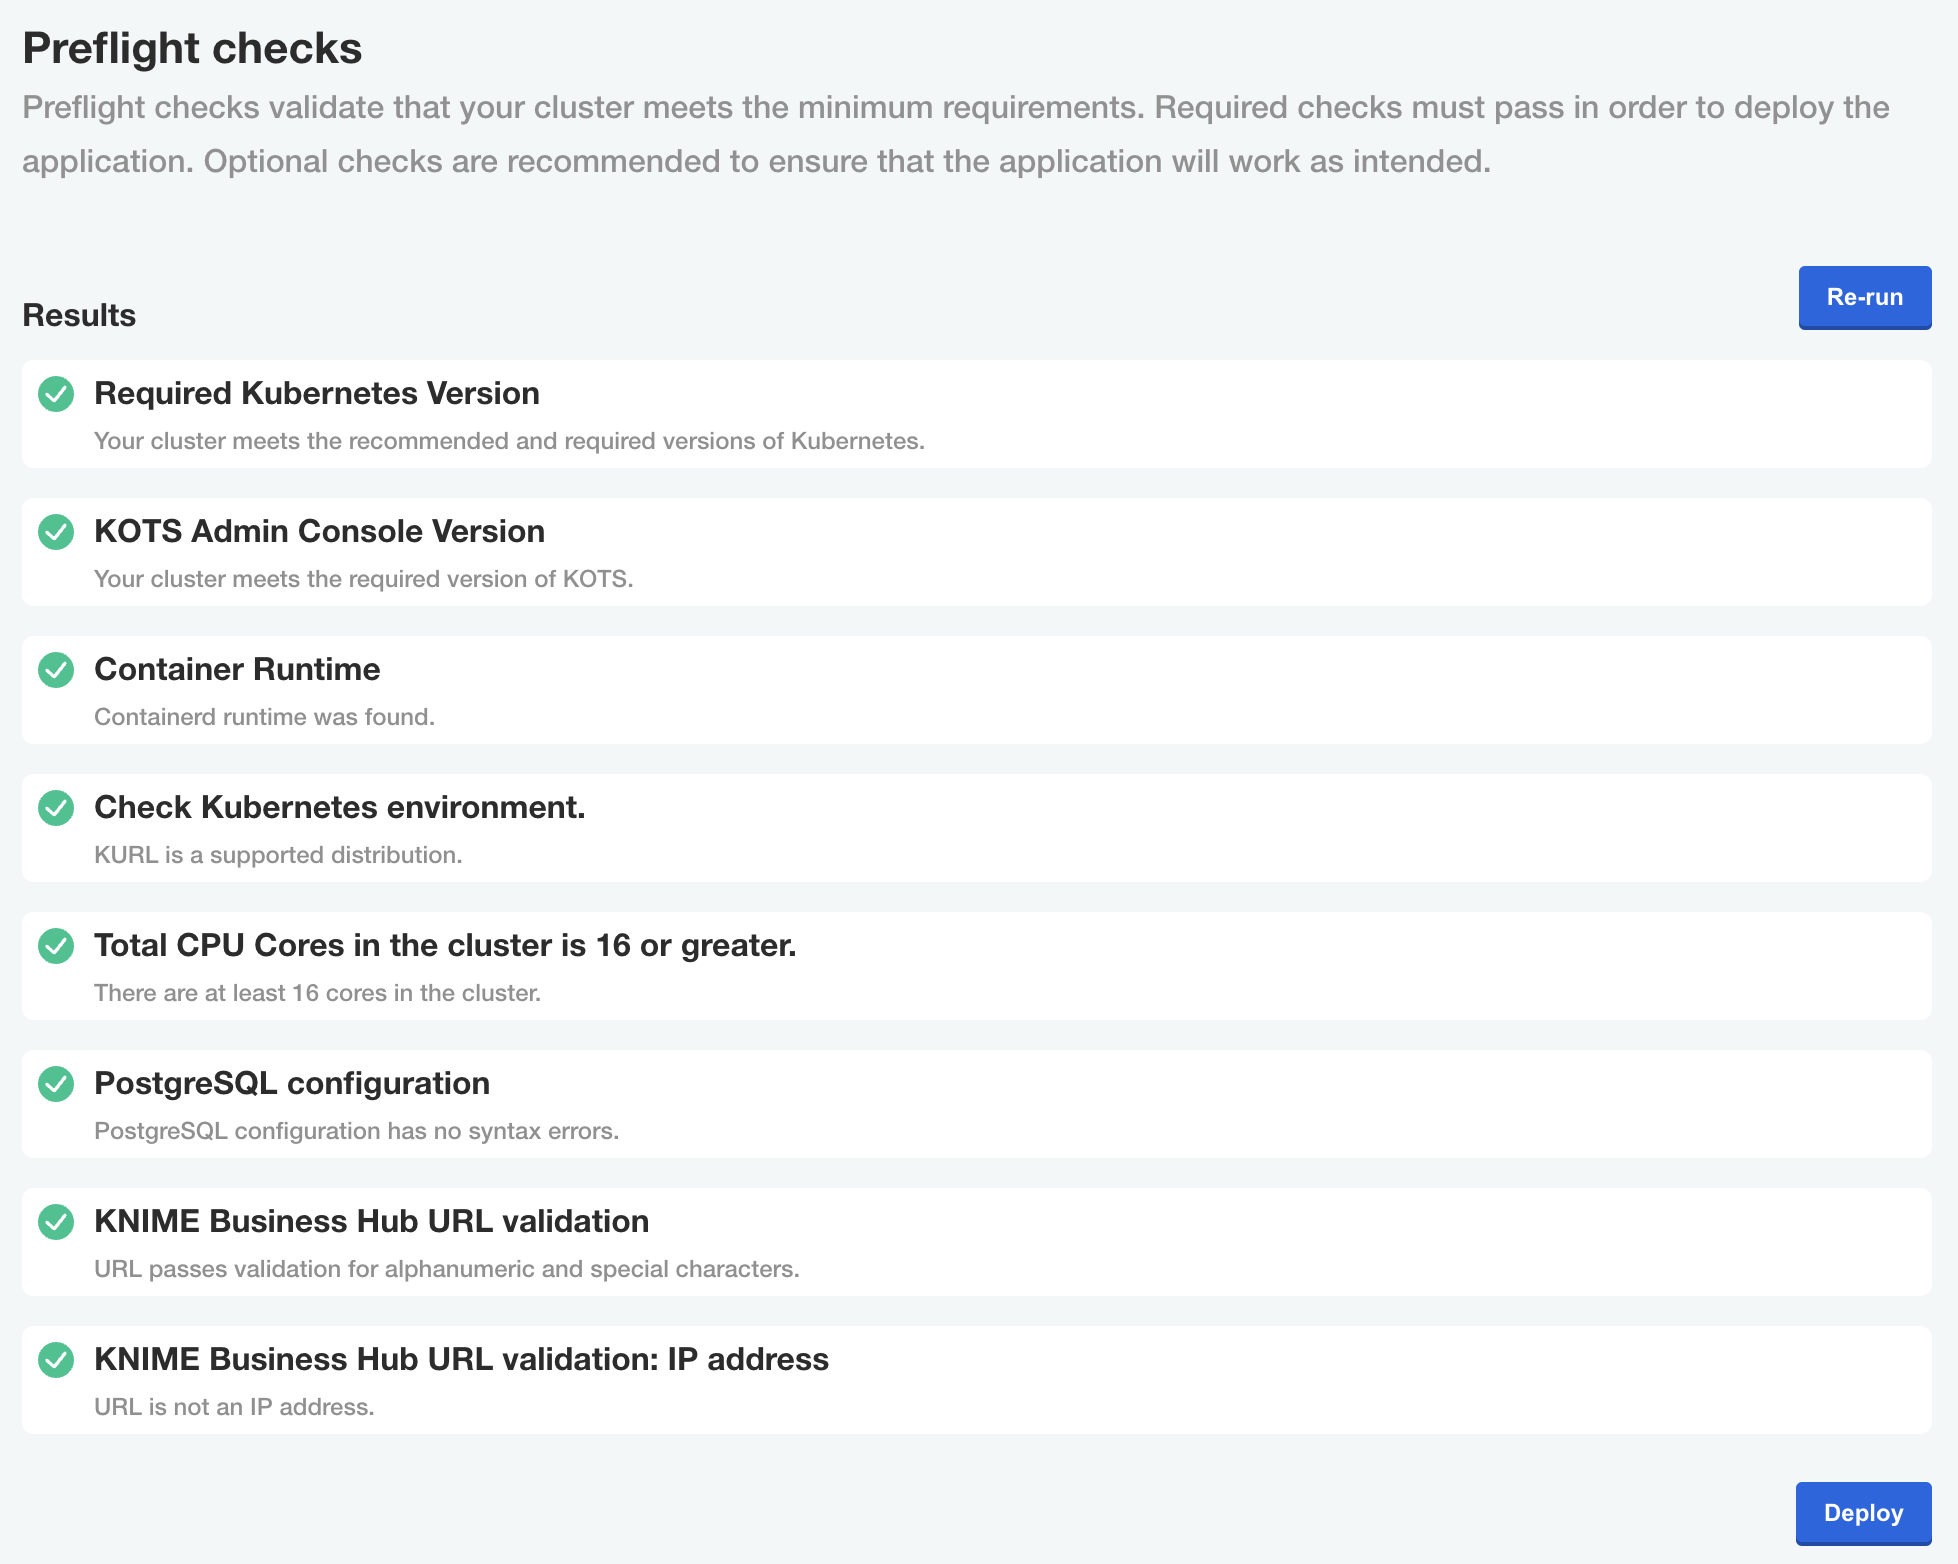
Preflight checks
The final step before installing is the preflight checks, which is a set of automated tests to help identify if KNIME Business Hub is ready for installation. It will check the Kubernetes distribution, Kubernetes version, resources available to the cluster, and other mission-critical settings.
It is highly recommended to never skip the pre-flight checks during installation or upgrades.
Wait for the installation to complete
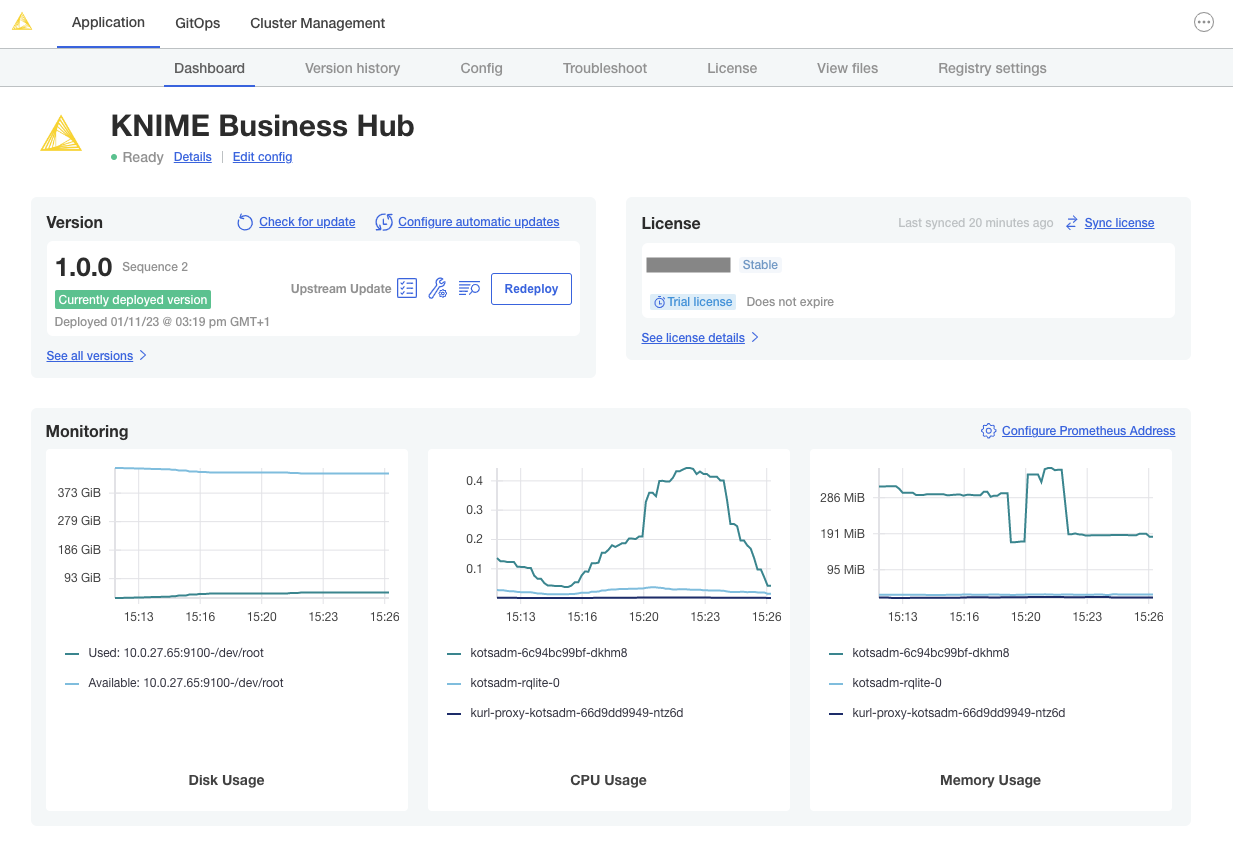
If the preflight checks all passed and you opted to continue, the only thing left to do is wait for a few minutes until KNIME Hub finishes installing! You should see the installation turn the Ready status (top left) to green after 15-20 minutes.
If you cannot access the KNIME Business Hub Webapp URL after the Ready status has turned green, the first troubleshooting step would be to check the Config tab in the KOTS Admin Console and ensure the URLs are configured properly.
Navigating to the Webapp URL should display the KNIME Business Hub landing page.
KNIME Business Hub air gap installation
Air gap install
The term air gap is used to indicate a computer network environment that has no external network access. This type of networking environment is useful for securing sensitive data, applications, and computing resources.
An air gap environment may be completely isolated or have a firewall between it and other networks with wider access. That wider access may be to the external world or within the wider organization.
Installing modern software in an air gap environment can be challenging. Containerization and public registries for container images work on the assumption that all software installs have access to the public internet. To get around this challenge, software installs have to package all the required artifacts and images into a bundle that can be copied to portable media for transport into the air gap environment.
The KNIME Business Hub supports installation into environments with externally accessible networks and into air gap environments. Of course air gap environments require an air gap install approach. But even networks with external access may require air gap installations. For instance, many organizations do not allow downloading container images from public image registries. In this instance, an air gap install will be required.
The Docker executor image that is shipped along with the air gap bundle of KNIME Business Hub version 1.7.0 is registry.hub.knime.com/knime/knime-full:r-5.1.1-379.
|
Getting started
To get started with an air gap install you will need the link to the Download Portal of Replicated and a password that you will receive from your KNIME customer care representative.
Enter the Download Portal from a machine that has access to the internet and has also access to the installation machine.
Here, you need to select the type of installation that you need to perform. Select "Embedded cluster" option so that the installation process will also install Kubernetes cluster along with the KNIME Business Hub.
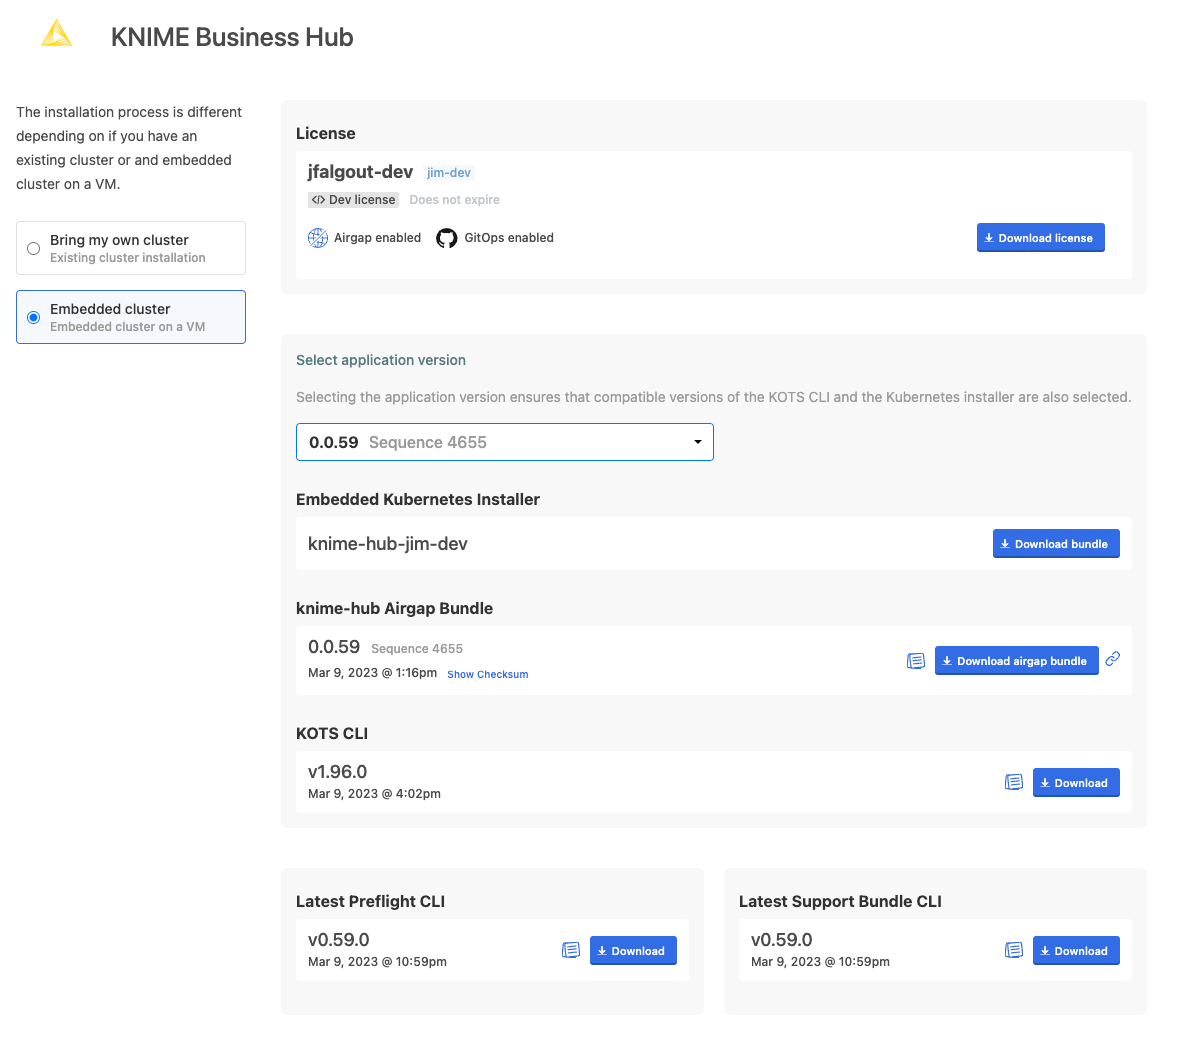
From the download page you need to download:
-
The Replicated license file (
.yaml) with air gap install enabled. -
The airgap bundle for the KNIME Business Hub (knime-hub Airgap Bundle).
-
Finally, you will need kURL bundle to install the kURL distribution of Kubernetes. This means you need to download the Embedded Kubernetes installer bundle.
Getting Kubernetes ready
Next step is to install the new Kubernetes cluster.
The kURL distribution of Kubernetes is used for new Kubernetes installs. This distribution is installed into a single machine and also supports extending to a cluster of machines.
Installing kURL
kURL is a Kubernetes distribution supported by KNIME Business Hub. If you do not have an existing Kubernetes cluster, then kURL can be used as the deployment cluster for KNIME Business Hub.
The kURL install bundle is required to install and deploy a Kubernetes instance to a single VM.
To download the kURL bundle go to the link to the Download Portal you received from your KNIME customer
care representative, and download the Embedded Kubernetes Installer (knime-hub.tar.gz).
You will also need to create a file patch.yaml that looks like the following:
# This is an example patch file to override the Kurl MinIO object store's size. This should
# be sized larger for airgap installs or when using the embedded registry to ensure adequate
# disk is available. The default size is 10GB if not overridden.
apiVersion: cluster.kurl.sh/v1beta1
kind: Installer
metadata:
  name: "knime-hub-installer-patch-minio-size"
spec:
  minio:
    claimSize: "30Gi"
This is to ensure that enough storage is allocated for the MinIO object store used for staging/storing artifacts.
By default, the Kurl MinIO object store is only 10GB, which is likely to fill up very quickly for airgap installations so you need to use the patch.yaml file to override the size setting at install.
Copy the downloaded bundle knime-hub.tar.gz and the patch.yaml to the target machine and run the following commands:
tar xvzf knime-hub.tar.gz
cat install.sh | sudo bash -s airgap installer-spec-file="./patch.yaml"
bash -l
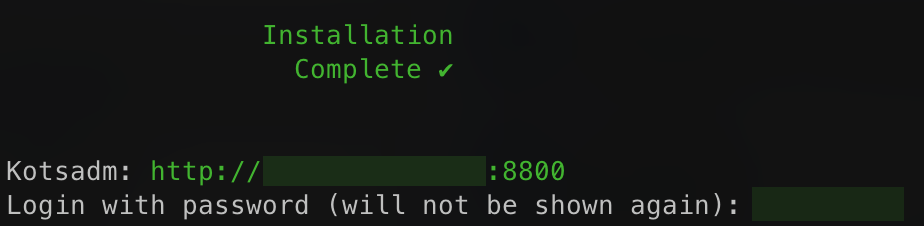
The output of the command will contain the KOTS Admin Console URL and password. Look for these lines in the command output and copy the values:
Kotsadm: http://10.0.102.215:8800
Login with password (will not be shown again): <password>
The kotsadm password can be changed using the command:
kubectl kots reset-password default
The kotsadm password will be required when installing the KNIME Business Hub in this Kubernetes cluster.
Installing KNIME Business Hub
Once your Kubernetes cluster is installed and configured with the KOTS extension, you are ready to install the KNIME Business Hub. Now you need to proceed with the airgap install on a machine that:
-
Hosts the web browser used for the install and has access to the internet
-
Has access to the machine into which you are installing your KNIME Business Hub instance
On the machine that can access the installation machine, you can open the KOTS Admin Console URL and enter the kotsadm password. Follow the instructions for installing the KNIME Business via a browser. You will first need to upload the license and then the airgap bundle you downloaded from the Download Portal.
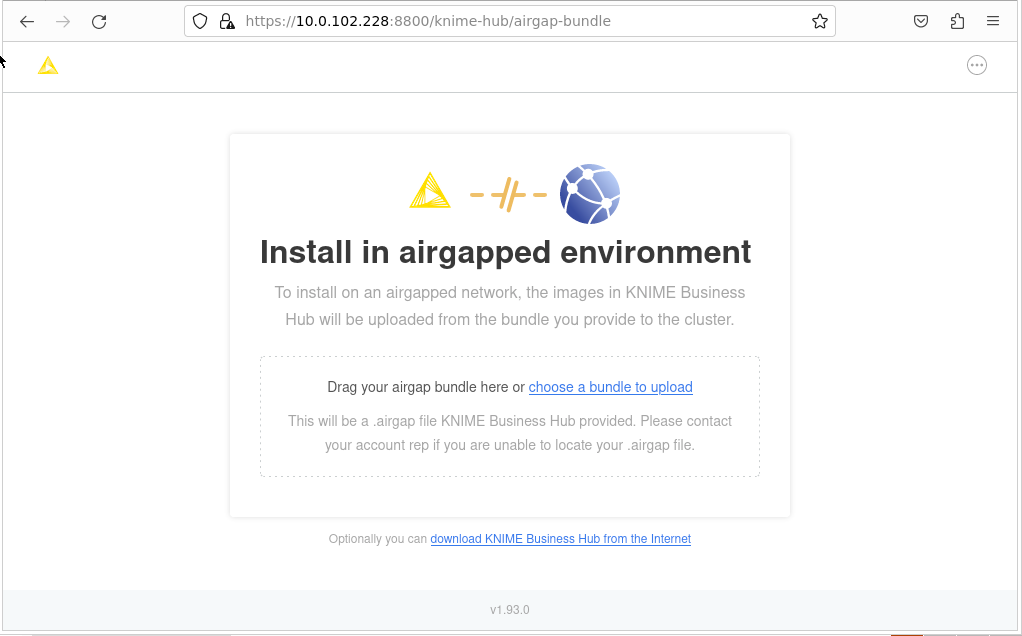
Once you select the KNIME Business Hub airgap bundle to use, the bundle will be uploaded to the install computer. The bundle is large and will take some time to upload.
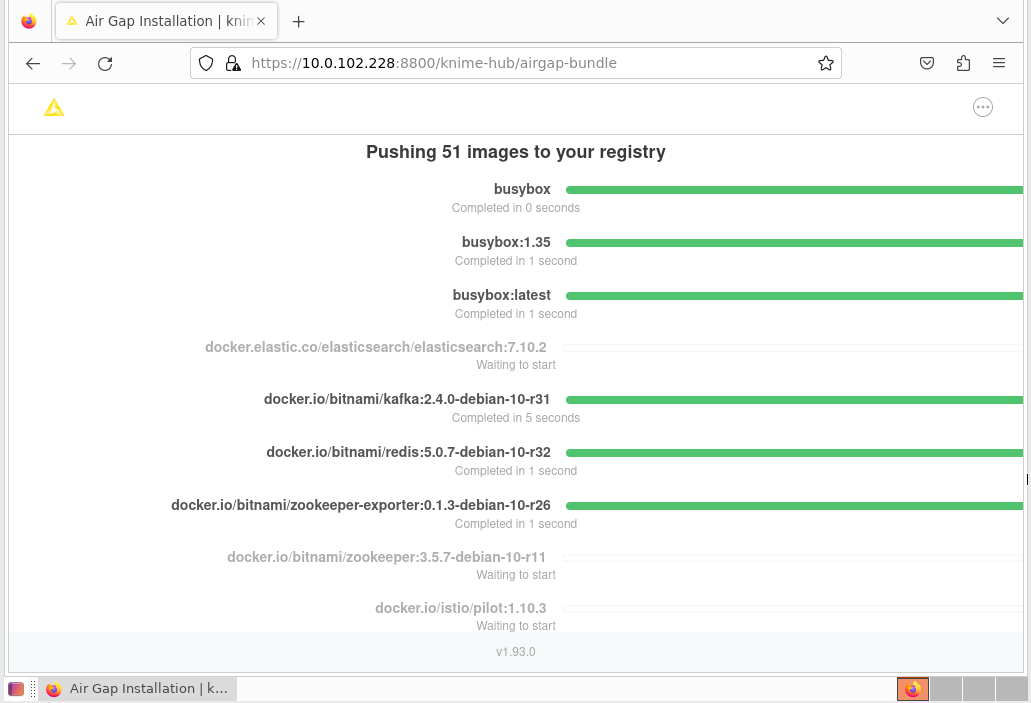
Once the bundle has completed loading, the installer will extract all the required images from the bundle and store them in a local image registry. Again this will take some time. In your browser, you will see the progress of the extraction and load process. It will look like the screen shot below. Once the load into the registry is complete, the configuration page will be shown. Proceed as normal with the install at this point.
If all prior steps were successful, you should now be prompted to configure your KNIME Business Hub installation.
To do so follow the steps in the Configure the installation section.
Post-installation steps
Connecting kubectl or other external tools to your cluster
Executing the following command on the Ubuntu instance in which KNIME Business Hub is installed will output the kubeconfig file which is required for accessing your cluster from another machine.
Sometimes the KUBECONFIG environment variable is not set automatically
after installation. Running bash -l will reload the shell and likely
solve the issue. Otherwise, you can run kubectl config view --raw which
is equivalent to cat $KUBECONFIG.
cat $KUBECONFIG
Note that the .clusters[0].cluster.server property is almost certainly
set to the private IPv4 address of the cluster (incorrect) and not the
public IPv4 address (correct). Update the property to match the public
IPv4 address of the Ubuntu instance hosting KNIME Business Hub.
apiVersion: v1
clusters:
- cluster:
    certificate-authority-data: ...
    server: https://<replace-with-public-ip>:6443
  name: kubernetes
contexts:
- context:
    cluster: kubernetes
    user: kubernetes-admin
  name: kubernetes-admin@kubernetes
current-context: kubernetes-admin@kubernetes
kind: Config
preferences: {}
users:
- name: kubernetes-admin
  user:
    client-certificate-data: ...
    client-key-data: ...
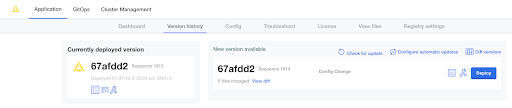
Version updates
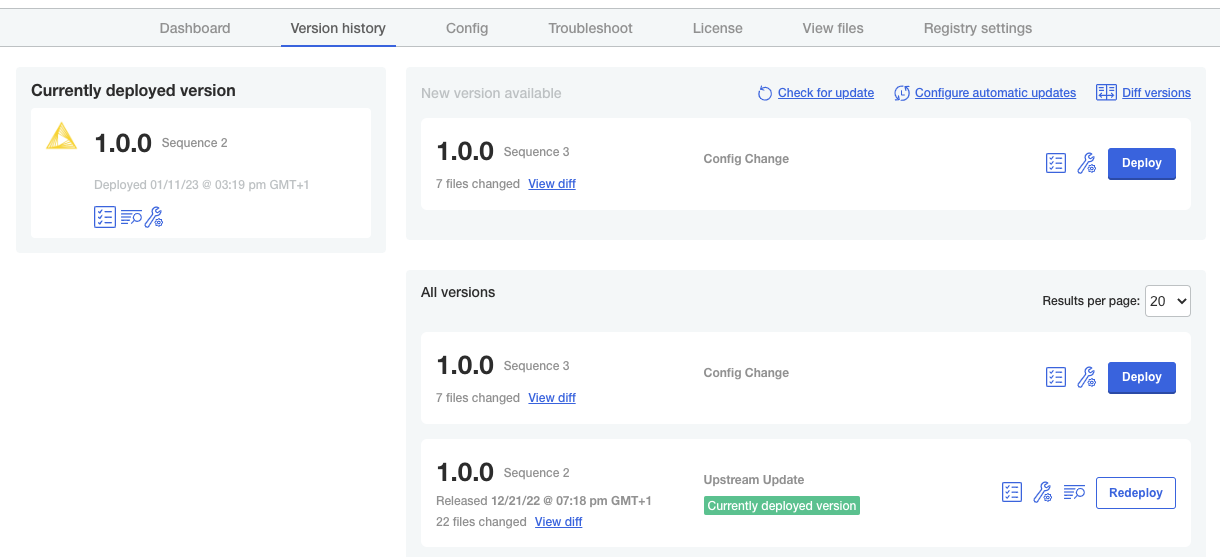
If you save any changes in the Config tab of the KNIME Business Hub Admin Console, or check for updates and see a new version that you can upgrade to, then the new version will be visible in the Version history tab. New versions of KNIME Business Hub will not be deployed automatically unless automatic updates have been configured. Preflight checks will execute prior to deployment and the deployment itself can be triggered by clicking the Deploy button.
User registration
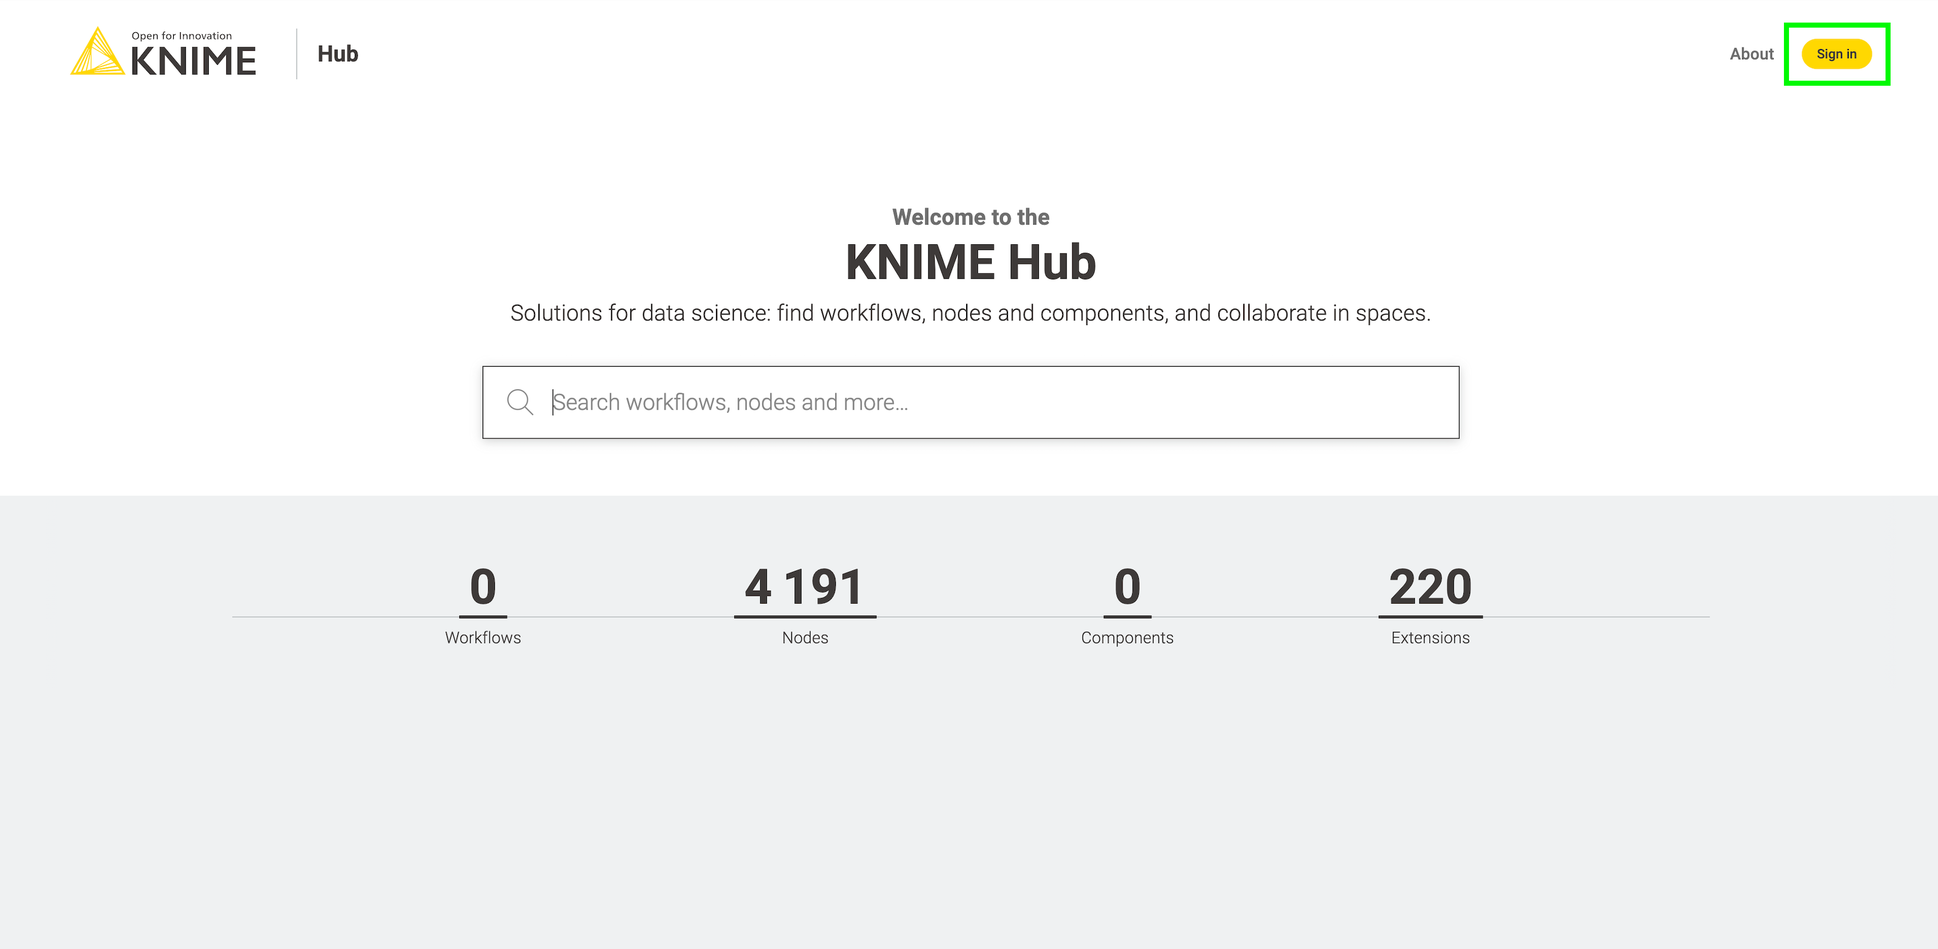
After initial installation, start the process of creating the first user by clicking the Sign In button.
Next, click the Register button to proceed with creating a new account. You will be prompted for user information and will be logged in automatically.

Users can change their password by going to
auth.<base-url>/auth/realms/knime/account (e.g.
http://auth.hub.example.com/auth/realms/knime/account) and navigating to
Account Security → Signing In.
Keycloak setup
Keycloak is an open source software product that KNIME Business Hub leverages for authenticating users with Single-Sign On. Keycloak offers Identity Brokering and User Federation to external Identity Providers.
You can manage your Keycloak setup by going to auth.<base-url>/auth/ (e.g.
http://auth.hub.example.com/auth/), clicking Administration Console and
logging in with the Keycloak admin credentials. These credentials are
stored in a kubernetes secret called credential-knime-keycloak in the
knime namespace.
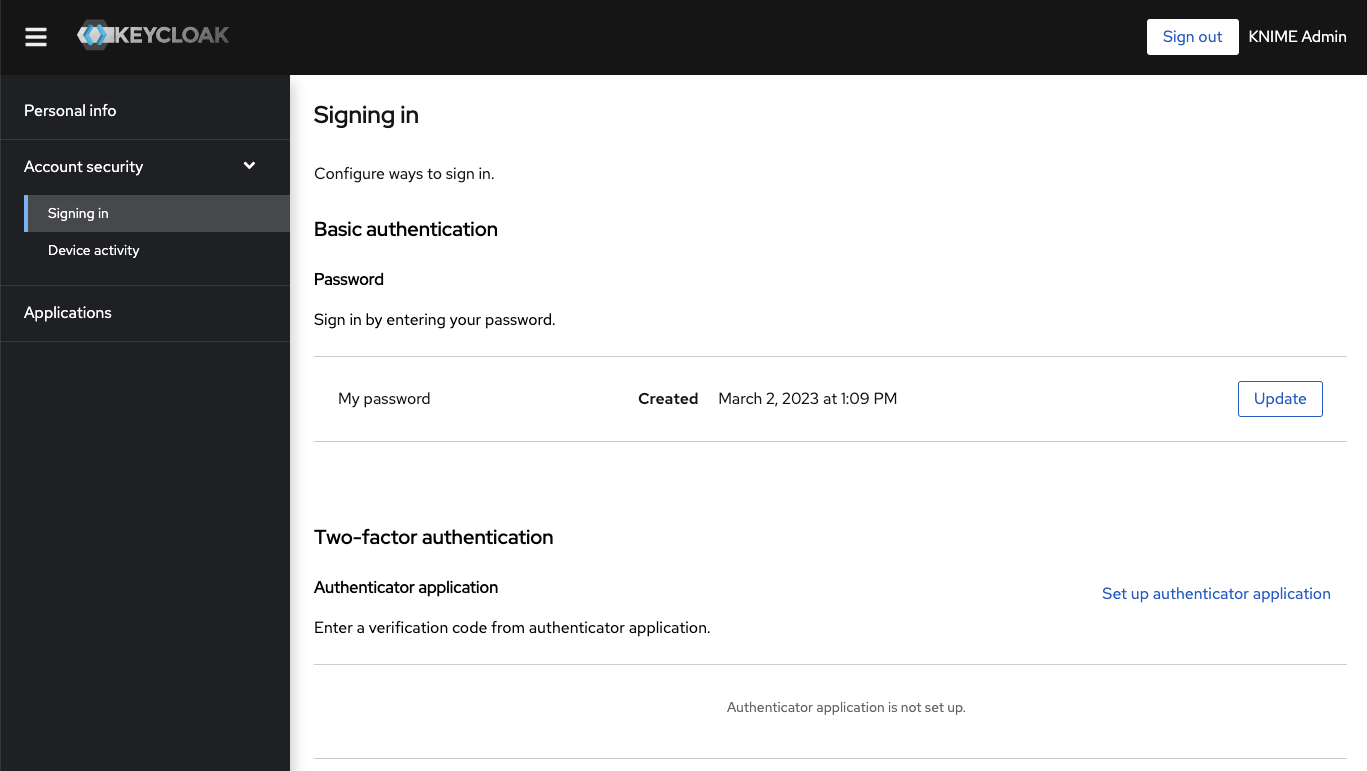
|
When you first log in to the Keycloak Administration Console you are shown the |
For configuring your Keycloak setup, e.g.for adding User Federation or an external Identity Providers, consult the Keycloak Server Administration Guide.
Integrating an external Identity Provider (IdP)
While Keycloak itself can be used as the user base, KNIME Business Hub can also federate to an external IdP. To do this the external IdP needs to support a protocol known to Keycloak, such as SAML v2.0, OpenID Connect v1.0, or OAuth v2.0. For configuring Keycloak to use an external IdP please see the Integrating identity providers section in Keycloaks own documentation on this topic.
| If you are using Azure AD as external Identity Provider you can restrict who can register to your KNIME Business Hub instance by deactivating the option "Assignment required?" in Azure AD to Yes and then allowing only a subset of users or groups to access the KNIME Business Hub instance as explained in the Azure AD documentation. |
Requirements
Keycloak and KNIME Business Hub have the following requirements for a user or external Identity Provider:
-
Usernames can only include letters and numbers as first character. Letters, numbers and underscore as last character. Letters, numbers, space, dot, underscore and hyphen for remaining characters. The minimum length is 3 characters, the maximum is 64. Special characters like umlauts (äöü) are not allowed.
-
This also means that a username can not be an email address.
-
KNIME Business Hub uses this regex to validate usernames:
^[a-zA-Z0-9][a-zA-Z0-9-_. ]{1,62}[a-zA-Z0-9_]$.
-
-
When a new user is added to keycloak, it needs to have values for the Username, Email, First name and Last name fields. If any of those are not filled in automatically you need to create a mapper for it in the Identity Provider settings. Otherwise the user will be prompted to fill in details themselves when they log in for the first time.
-
Each user needs to have an email address, even if notifications are not configured in KNIME Business Hub.
Identity Provider Mapper
After adding an external IdP to your Keycloak instance you can create Identity Provider Mappers. These mappers can be used to fill in attributes if they are not getting automatically added, like Email. See the Mapping claims and assertions section in Keycloaks documentation.
In Keycloak, in the knime realm, go to the Identity Providers section, click your provider and go to the Mappers tab. Click the Add Mapper button and configure the
mapper. Some useful Mapper types:
-
Username Template Importer: you can use this mapper to generate a username from multiple claims if a username claim is not available. Example template:
${CLAIM. given_name}.${CLAIM.family_name}.given_nameandfamily_nameare the given claims here. Nesting is possible with e.g.${CLAIM.user_info.given_name}.-
There are three transformers you can use here:
lowercase,uppercase, andlocalpart, example usage.${CLAIM.email | localpart}.localpartremoves the@domainpart of the email, e.g.first.lastname@example.combecomesfirst.lastname. This way you can transform an email into a valid username.
-
-
Attribute Importer: map an Identity Provider claim to a Keycloak attribute. Useful target attributes:
email(Email),given_name(First name), andfamily_name(Last name). The Claim field is not a template like above, but accepts the claim name directly, e.g.family_name. -
Use the Hardcoded Attribute mapper if an attribute can’t be constructed from a claim.
For finding available claims see the section below.
Tips for debugging Keycloak when integrating an external IdP
To create appropiate mappers in the IdP configuration one needs to know what the external IdP is actually returning to Keycloak. This can be done by increasing the
loglevel to DEBUG on the Keycloak instance. To do so you need to modify an instance of the keycloaks.keycloak.org CustomResource. You can get the current yaml
definition of it by executing:
kubectl get keycloaks.keycloak.org -n knime knime-keycloak -o yaml
You can either save this output to a file, modify the file, and apply the changes to the cluster with:
kubectl apply -f <file>
Or you can edit it directly in the cluster using kubectl edit. This will open the default editor in your current shell. Make the modification, save and exit the editor,
and it will automatically be applied to the cluster:
kubectl edit keycloaks.keycloak.org -n knime knime-keycloak
The modification that needs to be done is adding the KEYCLOAK_LOGLEVEL variable under spec.keycloakDeploymentSpec.experimental.env:
spec:
  keycloakDeploymentSpec:
    experimental:
      env:
      - name: KEYCLOAK_LOGLEVEL
        value: DEBUG
Do not remove or change any of the other lines.
After this modification has been applied the keycloak-operator will automatically reconcile the keycloak-0 pod in the knime namespace. After the pod is ready again
attempt a login with the configured external IdP in the KNIME Business Hub UI (e.g.http://hub.example.com) and look at the log output of the keycloak-0 pod. The DEBUG
loglevel will output a lot of information, the interesting lines contain org.keycloak.social.user_profile_dump with the full JSON that was received from the external IdP:
15:08:32,986 DEBUG [org.keycloak.social.user_profile_dump] (default task-3) User Profile JSON Data for provider oidc: {"sub":"02aebee3-aaba-4e96-86a7-1d12531e8fb2","email_verified":false,"name":"Admin Admin","preferred_username":"admin","given_name":"Admin","family_name":"Admin","email":"admin@example.com"}
To turn off again the DEBUG logging in Keycloak, remove the KEYCLOAK_LOGLEVEL variable that you added in the earlier step.
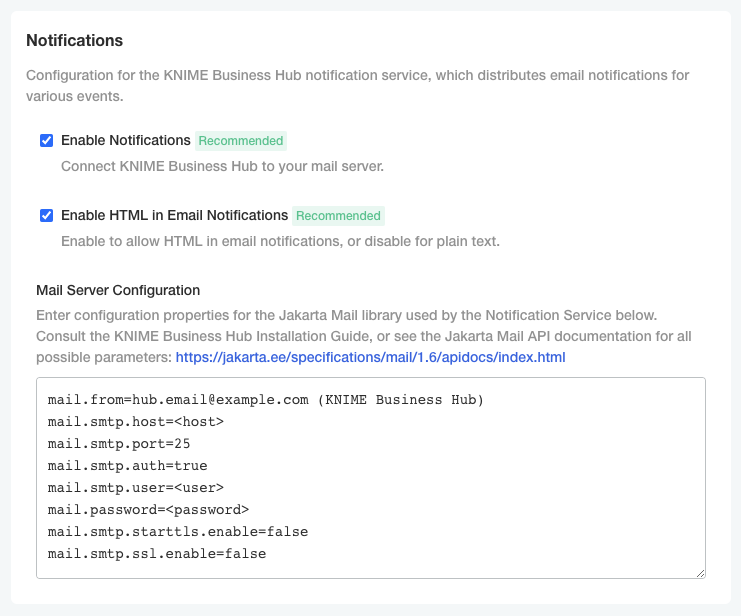
Notifications
In order to configure the Notification Service to send emails, you have to supply configuration properties in the Mail Server Configuration field in the KNIME Business Hub Config. The table below shows some of the possible options. The Notification Service uses Jakarta Mail, see the Jakarta Mail API documentation for all possible parameters.
| Name | Value |
|---|---|
|
Address from which all mails are sent, required |
|
SMTP server host address |
|
SMTP port, default 25 |
|
Set to |
|
Username for SMTP authentication; optional |
|
Password for authentication; optional |
|
If |
|
If set to |
Enabling custom logos and other branding options
You can change the name of your KNIME Business Hub deployment from the global settings.
To enable other branding options for your KNIME Business Hub instance, find the "Branding" section below and enable them.
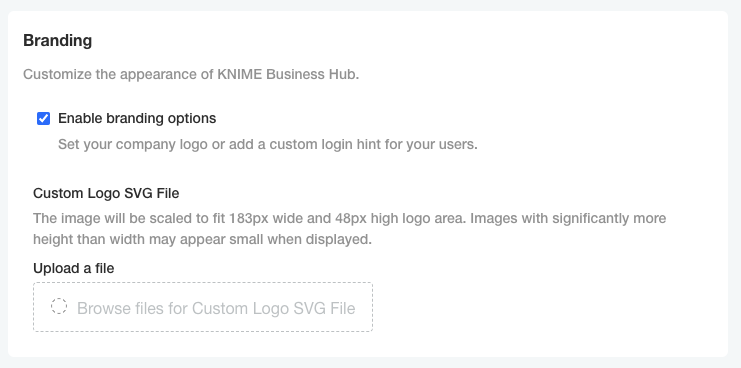
If customizing the logo, the file being uploaded must be an .svg file in XML format such as the one below.
example.svg
<?xml version="1.0" encoding="UTF-8" standalone="no"?>
<!DOCTYPE svg PUBLIC "-//W3C//DTD SVG 1.1//EN" "http://www.w3.org/Graphics/SVG/1.1/DTD/svg11.dtd">
<svg width="100%" height="100%" viewBox="0 0 183 48" version="1.1" xmlns="http://www.w3.org/2000/svg" xmlns:xlink="http://www.w3.org/1999/xlink" xml:space="preserve"
xmlns:serif="http://www.serif.com/" style="fill-rule:evenodd;clip-rule:evenodd;stroke-linejoin:round;stroke-miterlimit:2;">
    <g transform="matrix(0.673983,0,0,0.673983,-2.4399,8.02946)">
        <text x="6.739px" y="43.245px" style="font-family:'Arial-BoldMT', 'Arial', sans-serif;font-weight:700;font-size:54.619px;">EXAMPLE</text>
    </g>
</svg>
Once the configuration changes to the logo have been applied and deployed, the KNIME Business Hub webapp should automatically restart with the new branding configuration.
Restart a node
Before rebooting a node please call the shutdown script suggested here on the node.
Otherwise, after a VM restart old pods might be in Failed or Shutdown state.
If that is the case please delete the failed pods after the restart with the following command:
kubectl delete pod --field-selector=status.phase==Failed --all-namespaces
Update your KNIME Business Hub license
In order to deploy a new Business Hub license, please go to the Replicated console. There, navigate to the Config tab and find your current license file.
Click “select a different file”, and choose the .xml file provided by your KNIME customer care representative. Afterwards, scroll all the way to the bottom to confirm
the configuration change. Click “go to updated version” next. This brings you to the “version history”, where you need to click on “deploy” to switch to the new license.
Advanced installation guide
This section covers advanced installation topics for detailed networking requirements, setting up highly-available (HA) clusters and other environmental considerations.
Highly-Available (HA) Embedded Cluster installation
A highly-available (HA) cluster consists of running multiple primary nodes which share the responsibility of acting as the control-plane, meaning any primary instance can ensure that all nodes in the cluster are properly managed and work is evenly distributed across them.
In an HA configured cluster where three or more nodes are running, any node can become unavailable without impacting the overall stability and health of the cluster. Furthermore, any processes running on a node that becomes unavailable will be automatically moved to an available node, allowing the cluster to automatically self heal.
Additionally, for a cluster to be highly-available, all data must be replicated dynamically between all nodes to ensure any migrated processes have access to all needed data. This is enabled by configuring the Rook volume provider add-on onto nodes during the installation process. Rook requires additional, unformatted block devices (disks) be attached to each node which it leverages for volume management. Additional information can be found here.
Installation overview
In the most basic HA scenario, three or more nodes are installed where each node is configured to act as a primary node. A primary node is a node that additionally runs processes for the Kubernetes control-plane. A secondary node is a node that only runs non control-plane processes.
Having all nodes configured as primary nodes ensures any node can become unavailable without affecting the stability of the Kubernetes cluster.
If more than three nodes are planned to be configured in a cluster, a minimum of three of them must be primary nodes. All additional nodes can be installed as secondary nodes if desired.
When installing the Kurl embedded Kubernetes cluster in an HA configuration, the installation process is fully run on an initial instance, creating the first primary node. Upon completion of the install, output will be generated and printed to the console which includes a "join command" that can be run on each subsequent instance to configure it as a new node and cluster it with existing nodes.
Note all relevant ports that should be open for nodes to communicate with each other in the advanced Networking Requirements.
Installing the first node
When installing the kURL embedded cluster, the command line script needs to be modified to pass in additional parameters to configure the
node to enable additional HA components.
Run the following install command with the following flags to initialize the first node.
curl -sSL https://kurl.sh/knime-hub-stable-ha | sudo bash -s ha ekco-enable-internal-load-balancer
The installer may prompt the user to indicate when additional configurations are being enabled or installed, but will otherwise proceed as normal.
This install command is similar to the one for the single-node install, but has two additional parameters (listed after the -s flag)
to enable the ha configuration option and the internal-load-balancer which
makes the Kubernetes control-plane API a highly-available endpoint.
Installing additional nodes
Once the first node has completed installation, the standard output will be printed to the terminal for how to access the KOTS Admin
Console and more.
Among this output is a join command (including a dynamically generated token) which can be run on subsequent instances to install them as
nodes and join them to the cluster.
| The Rook addon to be able to replicate data to all nodes needs to have at least 3 nodes available during cluster installation. Until at least 3 nodes are installed, the OpenEBS addon is used to provision Local Persistent Volumes to Stateful workloads. |
Once the third node has joined the cluster, migration from OpenEBS to Rook will be executed automatically and the user will be prompted to start the process.
Once all nodes have been intialized, the KOTS Admin Console can be used to proceed with the installation as normal.
Each node and its status are viewable from the admin console’s Cluster Management tab once the KNIME Business Hub install is complete.
Networking requirements
Firewall openings for online installations
The following domains need to be accessible from servers performing online kURL installs. IP addresses for these services can be found in replicatedhq/ips.
| Host | Description |
|---|---|
amazonaws.com |
tar.gz packages are downloaded from Amazon S3 during embedded cluster installations. The IP ranges to allowlist for accessing these can be scraped dynamically from the AWS IP Address Ranges documentation. |
k8s.gcr.io |
Images for the Kubernetes control plane are downloaded from the Google Container Registry repository used to publish official container images for Kubernetes. For more information on the Kubernetes control plane components, see the Kubernetes documentation. |
k8s.kurl.sh |
Kubernetes cluster installation scripts and artifacts are served from kurl.sh. Bash scripts and binary executables are served from kurl.sh. This domain is owned by Replicated, Inc which is headquartered in Los Angeles, CA. |
No outbound internet access is required for airgapped installations.
Host firewall rules
The kURL install script will prompt to disable firewalld. Note that firewall rules can affect communications between containers on the same machine, so it is recommended to disable these rules entirely for Kubernetes. Firewall rules can be added after or preserved during an install, but because installation parameters like pod and service CIDRs can vary based on local networking conditions, there is no general guidance available on default requirements. See Advanced Options for installer flags that can preserve these rules.
The following ports must be open between nodes for multi-node clusters:
Primary Nodes:
| Protocol | Direction | Port Range | Purpose | Used By |
|---|---|---|---|---|
TCP |
Inbound |
6443 |
Kubernetes API server |
All |
TCP |
Inbound |
2379-2380 |
etcd server client API |
Primary |
TCP |
Inbound |
10250 |
kubelet API |
Primary |
UDP |
Inbound |
8472 |
Flannel VXLAN |
All |
TCP |
Inbound |
6783 Weave |
Net control |
All |
UDP |
Inbound |
6783-6784 |
Weave Net data |
All |
TCP |
Inbound |
9090 |
Rook CSI RBD Plugin Metrics |
All |
Secondary Nodes:
| Protocol | Direction | Port Range | Purpose | Used By |
|---|---|---|---|---|
TCP |
Inbound |
10250 |
kubelet API |
Primary |
UDP |
Inbound |
8472 |
Flannel VXLAN |
All |
TCP |
Inbound |
6783 |
Weave Net control |
All |
UDP |
Inbound |
6783-6784 |
Weave Net data |
All |
TCP |
Inbound |
9090 |
Rook CSI RBD Plugin Metrics |
All |
These ports are required for Kubernetes and Weave Net.
Available ports
In addition to the ports listed above that must be open between nodes, the following ports should be available on the host for components to start TCP servers accepting local connections.
| Port | Purpose |
|---|---|
2381 |
etcd health and metrics server |
6781 |
weave network policy controller metrics server |
6782 |
weave metrics server |
10248 |
kubelet health server |
10249 |
kube-proxy metrics server |
9100 |
prometheus node-exporter metrics server |
10257 |
kube-controller-manager health server |
10259 |
kube-scheduler health server |
Installation on hosts with undersized root volumes
By default, the Kurl embedded cluster uses OpenEBS for volume provisioning, which leverages the hosts
disk for persistence. This location defaults to /var/openebs/local. Additionally, the host disk is used for caching container images and
other artifacts.
If the host disk does not have sufficient capacity for installation, an additional disk can be mounted and configured for use.
Follow the recommended best practice for your hardware, infrastructure provider and Linux distribution to add a new disk and ensure a partition and filesystem have been created on it and that it is mounted.
The following steps can then be used to configure that disk for persistence with KNIME Business Hub.
Set up new directories and symlinks
The disk should be mounted to /var/lib/replicated. Once that is done, the following will create and link additional needed directories.
mkdir /var/lib/replicated/kubelet
ln -s /var/lib/replicated/kubelet /var/lib/kubelet

mkdir /var/lib/replicated/openebs
ln -s /var/lib/replicated/openebs /var/openebs

mkdir /var/lib/replicated/containerd
ln -s /var/lib/replicated/containerd /var/lib/containerd

mkdir /var/lib/replicated/kurl
Update installer script
Next, download the installer script, but don’t execute it.
curl -sSL https://kurl.sh/knime-hub > kurl-installer.shInside the installer script is a line starting with Environment="KUBELET_CONFIG_ARGS=, which specifies flags to be passed to the kubelet
process that runs on the node. An additional flag (--root-dir) needs to be appended to these arguments to point to /var/lib/replicated/
kubelet.
This line in the installer script can be manually updated, or the following sed command can be run to automatically apply the change.
sed -i 's/\/var\/lib\/kubelet\/config\.yaml/\/var\/lib\/kubelet\/config\.yaml --root-dir=\/var\/lib\/replicated\/kubelet/g' kurl-installer.shOnce edited, the complete line should look like the following:
Environment="KUBELET_CONFIG_ARGS=--config=/var/lib/docker/kubelet/config.yaml --root-dir=/var/lib/replicated/kubelet"Install Kurl with argument overrides
To complete the install, chmod is used to make the shell script executable, then the script is executed with any needed arguments.
The kurl-install-directory="/var/lib/replicated/kurl" argument must be specified. Other arguments can additionally be added as needed.
Note that, unlike standard install command which uses curl to download the installation script and pipe it directly into a bash shell,
the -s flag is not needed before specifying arguments when the script is directly executed.
chmod +x kurl-installer.sh
./kurl-installer.sh kurl-install-directory="/var/lib/replicated/kurl"
Uninstalling KNIME Business Hub
Uninstalling KNIME Business Hub is a highly destructive action that can have permanent implications. Please ensure you are connected to the right cluster and 100% sure you want to uninstall all resources related to KNIME Business Hub before proceeding. Please ensure you have retrieved all data or backups from the cluster that you want to preserve.
To completely remove a KNIME Business Hub instance, the following commands can be run from a terminal which has kubectl access to the cluster running KNIME Business Hub.
Both kubectl and Helm must be installed to successfully run the commands. Please confirm that the proper Kubernetes context is set before executing.
# Remove the KNIME Business Hub app from the KOTS Admin Console.
kubectl kots remove knime-hub -n default --force

# List all helm releases that will be deleted in a later step. This does not delete anything yet.
# Ensure there are no helm releases that you deployed yourself.
helm ls -a -n hub && helm ls -a -n knime

# Delete all helm releases in the hub namespace.
helm ls -a -n hub | awk 'NR > 1 { print  "-n "$2, $1}' | xargs -L1 helm delete;

# Delete the knime-hub-keycloak helm release, and wait 10seconds to give the knime-keycloak-operator time to reconcile.
helm delete -n knime knime-hub-keycloak; sleep 10;

# Delete all helm releases in the knime namespace.
helm ls -a -n knime | awk 'NR > 1 { print  "-n "$2, $1}' | xargs -L1 helm delete;

# Finally, delete all namespaces that were created by KNIME Business Hub.
kubectl delete namespace istio-system hub hub-execution knime
If the commands above run successfully, all KNIME Business Hub resources will be removed from the cluster. You could then re-install KNIME Business Hub into the same cluster by navigating to the KOTS Admin Console in a browser and following this installation guide again.
Removing kubernetes from a VM
You can uninstall all KOTS resources or remove everything related to kubernetes from a VM by following the documentation provided by Replicated under "Delete the Admin Console".
Additional resources
Further documentation can be found here: