Introduction
KNIME Business Hub is a customer-managed Hub instance. Once you have a license for it and proceed with installation you will have access to Hub resources and will be able to customize specific features, as well as give access to these resources to your employees, organize them into Teams and give them the ability to manage specific resources.
This guide provides information on how to administrate a KNIME Business Hub instance.
To install a KNIME Business Hub please refer to the KNIME Business Hub Installation Guide.
A user guide is also available here, which contains instructions on how to perform team administration tasks. Team admins are designated by the global Hub admin, and have control over their team’s allocated resources, can add users to their team, create execution contexts and have an overview of the team’s deployments. In this way the Hub administration tasks are distributed and reallocated to those users that have a better overview of their own team necessities.
Create and manage teams
A team is a group of users on KNIME Hub that work together on shared projects. Specific Hub resources can be owned by a team (e.g. spaces and the contained workflows, files, or components) so that the team members will have access to these resources.
Sign in to the KNIME Business Hub instance with the admin user name by visiting the KNIME Business Hub URL.
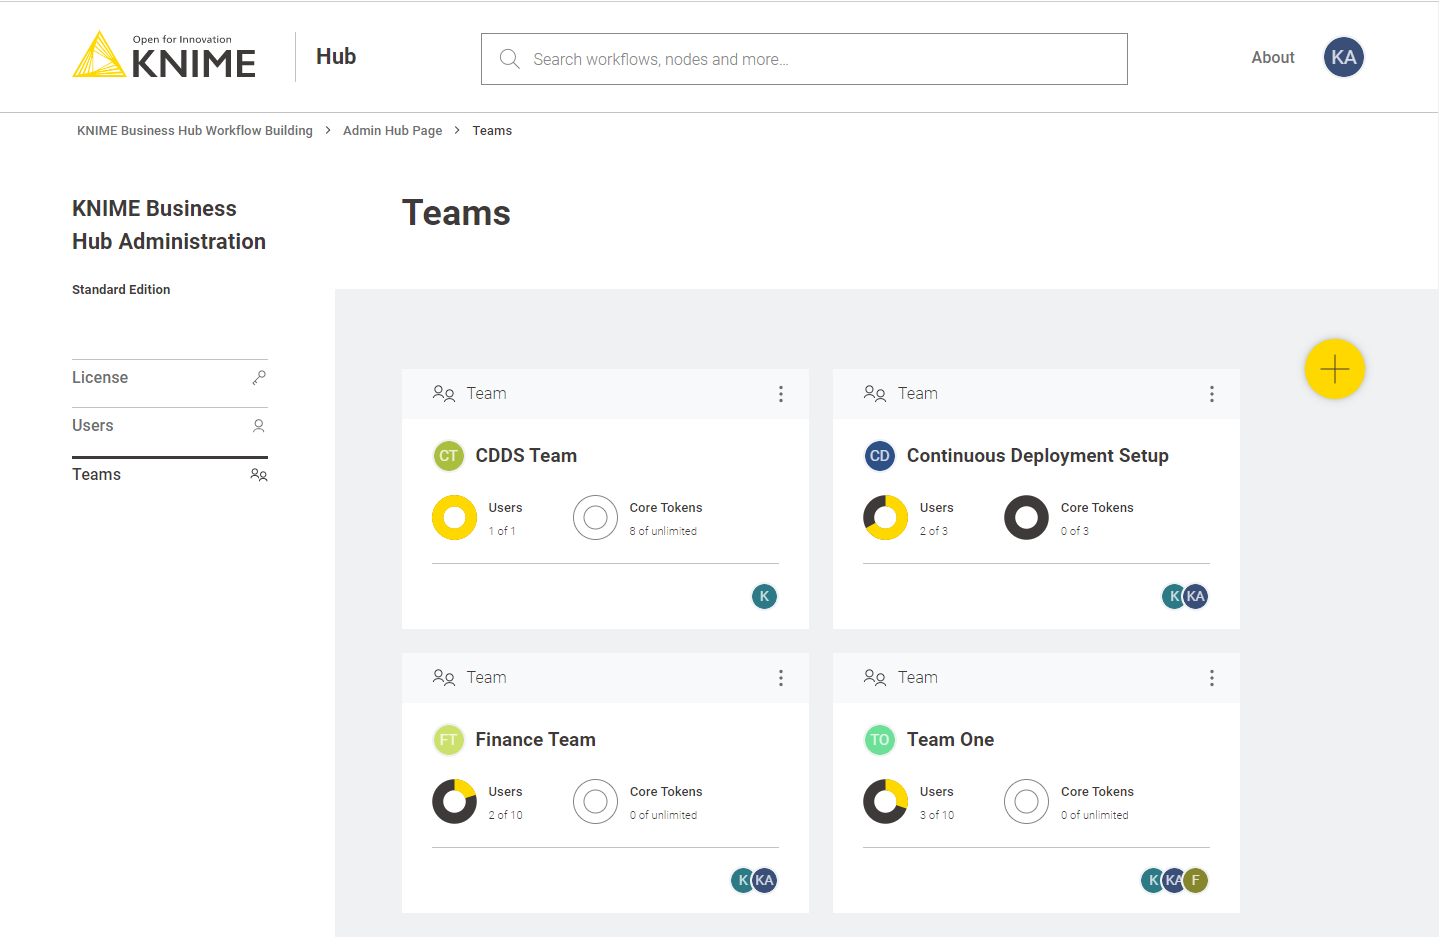
Then click your profile picture on the right upper corner of the page and select Administration to go to the KNIME Business Hub Administration page. Click Teams in the menu on the left. Here you will be able to see an overview of the existing teams and you will be able to manage them.
Create a team
To create a new team click the yellow plus button on the right.
After you create a new team you will be redirected to the new team’s page. Here you can change the name of the team. To do so click the name of the team under the team logo on the left side of the page. The name of the team can also be changed at any point in time by the team administrator.
From the team’s page you can:
-
Add members to the team
-
Change their role to, for example, promote a user to team admininistrator role
Here you might for example want to assign the team to a team administrator. To do so click Manage team and enter the user name of the user you want to assign as a team administrator for the current team. Then click on the role and select Member and Admin. At the same time you might want to delete the global admin user name from the team members list. To do so click the bin icon corresponding to that user. Click Save changes to finalize the setting.
Allocate resources to a team
To allocate resources to a team navigate to the KNIME Business Hub Administrator page and select Teams from the menu on the left.
Here you can see an overview of the teams available, their allocated resourced, and of their current usage. Click the three dots on the right upper corner of the card corresponding to the team you want to allocate resources to.
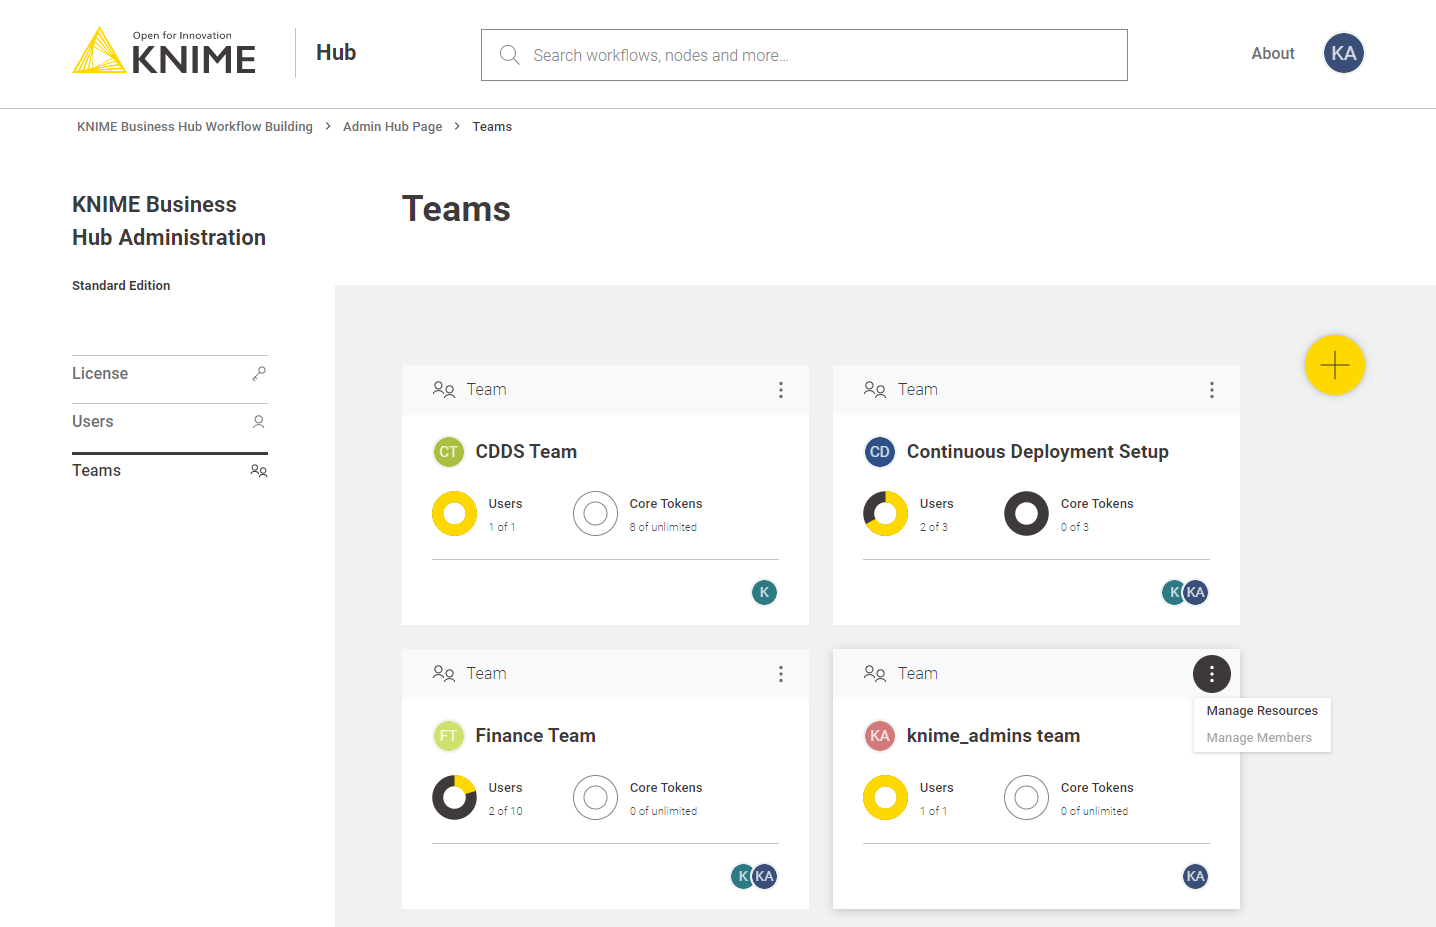
Select Manage resources from the menu. A panel on the right will open where you can select the resources you want to allocate.
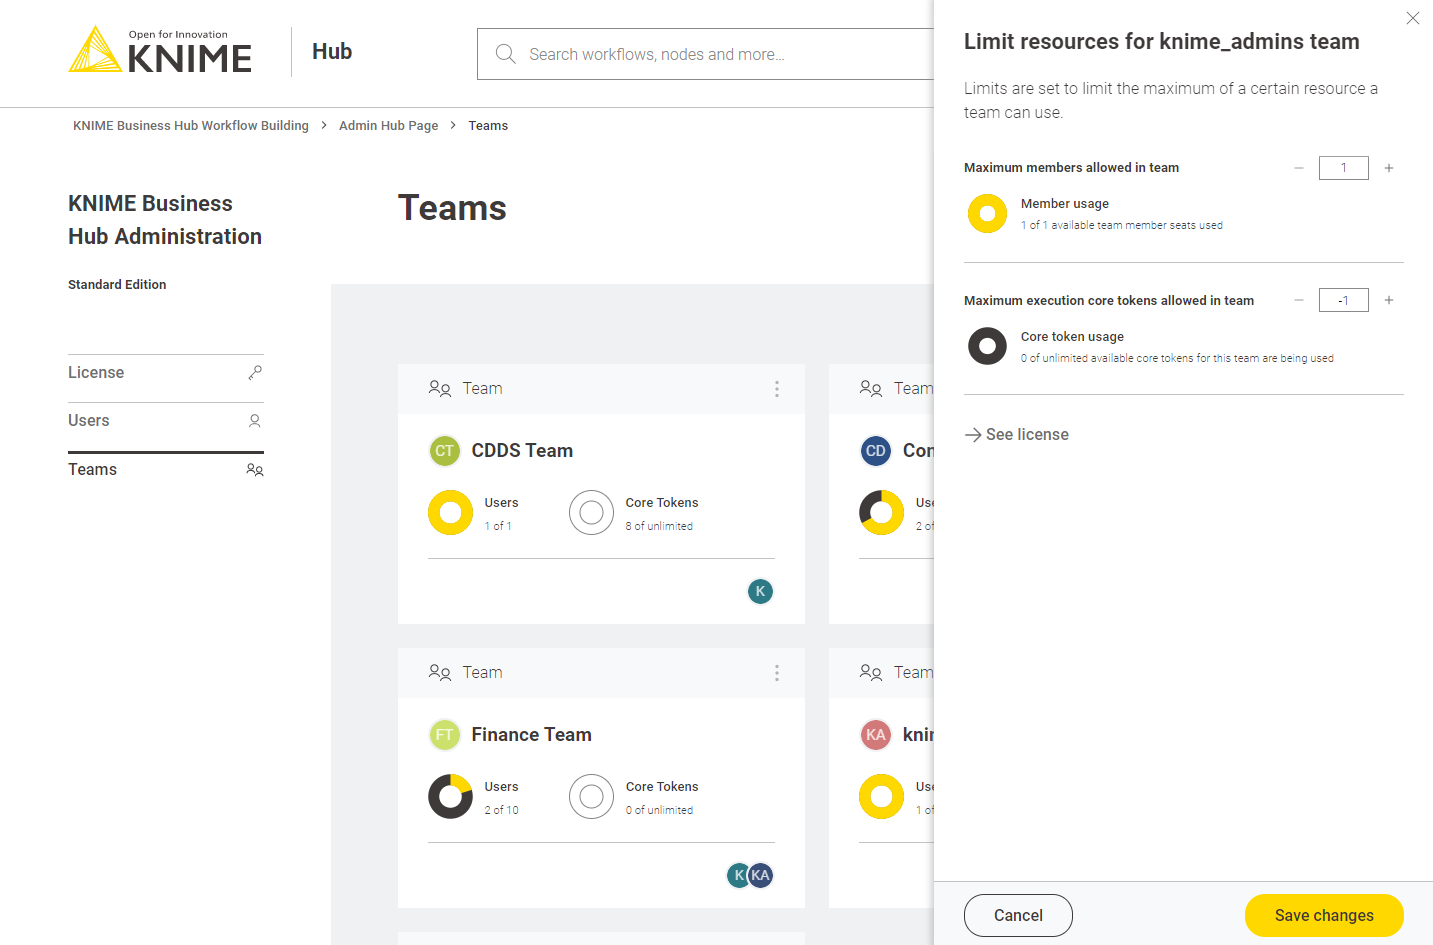
Here you can change:
-
The maximum number of members allowed in that team
-
The maximum number of execution vCore tokens allowed for that team
Click Save changes when you have set up the resources for the current team.
Manage team members
From the KNIME Business Hub Administration page you can also manage the team members.
Click the three dots on the right upper corner of the card corresponding to the team. From the menu that opens select Manage members. In the side panel that opens you can add members to a team, or change the team members role.
Delete a team
From the KNIME Business Hub Administration page you can also delete a team.
Click the three dots on the right upper corner of the card corresponding to the team. From the menu that opens select Delete. Be aware that this operation will delete also all the team resources, data and deployments.
Execution resources
As mentioned in the previous section you as an Hub admin can assign execution resources to each team.
Team admins will then be able to build execution contexts according to the execution resources that you assigned to their team. These execution contexts will then be dedicated specifically to that team.
As an Hub admin you can also create a shared execution context. Once you create one you can share it with multiple teams.
For an overview of all the available execution contexts click your profile icon on the top right corner of the KNIME Hub and select Administration from the drop-down.
You will be then redirected to the KNIME Business Hub administration page.
Here, select Execution resources from the menu on the left.
In this page you can see an overview of All the execution contexts available on the Hub.
From the toggle at the top you can filter to see only a specific type of execution contexts available in the Hub instance.
Select:
-
Shared: Shared execution contexts are created by the Hub admin. They can be made available to multiple teams.
-
Dedicated: Dedicated execution contexts are created by the team admins for their team. Dedicated execution contexts are exclusively used by a single team.
Create a shared execution context
As an Hub admin you can create a shared execution context and make it available to multiple teams.
To do so click the ![]() button.
A side panel opens where you can set up the new shared execution context.
button.
A side panel opens where you can set up the new shared execution context.
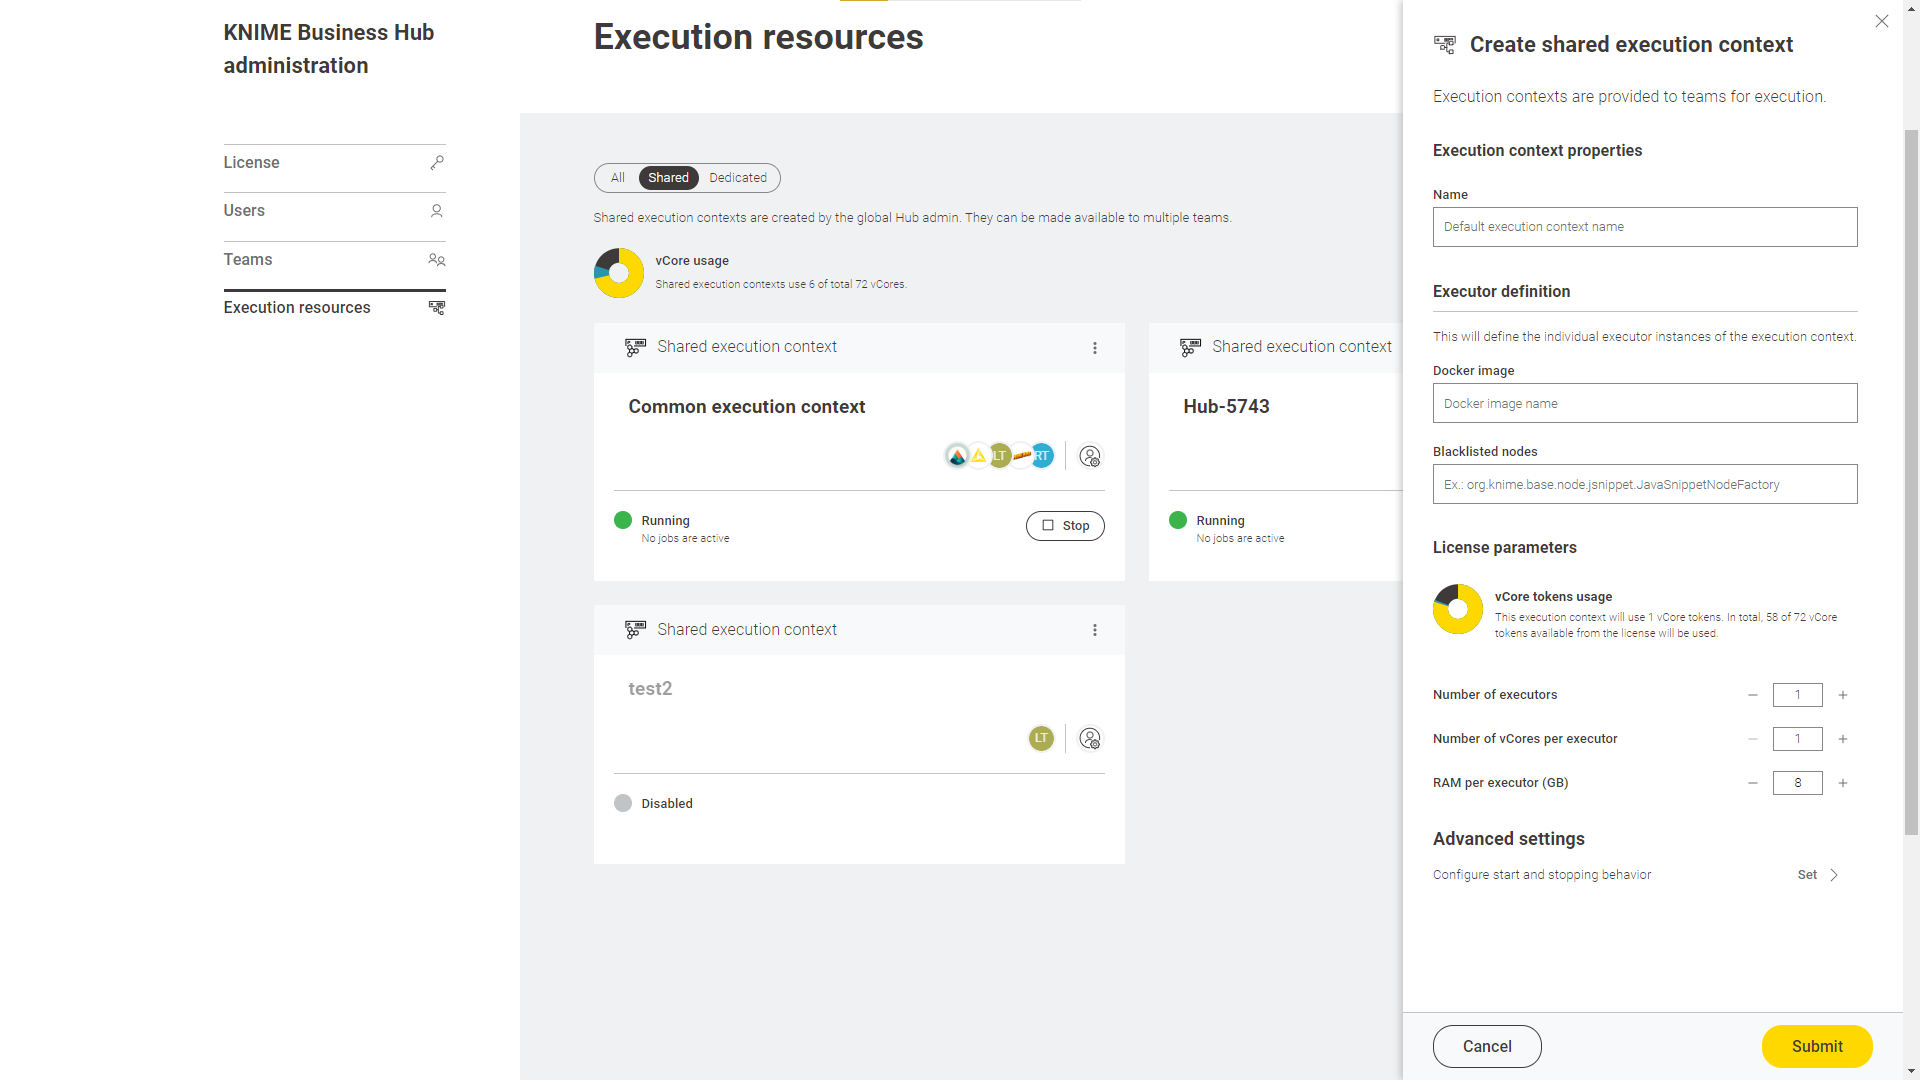
Here you can give the execution context a name, set up which Docker image to use as the executor, give a list of blacklisted nodes, and assign the resources that the execution context will be able to use.
| Find more information about how to set up the execution context in the KNIME Business Hub User Guide. |
Finally, you can configure wether you want the execution context to automatically start and stop. To do so click Set under Configure start and stop behavior and select On (the setting is Off by default) from the toggle on top. Then you can indicate the desired inactivity time (in minutes) for the execution context to stop.
The execution context will start automatically when a queued workflow needs to run and stop automatically when there are no more active or queued workflows.
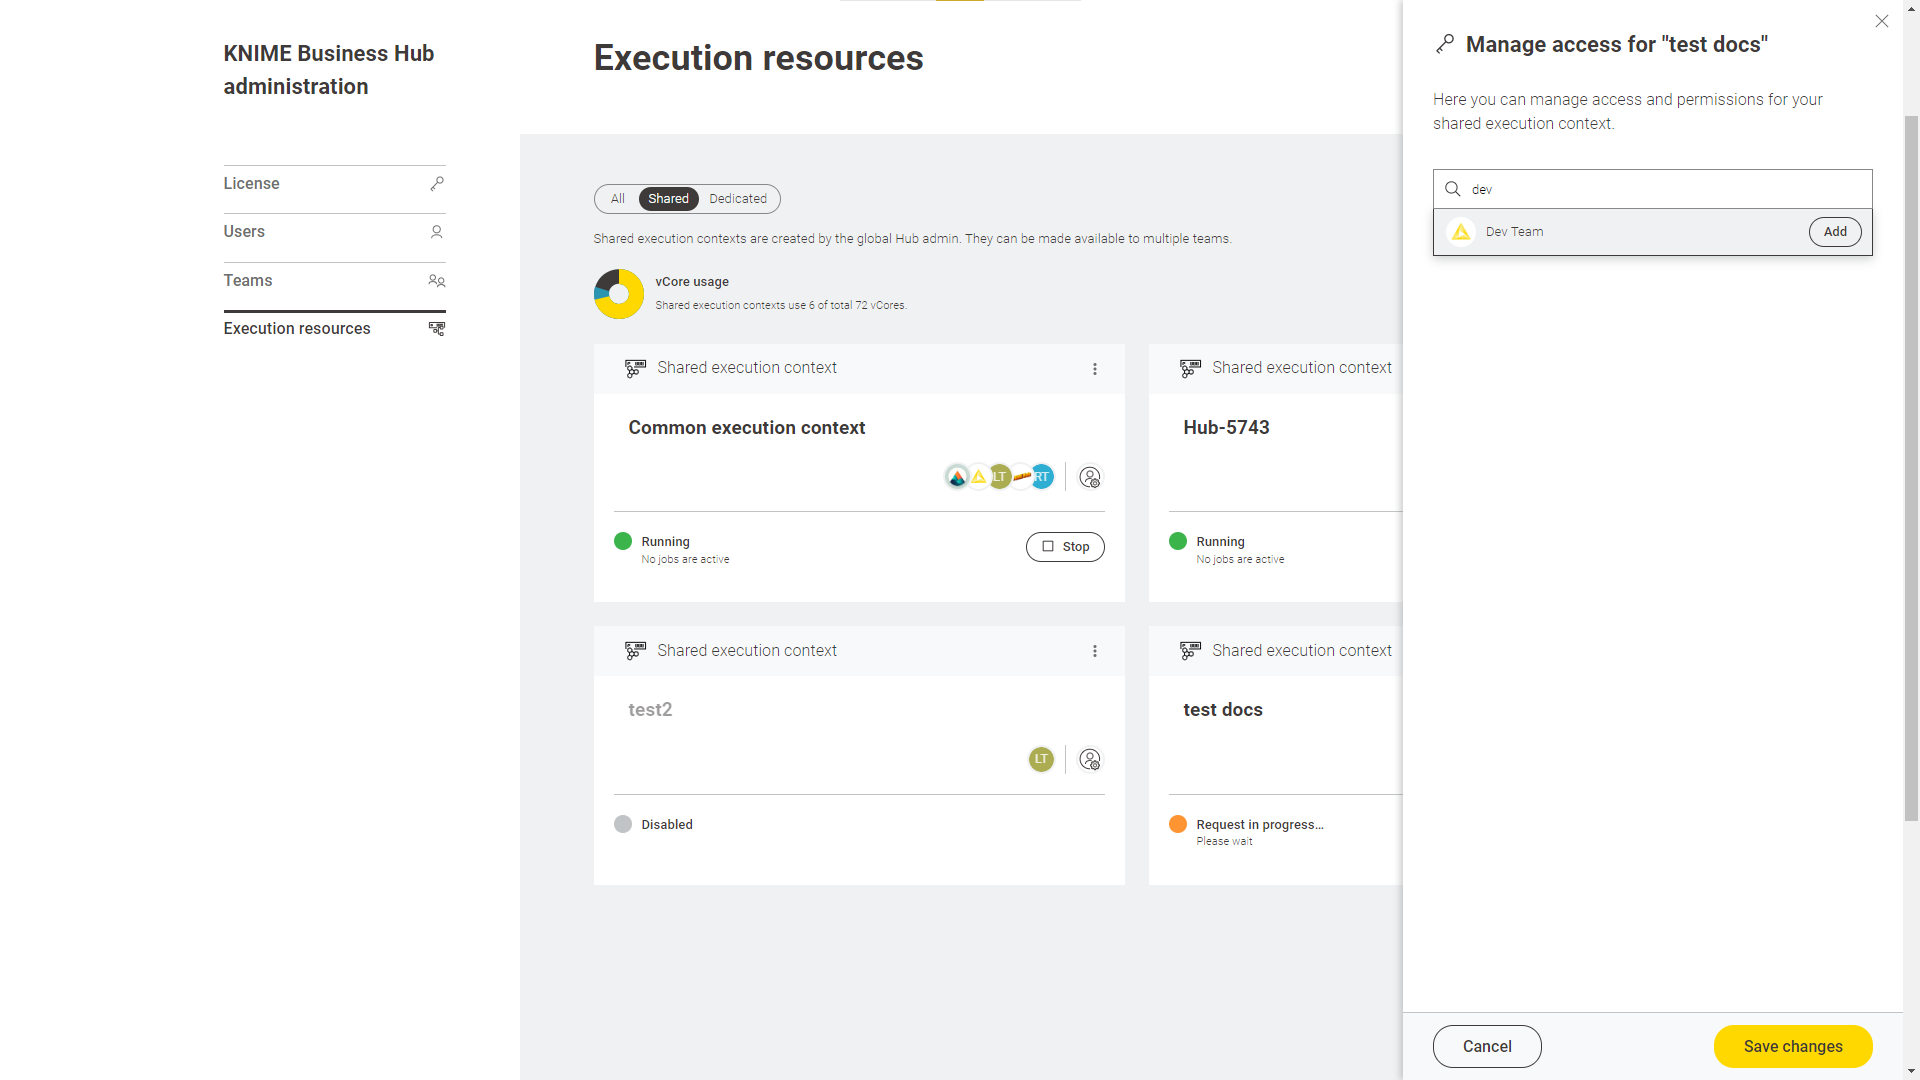
Click Submit to create the execution context. A notification will appear where you can click Manage access to share the execution context with the teams.
At any time you can also manage the access to a shared execution context bx clicking the ![]() icon in the corresponding tile and selecting Manage access from the menu.
icon in the corresponding tile and selecting Manage access from the menu.
Manage shared execution contexts
Also from the Execution resources page you can have an overview about the current status of an execution context, which teams have access to it, how many jobs are running and also manage the execution context performing the following operations:
-
Start and Stop an execution context by clicking the Start/Stop button in the tiles
-
Click the
 icon in the tile and from the menu that opens you can:
-
Edit: You can change the parameters and configurations in the right side panel that opens.
-
Manage access: Manage the access of teams to a shared execution context.
-
Enable/Disable: You will need first to delete the jobs associated to the execution context then proceed with disabling it.
-
Delete: As a Hub administrator you can delete a shared execution context. You will need to first, delete the jobs associated to the execution context then proceed with disabling it. Finally, you can delete the shared execution context.
-
Show details: Selecting this option will open a new page with a list of all the jobs that are running on that execution context, the usage of the execution context (e.g. how many vCores are in use) and other information. You can also switch to the specific Executor tab to see more details about the executor.
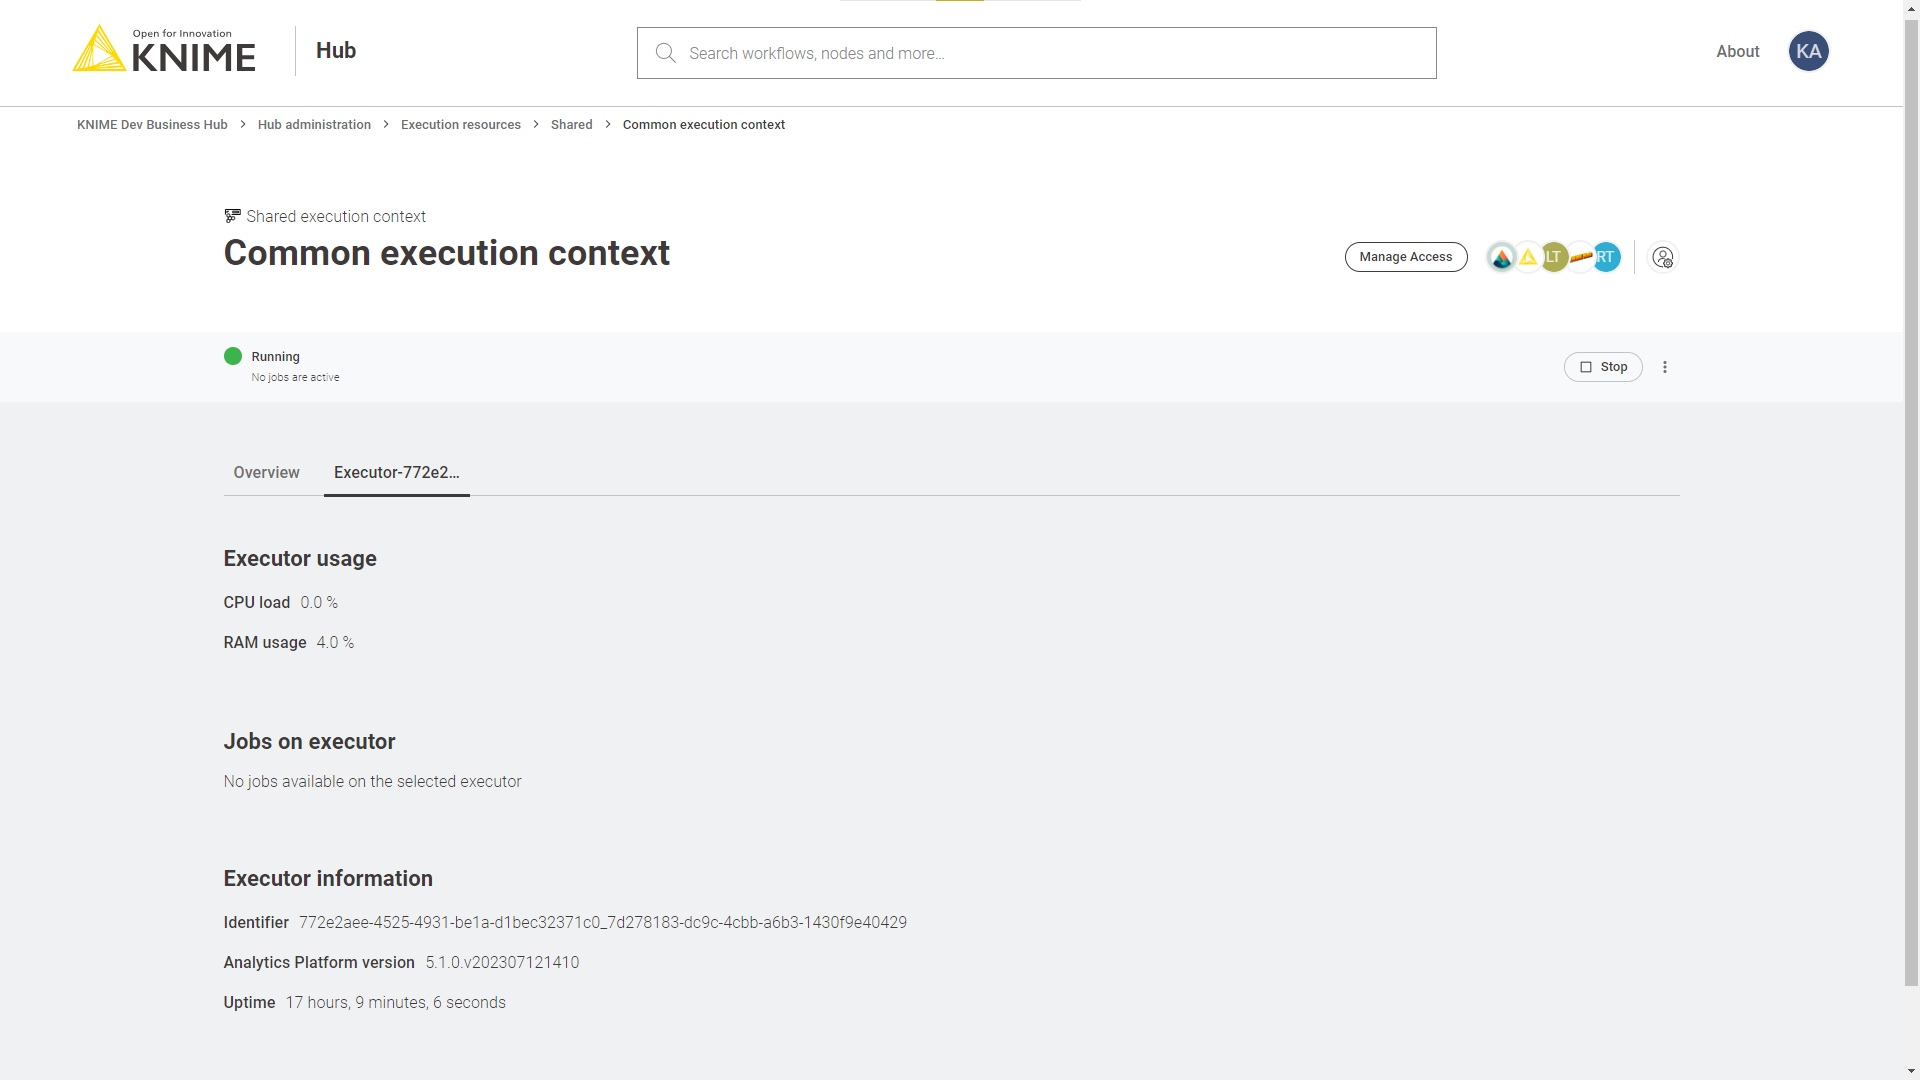 Figure 6. Additional executor information page
-
Advanced configuration of execution contexts
Execution contexts can be created and edited also via the Business Hub API.
Find more information on the available configurations in the Advanced configuration of execution contexts section in KNIME Business Hub User Guide.
Users management
To see a list of all the users that have access to your KNIME Business Hub instance you can go to the KNIME Business Hub Administration page and select Users from the menu on the left.
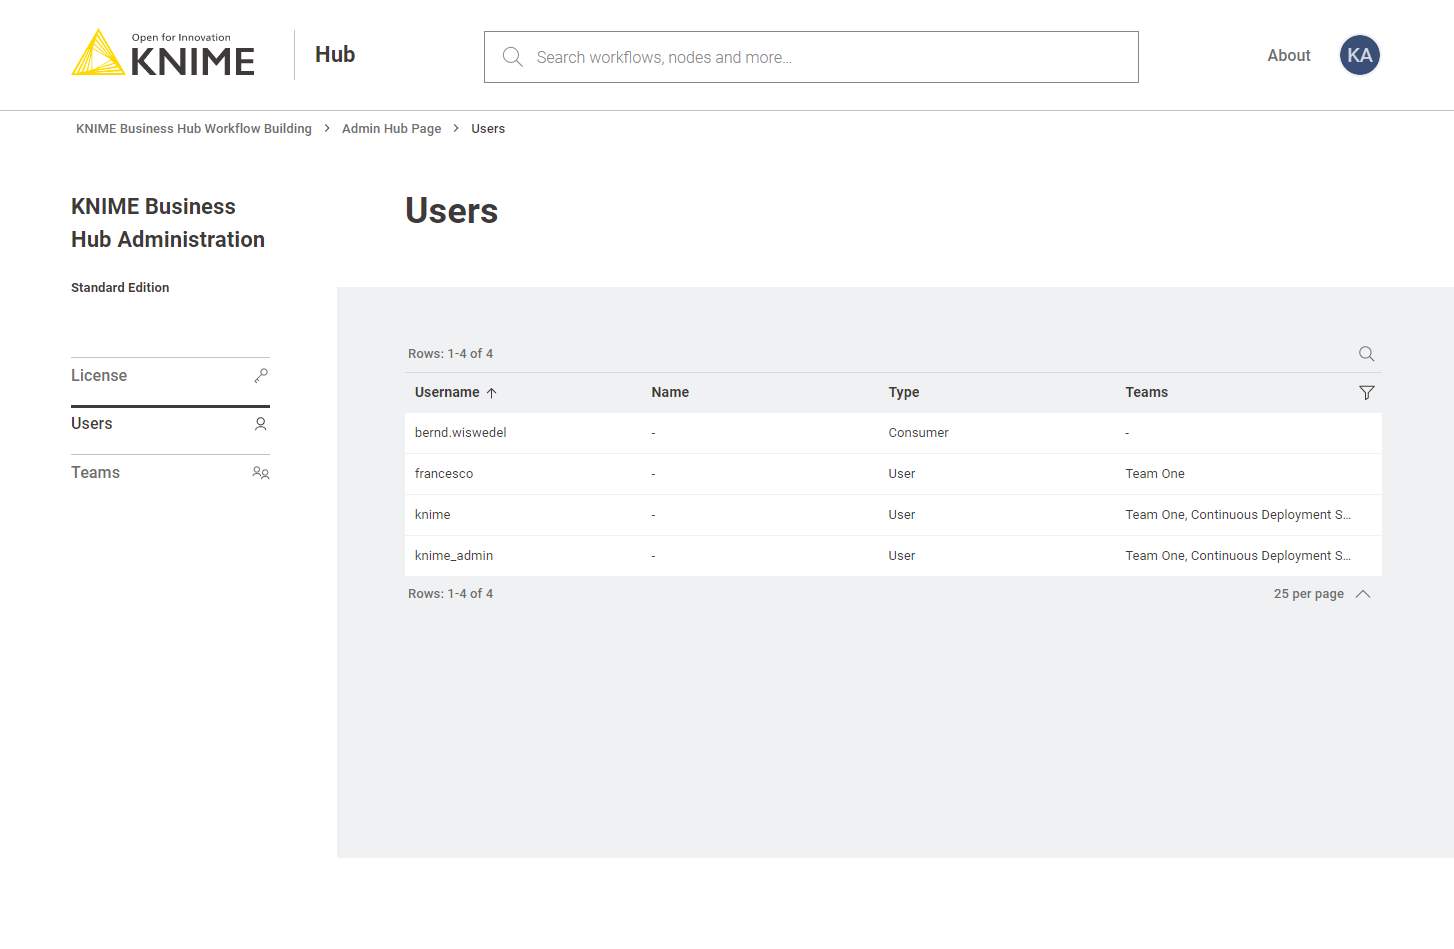
Here you can filter the users based on their team, the type of users and their username and name. To do so click the funnel icon in the users list. You can also search the users by using the magnifier icon and typing the keyword in the field that appears.
Delete a user
You can delete a user from the KNIME Business Hub Administration page. Click the three dots and select Delete. You will need to confirm the user deletion in the window that opens by clicking Delete user. Be aware that this action will also delete all data from the deleted user and it will not be possible to restore the user.
Note that this user will continue to exist in Keycloak itself and you may want to delete it from there as well.
Make a user Global Hub Admin
Users are managed in the backend via the Keycloak instance embedded in KNIME Business Hub. Therefore, the operation of promoting a registered user to the role of Global Hub Admin is done in Keycloak.
To do so follow these steps:
-
First you will need to access the keycloak admin console. To do so you will need the credentials that are stored in a kubernetes secret called
credential-knime-keycloakin theknimenamespace. To get the required credentials, you need to access the instance the Business Hub is running on and run the following command:kubectl -n knime get secret credential-knime-keycloak -o yaml
This will return a file that contains the
ADMIN_PASSWORDand theADMIN_USERNAME. Please notice that they are bothbase64encrypted. In order to get the decrypted username and password, you can run the following commands:echo <ADMIN_PASSWORD> | base64 -d echo <ADMIN_USERNAME> | base64 -d
-
Then go to
http://auth.<base-url>/auth/and login. -
In the top left corner click the dropdown and select the "Knime" realm, if you are not there already.
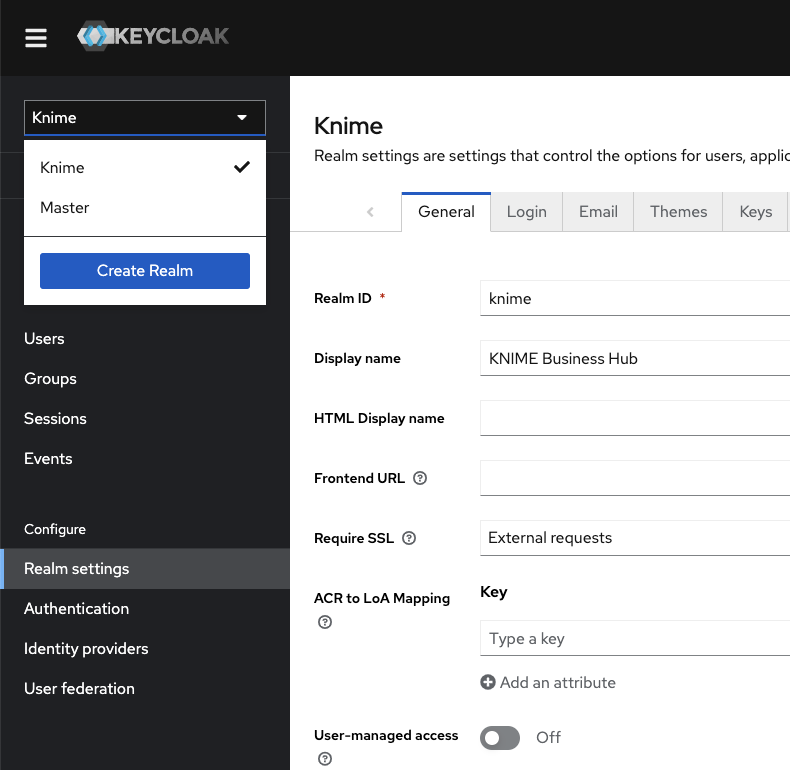 Figure 8. Select the "Knime" realm
 -
Navigate to the Users menu and search for the user by name or email:
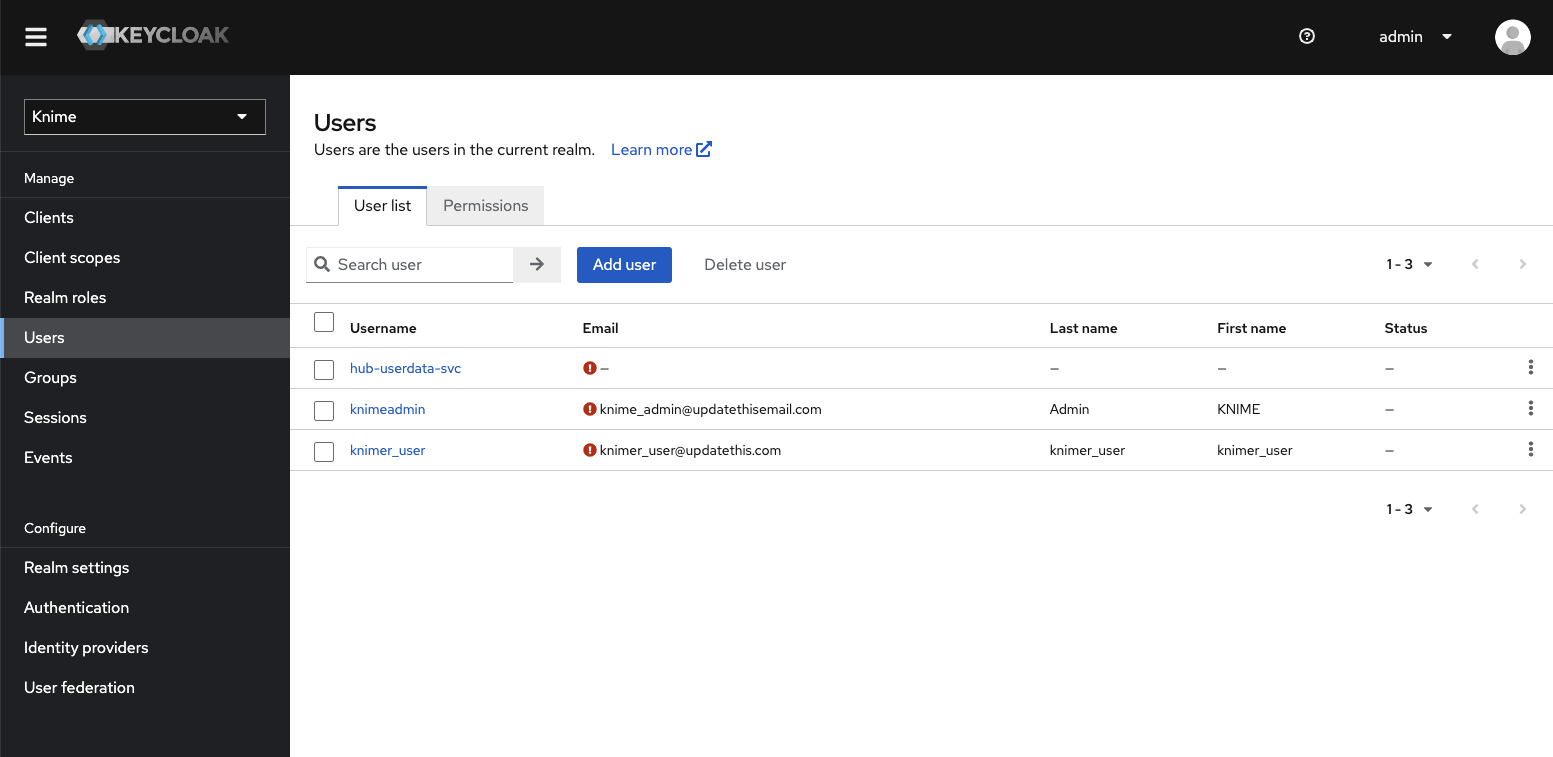 Figure 9. The Keycloak users menu
In order for a user to appear in this list, it is necessary that they have logged into your KNIME Business Hub installation at least once.
-
Click the user and go to the Groups tab. Click Join Group and either expand the hub group by clicking it, or search for "admin". Select the admin group and click Join:
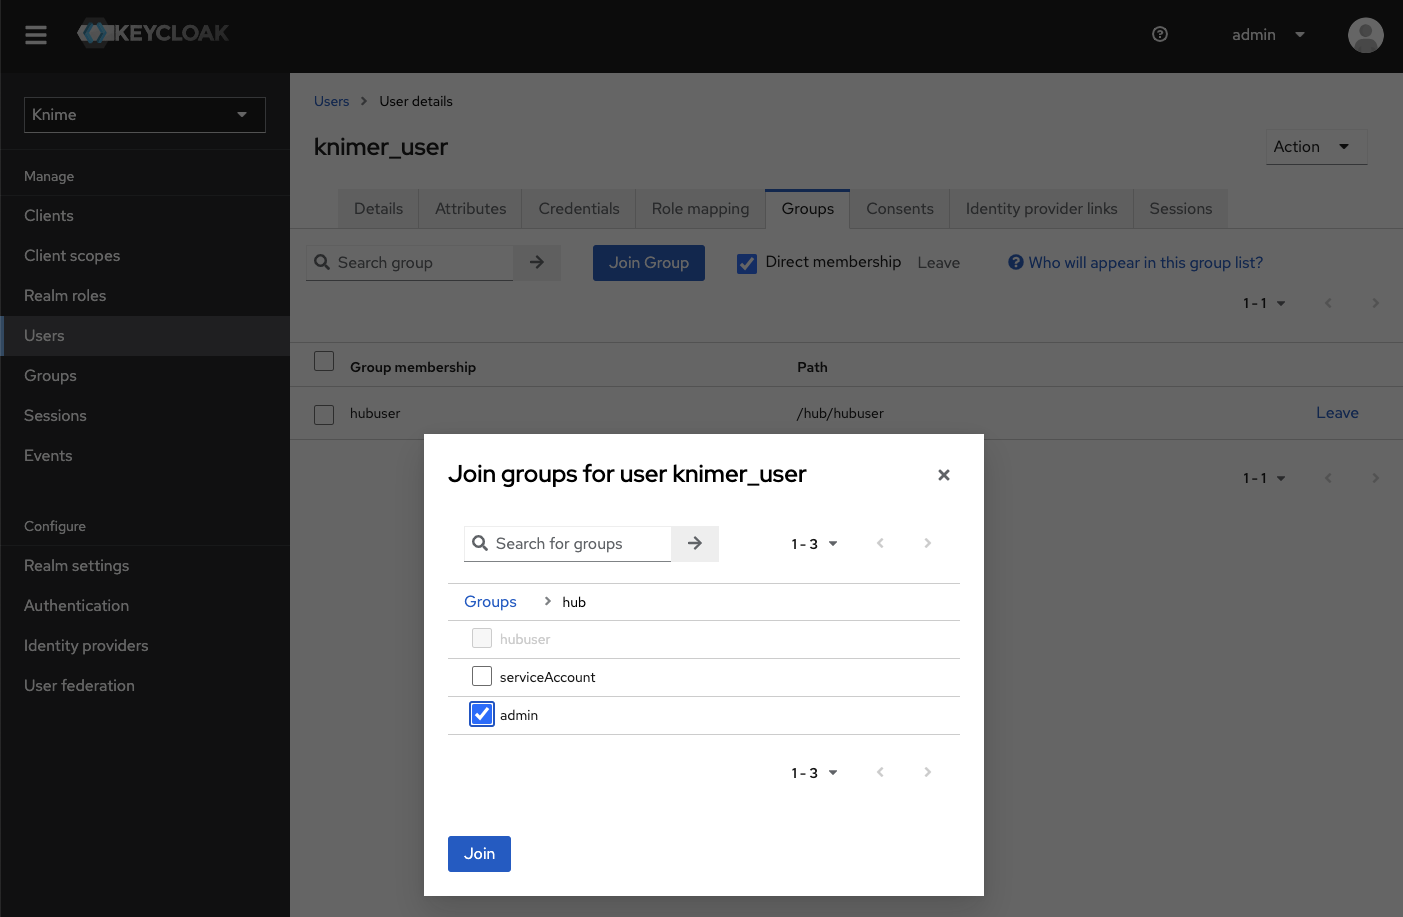 Figure 10. Making a user a Global Hub Admin in Keycloak. If you are searching for the group then the group might show up under its full path "/hub/admin"
 -
Done. The user now has the role of Global Hub Admin, and can access the admin pages from within the Hub application to e.g., create teams or delete users.
|
Please notice that right now there are some operations that can be performed only by the global admin user that was created contextually to the KNIME Business Hub instance installation. Therefore, it is recommended to not delete the corresponding global admin user even when more users have been promoted to global admin users. |
Expose external groups inside KNIME Business Hub
As a Global KNIME Hub administrator you can configure groups that are provided via an external identity provider to be exposed inside the KNIME Business Hub instance.
Two possible sources for your external groups are:
-
Groups are provided within the access token of your OIDC provider.
-
Groups are imported from LDAP by federating the login.
External OIDC provider
Assume you have an identity provider that provides groups through a groups claim in the access token.
{
    ...,
    "groups": [
	    "finance",
	    "marketing",
	    "data"
    ]
}
First you need to configure Keycloak in such a way that it can map these groups to a user attribute. The second step is to add a mapper that maps these user attributes into the Keycloak’s tokens.
Your third-party identity provider should have been set up already. Keycloak has to be configured as follows:
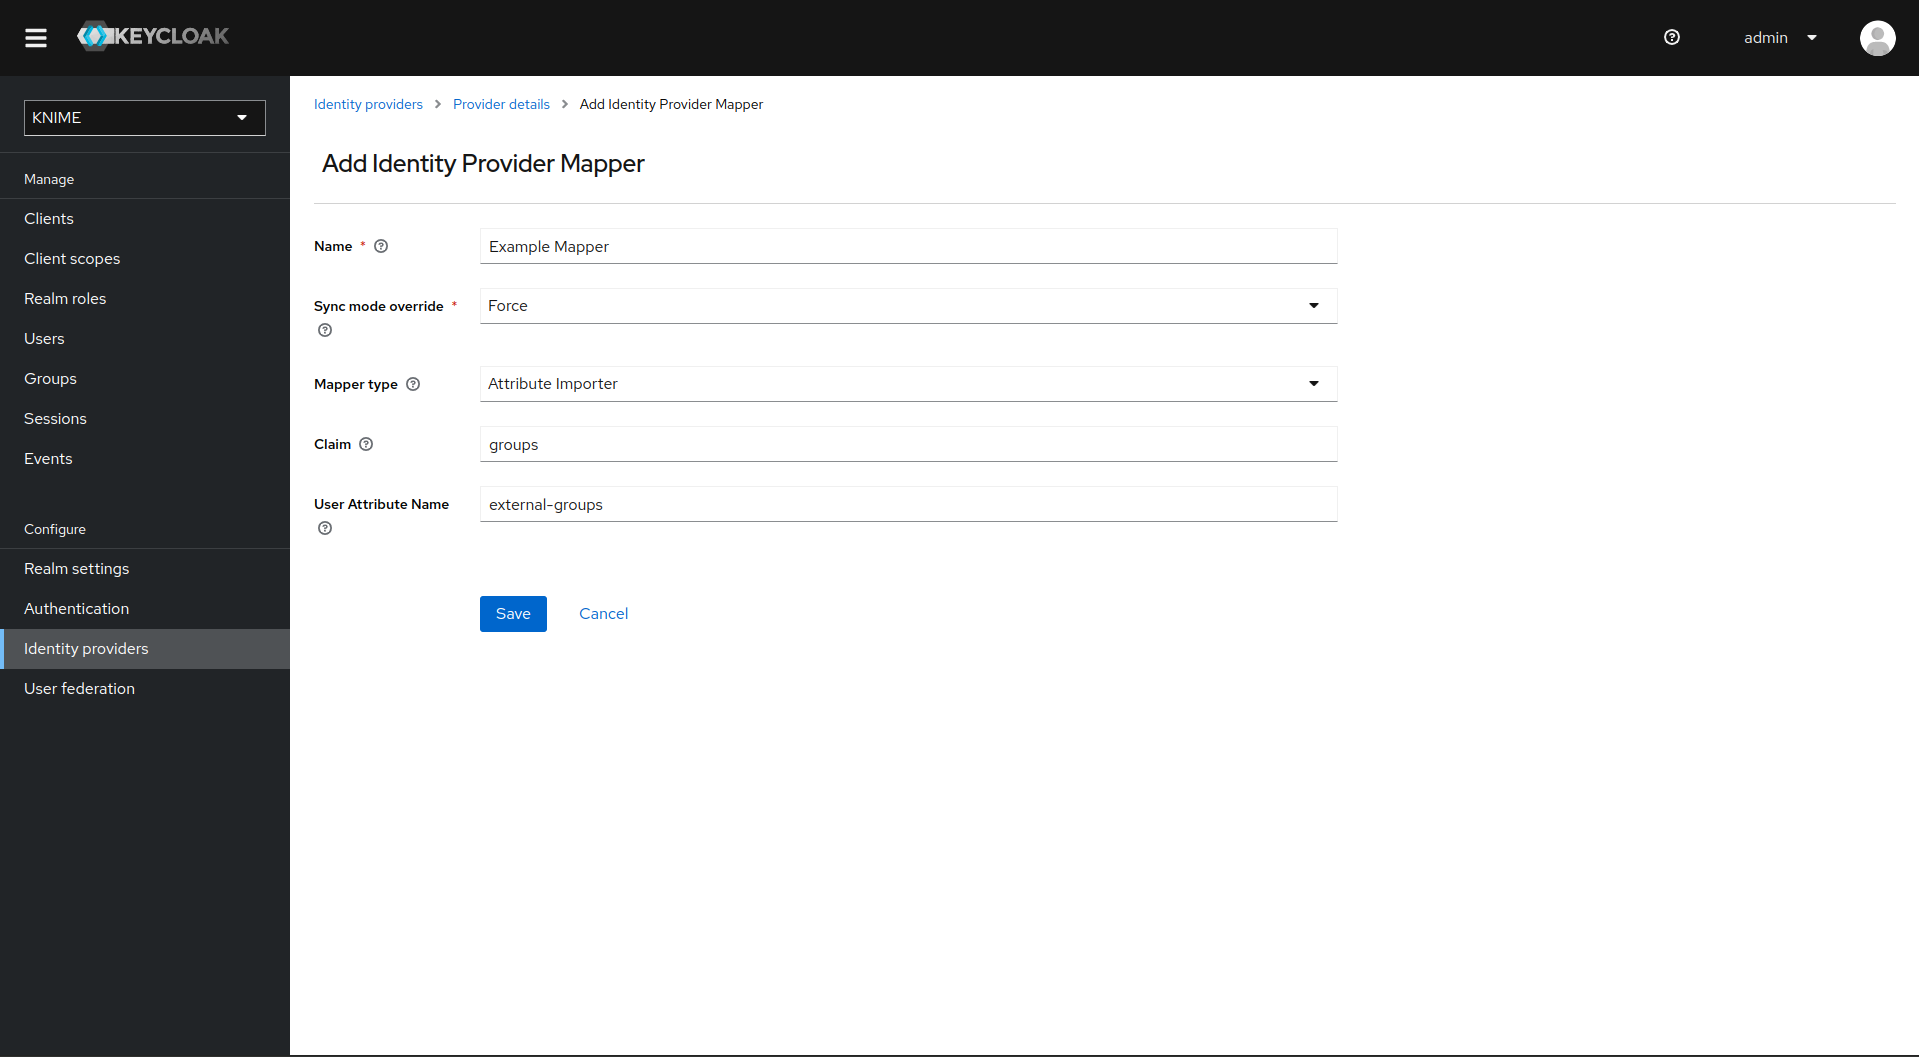
First step is to add an Attribute Importer Mapper.
-
In Keycloak select realm Knime in the top left dropdown menu
-
On the left tab select Identity Providers
-
Select your third-party provider
-
Switch to the tab Mappers and click on Add mapper
-
Provide a name for the mapper and set the Sync mode override to Force to ensure that the user’s group memberships are updated upon every login
-
Set Mapper type to Attribute importer
-
Enter the Claim that contains the external groups in the original token (in our example groups)
-
In the User Attribute Name field enter external-groups
-
Click on Save
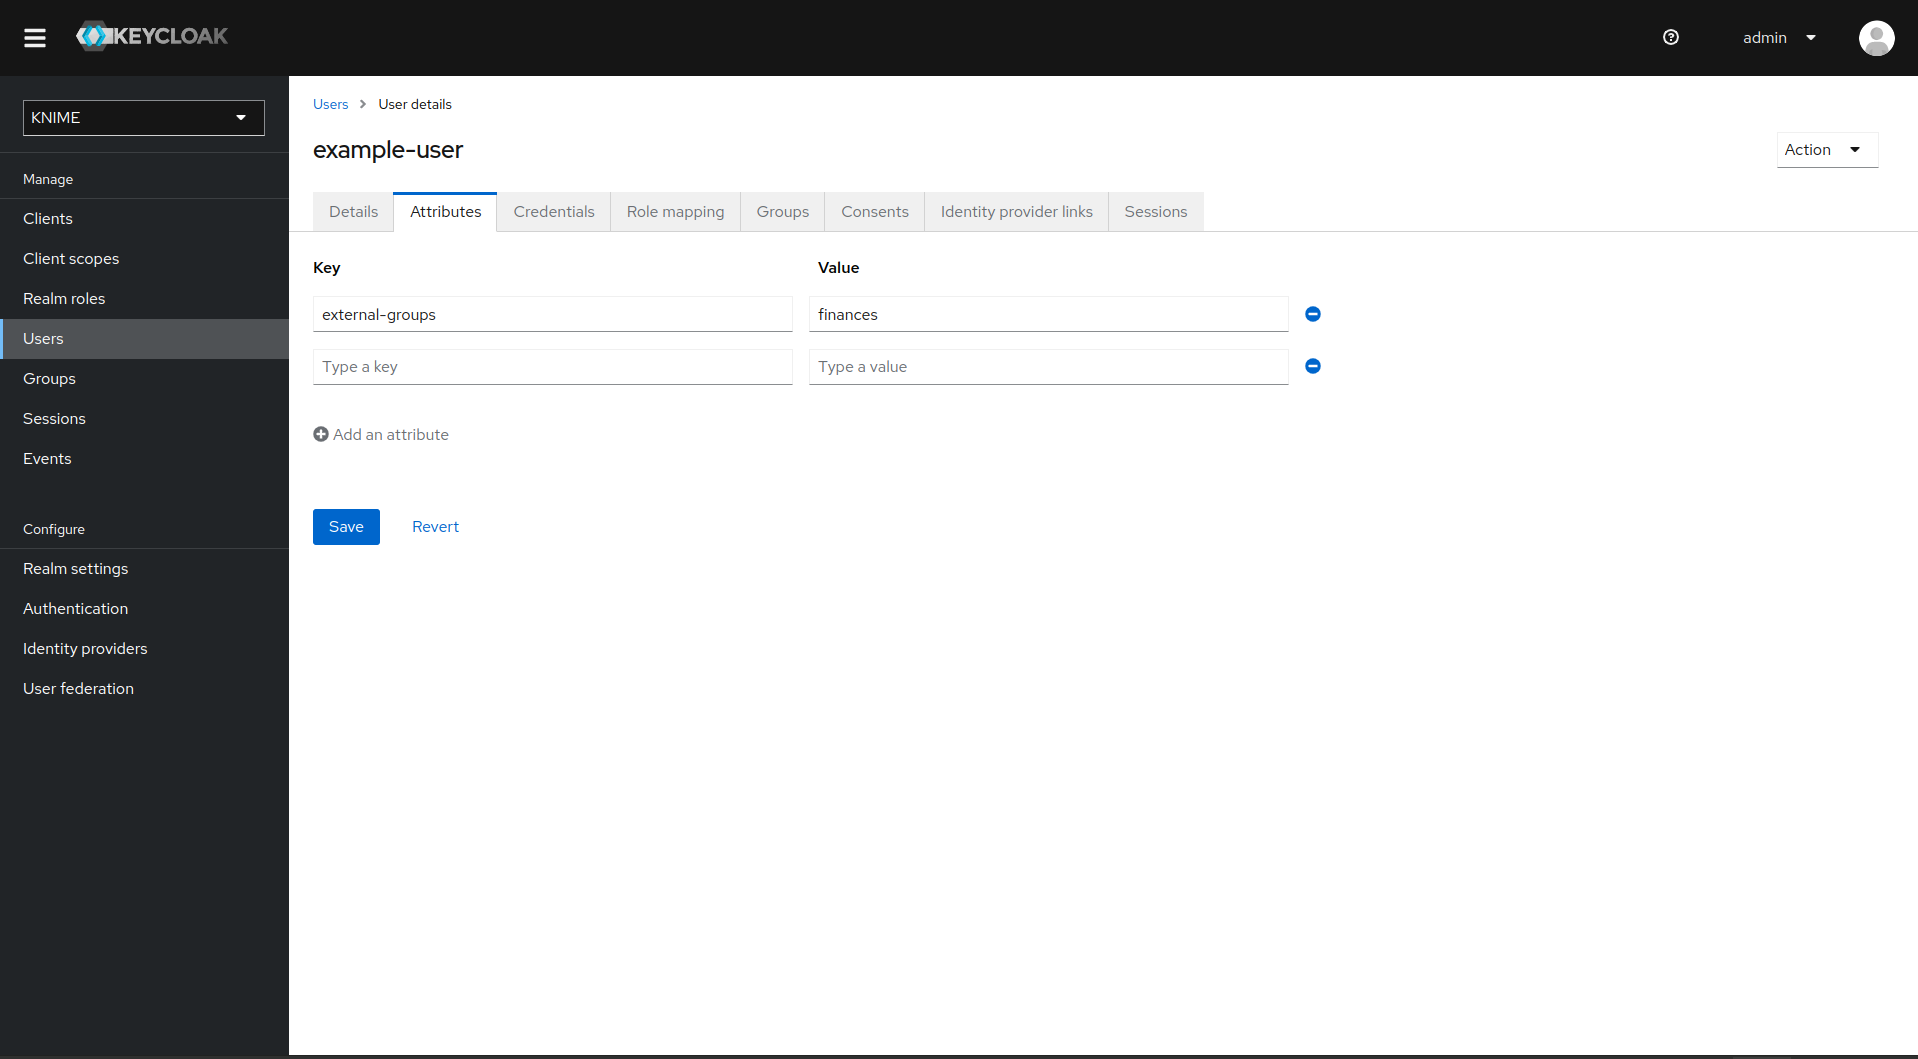
Now, every user in Keycloak who logged in after the mapper has been added will have an external-groups attribute associated like in the following picture:
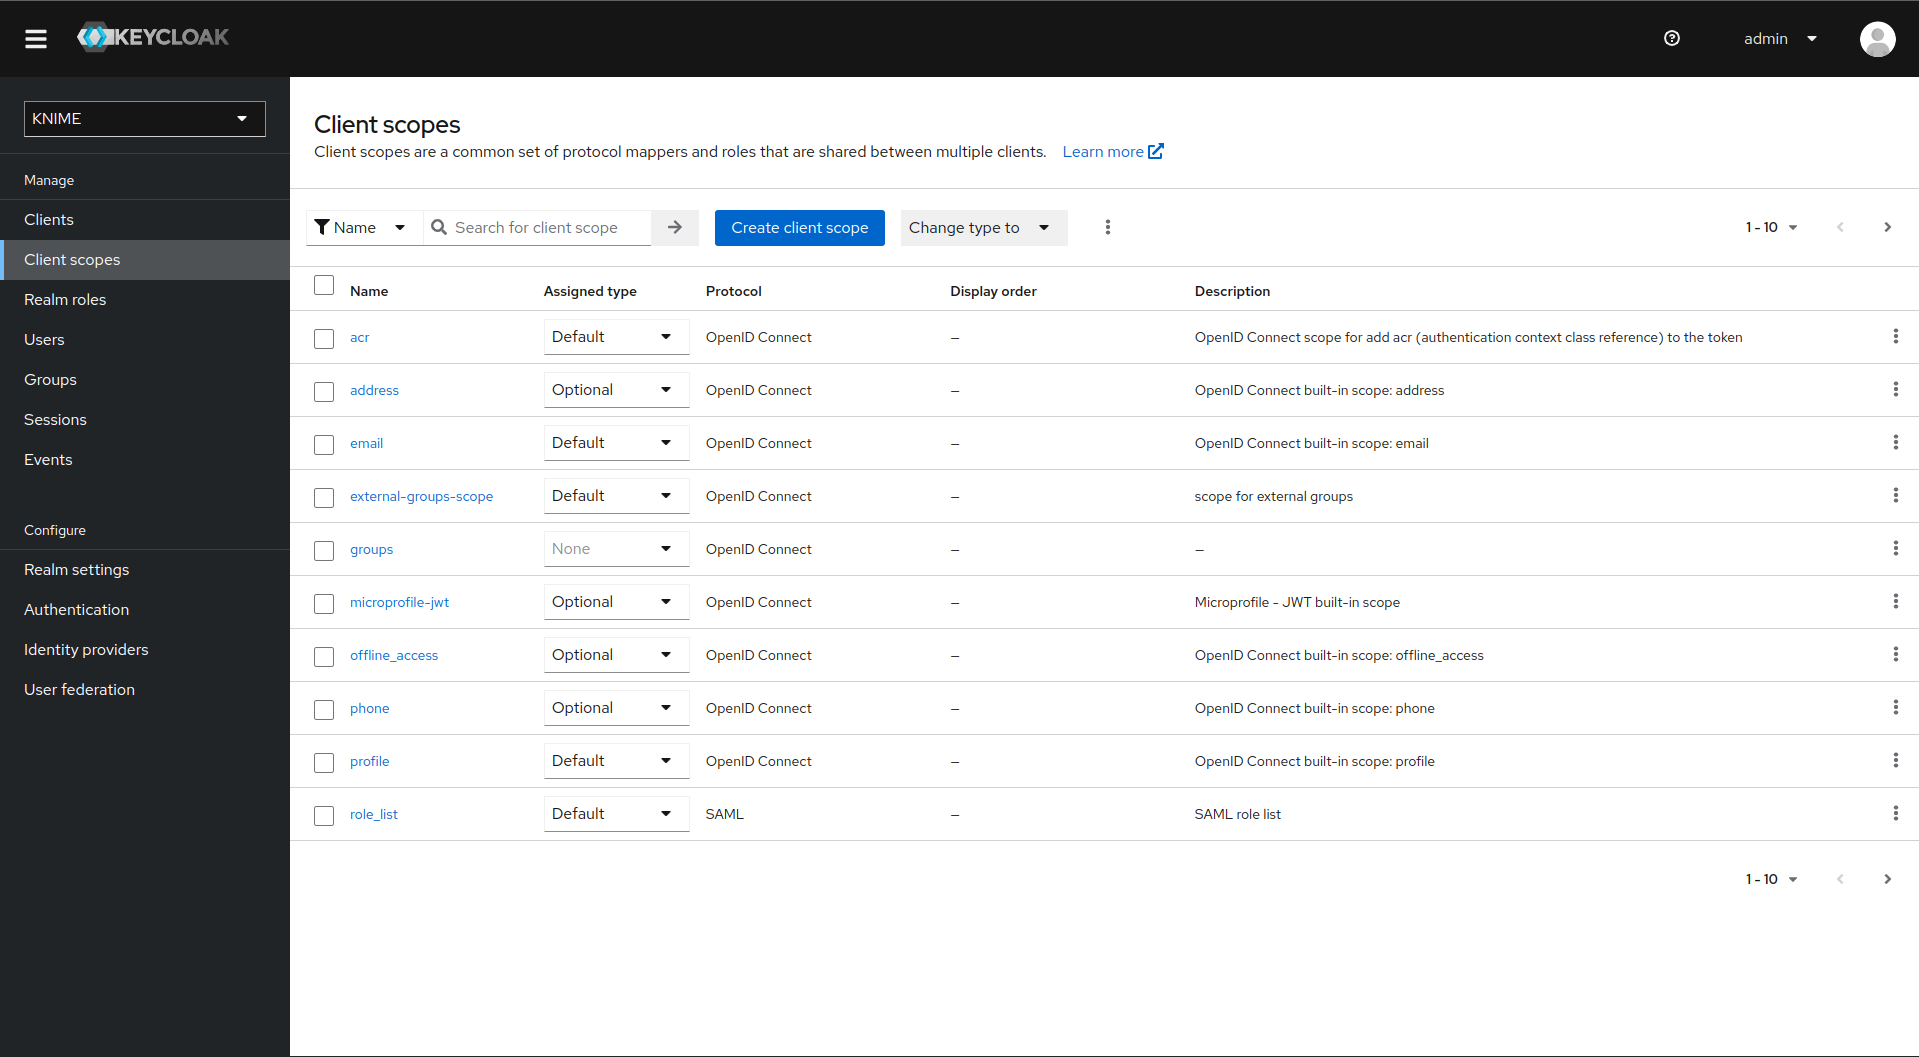
Now, the external groups are known to Keycloak. To expose them inside KNIME Business Hub they need to be mapped into the access tokens issued by Keycloak. For this a second mapper needs to be added, that maps the user attribute external-groups to a claim in the user’s access token.
To do this you need to add a client scope, which includes a mapper for the user attribute.
-
On the left tab select Client scopes
-
Select groups
-
Switch to the tab Mappers
-
Click on Add mapper > By configuration and select User Attribute from the list
-
Provide a name, e.g. external-groups-attribute-mapper
-
Set both fields User Attribute and Token Claim Name to external-groups
-
Ensure that Add to ID token, Add to access token, Add to userinfo, and Multivalued are turned on and that Aggregate attribute values is turned off
-
Click on Save


With both mappers in place, the external groups are part of the access tokens issued by Keycloak. By this, the external groups are exposed inside KNIME Business Hub. In order to enable external groups to be used for permissions and access management they need to be configured separately through the admin REST API as described in Enable external groups.
LDAP federation
If you have user federation configured for an LDAP instance that also supplies external group names you need to configure mappers that map these groups into the access tokens used inside the Hub instance.
To ensure that groups from Keycloak groups and groups from LDAP are not mixed we recommend to treat external groups as realm roles.
In order to do this we recommend to first create a dummy client for which roles can be created based on the LDAP groups. This will guarantee that any changes will be compatible with future changes to the KNIME Hub client in Keycloak.
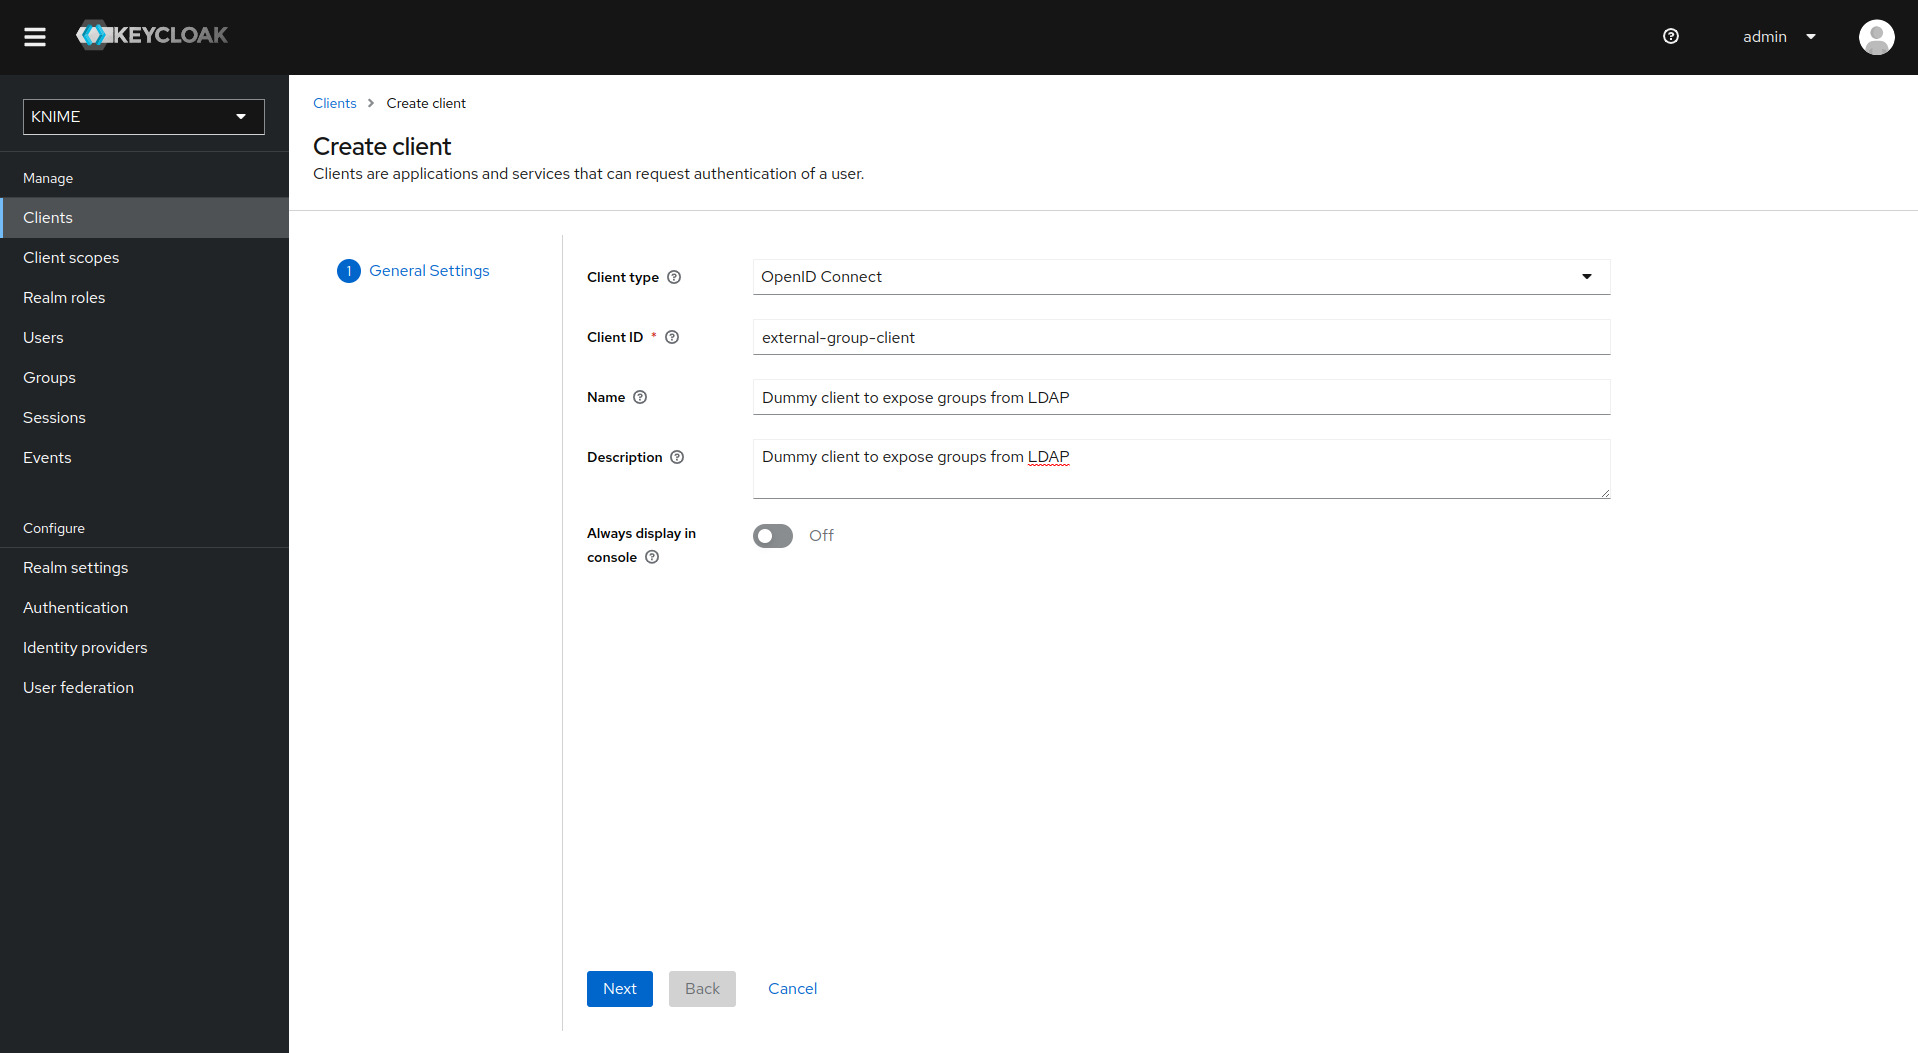
To create a new client follow these steps:
-
In Keycloak select realm Knime in the top left dropdown menu
-
On the left tab select Clients and click Create client
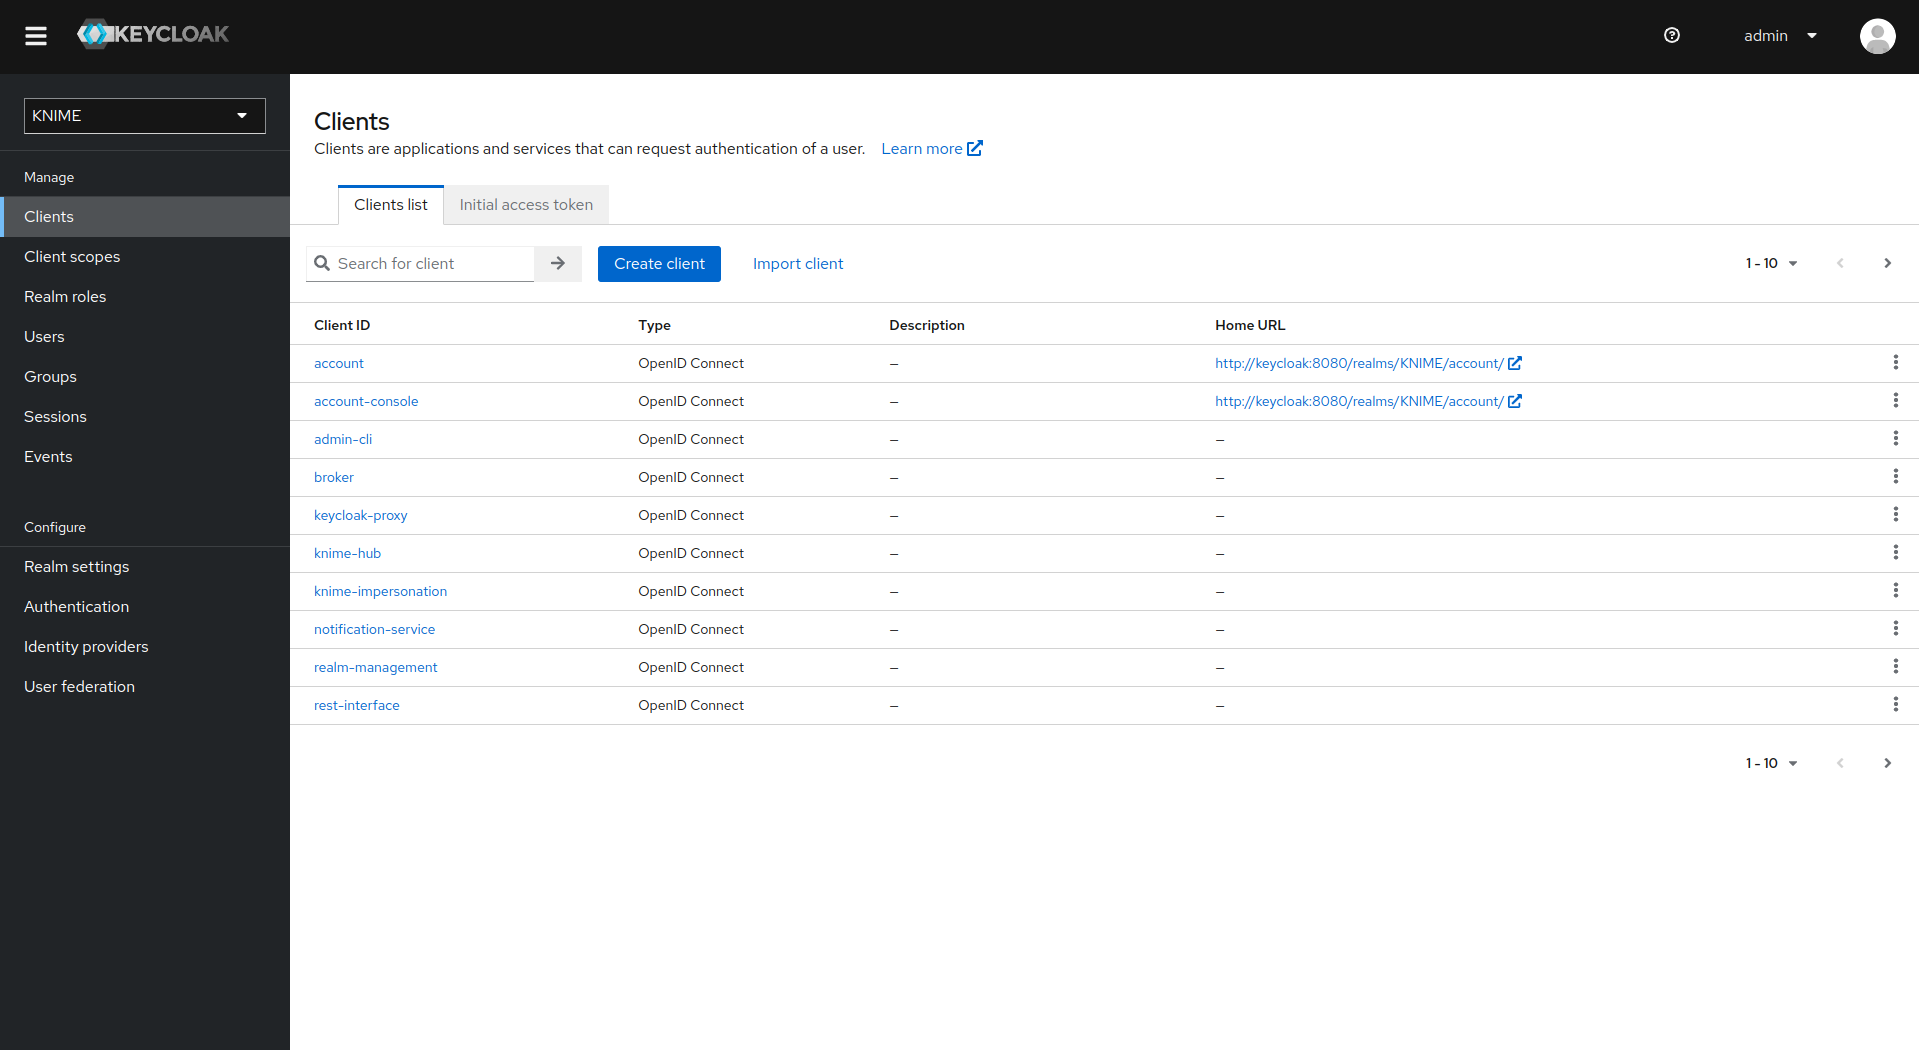
-
Set Client type to OpenID Connect
-
Enter a Client ID (in our example external-group-client), and a useful Name and Description
-
Click on Next
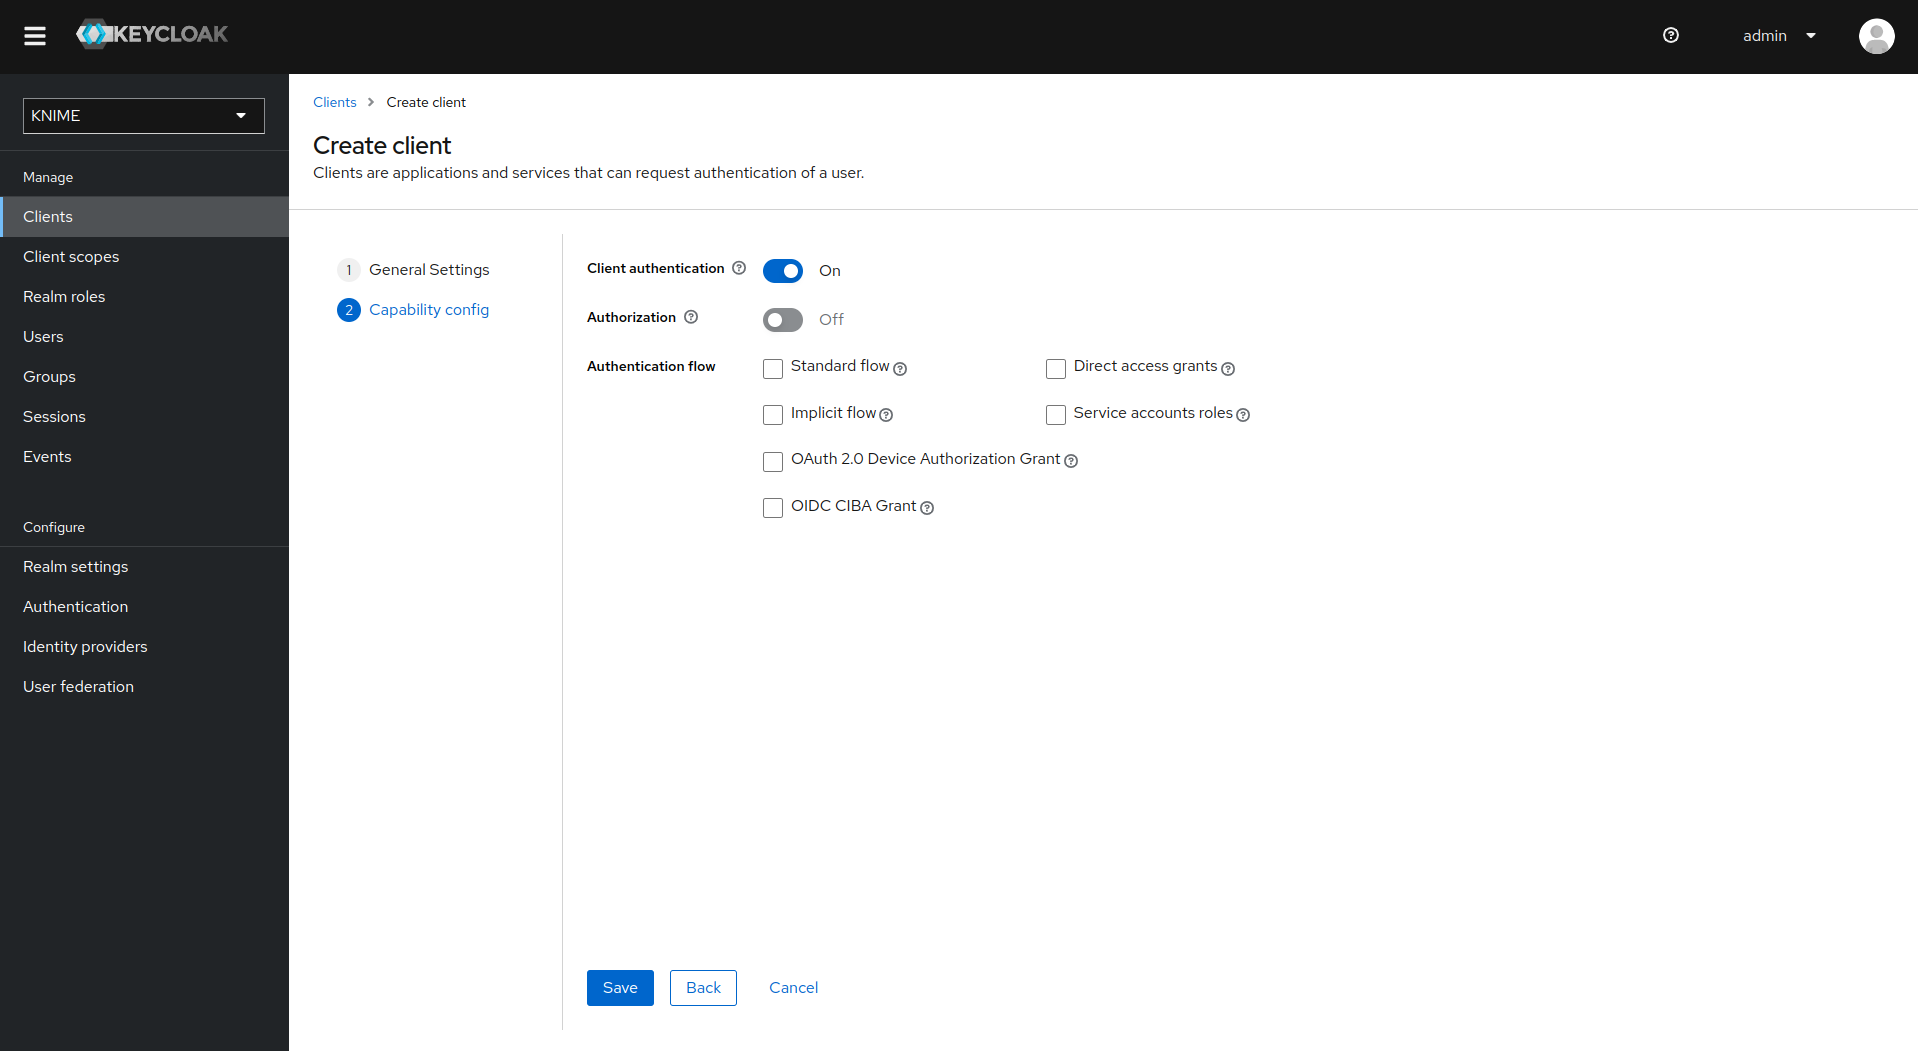
-
De-select all checkboxes of Authentication flow in the Capability config section, since this client will not require any capabilities
-
Enable Client authentication
-
Click on Save
Now that the dummy client is set up, you can proceed to create a mapper that maps the user groups from LDAP to roles inside the dummy client:
-
On the left tab select User federation and click on your LDAP configuration
-
Switch to the tab Mappers
-
Click on Add mapper
-
Provide a name, e.g. ldap-group-to-dummy-client-role-mapper
-
Set Mapper type to role-ldap-mapper
-
Setup the mapper according to your LDAP
-
Disable User Realm Roles Mapping
-
Set Client ID to the previously created dummy client (in our example external-group_client)
-
Click on Save
Now if a user logs in with the LDAP credentials the user’s groups will be mapped to ad-hoc created client roles inside the 'external-group-client'.
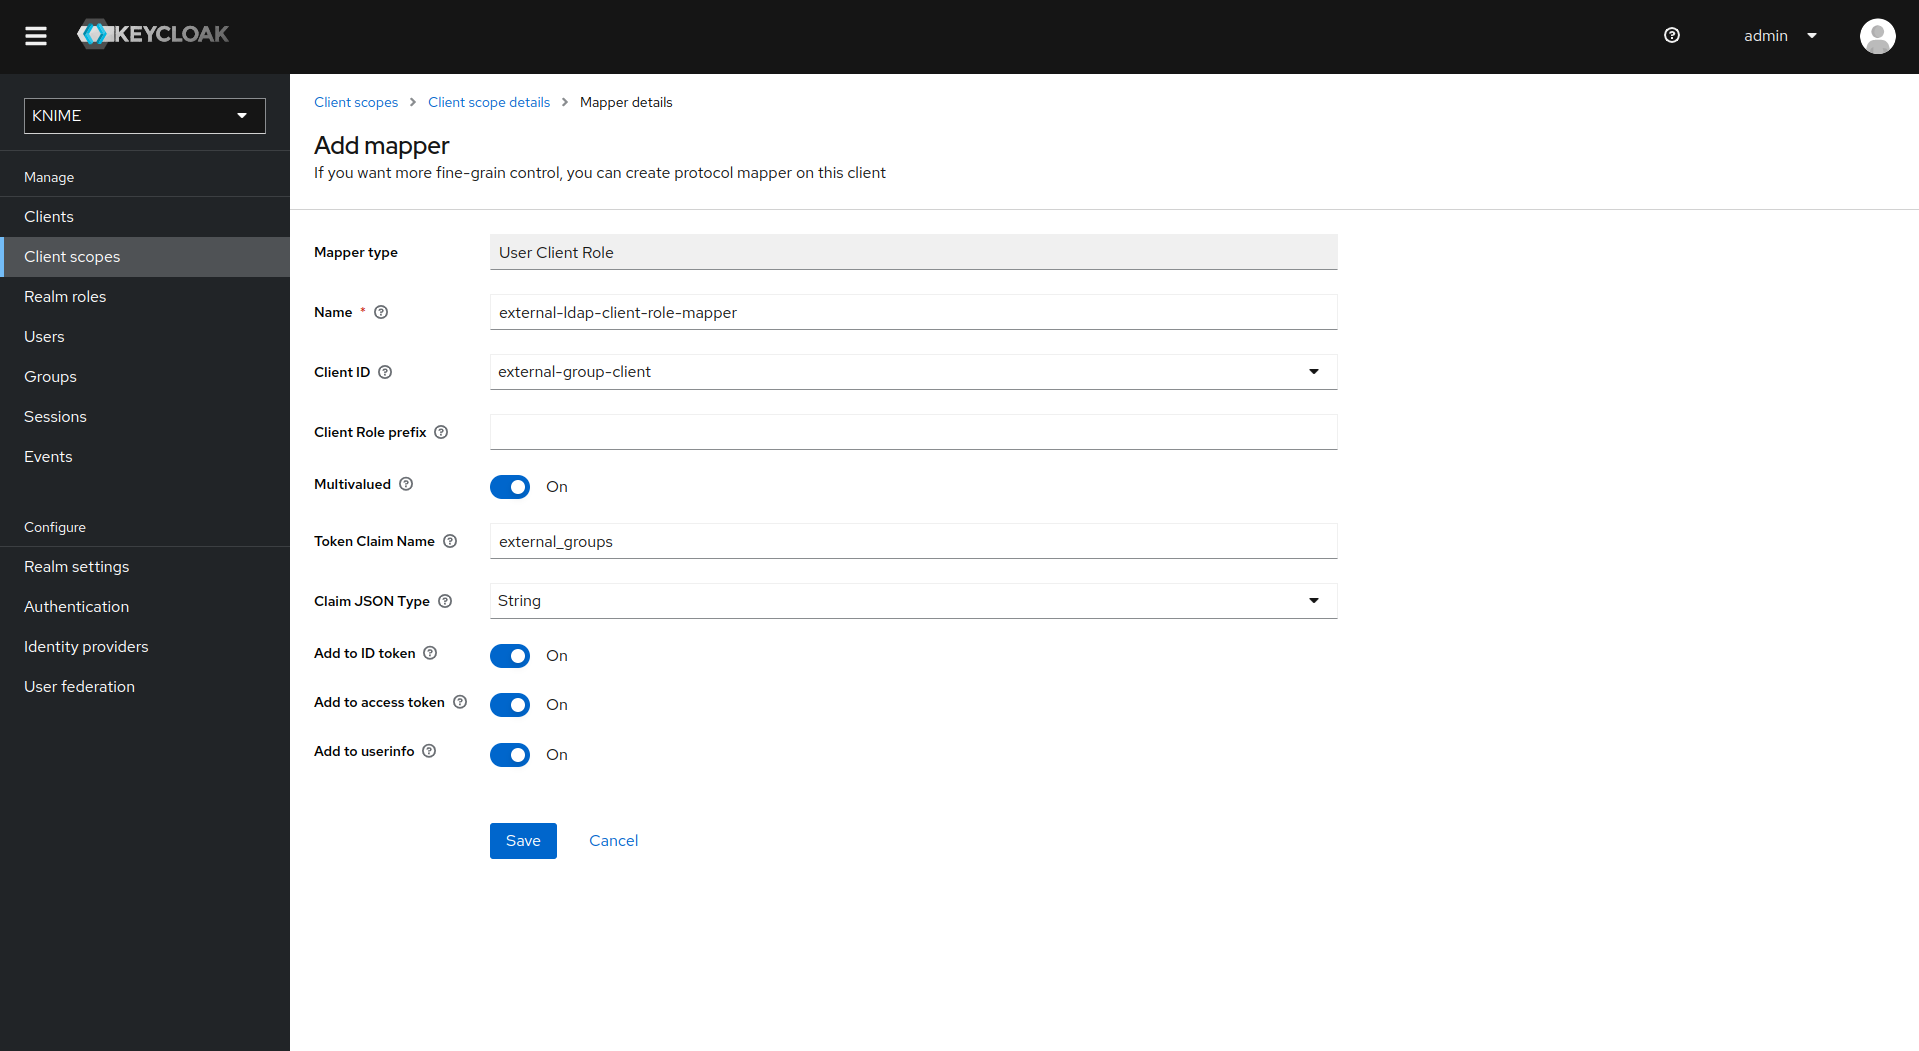
Next, you need to create a mapper that maps a user’s realm roles from the dummy realm to the access tokens:
-
On the left tab select Client scopes
-
Select groups
-
Switch to the tab Mappers
-
Click on Add mapper > By configuration and select User Client Role from the list
-
Provide a name, e.g. external-ldap-client-role-mapper
-
Set Client ID to the previously created dummy client (in our example external-group_client)
-
Set Token Claim Name to external-groups
-
Set Claim JSON Type to String
-
Ensure that Add to ID token, Add to access token, Add to userinfo, and Multivalued are turned on
-
Click on Save
Enable external groups
Once you have configured the external groups in Keycloak you need to create the groups that you want to be available inside KNIME Business Hub.
To do so you have to make a PUT request to the corresponding endpoint:
PUT https://api.<base-url>/accounts/hub:global/groups/<external-group-name>
where <external-group-name> is the name of the group and it must match the group name in the external identity provider.
Docker executor images
In order to create execution contexts for their teams, team admins will need to reference the Docker image of the KNIME Executor that they want to use.
Public Docker executor images are made available by KNIME which correspond to the full builds of KNIME Executor versions 4.7.0 and higher.
The currently available executor images have the following docker image name:
-
registry.hub.knime.com/knime/knime-full:r-4.7.4-179 -
registry.hub.knime.com/knime/knime-full:r-4.7.5-199 -
registry.hub.knime.com/knime/knime-full:r-4.7.6-209 -
registry.hub.knime.com/knime/knime-full:r-4.7.7-221 -
registry.hub.knime.com/knime/knime-full:r-4.7.8-231 -
registry.hub.knime.com/knime/knime-full:r-5.1.0-251 -
registry.hub.knime.com/knime/knime-full:r-5.1.1-379 -
registry.hub.knime.com/knime/knime-full:r-5.1.2-433 -
registry.hub.knime.com/knime/knime-full:r-5.1.3-594 -
registry.hub.knime.com/knime/knime-full:r-5.2.0-271 -
registry.hub.knime.com/knime/knime-full:r-5.2.1-369 -
registry.hub.knime.com/knime/knime-full:r-5.2.2-445 -
registry.hub.knime.com/knime/knime-full:r-5.2.3-477 -
registry.hub.knime.com/knime/knime-full:r-5.2.4-564 -
registry.hub.knime.com/knime/knime-full:r-5.2.5-592
However you might want to add specific extensions to the KNIME Executor image that is made available to team admins to create execution contexts.
The following section explains how to do so.
Add extensions to an existing Docker image
In order to install additional extensions and features to the KNIME Executor image, you will need to first create a Dockerfile.
The file is named Dockerfile with no file extension.
You can use the example Dockerfile below which demonstrates how to extend the base image with a custom set of update sites and features.
If you need to install Docker please make sure not to install it on the same virtual machine (VM) where the KNIME Business Hub instance is installed, as it might interfere with containerd, which is the container runtime used by Kubernetes.
|
# Define the base image
FROM registry.hub.knime.com/knime/knime-full:r-4.7.4-179

# Define the list of update sites and features
# Optional, the default is the KNIME Analytics Platform update site (first entry in the list below)
ENV KNIME_UPDATE_SITES=https://update.knime.com/analytics-platform/4.7,https://update.knime.com/community-contributions/trusted/4.7
# Install a feature from the Community Trusted update site
ENV KNIME_FEATURES="org.knime.features.geospatial.feature.group"

# Execute extension installation script
RUN ./install-extensions.sh
The KNIME_UPDATE_SITES environment variable determines the update sites that will be used for installing KNIME Features. It accepts a comma-delimited list of URLs.
The KNIME_FEATURES environment variable determines the extensions which will be installed in the KNIME Executor. It accepts a comma-delimited list of feature group identifiers.
A corresponding update site must be defined in the KNIME_UPDATE_SITES list for feature groups to be successfully installed.
You can get the necessary identifiers by looking at Help → About KNIME → Installation Details → Installed Software in a KNIME instance that has the desired features installed.
Take the identifiers from the "Id" column and make sure you do not omit the .feature.group at the end (see also screenshot on the next page).
The base image contains a shell script install-extensions.sh which lets you easily install additional extensions in another Dockerfile.
Once the Dockerfile has been customized appropriately, you can build a Docker image from it by using the following command:
# Replace <image_name> and <tag_name> with actual values
docker build -t <image_name>:<tag_name> .
Python and Conda in Docker images
When you create an Execution Context on KNIME Business Hub based on a full build you will have KNIME Python bundled available. If you need additional libraries you would need to make them available on the Hub instance.
You can do this in two ways:
-
Use the Conda Environment Propagation node.
-
Customize the Executor image used.
To get started with Conda environment propagation, check out KNIME Python Integration Guide. However, any libraries installed using Conda environment propagation will be removed when the executor restarts and installed again next time, so libraries that are used often should be installed as part of the executor Docker image.
In order to do so you need to:
-
Install Python in the executor Docker image
-
Declare to the execution context the path to the Python installation folder so that the executor can execute Python nodes
Install Python in the executor Docker image
The first step is the installation of Python and an environment manager for instance miniconda on a Docker image.
To do so, first you need the Docker Project to hold a miniconda installer near the Dockerfile, for example:
python-image/
  container/
  |-Miniconda3-py310_23.3.1-0-Linux-x86_64.sh
  dockerfiles/
  |-Dockerfile
You will also need to provide a .yml file that will contain all the modules, packages and Python version that you need to install in order to execute the Python scripting nodes.
The .yml file could look like the following:
name: py3_knime # Name of the created environment
channels: # Repositories to search for packages
  - defaults
  - anaconda
  - conda-forge
dependencies: # List of packages that should be installed
# - <package>=<version> # This is an example of package entry structure
  - python=3.6 # Python
  - scipy=1.1 # Notebook support
  - numpy=1.16.1 # N-dimensional arrays
  - matplotlib=3.0 # Plotting
  - pyarrow=0.11 # Arrow serialization
  - pandas=0.23 # Table data structures
Then you need to pull any available executor Docker image, install miniconda in batch mode on the image and define the environment variable for conda, as in the following example.
Also you will need to create your environments, that you specified in the .yml files.
# getting recent knime-full image as a basis
FROM registry.hub.knime.com/knime/knime-full:r-4.7.3-160

# getting Miniconda and install in batch mode
COPY container/Miniconda3-py310_23.3.1-0-Linux-x86_64.sh /home/knime/miniconda-latest.sh
RUN bash miniconda-latest.sh -b

# adding path to Miniconda bin folder to system PATH variable
ENV PATH="/home/knime/miniconda3/bin:$PATH"

# copy default conda environments into container
COPY --chown=knime envs/ ./temp_envs
RUN conda env create -f ./temp_envs/py3_knime.yml && \
    rm -rf ./temp_envs
When installing conda and creating the environments you will obtain the following paths that will need to be added in the .epf file of the customization profile during the set up of the execution context.
For example based on the above Dockerfile:
<path to conda installation dir>=/home/knime/miniconda3/
<path to default conda environment dir>=<path to conda installation dir>/envs/<name of the env>
Now you can build the new Docker image, for example:
docker build . -f /dockerfiles/Dockerfile -t knime-full:4.7.3-with-python
Finally retag the image to make it useable for your embedded registry on Business Hub:
docker tag knime-full:4.7.3-with-python registry.<hub-url>/knime-full:4.7.3-with-python
Once you have created the Docker image with Python installed create an execution context that uses the newly created Docker image.
Set up the execution context
Now you need to set up and customize the execution context.
In order to declare to the execution context the path to the Python installation you will need to build a dedicated customization profile and apply it to the execution context.
-
Build the
.epffile by following the steps in KNIME Python Integration Guide and exporting the.epffile. To export the.epffile from KNIME Analytics Platform go to File > Export Preferences… -
Open the file and use only the parts related to Python/conda.
The .epf file could look like the following:
/instance/org.knime.conda/condaDirectoryPath=<path to conda installation dir>
/instance/org.knime.python3.scripting.nodes/pythonEnvironmentType=conda
/instance/org.knime.python3.scripting.nodes/python2CondaEnvironmentDirectoryPath=<path to default conda environment dir>
/instance/org.knime.python3.scripting.nodes/python3CondaEnvironmentDirectoryPath=<path to default conda environment dir>
Find more details on how to set-up the .epf file in the Executor configuration section of the KNIME Python Integration Guide.
|
Now follow these steps to customize the execution context:
-
Build the
.zipfile containing the customization profile using the.epffile you just created. -
Upload the customization profile
.zipfile to KNIME Business Hub. -
Apply the customization profile to the execution context.
Advanced configuration
This section covers some of the configuration settings that are available for your KNIME Business Hub instance.
The following configurations are available in the KOTS Admin Console and can be changed after the installation and first minimal configuration steps are concluded successfully.
You can access the KOTS Admin Console via the URL and password you are provided in the output upon installation.
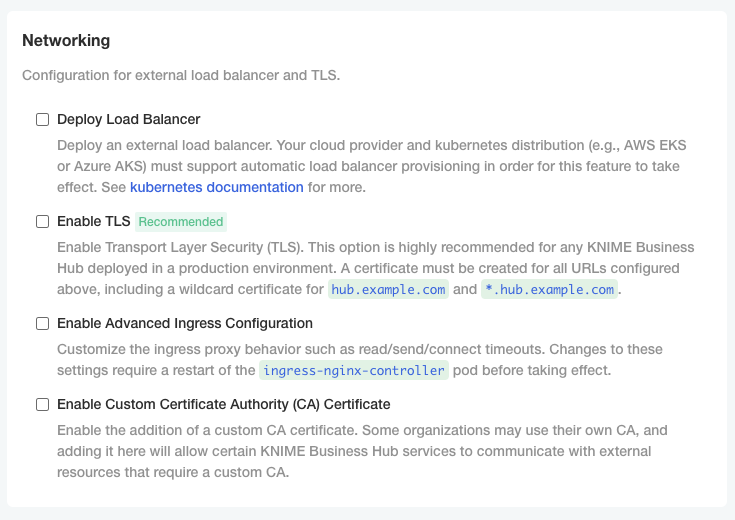
Configure networking
In the "Networking" section of the KOTS Admin Console you can:
-
Deploy an external load balancer for traffic ingress: this feature takes effect only if your cloud provider and kubernetes distribution support automatic load balancer provisioning.
-
Enable Transport Layer Security (TLS): the encryption protocol that provides communications security is highly recommended especially for KNIME Business Hub instances deployed in a production environment.
Please, be aware that if TLS is not enabled some HTTPS-only browser’s features will not be available. For example, it will not be possible for a user to copy generated application passwords. -
Enable advanced ingress configuration: you can customize the ingress proxy behavior, for example configuring the read/send/connect timeouts.
Configure TLS
If you enable the Transport Layer Security (TLS) you need to have a certificate that is valid for all the URLs defined during the installation.
We recommend to create a wildcard certificate for <base-url> and *.<base-url>, e.g. hub.example.com and *.hub.example.com.
Check Enable TLS in the "Networking" section of the KOTS Admin Console.
-
Upload your own certificate: Select Upload your own certificate to be able to upload the certificate files.
You will need an unencrypted private key file and a certificate file that contains the full certificate chain. In the certificate chain the server certificate needs to be the first in the PEM file, followed by the intermediate certificate(s). You usually can get a certificate from your company’s IT department or Certificate Authority (CA).
Another possibility, if you have a public domain name, is to use
letsencryptto obtain a certificate.Both certificates need to be PEM formatted as requested by the
ingress-nginx-controller(see the relevant documentation here).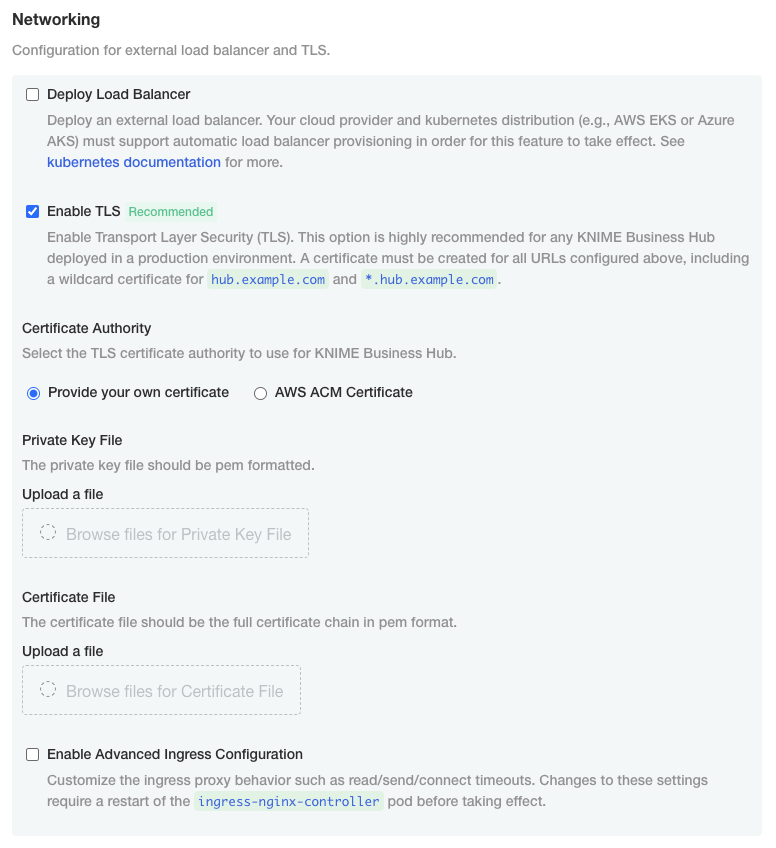
-
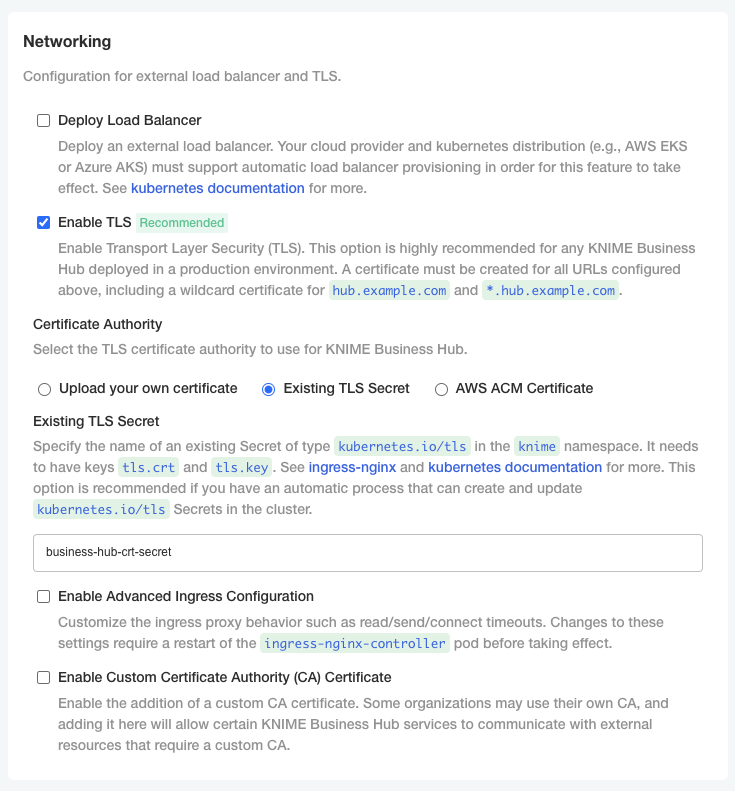
Existing TLS Secret: Select Existing TLS Secret to specify the name of of an existing Secret of type
kubernetes.io/tlsin theknimenamespace. It needs to have keystls.crtandtls.key, which contain the PEM formatted private key and full chain certificate.This option is recommended if you have an automatic process that can create and renew
kubernetes.io/tlsSecrets in the cluster, like the cert-manager project.See ingress-nginx and kubernetes documentation on TLS secrets for more details.
-
Select AWS ACM Certificate if, instead, you have deployed an AWS Elastic Load Balancer (ELB). In this case you can use AWS Certificate Manager (ACM) and set the certificate as an annotation directly on the loadbalancer. You can find more information in AWS documentation for ACM here.
Once you obtained the certificate Amazon Resource Name (ARN) in the form
arn:aws:acm:<region>:<account-id>:certificate/<certificate-id>, insert the ARN in the corresponding field as shown in the image below.
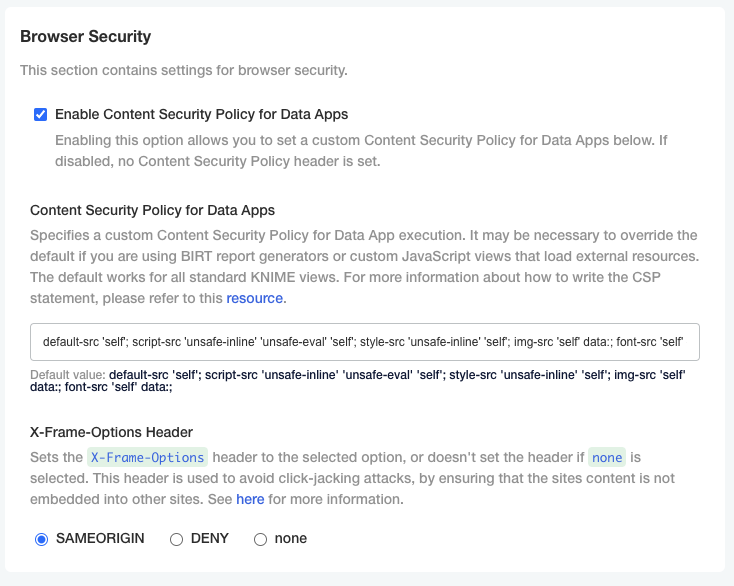
Configure Browser Security
In the "Browser Security" section of the KOTS Admin Console you can:
-
Specify a custom Content Security Policy for Data App execution. It may be necessary to override the default if you are using custom JavaScript views that load external resources. The default works for all standard KNIME views. For more information about how to write the CSP statement, please refer to this resource.
-
Configure the X-Frame-Options header being set by webapps. This header is used to avoid click-jacking attacks, by ensuring that the sites content is not embedded into other sites. See here for more information.
Node affinity
Node affinity makes it possible to ensure that cluster resources intended for a specific task, e.g. execution resources, run on a specific set of nodes. There are two roles that each pod is grouped
into: core and execution. Pods in the core group consist of KNIME Business Hub control plane resources, and pods in the execution group relate to execution contexts.
In order to use the node affinity feature in your KNIME Hub cluster, you can apply one or both of the following labels to nodes within your cluster:
-
hub.knime.com/role=core -
hub.knime.com/role=execution
To label a node, you can execute the following command (where <node-name> is the name of the node you want to label):
kubectl label node <node-name> hub.knime.com/role=core
| For more information about labeling nodes, see the Kubernetes documentation. |
Pods will have to be restarted in order to be rescheduled onto labeled nodes. You can use the following example commands to restart the pods in a live cluster:
-
kubectl rollout restart deployment -n istio-system -
kubectl rollout restart deployment -n hub -
kubectl rollout restart deployment -n knime -
kubectl delete pods --all --namespace hub-executionThis command will restart all execution context pods.
There are a few things to note about the behavior of this feature:
-
Node affinity uses a "best effort" approach to pod scheduling.
-
If one or both of the
hub.knime.com/rolelabels are applied, cluster resources will attempt to be scheduled onto the nodes based on their role. -
If no nodes have a
hub.knime.com/rolelabel, pods will be scheduled onto any available node. -
If labeled nodes reach capacity, pods will be scheduled onto any available node.
-
If a labeled node is shut down, pods will be rescheduled onto other nodes in the cluster with a preference towards using nodes that have a matching label.
-
Node affinity for KNIME Business Hub uses the
preferredDuringSchedulingIgnoredDuringExecutionapproach (see the Kubernetes documentation for more details).
-
-
It is possible to use only one of the labels above, e.g. labeling nodes for the
executionrole but not specifying any node labels for thecorerole.
Create a collection
It is possible to create collections on your KNIME Business Hub instance.
KNIME Collections on KNIME Hub allow upskilling users by providing selected workflows, nodes, and links about a specific, common topic.
One example of a collection can be found on KNIME Community Hub here.
| This is a feature of KNIME Business Hub - Enterprise edition. |
In order to create a new collection page you need to be a Global Admin of your KNIME Business Hub instance.
The creation of a collection is possible via REST API, and a description of the different configurations can be found in your KNIME Business Hub API doc at the following URL:
api.<base-url>/api-doc/?service=catalog-service#/Collections
e.g. api.hub.example.com/api-doc/?service=catalog-service#/Collections.
In order to create a collection the items (i.e. workflows and nodes) that are collected need to be stored and accessible on the same KNIME Business Hub instance where collection is created.
To create the collection you will need then to build a json file with the schema that is available in the API doc in the Collections section, under the POST /collections request description.
The following is an example that would allow you to build a collection, similar to the one available on KNIME Community Hub here.
In the first section you can for example set up a title, a description, a so-called hero, which is the banner image at the top right of the example collection page, and tags:
{
  "title": "Spreadsheet Automation",
  "description": "On this page you will find everything to get started with spreadsheet automation in KNIME",
  "ownerAccountId": "account:user:<global-admin-user-id>",
  "hero": {
    "title": "New to KNIME?",
    "description": "Get started with <strong>KNIME Analytics Platform</strong> to import all the examples and nodes you need for spreadsheet automation right now!",
    "actionTitle": "Download",
    "actionLink": "https://www.knime.com/downloads"
  },
  "tags": [
    "Excel",
    "XLS"
  ],
Next you can add different sections and subsections, each with a title and a description, choose a layout, and select the itemType such as Space, Component, Workflow, Node, Extension, or Collection. For each of these items you will need to provide the id under which they are registered in your Business Hub installation.
The id for workflows, spaces, components, and collections can be build by taking the last part of their URL, after the ~, and adding a * at the beginning.
For example, the following workflow on the KNIME Community Hub has URL https://hub.knime.com/-/spaces/-/latest/~1DCip3Jbxp7BWz0f/ so its id would be *1DCip3Jbxp7BWz0f.
The id for node and extensions instead needs to be retrieved with a REST call, for example to the search endpoint of your KNIME Business Hub instance.
  "sections": [
    {
      "title": "Workflow examples",
      "description": "Some subtitle text here. Can have <strong>bold format</strong>",
      "iconType": "Workflow",
      "subsections": [
        {
          "title": "How to do basic spreadsheet tasks in KNIME",
          "description": "Some examples on how to do common things",
          "layout": "SingleColumn",
          "numberOfTeaseredItems": 2,
          "items": [
            {
              "title": "Click Here!",
              "itemType": "Link",
              "absoluteUrl": "https://knime.com"
            },
            {
              "id": "*SJW5zSkh1R3T-DB5",
              "itemType": "Space"
            },
            {
              "id": "*vpE_LTbAOn96ZOg9",
              "itemType": "Component"
            },
            {
              "id": "*MvnABULBO35AQcAR",
              "itemType": "Workflow"
            },
            {
              "showDnD": true,
              "id": "*yiAvNQVn0sVwCwYo",
              "itemType": "Node"
            },
            {
              "id": "*bjR3r1yWOznPIEXS",
              "itemType": "Extension"
            },
            {
              "id": "*QY7INTkMW6iDj7uC",
              "itemType": "Collection"
            }
          ]
        }
      ]
    }
  ]
}
Administrator workflows
The workflows described in this section of the documentation aim to support KNIME Business Hub administrators, or heavy KNIME Business Hub users, to clean up, monitor and better administrate their Business Hub instance.
The functionalities provided are a time saver for monitoring or administrating KNIME Business Hub, eliminating the need for manual work and centralizing information from various applications.
Workflows overview
The user can access the workflows on the KNIME Community Hub in a public space owned by KNIME. Additionally, the user can find them on a dedicated collection page. To use them, download the workflows from the Community Hub and upload them into an existing team space in your KNIME Business Hub installation.
Business Hub has three types of user roles (global admin, team admin, and team member). All the users with access to the “Admin Space” can run the workflows. The user’s role defines their allowed actions when running the different workflows.
The workflows can be run as data applications on-demand or directly scheduled using the Business Hub UI. First, you must deploy the workflows as a Data app or Schedule.
Below the list of workflows within the “Admin Space”, click on them to read further details:
Requirements and prerequisites
Requirements
-
The user needs to exist and be at least a Team member (no matter the user’s role) where the “Admin Space” is located
-
Also, the user needs at least view access to the “Admin Space.”
Prerequisites
-
The user should be familiar with new concepts on the Hub. See the KNIME Business Hub User Guide.
-
The user needs to create an application password specific to her account on KNIME Business Hub that most applications will use.
Discard Failed Jobs
Overview
This workflow aims to keep "clean" the KNIME Business Hub installation by discarding failed jobs from any kind of execution run by the KNIME Business Hub users.
Workflow specs
Without applying any time range, the workflow discards all failed jobs for the following execution types: ad-hoc executions, triggers, data apps, schedules or shared deployments.
We consider as failed jobs all those with any of the following states after execution: “Execution_Failed”, “Execution_Failed_With_Content”, “Execution_Canceled”, or “Vanished”.
The failed jobs a user can discard depend on the role of the user running the workflow:
Global admin: can discard all failed jobs in any team and space from any execution type.
Team admin: can discard all failed jobs of the teams of which it is an admin from any execution type.
Team member: can discard only self-generated failed jobs from any execution type, any team and space of which it is a member (no matter the user’s right’s on space items). It also includes deployments shared with the user from teams where the user is not a member.
Deployment configuration
In both cases, you can provide the following information to deploy the workflow:
-
Hub URL: The URL of your KNIME Business Hub instance, e.g. “https://my-business-hub.com”.
-
Application Password ID: User-associated application password ID.
-
Application Password: User-associated application password.
If you want to know how to create an application password, follow these steps.
Data app
After deploying the workflow as a Data App, you can run it. To do so, follow these instructions.
Below are the steps for the data app:
-
Business Hub connection: you need to connect to the KNIME Business Hub instance through the previously generated application password.
-
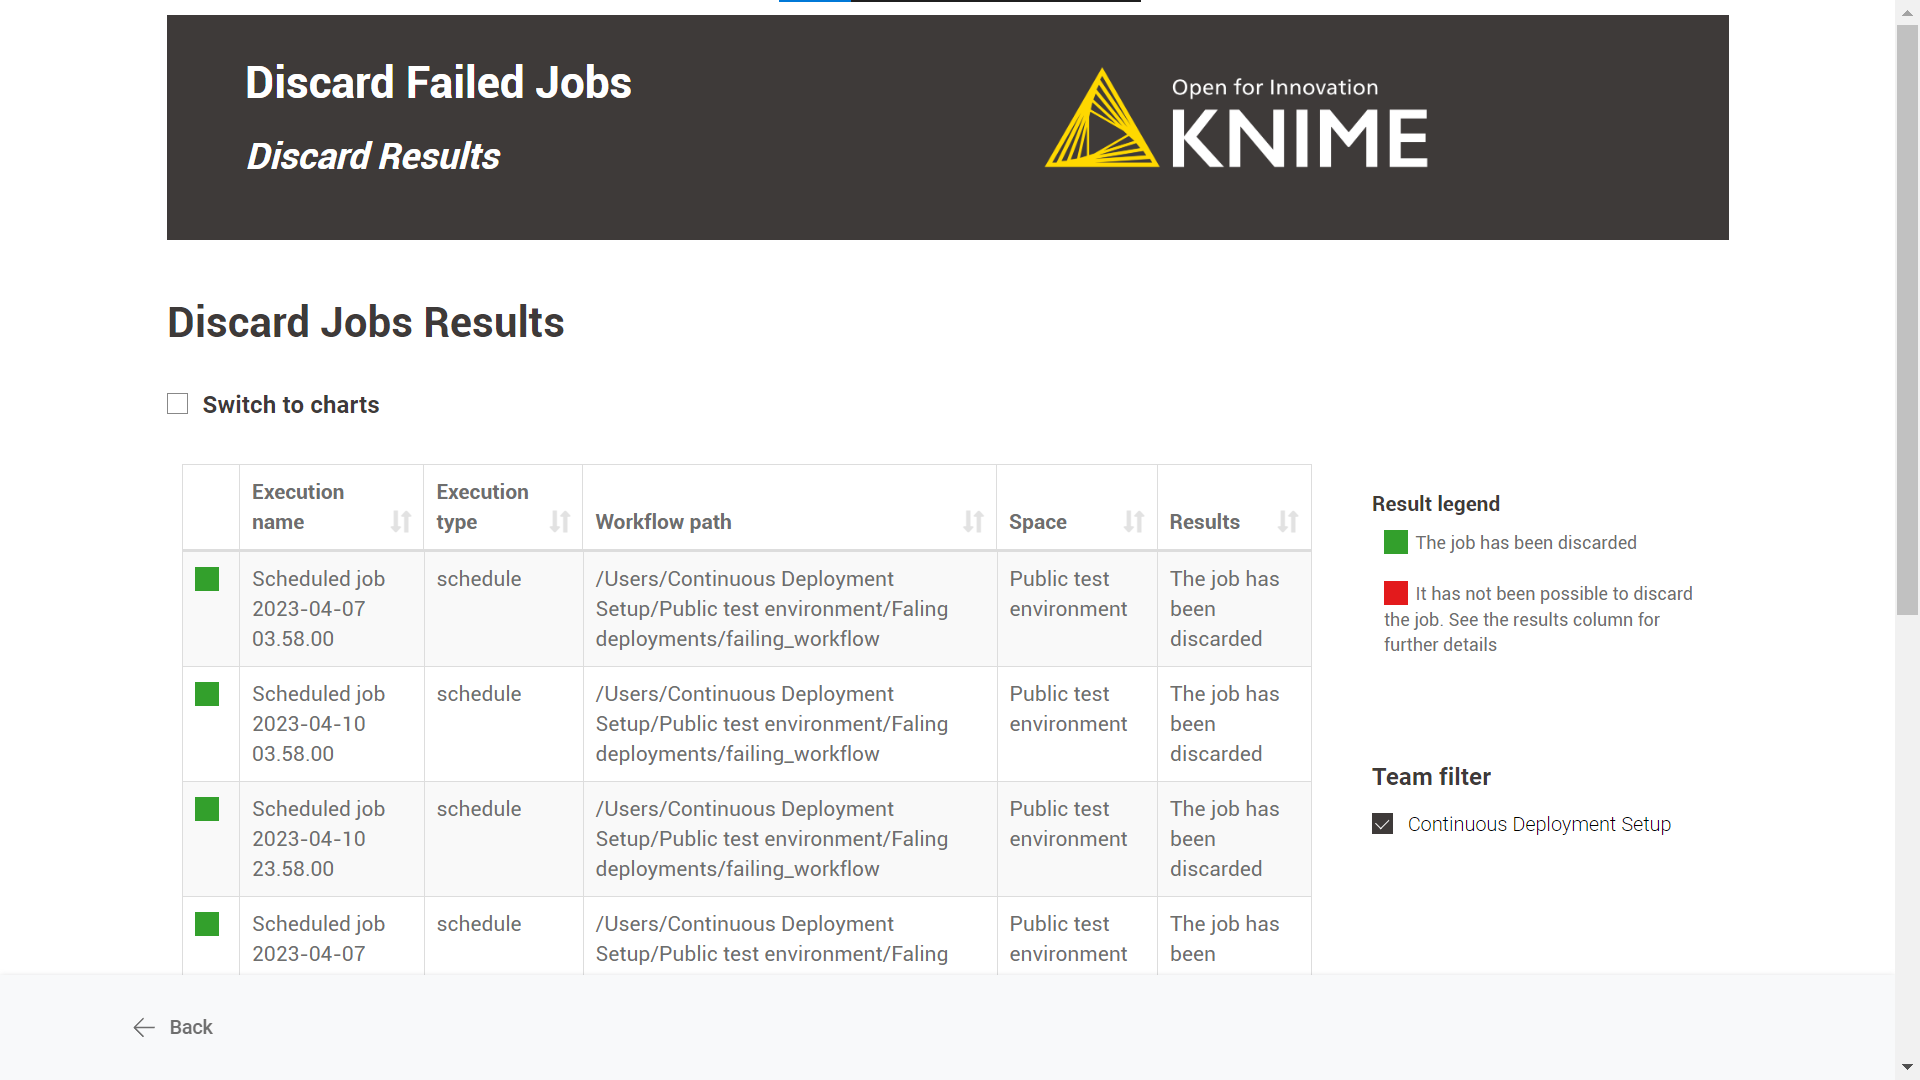
Select Job State: it is possible to customize which types of failed jobs you want to discard. Max 4 job states should be available: “Execution_Failed”, “Execution_Failed_With_Content”, “Execution_Canceled”, or “Vanished”.
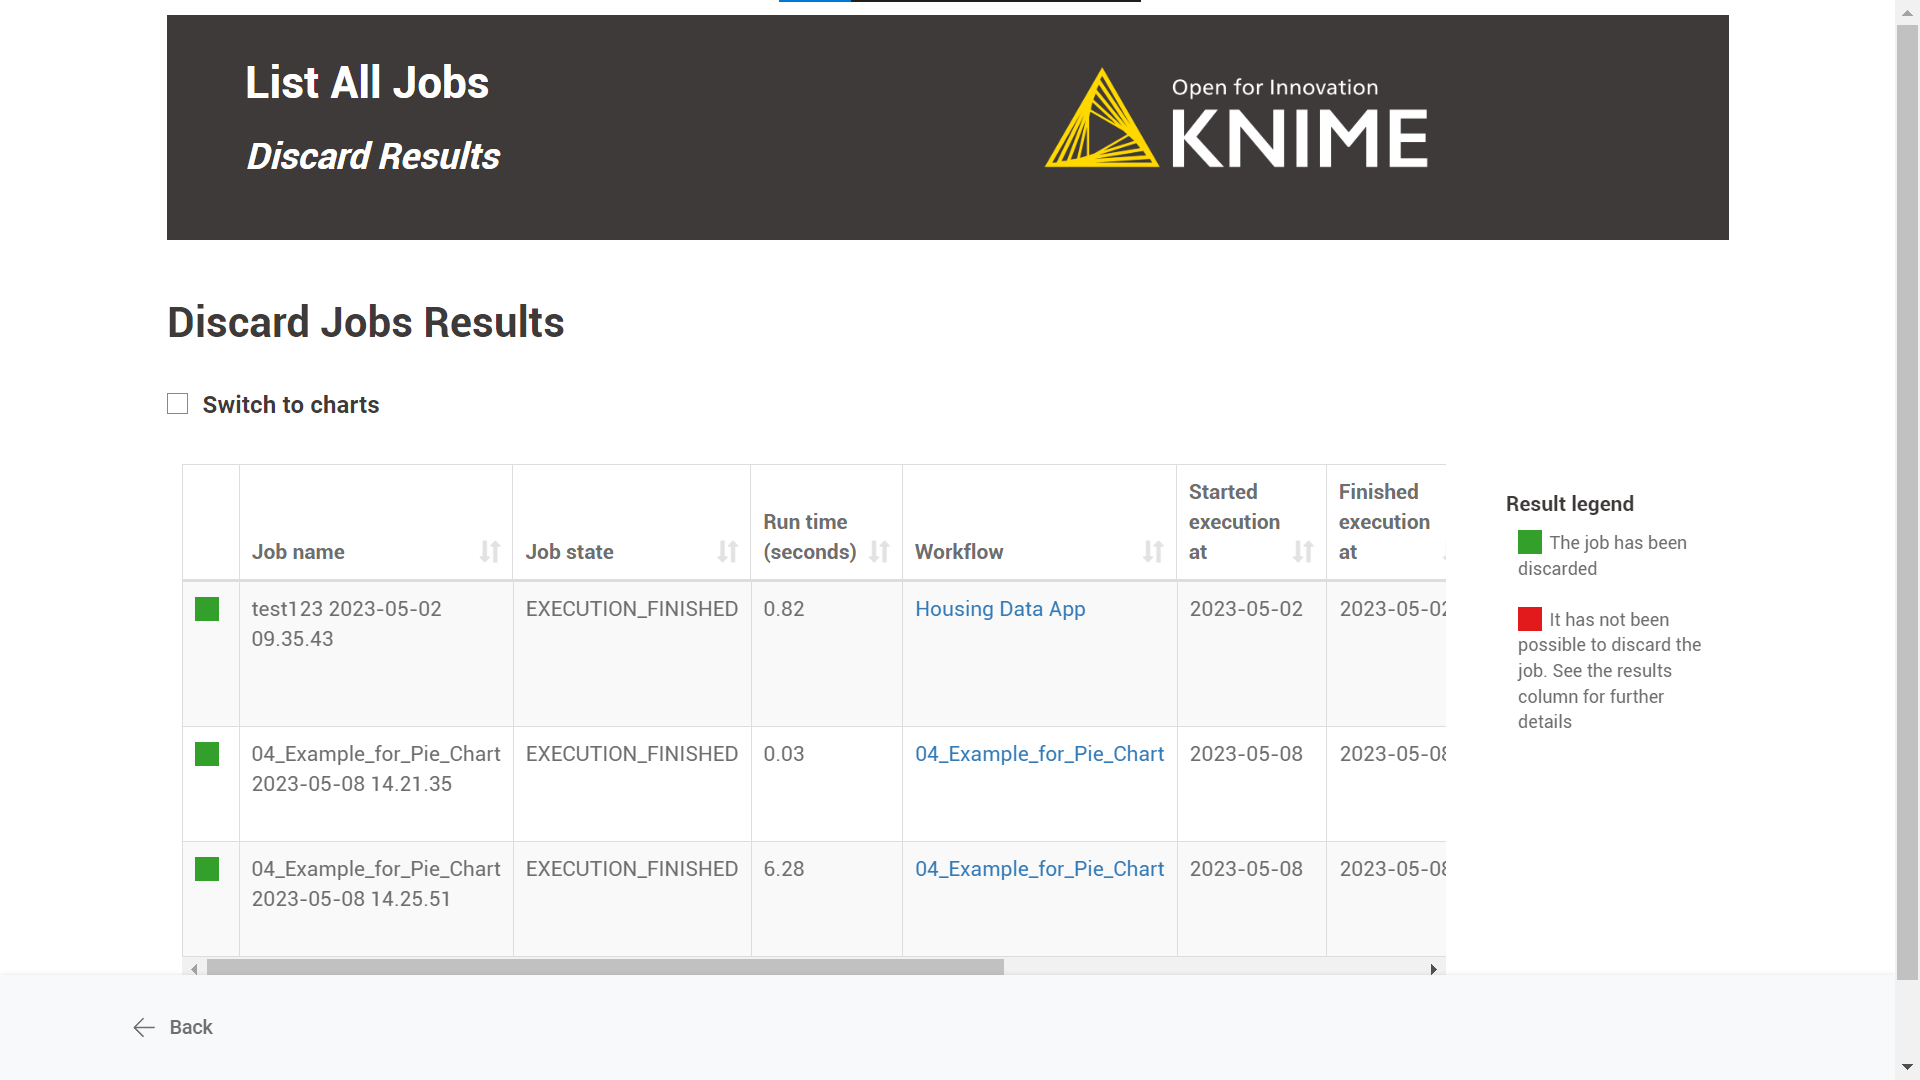
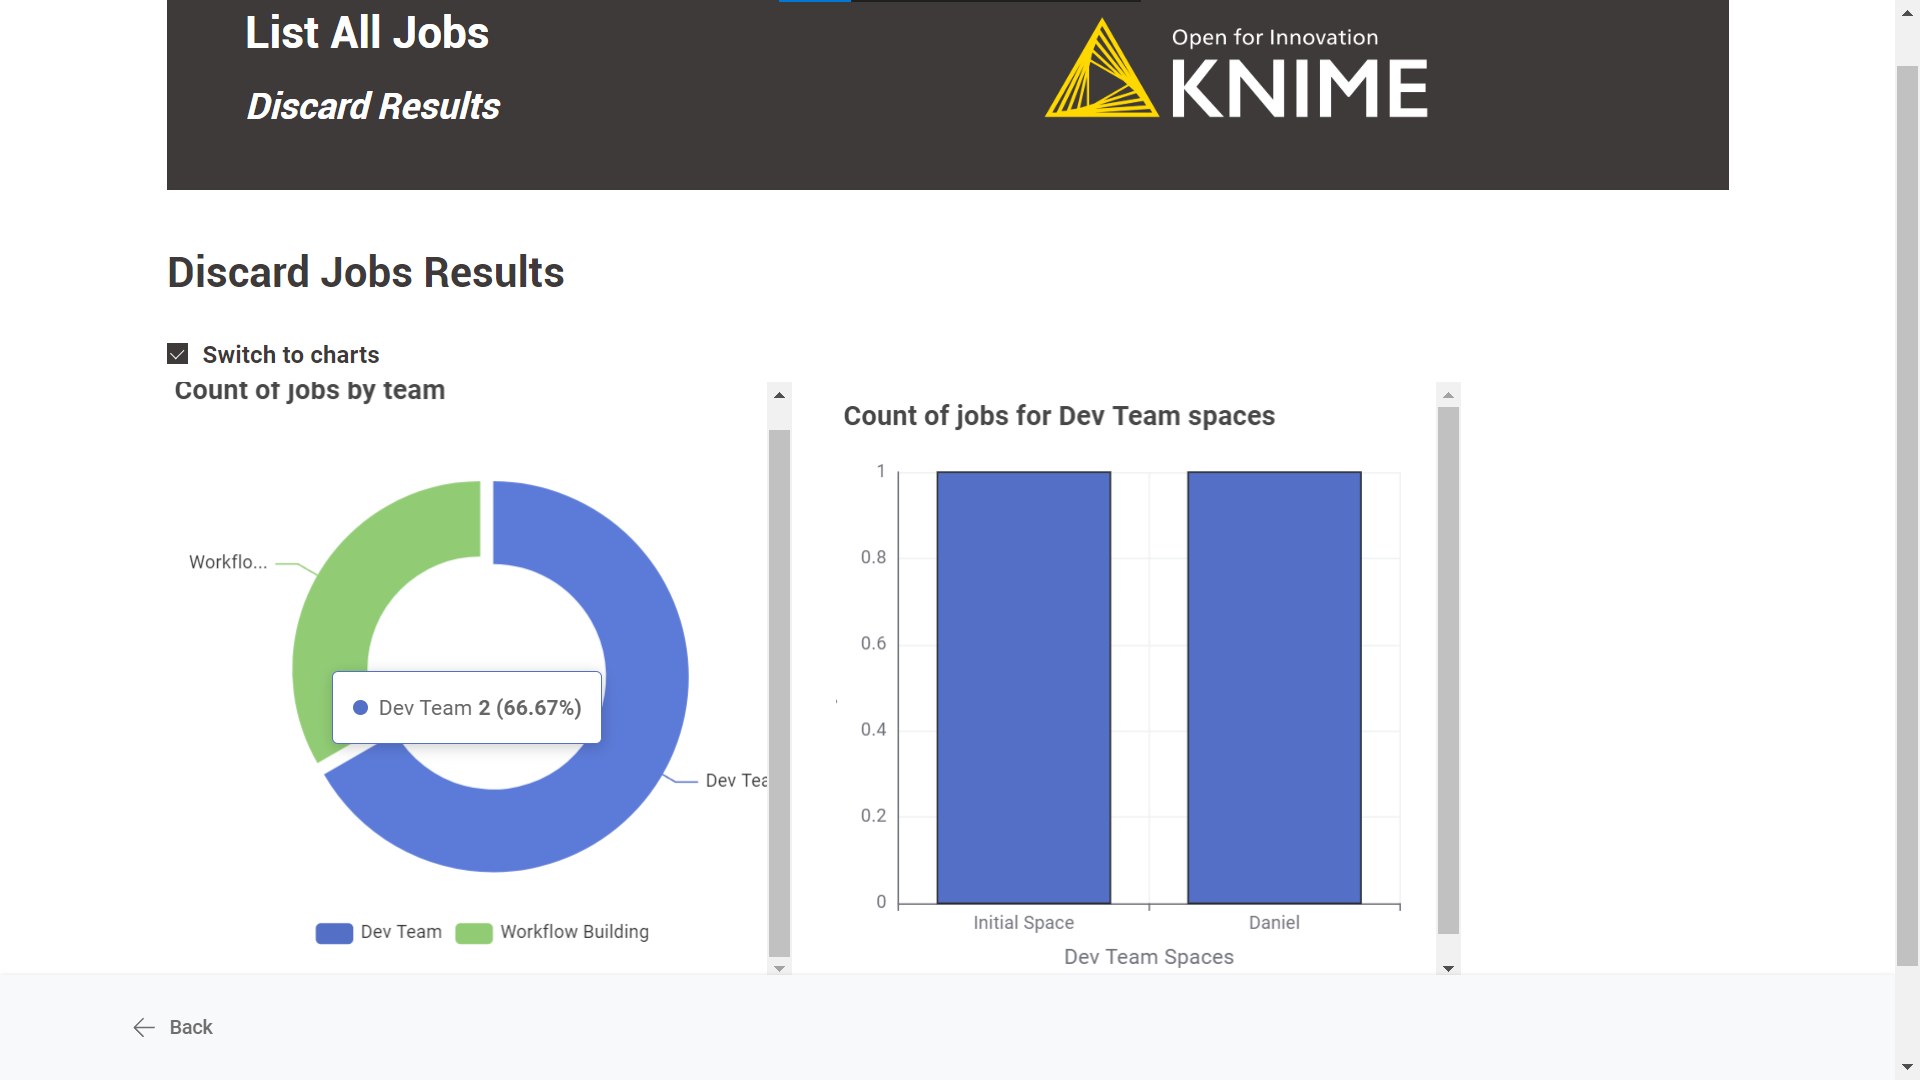
-
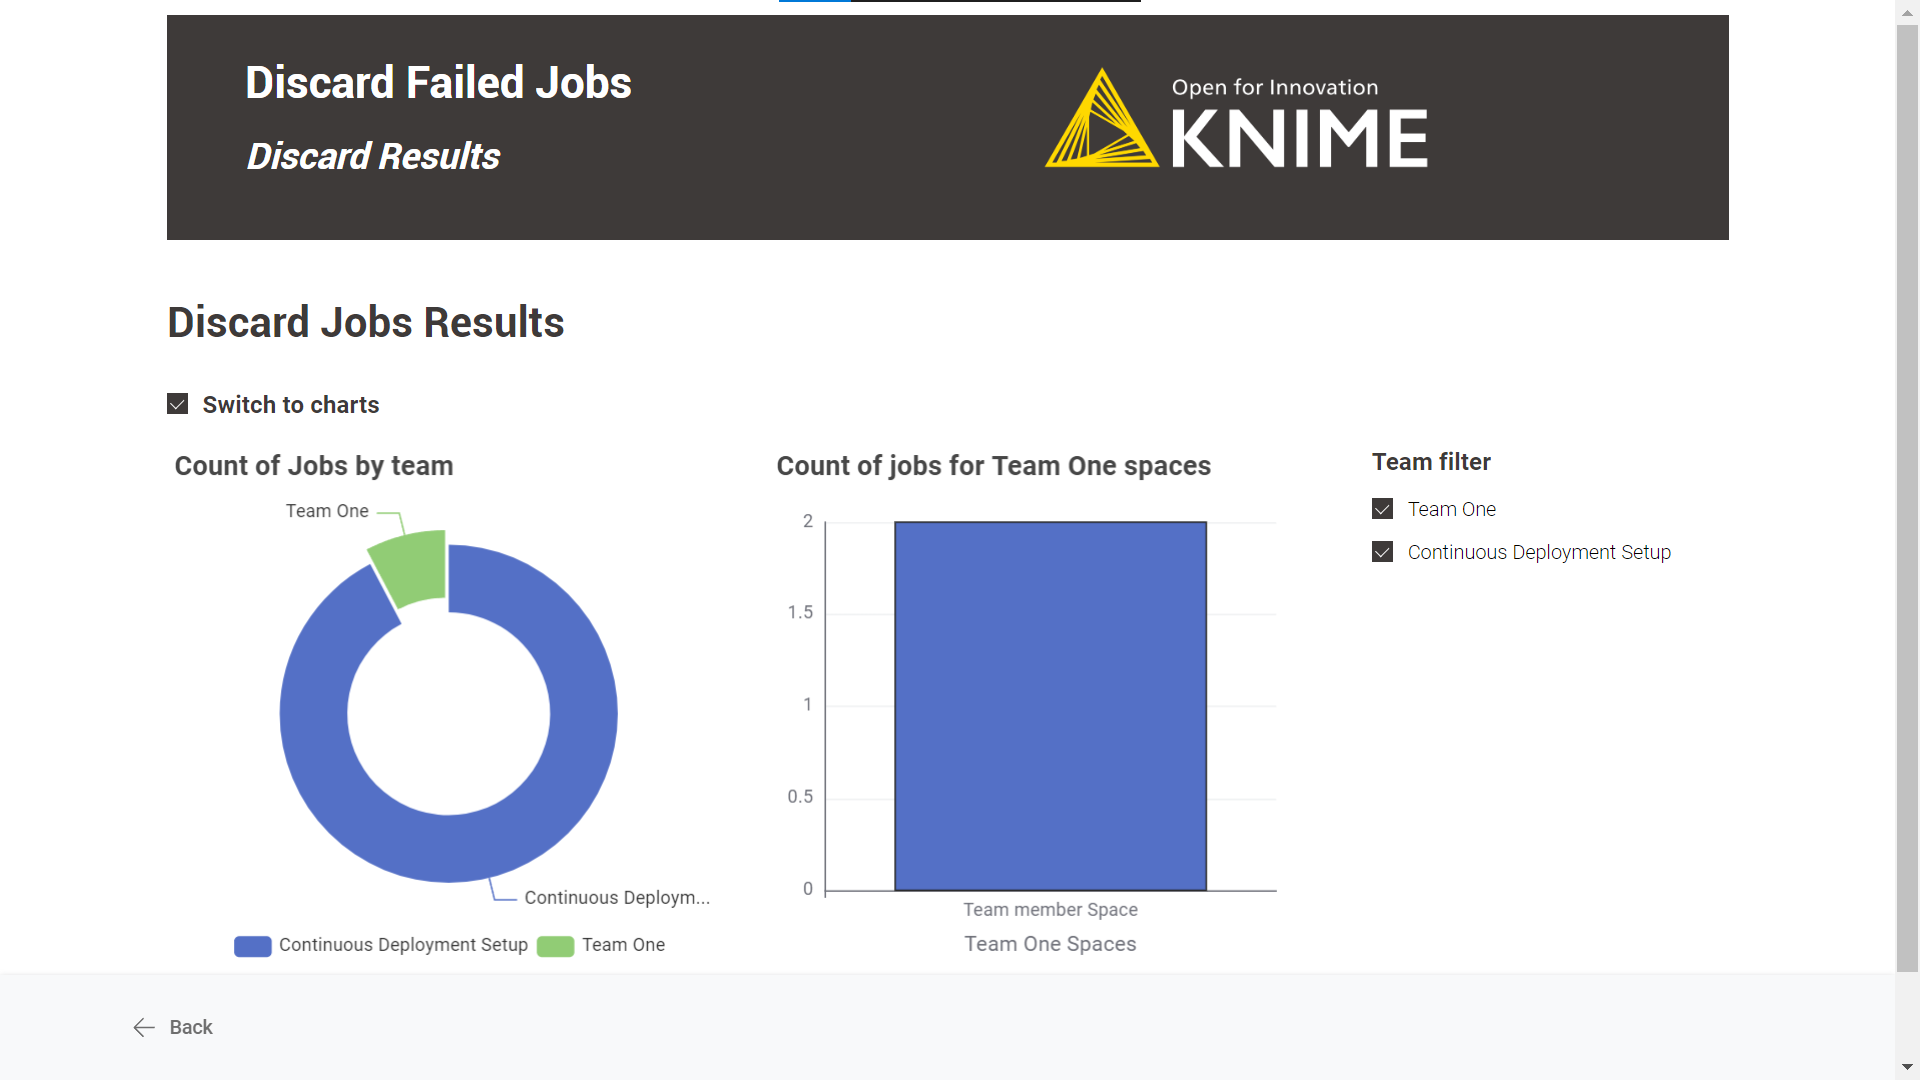
Discard Results: A table with the discard jobs results is displayed by default. There is also the possibility to see an illustrated version of the table by selecting the “Switch to charts” option.
Schedule
-
Define when the workflow should be executed through the schedule options. For more information, follow this guide.
-
Ensure the Schedule Deployment is active (Status column).
-
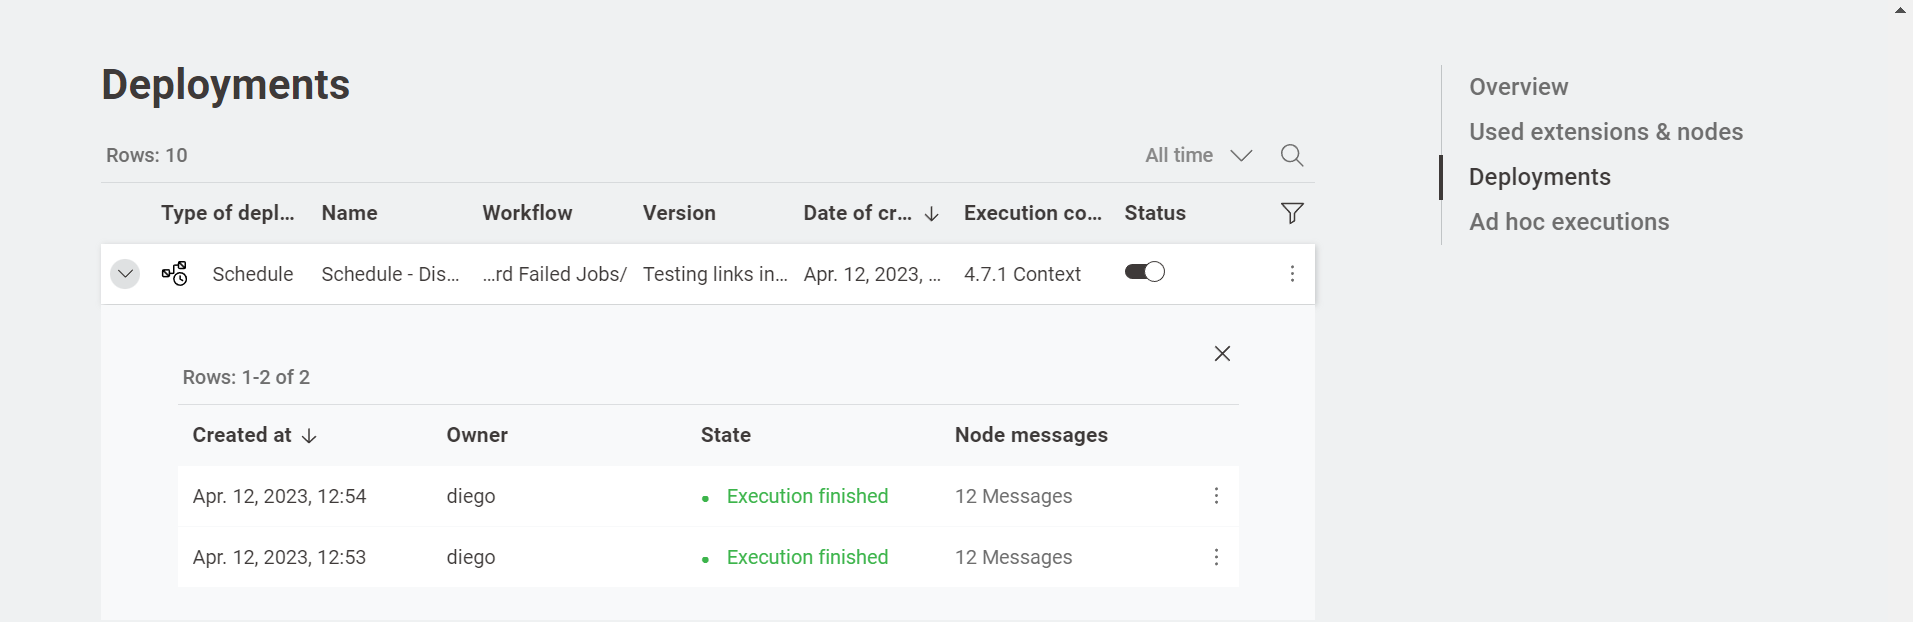
In the Team Deployments page or the workflow page, Deployments section, you can check the number of executions and their status.
List All Jobs
Overview
The workflow scope is to list all the jobs (excluding the failed ones) accessible to the user.
Additionally, the user can use the workflow to easily pinpoint any irregularities in the workflow’s execution or sort jobs that have been in an execution state for an extended period.
Furthermore, it is possible to select the jobs and discard them.
Workflow specs
Without applying any time range, the workflow lists all jobs for the following execution types: ad-hoc executions, triggers, data apps, schedules or shared deployments.
We only consider not failed jobs. This means we exclude any jobs with states such as: “Execution_Failed”, “Execution_Failed_With_Content”, “Execution_Canceled”, or “Vanished”.
The job information a user could retrieve depends on the user role running the deployed workflow:
Global admin: can recover all workflow jobs in any team and space.
Team admin: can recover all workflow jobs within the team where it is an admin.
Team member: can recover workflow jobs from any team and space where is a member (no matter the user’s right’s on space items). It also includes shared deployments from teams where the user is not a member.
The jobs a user can discard depend on the role of the user running the deployed workflow:
Global admin: can discard all jobs in any team and space from any execution type.
Team admin: can discard all jobs of the teams of which it is an admin from any execution type.
Team member: can discard only self-generated jobs from any execution type, team and space of which it is a member (no matter the user’s right on space items). It also includes deployments shared with the user from teams where the user is not a member.
Deployment configuration
This workflow can be deployed as a data app.
You can provide the following information to deploy the workflow:
-
Hub URL: The URL of your KNIME Business Hub instance, e.g. “https://my-business-hub.com”.
-
Application Password ID: User-associated application password ID.
-
Application Password: User-associated application password.
If you want to know how to create an application password, follow these steps.
Data app
After deploying the workflow as a Data App, you can run it. To do so, follow the instructions.
Below are the steps for the data app:
-
Business Hub connection: you need to connect to the KNIME Business Hub instance through the previously generated application password.
-
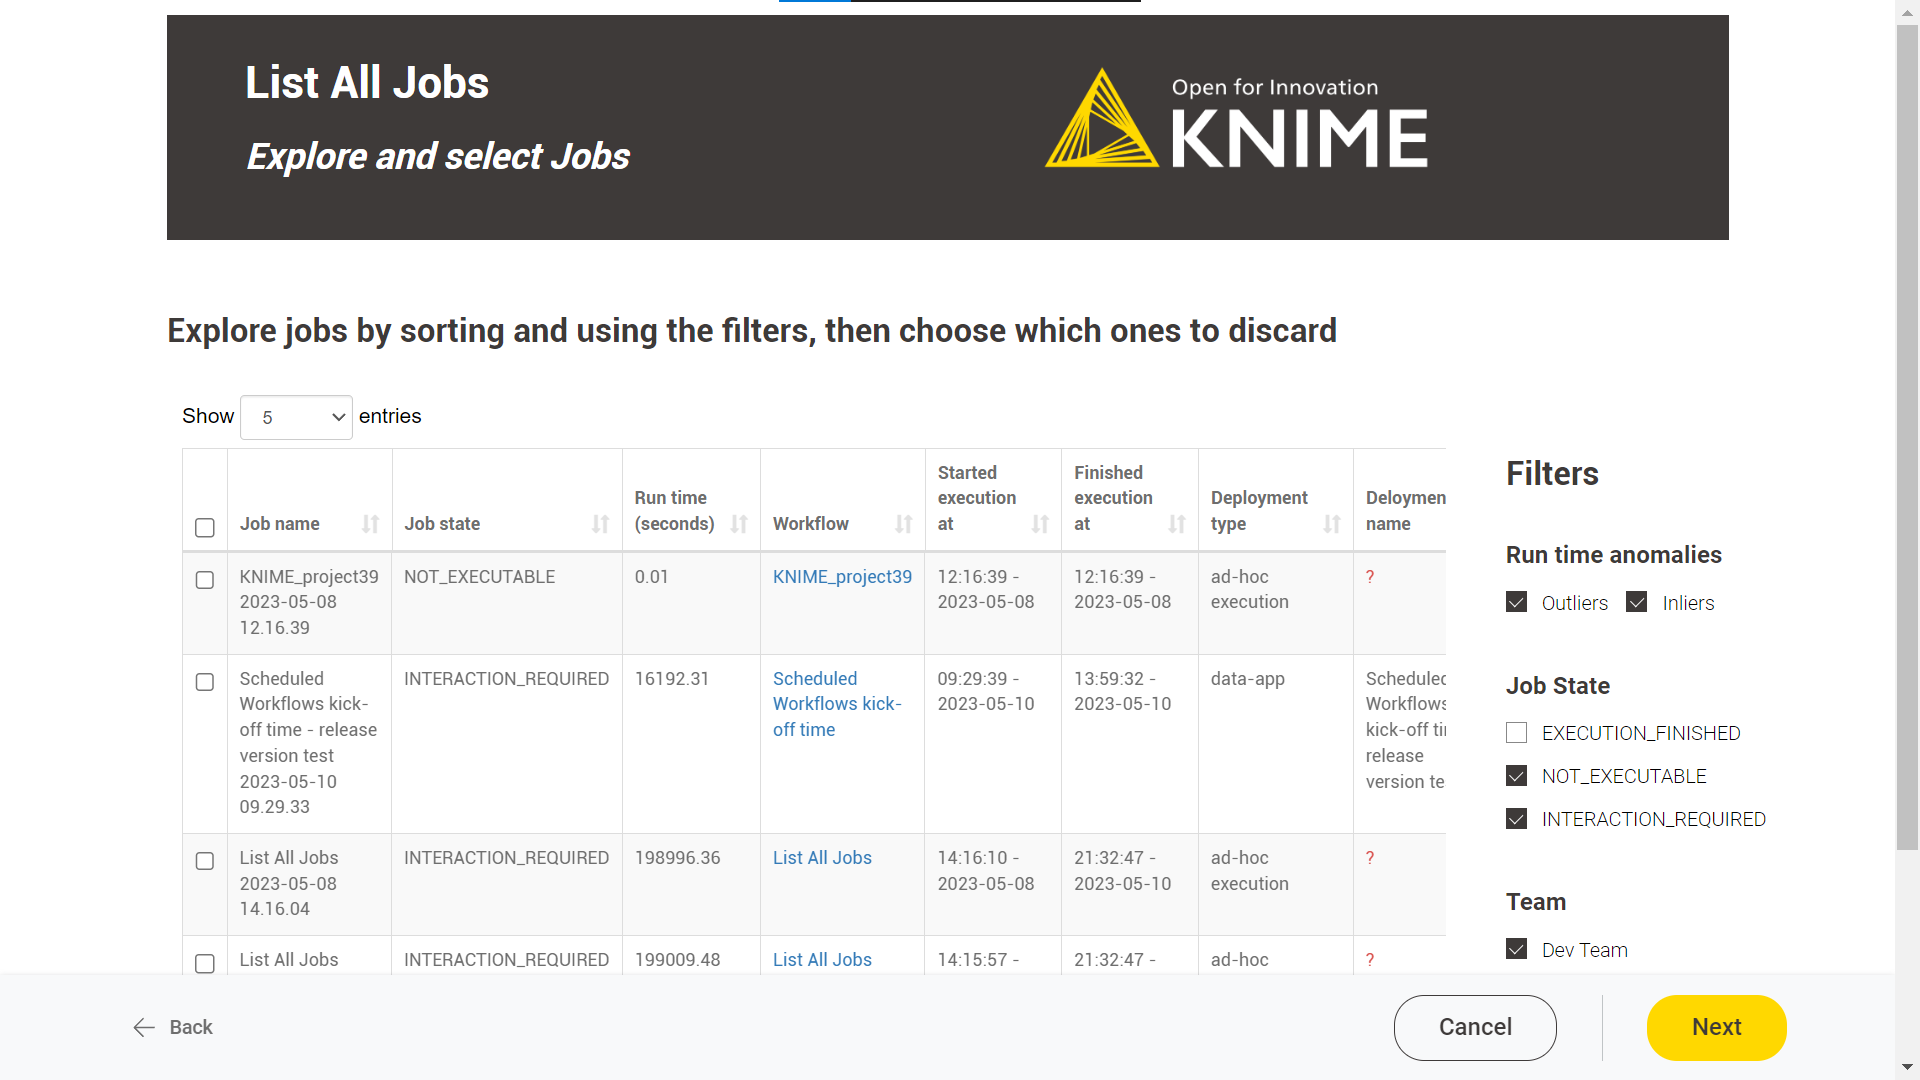
Explore and select Jobs: this feature displays a table of all available jobs for the user. Each job is listed with its name, state, runtime information, and corresponding workflow deployment.
Two exceptions related to the job’s deployment information:
-
When ad-hoc executions generate jobs, the deployment name is not available.
-
If the workflow is executed when a deployment that has generated a job is not available anymore in the KNIME Business Hub (because it has been discarded or, in the case of schedules, the deployment has ended), retrieving the deployment information is not possible. It displays a message in the "Deployment name" column: "This deployment is no longer available."
On the right side, the user can find three filters:
-
Run time anomalies: it detects outliers using the Numeric Outliers node. As a user, you can focus on "Outliers", which will help you identify jobs that take significantly longer or shorter to execute than others within the same workflow deployment.
-
Job state: It allows filtering by specific job states. The available job states will be shown based on the currently listed jobs.
-
Team: the user can filter by team.
-
-
Discard Results: A table with the discard jobs results is displayed by default. There is also the possibility to see an illustrated version of the table by selecting the “Switch to charts” option.
Delete Old Versions
Overview
The workflow aims to delete old item versions that aren’t involved in any deployment. The sought effect of this operation is to avoid a massive proliferation of item versions within the Business Hub installation, impacting disk space.
Workflow specs
The workflow deletes all item versions older than the specified number of days, e.g. older than seven days.
The deletion will only be applied to the selected teams and spaces using the workflow as a data app or schedule deployment.
In cases where a rule applies to all versions in a space, the latest version will not be deleted, even if it is affected by the rule. Additionally, item versions that are involved in deployments are exempt from the rule.
Depending on your user role on the KNIME Business Hub, if you execute this workflow, you will have the following permissions:
Global admin: Can delete every item version not used in any deployment from any team on the KNIME Business Hub instance.
Team admin: Can only delete the item versions not involved in any deployment in the team where it’s an admin.
Team member: Can only delete the item versions not involved in any deployment in the teams where it’s a member. The Team member must have “Edit” permissions for the targeted spaces to perform the version deletion.
Deployment configuration
You need to provide the following information to deploy the workflow as a data app or to schedule it:
-
Hub URL: The URL of your KNIME Business Hub instance, e.g. “https://my-business-hub.com”.
-
Application Password ID: User-associated application password ID.
-
Application Password: User-associated application password.
-
Team name: Use “*” to select all and “/” to choose a subset: “Team1/Team2”.
-
Space name: Use “*” to select all and “/” to choose a subset: “Space1/Space2”.
-
The number of days: All item versions older than that will be deleted (default is 30 days).
To create an application password, follow these steps.
Data app
After deploying the workflow as a data app, you can run it. To do so, follow these instructions. Below are listed the steps for the data app::
-
Business Hub connection: You need to connect to the KNIME Business Hub instance through the application password generated previously.
-
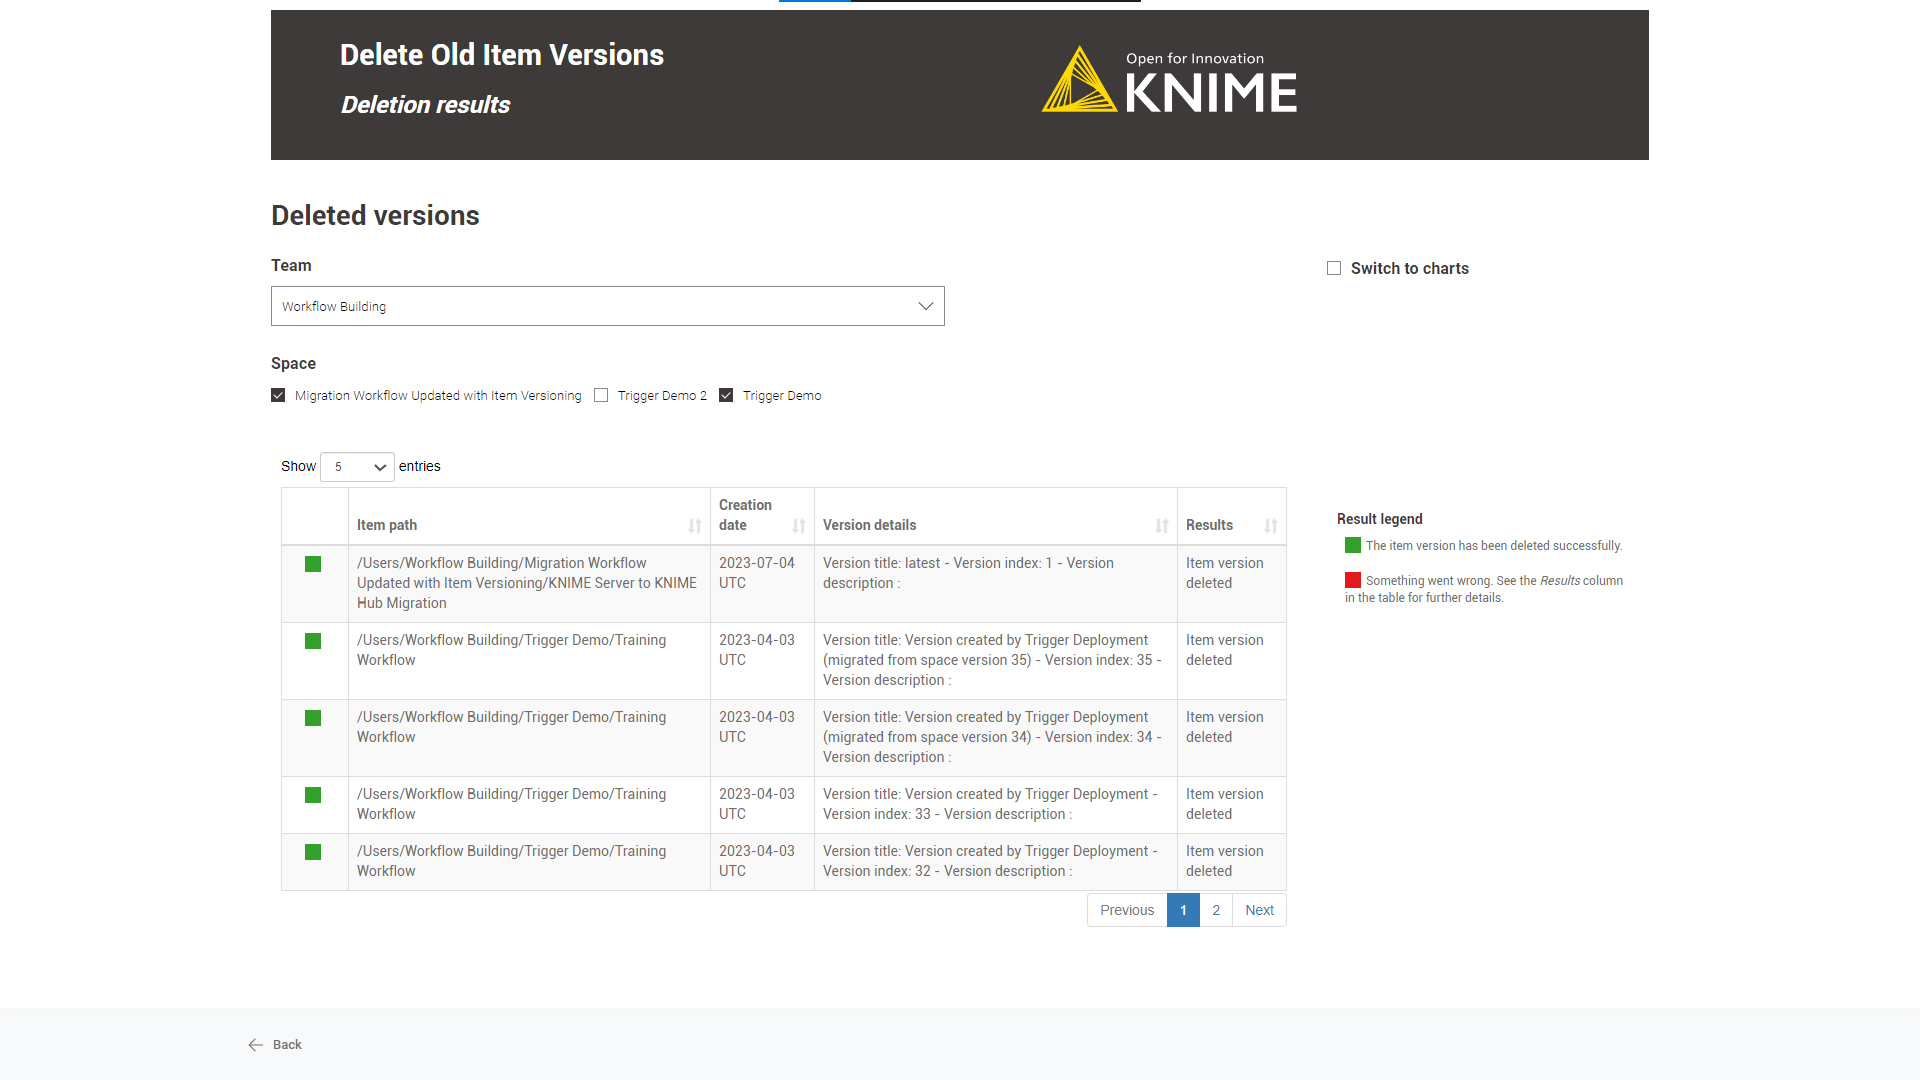
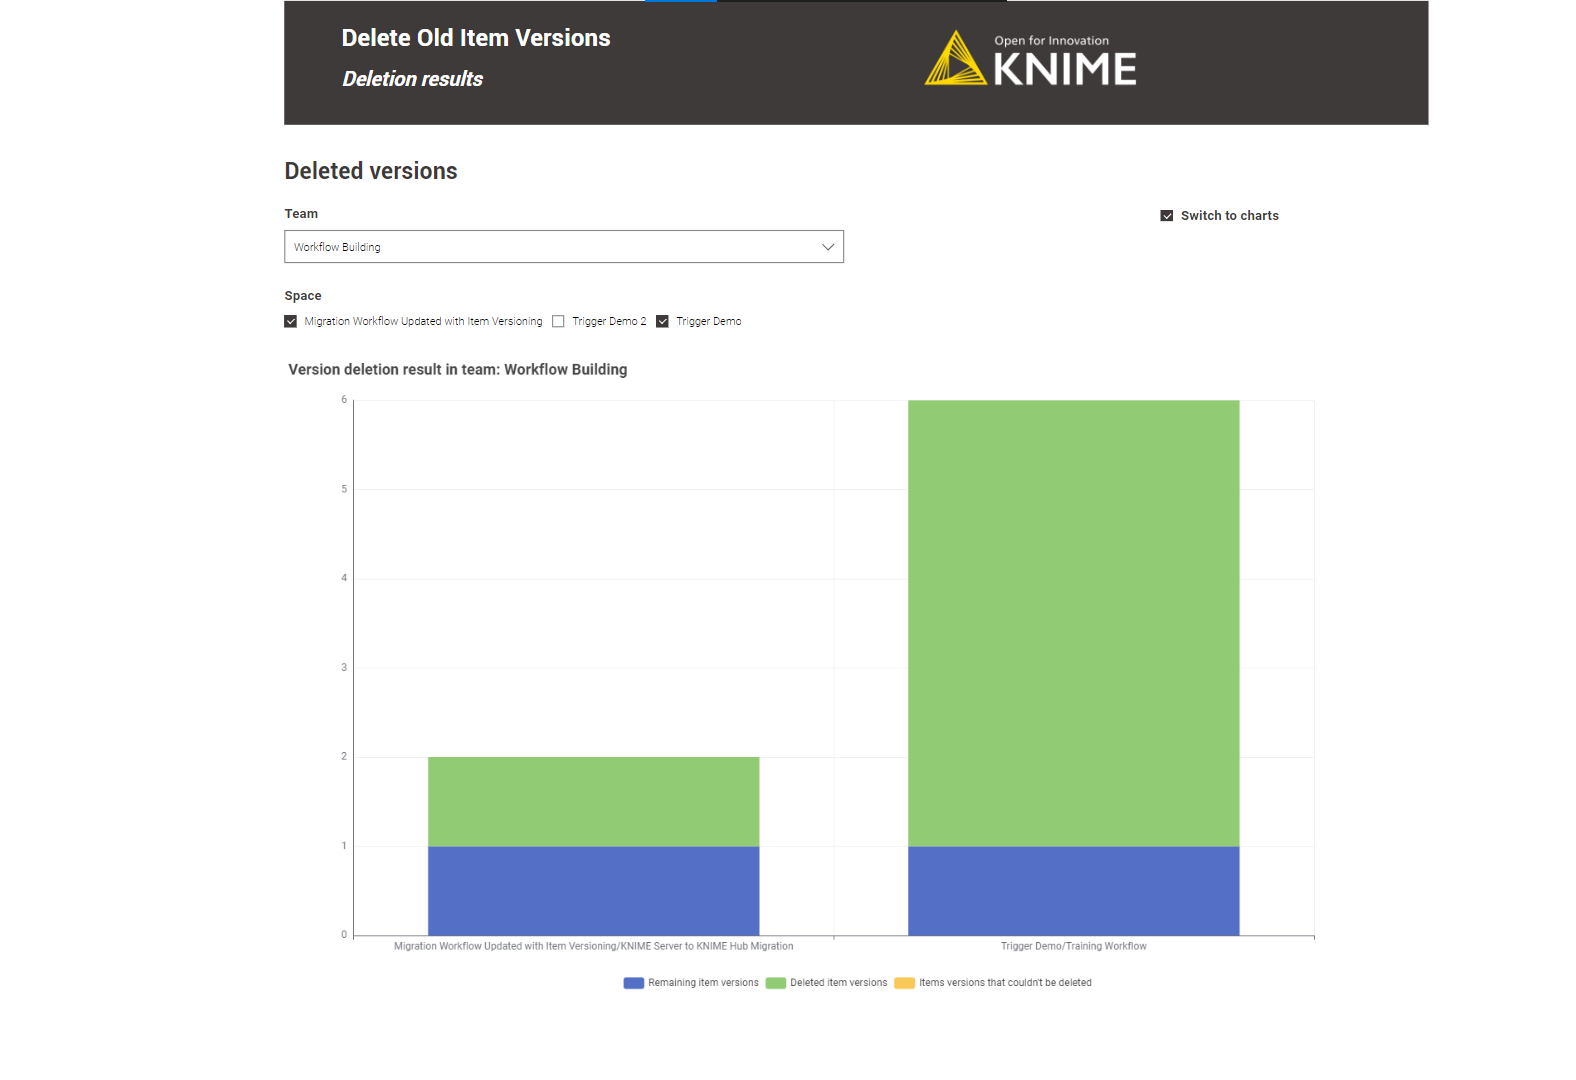
Team and Space selection: Select the teams and associated spaces from which the workflow should delete the old versions.
-
Define version deletion rule: Here, you can set a version deletion rule. All versions older than the given number of days will be deleted.
-
Deletion result: A table showing the deletion result with the version information will appear by default.
Switching to a chart view is possible using the “Switch to charts” option.
Schedule
-
Define when the workflow should be executed through the schedule options. For more information, follow this guide.
-
Ensure the Schedule Deployment is active (Status column).
-
In the Team Deployments page or the workflow page, Deployments section, you can check the number of executions and their status.
Scheduled Workflows Kick-Off Times
Overview
The workflow aims to prevent scheduled deployments from overlapping and, consequently, helps to avoid overloading KNIME Business Hub executors.
Running on demand as a data app offers the user a visual overview of the scheduled deployments within the given number of days by team and execution context.
Worklfow specs
The workflow visualizes all the scheduled deployments by KNIME Business Hub execution context and team in the following days. Notice that the maximum number of days is set up to seven.
The workflow shows only those schedules whose deployment is active and has not been disabled via the KNIME Analytics Platform and those with a valid next execution date.
Depending on the user role, you can view the following schedules:
Global admin: monitor the scheduled workflows of any team and any KNIME Business Hub execution context.
Team admin: monitor the scheduled workflows for any KNIME Business Hub execution context in the team.
Team member: monitor the scheduled workflows for any KNIME Business Hub execution context in the team.
Deployment configuration
This workflow can be deployed as a data app.
You can provide the following information to deploy the workflow as a data app:
-
Hub URL: The URL of your KNIME Business Hub instance, e.g. “https://my-business-hub.com”.
-
Application Password ID: User-associated application password ID.
-
Application Password: User-associated application password.
To create an application password, follow these steps.
Data app
After deploying the workflow as a data app, you can run it. To do so, follow these instructions. Below are the steps for the data app:
-
Business Hub connection: You need to connect to the KNIME Business Hub instance through the application password generated previously.
-
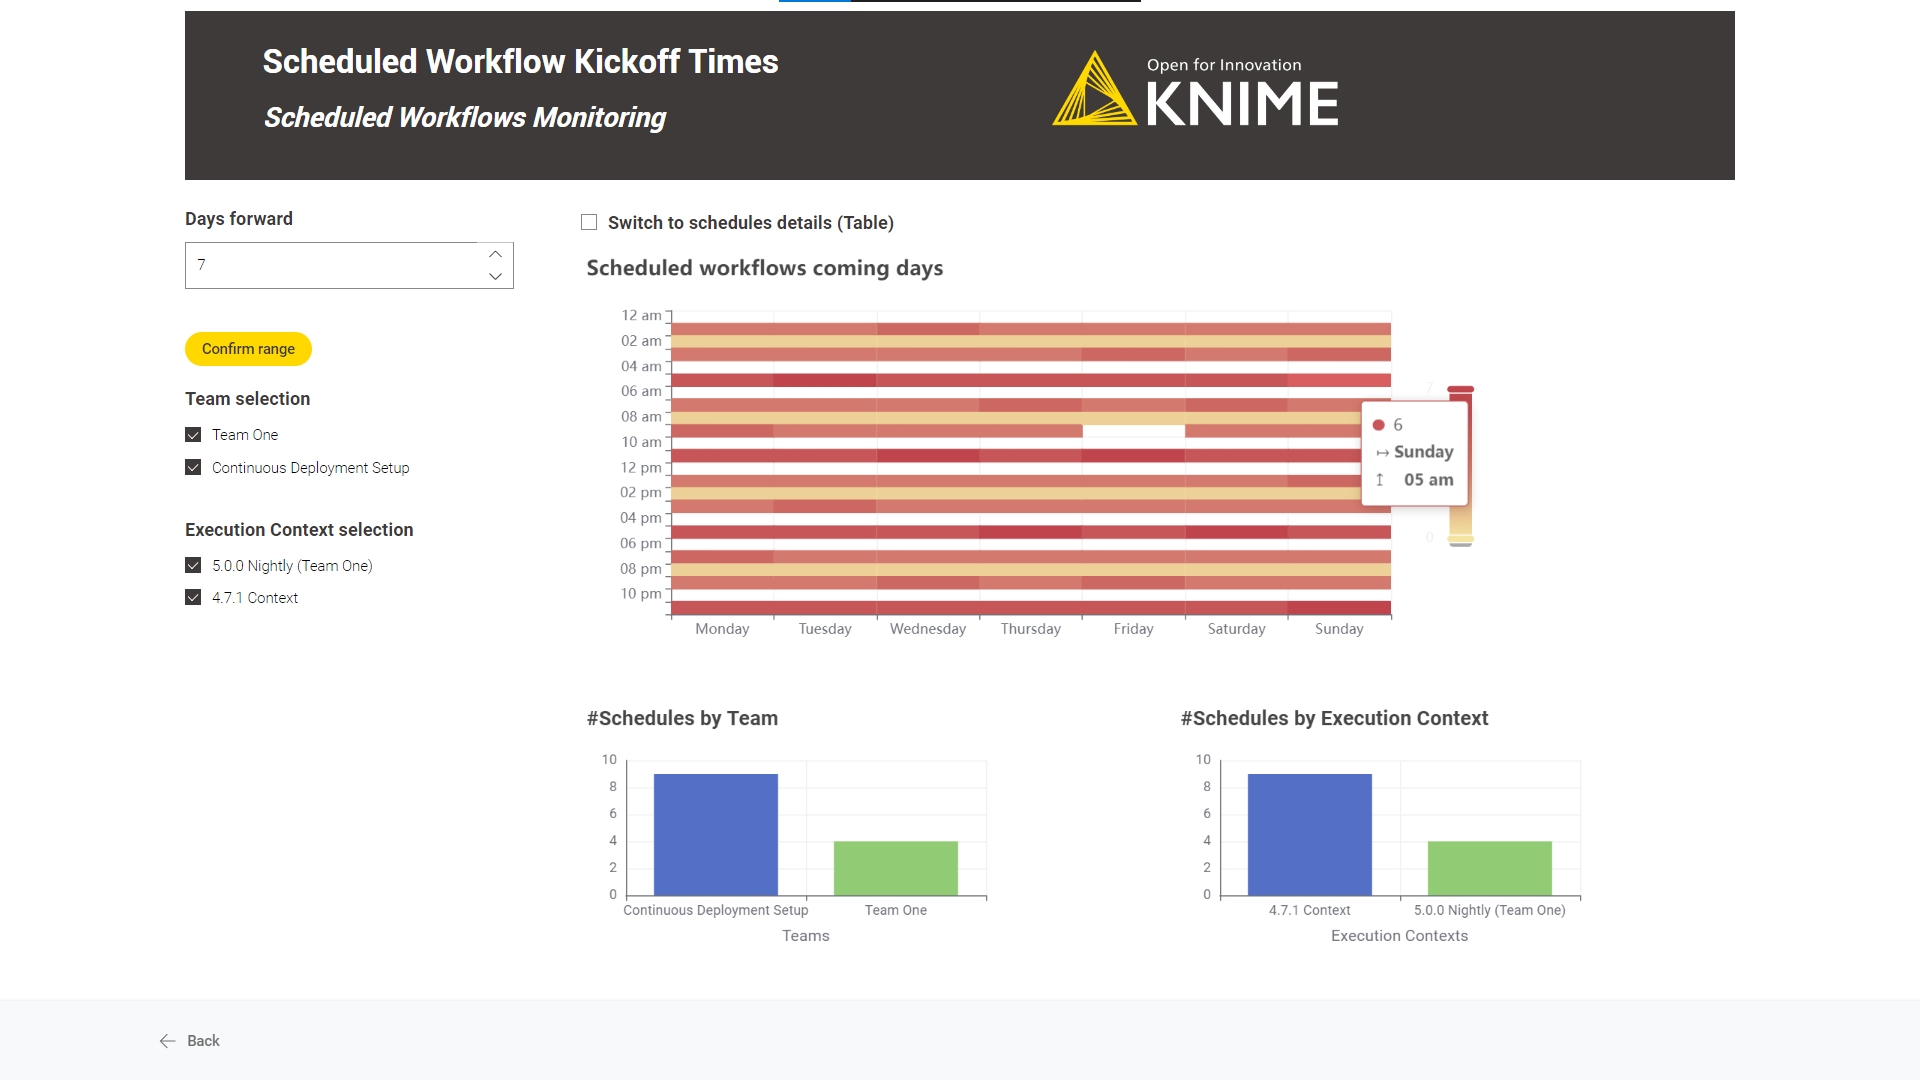
Scheduled Workflows Monitoring: By default, it visually represents the scheduled workflows in the coming days.
The number of scheduled workflows per day and hour and the number of
schedules by team and execution context are represented.
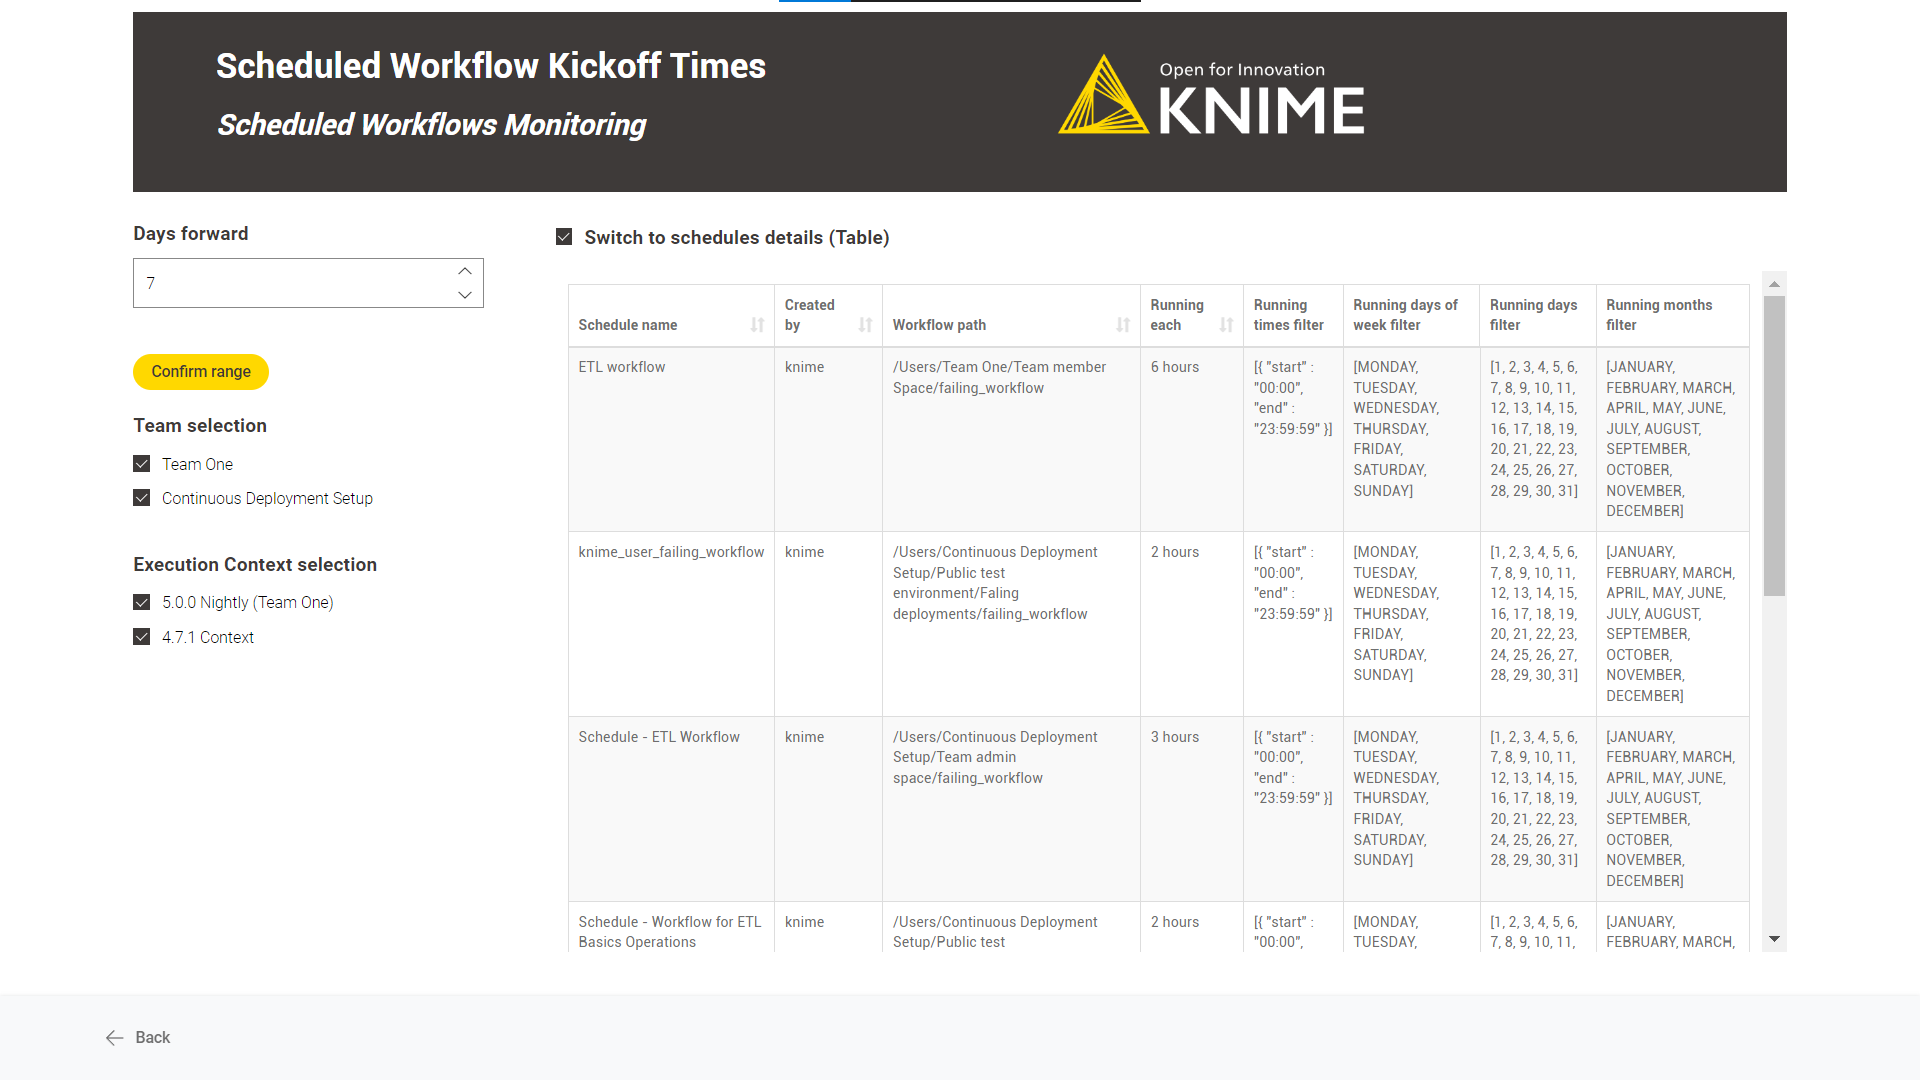
Diving deep into each scheduled deployment is possible by switching to a
“Table” mode. Use the “Switch to schedules details (Table)” option.
Count Workflows Running Per Day
Overview
After a while, the KNIME Business Hub instance automatically discards already executed workflow jobs. KNIME Business Hub administrators can define this time window until a specific period, but it is not infinite.
The workflow scope is to go beyond this automatic discard timeline creating a historical file with all the workflow execution information for further consultation.
Workflow specs
The workflow saves in the root level of an existing team space a CSV file of the jobs information of any state (“Executed”,” Failed”, etc.) and from any execution type (Deployments and Ad-hoc executions).
The workflow job information a user could retrieve depends on the user role running the deployed workflow:
Global admin: can recover all workflow jobs in any team and space.
Team admin: can recover all workflow jobs within the team where it is an admin.
Team member: can recover workflow jobs from any team and space where is a member (no matter the user’s right’s on space items). It also includes shared deployments from teams where the user is not a member.
The team space where the CSV file can be saved depends on the user role running the deployed workflow:
Global admin: can save workflow job information in any team space.
Team admin: can save workflow job information in every team space where it is an admin.
Team member: can save workflow job information in every team space where it is a member and it has edit permissions.
The user must define the number of backward days you want to retrieve the workflow job information, e.g. last five days.
If you repeatedly target the same team space executing this workflow, the workflow will append the new information to the master file.
Deployment configuration
You can provide the following information to deploy the workflow as a data app or schedule it:
-
Hub URL: The URL of your KNIME Business Hub instance, e.g. “https://my-business-hub.com”.
-
Application Password ID: User-associated application password ID.
-
Application Password: User-associated application password.
-
Last n days filter: Save job information of all jobs from the last n days.
-
Select the destination Team: The team in which the job information will be saved.
-
Select the destination Space: The space in which the job information will be saved.
To create an application password, follow these steps.
Data app
After deploying the workflow as a data app, you can run it. To do so, follow these instructions. Below are the steps for the data app:
-
Business Hub connection: You need to connect to the KNIME Business Hub instance through the previously generated application password.
-
Set rule and file destination: Select the last n days to save the workflow job information. And choose the destination team and space where this file will be saved.
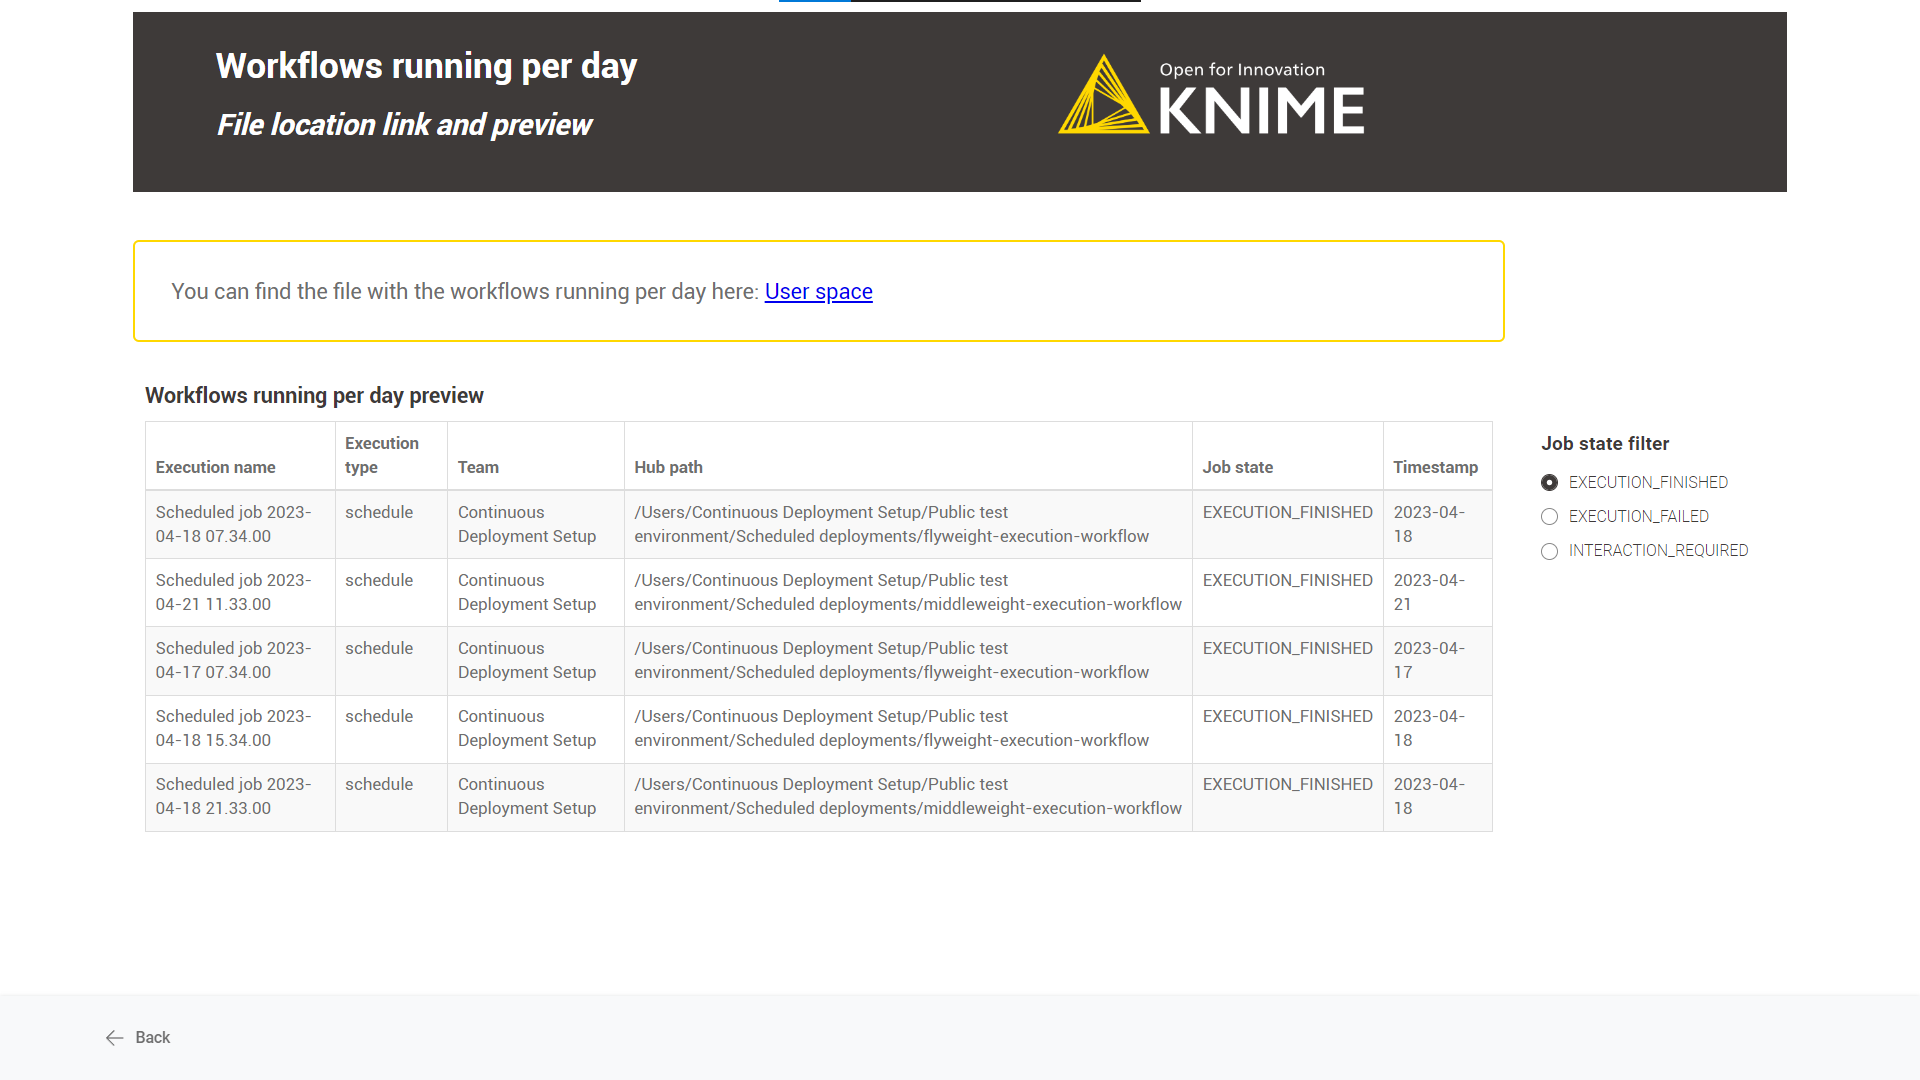
-
File location link and preview: You can find the link to the destination space and a preview of the saved job information.
Schedule
-
Define when the workflow should be executed through the schedule options. For more information, follow this guide.
It is recommended to adjust the last n days' field to the chosen schedule option, e.g. if the workflow is scheduled every seven days, set the last n days to seven to avoid duplicate information in the CSV file. -
Ensure the Schedule Deployment is active (Status column).
-
In the Team Deployments page or the workflow page, Deployments section, you can check the number of executions and their status.
Workflows' Run Time
Overview
This workflow aims to list all the workflows sorted by the average execution time (the greater the first) for the last n days.
Workflow specs
We calculate the run time by solely considering the deployed schedules, as monitoring the execution time of other deployment types is not meaningful. For example, a user could play around one hour or five minutes with a data app.
The average workflow execution time and the standard deviation are calculated for the given period.
Be aware that the number of days a workflow deployment’s job is available depends on the KNIME Business Hub instance’s configuration, e.g. a common value would be seven days. After that period, all jobs would be discarded automatically.
The average jobs run time, which a user can monitor, depends on the role of the user running the deployed workflow:
Global admin: can monitor the run time of all deployed schedules in any Team and Space.
Team admin: can monitor the run time of all deployed schedules within the Team where it is an admin.
Team member: can monitor the run time of all deployed schedules within the Team where it is a member.
Deployment configuration
This workflow is designed to be deployed only as a data app.
You can provide the following information to deploy the workflow:
-
Hub URL: The URL of your KNIME Business Hub instance, e.g. “https://my-business-hub.com”.
-
Application Password ID: User-associated application password ID.
-
Application Password: User-associated application password.
-
Last n days filter: number of days from calculating the average execution time, e.g. last seven days.
If you want to know how to create an application password, follow these steps.
Data app
After deploying the workflow as a data app, you can run it. To do so, follow these instructions. Below are the steps for the data app:
-
Business Hub connection: You need to connect to the KNIME Business Hub instance through the application password generated previously.
-
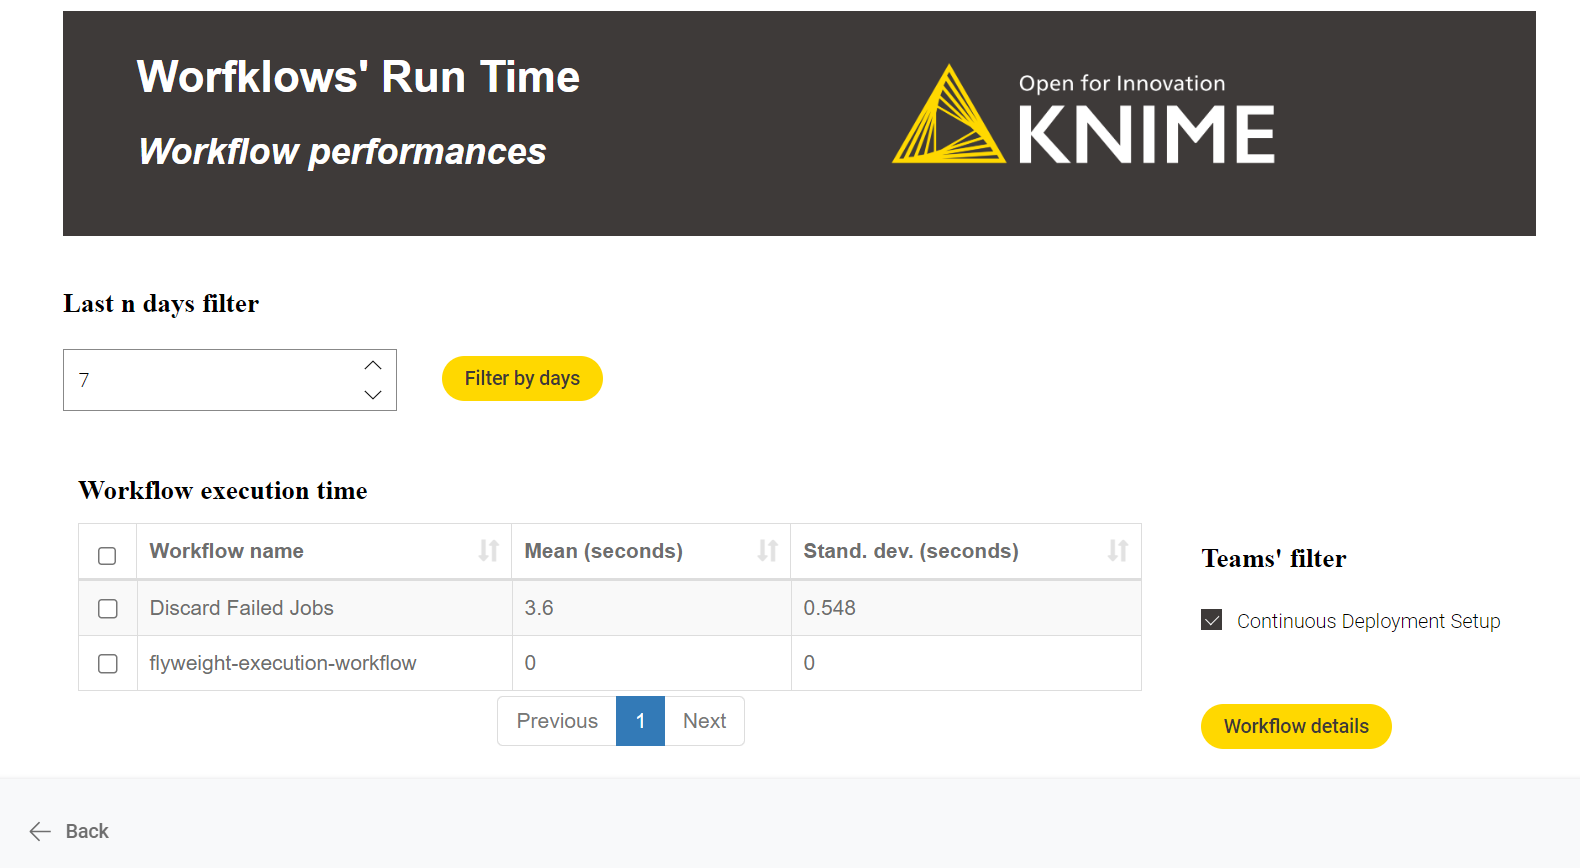
Workflow performances: A performance overview of the deployed workflows for the last n days. Diving deep into any workflow performance is possible by selecting the workflow and clicking the “workflow details” button. When diving deep into the workflow, each workflow’s average run time calculation is calculated per day (stacked area chart).
Monitor Users' Usage
Overview
The workflow aims to track KNIME Business Hub user logins to better manage the KNIME Business Hub users' quantity and instance usage.
Workflow specs
You need access to the Keycloak instance embedded in KNIME Business Hub to generate the Client Id and Secret necessary to access the KNIME Business Hub user information.
The workflow shows information about two users type: active and inactive.
Inactive users: those who have never logged into the KNIME Business Hub instance since their creation date.
Active users: those who logged into the KNIME Business Hub instance in the last n days.
It is possible to analyse the session length for actively engaged users. However, it’s important to note that if a user doesn’t log out after each session, it could impact the accuracy of the KPI calculation. As a result, this metric cannot be considered completely dependable.
Deployment configuration
This workflow is designed to be deployed only as a data app.
You can provide the following information to deploy the workflow:
-
Hub URL: The URL of your KNIME Business Hub instance, e.g. “https://my-business-hub.com”.
-
Keycloak Client ID: your-ClientId from Keycloak.
-
Keycloak Client Secret: your-Client-Secret from Keycloak.
To generate a Keycloak Client ID and Client Secret:
-
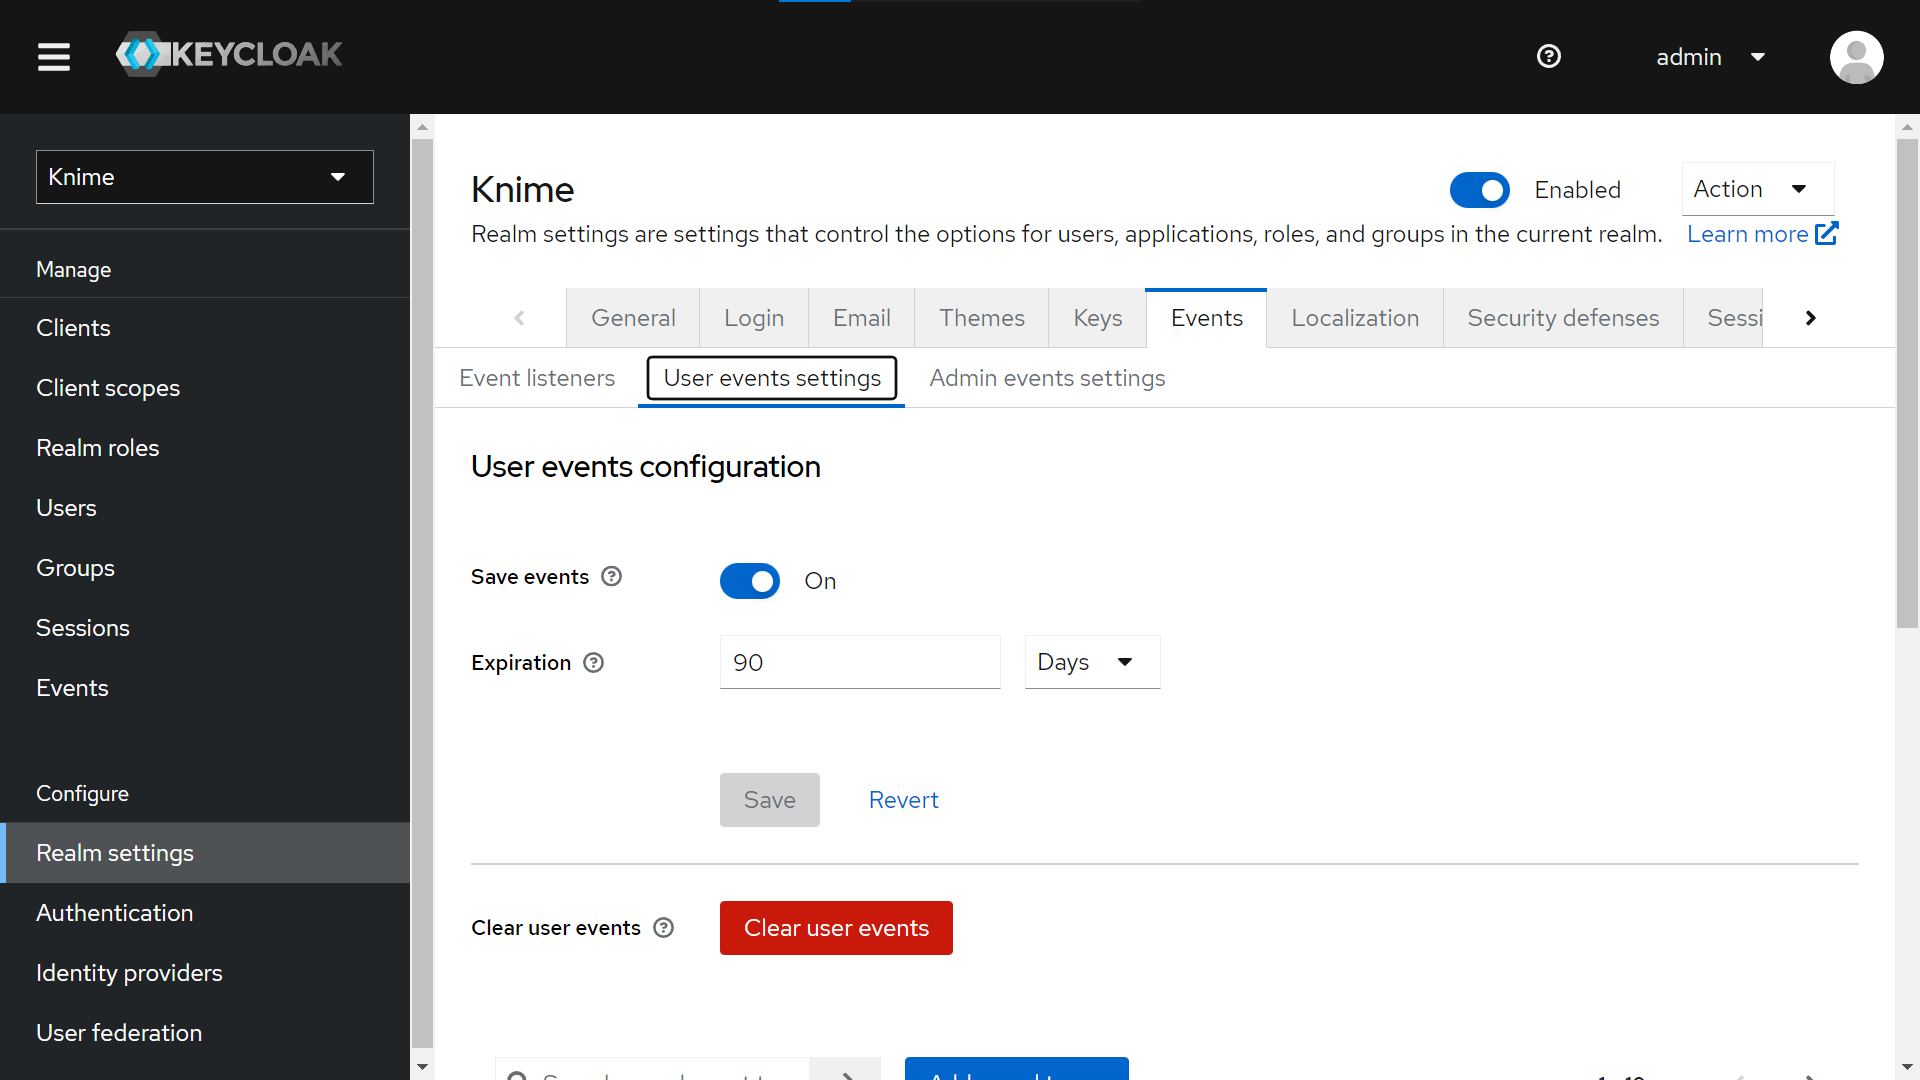
Login into Keycloak Admin Console: "https://auth.my-business-hub.com > Administration Console".
-
Select your Realm, and from “Realm Settings > Events > User events settings”, activate “Save events” to save KNIME Business Hub Users events. You can configure how many days to keep the user’s events.
-
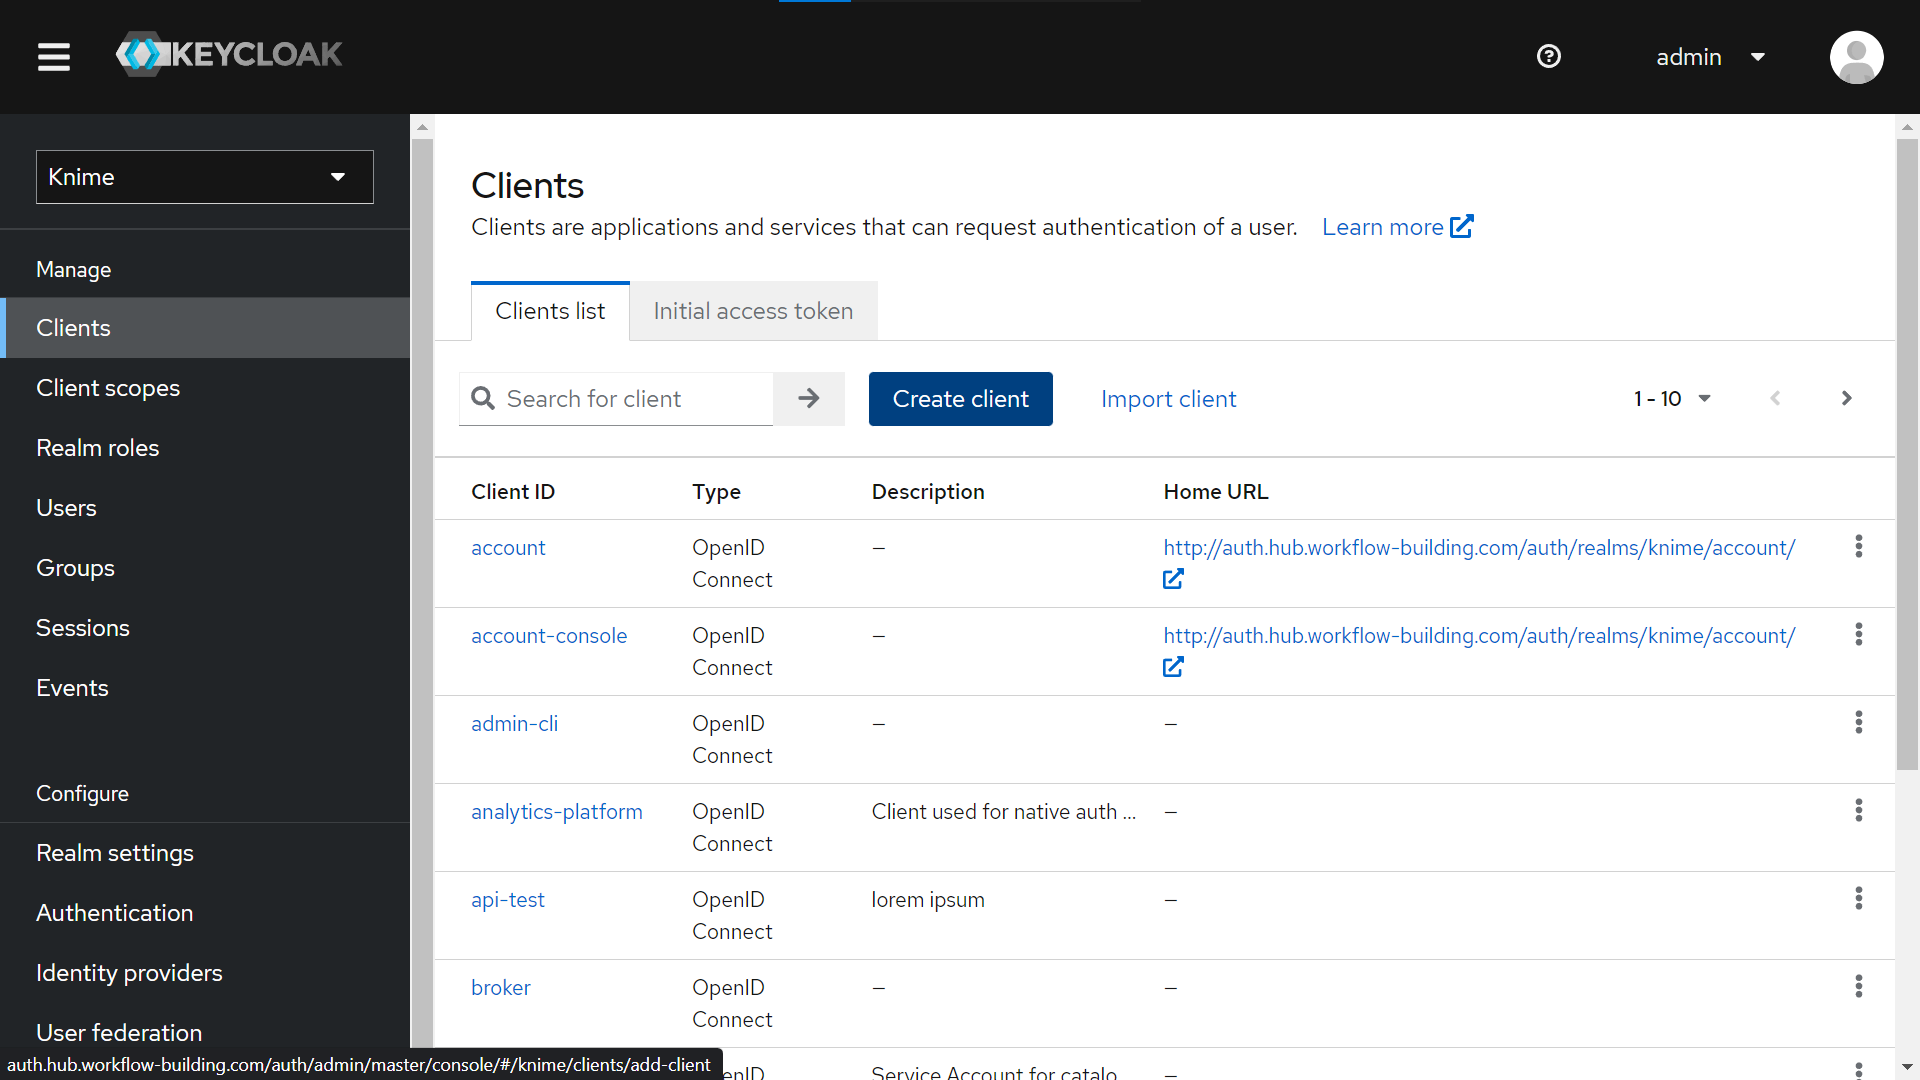
Create a new Client from “Clients > Create Client”. Give it a Client ID (tutorial-api in our example), a name (tutorial) and a description (lorem ipsum).
-
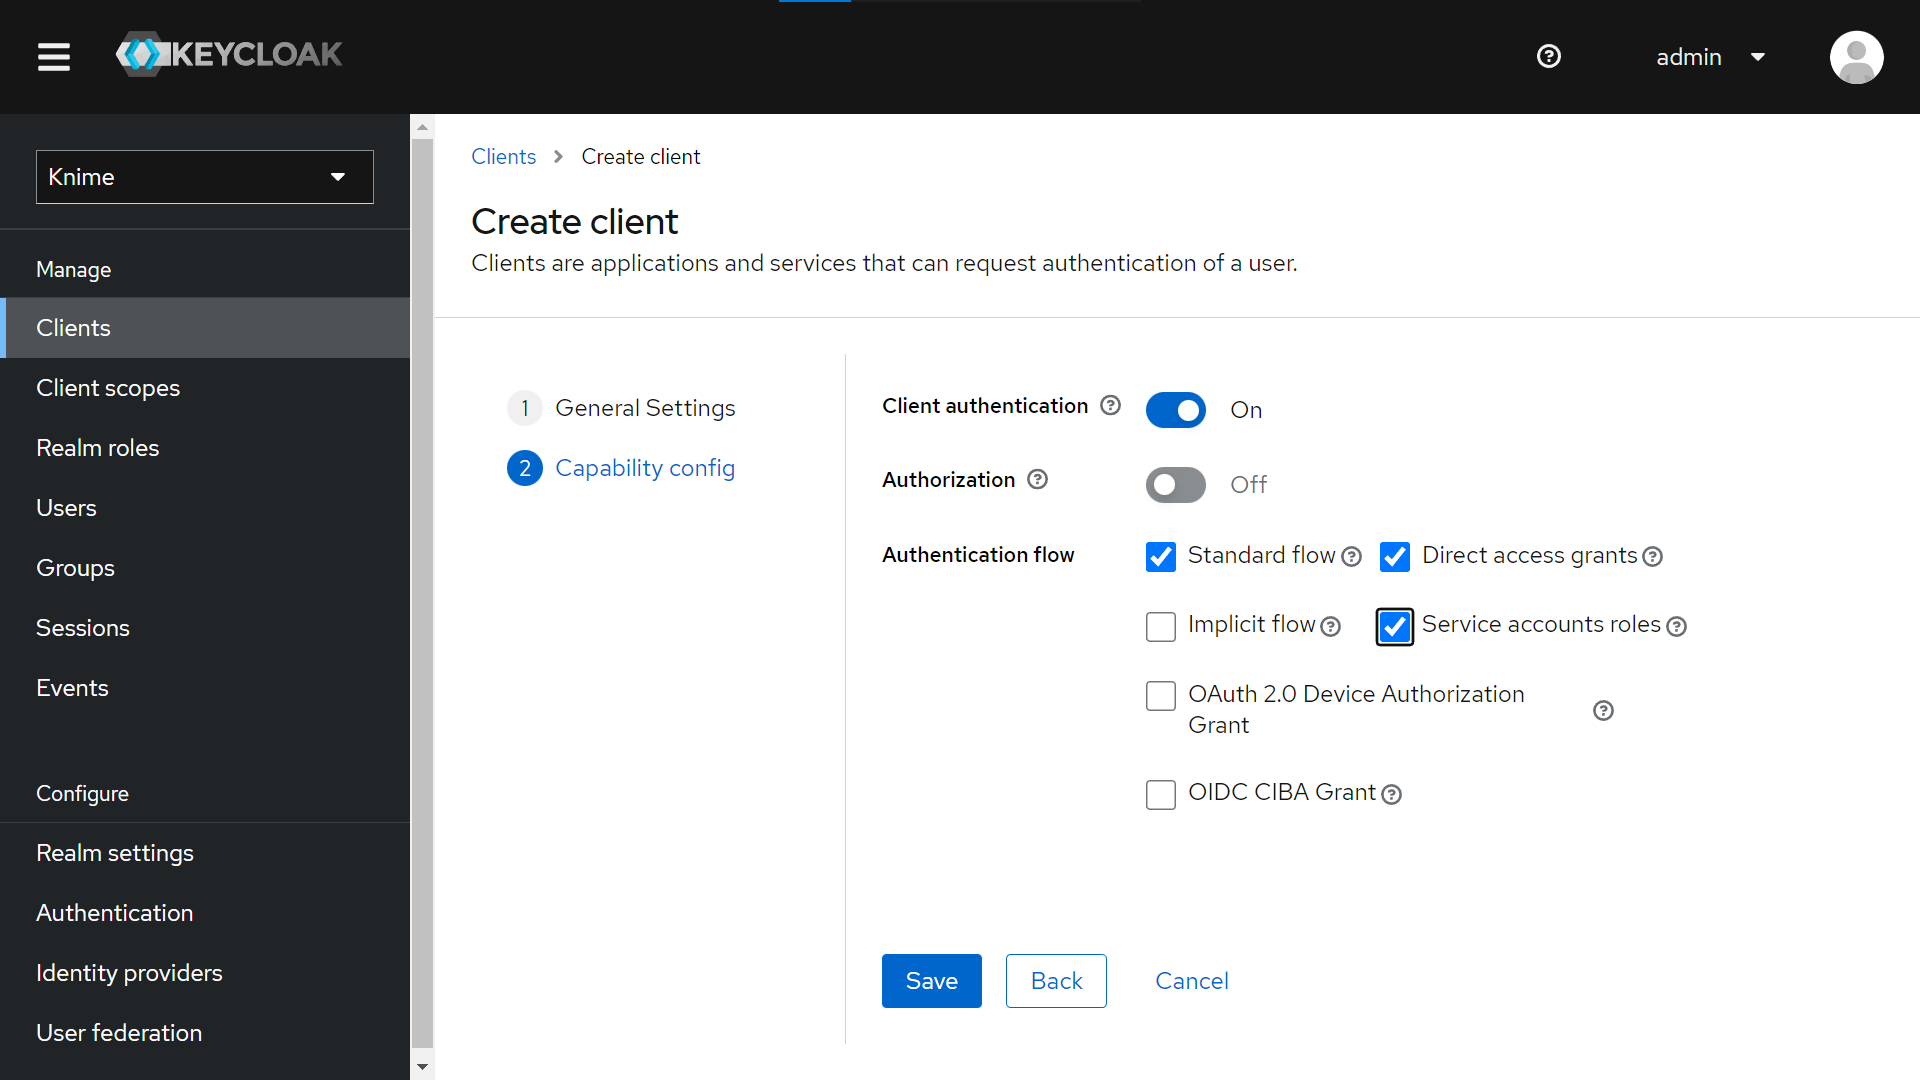
In the “Capability config” section, activate “Client authentication”.
-
Select “Service account roles” to allow you to authenticate this client to Keycloak and retrieve the access token dedicated to this client.
-
Save your new client.
-
-
Click on your new Client (tutorial-api) from “Clients > Client ID (Column)”.
-
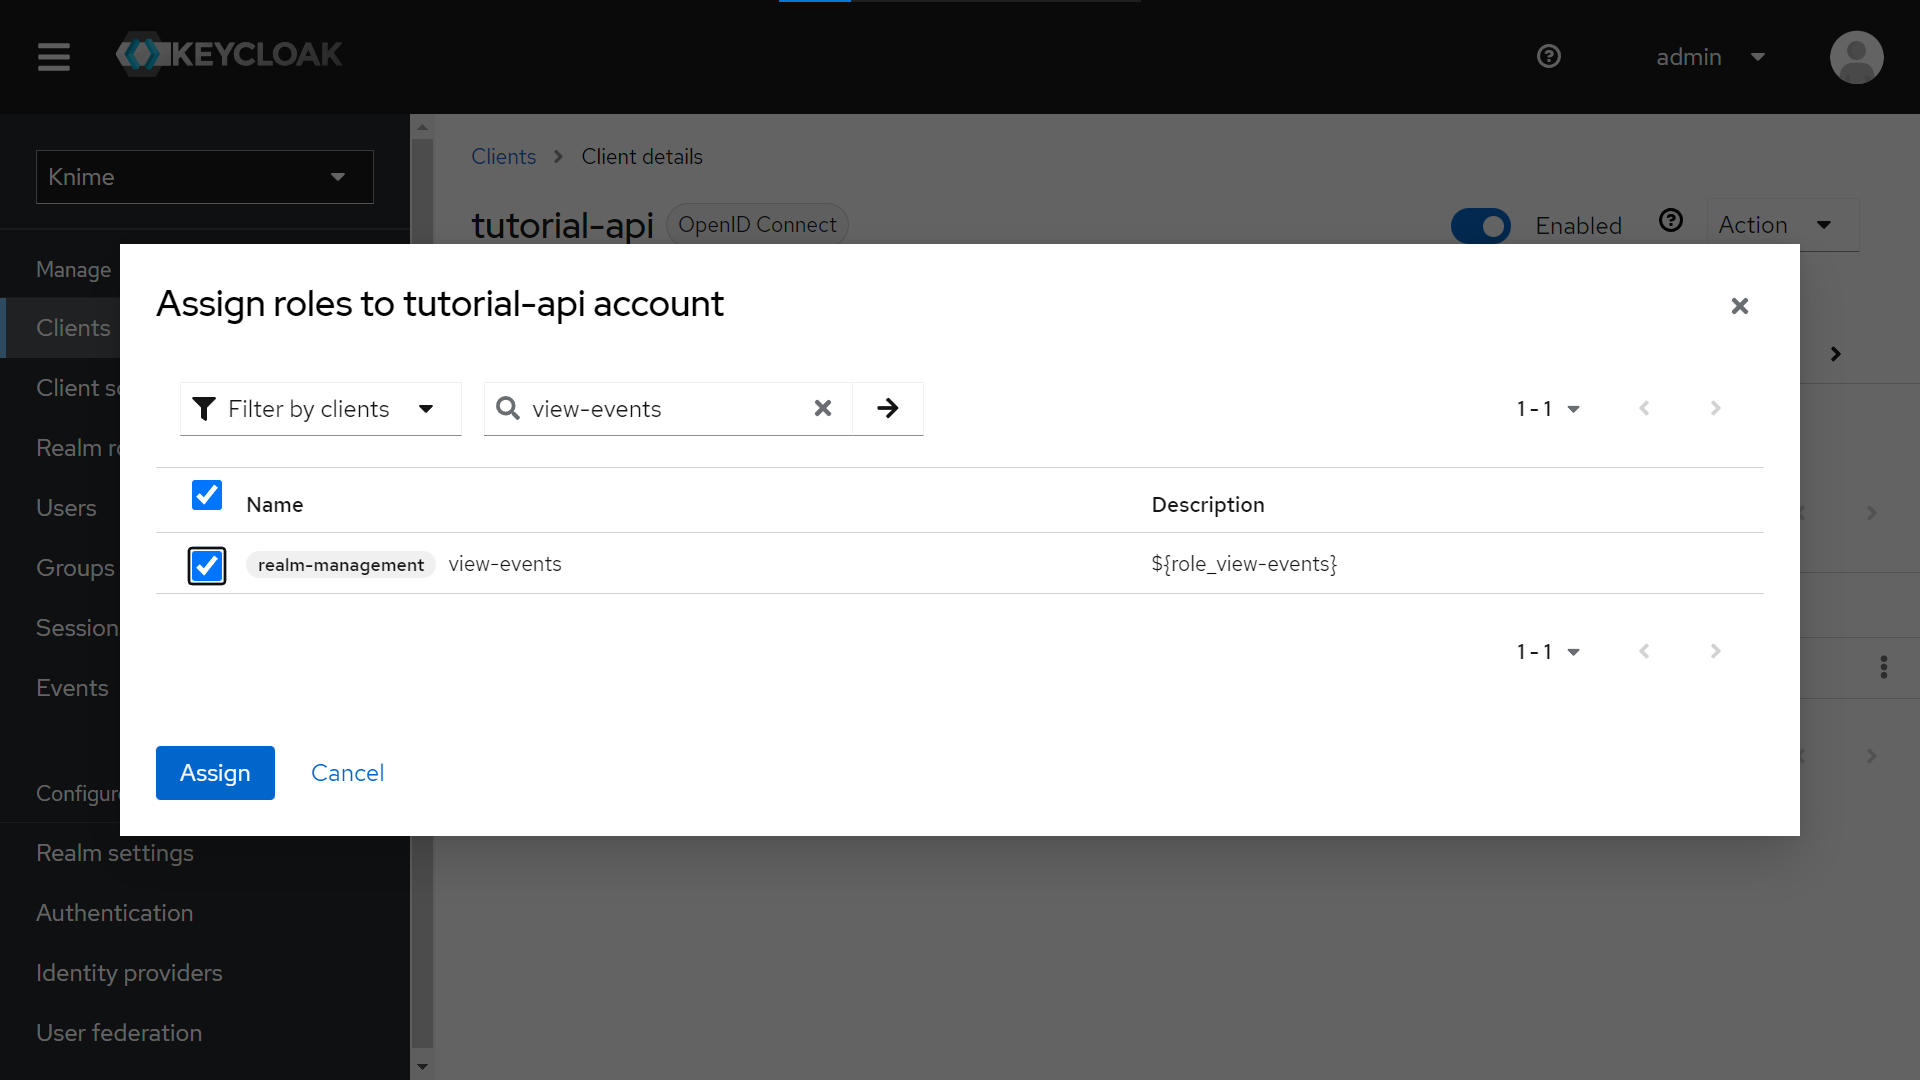
Go to the “Service account roles” tab > Click the “Assign role” button.

-
Click “Filter by Roles” and select “Filter by clients”.
-
Search for “view-events” and for “manage-users” and assign both roles to the Service account associated with our client.
-
-
Finally, to retrieve the Client ID and Client secret:
-
Go to “Clients > Client ID (Column)” and choose your client (tutorial-api in our example)
-
Click on the “Credentials” tab
-
Leave as a Client Authenticator the “Client ID and Secret” option.
-
Copy the Client’s Secret.
-
Copy the Client ID from the top of the tab (“tutorial-api” in the screenshot below).

-
Data app
After deploying the workflow as a data app, you can run it. To do so, follow these instructions. Below are the steps for the data app:
Keycloak connection: the user must connect to the Keycloak instance embedded in KNIME Business Hub through the previously generated Client ID and Secret.
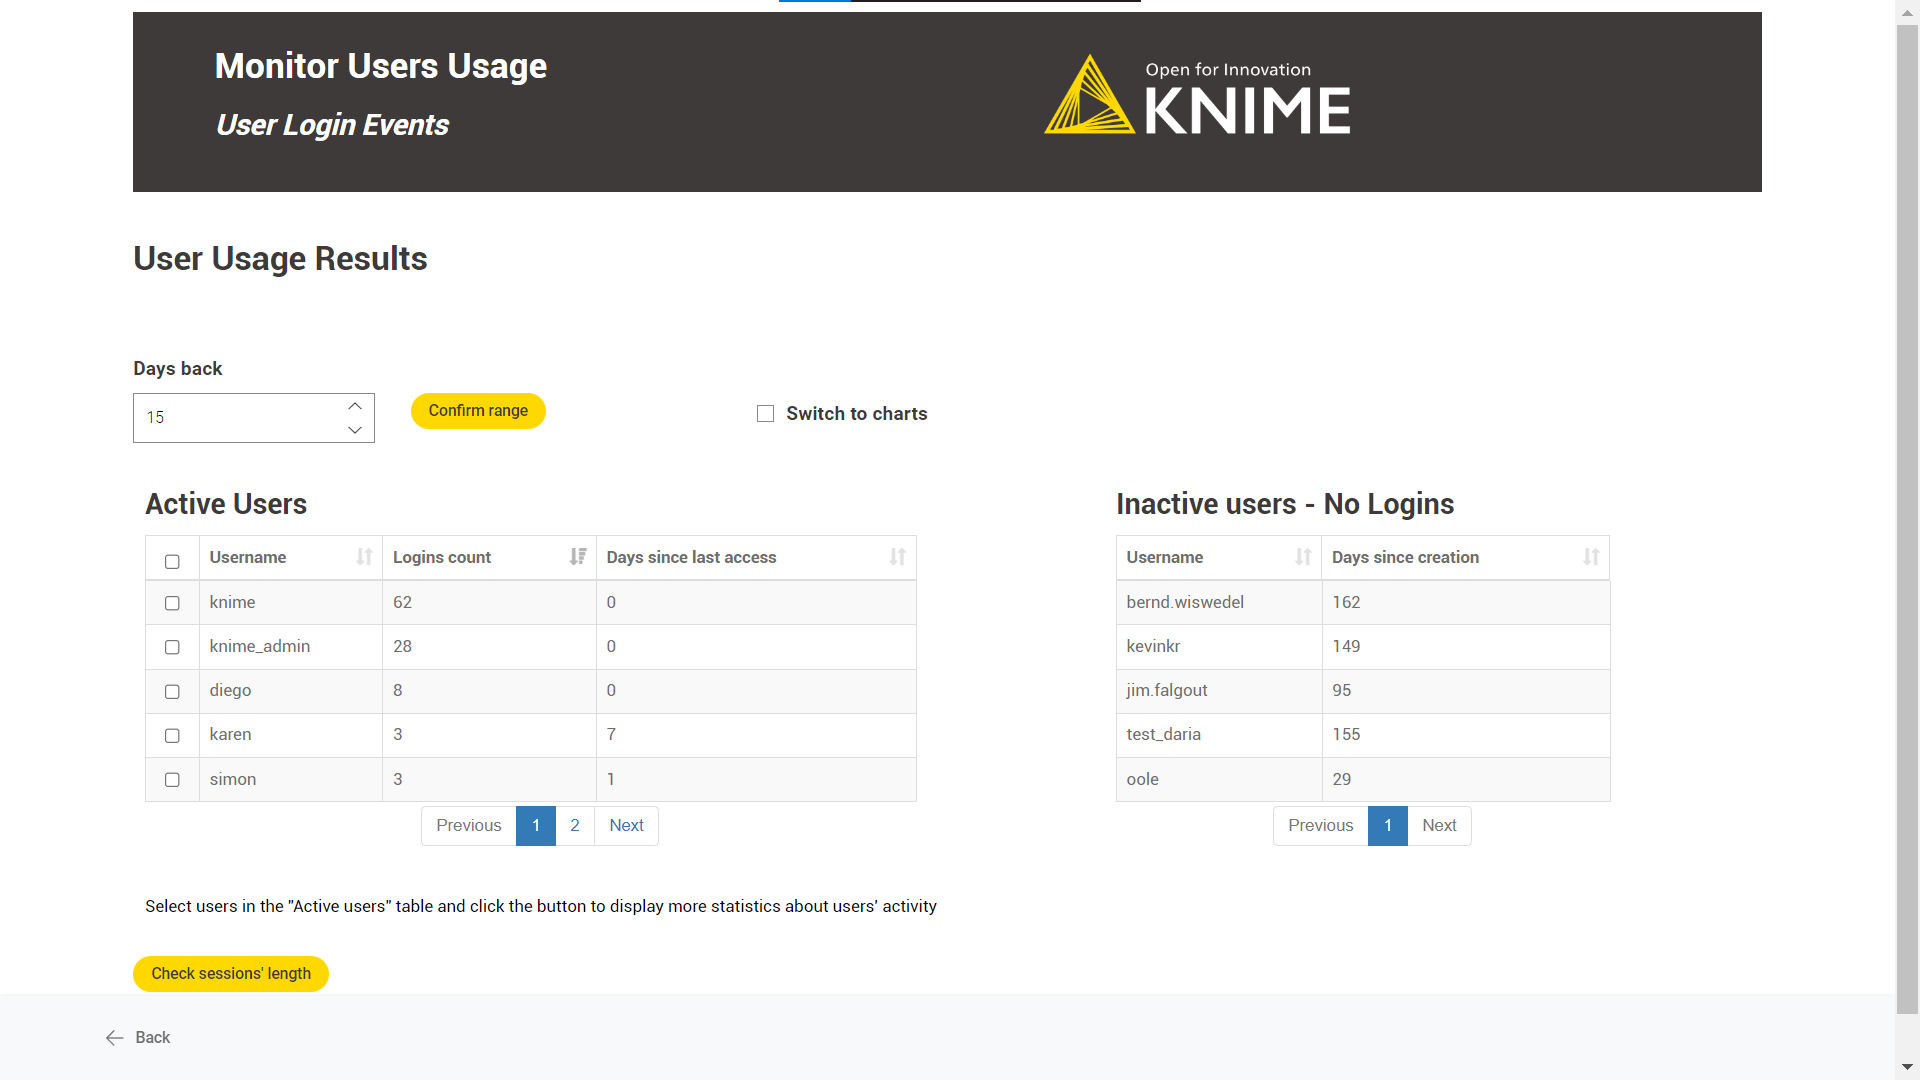
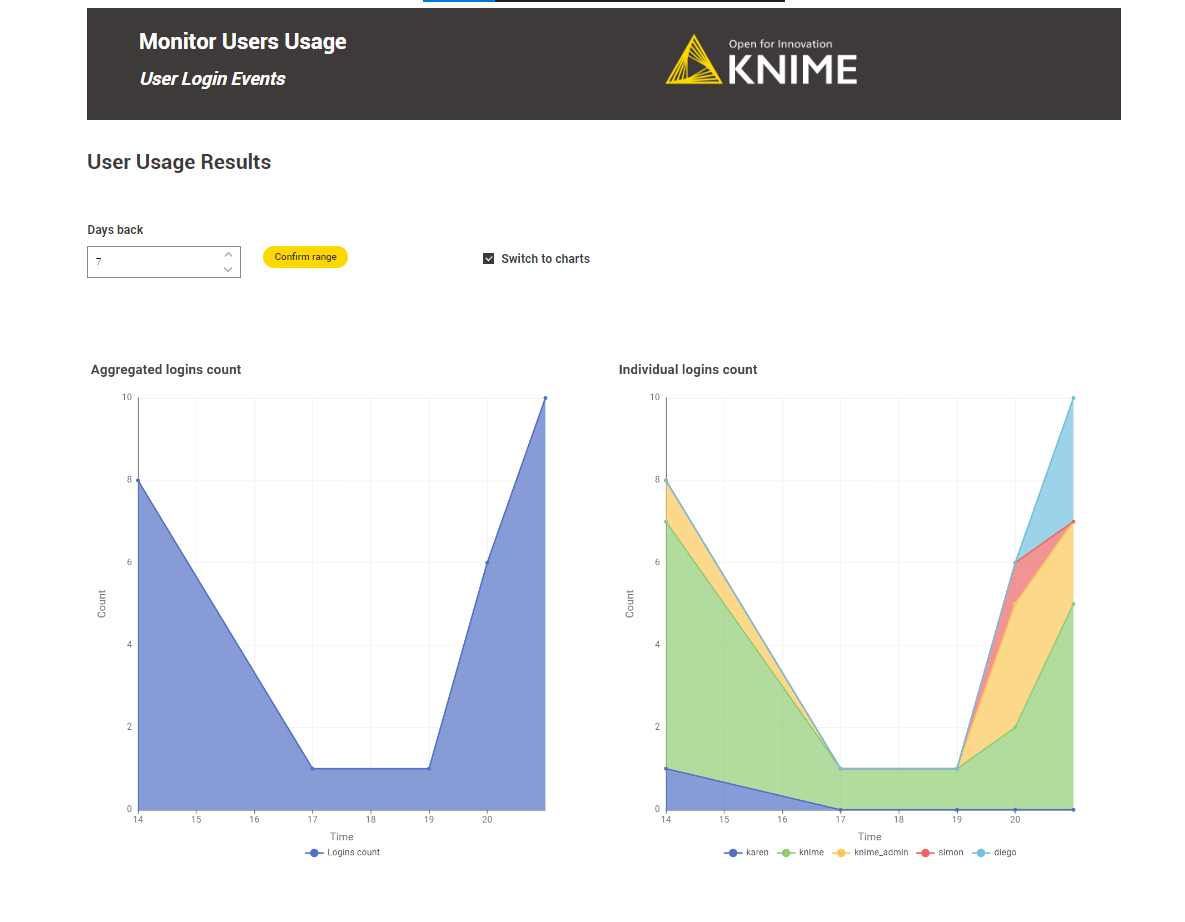
User login events: Select the last n days to see KNIME Business Hub active users' login count and inactive users' information. It is possible to explore the active users' session length.
Also, the user can switch to chart mode by clicking the “Switch to charts” option.
KNIME Business Hub API documentation
Most KNIME Business Hub functionalities are also available via REST API allowing you to perform several actions.
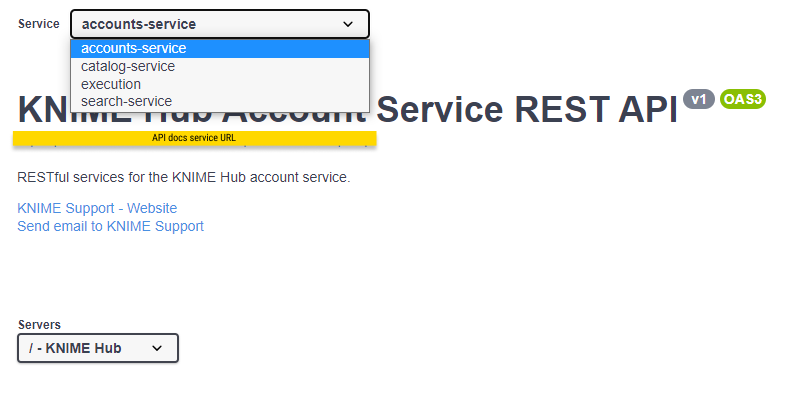
You can access the API documentation by navigating to the following URL:
api.<base-url>/api-doc
where <base-url> is your Business Hub instance URL, e.g. hub.example.com.
Here you can select from the drop-down menu the service you want to use.
Support Bundles and Troubleshooting
When generating a support bundle, no data leaves the cluster.
If necessary, you can download the support bundle and send it to KNIME for the purpose of troubleshooting. Under extreme circumstances, the KNIME team may forward the support bundle to the Replicated support team for additional help.
When generating a support bundle, a limited amount of information will be automatically redacted (IPv4 addresses, connection strings, etc.). You can configure additional redactions and/or manually redact information prior to sending the bundle. See the Configuring redaction in support bundles section for more details.
KNIME Business Hub is capable of generating support bundles in a standard format, even when the admin console isn’t working. This ensures that users are able to provide all of the necessary information for KNIME to be able to identify the problem and prescribe a solution.
Generating a support bundle (GUI)
In order to help troubleshoot an installation, or to simply inspect the logs of the cluster in a user-friendly format, you will need to generate a support bundle.
Simply open the KOTS Admin Console, navigate to the Troubleshoot pane, and click the Generate a support bundle button to generate a support bundle.
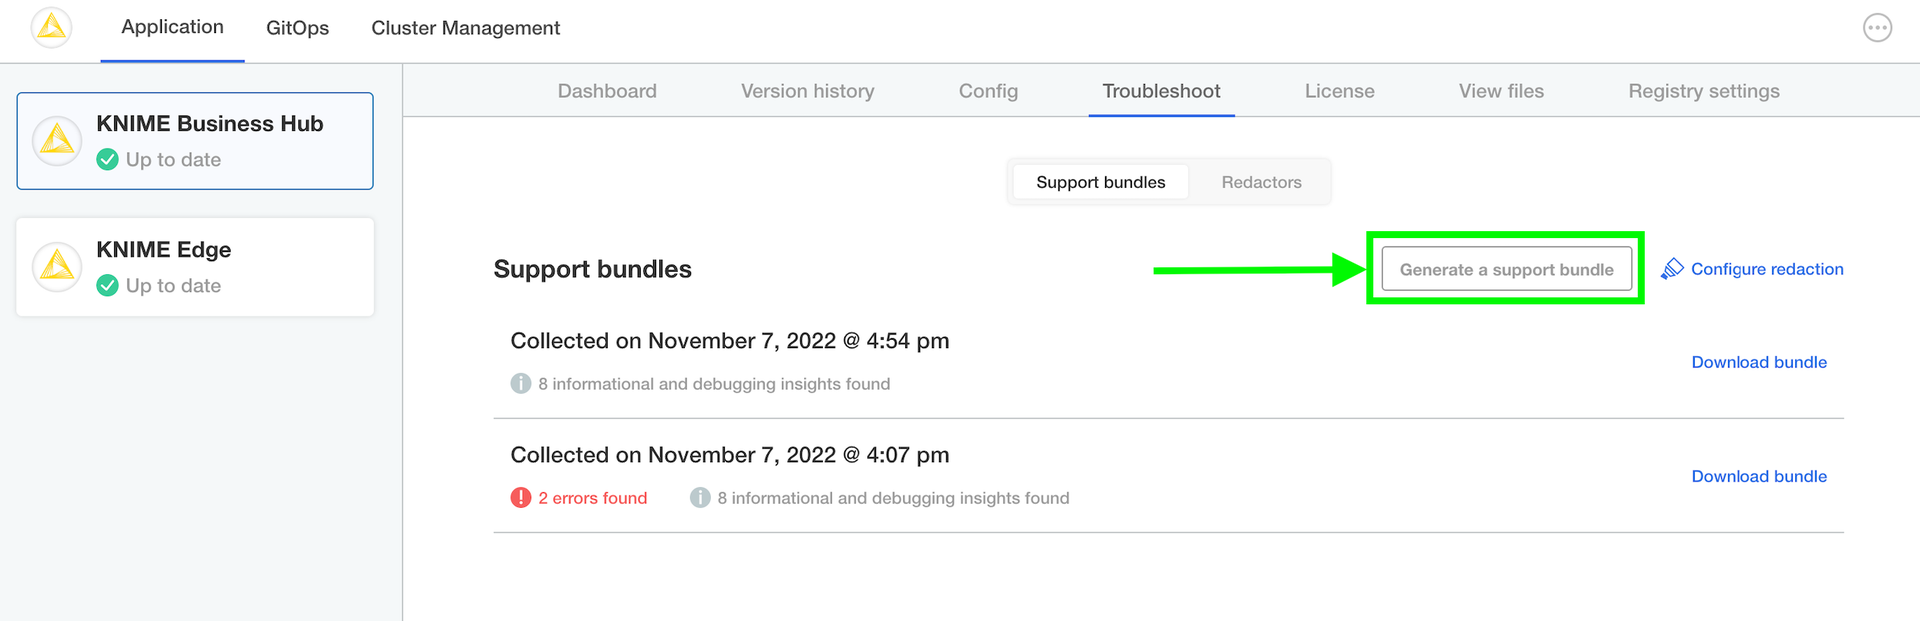
All generated support bundles will display in the list above. Click the Download bundle button to download the bundle(s) you want to share with KNIME, and please see the Configuring redaction in support bundles section for information on how to redact confidential/personal information before sending.
Generating a support bundle (CLI)
See Replicated documentation for instructions on how to generate a support bundle via the Replicated CLI.
Configuring redaction in support bundles
When generating a support bundle, a limited amount of information will be automatically redacted (IPv4 addresses, connection strings, etc.) but it is not guaranteed to be a comprehensive set of redactions. You may have additional information in your logs or configuration that you do not wish to share with the KNIME engineering team.
One option is to unzip the generated .zip support bundle and manually review/redact information prior to sending the bundle to KNIME. However, there is a lot of information to review and the redaction of certain information can be automated fairly easily. The ideal option is to configure automated redactions via Redactor resources, which will automatically redact information for all future support bundles.
In order to configure automated redactors, first open the KOTS Admin Console. Navigate to the Troubleshoot pane and click Configure Redaction.
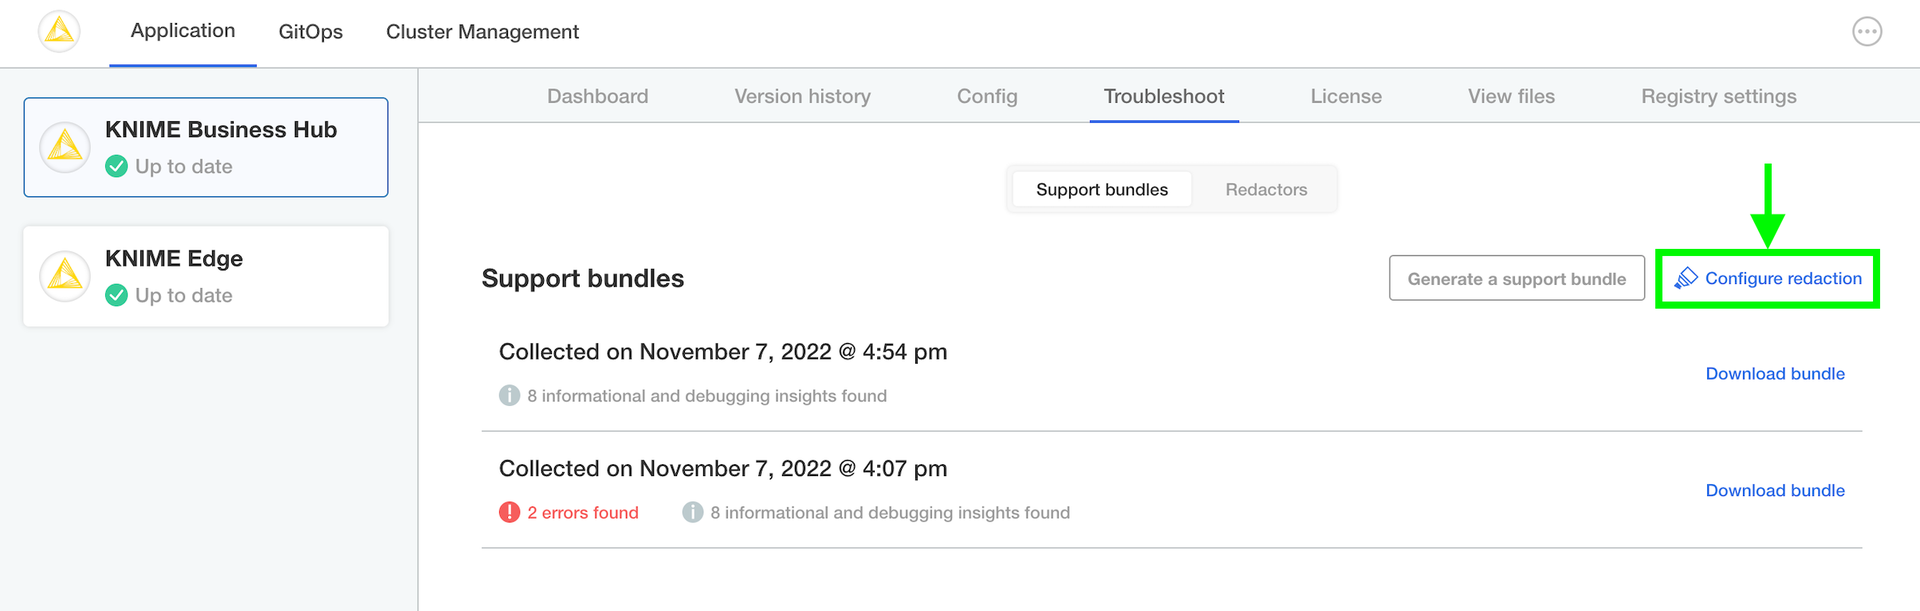
If you have configured your own custom redactions that you feel would be valuable to other users of KNIME Business Hub, please feel encouraged to share the configuration with KNIME so that it can be considered & potentially added to future releases.
Inspecting support bundles
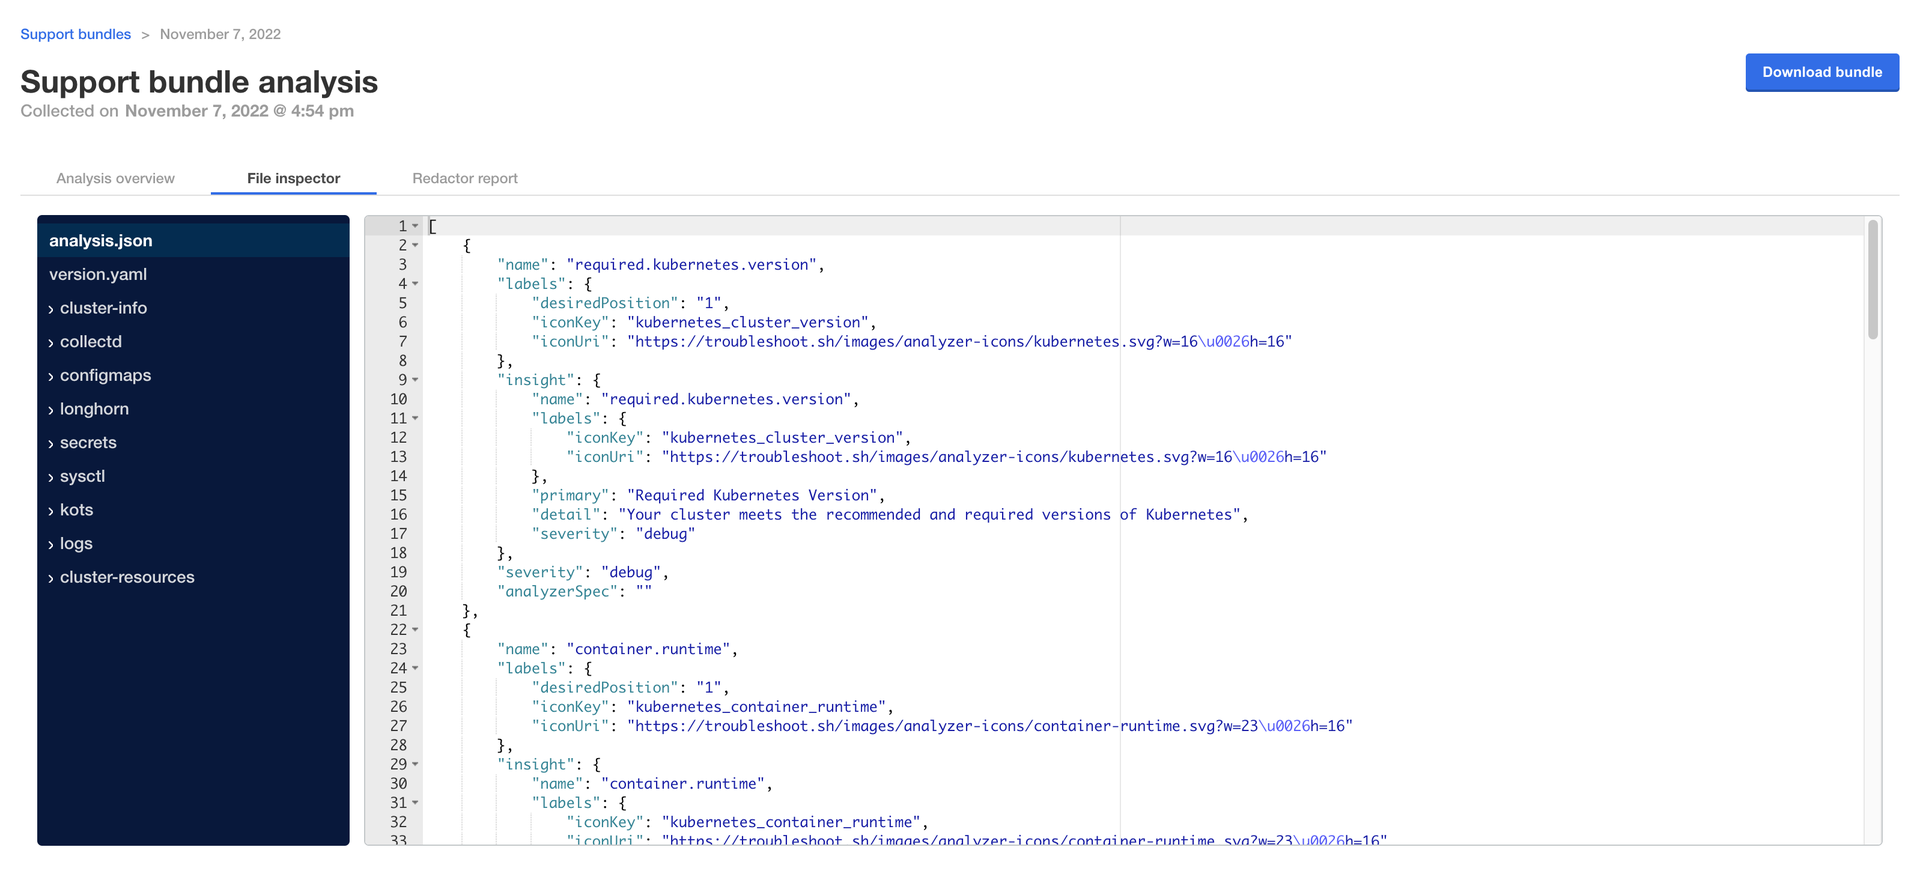
There are quite a number of of files generated in a support bundle. Not necessarily every file is useful for every problem. However, by collecting the same information in the same way each time, KNIME can ensure the best quality support possible for customers.
It is possible to inspect a support bundle entirely in the admin console. See below for an example screenshot.
Here are the most important folders/files and their purposes:
| Path | Purpose | Example (may have properties omitted) |
|---|---|---|
|
|
[ { "name": "kotsadm.status", "insight": { "name": "kotsadm.status", "primary": "kotsadm Status", "detail": "At least 1 replica of the Admin Console API is running and ready", "severity": "debug" }, "severity": "debug", "analyzerSpec": "" } ] |
|
|
(typical application logs) |
|
|
{ "kind": "PodList", "apiVersion": "v1", "metadata": { "resourceVersion": "1686941" }, "items": [ ... ] } |
Backup and restore with Velero Snapshots and Kotsadm
Snapshot backups and restore features are available into Replicated deployments via Velero, a tool for backing up Kubernetes cluster resources and persistent volumes.
One-time snapshots as well as automated scheduled snapshots can be managed from the Snapshots panel within your Kotsadm dashboard at https://<base-url>:8800/app/knime-hub.
|
Snapshot creation and restoration are disruptive processes. KNIME applications, and Replicated admin access may be unavailable during an active backup or restore operation. |
Creating snapshot backups
-
First, configure storage for your backups. Navigate to the Snapshots tab of your Kotsadm dashboard. Click the 'Settings' button to edit backup settings where you’ll be able to add a storage target.
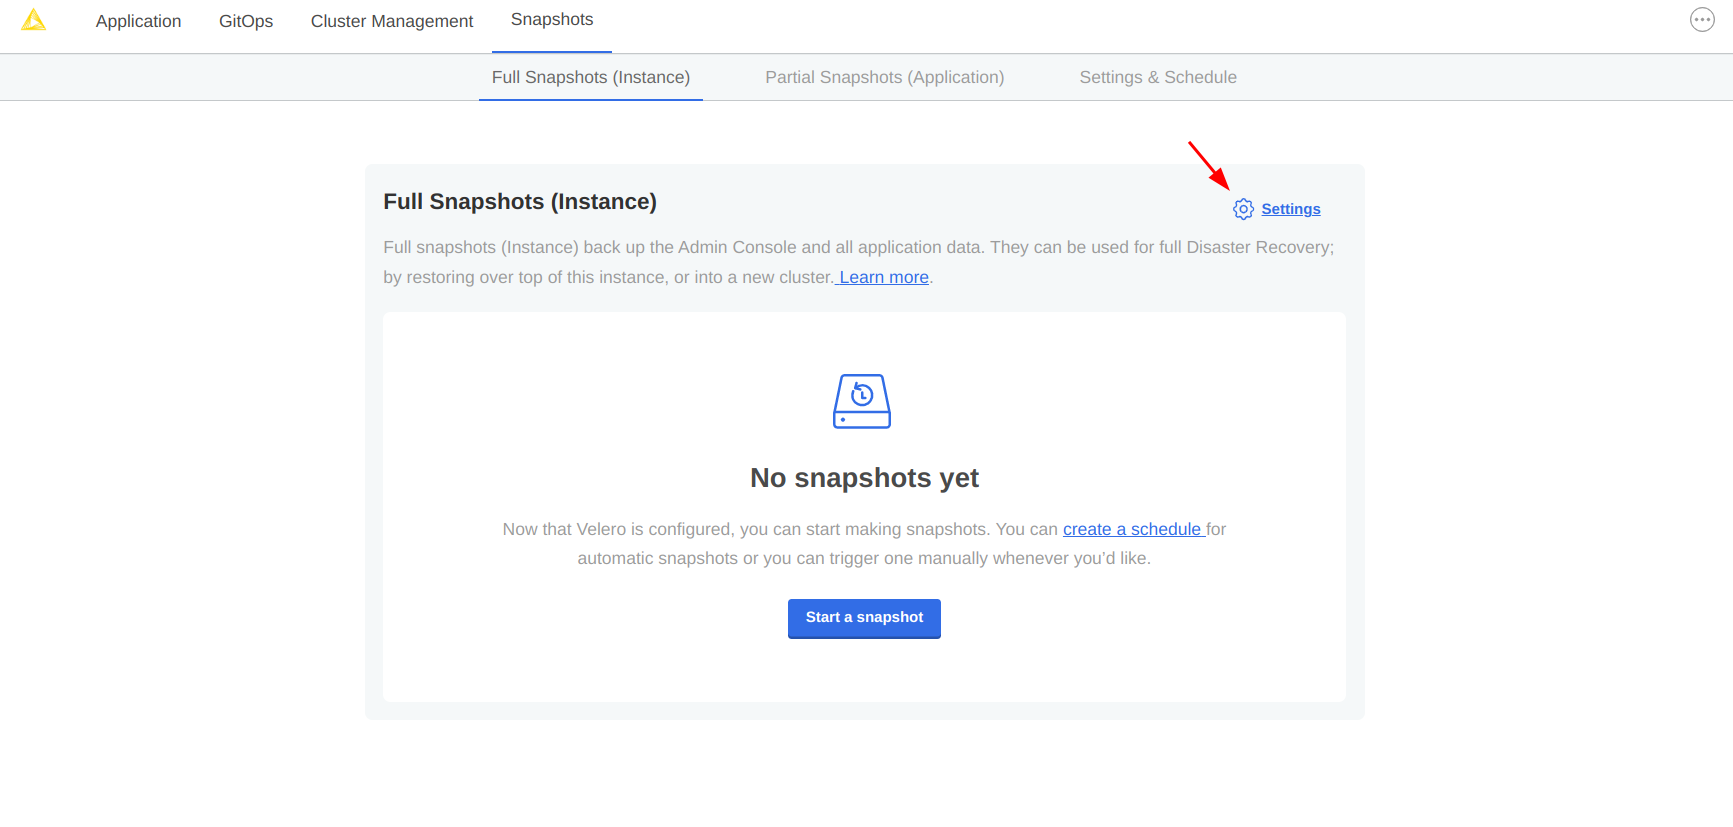 Figure 14. Snapshots tab with settings link
 -
Velero supports local storage (not recommended), Amazon S3, Azure Blob Store, Google Cloud Storage, and S3 API compatible storage endpoints such as Minio. Select your preferred snapshot storage type from the 'Destination' drop-down menu, and fill in the required fields with parameters specific to your storage endpoint. Click the 'Update storage settings' button and wait for Velero to verify backup storage access.
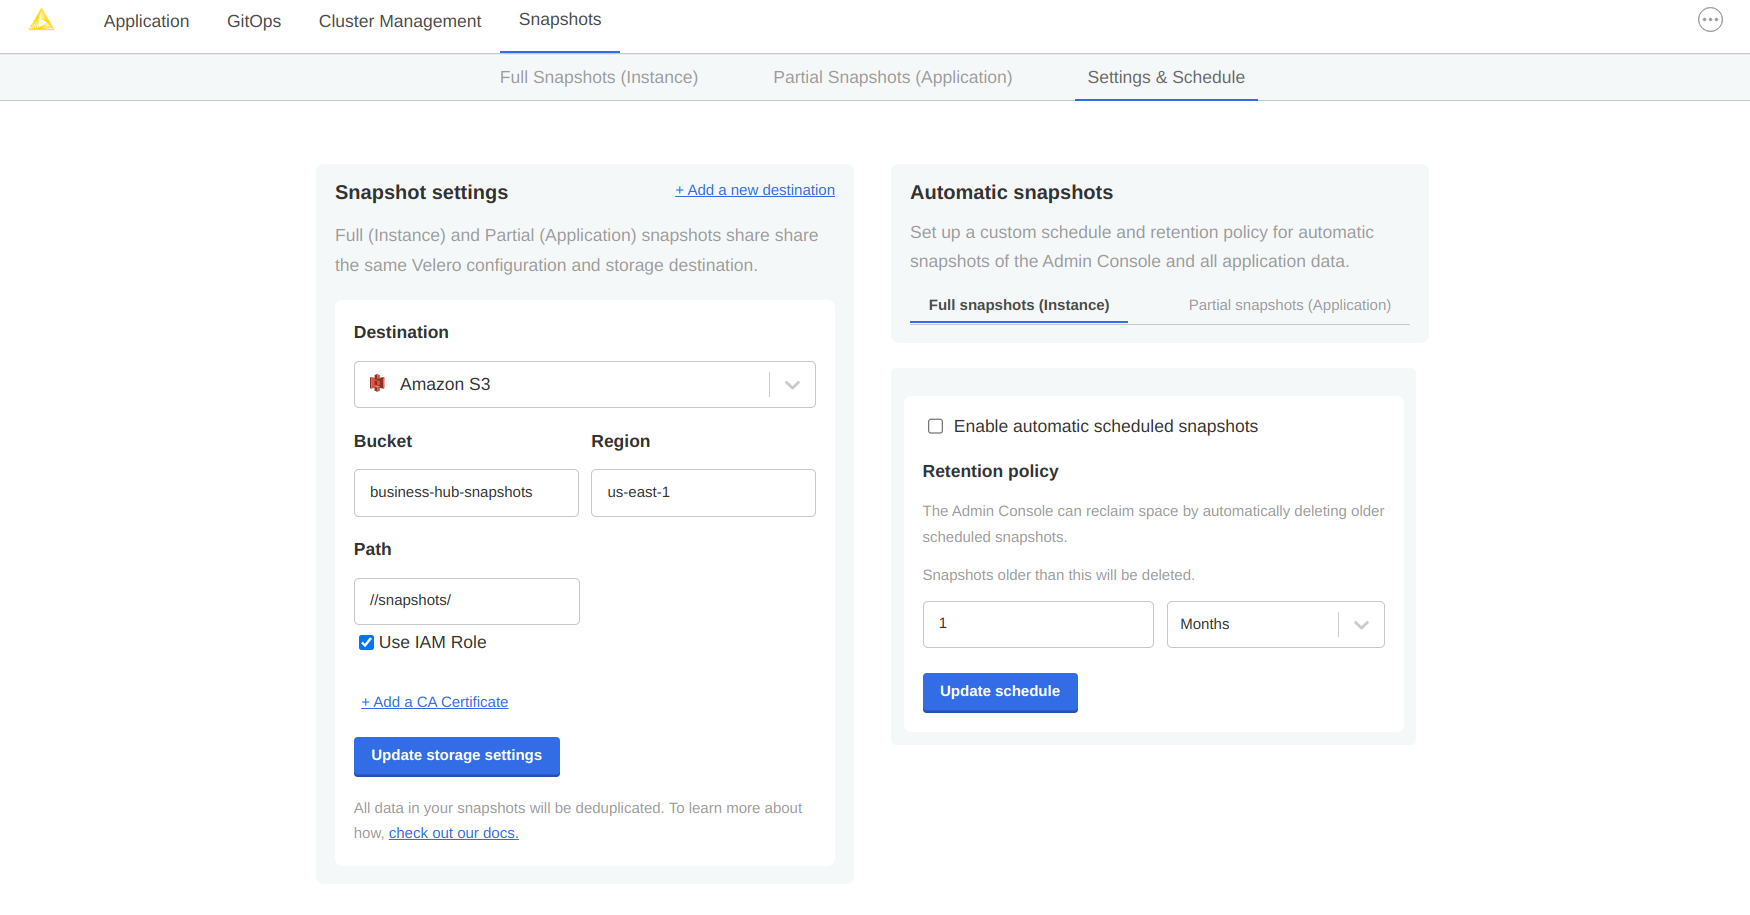 Figure 15. Snapshots destination settings for AWS S3 storage
 -
With a valid backup storage configured, you can create a Snapshot of your KNIME deployment by clicking the Full Snapshots tab, and then the Start a snapshot button. This may take a few minutes to complete.
-
Once your snapshot is complete, from the same Full Snapshots screen, you can click the 'Settings' button to manage snapshot retention, or configure automatic snapshots by checking the Enable automatic scheduled snapshots box and setting a schedule using a CRON expression.
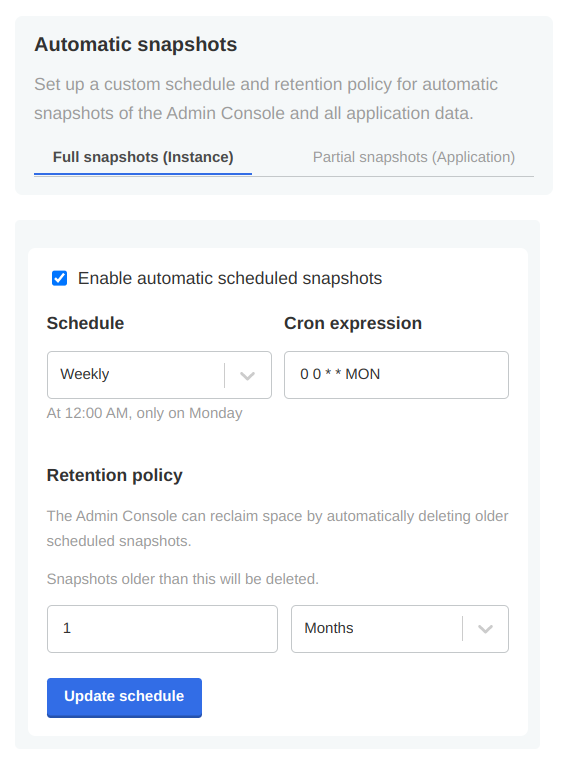 Figure 16. Example automatic snapshot scheduled to run at 12:00am weekly with a 1 month retention policy.
Backup Troubleshooting
Velero is installed into the embedded Kurl Kubernetes cluster with default settings and resource allocations.
As the number of objects or overall size of data to be backed up increases, it may eventually occur that the CPU and memory resources allocated for Velero processes are no longer sufficient to successfully complete the backup.
In the event that backup failures are encountered, it is recommended to increase the CPU and memory allocation directly to the Velero’s node agent process via kubectl.
$ kubectl patch daemonset node-agent -n velero --patch \
'{"spec":{"template":{"spec":{"containers":[{"name": "node-agent", "resources": {"limits":{"cpu": "2", "memory": "2048Mi"}, "requests": {"cpu": "1", "memory": "512Mi"}}}]}}}}'
The CPU and memory resources and limit values can be adjusted as needed to find sufficient values for backup process. Typically, only the limit values will need to be increased.
|
At this time, the resource allocation override to Velero will revert after a |
Restoring a snapshot
-
Navigate to the list of available snapshot restore points from your Kotsadm dashboard by browsing to Snapshots→ Full Snapshots. From this screen, identify the snapshot instance you would like to use, and take note of the instance ID.
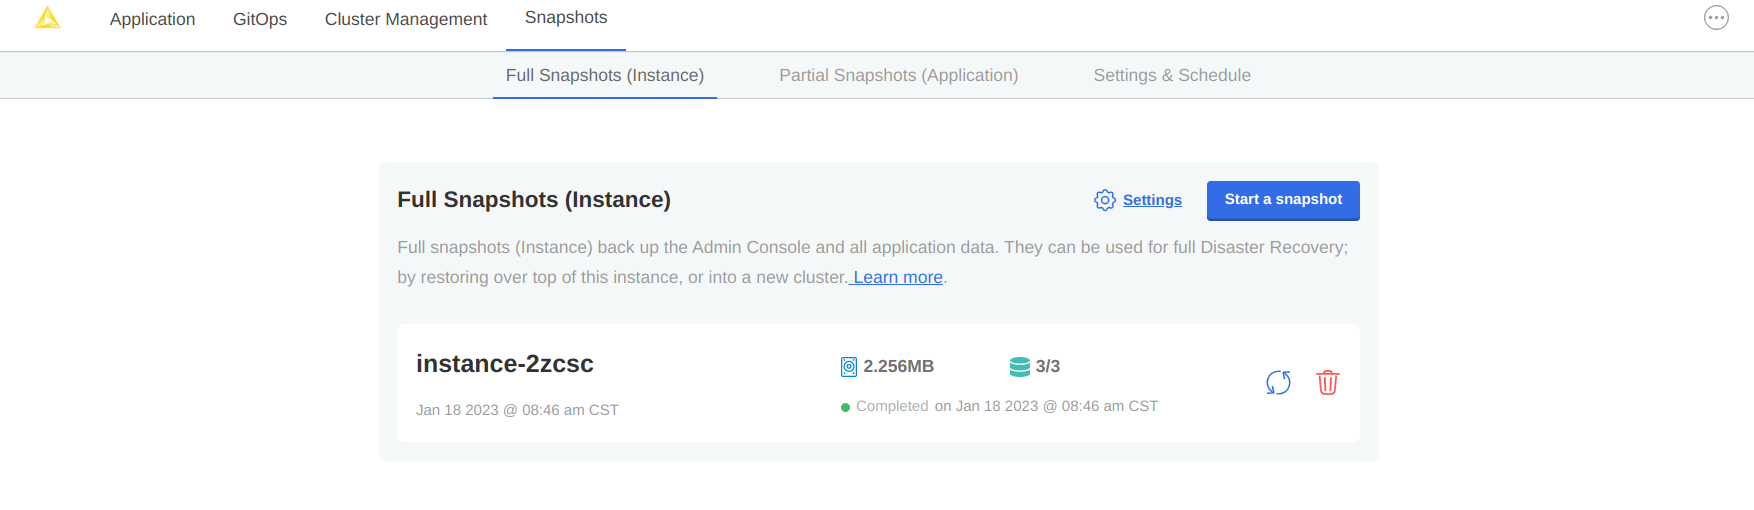 Figure 17. In this example, there is only one snapshot available and its ID is
instance-2xcscA list of snapshots can also be retrieved by command line:
$ kubectl kots get backups
NAME              STATUS       ERRORS    WARNINGS    STARTED                          COMPLETED                        EXPIRES
instance-2zcsc    Completed    0         0           2023-01-18 14:46:26 +0000 UTC    2023-01-18 14:46:53 +0000 UTC    29d
-
Now, restore the snapshot using a single CLI command.
$ kubectl kots restore --from-backup {Snapshot ID}
-
Assuming the restore completed without errors, you can verify your Hub installation is functioning as expected.
Changelog (KNIME Business Hub 1.7)
KNIME Business Hub 1.7.0
(released November 06, 2023)
Important installation notes
Kubernetes version 1.25-1.27 is required for Business Hub 1.7.0. Pre-flight checks in the installer make sure that the correct version is available.
Infrastructure and security updates
Support provided ingress-nginx deployments
-
In existing clusters creating own ingress-nginx deployments before the installation of Hub is now enabled. Whether the Hub install process deploys the inbuilt ingress-nginx can be configured on the Kots Admin dashboard.
Security context update
-
Security contexts updated for pods, containers and jobs in the hub, knime and knime-execution namespaces.
Bug Fixes
-
Fixed a bug where schedules edited with KNIME Analytics Platform didn’t respect job discard settings.
-
Fixed a bug where saving executed job as workflows didn’t work in case workflow size was larger than 50 MB.
-
Fixed a bug where under certain circumstances jobs were shown duplicated in the AP explorer.
-
Fixed a bug where schedules in all teams connected to a user were deactivated when the user left any team.
-
Various smaller fixes.
Changelog (KNIME Business Hub 1.6)
KNIME Business Hub 1.6.0
(released September 22, 2023)
Important installation notes
Business Hub 1.6.0 comes with Kubernetes 1.25 for the embedded clusters.
We recommend updating by running the Kubernetes installer command:
curl -sSL https://kurl.sh/knime-hub | sudo bash
| Run the command only when updating from KNIME Business Hub version 1.5.2 or higher, or after you updated to version 1.6.0. |
All pods will restart during the update, some downtime is expected. Creating a backup before upgrading is recommended.
New Features
Save jobs to spaces
-
Jobs on KNIME Business Hub can now be saved any space where the user has permissions. Great feature to utilize for fixing a faulty job and saving the results for the future.
-
Documentation: KNIME Business Hub User Guide
Execution context redesign
-
Improved usability of execution resource management based on customer feedback. Current job list is now available on execution context and executor level.
Auto start-stop of execution contexts
-
Save money on infrastructure costs by only starting up your execution resources when they are actually used, and by shutting them down afterwards.
-
Auto start-stop can be enabled for each execution context separately.
Download job logs
-
Downloading job logs is now available from the Hub user interface.
-
To use this feature an executor based on KNIME Analytics Platform version > 5.1 is necessary.
-
Documentation: KNIME Business Hub User Guide
Improvements
Triggers listening to version creation
-
It is now possible to trigger deployments when a new workflow version is created.
-
Documentation: KNIME Business Hub User Guide
Deprecated nodes are not part of search results
Infrastructure updates
Embedded clusters updated
-
New Kubernetes version for embedded clusters is 1.25
Kubernetes node affinity
-
Node affinity available to separate execution resources from Hub core services
-
Documentation: KNIME Business Hub Admin Guide
Important Bug Fixes
-
Fixed a bug where two trigger deployments triggered at the same time could produce inconsistent results
-
Fixed faulty URLs on the API documentation
-
Fixed KNIME AP mount point registration https problem
-
Fixed an issue where global proxy settings could break executor functionality
-
Fixed an issue where Hub could get into a crash loop with many APs connected and large files being uploaded / downloaded at the same time
Changelog (KNIME Business Hub 1.5)
KNIME Business Hub 1.5.2
(released Aug 14, 2023)
Important installation notes
Postgres will restart during the update, short downtime is expected.
Infrastructure updates
KNIME Business Hub is now compatible with Kubernetes 1.25.
KNIME Business Hub 1.5.1
(released July 27, 2023)
Important Bugfixes
-
HUB-5628 Fixed an issue that prevented the creation of disabled schedules. Impacting KNIME Server to Hub migration.
-
HUB-5649 Fixed a bug that prevented notification service updates when a subscription for a deleted user was present.
-
Fixed a configuration issue that caused the trigger-service to not start up in some scenarios.
KNIME Business Hub 1.5.0
(released July 17, 2023)
Important installation notes
All executor pods will restart during the update, some downtime is expected. Creating a backup before upgrading is recommended.
New Features
Item level versioning
-
Item level versioning has been introduced with Hub 1.5.0
-
Users can create / restore / delete versions of individual items
-
Item versions can be utilized in Ad hoc execution, Deployments
-
Using KNIME Analytics Platform 5.1 users can leverage item level versioning for Ad hoc execution, sharing component links and use new nodes like the "Version Creator"
-
Space level versioning has been deprecated
-
All items in previously versioned spaces are automatically migrated to be versioned on item level upon updating
Volume Mount support for Execution Contexts
-
Kubernetes volumes can now be attached to Execution Contexts by editing the custom resource definition.
-
This allows attaching secrets and config maps as files to Execution Contexts.
Improvements
Keycloak enforces username validation
-
Username restrictions described in the [KNIME Business Hub Installation Guide](https://docs.knime.com/latest/business_hub_installation_guide/index.html#_keycloak_setup) are now enforced by KNIME Business Hub’s identity provider Keycloak. Preventing problems where users could be synced into Hub but they could not login with their credentials.
Notifications redesign
-
KNIME Business Hub UI notifications were redesigned to be less intrusive and to be more convenient for users.
Schedule deployment
-
Initial start date of schedules can no longer be in the past.
Space permissions
-
Users with viewer permission can no longer delete spaces
Infrastructure updates
Artemis update
-
Artemis version has been updated to 2.29.0
Quarkus update
-
Quarkus has been updated to 3.1.1 in the execution services
Execution Context security hardening
-
Execution Contexts now have a more restrictive security context to help prevent containers from escalating privileges and prevent running as root user. This increases compliance with typical enterprise cluster security policies enforced with tools such as Kyverno.
Important BugFixes
-
HUB-4991 - Fixed a bug where users were not able to execute deployments shared with them, if they didn’t have access to the deployed workflow.
-
HUB-5396 - Fixed the state persistor issue that could result in timeouts and various problems in workflow execution on the Hub.
Changelog (KNIME Business Hub 1.4)
KNIME Business Hub 1.4.2
Main motivation for the 1.4.2 KNIME Business Hub release is to prepare for the upcoming 5.1 KNIME Analytics Platform release. It is an optional update as 1.5.0 Business Hub is coming out with all new features before AP 5.1.
Improvements
Support for using KNIME Analytics Platform 5.1 as a workflow editor. Compatibility with uploading workflows to the Hub using KNIME AP 5.1.
Important Bugfix
-
HUB-5396 - Fixed the state persistor issue that could result in timeouts and various problems in workflow execution on the Hub.
KNIME Business Hub 1.4.1
Important Bugfixes
-
Fix Bug disabled functionalities for interacting with components in the HUB from AP versions (4.7.0, 4.7.1, 4. 7.2, 4.7.3, 5.0.0) affected by a bug in which saving shared components might delete local workspaces
-
Listing HUB spaces from affected AP versions will return the components as
dataobjects, which don’t have the potential to trigger the bug, but limits the use of components. -
Changed file extension for downloading components from .knwf to .knar.
KNIME Business Hub 1.4.0
Important installation notes
Please calculate with some downtime during which some services might not be available.
New Features
Data apps
Share data app deployments with "any signed in user"
You can now share your data apps with every Hub user in your company with one setting. Data app deployments shared this way will be available in every user’s
data apps portal.
Share data app deployments with external groups
Sharing data app deployments with users from externally managed groups (e.g. LDAP/AD groups) is now available. This is done by either importing LDAP groups to
Keycloak, or by connecting Keycloak to an external OIDC provider, which provides groups through the access token. Usage of such external groups is for sharing of
data app deployments only. The actual users who run the deployments are still managed within KNIME Business Hub.
Data Apps Portal UX enhancements
Enhanced the visual design and user experience of the data apps portal, enabling the addition of categories and descriptions to data apps. This enhancement
allows data app consumers to effortlessly filter and identify relevant data apps based on their category and description.
Content Security Policy for data apps
Admins of KNIME Business Hub can now set custom Content Security Policies for data apps, to restrict which resources, from where can be loaded into the data
app’s user’s browser.
See more in: Business Hub Admin Guide.
Deployments
Editing deployments
Recreating deployments is no longer needed just to change their configuration.
Admin functionality
Backup / restore via Velero
KNIME Business Hub is now complemented with the widely used, open-source backup / restore tool: Velero. You can mitigate the risk of serious data loss by setting
up a backup schedule. The backup process does not require any downtime.
X-Frame-Options Header
Now admins can also select from different X-Frame-Options header options, to prevent clickjacking attacks.
See more in: Business Hub Admin Guide.
Security
Improved security by removing sensitive information shown in the HTML source code.
Edge
KNIME Edge integration
KNIME Edge 1.3 is now compatible with KNIME Business Hub 1.4.
Important Bugfixes
-
HUB-4774: Next execution time for schedules repeating every 24 hours cannot be computed
-
HUB-5093: Heap size calculation doesn’t work on Ubuntu 22.04 (Cgroups V2), leading to a too low limit being set for various services
Changelog (KNIME Business Hub 1.3.0)
KNIME Business Hub 1.3.0
(released April 03, 2023)
Important installation notes
-
With the release of KNIME Business Hub 1.3.0 new security features are introduced regarding executor communication. For this reason, KNIME Business Hub requires every executor to be on Analytics Platform version 4.7.1 or higher. You can find a list of the available executor images here.
-
With this release we changed the istio configuration of two services, to allow them to see the IP of the caller if the request is coming from within the cluster. This can cause those two services (
keycloak-proxy,s3-proxy) to not start up in some scenarios, with a "too many open files" error in the istio-proxy container of those pods. This can be fixed by increasing the open file limit on the host VM, e.g. by running the following command:
sudo sysctl fs.inotify.max_user_instances=8192. -
The KOTS App Manager is now on version 1.96.3. This new version fixes an important bug, so it should be updated before updating to KNIME Business Hub version 1. 3. To do so use the following command:
curl -sSL https://kurl.sh/knime-hub | sudo bash. -
If you haven’t updated to KNIME Business Hub 1.2.0, yet, you need to follow update guide in the changelog for 1.2.0 before updating to 1.3.
New Features
Molecule sketcher
Use the new Molecule Widget (Labs) node to accept molecule input from your users. With this new node we made the integration of different sketchers easier and
allowed to provide different
sketchers also for the KNIME Analytics Platform. In this release the ketcher sketcher is included. Additional sketchers will follow in the upcoming releases.
Collections
Introduce your users to a topic using collection pages. Collection pages serve as a starting point for your users to explore examples and building blocks related
to your chosen topic,
facilitating their onboarding process.
To start creating collections read our guide here.
KNIME Analytics Platform customization profiles
Use Business Hub to distribute preference profiles to either local Analytics Platform clients or to KNIME Hub executors. This can be used to e.g. easily ship
database drivers.
More information about Analytics Platform customization profiles here.
Trigger deployment
Trigger is a powerful new type of deployment which allows automating workflow execution based on specific conditions, such as another workflow or component being
added or removed to a space.
To get started with Triggers, check out our documentation here.
Changelog (KNIME Business Hub 1.2.0)
KNIME Business Hub 1.2.0
(released March 13, 2023)
KNIME Business Hub 1.1.1 to 1.2.0 Upgrade
-
KNIME Business Hub 1.2.0 is expected to run in a Kubernetes 1.23.x cluster. Prior versions of KNIME Business Hub ran in Kubernetes 1.21.x clusters.
-
For embedded kurl cluster installations, the cluster update process is to:
-
First, check for updates in KOTS Admin Console.
-
Once the KNIME Business Hub 1.2.0 update has been identified and preflight checks have been run, trigger the deployment.
-
After the deployment process has completed, run the following command in the terminal of the host machine to upgrade the Kubernetes cluster version (among other components):
-
curl -sSL https://kurl.sh/knime-hub | sudo bash -
You will have to enter
yto various yes/no prompts during this upgrade process.
-
-
New Features
-
New supported Kubernetes versions: 1.22, 1.23, 1.24
-
Keycloak version updated to 19.0.3, see Keycloak documentation: https://www.keycloak.org/docs/19.0.3/server_admin/
-
Support for airgapped environments: Installing KNIME Business Hub in environments with no internet connection. Install instructions: https://docs.knime.com/ latest/business_hub_installation_guide/index.html#_introduction
-
Embedded docker registry for custom executor images: Embedded cluster installations using kURL now contain an embedded docker registry for storing custom executor images. Documentation: https://docs.knime.com/latest/business_hub_installation_guide/index.html#embedded-docker-registry-configuration
-
Recreate strategy for Execution contexts: For upgrading execution contexts now rolling updates and recreate strategies are both available.
-
Support for custom certificate authorities
Bugfixes
-
Removed the unused ipv6 listener in the Business User Portal container, that could cause crashes in some environments