Introduction
KNIME Business Hub is a customer-managed KNIME Hub instance. Once you have a license for it and proceed with installation you will have access to Hub resources and will be able to customize specific features, as well as give access to these resources to your employees, organize them into Teams and give them the ability to manage specific resources.
Once you have access to a KNIME Businsess Hub instance available at your company, you can use KNIME Business Hub to perform a number of tasks such as:
-
collaborate with your colleagues,
-
test execution of workflows,
-
create and share data apps, schedules, and API services
-
keep track of changes with versioning.
This guide provides information on how to use KNIME Business Hub from a user perspective.
To install and administrate a KNIME Business Hub instance please refer instead to the following guides:
Connect to KNIME Business Hub
You can use a standard web browser to connect to your KNIME Business Hub instance, once you are provided with the address (URL) and your access credentials - username and password.
After providing them you will be able to access to the home page of the KNIME Hub.
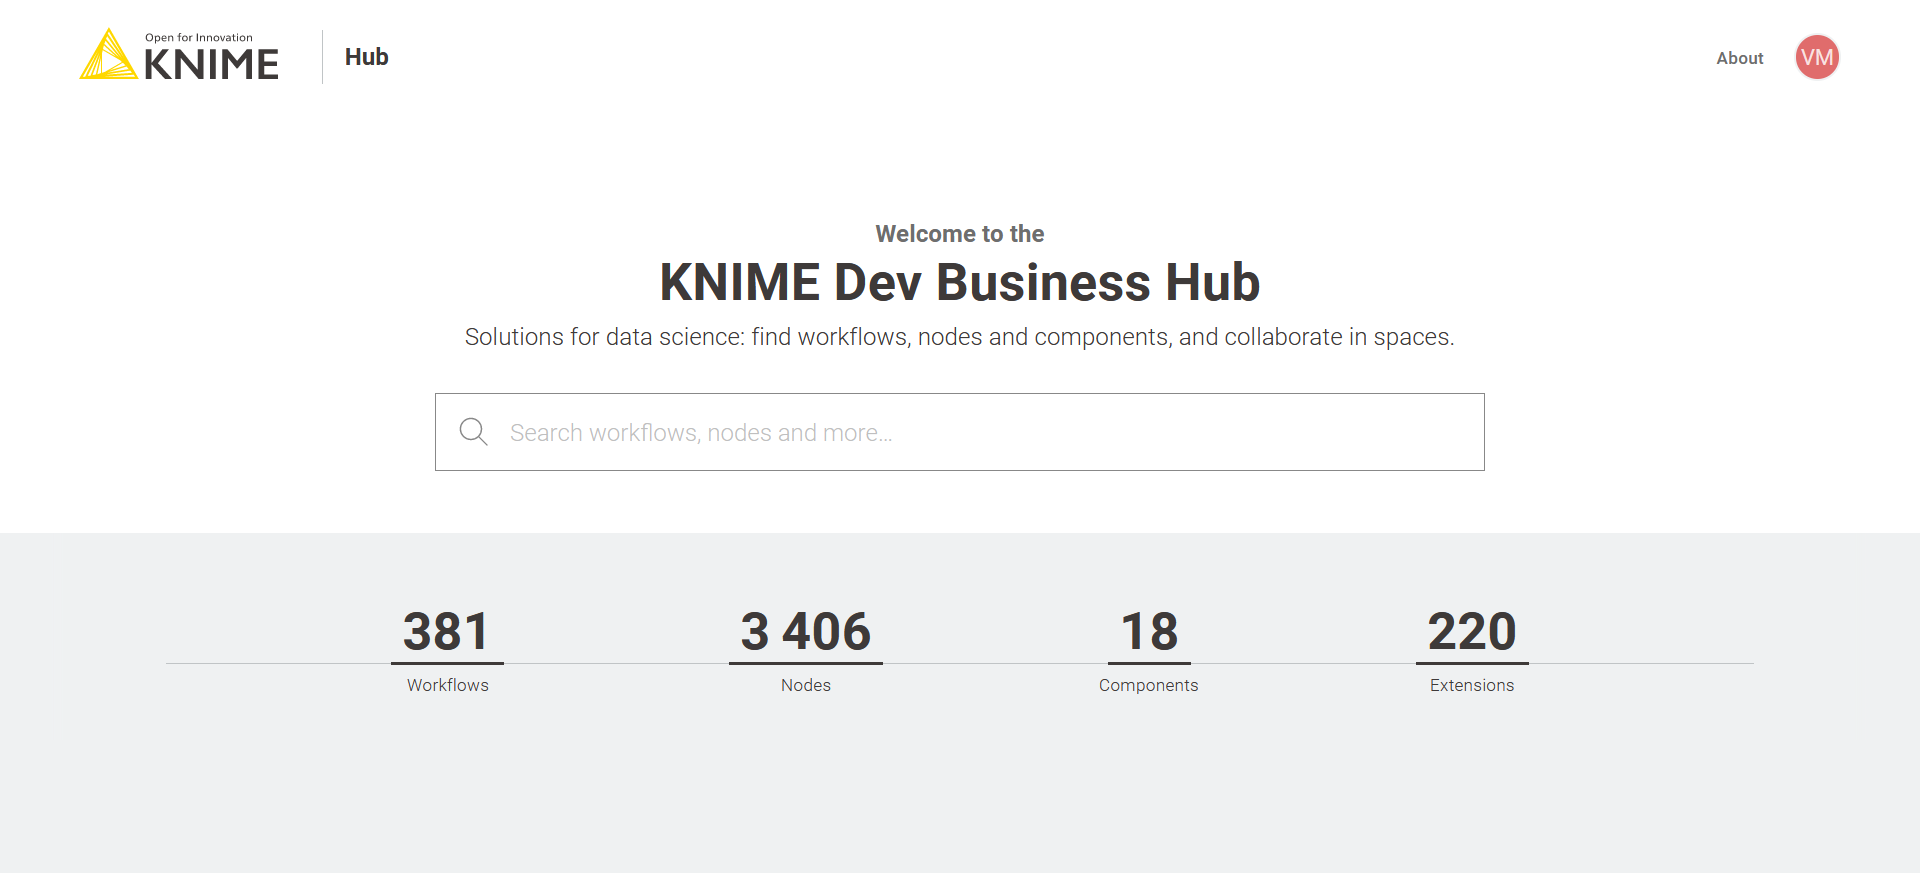
Now you can use the search functionality by typing your search terms into the search bar. The search will show results among all the Hub items that are available to you, based on your role and the items permissions.
Your user will be assigned to one or more teams so that you will be able to work on projects together with your colleagues.
Connect to KNIME Business Hub from KNIME Analytics Platform
To connect to KNIME Business Hub from KNIME Analytics Platform you have to first add its mount point to the KNIME space explorer.
Space explorer
The space explorer on the left-hand side of KNIME Analytics Platform is where you can manage workflows, folders, components and files in a space, either local or remote on a KNIME Hub instance. A space can be:
-
Your local workspace you selected at the start up of the KNIME Analytics Platform
-
One of your user’s spaces on KNIME Community Hub
-
One of your team’s spaces on KNIME Business Hub.
In the following, you will learn how to connect to the KNIME Business Hub.
| Please be aware that in case you want to work with KNIME Server you need to switch to the classic user interface. |
Setup a mount point
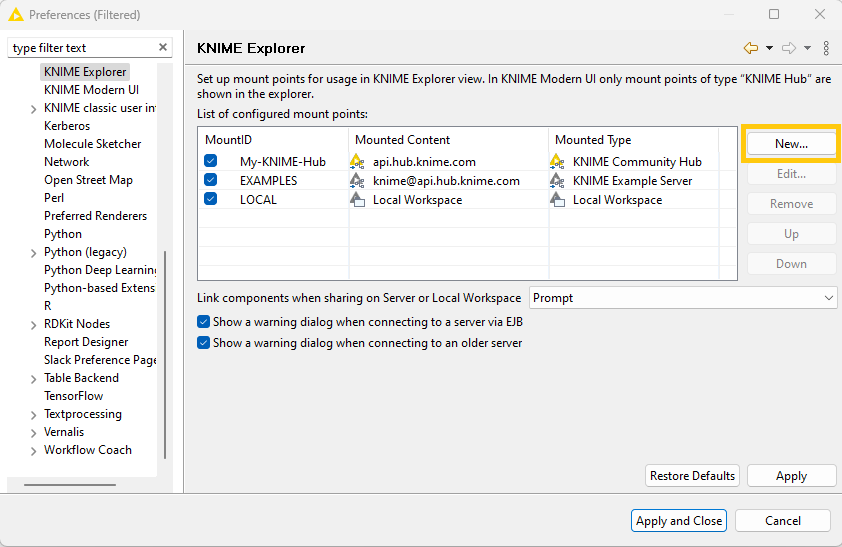
Click the cog button in the top-right corner to open the Preferences dialog.
In the preferences window choose KNIME → KNIME Explorer. Click New … to add the new Hub mount point as shown in Figure 2.
The Select New Content window opens as shown in Figure 3. Select KNIME Hub and insert the Hub address, the URL that connects the space in KNIME Analytics Platform to the KNIME Business Hub.
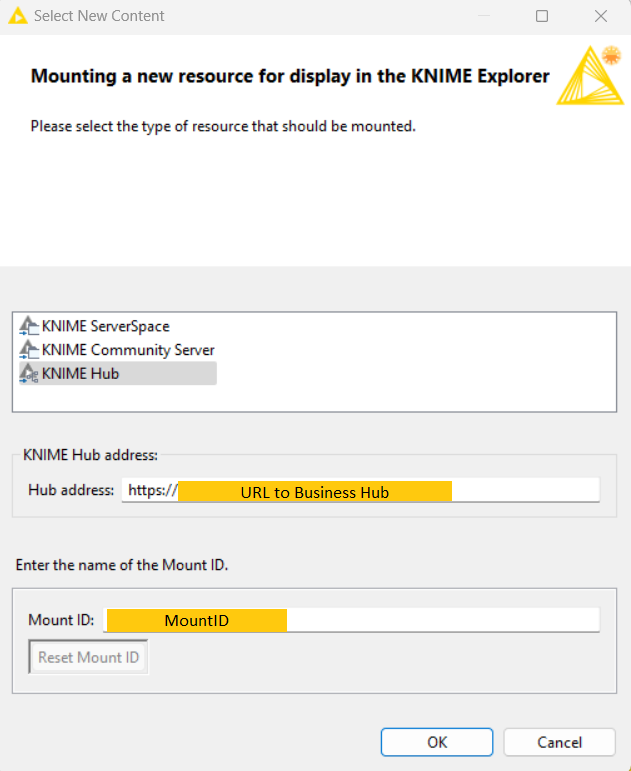
In the Mount ID field the name of the mount point will be automatically filled. Finally click OK and Apply and Close.
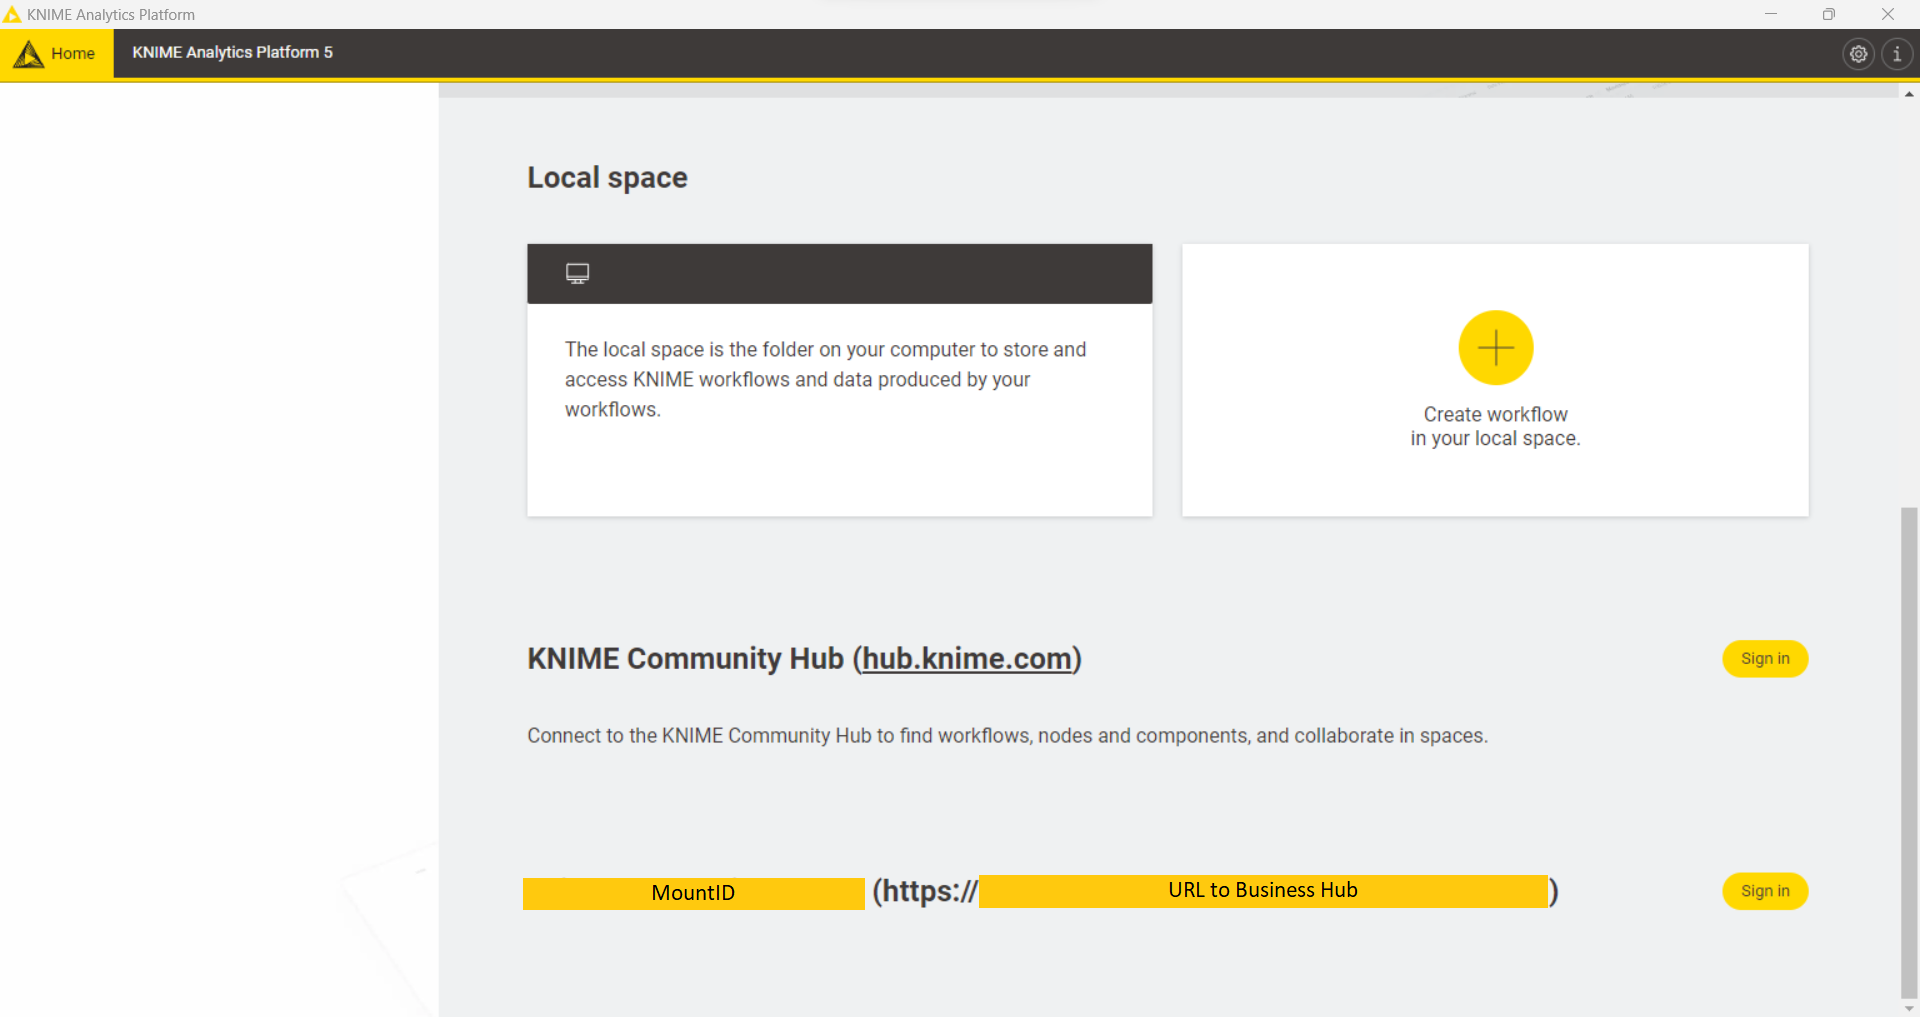
Access KNIME Hub
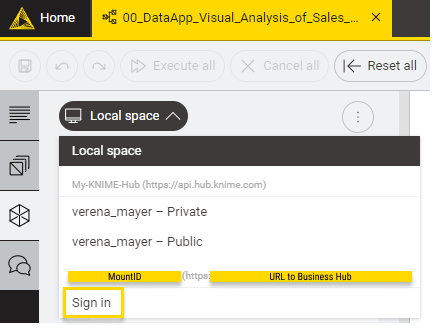
On the top of the space explorer you can sign in to any of the Hub mount points and select a space. The MountID will be displayed along with the URL to the Business Hub, as shown in Figure 4.
Here you can perform different types of operations on items:
-
Delete or rename your items. To do so, right-click the desired item and select Rename or Delete from the context menu.
-
Open workflows as local copy or on KNIME Hub. To do so right-click the desired item and select either Download to local space or Open in Hub from the context menu.
-
Create folders to organize your items within the space. To do so, click the three dots in the upper-right corner of the space explorer and select Create folder.
-
Create new workflows or import local workflows by clicking the three dots and selecting Create workflow or Import workflow.
Click on the Home tab. All your mount points are listed at the bottom of the entry page. The MountID will be displayed along with the URL to the Business Hub, as shown in Figure 5. Click the yellow Sign in button to the right of the mount point. Now you will see all the spaces that you have access to. Click on the tile of the space you want to access. Within this space you can also import workflows, components or add data files from your local workspace to the KNIME Hub instance or create a folder.
Gain a more detailed insight about the entry page and the space explorer in the KNIME Analytics Platform User Guide.
Search items in KNIME Hub
Insert a keyword in the search bar to search among the following items:
-
Nodes
-
Components
-
Workflows
-
Extensions
Press Enter to visualize the results.
You will see a list of all the search results in tiles, with:
-
An icon indicating if they are nodes, components, workflows or extensions
-
The title
-
Tags, when available
-
A preview of the description, when available
-
The owner icon for workflows, and extensions
-
The icon, for nodes and components
On top of the search results list, you can filter the results to list only nodes, components, workflows, and extensions, by clicking the respective tab, shown in Figure 6.
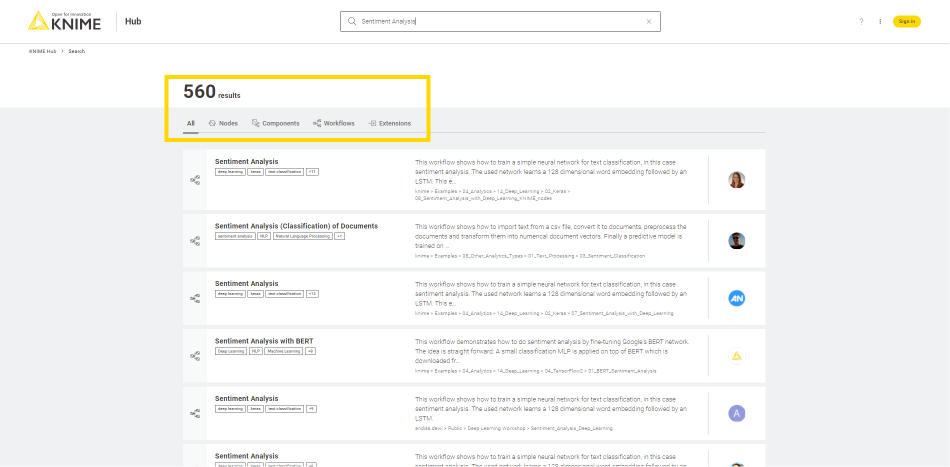
Click on a search result to access the relative page.
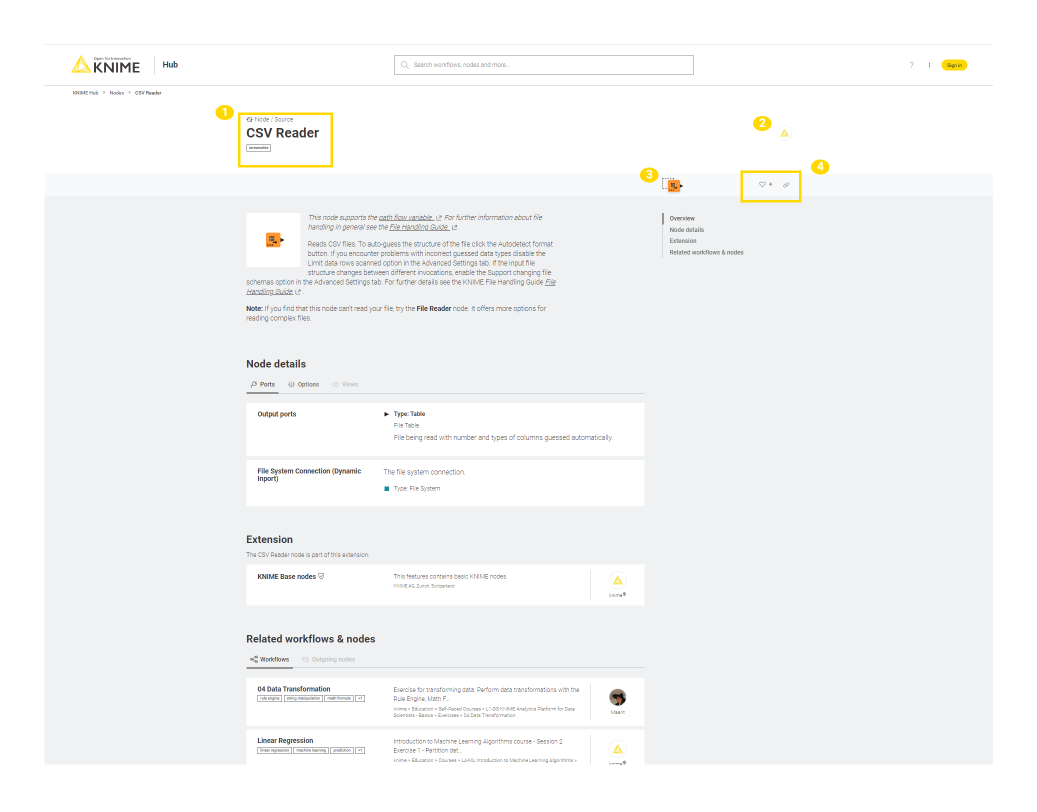
Nodes
On the node page you will find:
-
The node function, name, and tags
-
The node owner
-
The node drag & drop element: You can drag & drop the element into the Workflow Editor of KNIME Analytics Platform to use the node directly to build a workflow or a component. See the Drag & drop section for more details on this feature.
-
The node likes and a link icon to copy the node short link.
For each node you can also find:
-
An Overview with a description of the node functionality
-
Node details where you can see information about Input and Output node ports, a description of the additional Options, and, when available, the Views that the node is able to produce
-
In the section Extension, you can see the node extension and the extension owner
-
Finally, in the section Related workflows & nodes you are provided with:
-
Workflows that are available on KNIME Hub and that contain the node
-
When available, the Outgoing nodes, that are the most popular nodes to follow the node when building a workflow.
-
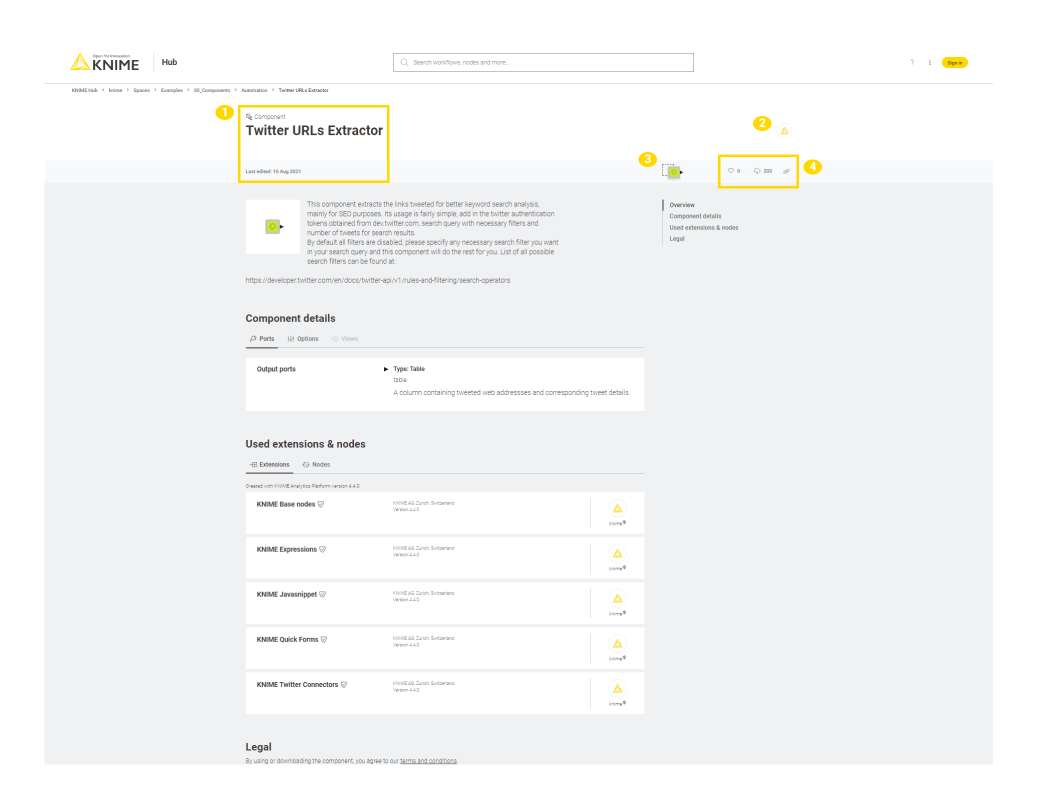
Components
Since components really are KNIME nodes that you create which bundle functionality, have their own configuration dialog and their own composite views, also in the component page you will find similar information as for nodes.
-
The component name and last edit date
-
The component owner
-
The component drag & drop element: You can drag & drop the element into the Workflow Editor of KNIME Analytics Platform to use the component directly to build a workflow. See the Drag & drop section for more details on this feature.
-
The component likes, the count of downloads, and a link icon to copy the component short link.
For each component you can also find:
-
An Overview with a description of the component functionality, when provided by the component owner
-
Component details where you can see information about Input and Output component ports, a description of the additional Options, and, when available, the Views that the component is able to produce
-
In the section Used extensions & nodes you can see the component extensions and nodes.
-
Finally, in the section Related workflows you are provided with Workflows that are available on KNIME Hub and that contain the component.
Workflows
A workflow page typically has multiple useful information about the workflow such as:
-
The workflow title, tags and last edit date
-
The space owner where the workflow is contained and, if different from the space owner, the workflow developer
-
The workflow drag & drop element: You can drag & drop the element into a selected mount point in the KNIME Explorer of KNIME Analytics Platform. This will prompt an Import window which allows you to import the workflow into the mount point. See the Drag & drop section for more details on this feature.
-
The workflow likes, the count of downloads, and a link icon to copy the workflow short link.
For each workflow you can also find:
-
An Overview with a description of the workflow when provided by the workflow developer
-
External resources links to external resources such as KNIME blog posts, KNIME documentation, or any other interesting link that the workflow developer might want to provide
-
In the section Used extensions & nodes you can see the you can see the workflow extensions and nodes, and the KNIME Analytics Platform that has been used to create the workflow
Extensions
Extensions are collection of nodes that provide additional functionality such as access to and processing of complex data types, the use of advanced algorithms, as well as the use of scripting nodes, and so on.
KNIME Extensions are developed and maintained by KNIME, allowing you to access open source projects and add their functionality to your KNIME workflows. Community Extensions instead include functionality specific to various industries and domains. Some of these community extensions are classified as Trusted Community Extensions, which have been tested for backward compatibility and compliance with the KNIME usage model and quality standards, and Experimental Community Extensions, which come directly from the labs of our community developers. Finally, also Partner Extensions are available which provide additional capabilities offered and maintained by our partners.
All these Extensions are available on KNIME Hub.
An extension page typically has multiple useful information about the extension such as:
-
The extension name and owner, version of the extension
-
The extension drag & drop element: You can drag & drop the element into the Workflow Editor of KNIME Analytics Platform. If the extension is not already installed this will prompt an Install Extension window which allows you to install the extension. See the Drag & drop section for more details on this feature.
-
The extension likes, and a link icon to copy the extension short link.
For each extension you can also find:
-
An Overview with a description of the extension when provided
-
Included nodes with a list of all the nodes that are part of the extension and that will be available once the extension is installed
-
In the section Related workflows, you are provided with Workflows that are available on KNIME Hub and that contain the nodes that are part of the extension
-
Finally, in the section Legal & update site, you can have legal information about the copyright and the update site information, with the type of the extension, version number, and the link to the update site.
Collections
KNIME Collections on KNIME Hub allow upskilling users by providing selected workflows, nodes, and links about a specific, common topic.
One example of a collection can be found on KNIME Community Hub here.
This collection, for example, contains:
-
Workflow examples:
 Figure 8. Example workflows in a collection on KNIME Hub
 -
Nodes:
 Figure 9. Nodes in a collection on KNIME Hub
 -
Links:
 Figure 10. Additional links in a collection on KNIME Hub
Drag & drop
You can drag & drop nodes, components, extensions, and workflows from KNIME Hub to import them into KNIME Analytics Platform and use them right away to build your own workflow, install KNIME Extensions, and execute uploaded workflow into your local installation.
-
Node and components: You can drag & drop a node or a component from KNIME Hub into your Workflow Editor in KNIME Analytics Platform. In case the node is part of an Extension that is not yet installed into your local installation of KNIME Analytics Platform or in case nodes that are part of extensions that are not yet installed are contained in the component, you will be asked if you want KNIME Analytics Platform to search and install the missing extension(s), as shown in Figure 11.
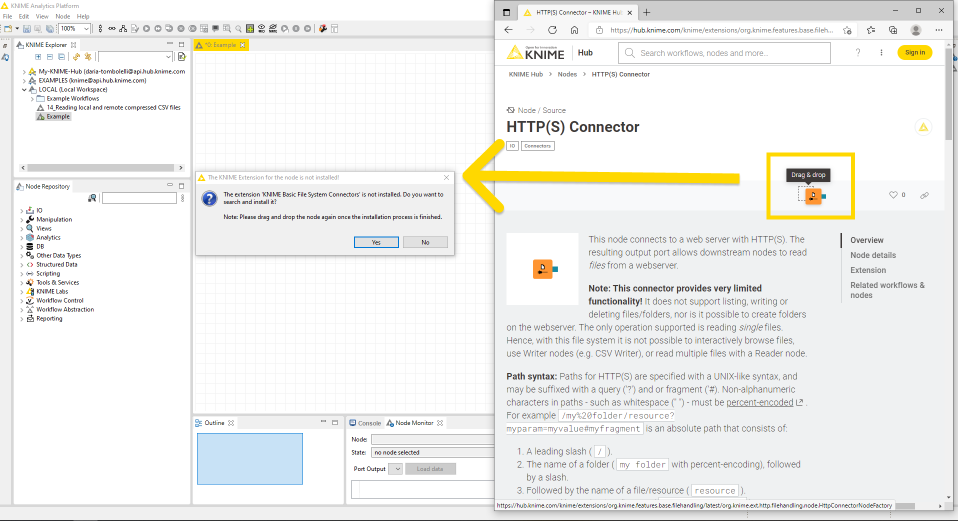 Figure 11. Drag & drop a node from KNIME Hub to KNIME Analytics Platform and install missing extension
 -
Extensions: You can drag & drop a specific extension into the Workflow Editor. KNIME Analytics Platform will search and install it. In order to be able to install the extension the extension’s update site that is indicated at the end of the extension page in the section Legal & update site must be activated in KNIME Analytics Platform.
Teams
A team is a group of users on KNIME Hub that work together on shared projects. Specific Hub resources can be owned by a team (e.g. spaces and the contained workflows, files, or components) so that the team members will have access to these resources.
The team can own public or private spaces. For more details see the section Team owned spaces.
The items that are stored in a team’s public space will be accessible by everyone with access to the Business Hub instance and be presented as search results when searching on KNIME Hub. Only team members will have upload rights to the public spaces of the team. Only the team members instead have read access to the items that are stored in a team’s private space. This will then allow KNIME Hub users that are part of a team to collaborate privately on a project.
Create a team
Teams are firstly created by the KNIME Hub Global Administrator. The global admin will assign a user the role of team admin as well allocate resources to that team. The team admin will be able to start adding team members and create execution contexts that can be used by the team.
There are two types of roles a user can be assigned when part of a team:
-
Administrator. A team administrator can:
-
Member. A team member can:
-
View the team page, with members list and spaces
-
The team creator is automatically assigned administrator role and can promote any of the team members to administrators. In order to do so please follow the instructions in the section Manage team members.
Team owned spaces
A team can own an unlimited number of both public and private spaces.
-
Team owned public spaces: The items that are stored in a team’s public space will be accessible by everyone and be presented as search results when searching on KNIME Hub. Only team members will have upload rights to the public spaces of the team.
-
Team owned private spaces: Only the team members instead have read access to the items that are stored in a team’s private space. This will then allow KNIME Hub users that are part of a team to collaborate privately on a project.
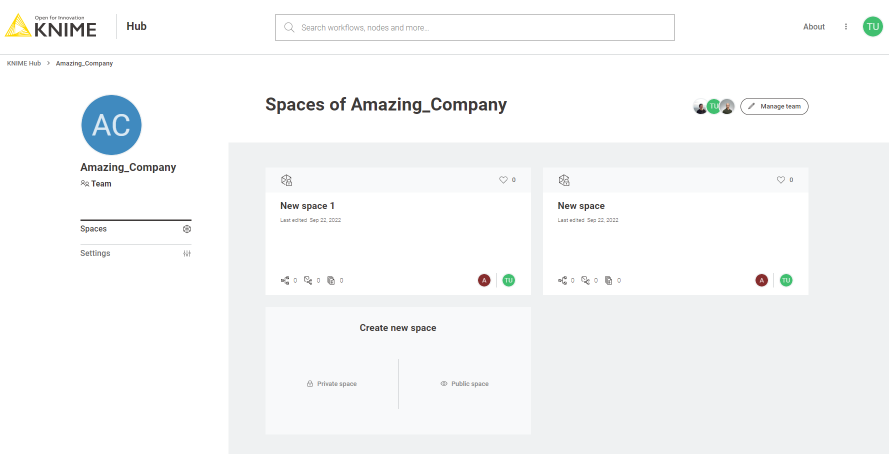
You can create a new space by going to the team’s profile. To do so click your profile icon on the top right corner of KNIME Hub. In the tile Create new space click Private space to create a private space for your team, or Public space to create a public space. You can then change the name of the space, or add a description. You can change or add these also later by going to the relative space page and clicking the space name or Add description button to add a description for the space.
You can also change the visibility of the space from private to public and vice-versa, if you are a team admin, or delete the space. To do so, from the space page click the three vertical dots as shown in the image below.
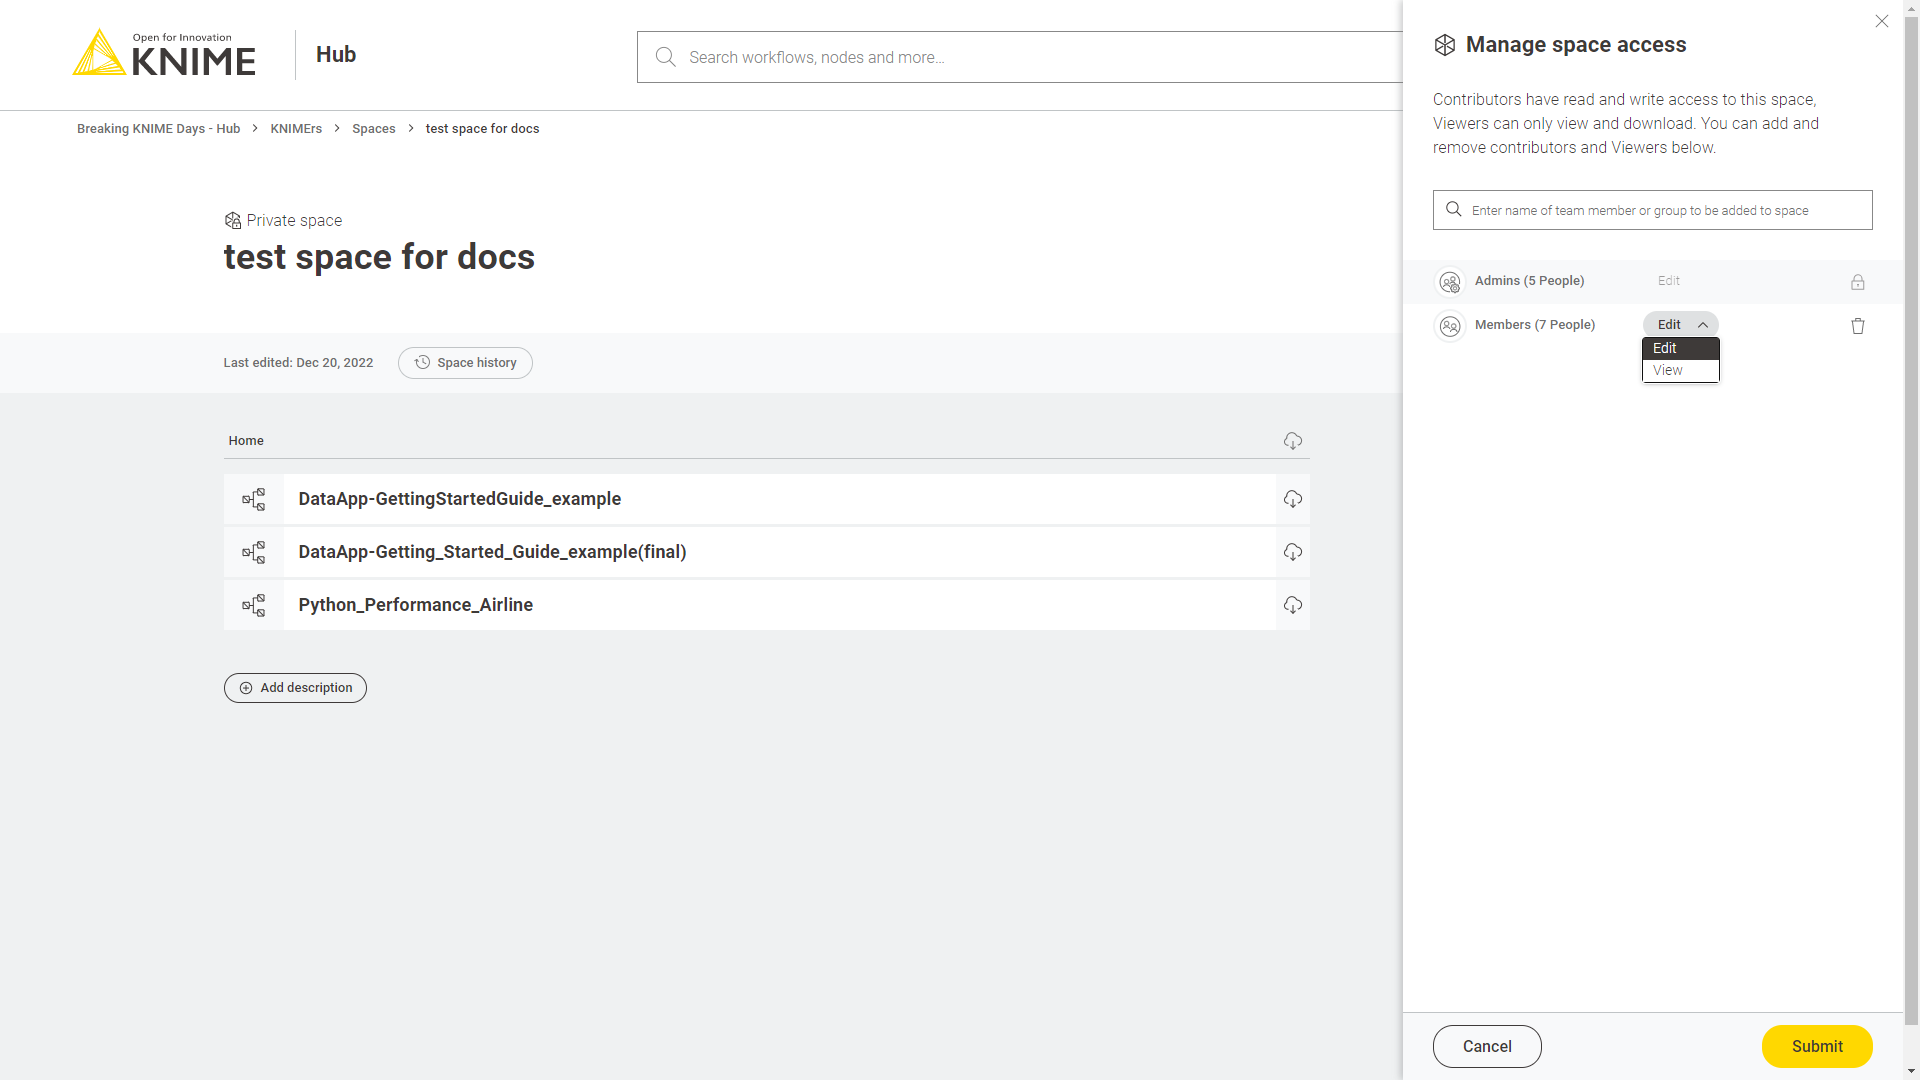
Manage space access
You can also manage the access to a specific space. To do so navigate to the space and click the pencil icon.
In the Manage space access side panel that opens you can change the rights the other team members have on the items in the space - e.g. you can grant them Edit rights or View rights.
Manage team members
You can manage your team by going to the team’s profile. To do so click your profile icon on the top right corner of KNIME Hub.
In the dropdown menu that opens you will see your teams. Select the team you want to manage to go to the corresponding team’s profile page.
Here you can click Manage team button to open the Manage Team Members side panel, as shown in the image below.
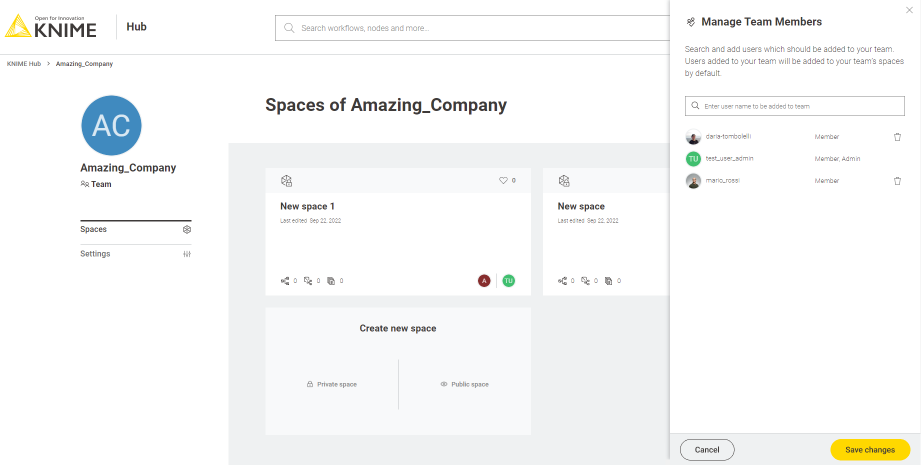
You will see here a list of the team members and their assigned role.
From here a team admin can change the role of the team members. To do so click the drop down arrow close to the name and select the roles you want to assign to each user.
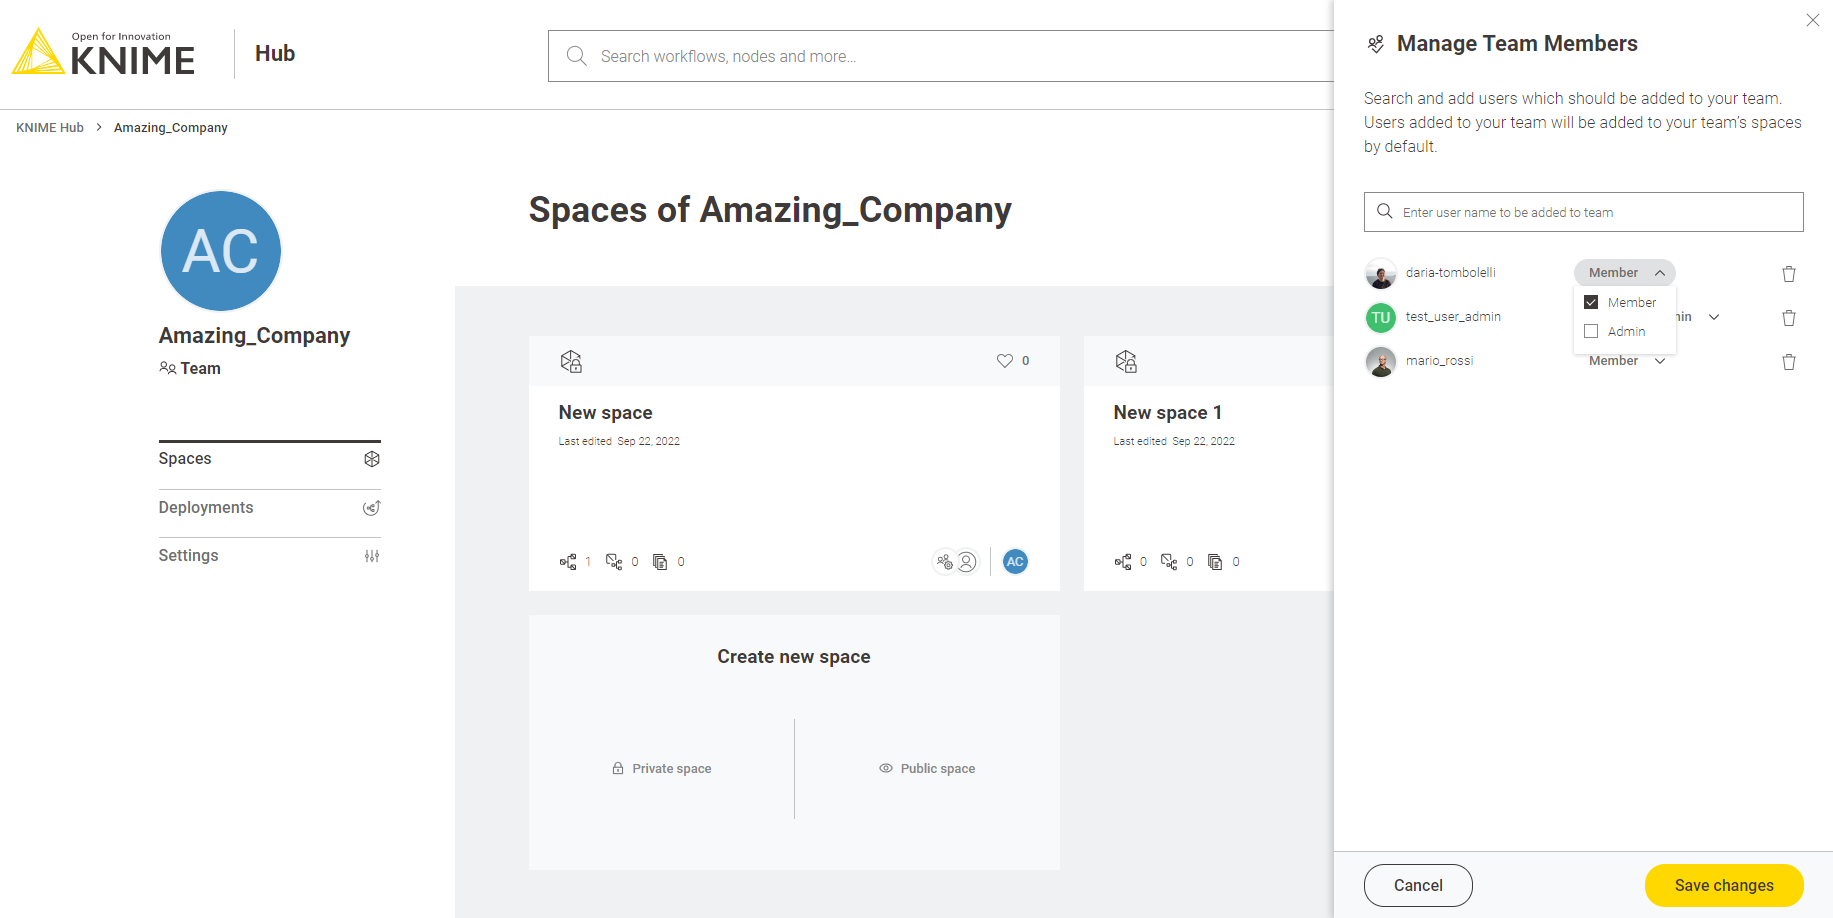
Then click Save changes button to apply your changes.
Add members to a team
To add a new member enter the user name of the users that you want to add to the team in the corresponding field in the Manage Team Members panel then click Save changes button to apply your changes.
In case you added more users than allowed by your license you will be notified with a message. Please remove the exceeding users or purchase more users.
Delete members from a team
To delete a member go to the Manage Team Members panel and click the bin icon for the user you want to delete. Then click the Save changes button to apply your changes.
Customization profiles
Customization profiles are used to deliver KNIME Analytics Platform configurations from KNIME Hub to KNIME Analytics Platform clients and KNIME Hub executors.
This allows to define centrally managed:
-
Update sites
-
Preference profiles (such as Database drivers, Python/R settings)
A profile consists of a set of files that can:
-
Be applied to the client during startup once the KNIME Analytics Platform client is configured. The files are copied into the user’s workspace.
-
Be applied to the KNIME Hub executors of the execution contexts.
Customization profiles can be:
-
Global customization profiles that need to be uploaded and managed by the Global Admin. These can be applied across teams via shared execution context or to specific teams.
-
Team’s customization profiles, which are scoped to the team, can be uploaded either by a Global Admin or a team admin.
Every user of the KNIME Business Hub instance can then download and use customization profiles.
| Currently, customization profiles can be managed on KNIME Hub via REST or using the dedicated Customization Profile data application available here. An upcoming release will add the capability to go via KNIME Hub UI as well. |
Create a customization profile
A customization profile is a file with the .epf extension, that contains the needed profile information. So the first step is to create such a file.
-
Create an
.epffile that contains the needed profile information:-
Build the file from a local KNIME Analytics Platform installation. Set up the needed configuration in a local KNIME Analytics Platform installation, then go to File → Export Preferences. Open the created
.epffile, and look for the entries related to your needed settings. Remove all other settings (as some contain e.g. local paths on your machine, which will inevitably cause issues when applying to another installation). -
Place the
.epffile in a folder, together with any additional files that need to be distributed along the profile (e.g. database drivers) -
Create a
.zipfrom that folder
-
When creating a zip file on macOS using the built in functionality, two files are automatically added that cause the next steps (i.e. applying the profile in Analytics Platform) to fail. There is a way to prevent creation of these files if creating the .zip via command line, see
here. If in doubt, use a Windows or Linux machine to create the .zip file.
|
| The customization profiles on the KNIME Hub instance are going to be accessible without user authentication therefore they shouldn’t contain any confidential data such as passwords. |
For further details and an example on how to distribute JDBC driver files go to the Hub-managed customization profiles section of the KNIME Database Extension Guide.
Variable replacement
It is possible to use variables inside the preferences files (only those files
ending in .epf) which are replaced on the client right before they are
applied. This makes the Hub-managed customizations even more powerful. These
variables have the following format: ${prefix:variable-name}. The following
prefixes are available:
-
env: the variable is replaced with the value of an environment value. For example,${env:TEMP}will be replaced with/tmpunder most Linux systems. -
sysprop: the variable is replaced with a Java system property.
For example,${sysprop:user.name}will be replaced with the current user’s name. For a list of standard Java system properties see the JavaDoc. Additional system properties can be defined via-vmargsin theknime.ini. -
profile: the variable will be replaced with a property of the profile in which the current preference file is contained in. Currentlylocationandnameare supported as variable names. For example,${profile:location}will be replaced by the file system location of the profile on the client. This can be used to reference other files that are part of the profile, such as database drivers:
org.knime.workbench.core/database_drivers=${profile:location}/db-driver.jar
In case you want to have a literal in a preference value that looks like a
variable, you have to use two dollar signs to prevent replacement. For example
$${env:HOME} will be replaced with the plain text ${env:HOME}. If you want
to have two dollars in plain text, you have to write three dollars
($$${env:HOME}) in the preference file.
| Once you use variables in your preference files they are not standard Eclipse preference files anymore and cannot be imported as they are. |
Client customization
Besides the preferences that are exportable by KNIME Analytics Platform there are additional settings that can be added to the preference files to customize clients:
|
|
|
|
|
|
|
|
|
|
|
Upload a customization profile
After creating the .zip file, you need to upload it to KNIME Business Hub. You can do it via REST or via data application.
Upload via REST Request
-
If you have not done so already, on KNIME Business Hub, create an application password for the user uploading the profile.
-
For global customization profiles, use a global admin user.
-
For team’s customization profiles, the user can be either a global admin user or a team admin user.
-
-
Send a
POSTrequest tohttps://api.<base-url>/execution/customization-profileswith the following set up:-
Authorization: select Basic Auth, using username and password from the created application password
-
Body: select form-data as request body type and add the following entries:
-
Add a new key, set content to “File”. Name of the key needs to be “content”. The value of the key is the
.zipfile containing the profile, and the content type isapplication/zip. -
Add a new key, set content to “Text”. Name of the key needs to be “metadata”.
-
The value of the key is:
For global customization profiles enter:
{
  `name`: `<profile_name>`,
  `scope`: `hub:global`
}
For team’s customization profiles you first need to obtain the
<team_ID>of the team you want to upload the customization profile to. To do so you can use the followingGETrequest:GET api.<base-url>/accounts/identity
You will find the
<team_ID>in the body response underteams:... `teams`: [ { `id`: `account:team:<team_ID>`, `name`: `<team_name>`, ... } ] ...
Then the value of the key is:
{
  `name`: `<profile_name>`,
  `scope`: `account:team:<team_ID>`
}
-
Set the content type for the second key to
application/json
-
-
-
When using Postman there is no need to manually adjust the headers
-
-
Send the request
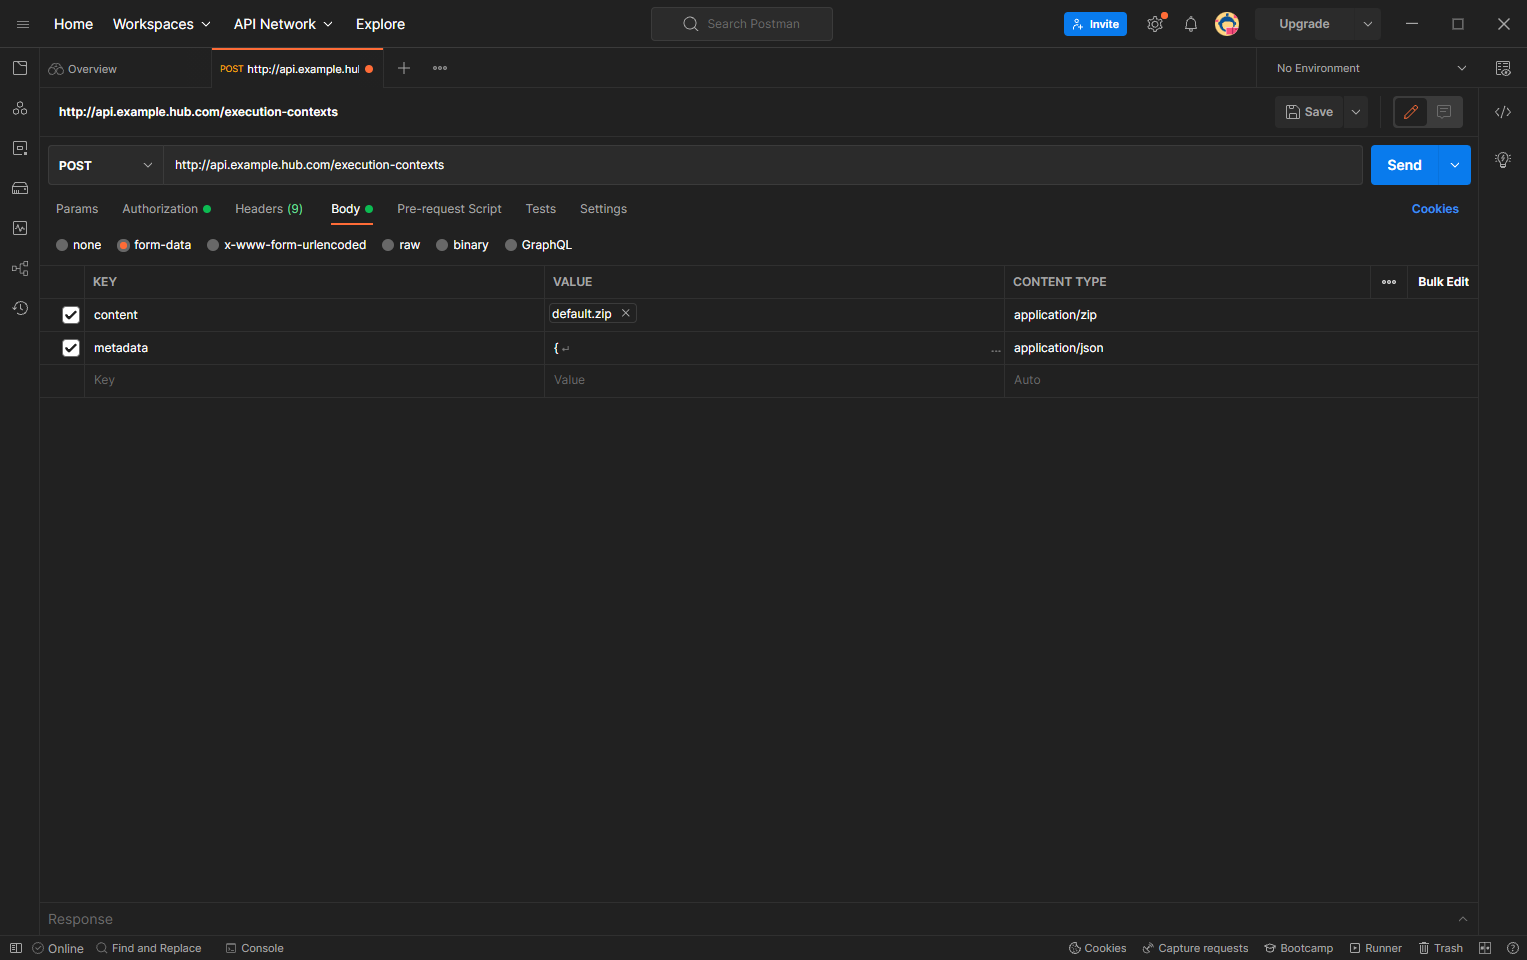 Figure 19. Set up Postman for a REST call to upload a customization profile to a KNIME Hub instance
 -
If successful, you will receive a 201 status response. Make note of the created
<profile_ID>, as this will be used to refer to the profile when requesting it.
|
You can refer to the API documentation at the following URL for more details about the different calls you can make to the Customization Profiles endpoint. http://api.<base-url>/api-doc/execution/#/Customization%20Profiles |
Upload via Data Application
-
If you have not done so already, on KNIME Business Hub, create an application password for the user uploading the profile.
-
For global customization profiles, use a global admin user.
-
For team’s customization profiles, the user can be either a global admin user or a team admin user.
-
-
Download the workflow:
Click here and download the workflow to your KNIME Analytics Platform. -
Upload the downloaded workflow to your KNIME Business Hub instance via KNIME Analytics Platform.
-
Deploy the workflow as a data application. You can learn more about how to do it here.
-
The first step to begin using the data application is establishing a connection with the Hub instance. You must enter your Hub URL and application password in the data app to connect to your KNIME Business Hub instance.
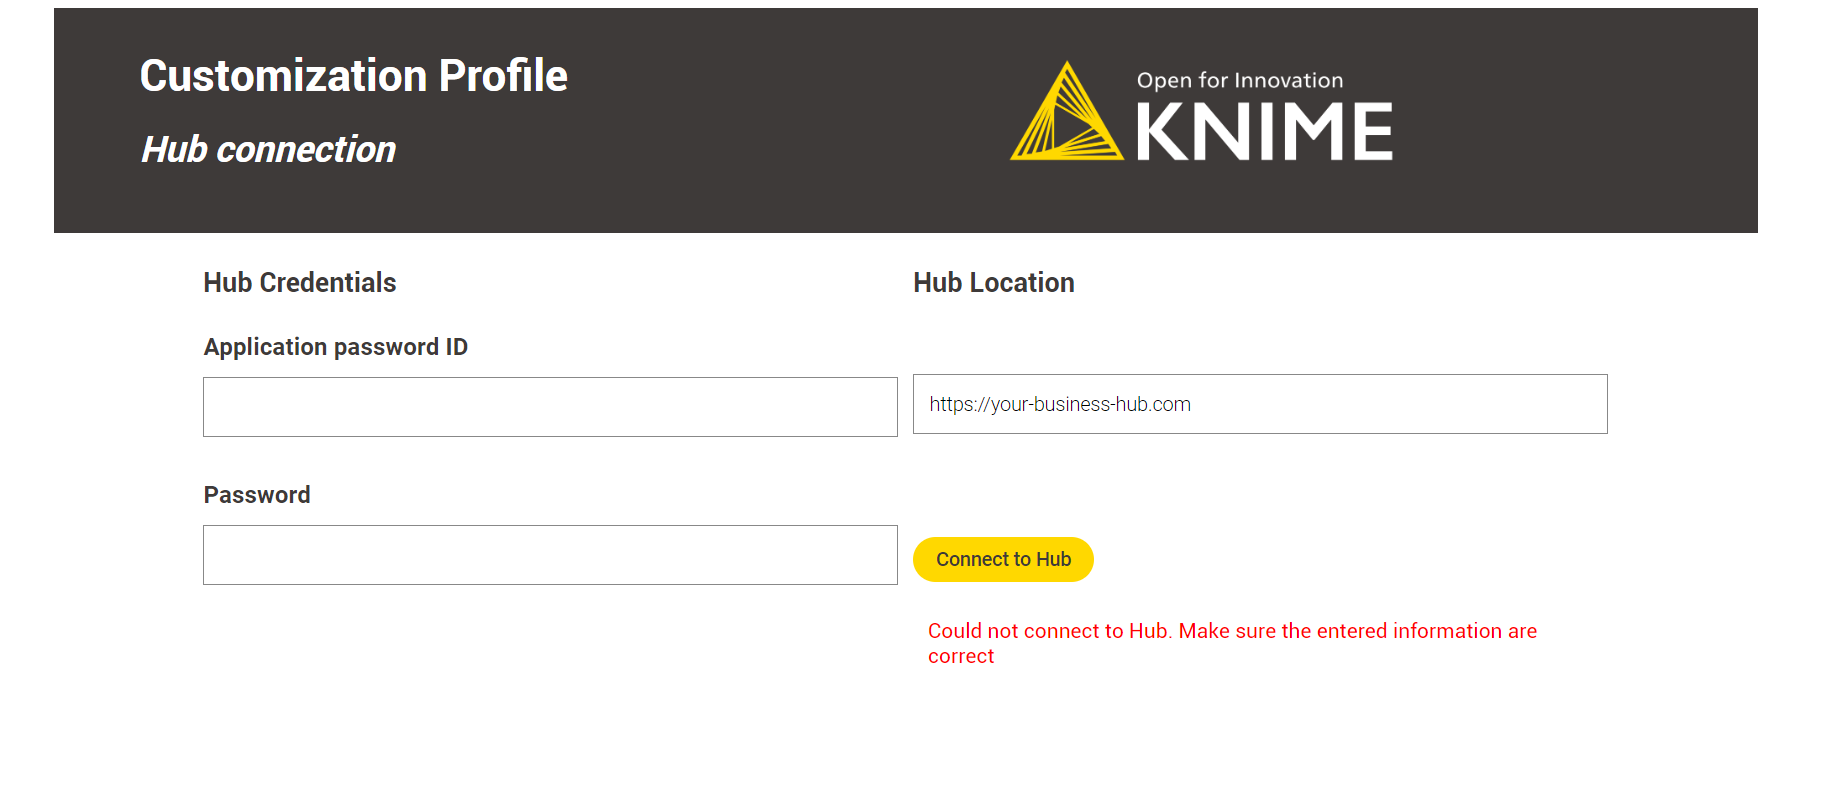 Figure 20. The Hub connection step.
 -
Select
Upload a New Customization Profilein theAction Selectionmenu and clickNext. You can upload multiple customization profiles to your KNIME Business Hub instance.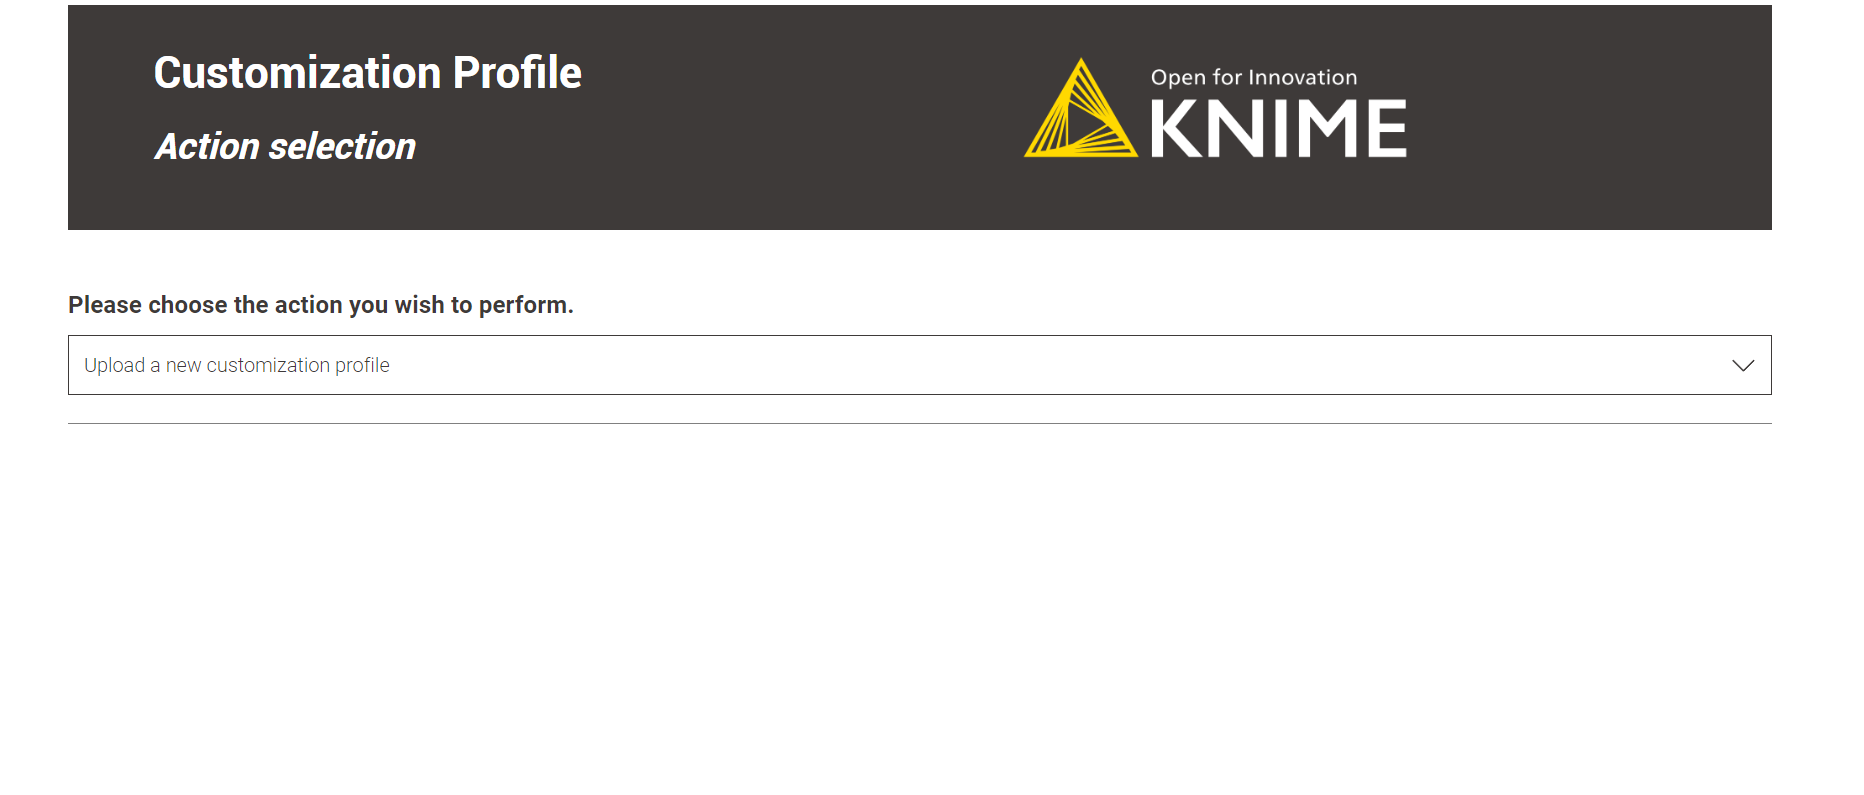 Figure 21. The upload option is selected in the action selection step.
 -
In the next step, select the customization profile file previously created, give it a name, and define its scope.
-
Global Admin: You can choose the customization profile scope if logged in to the Data App as a Global Admin.
-
Global scope: After being uploaded to KNIME Business Hub, the global customization profile can be applied to a shared or a team execution context.
-
Team scope: When a customization profile with team scope is uploaded, it can be applied to the team’s executors. It is possible to upload the same customization profile to multiple teams. The Global Admin can upload the customization profile to any team.
 Figure 22. Global Admin executing the data app
-
-
Team Admin: If you’re logged in as a team admin, you can only upload the customization profile as a team-scoped type. You can upload the same customization profile for multiple teams. The availability of teams is determined by the permissions of the user who is logged in.
-
-
In the Upload Results step, a table displays the results of the customization profile upload operation, along with a legend.
If everything goes well, the green light means your customization profile has been successfully uploaded to the KNIME Business Hub. You can now apply it to a KNIME Analytics Platform installation or to a KNIME Business Hub executor.
-
Error Handling: The data application is designed to handle two types of errors:
-
Missing customization profile file.
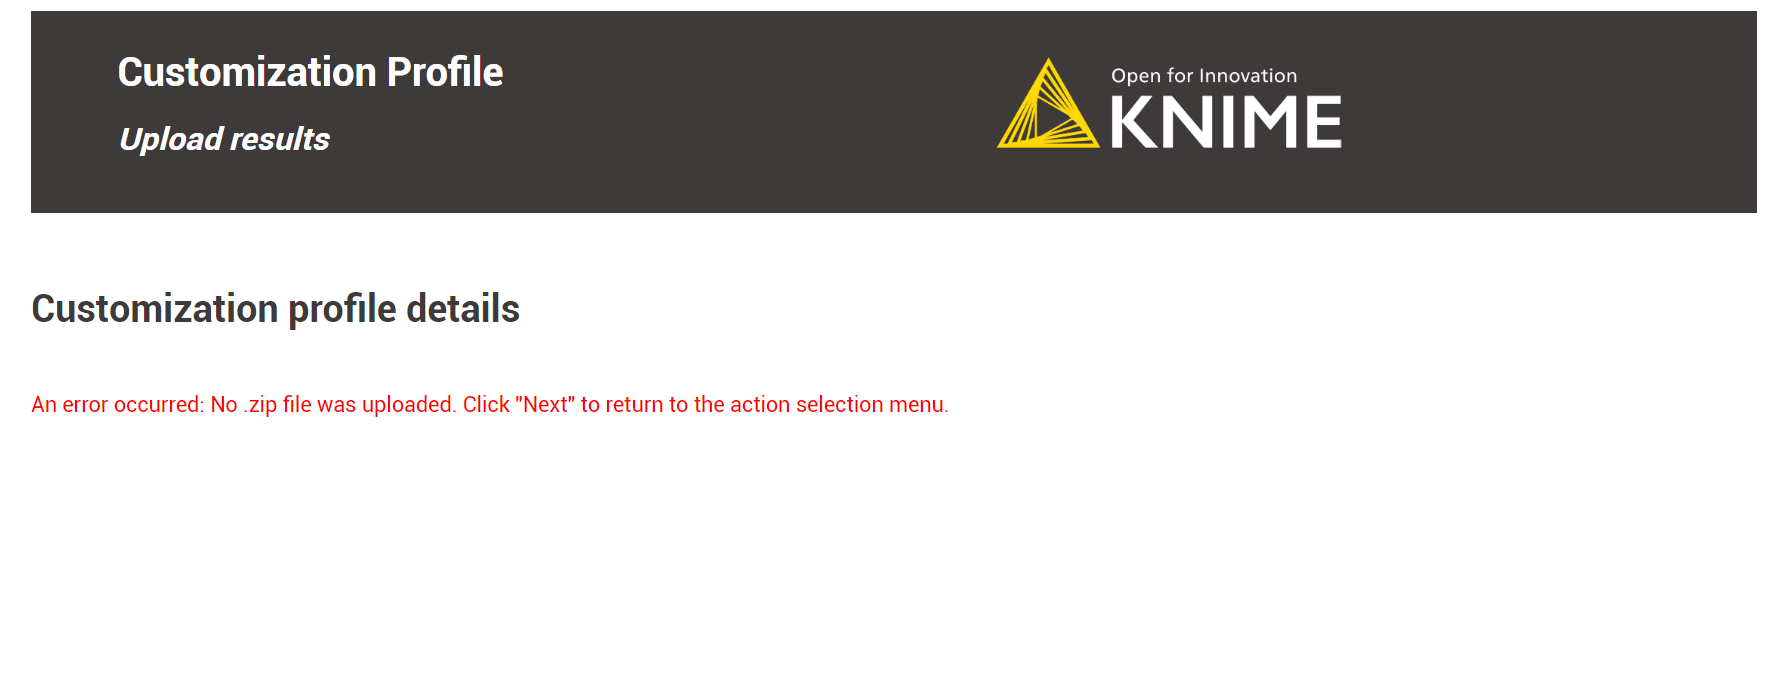 Figure 23. This error occurs when no customization profile file is provided.
 -
No team selection (for team-scoped customization profiles).
If you encounter an error message, click
Nextand select theTurn back to the choose action menuoption. Repeat the operation, fixing the error.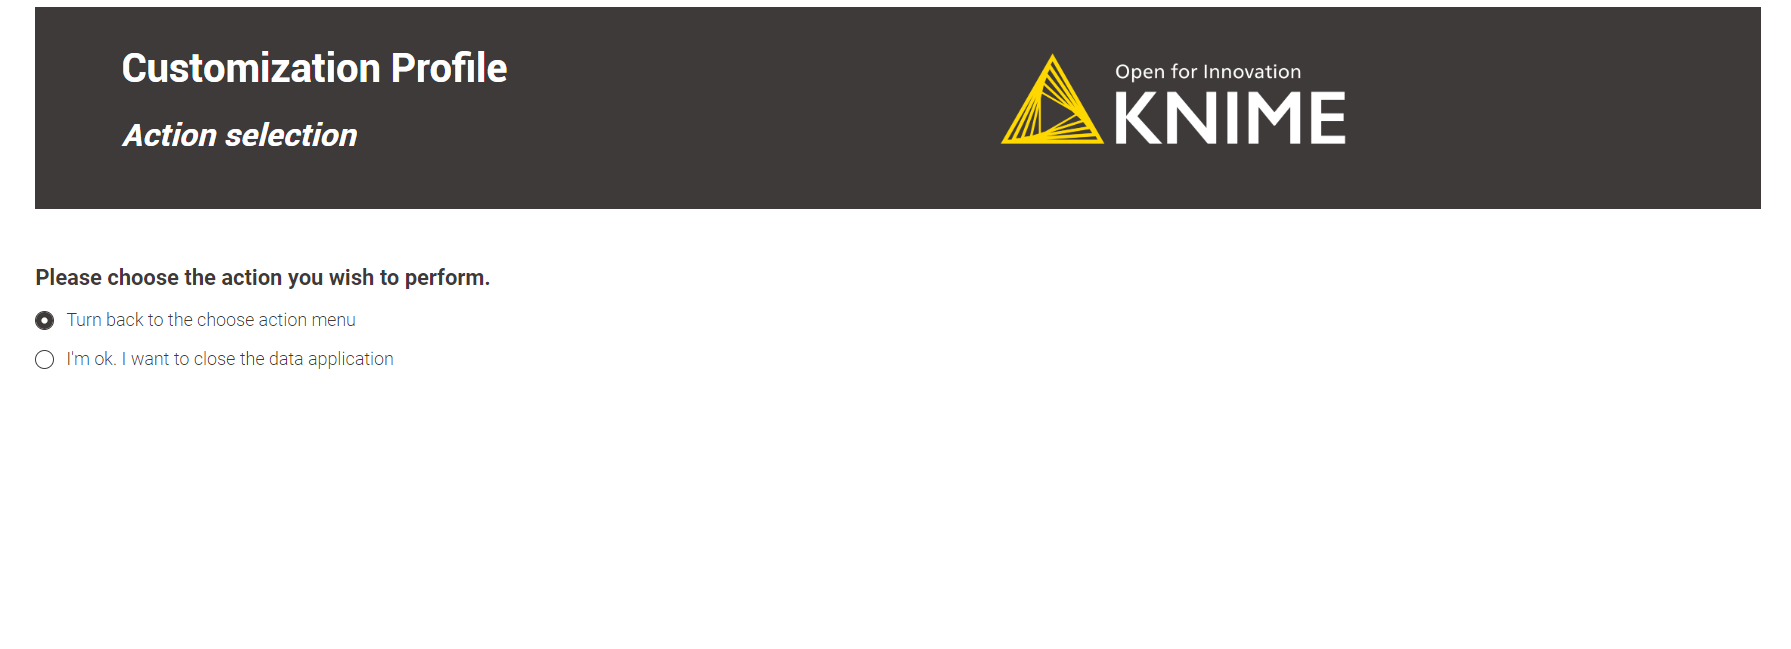 Figure 24. Turn back to the action menu and repeat the operation.
-
-
Click
Nextto finish the operation. You can return to theAction Selectionmenu to perform additional actions or close the data application directly.
Apply a customization profile
Apply a customization profile to KNIME Analytics Platform client
In order to apply a customization profile in a local KNIME Analytics Platform installation, you need to add it to the installation’s knime.ini file.
If you have already changed your default settings in the KNIME Analytics Platform installation these will not be overwritten. However, you can
choose to Restore all preferences to defaults via the preference page in the KNIME Analytics Platform, before the restart.
Add the following lines to the knime.ini, right before the -vmargs line.
Please note the line breaks. I.e., these need to be four individual lines in your knime.ini.
-profileLocation
https://api.<base-url>/execution/customization-profiles/contents
-profileList
<profile_ID>
Apply via REST Request
-
If you have not done so already, on KNIME Business Hub create an application password for the user uploading the profile
-
For global customization profiles, use a global admin user
-
For team’s customization profiles, the user can be either a global admin user or a team admin user
-
-
You can obtain the
<profile_ID>using the followingGETrequest:-
For global customization profiles:
GET api.<base-url>/execution/customization-profiles/hub:global
-
For team’s customization profiles:
GET api.<base-url>/execution/customization-profiles/account:team:<team_ID>
Refer to the above section to find out how to get the <team_ID>.
-
-
Upon the next startup of KNIME Analytics Platform, the customization profile will be retrieved from KNIME Business Hub, and its settings will be applied.
Apply via Data App
To generate the lines for the knime.ini file, you can use the data application. Similar to the customization profile upload operation, the user paths and features available to you depend on whether you are executing the data app as a Global Admin or a team admin.
| It is only possible to apply one customization profile at a time. If you need to apply multiple profiles, please repeat the operation. |
-
To apply an existing customization profile, in the Action Selection menu, select
Apply an existing customization profile.-
You will see a list of all available customization profiles uploaded to your KNIME Business Hub instance.
-
Global Admin: can access all uploaded customization profiles within the current KNIME Business Hub instance. It can apply either team or global-scoped customization profiles to the KNIME Analytics Platform installation.
-
Team Admin: can only access and apply team-scoped customization profiles from their own teams.
-
-
If no customization profiles have been uploaded yet, you can upload one using the corresponding option in the menu.
-
In the table, if the
Team namecolumn has a value ofAny, the customization profile has a global scope and can be applied to any team. -
Select one customization profile and click
Next. Figure 25. A global and a team customization profiles are available for the Global Admin.
-
-
In the
Apply customization profilestep is already selected by default the optionApply one customization profile to KNIME Analytics Platform.-
You can copy-paste the generated lines in your
knime.inifile as explained above.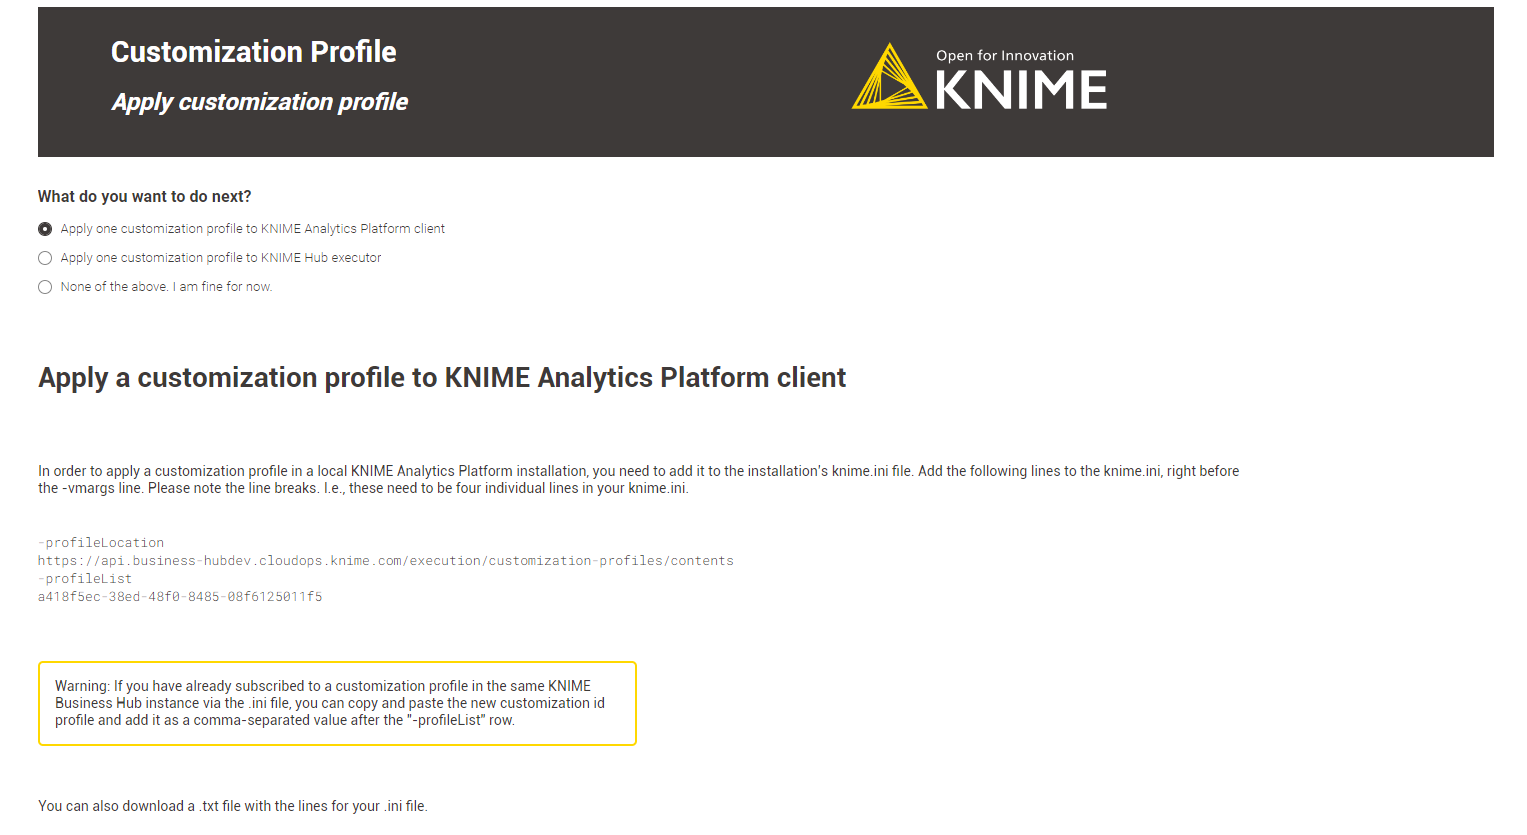 Figure 26. An overview of the Apply customization profile to KNIME Analytics Platform
The
profileLocationis based on the Hub URL provided during authentication, and theprofileListcontains the previously selected customization profile. -
It is possible to download a
.txtfile with the lines for yourknime.inifile. You can share it with your teammates to facilitate the application of the customization profile.If you have already subscribed to a customization profile for the same KNIME Business Hub instance via the knime.inifile, you can copy and paste the new customization id profile and add it as a comma-separated value after the-profileListrow. -
After copy-pasting the
knime.inilines or downloading the.txtfile, click Next. You will then have the option to return to the Action selection menu or close the data app.
-
-
Error Handling: The data application handles two types of errors for the application branch.:
-
No customization profiles uploaded to the KNIME Business Hub.
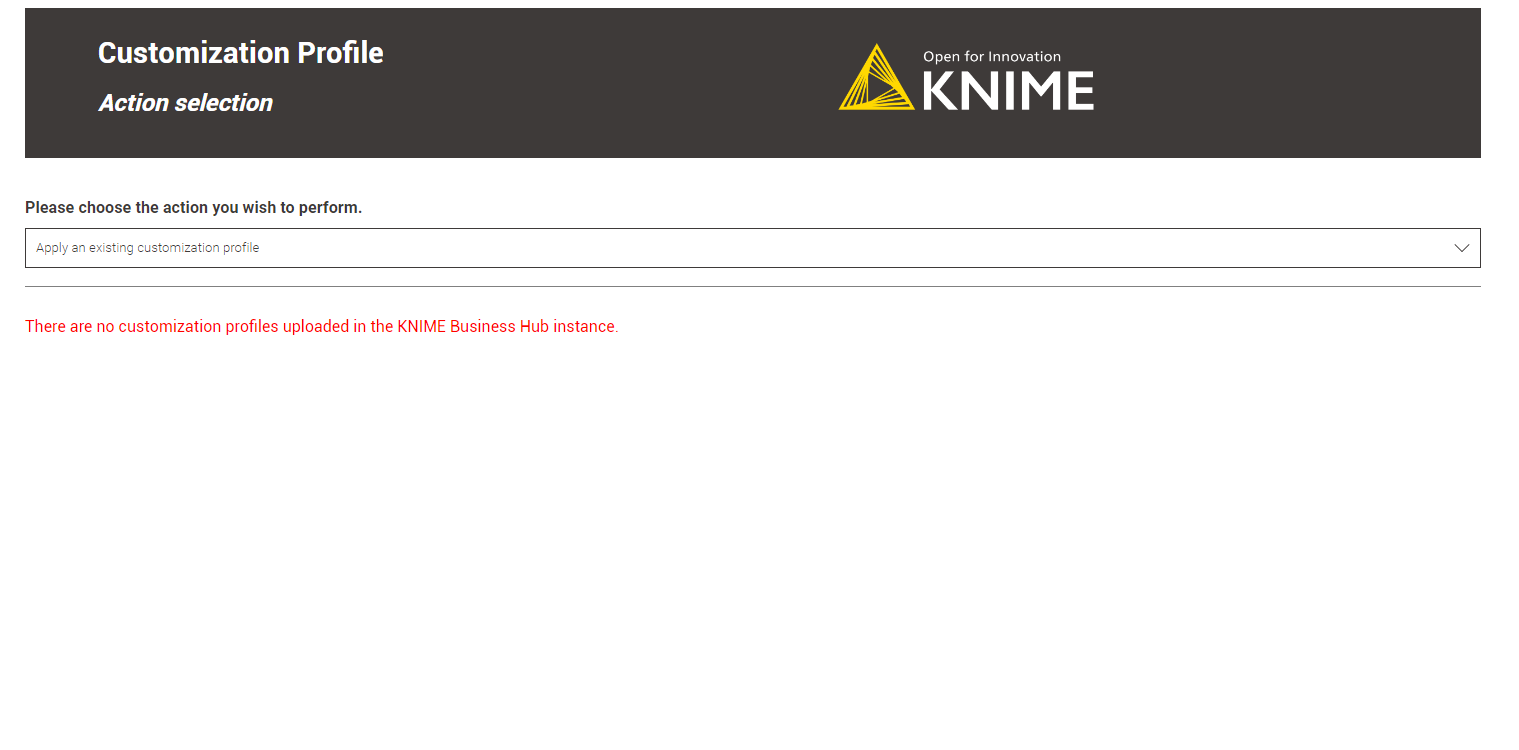 Figure 27. This error occurs when there are no customization profiles uploaded in the KNIME Business Hub instance.
 -
No customization profile selected.
If you encounter an error message, click
Nextand select theTurn back to the choose action menuoption. Repeat the operation, fixing the error.
Figure 28. Turn back to the action menu and repeat the operation.
-
Upon the next startup of KNIME Analytics Platform, the customization profile will be retrieved from KNIME Business Hub, and its settings will be applied.
| It is currently not possible to select the customization profiles of a KNIME Business Hub instance via File → Preferences → KNIME → Customization profiles option in KNIME Analytics Platform. A future KNIME Analytics Platform release will support this feature. |
Apply a customization profile to KNIME Hub executor
Apply via REST request
In order to apply a customization profile to all executors running in a KNIME Business Hub execution context, you will need to send a request to the execution context endpoint.
First you need to get the execution context ID. To do so you can use the following GET request to get a list of all
the execution contexts that are owned by a specific team:
GET api.<base-url>/execution-contexts/account:team:<team_ID>
If you are a global admin you can also GET a list of all the execution contexts available on the Hub instance with the call GET api.<base-url>/execution-contexts/.
|
Now you can apply the new customization profile to the selected execution context.
To do so you need to update the execution context by using the follwing PUT request:
PUT api.<base-url>/execution-contexts/<execution-context_ID>
You need to select Body > raw > JSON and add the following to the request body:
{
`customizationProfiles`: [
    `<profile_ID>`
  ]
}
Refer to the above section to find out how to get the <profile_ID>.
|
This will cause a restart of all executor pods of this execution context, after which the profile will be applied.
| At present, this will also terminate all jobs currently running on the executor. |
Apply via Data App
To apply a customization profile to all executors running in a KNIME Business Hub execution context, we can use the data application. However, the type of user logged in affects the operations that can be performed. Refer to the table below for a comprehensive overview.
| User type | Eligible customization profile | Customization profile type | Eligible Execution Context |
|---|---|---|---|
Global Admin |
All uploaded within the KNIME Business Hub instance |
Global |
Shared and any team specific execution context |
Team-scoped |
Any team execution contexts |
||
Team admin |
Only those uploaded in teams in which the user has team admin rights |
Team-scoped only |
Only the team execution contexts where the customization profile was uploaded. Shared execution contexts are not eligible |
To provide a better understanding of the table, here are some examples to demonstrate its functionality:
-
A Global Admin can choose one team-scoped customization profile and apply it to any team-scoped execution context within the KNIME Business Hub instance. For instance, the Global Admin can apply
Team A’s customization profileto the execution context ofTeam B, i.e., execution context B.1. -
A Global Admin can also select a Global customization profile and apply it to any shared and team-scoped execution context within the KNIME Business Hub instance.
-
A team admin can only choose team-scoped customization profiles uploaded within the teams with admin rights. For example, they can only apply a customization profile uploaded in
Team Awithin the Team A execution contexts.
-
Learn how to download the data app from Community Hub, upload and deploy it in KNIME Business Hub, and authenticate with your application password in the Upload a customization profile section.
-
Select
Apply an existing Customization Profilein theAction Selectionmenu to apply a Customization Profile. -
Choose the desired customization profile from the table and click
Next. In the table, if theTeam namecolumn has a value ofAny, the customization profile has a global scope and can be applied to any team.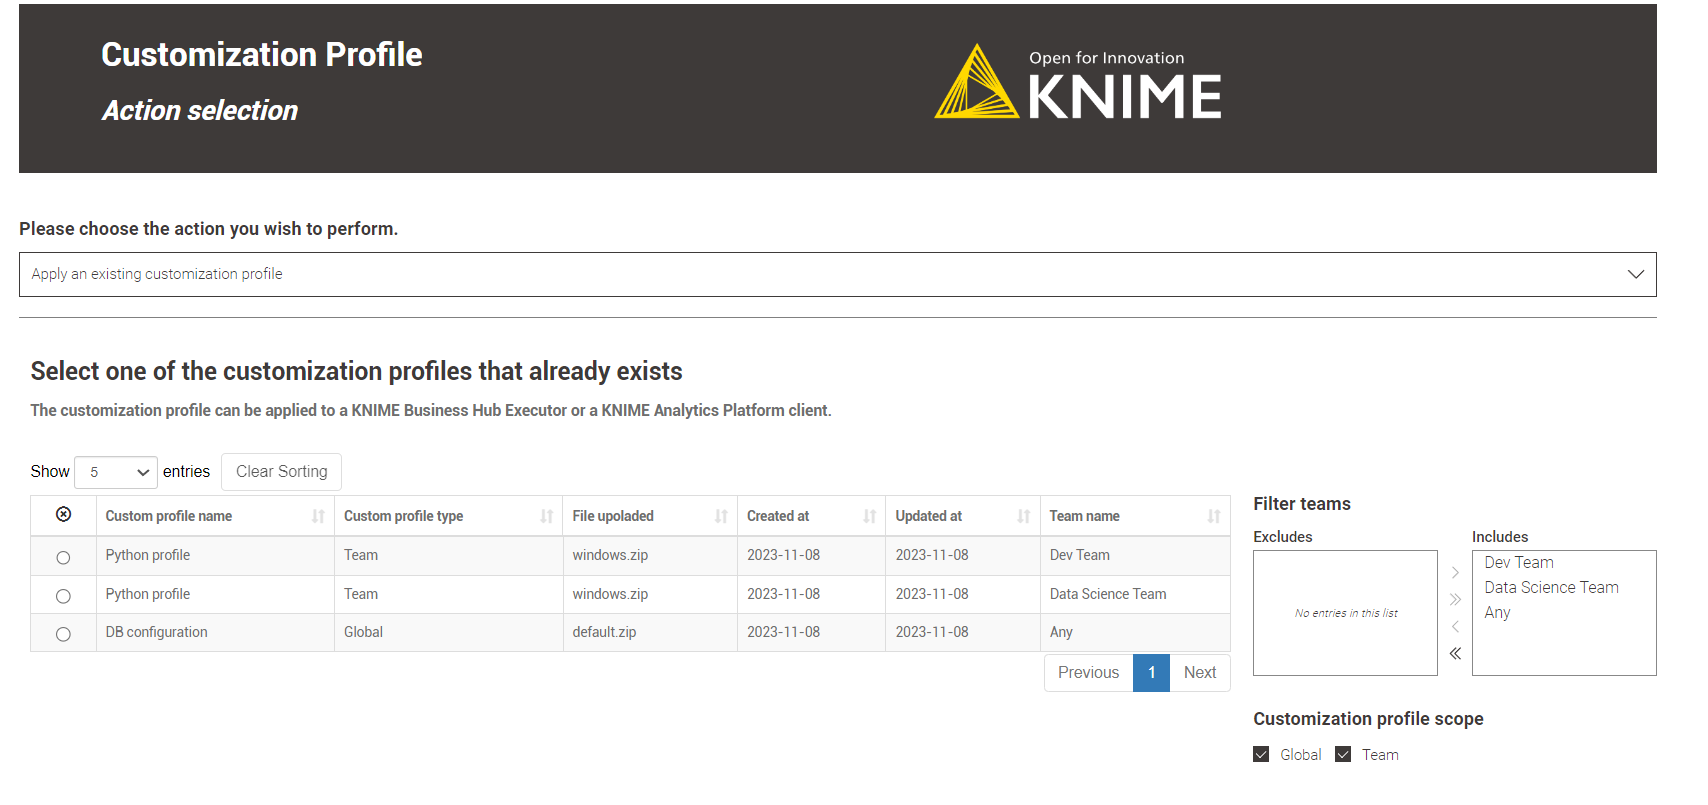 Figure 29. A Global Admin could select a global or team-scoped customization profile.
It is only possible to apply one customization profile at a time. To apply multiple customization profiles, repeat the operation. -
When you reach the
Apply customization profilestep, choose the optionApply one customization profile to KNIME Hub Executor. You’ll see a table that shows the available execution contexts based on your user type and the previously selected customization profile scope.Applying a new customization profile with the same name as an existing one to an execution context causes an internal error. Check the "Existing customization profiles name" column to avoid this. Select one or more execution contexts from the table where you want to apply the customization profile and click
Next. Figure 30. The team admin can apply a customization profile uploaded to the Dev Team to the team-scoped execution contexts.
 -
In the
Application Resultsstep, a table displays the results of the customization profile application operation, along with a legend.If everything goes well, the green light indicates that your customization profile has been successfully applied to KNIME Business Hub executors for the selected execution contexts.
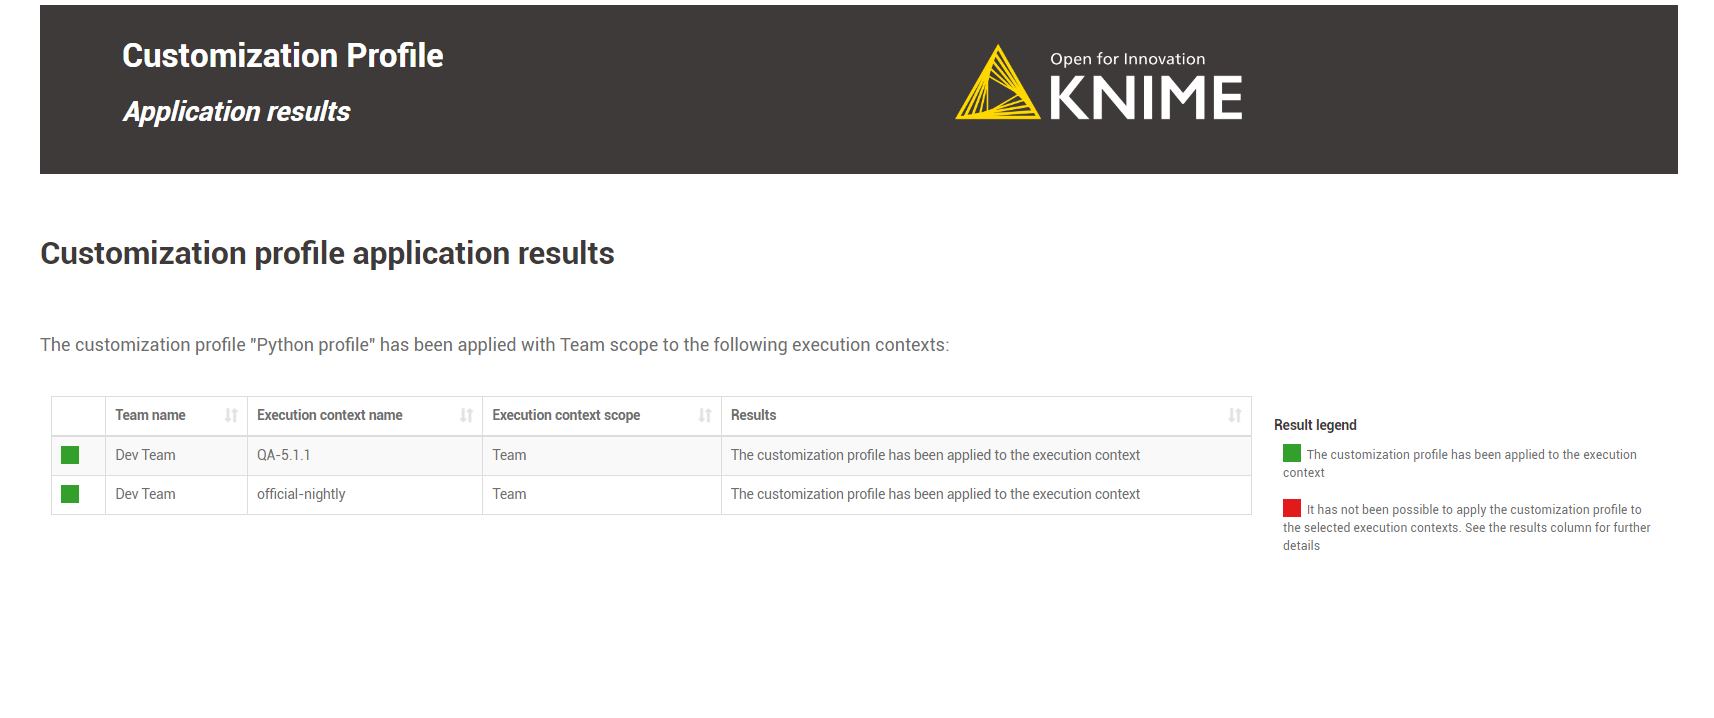 Figure 31. The team admin has applied the Python profile to two different execution contexts for the same team.
 -
Error Handling: The data application handles two types of errors for the application branch.:
-
No customization profiles were uploaded to the KNIME Business Hub.
-
Attempting to apply a customization profile to an execution context with a customization profile with the same name.
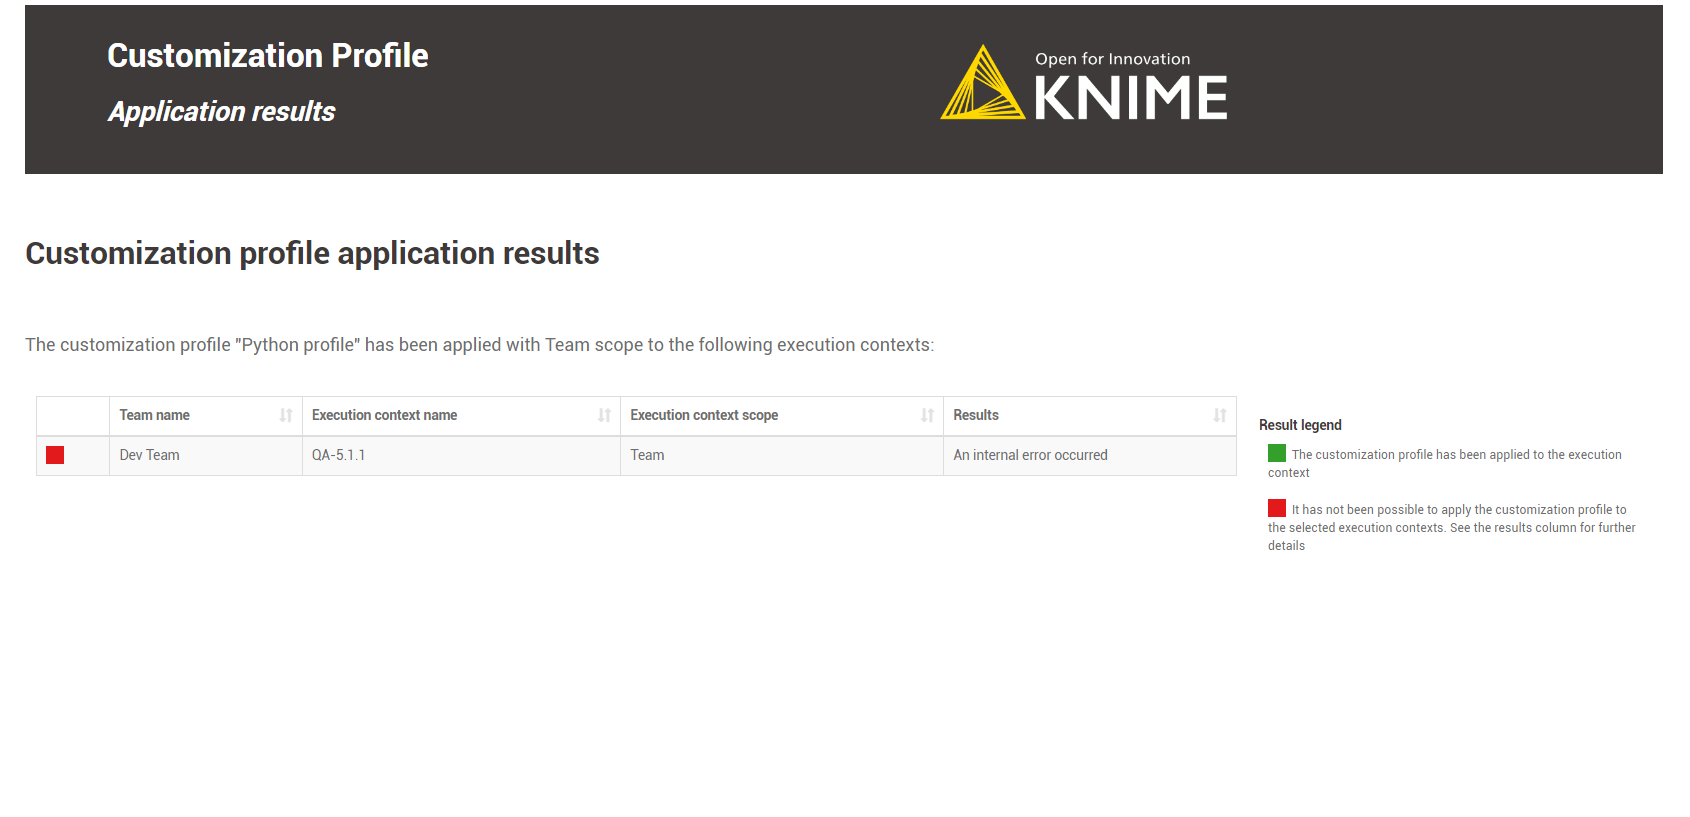 Figure 32. A view of the error.
 -
No customization profile was selected.
-
When no execution contexts were chosen to apply the customization profile.
If you encounter an error message, click
Nextand select theTurn back to the choose action menuoption. Repeat the operation, fixing the error.
Figure 33. Turn back to the action menu and repeat the operation.
-
-
Click
Nextto finish the operation. You can return to theAction Selectionmenu to perform additional actions or close the data application directly.
Update a customization profile
It is possible to update customization profiles uploaded to KNIME Business Hub. This can be done even if the customization profile has already been applied to the KNIME Business executor via execution context. You can update two features:
-
The customization profile name.
-
The customization profile zip file can be overwritten. Refer to the create a customization profile section to learn how to make one.
Update via REST Request
Updating a customization profile is like replacing an existing profile with a new file and name.
If you want to update a customization profile via REST Request, the process is similar to the uploading process. The only difference is that instead of a POST Request, you need to perform a PUT Request and specify the ID of the customization profile.
-
If you have not done so already, on KNIME Business Hub, create an application password for the user uploading the profile.
-
For global customization profiles, use a global admin user.
-
For team’s customization profiles, the user can be either a global admin user or a team admin user.
-
-
To begin, you will need to get the list of all uploaded customization profiles on KNIME Business Hub:
You can obtain the
<profile_ID>using the followingGETrequest:For global customization profiles:
GET api.<base-url>/execution/customization-profiles/hub:global
For team’s customization profiles:
GET api.<base-url>/execution/customization-profiles/account:team:<team_ID>
Refer to the above section to learn how to get the <team_ID>. -
Updating a customization profile is similar to uploading it via a REST Request. However, unlike uploading, we only need to provide the name and file of the customization profile for updating. So, we don’t need to provide the scope as it remains the same.
-
Send a
PUTrequest tohttps://api.<base-url>/execution/customization-profiles/<customization-profile-ID>with the following set up: -
Authorization: select Basic Auth, using username and password from the created application password
-
Body: select form-data as request body type and add the following entries:
-
Add a new key, set content to “File”. Name of the key needs to be “content”. The value of the key is the
.zipfile containing the profile, and the content type isapplication/zip. -
Add a new key, set content to “Text”. Name of the key needs to be “metadata”.
-
The value of the key is the same for global and team-scoped customization profiles:
{
  `name`: `<profile_name>`
}
-
Set the content type for the second key to
application/json
-
-
-
When using Postman there is no need to manually adjust the headers
-
-
Send the request
Update via Data Application
Users can use the customization profile data app to update customization profiles previously uploaded to the KNIME Business Hub.
Depending on the user’s role as a Global Admin or a Team Admin, they can access and update specific customization profiles:
-
Global Admin: can update all uploaded customization profiles within the current KNIME Business Hub instance, either team or global-scoped customization profiles.
-
Team Admin: can only update team-scoped customization profiles from their own teams.
-
Learn how to download the data app from Community Hub, upload and deploy it in KNIME Business Hub, and authenticate with your application password in the Upload a customization profile section.
-
Select
Update an existing Customization Profilein theAction Selectionmenu to update a Customization Profile. Choose the desired customization profiles from the table and clickNext.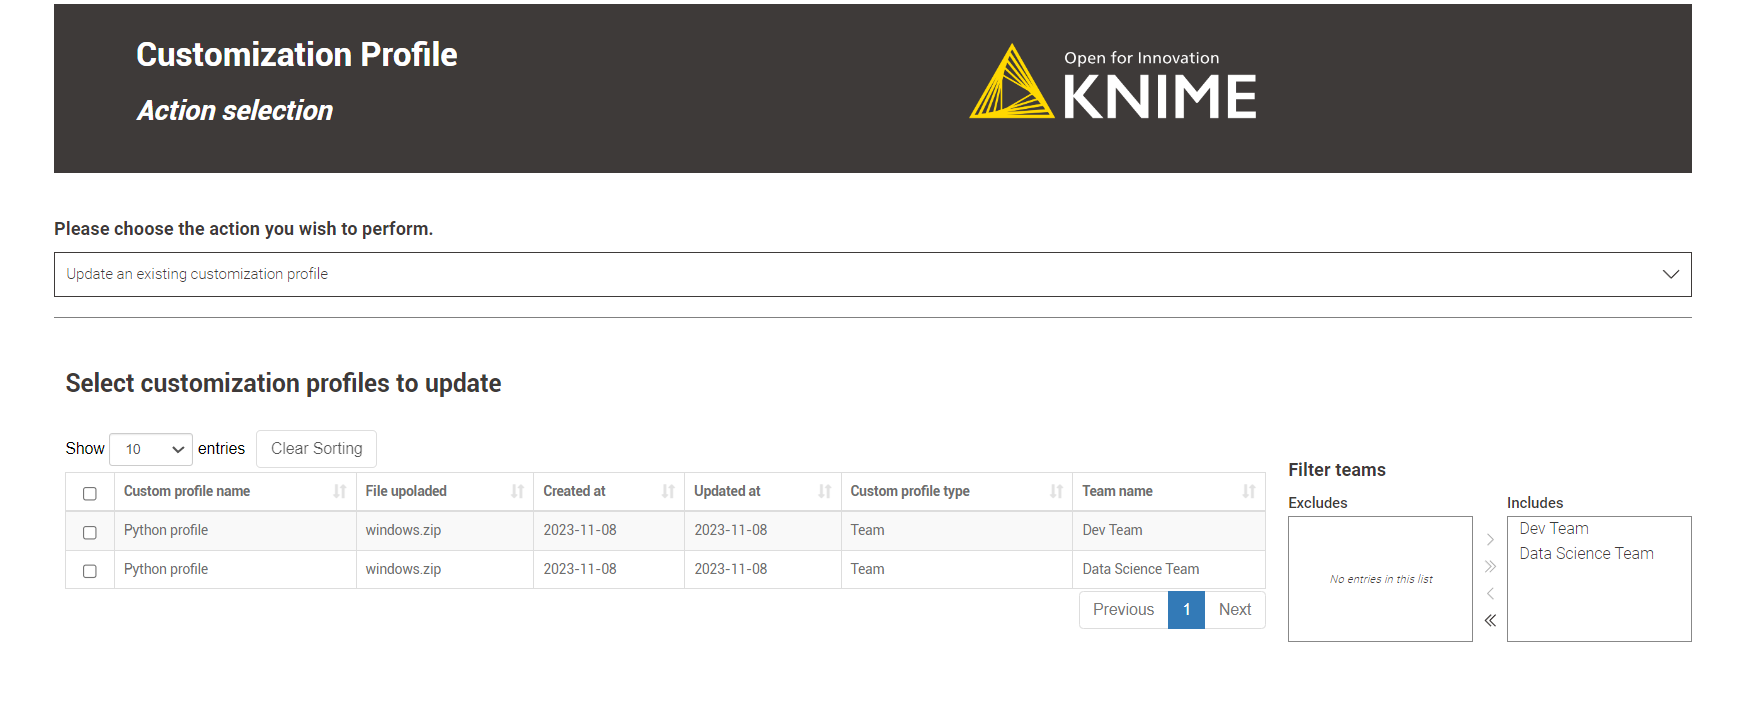 Figure 34. A team admin could select only team-scoped customization profiles.
You can choose to update multiple customization profiles at the same time. -
In the
Update Customization Profilestep, you can change the customization profile name by double-clicking the corresponding table cell and uploading a new customization profile to overwrite the existing one.Refer to the "File uploaded" column for the currently assigned customization profile file.
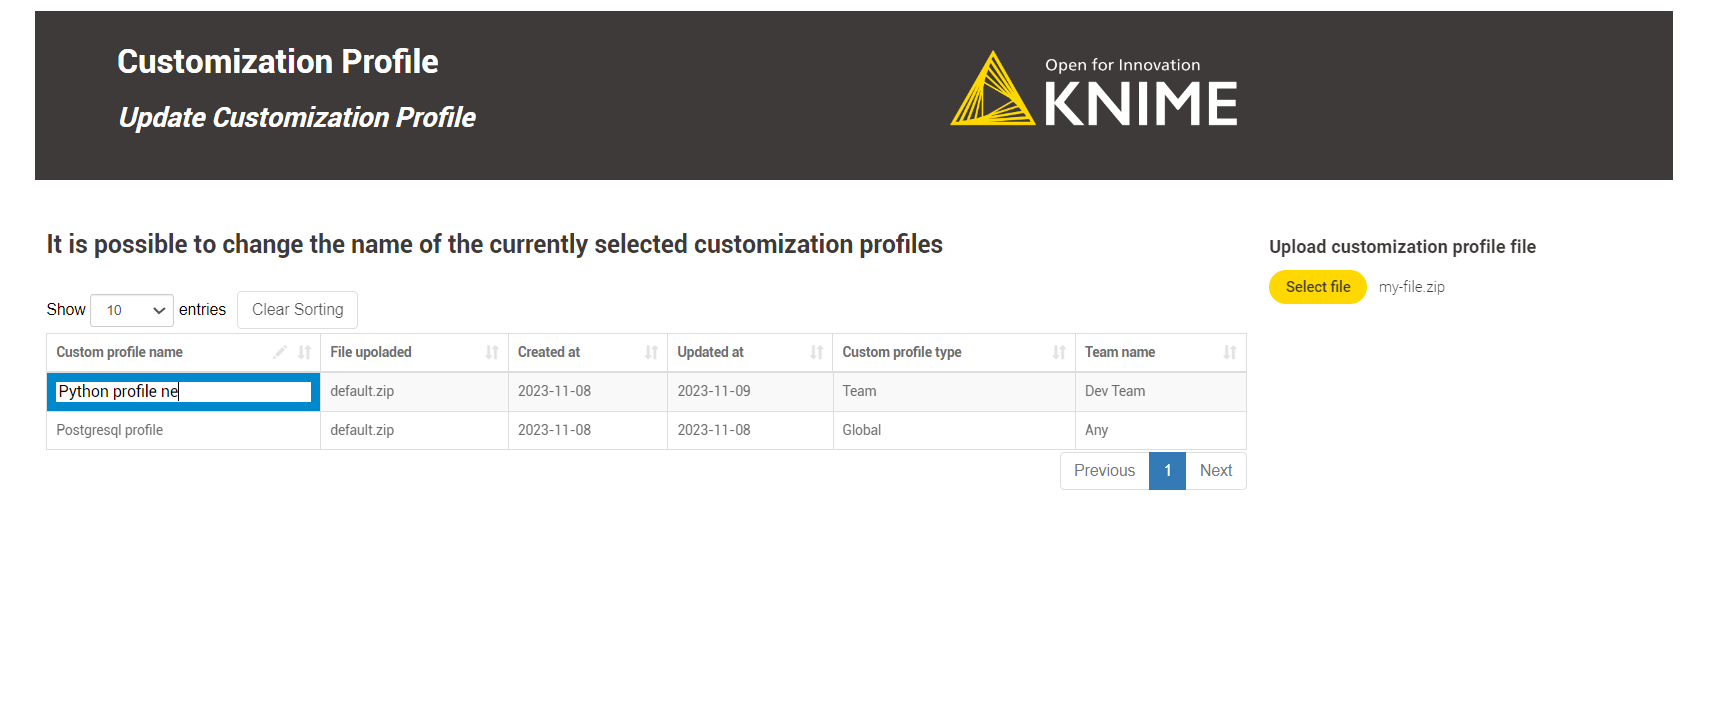 Figure 35. A Global Admin updating two customization profiles at once.
Updating multiple customization profiles at once is possible, but it’s important to note that you can only upload a single customization profile file for all the customization profiles. Although each customization profile can be renamed, they will all share the same customization profile file. -
In the
Update Resultsstep, a table displays the results of the customization profile updating operation, along with a legend.If everything goes well, the green light indicates that your selected customization profiles have been successfully updated with new names and a new customization profile file.
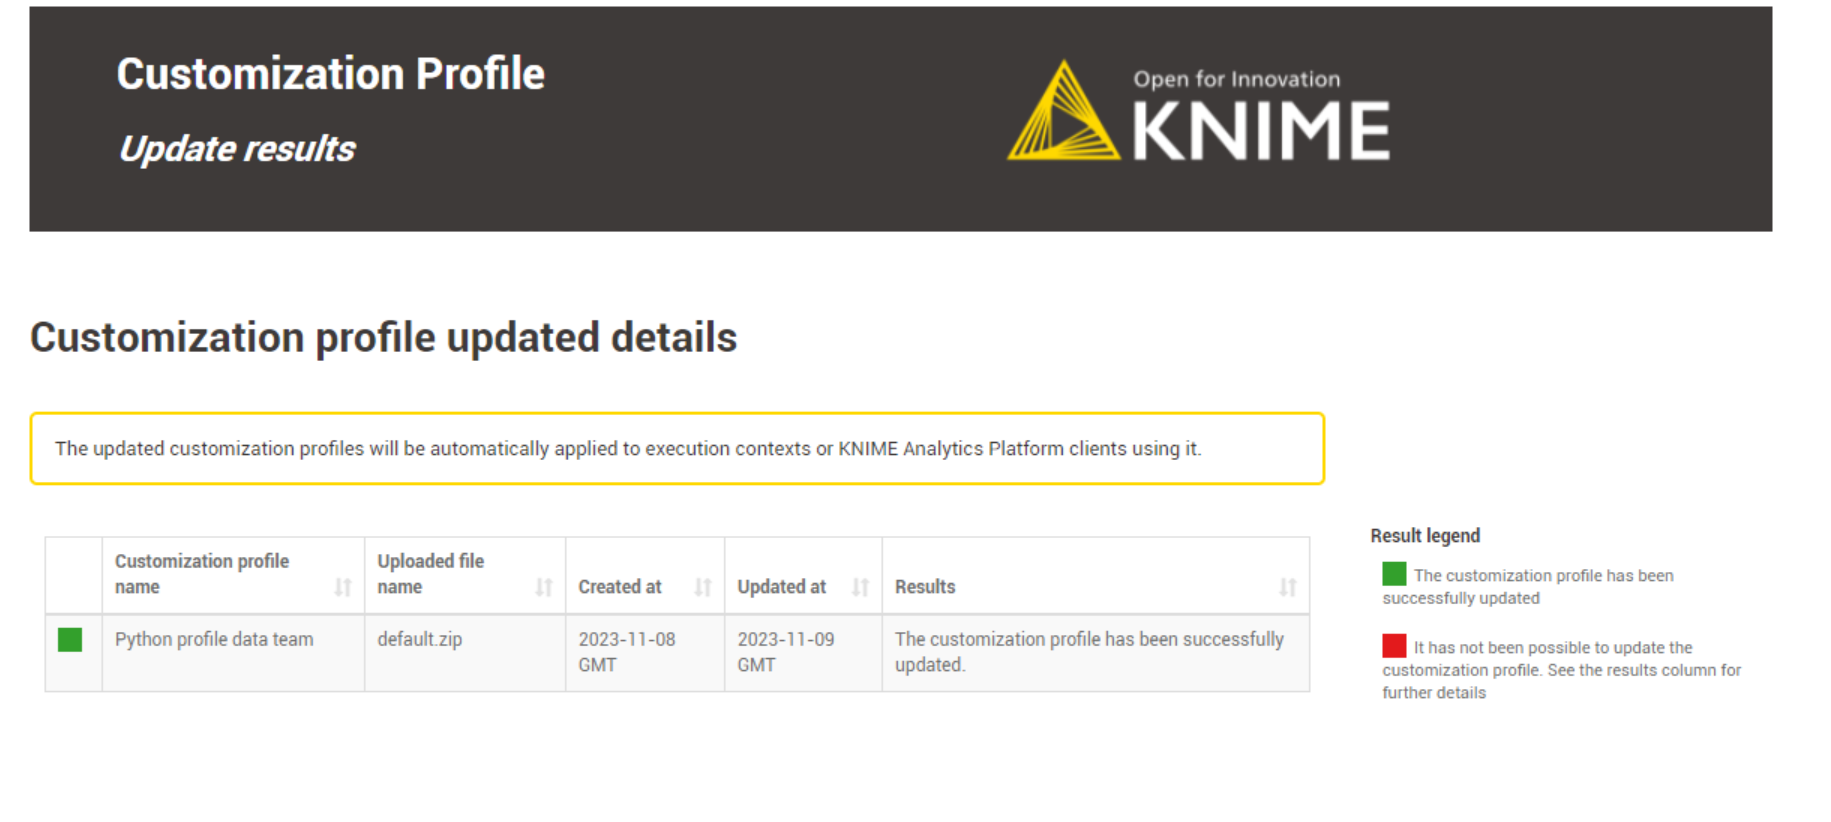 Figure 36. The outcome of updating two customization profiles.
The updated customization profiles will be automatically applied to execution contexts or KNIME Analytics Platform clients using it. -
Error Handling: The data application handles two types of errors for the update option:
-
An error will occur if the user does not upload a new customization profile file during the
Update Customization Profilestep.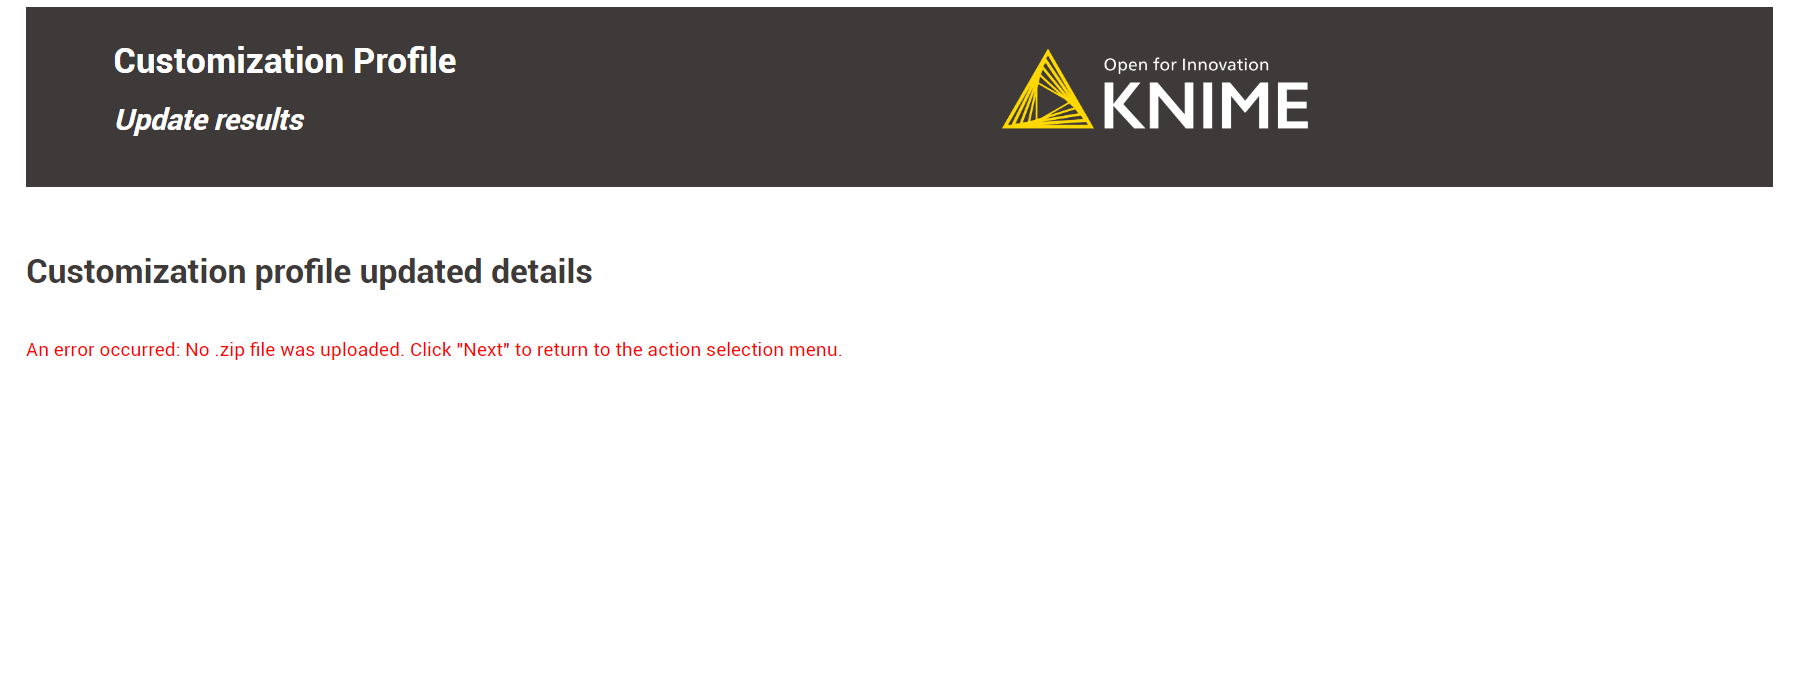 Figure 37. A view of the error.
 -
No customization profiles were selected in the
Update Customization Profilestep.If you encounter an error message, click
Nextand select theTurn back to the choose action menuoption. Repeat the operation, fixing the error.
Figure 38. Turn back to the action menu and repeat the operation.
-
-
Click
Nextto finish the operation. You can return to theAction Selectionmenu to perform additional actions or close the data application directly.
Detach a customization profile
It’s important to know that detaching a customization profile is not the same as deleting it. When you detach a customization profile, it isn’t removed from KNIME Business Hub. Instead, it just means that the customization profile won’t be applied to the KNIME Analytics Platform or the KNIME Business executors.
However, the customization profile is still available in KNIME Business Hub, so it can be reused again whenever needed.
Detach a customization profile from KNIME Analytics Platform client
To detach a customization profile from the KNIME Analytics Platform client, you can simply delete the following lines from the knime.ini file:
-profileLocation
https://api.<base-url>/execution/customization-profiles/contents
-profileList
<profile_ID_1>,<profile_ID-2>
If multiple customization profiles are applied to your KNIME Analytics Platform, you can detach a specific target customization profile by deleting it from the -profileList row. For instance, if you wish to detach only <profile-ID_2>, you can do so by following this syntax:
-profileLocation
https://api.<base-url>/execution/customization-profiles/contents
-profileList
<profile_ID_1>
After completing these steps, the selected customization profiles will be detached from the KNIME Analytics Platform client. This way, when your KNIME Analytics Platform installation is initiated, the customization profile will no longer be applied.
Detach a customization profile from a KNIME Business Hub executor
Detaching a customization profile applies only to those customization profiles applied to a KNIME Business Hub executor via execution context. Separating a customization profile from its execution context is the prerequisite step to deleting a customization profile from a KNIME Business Hub instance.
Detaching a customization profile from an execution context can also be done if the user no longer wants to apply the customization to the executors.
Detach via REST Request
You can detach a customization profile from a KNIME Business Hub execution context, which is the inverse of applying it. The steps for detaching a customization profile are similar to applying one.
To detach a customization profile from all executors running in a KNIME Business Hub execution context, you must send a request to the execution context endpoint, not including the customization profile ID that you want to detach.
-
If you have not done so already, on KNIME Business Hub, create an application password for the user uploading the profile.
-
For global customization profiles, use a global admin user.
-
For team’s customization profiles, the user can be either a global admin user or a team admin user.
-
-
First, you need to get the execution context ID. To do so, you can use the following
GETrequest to get a list of all the execution contexts that are owned by a specific team:GET api.<base-url>/execution-contexts/account:team:<team_ID>
If you are a Global Admin you can also GETa list of all the execution contexts available on the Hub instance with the callGET api.<base-url>/execution-contexts/. -
Retrieve the existing customization profiles in the execution context from the above Get Request response. Look for a key in the JSON body similar to:
"customizationProfiles" : [ "<customization-profile-ID_1>",<customization-profile-ID_2>" ]
-
Now, you can detach the target customization profile from the selected execution context. To do so, you need to update the execution context by using the following
PUTrequest:PUT api.<base-url>/execution-contexts/<execution-context_ID>
-
To detach a customization profile, e.g.
<customization-profile-ID_1>, from the target execution context, follow these steps. SelectBody > raw > JSONand ensure you do not include the customization profile you wish to remove. Use the syntax of the request body shown below:{ `customizationProfiles`: [ `<customization-profile-ID_2>` ] }
-
If the target execution context has only one customization profile attached, you can detach it by doing an empty request.
{
`customizationProfiles`: []
}
Detach via Data Appliation
The data application allows users to detach customization profiles applied to execution contexts in KNIME Business Hub.
For instructions on how to apply a customization profile to an execution context, refer to this section.
The customization profiles available for detachment depend on the user type:
-
Global Admin: can detach all applied customization profiles within the current KNIME Business Hub instance, either team or global-scoped customization profiles.
-
Team Admin: can only detach team-scoped customization profiles from their own teams.
-
Learn how to download the data app from Community Hub, upload and deploy it in KNIME Business Hub, and authenticate with your application password in the Upload a customization profile section.
-
Select
Detach a customization profile from an execution contextin theAction Selectionmenu to detach a customization profile. Choose the desired customization profiles from the table and clickNext.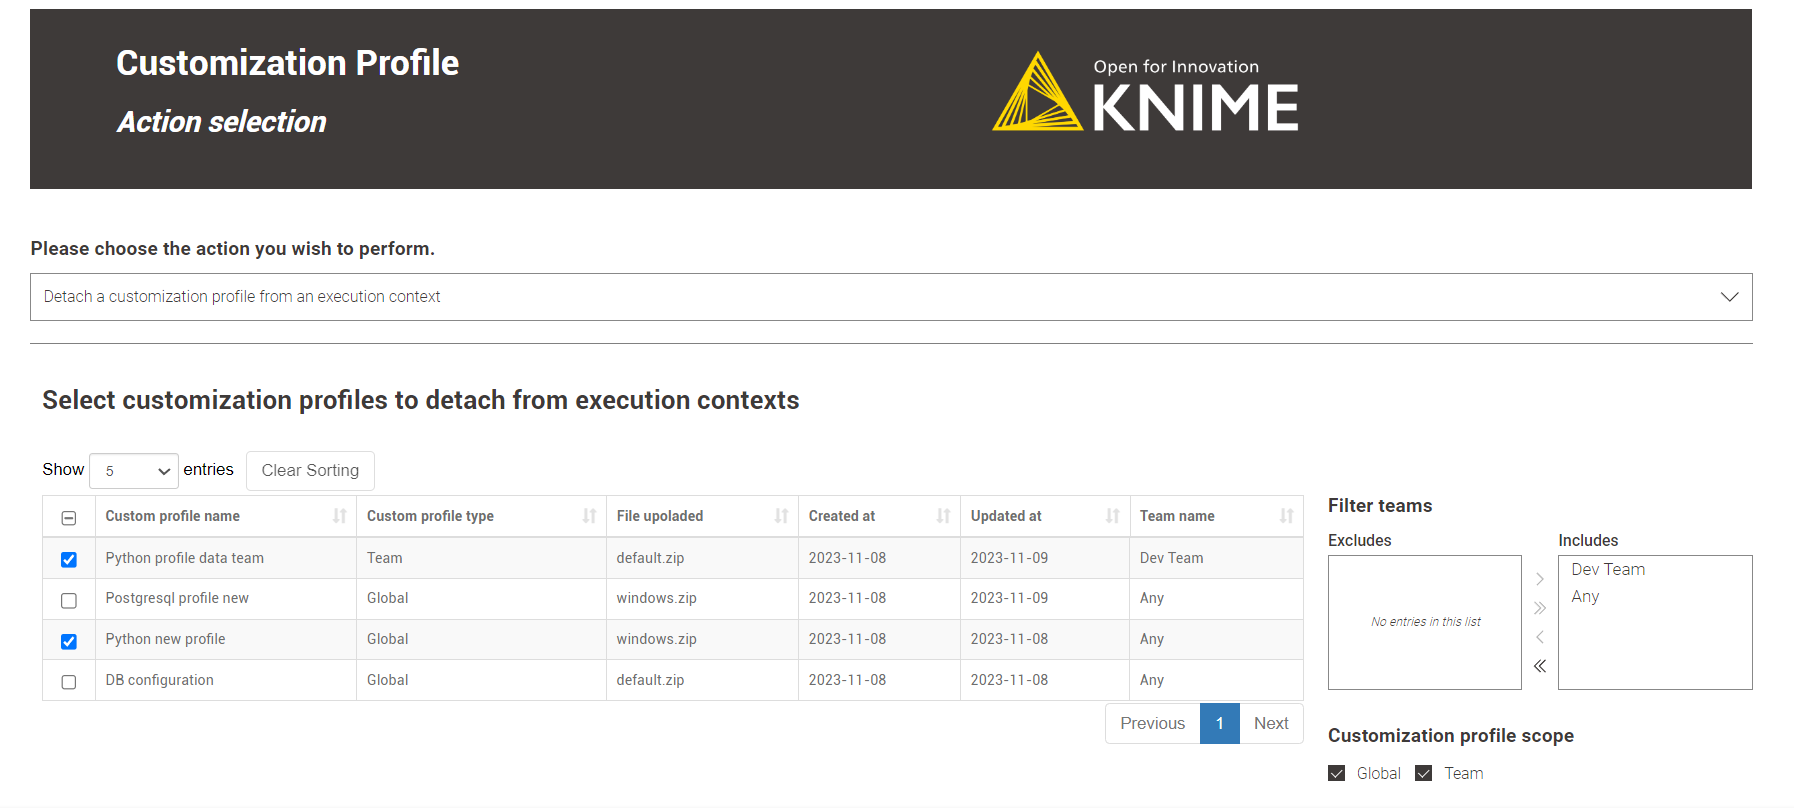 Figure 39. A Global admin is able to detach either team or global-scoped customization profiles.
You can choose to detach multiple customization profiles at the same time. -
Once you click on
Next, a table will be displayed showing all the execution contexts where the selected customization profiles have been applied. -
At this point, you can choose multiple execution contexts to detach the customization profile.
-
Notice that for execution contexts with
globalscope, all teams where they are in use are listed in the columnTeam name. By detaching the customization profile from such an execution context, you will detach it from all the teams where the execution is being applied.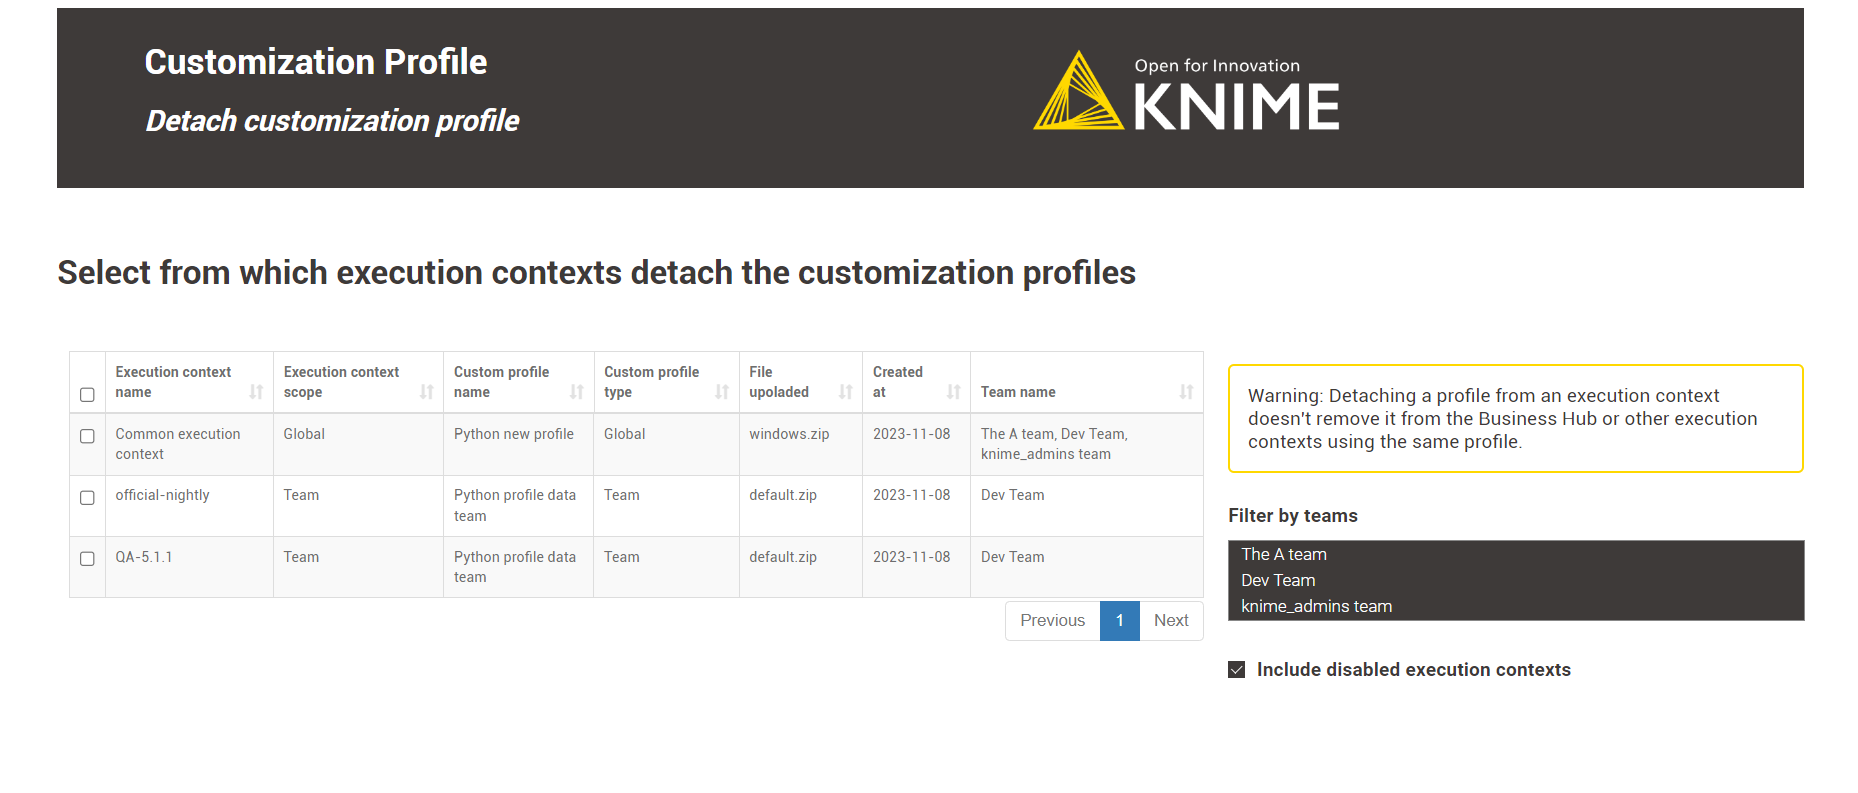 Figure 40. Here’s an example of a global execution context shared between three teams.
 -
After you perform the
Detach Resultsstep, a table will appear showing you the customization profile detach operation results.If everything goes well, the green light indicates that your selected customization profiles have been successfully detached from the selected execution contexts.
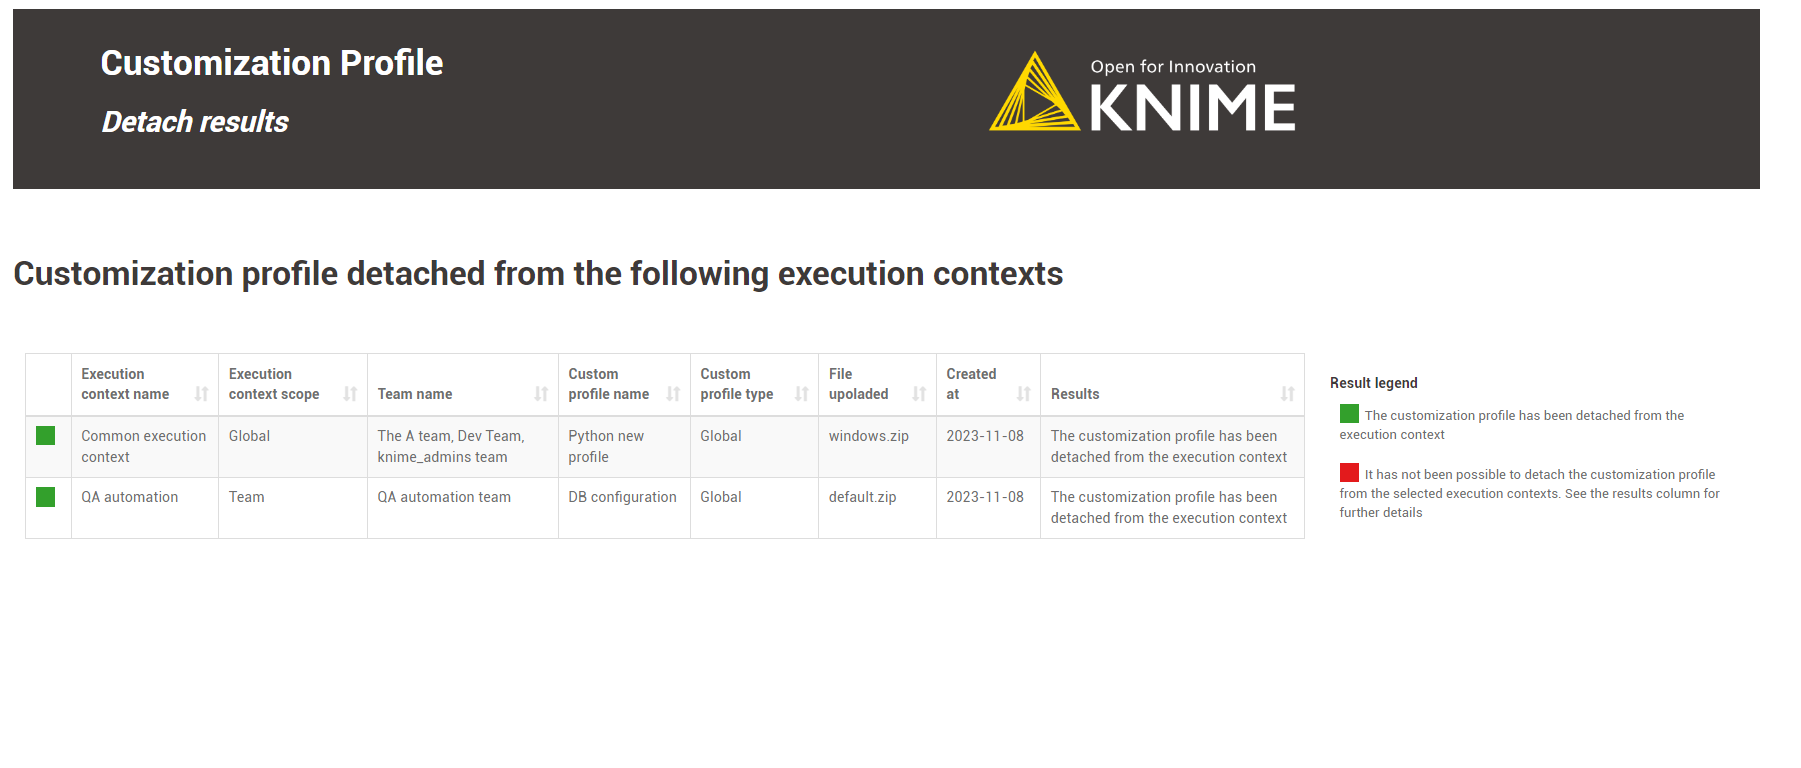 Figure 41. The outcome of detaching two customization profiles.
Detaching a customization profile from an execution context doesn’t remove it from the Business Hub or other execution contexts using the same profile. -
Error Handling: The data application handles three types of errors for the detach option:
-
An error will occur if no customization profiles are applied to any KNIME Business Hub execution context. In this case, you must select the option to Apply an existing customization profile.
-
An error is raised if the user:
-
Does not select any customization profile to detach.
-
If there are no execution contexts selected from where to detach the customization profiles.
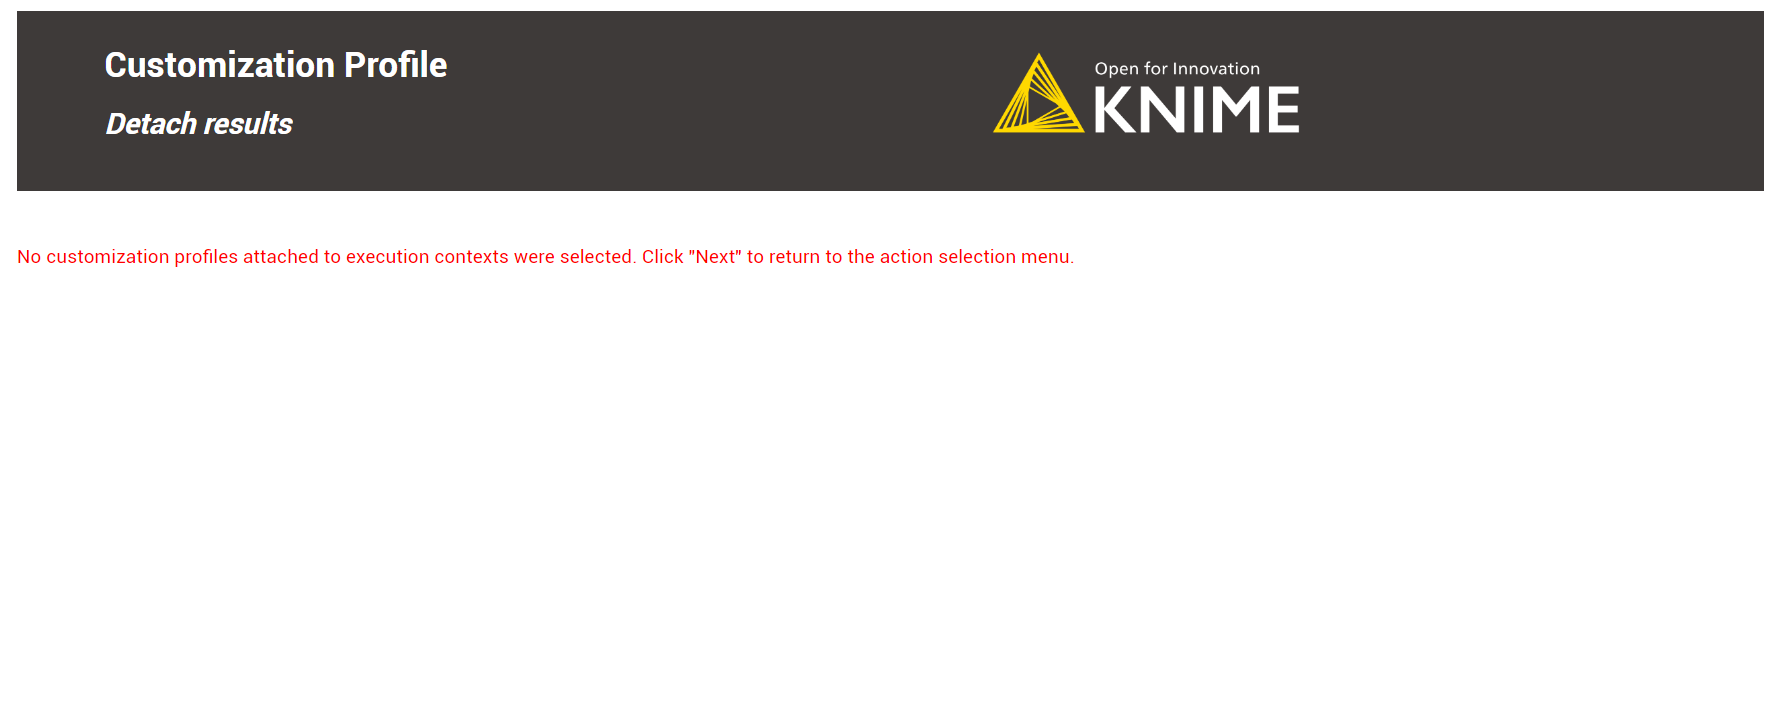 Figure 42. A view of one of the possible errors.
If you encounter an error message, click
Nextand select theTurn back to the choose action menuoption. Repeat the operation, fixing the error.
Figure 43. Turn back to the action menu and repeat the operation.
-
-
-
Click
Nextto finish the operation. You can return to theAction Selectionmenu to perform additional actions or close the data application directly.
-
Delete a customization profile
Deleting a customization profile from KNIME Business is a straightforward operation, and you can do it either through a REST request or the data application. Please follow the step-by-step guide below to understand how it works.
Please note that the type of user determines which customization profiles they can delete:
-
Global Admin: can delete all customization profiles within the current KNIME Business Hub instance, either team or global-scoped customization profiles.
-
Team Admin: can only delete team-scoped customization profiles from their own teams.
| Deleting a customization profile from KNIME Business Hub requires first detaching it from any execution context where it was applied. |
Please refer to the Detach a customization profile from a KNIME Business Hub executor section to understand how to detach a customization profile.
Delete via REST Request
Deleting a customization profile from KNIME Business Hub is possible via a REST request.
Below are the steps to accomplish this:
-
If you have not done so already, on KNIME Business Hub, create an application password for the user uploading the profile.
-
For global customization profiles, use a global admin user.
-
For team’s customization profiles, the user can be either a global admin user or a team admin user.
-
-
To start, you need to retrieve the list of the uploaded customization profiles to KNIME Business Hub:
You can obtain the
<customization_profile_ID>using the followingGETrequest:For global customization profiles:
GET api.<base-url>/execution/customization-profiles/hub:global
For team’s customization profiles:
GET api.<base-url>/execution/customization-profiles/account:team:<team_ID>
Refer to the above section to find out how to get the <team_ID>. -
Once you have the
<customization-profile-ID>that you want to delete, perform a DELETE Request.-
Send a
DELETErequest tohttps://api.<base-url>/execution/customization-profiles/<customization-profile-ID>with the following set up:-
Authorization: select Basic Auth, using username and password from the created application password
After a successful deletion, you will receive a 20* status code.
-
-
Delete via Data Application
-
Learn how to download the data app from Community Hub, upload and deploy it in KNIME Business Hub, and authenticate with your application password in the Upload a customization profile section.
-
Select
Delete a customization profile from your Business Hub instancein theAction Selectionmenu to delete a customization crofile. Choose the desired customization profiles from the table and clickNext.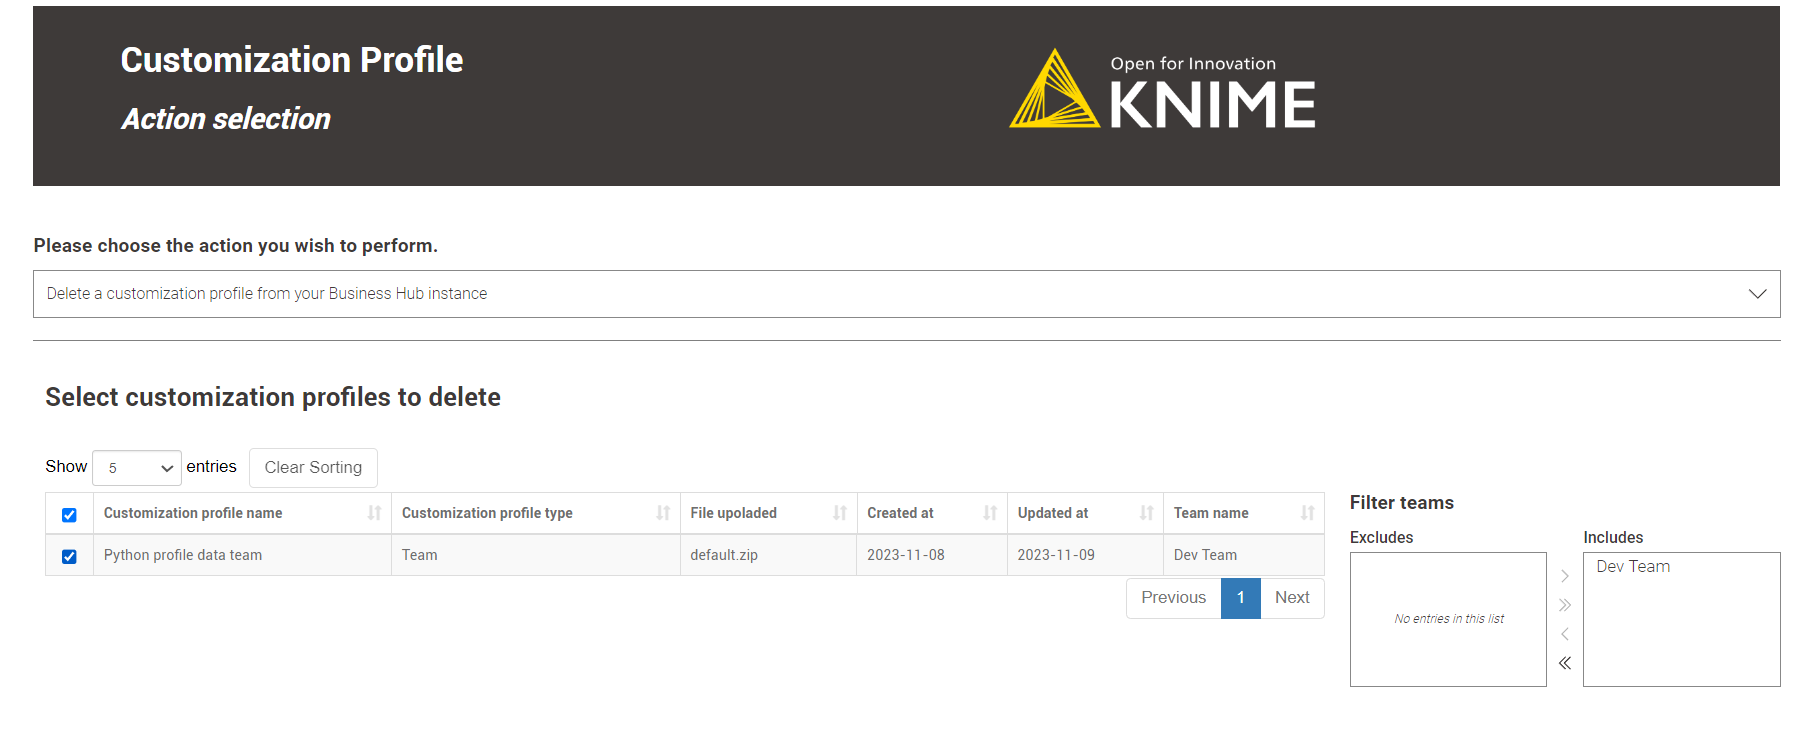 Figure 44. Team admins can only delete customization profiles from teams they are admin of.
You can choose to delete multiple customization profiles at the same time. -
As deleting is a delicate operation, in the next step, we offer a preview of the selected customization profiles to be deleted to ensure the user is performing the desired action.
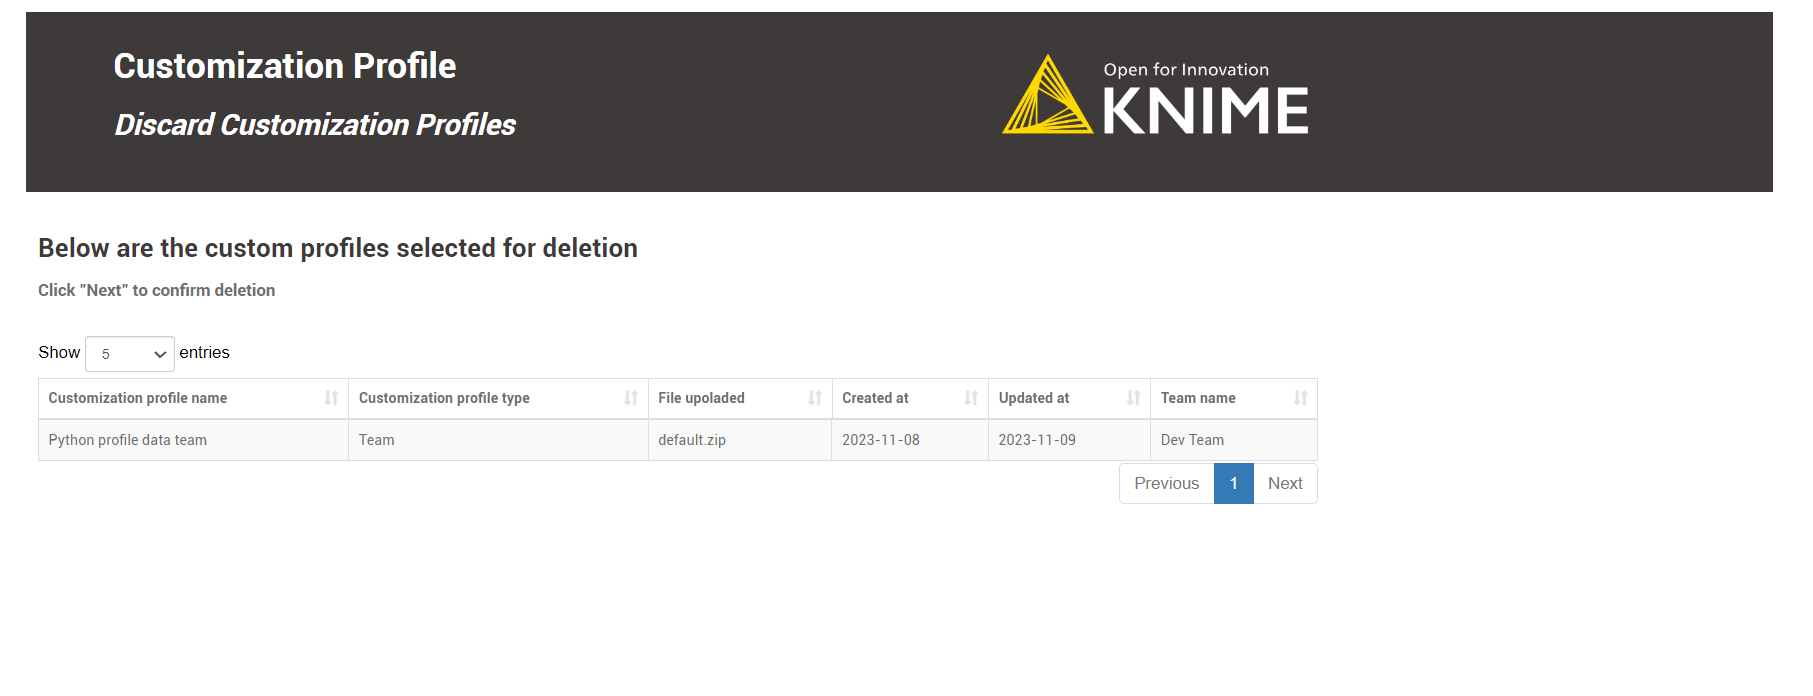 Figure 45. Preview of the selected customization profile.
Clicking Nextwill delete the customization profile directly. -
The
Discard resultssection displays a table with a legend indicating the success or failure of deleting a customization profile. Green means success, red means failure, and orange means you need to detach the customization profile from the execution contexts first. Figure 46. The deletion of a customization profile from KNIME Business Hub was successful.
 -
Error Handling: The data application handles two types of errors for the delete option:
-
If the user doesn’t select any customization profile.
-
When deleting a customization profile still attached to an execution context, reference the Detach a customization profile from a KNIME Business Hub executor section for resolution.
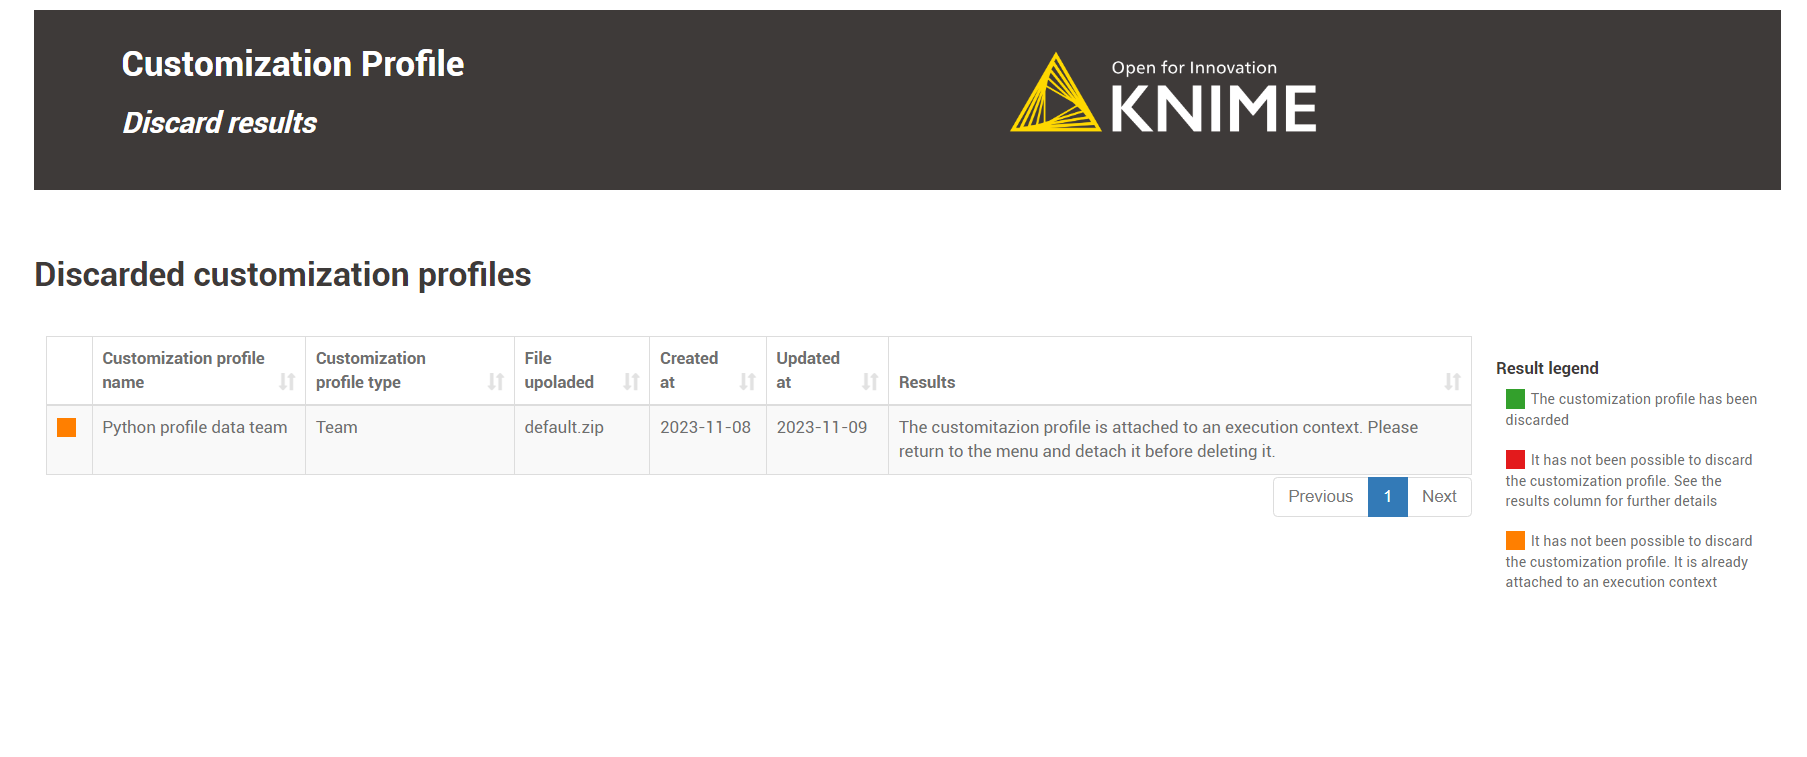 Figure 47. A view of one of the possible errors.
If you encounter an error message, click
Nextand select theTurn back to the choose action menuoption. Repeat the operation, fixing the error.
Figure 48. Turn back to the action menu and repeat the operation.
-
-
Click
Nextto finish the operation. You can return to theAction Selectionmenu to perform additional actions or close the data application directly.
Upload items to KNIME Hub
Once you have added the KNIME Business Hub mount point and you are connected to your KNIME Hub account from KNIME Analytics Platform you can upload the desired items to your KNIME Hub spaces.
You can upload workflows, components or files to any of your team owned spaces by:
-
Dragging & dropping the item from your local mount point to the desired location in the KNIME Hub mount point, or by
-
Right-clicking the item from KNIME Explorer and selecting Upload to Server or Hub from the context menu. A window will open where you will be able to select the location where you want to upload your workflow or component.
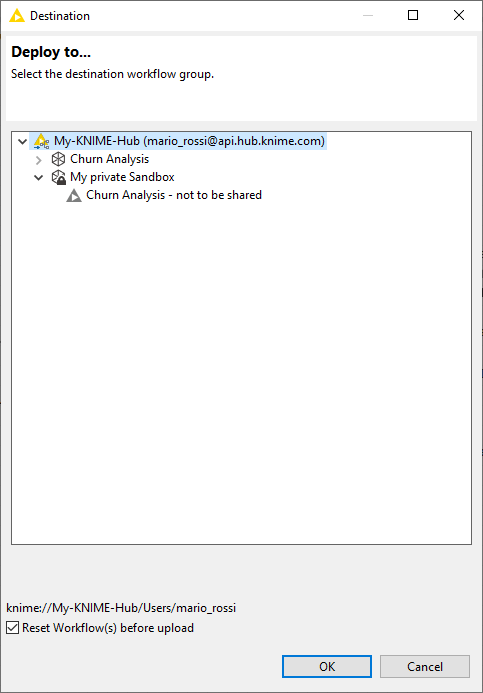 Figure 49. Upload a local item to your KNIME Hub mount point
Please notice that if the items are uploaded to a public space they will be available to everyone, hence be very careful with the data and information (e.g. credentials) you share.
Move items within KNIME Hub
You can move items that you uploaded to KNIME Hub to a new location within the space that contains the item or to a different space that you have access to. To do this you need to be connected to the KNIME Hub mount point on KNIME Analytics Platform. You can then move the items within KNIME Hub just by dragging the item in the KNIME Explorer.
Delete items from KNIME Hub
You can also delete items that you uploaded to KNIME Hub.
To do so you can:
-
Connect to KNIME Hub mount point on KNIME Analytics Platform. Right-click the item you want to delete and select Delete… from the context menu
-
From KNIME Hub, sign in with your account and go to the item you want to delete. Click the three dots on the top right of the page and select Delete workflow.
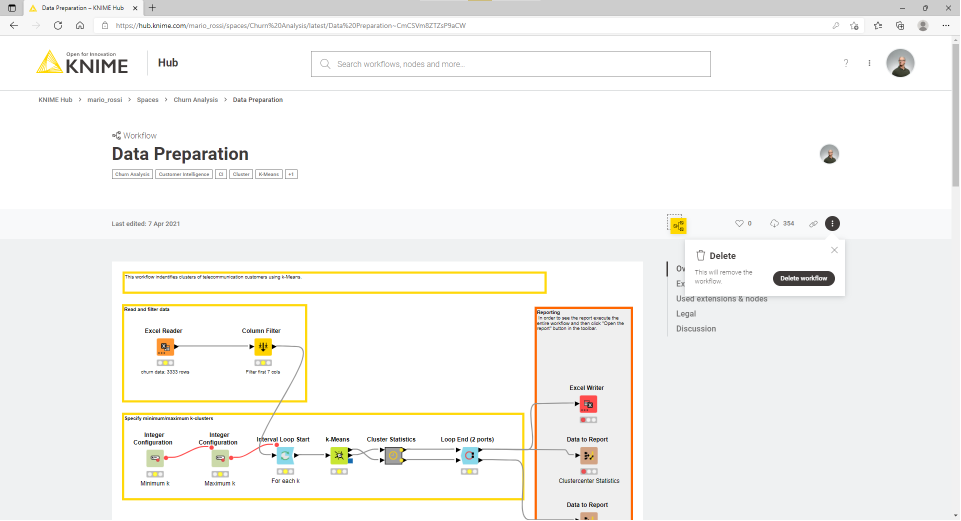 Figure 50. Delete a workflow from KNIME Hub
Download items from KNIME Hub
You can of course also download items from KNIME Hub to use them in your local KNIME Analytics Platform installation.
You can do this either from the KNIME Explorer by drag&drop or copy paste the workflow from the KNIME Hub mount point
to your LOCAL mount point or you can also download the workflow from KNIME Hub in the browser. To do so go to the specific
workflow or component you want to download on KNIME Hub and click the download button ![]() .
.
The file will be saved on your local machine and then you can import it to your KNIME Analytics Platform, by going to File → Import KNIME Workflow… and selecting the file you want to import.
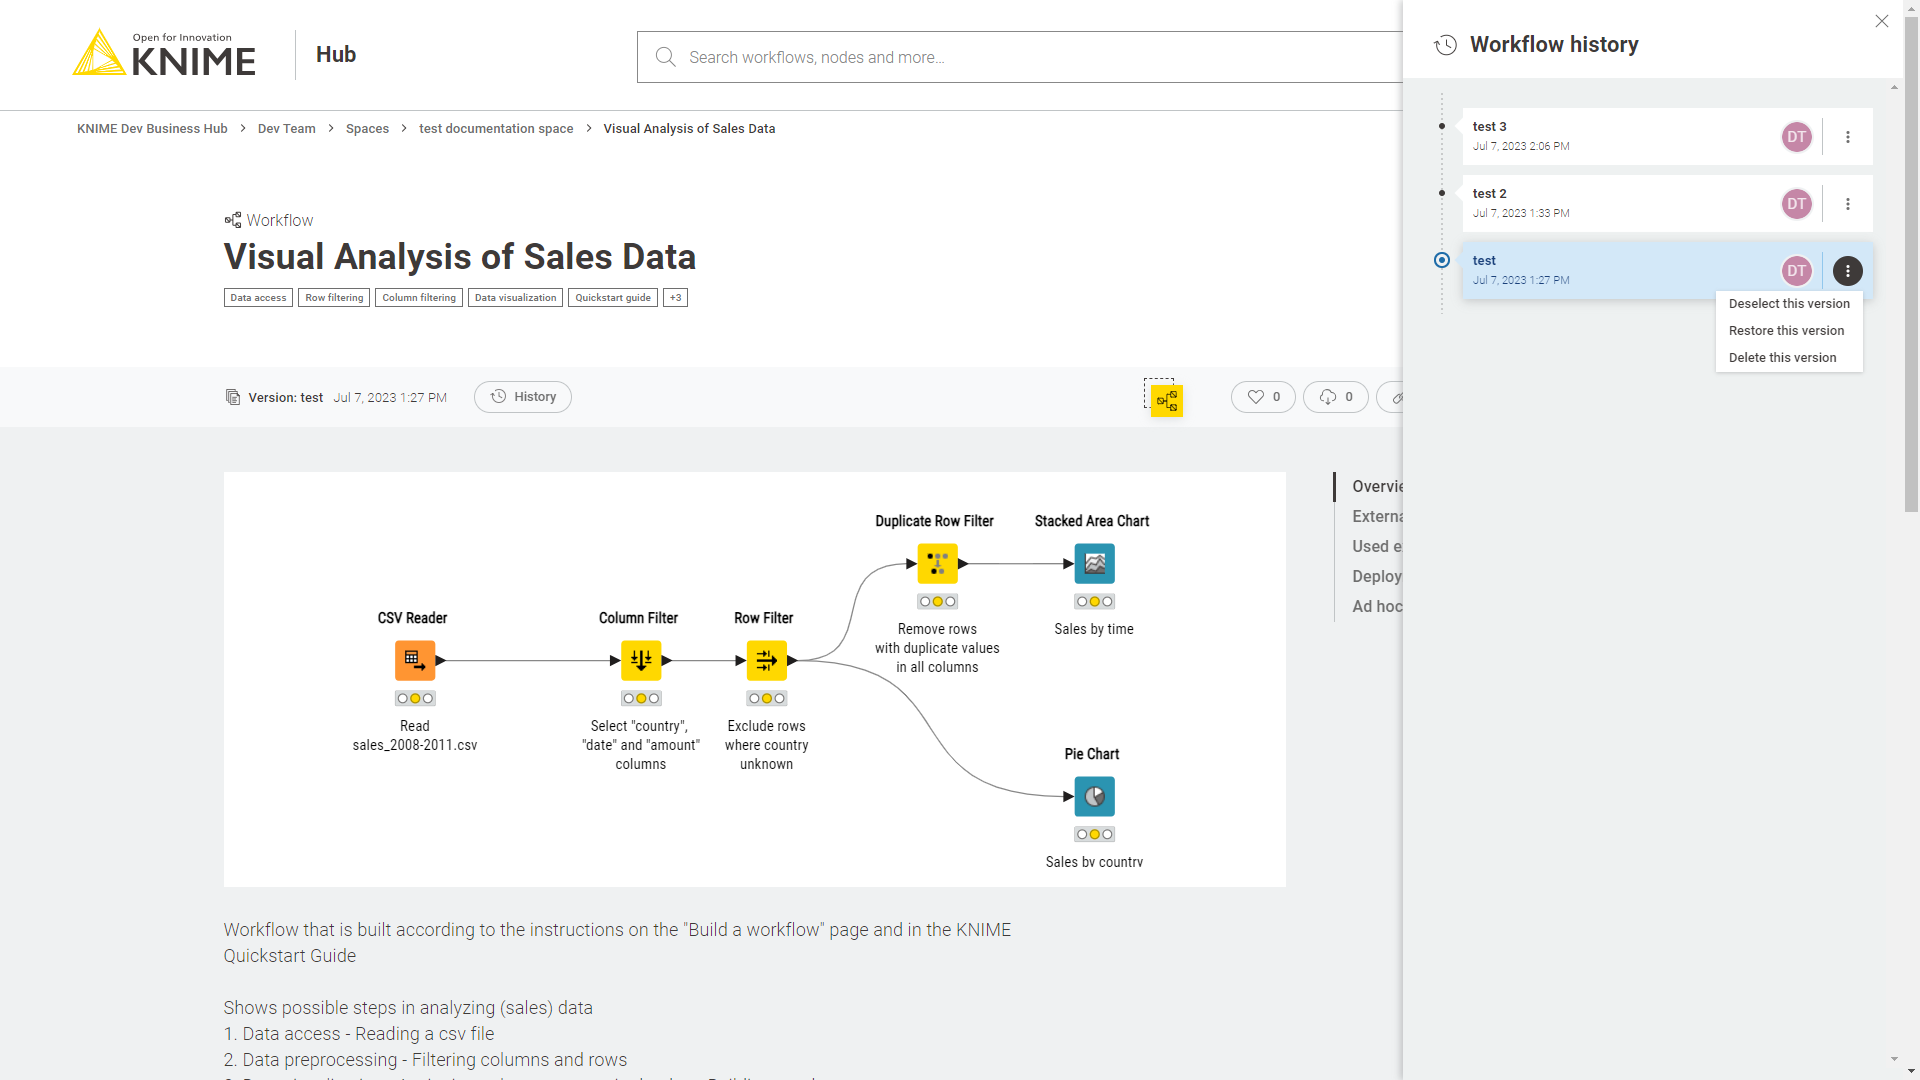
Versioning
When uploading items to a space on KNIME Hub you will be able to keep track of their changes.
You can also create versions of the items so that you can go back to a specific saved version at any point in time in the future to download the item in that specific version.
Once a version of the item is created new changes to the item will show up as unversioned changes.
Create a version of an item
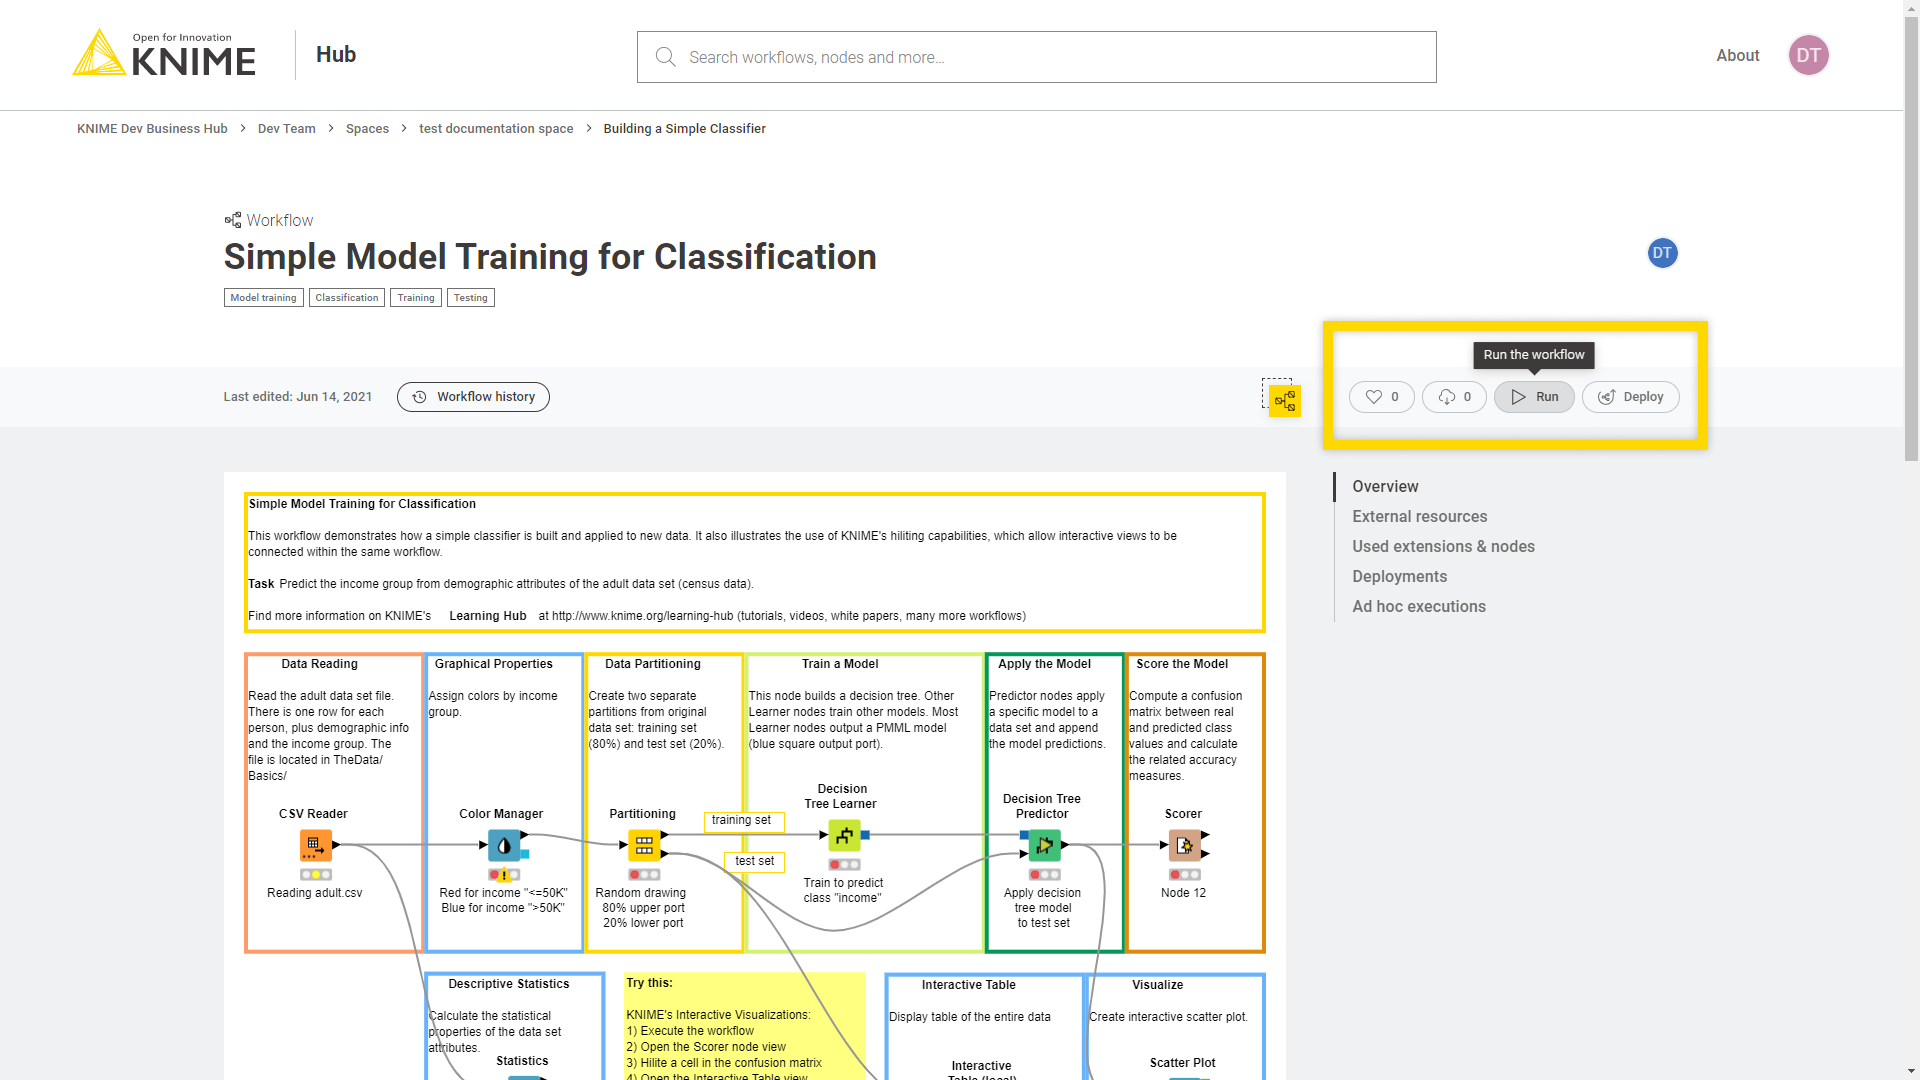
Go to the item you want to create a version of by navigating through the KNIME Business Hub instance or via the KNIME Analytics Platform and click History.
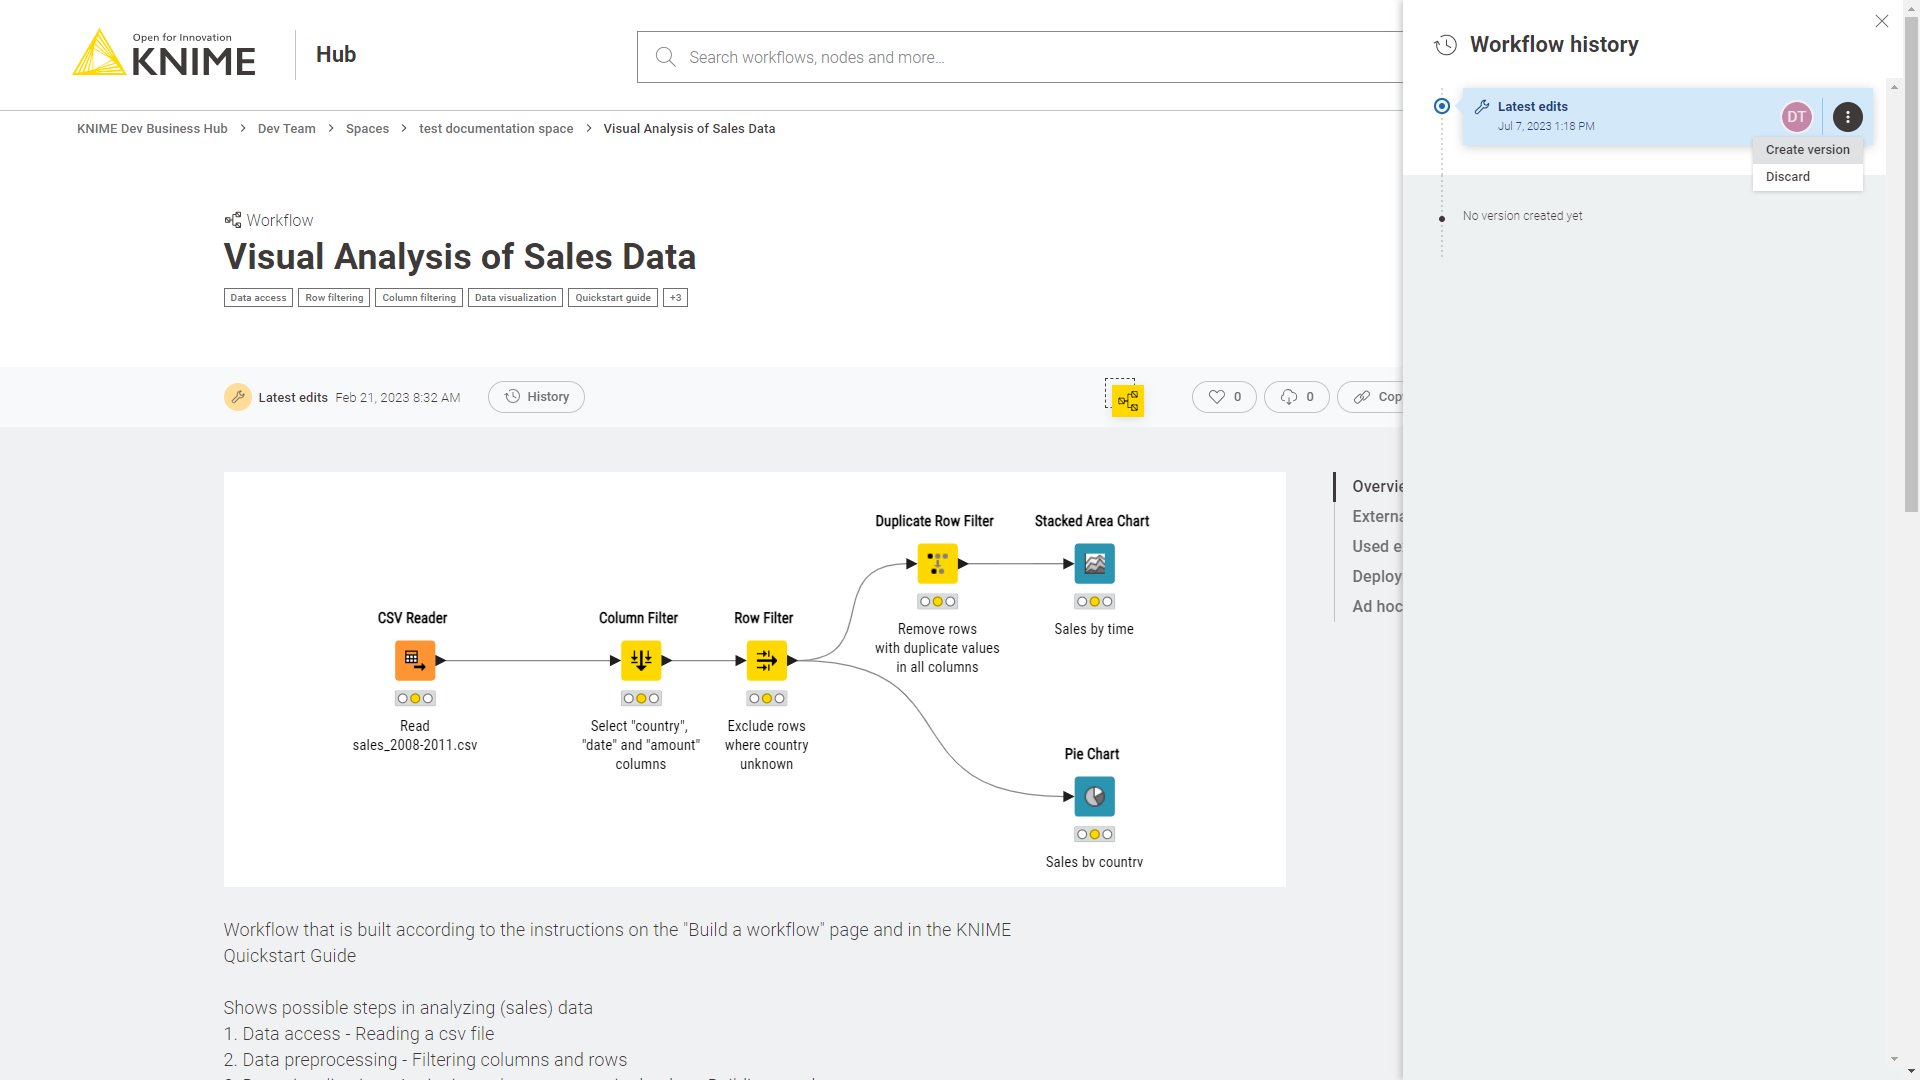
A panel on the right opens where you can see all the versions already created and all the unversioned changes of the item since the last version was created.
Click Create version to create a new version. You can then give the version a name and add a description.
Show a version
In the Workflow history or Component history panel click the version you want to see or click the three dots and select Show this version. You will be redirected to the item in that specific version.
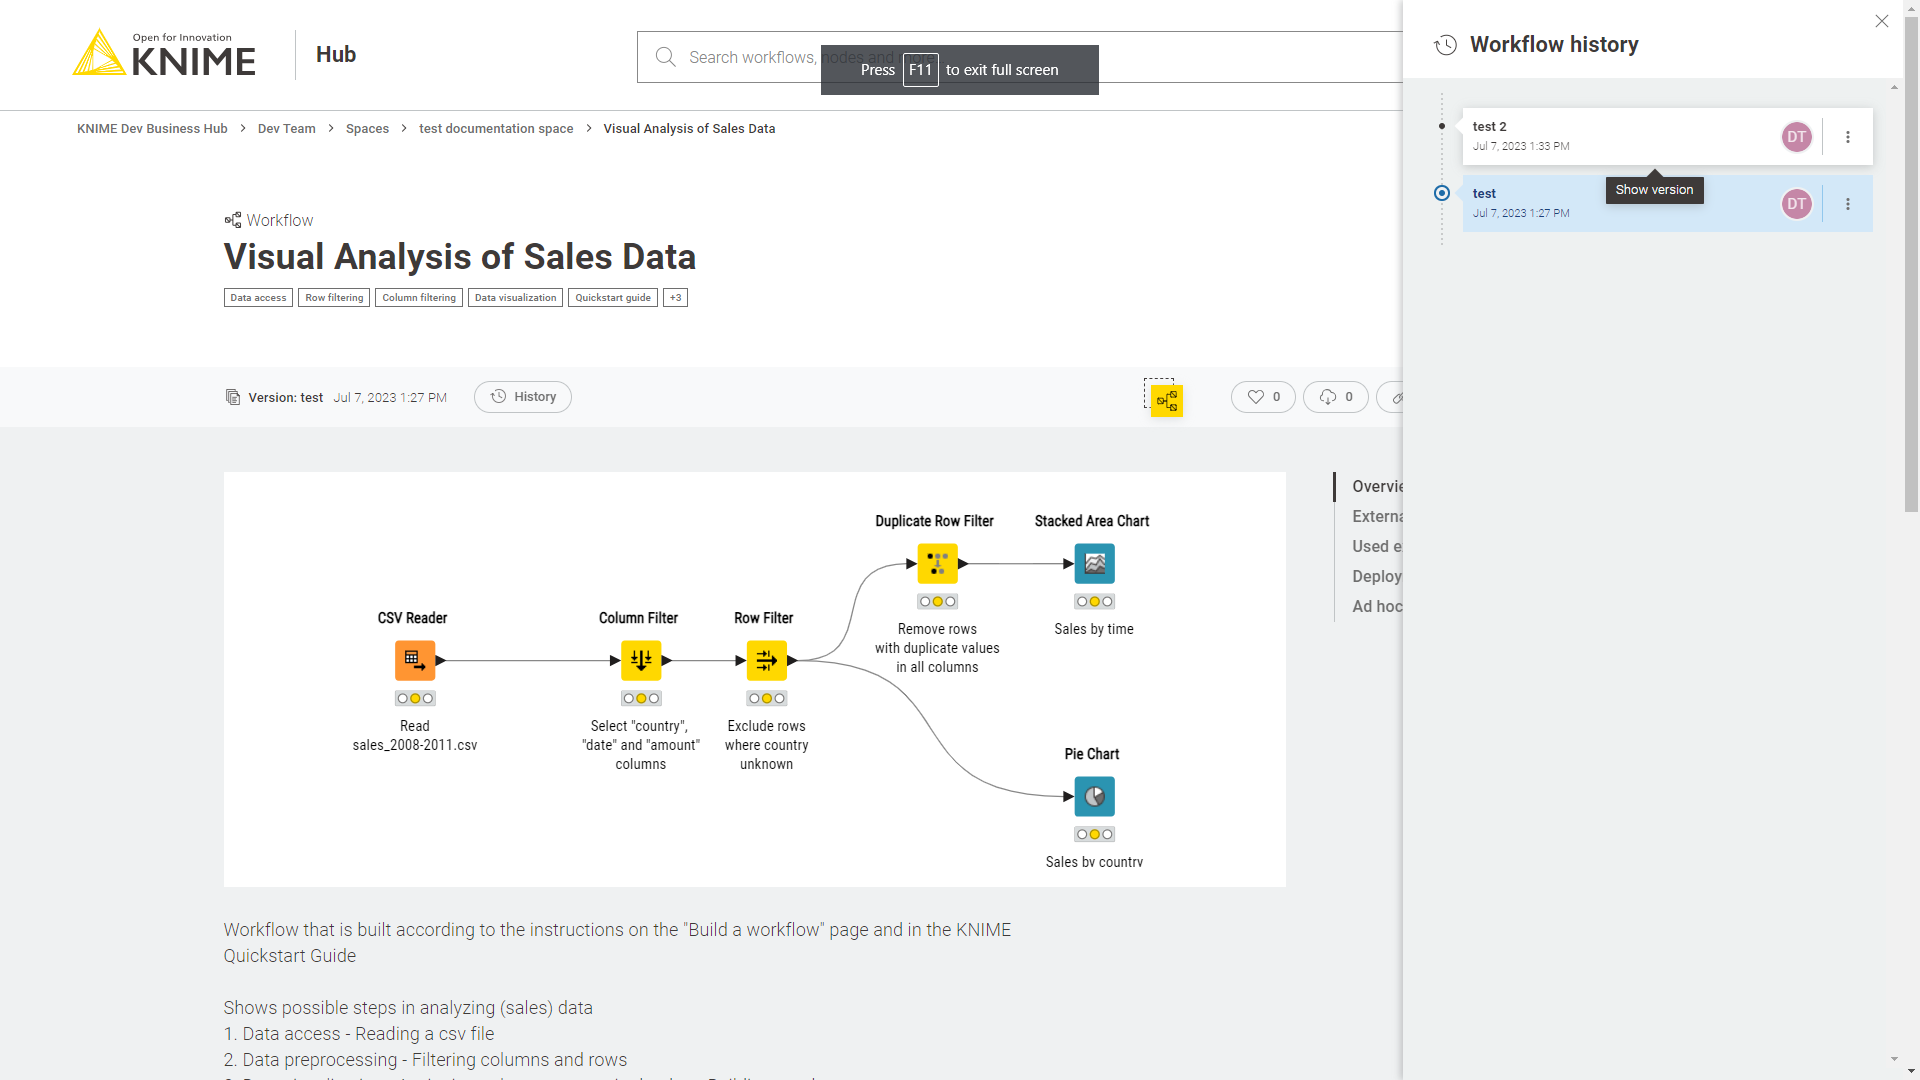
To go back to the latest state of the item click the selected version to unselect it.
Restore a version
To restore a version that you created click the three dots in the version tile from the item history and select Restore this version.
The latest state contains now the corresponding changes as unversioned edits.
Delete a version
In the History panel click the three dots for the version you want to navigate to and click Delete. Only Team administrators can delete a version.
Execution of workflows on KNIME Hub
You can execute workflows on KNIME Hub. In order to do so the team you are a member of needs to have an execution context assigned to.
A team can own multiple execution contexts which are dedicated execution resources with configured execution settings.
Execution contexts
An execution context provides dedicated execution resources with configured execution settings for the execution and deployment of workflows on KNIME Hub.
They operate using a selected custom executor image, which defines custom hardware and KNIME Analytics Platform configuration for the deployments.
Execution contexts are owned and managed by the teams.
A default execution context can be assigned to a space. It is possible to create as many execution contexts as necessary. They can be used for specific deployments, for example in a development, testing, production configuration.
Execution contexts can be created by the team admin once the Docker image of the executor is available. The latter is maintained by the global Hub admin. Shared execution contexts can instead be created by a Hub admin and shared with your team.
Create a new execution context
The team admin can create a new execution context.
To do so go to the team profile page and click Settings in the menu on the left.
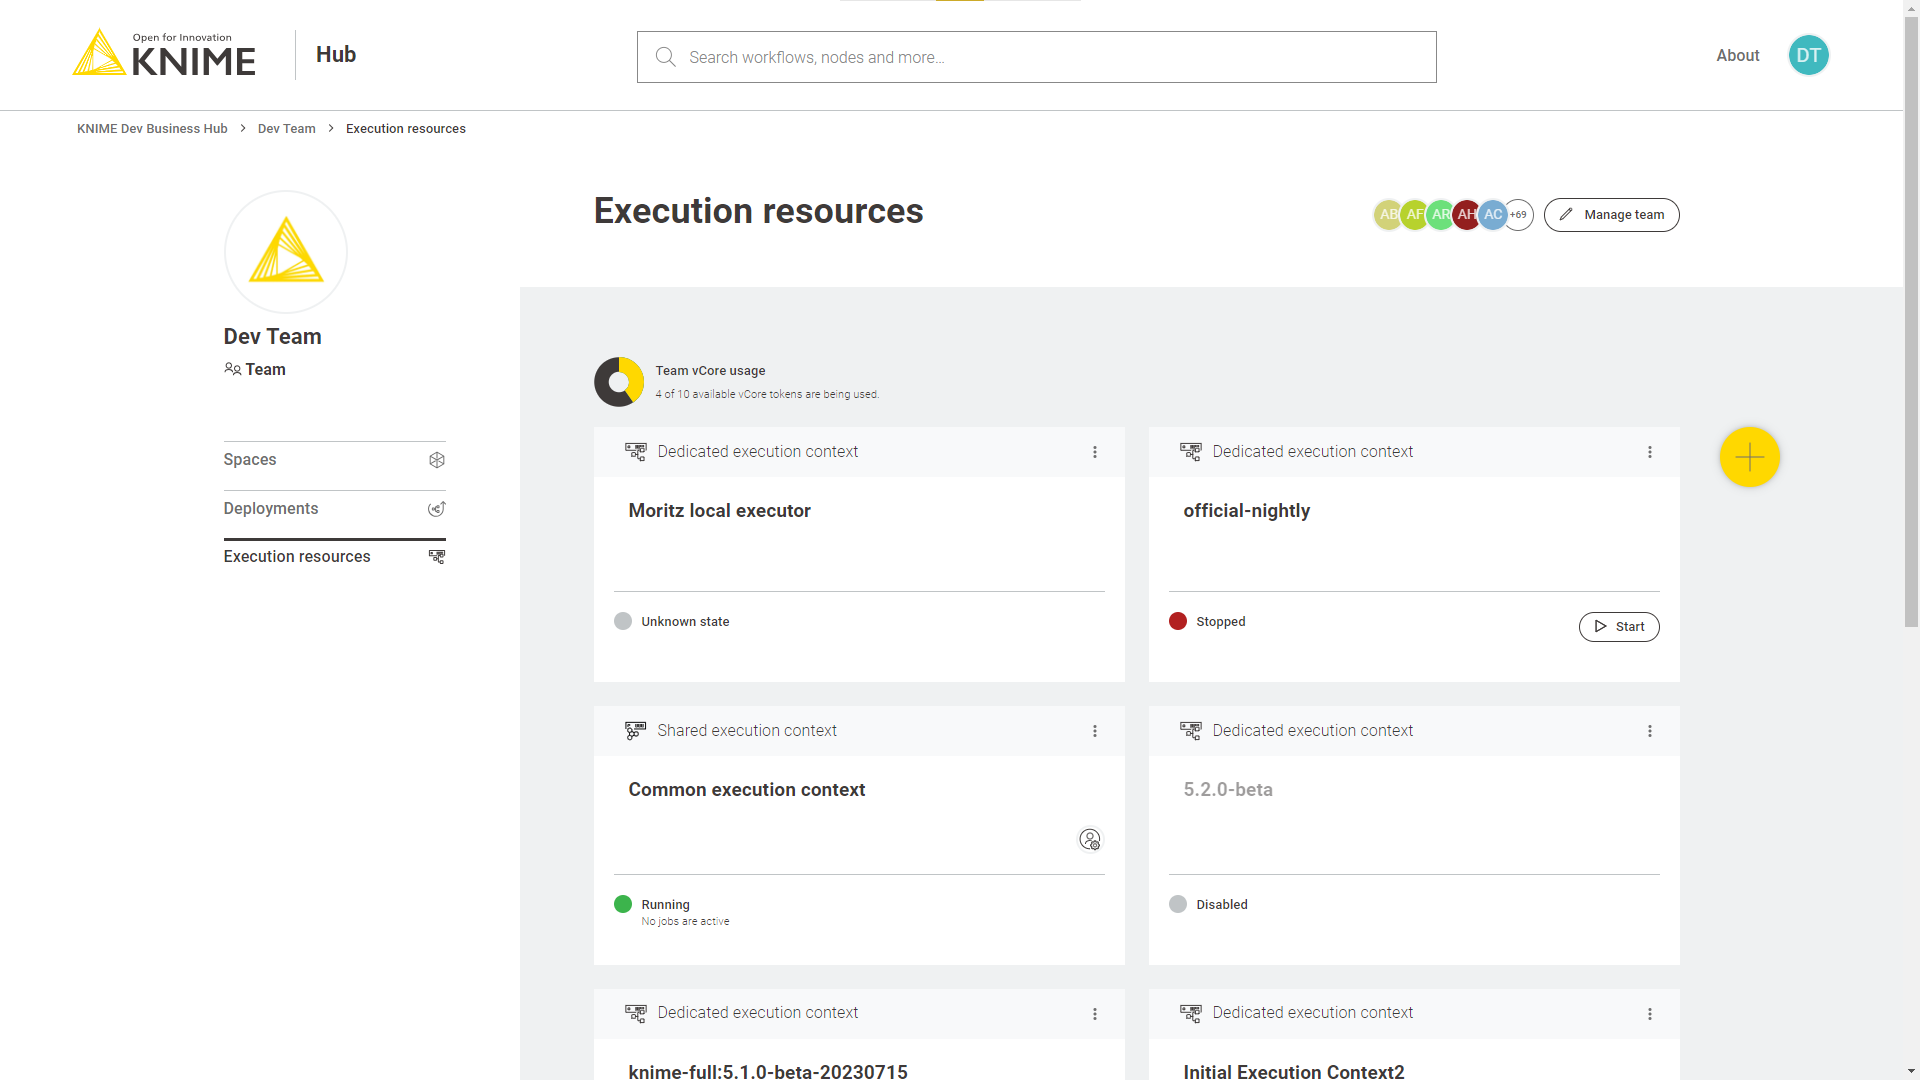
Here you will see all the available Execution resources of your team, you can see how many vCores are available and in use for each execution context, the version of the executor, its memory usage and CPU load.
To create a new execution context for your team click the ![]() button.
button.
In the side panel that opens you can define your execution context.

Here you can specify:
-
Name: is the name of the execution context
-
Docker image: is the name of the Docker image of the executor that you can obtain from your KNIME Hub Global Administrator.
Public Docker executor images are made available by KNIME which correspond to the full builds of KNIME Executor versions 4.7.0 and higher.
The currently available executor images have the following docker image name:
-
registry.hub.knime.com/knime/knime-full:r-4.7.4-179 -
registry.hub.knime.com/knime/knime-full:r-4.7.5-199 -
registry.hub.knime.com/knime/knime-full:r-4.7.6-209 -
registry.hub.knime.com/knime/knime-full:r-4.7.7-221 -
registry.hub.knime.com/knime/knime-full:r-4.7.8-231 -
registry.hub.knime.com/knime/knime-full:r-5.1.0-251 -
registry.hub.knime.com/knime/knime-full:r-5.1.1-379 -
registry.hub.knime.com/knime/knime-full:r-5.1.2-433 -
registry.hub.knime.com/knime/knime-full:r-5.1.3-594 -
registry.hub.knime.com/knime/knime-full:r-5.2.0-271 -
registry.hub.knime.com/knime/knime-full:r-5.2.1-369 -
registry.hub.knime.com/knime/knime-full:r-5.2.2-445 -
registry.hub.knime.com/knime/knime-full:r-5.2.3-477 -
registry.hub.knime.com/knime/knime-full:r-5.2.4-564 -
registry.hub.knime.com/knime/knime-full:r-5.2.5-592
-
-
Blacklisted nodes: is a list of nodes that should be blocked by the executor. You need to provide the full name of the node factory. You can get the factory name from the Hub itself by looking for the node. The last part of the URL is the node factory name. For example the Java Snippet node can be found at the following URL:
https://hub.knime.com/knime/extensions/org.knime.features.javasnippet/latest/org.knime.base.node.jsnippet.JavaSnippetNodeFactoryandorg.knime.base.node.jsnippet.JavaSnippetNodeFactoryis its factory name. Another way to determine the factory names of the nodes you want to block is to create a workflow with all nodes that should be blacklisted. After saving the workflow you are able to access thesettings.xmlof each node under<knime-workspace>/<workflow>/<node>/settings.xml. The factory name can be found in the entry with key "factory". -
Number of executors: is the number of executors that the execution context has assigned
-
Number of vCores per executor: is the number of vCPUs per executor
-
RAM per executor (GB): is the amount of RAM per executor in GB
|
You can assign an execution context as the default for a specific space. To do so you will need to perform a }, "defaultForSpaces": [ "*space1", "*space2" ] } where |
-
Advanced settings: Finally, you can configure wether you want the execution context to automatically start and stop. To do so click Set under Configure start and stop behavior and select On (the setting is Off by default) from the toggle on top. Then you can indicate the desired inactivity time (in minutes) for the execution context to stop. The execution context will start automatically when a queued workflow needs to run and stop automatically when there are no more active or queued workflows.
Advanced configuration of execution contexts
Execution contexts can be created and edited also via the Business Hub API. Here more advanced configuration are possible.
-
"defaultCpuRequirement": 0.0,: Specifies the default CPU requirement in number of cores of jobs without a specific requirement set. The default is0.0. -
"blacklistedNodes": "",: Add here if necessary a list of nodes that should be blocked by the executor. See the section about the blacklisted nodes for more information on the format. -
"defaultSwapTimeout": "PT1M",: Specifies how long to wait for a job to be swapped to disk. If the job is not swapped within the timeout, the operation is canceled. The default isPT1Mequal 1 minute. This timeout is only applied if no explicit timeout has been passed with the call (e.g. during execution context shutdown). -
"perJobLogging": true,: Enables a job trace log which records important operations on any job (loading, execution, discarding). The job trace log is enabled by default. -
"updateLinkedComponents": false,: Specifies whether component links in workflows should be updated right after a deployment of the workflow has been created to use the execution context. Default is to not update component links. -
"defaultRamRequirement": 0,: Specifies the default RAM requirement of jobs without a specific requirement set. In case no unit is provided it is automatically assumed to be provided in megabytes. The default is0MB. -
"defaultReportTimeout": "PT5M",: Specifies how long to wait for a report to be created by an executor. If the report is not created within the timeout, the operation is canceled. The default isPT5Mequal 5 minutes. This timeout is only applied if no explicit timeout has been passed with the call. -
"defaultExecutionTimeout": "PT5M",: Specifies the default timeout when executing a job synchronously. If the executor does not respond within the provided time it will cancel the execution and throw an error. The default isPT5Mequal 5 minutes. -
"maxJobTimeInMemory": "PT1H",: Specifies the time of inactivity before a job gets swapped out from the executor. The default isPT1Jequal 1 hour. Negative numbers disable swapping. -
"startExecutionTimeout": "PT1M",: Specifies the timeout the service will wait until execution has been started by the executor. If the executor does not respond within the provided time it will cancel the execution and throw an error. The default isPT1Mequal 1 minute. -
"maxLoadedJobsPerExecutor": 2147483647,: Specifies the maximum number of jobs that can be loaded at the same time into a single executor. The executor will not accept any additional jobs if this number has been reached until an existing job gets unloaded. The default is unlimited. -
"maxJobLifeTime": "PT168H",: Specifies the time of inactivity, before a job gets deleted. The default isPT168Hequal 7 days. Negative numbers disable forced auto-discard. -
"maxSwapFailures": 1,: Specifies the number of times a job is attempted to be swapped if swapping fails initially. -
"maxJobInOutSize": 10,: Specifies the maximum amount of data to be passed into and out of jobs using Container Input/Output nodes. Defaults to 10 MB. If larger values are needed, the amount of memory allocated to the rest-interface service should be increased as well to avoid stability issues. -
"defaultLoadTimeout": "PT5M",: Specifies the default timeout when loading a job. If the job does not get loaded within the timeout, the operation is canceled. The default isPT5Mequal 5 minutes. This timeout is only applied if no explicit timeout has been passed with the call. -
"maxJobExecutionTime": "PT24000H",: Specifies a maximum execution time for jobs. If a job is executing longer than this value it will be canceled and eventually discarded (seediscardAfterMaxExecutionTimeoption). -
"discardAfterMaxExecutionTime": false,: Specifies whether jobs that exceeded the maximum execution time should be canceled and discarded (true) or only canceled (false). May be used in conjunction withmaxJobExecutionTimeoption. The default (false) is to only cancel those jobs. -
"customizationProfiles": [],: Specifies customization profiles to apply to the executors running in the execution context. -
"saveWorkflowSummary": false,: Specifies if the workflow summary should be stored with the job upon swapping. Default value isfalse. -
"rejectFutureWorkflows": true,: Specifies whether the executor should reject loading workflows that have been create with future versions of KNIME Analytics Platform client. For new installations the value is set to true. If no value is specified the executor will always try to load and execute any workflow by default. -
"
defaultAsyncLoadTimeout": "PT5M",: Specifies the default timeout when loading a job asynchronously. The default isPT5Mequal 5 minutes.
Manage shared execution contexts
Also from the Execution resources page you can have an overview about the current status of an execution context, which teams have access to it, how many jobs are running and also manage the execution context.
You can also see more detils about your team’s execution context by clicking the ![]() icon of the execution context and selecting Show details. Selecting this option will open a new page with a list of all the jobs that are running on that execution context, the usage of the execution context (e.g. how many vCores are in use) and other information. You can also switch to the specific Executor tab to see more details about the executor.
icon of the execution context and selecting Show details. Selecting this option will open a new page with a list of all the jobs that are running on that execution context, the usage of the execution context (e.g. how many vCores are in use) and other information. You can also switch to the specific Executor tab to see more details about the executor.
Edit an existing execution context
As a team admin you can also edit an existing execution context.
From the Execution resources overview page you can click the ![]() icon of the execution context you want to modify and select Edit from the menu that opens.
icon of the execution context you want to modify and select Edit from the menu that opens.
You can change the parameters and configurations in the right side panel that opens.
Disable an execution context
As a team administrator you can disable an existing execution context.
You will need first to delete the jobs associated to the execution context then proceed with disabling it.
From the Execution resources overview page you can click the ![]() icon of the execution context you want to disable and select Disable from the menu that opens.
icon of the execution context you want to disable and select Disable from the menu that opens.
Delete an execution context
As a team administrator you can delete an existing execution context.
You will need to first disable the execution context you want to delete. First, delete the jobs associated to the execution context then proceed with disabling it.
Now you are ready to delete the execution context.
From the Execution resources overview page you can click the ![]() icon of the execution context you want to delete and select Delete from the menu that opens.
icon of the execution context you want to delete and select Delete from the menu that opens.
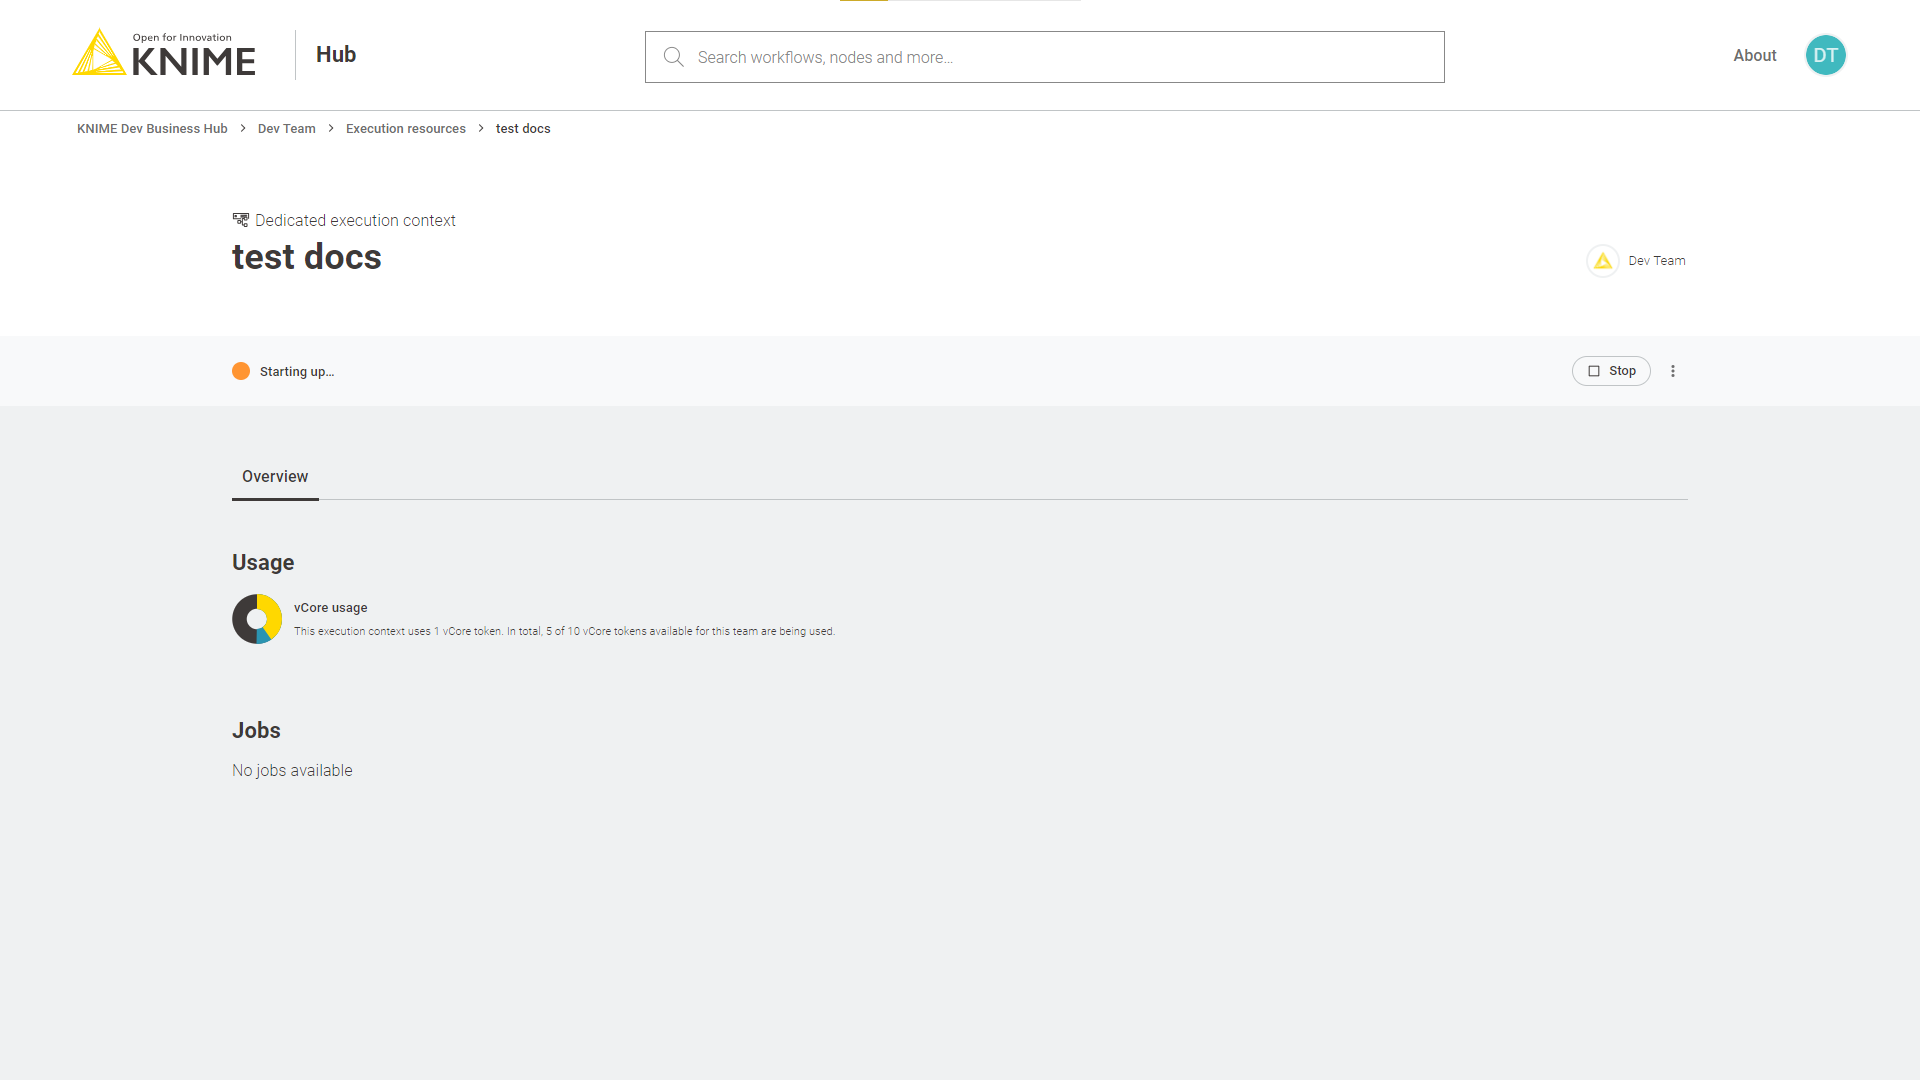
Ad hoc execution
When a team owned space is provided with an execution context it is possible to execute the workflows that are uploaded to that space.
If you want to have a one time execution of a workflow you uploaded to a space, for example to test it, you can go to the workflow page on KNIME Hub and click Run.
A side panel opens where you can:
-
If multiple execution contexts for the current space are available, select the execution context you want to use - otherwise the default execution context associated to that space will be used
-
Enable workflow actions: You can choose if a notification via e-mail will be sent On failure or On success. You can also Add more actions and notify multiple e-mails on different conditions.
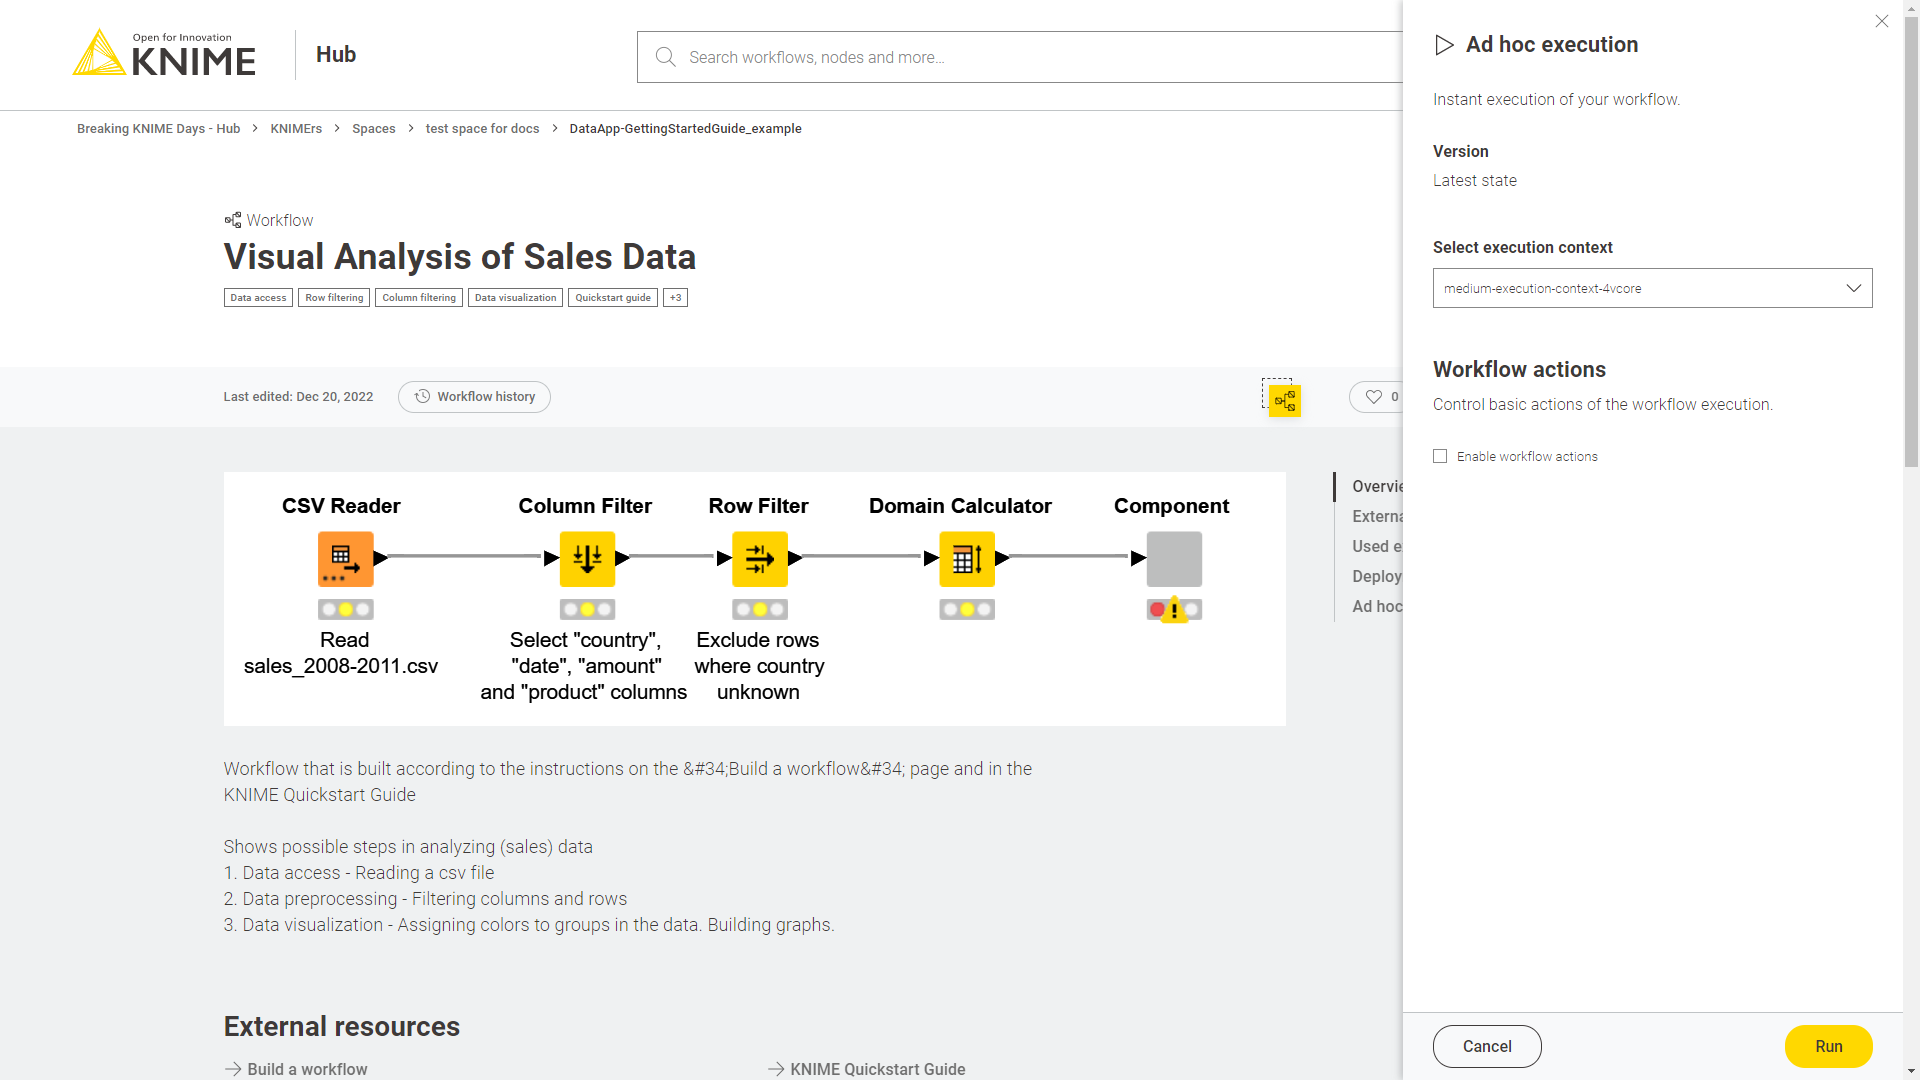 Figure 58. Ad hoc execution configuration panel
Then click Run and the workflow will be executed.
Please notice that an ad hoc execution will always be performed on the current version of the workflow from which the Run is initiated. This means that if you run a workflow from a state that contains unversioned changes the execution will be performed on the latest state. To run an ad hoc execution of a different version of the workflow go to the desired version and click Run.

Finally, you can see an overview of all the ad hoc execution jobs that have been performed on a specific workflow by selecting Ad hoc executions from the menu on the right in the workflow page.
Deployments
After a workflow is uploaded to KNIME Hub different type of deployments can be created.
You can create:
-
Data Apps: Data Apps provide a user interface to perform scalable and shareable data operations, such as visualization, data import, export, and preview.
-
Schedules: A workflow can be scheduled to run at specific times and perform specific actions based on the result of each execution.
-
API services: A workflow can be deployed as a REST endpoint and therefore called by external services.
-
Triggers: A workflow can be deployed as trigger deployment meaning that the workflow will be executed every time a specific selected event happens (e.g. a file is added to a space or a new version of a workflow is created).
To create a new deployment of a workflow that you uploaded to one of your team’s spaces you first need to have created at least one version of the workflow. After you create a version of the workflow click Deploy.
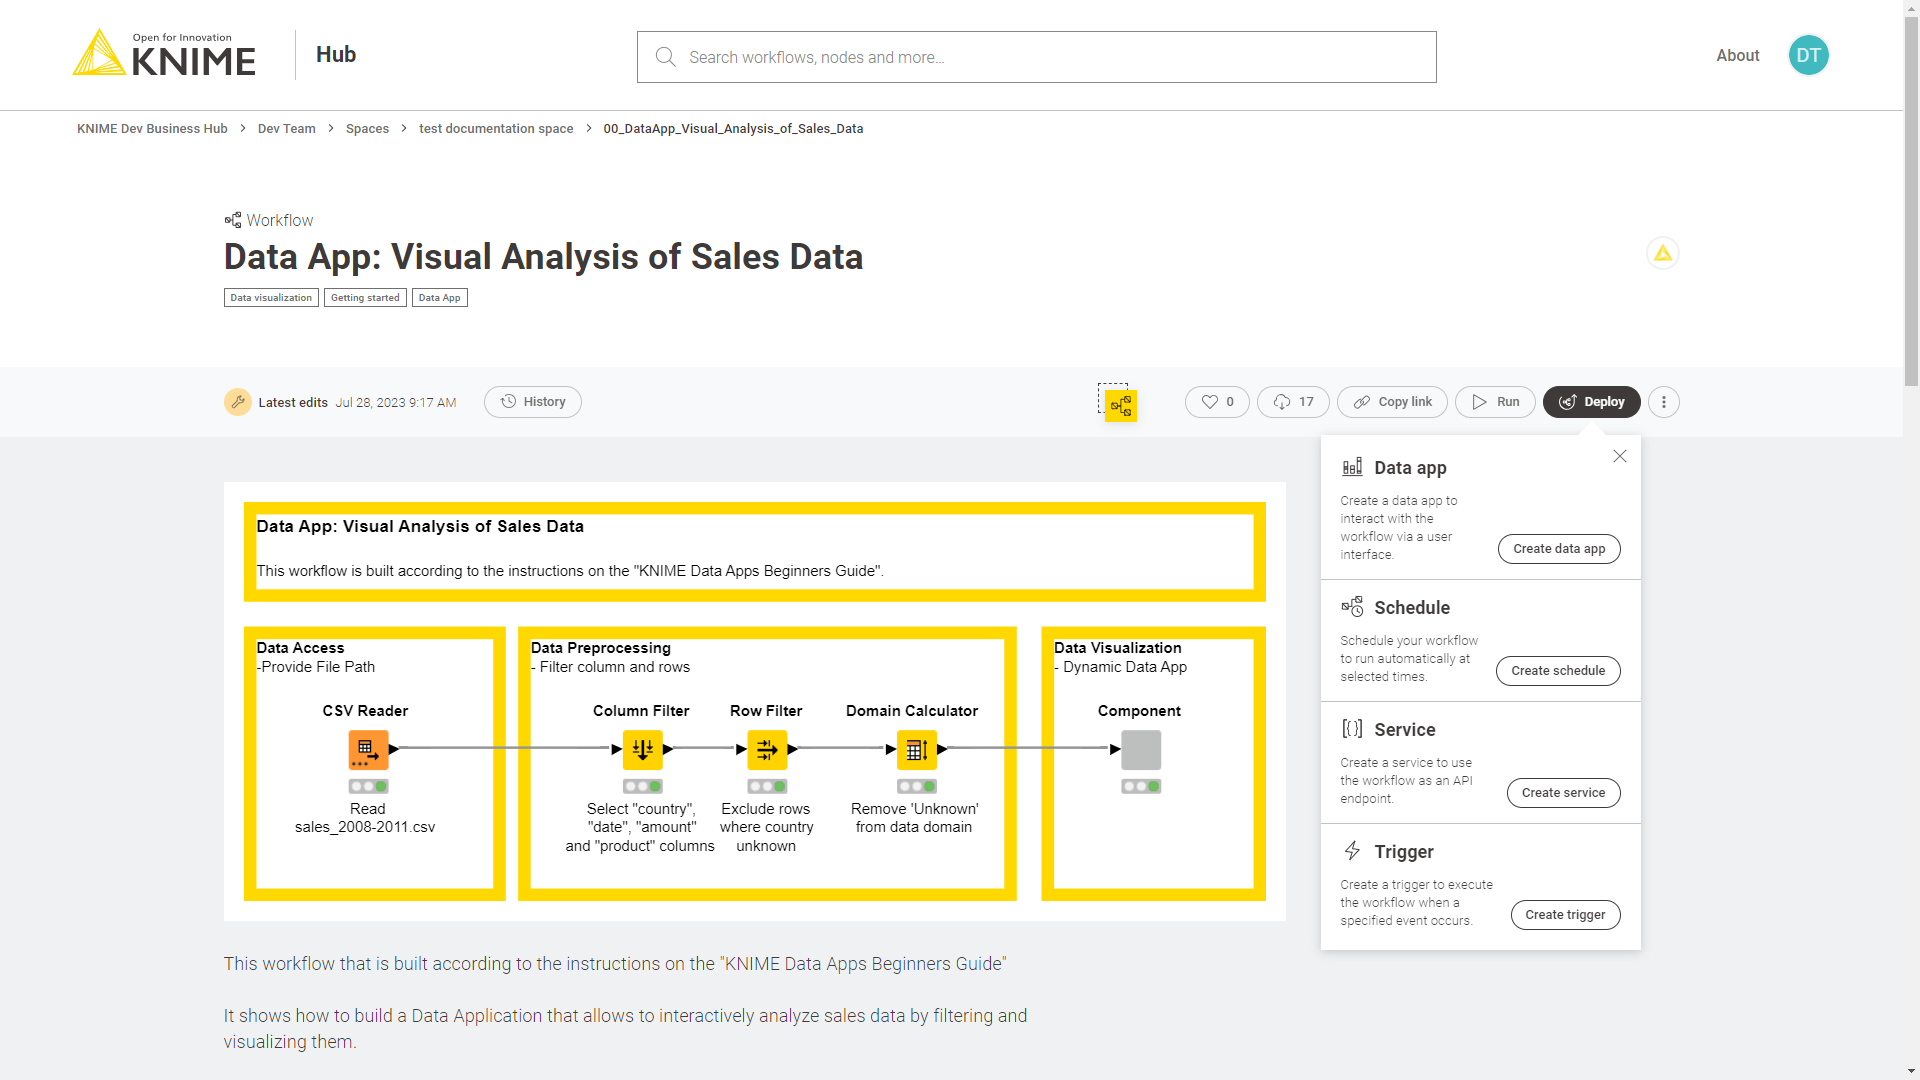
In the menu that opens you can select which kind of deployment you want to create.
Data apps
Select Create data app if you want to create a data app to interact with the workflow via a user interface.
In the right panel that opens you will be able to choose a Deployment name, select the version you want to deploy, select the execution context you want to use, and check Enable workflow actions if you want to enable sending an e-mail upon success or failure of the execution of the deployment you will create.
You will also be able to select a Category and a Description. Categories added here will be used to group the data apps in the Data Apps Portal. Also descriptions added here will be visible in the corresponding deployment’s tile in the Data Apps Portal.
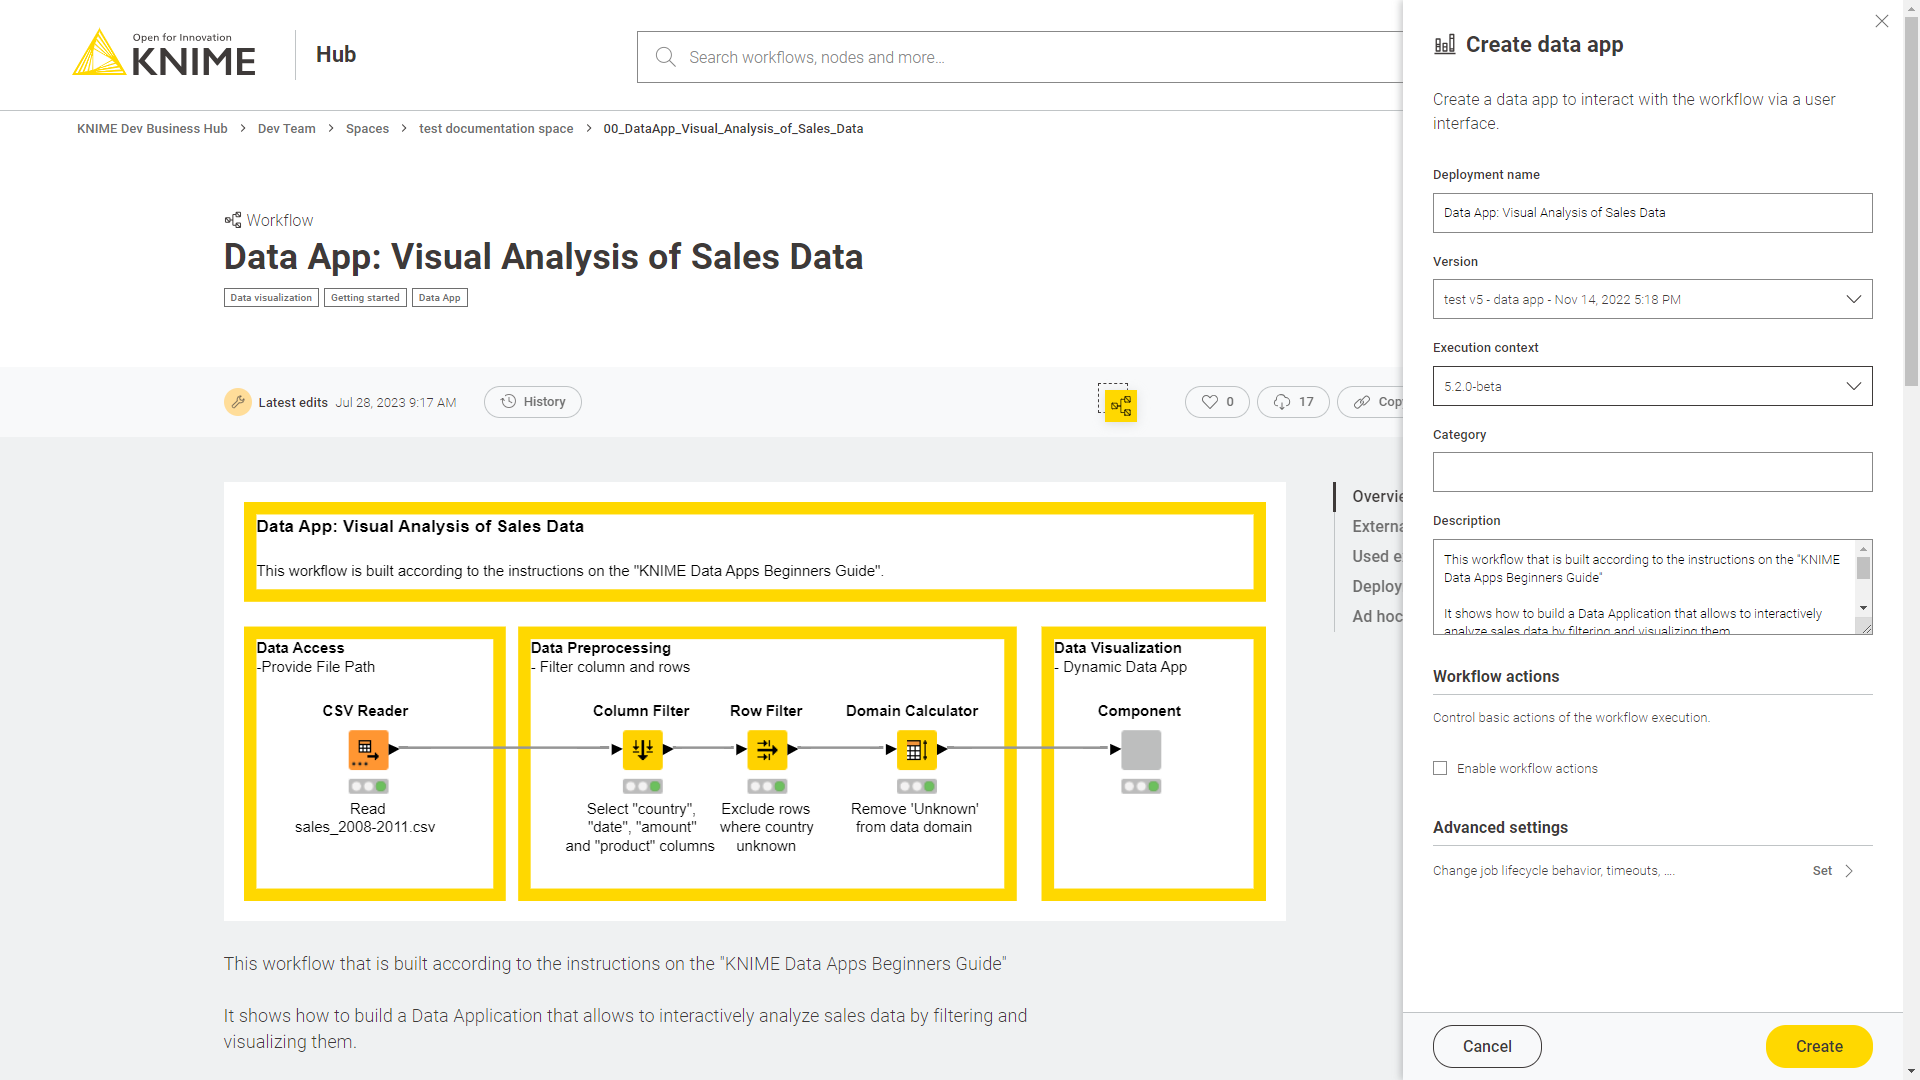
Under Advanced settings click Set to change the advanced settings of the deployment. Here you can configure the options regarding:
-
Job lifecycle: such as deciding when to discard a job, the maximum time a job will stay in memory, the job life time, or the options for timeout
-
Additional settings such as report timeouts, CPU and RAM requirements and so on
Notice that you can get additional information on the different fields by hovering over it with the cursor.
The values in the fields related to time need the format:
-
PT, which stands forPeriodofTime -
the amount of time, made of a number and a letter
D,H,MandSfor days, hours, minutes and seconds.
For example, PT1H means a period of time of 1 hour, PT168H means a period of time of 168 hours (which is equivalent of 7 days).
Schedule
Select Create schedule if you want to create a scheduled execution that will run your workflow automatically at selected times.
In the right panel that opens you will be able to choose a Deployment name, the version you want to deploy, and select the execution context you want to use.
Schedule options
Here, you can define when the workflow should be executed.

In the Schedule options section you can set up date and time of the Initial execution.
When selecting the check box Repeat execution you can select:
-
Every: Decide when the execution will be repeated, such as every minute, or every 2 hours and so on.
-
Start times: Set up one or more start times at which your workflow will be executed.
-
Schedule ends date: Set up if you want your repeated scheduled job to end and when.
Schedule details
If you check the option Repeat execution, under Set schedule details you can click Set to set up recurring executions, retries, and advanced schedule details. If you do not check the option Repeat execution, you will only find the set up options for retries and the advanced schedule details.
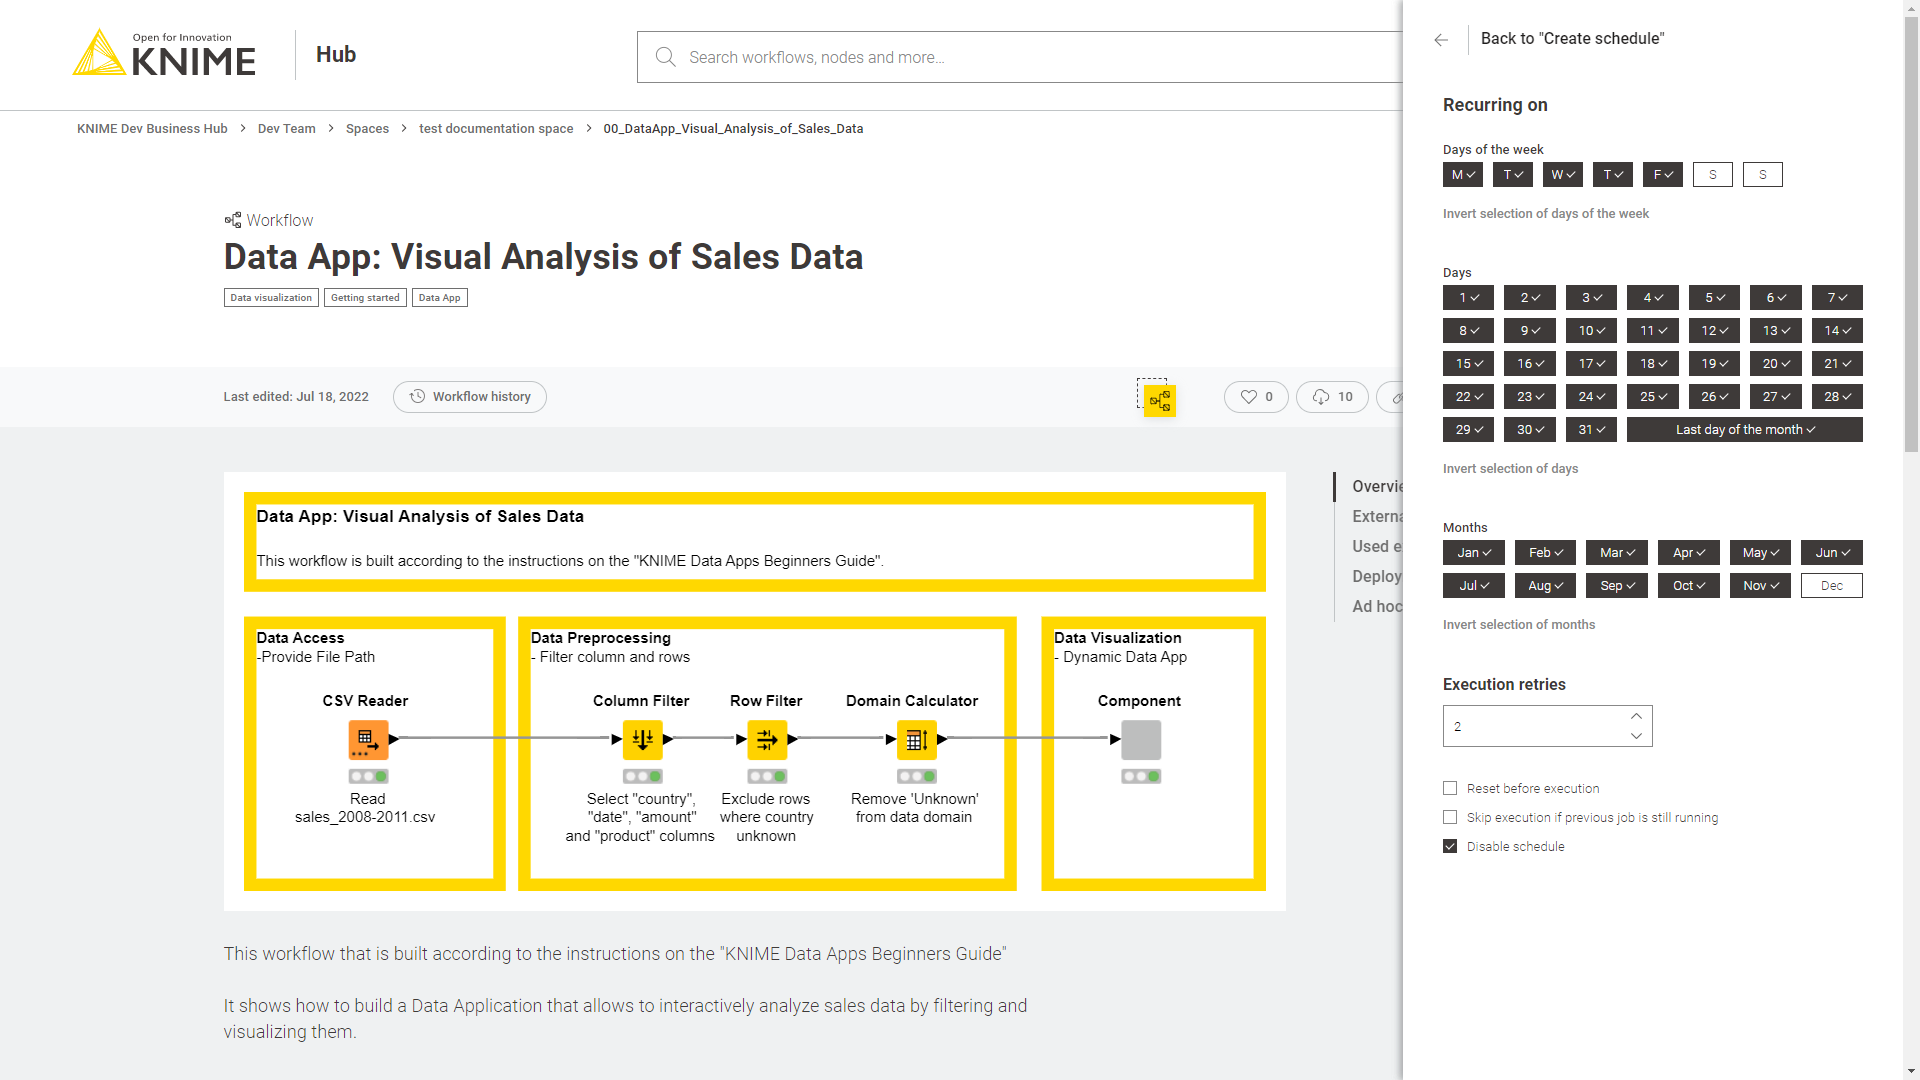
The workflow will run when all the selected conditions are met. In the above example the workflow will run from Monday to Friday, every day of the month, except for the month of December.
Finally, in the section execution retries and advanced schedule details you can set up the number of execution retries, and check the following options for the advanced schedule details:
-
Reset before execution: the workflow will be reset before each scheduled execution retries occur.
-
Skip execution if previous job is still running: the scheduled execution will not take place if the previous scheduled execution is still running.
-
Disable schedule: Check this option to disable the schedule. The scheduled execution will start run accordingly to the set ups when it is re-enabled again.
Workflow actions
If you check the option Enable workflow actions you can enable sending an e-mail upon success or failure of the execution of the deployment you will create.
Add the email and select the condition, and click Add more to add more actions.
Advanced settings
Finally, in the section Advanced settings you can configure additional set ups:
-
Job lifecycle: such as deciding in which case to discard a job, the maximum time a job will stay in memory, the job life time, or the options for timeout
-
Additional settings: such as report timeouts, CPU and RAM requirements, check the option to update the linked components when executing the scheduled job and so on
The values in the fields related to time need the format:
-
PT, which stands forPeriodofTime -
the amount of time, made of a number and a letter
D,H,MandSfor days, hours, minutes and seconds.
For example, PT1H means a period of time of 1 hour, PT168H means a period of time of
168 hours (which is equivalent of 7 days).
Service
Select Create service if you want to create a service to use the workflow as an API endpoint.
In the right panel that opens you will be able to choose a Deployment name, select the version you want to deploy, select the execution context you want to use, and check Enable workflow actions if you want to enable sending an e-mail upon success or failure of the execution of the deployment you will create.
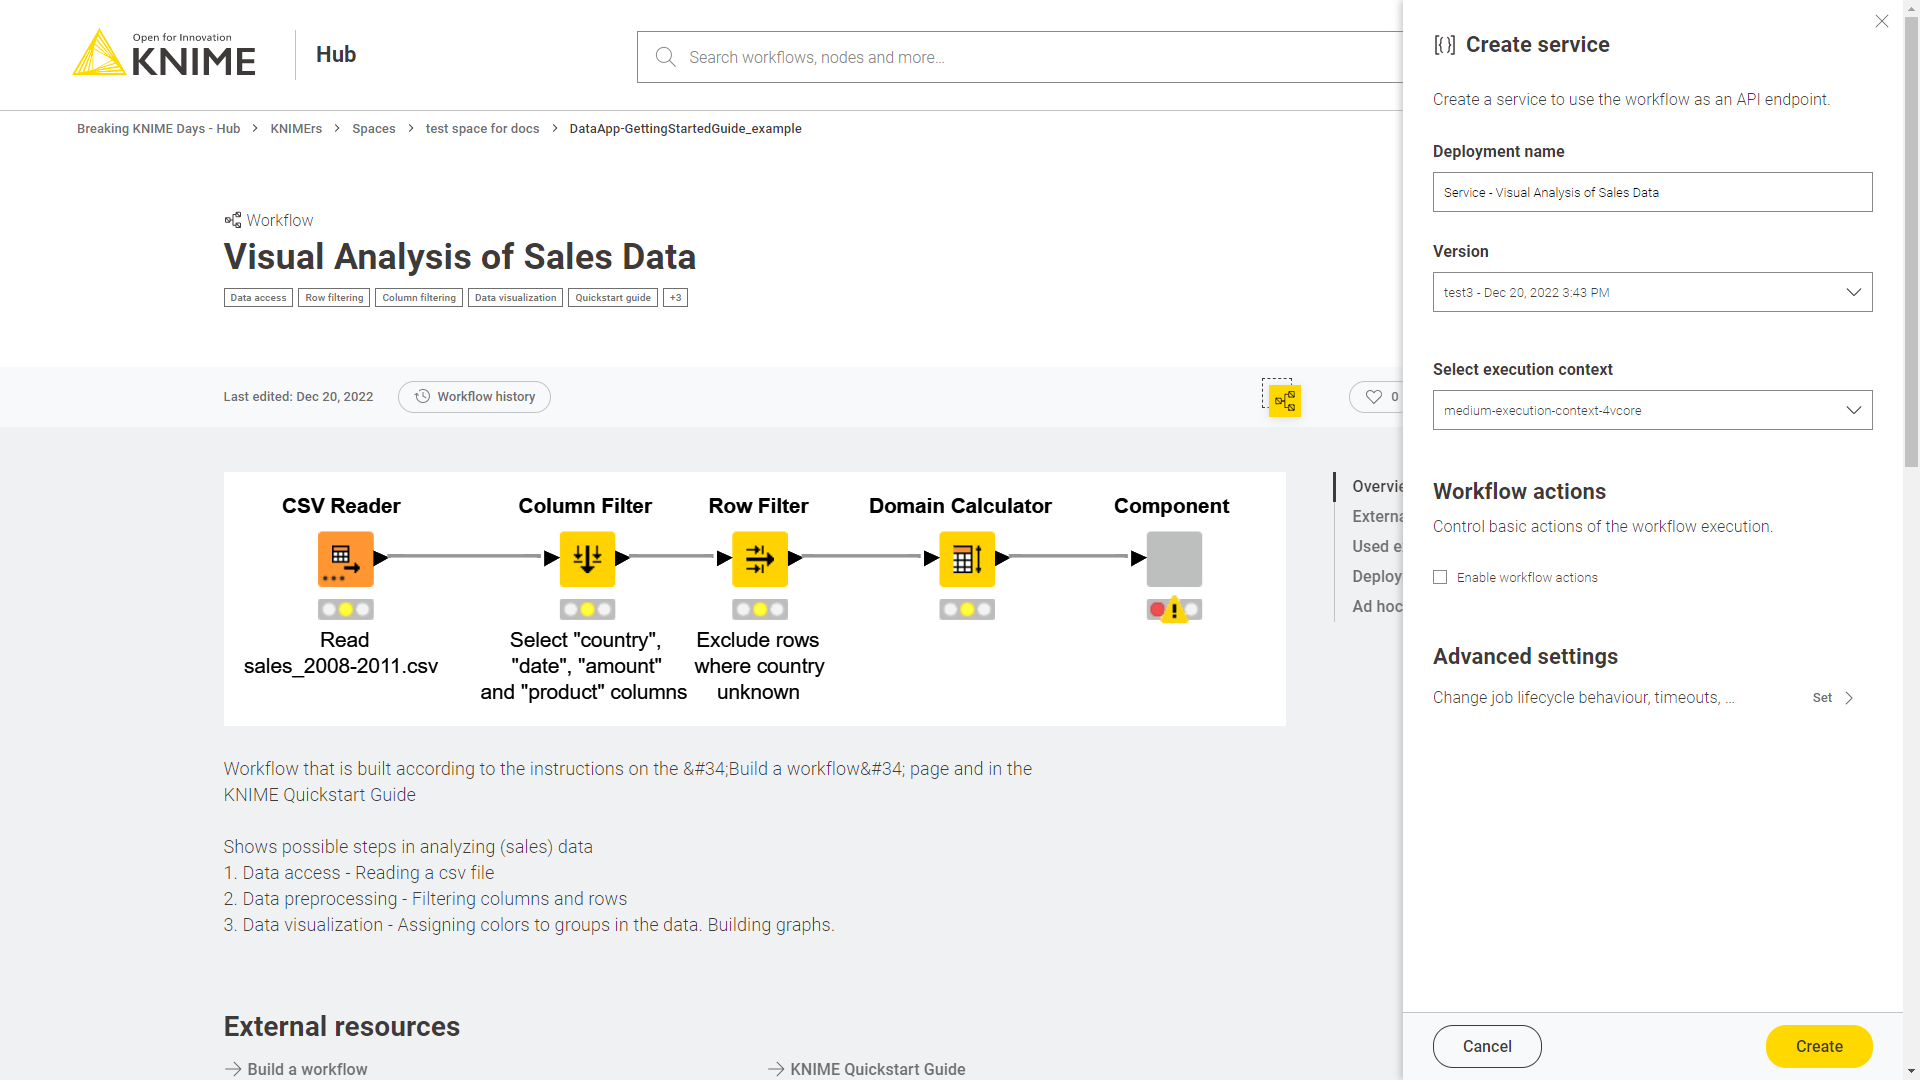
Under Advanced settings click Set to change the advanced settings of the deployment. Here you can configure the options regarding:
-
Job lifecycle: such as deciding when to discard a job, the maximum time a job will stay in memory, the job life time, or the options for timeout
-
Additional settings such as report timeouts, CPU and RAM requirements and so on
Notice that you can get additional information on the different fields by hovering over it with the cursor.
The values in the fields related to time need the format:
-
PT, which stands forPeriodofTime -
the amount of time, made of a number and a letter
D,H,MandSfor days, hours, minutes and seconds.
For example, PT1H means a period of time of 1 hour, PT168H means a period of time of
168 hours (which is equivalent of 7 days).
Application passwords
Application passwords can be used to provide authentication when using the KNIME Hub REST API, for example when executing deployed REST services. To create a new application password you can go to your profile page and select Settings → Application passwords from the menu on the left.
Click + Create application password and a side panel will show.
Here you can give a name in order to keep track of the application password purpose. Then click Apply. The ID and the password will be shown only once. You can copy them and use it as username and password in the base authentication when you want to execute a deployed REST service.
| Please, be aware that the copy button will not work on HTTP, so if TLS is not enabled. |

From this page you can also click the three dots button and click Delete from the menu that opens, in order to delete a specific application password.
Trigger
Select Create trigger if you want to create a trigger to execute the workflow when a specified event occurs.
In the right panel that opens you will be able to choose a Deployment name, the version you want to deploy, and select the execution context you want to use.
Trigger options
In the Trigger options section you define the events that will trigger the execution of the workflow you are deploying.
The trigger listens to a specific event and when all the conditions set here are met, the workflow is executed.
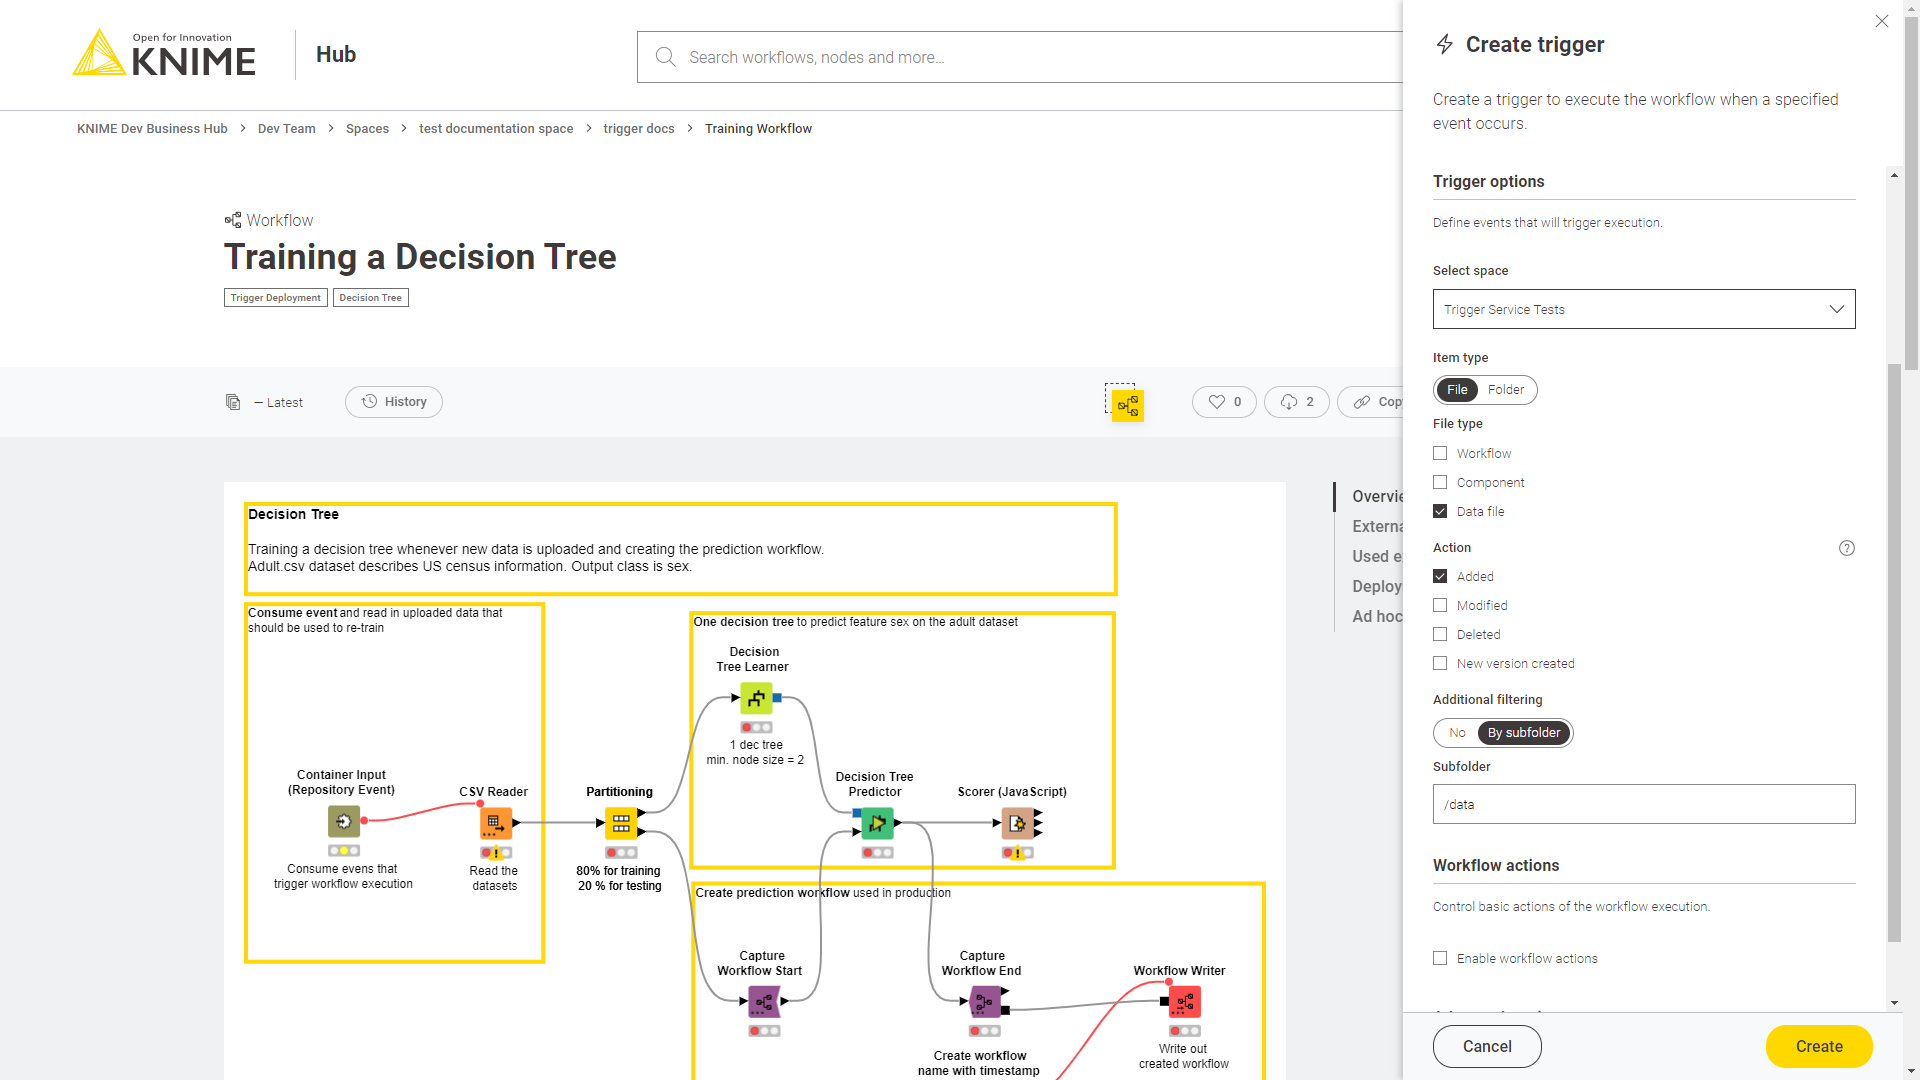
-
First select a space on the KNIME Hub in which the trigger is listening for events. You can select any space that is owned by the same team that owns the workflow you are deploying.
-
Then select the item type between:
-
File
-
Folder
-
-
If you select File as item type you can further filter by file type, choosing between Workflow, Component or Data file. You can select one or more of these file types.
-
Then select the action that is going to occur in order for the workflow to be executed. You can select multiple actions, but only one needs to happen to trigger the execution.
-
If you select File as item type you can select that the file is added, modified, deleted, and/or a new version is created.
-
If you select Folder as item type you can select that the folder is added and/or deleted.
-
-
Finally, you can set up an additional filtering selecting By subfolder. Add the relative path (e.g.
/example/folder) to the space the trigger deployment is listening for the event. The event will then need to happen in the space you selected, in the subfolder/example/folder. For example, if you selected that the trigger will execute when a File of the type Data file is added to the space Space1 in the subfolder/example/folder, the workflow execution will be triggered when the data file is added toSpace1/example/folder.
| It is important to note that, under special circumstances, job creation might fail (e.g. if the execution context can not accept new jobs), or the job itself fails. In these cases, the job creation or execution will not be retried and the event would not be recorded. This makes trigger deployments unsuitable for use cases that require 100% reliability. |
Workflow actions
If you check the option Enable workflow actions you can enable sending an e-mail upon success or failure of the execution of the deployment you will create.
Add the email and select the condition, and click Add more to add more actions.
Advanced settings
Finally, in the section Advanced settings you can configure additional set ups:
-
Job lifecycle: such as deciding in which case to discard a job, the maximum time a job will stay in memory, the job life time, or the options for timeout
-
Additional settings: such as report timeouts, CPU and RAM requirements, check the option to update the linked components when executing the scheduled job and so on
The values in the fields related to time need the format:
-
PT, which stands forPeriodofTime -
the amount of time, made of a number and a letter
D,H,MandSfor days, hours, minutes and seconds.
For example, PT1H means a period of time of 1 hour, PT168H means a period of time of
168 hours (which is equivalent of 7 days).
Node to get information about a trigger deployment
With KNIME Analytics Platform version 4.7.2 the Container Input (Repository Event) node is added to the KNIME Hub Connectivity extension.
If you want to receive information about the event that triggered the execution of a workflow on KNIME Hub, you can add this node to the workflow. Upload the workflow to your KNIME Hub instance and create a trigger deployment for the workflow. When the conditions set for the trigger are met and the workflow is executed the node will receive information about the event that triggered the execution and output them as flow variables. The different flow variables are listed in the node description.
The event information comprises:
-
What kind of item, e.g., a workflow, component, or file;
-
Where did the event happened, e.g., in a particular directory within a space;
-
What type of action was perfomed on the item, e.g., modified, added, or deleted.
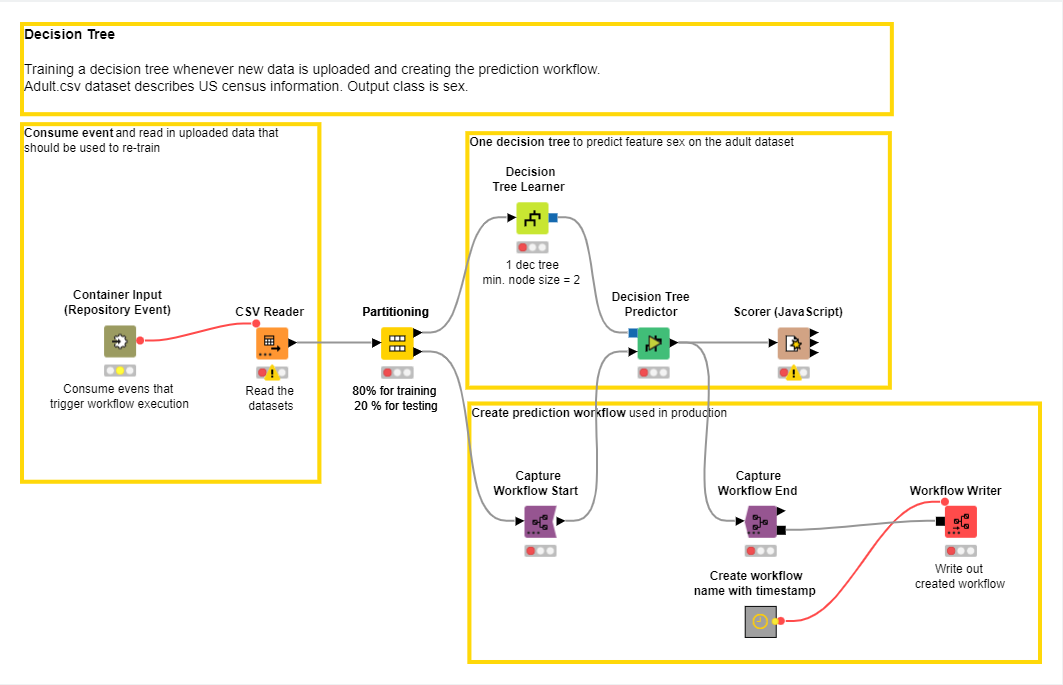
Managing deployments
Select Deployments from the menu on the right in the workflow page to see a list of the deployments that have been created for a specific workflow.
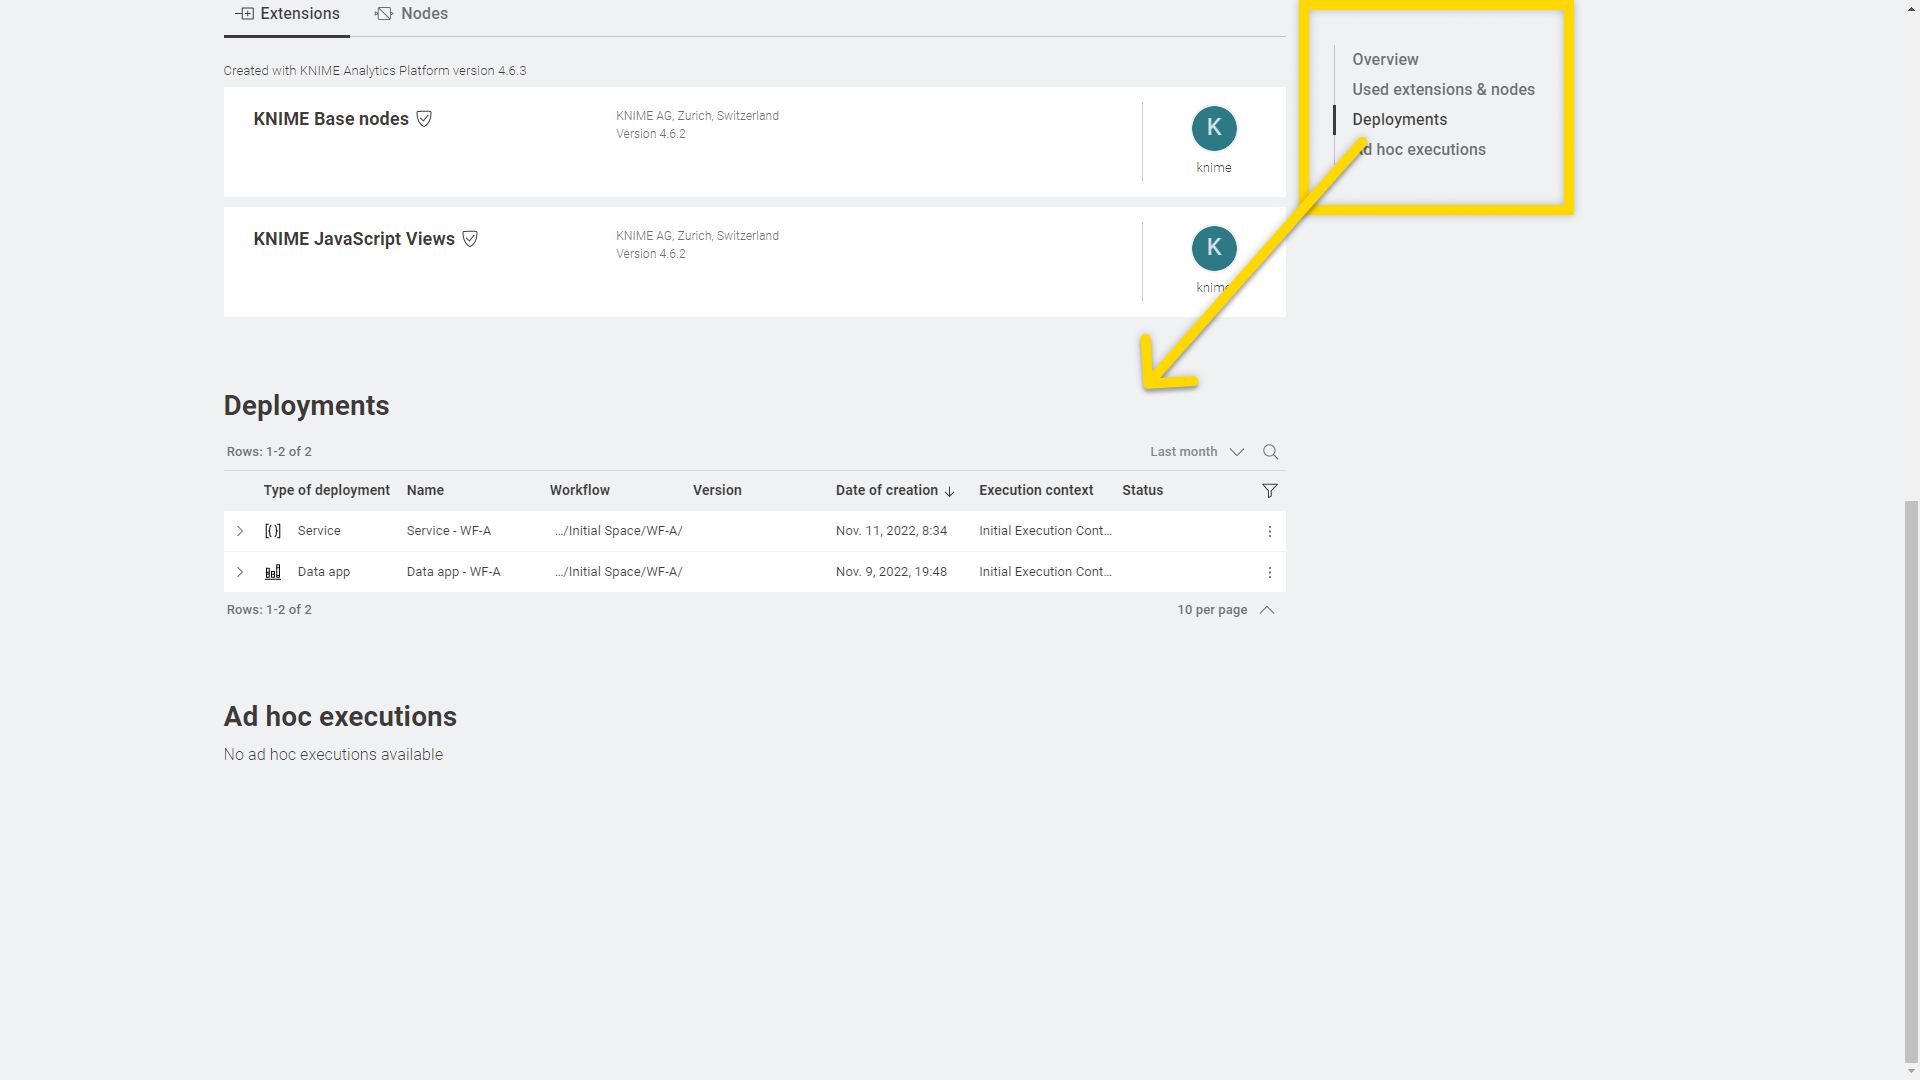
To see all the deployments that were created under a specific team go to that team page and select Deployments from the menu on the left.
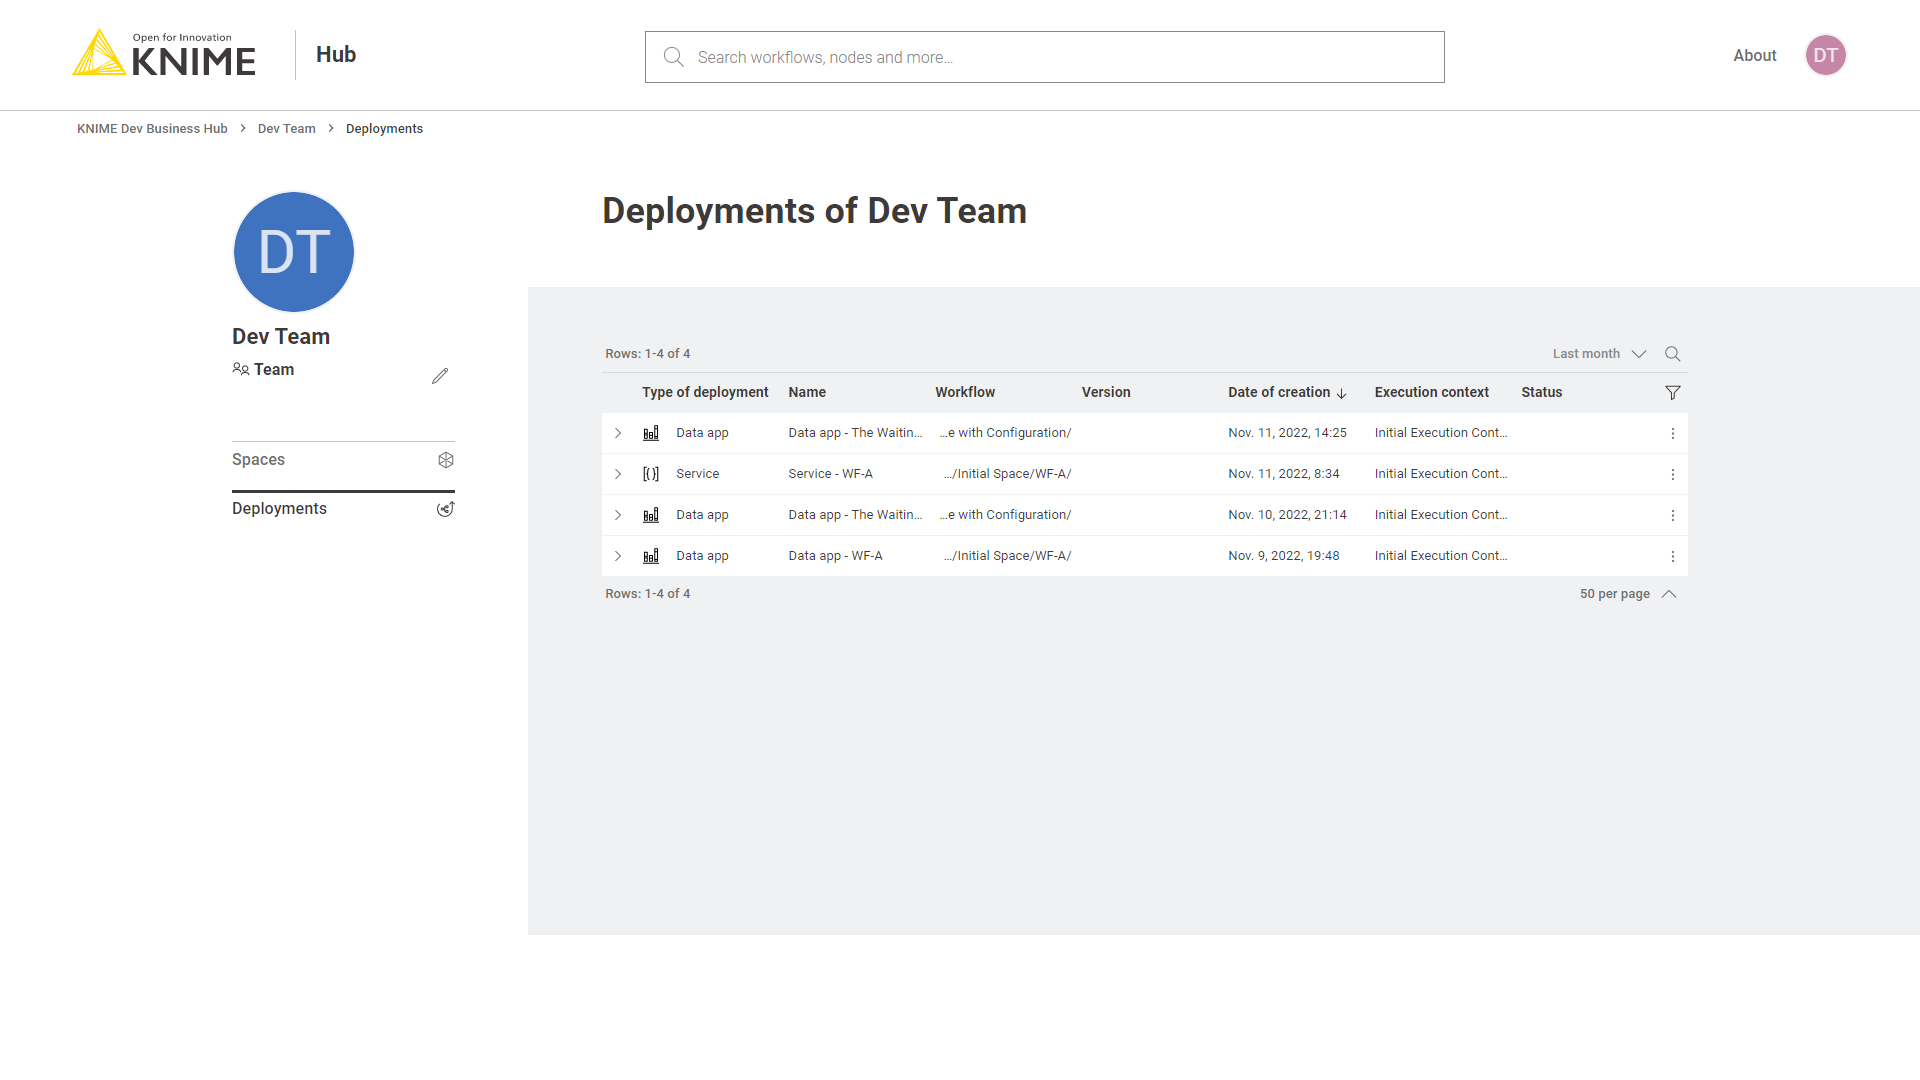
By clicking the three points menu at the end of the corresponding deployment row you can perform the following actions. Notice that depending on the type of deplyoment some actions might not be available.
-
Run: data apps, schedules and triggers
-
Open: services
-
Edit: all types of deployments
-
Manage access: data apps and services
-
Delete: all types of deployments
Run a Data App deployment
Once you have create a Data App deployment you can go to see the list of Deployments for the specific workflow, click the three dots on the row corresponding to the deployment you want to execute, and click Run/Open.
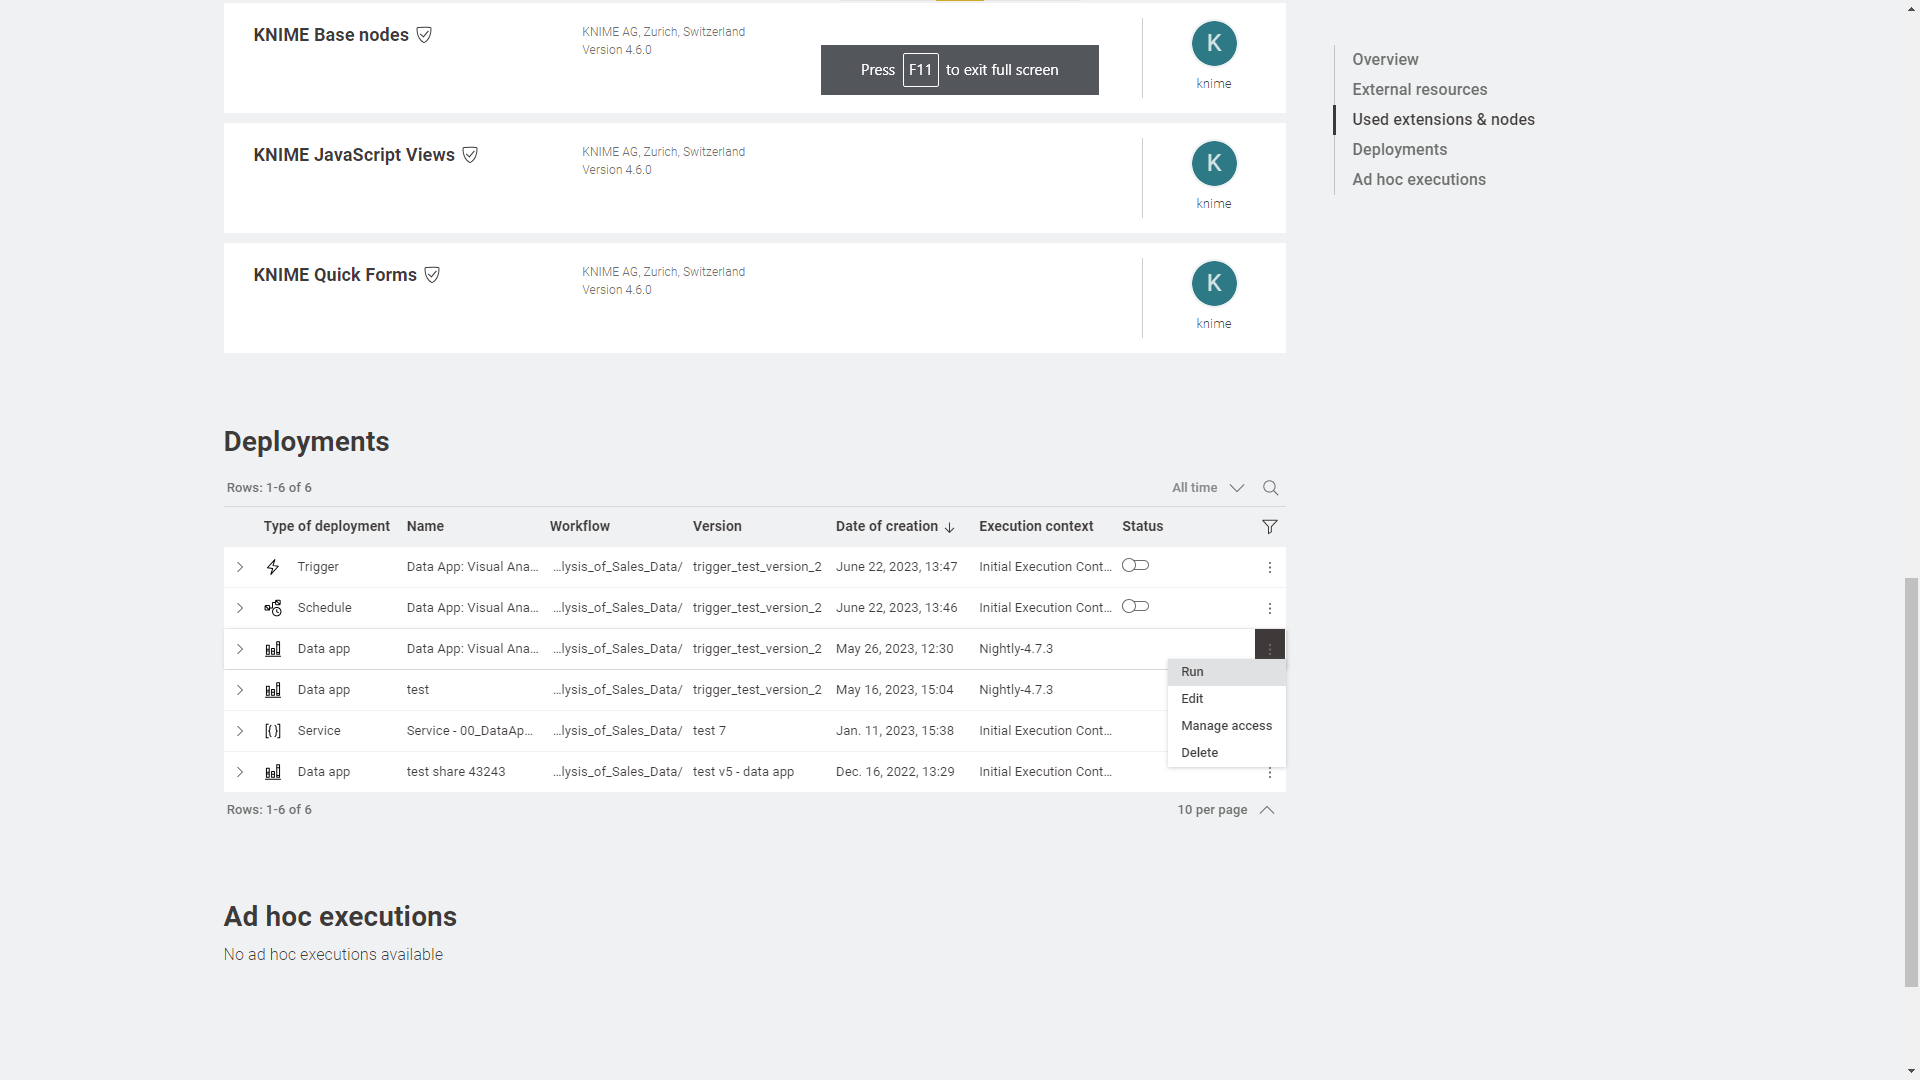
Change status of a schedule deployment
Also from the list of deployments available for a workflow or for the team, you can activate or deactivate a schedule. To do so click the toggle in the Status column.
Open a service deployment
When a service deployment is created a REST API endpoint is created. By selecting Open the definition of the endpoint opens.
Edit a deployment
You can edit a deployment from the deployments list by clicking the three dots in the corresponding row and selecting Edit from the menu.
The side panel for the deployment will open and you will be able to make changes to the deployment, then click Apply.
Manage access to data apps and services
For data apps and service deployments, you can select Manage access from the menu that opens when clicking on the three dots. This opens a side panel where you can type the name of the user or externally managed group you want to share the deployment with.
It is also possible to share the deployment with users that are not members of your team. When sharing a deployment, this will be available in the user profile in the Data Apps Portal section.
When managing the access of data apps and services, you can also select the option to share the deployment with all signed in users. This will allow every user who has access to the KNIME Business Hub instance to execute the deployment.
| Deployments shared this way will also be available to all future users who don’t have a Business Hub account yet. |
To do so select the Any signed in user option in the Manage deployment access panel.

The added user will still be available in case you change back to the default access type Only users added here.
Delete a deployment
You can delete a deployment from the deployments list by clicking the three dots in the corresponding row and selecting Delete from the menu.
Jobs
Every time a workflow is executed ad hoc or a deployment is executed a job is created on KNIME Business Hub.
To see the list of all the jobs that are saved in memory for the ad hoc execution of a specific workflow go to the workflow page and on the right side menu click Ad hoc jobs.
To see the list of all the jobs that are saved in memory for each of the deployments created for a specific workflow, go to the workflow page and on the right side menu click Deployments.
You can expand each deployment with the ![]() icon on the left of the deployment.
icon on the left of the deployment.
Also you can go to your team page and find a list of all deployments created within your team. Also here you can click the ![]() icon corresponding to a specific deployment to see all its jobs.
icon corresponding to a specific deployment to see all its jobs.
On each job you can click the ![]() icon on the right of the corresponding job line in the list and perform the following operations (their availability depends on the type of deployment or the job state):
icon on the right of the corresponding job line in the list and perform the following operations (their availability depends on the type of deployment or the job state):
-
Open: For example you can open the job from a data app and look at the results in a new tab
-
Save as workflow: You can save the job as a workflow in a space
-
Delete: You can delete the job
-
Download logs: You can download the log files of a job - this feature allows for debugging in case the execution of a workflow did not work as expected. To be able to download job logs you need an executor based on KNIME Analytics Platform version > 5.1.
Job states
Jobs exist in a variety of different states.
The possible states are:
-
Loading - Jobs being loaded by an executor or waiting to be accepted by an Executor.
-
Executing - Job is currently executing.
-
Execution finished - Job has been executed successfully
-
Execution failed - Job has been executed, but failed
-
Execution cancelled - Job has been cancelled manually during execution
-
Interaction required - Job is currently executing and is awaiting user input
-
Not executable - Job contains individual, unconnected nodes
-
Discarded - Job has been executed and discarded
-
Undefined - This is the first state of a job, and may be seen in the case where the Executor cannot communicate with the Hub due to network issues, or the executor not having enough free CPU/RAM resources.
-
Vanished - Job was in memory on an executor that has crashed, and is therefore lost.
Data Apps Portal
You can access the Data Apps Portal by going to the address:
https://apps.<base-url>
where <base-url> is the usual address of the KNIME Business Hub instance.
This page is available to every registered user. Consumers, for example, can access to this page to see all the data apps that have been shared with them, execute them at any time, interact with the workflow via a user interface, without the need to build a workflow or even know what happens under the hood.
To execute a data app click the corresponding tile. A new page will open in the browser showing the user interface of the data app.
To share a data app deployment with someone follow the instructions in the Manage access to a deployment section.
Known issues and compatibility
Please be aware that the compatibility of the following nodes and functionalities with KNIME Business Hub is still under development and it will full compatibility will be available soon.
-
Molecule Sketcher Widget node does not support custom widgets such as MarvinJS
-
Setting job lifecycle defaults for execution contexts is only possible right now via REST API