Introduction
KNIME Community Hub is a KNIME-managed Hub instance.
It is a central place to collect the common knowledge base among the KNIME Community and it has search functionalities as well as collaboration capabilities.
On KNIME Community Hub you can search for nodes, extensions, components, and workflows made available by the community.
You can use these as blueprints and building blocks in KNIME Analytics Platform, and build workflows to solve your data science use cases.
KNIME Hub can also be used to upload and organize workflows in a central place, and to collaborate with other users on your projects.
Via KNIME Hub you can:
-
Find workflows, components uploaded by KNIME Community
-
Upload and organize your workflows and components in projects
-
Create and manage projects
-
Collaborate with other users on your projects
Search items and use them in KNIME Analytics Platform
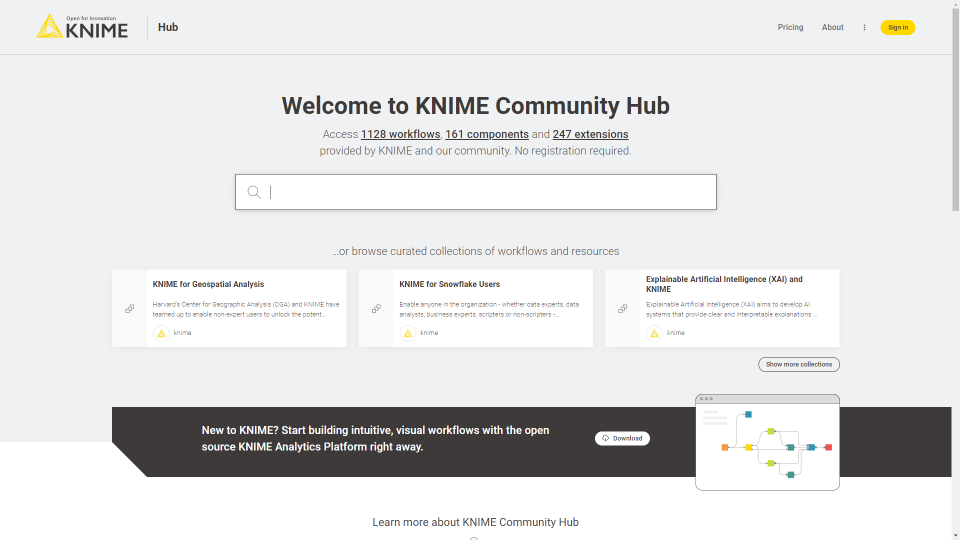
You can find the KNIME Community Hub at the following address:
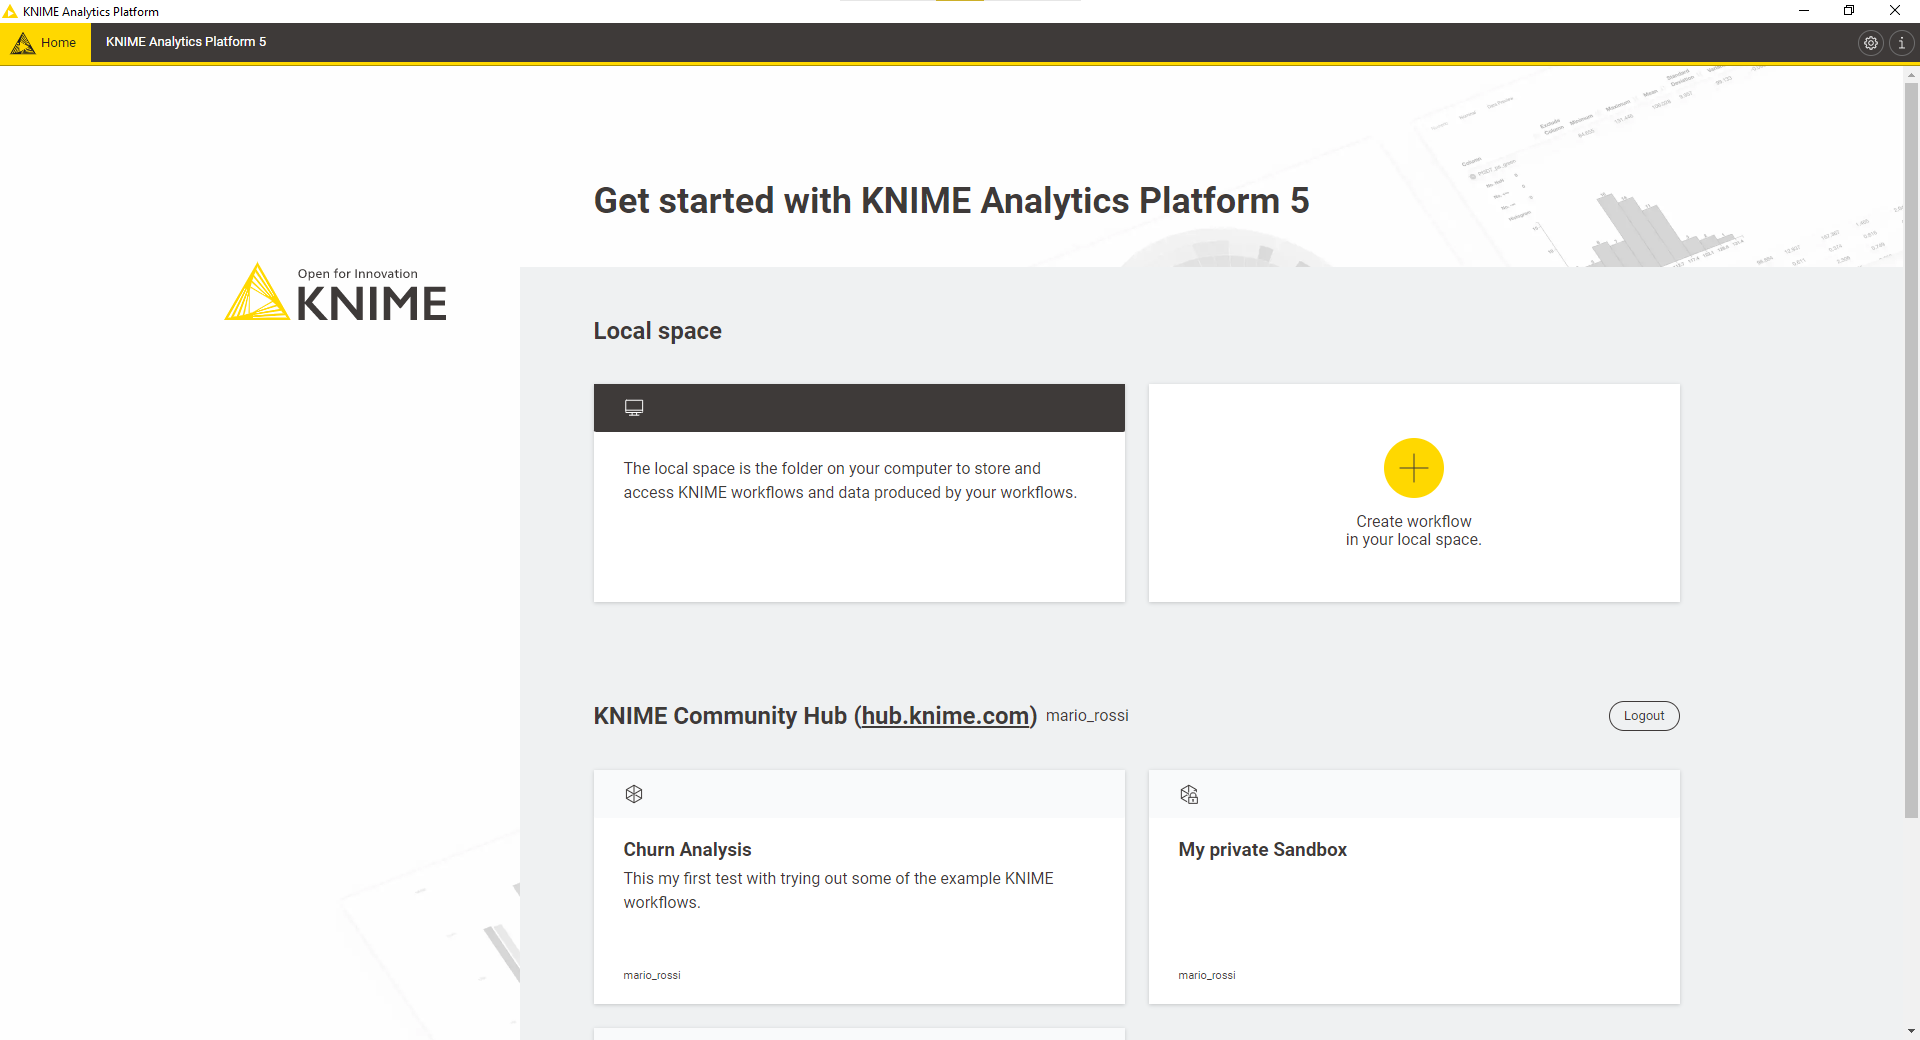
In the browser, you will access the KNIME Hub home page shown in Figure 1.
Search
Insert a keyword in the search bar to search among the following items publicly shared by the KNIME Community:
-
Nodes
-
Components
-
Workflows
-
Extensions
-
Collections
Press Enter to visualize the results.
You will see a list of all the search results in tiles, with:
-
An icon indicating if they are nodes, components, workflows or extensions
-
The title
-
Whether it is a draft or a versioned item (for components and workflows)
Find out more about versioning a workflow or a component in the versioning section. -
Tags, when available
-
A preview of the description, when available
-
The owner icon for workflows, and extensions
-
The icon, for nodes and components
On top of the search results list, you can filter the results to list only nodes, components, workflows, extensions, or collections by clicking the respective tab, shown in Figure 2.

Click on a search result to access the relative page.
When searching for workflows and components, the items that have been versioned will show up higher in rank than draft-only items. This ensures you to be able to easier find versioned workflows and components when searching on KNIME Hub.
Nodes
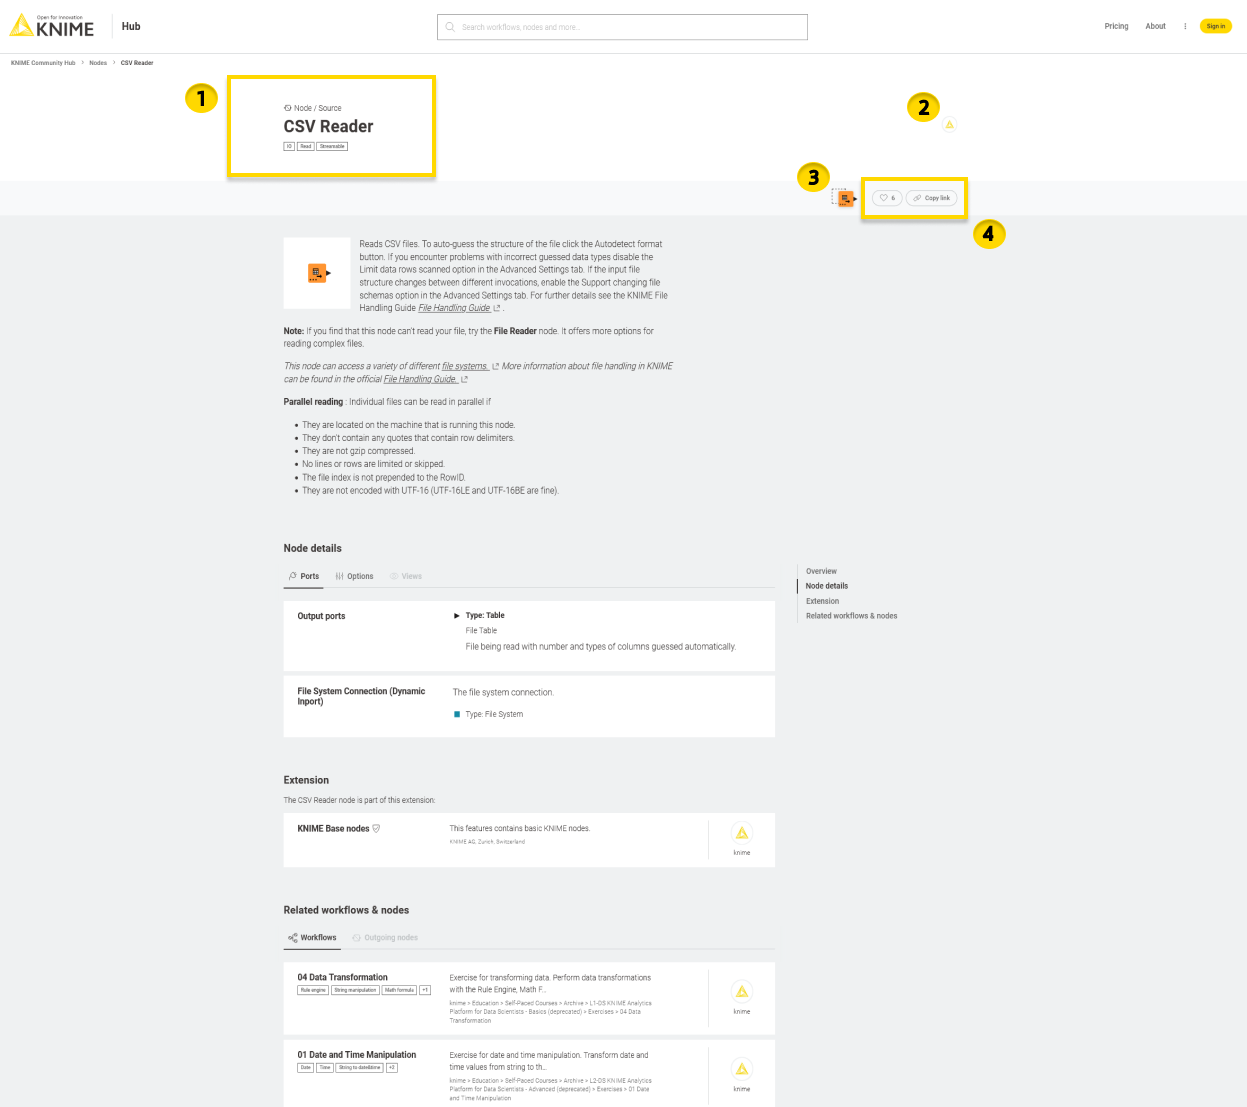
On the node page, as shown in Figure 3, you will find:
-
The node function, name, and tags
-
The node owner
-
The node drag & drop element: You can drag & drop the element into the Workflow Editor of KNIME Analytics Platform to use the node directly to build a workflow or a component. See the Drag & drop section for more details on this feature.
-
The node likes (see the Likes section for more details on this feature) and a link icon to copy the node short link
For each node you can also find:
-
An Overview with a description of the node functionality
-
Node details where you can see information about Input and Output node ports, a description of the additional Options, and, when available, the Views that the node is able to produce
-
In the section Extension, you can see the node extension and the extension owner
-
Finally, in the section Related workflows & nodes you are provided with:
-
Workflows that are available on KNIME Hub and that contain the node
-
When available, the Outgoing nodes, that are the most popular nodes to follow the node when building a workflow.
-
Components
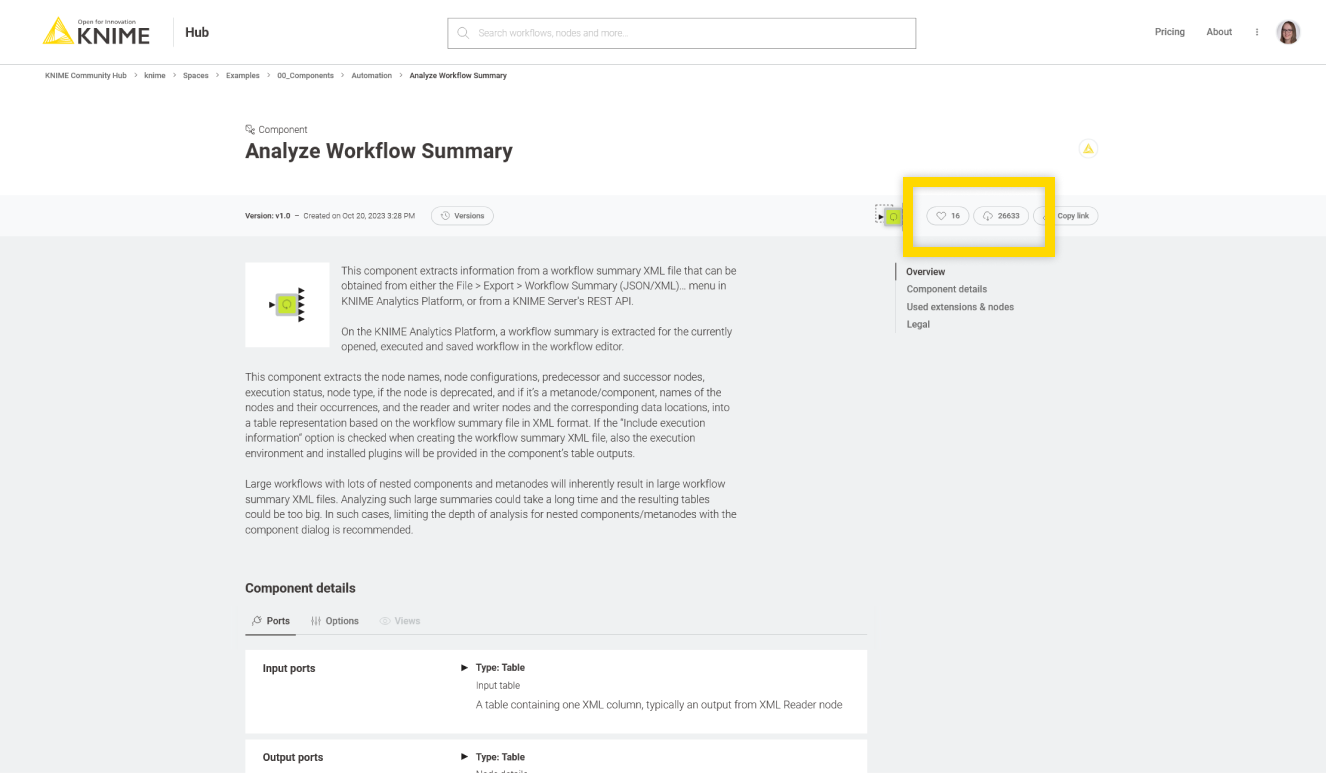
Components really are KNIME nodes that you create to bundle functionality. They have their own configuration dialog and their own composite views. Thus, also in the component page shown in Figure 4 you will find similar information as for nodes.
-
The component name, optionally its latest version (see the versioning section for more details on this feature), and last edit date
-
The component owner
-
The component drag & drop element: You can drag & drop the element into the Workflow Editor of KNIME Analytics Platform to use the component directly to build a workflow. See the Drag & drop section for more details on this feature.
-
The component likes (see the Likes section for more details on this feature), the count of downloads, and a link icon to copy the component short link.
For each component you can also find:
-
An Overview with a description of the component functionality, if provided by the component owner
-
Component details, where you can see information about the component’s Input and Output ports, a description of the additional Options, and, if available, the Views that the component is able to produce
-
In the section Used extensions & nodes you can see the component extensions and nodes
-
Finally, in the section Related workflows you are provided with Workflows that are available on KNIME Hub and that contain the component

Workflows
A workflow page typically has multiple useful information about the workflow such as:
-
The workflow title, tags, optionally its latest version (see the versioning section for more details on this feature), and its last edit date
-
The space owner where the workflow is contained and, if different from the space owner, the workflow developer
-
The workflow drag & drop element: You can drag & drop the element into a selected mount point in the space explorer of KNIME Analytics Platform. This will prompt an Import window which allows you to import the workflow into the mount point. See the Drag & drop section for more details on this feature.
-
The workflow likes (see the Likes section for more details on this feature), the count of downloads, and a link icon to copy the workflow short link.
For each workflow you can also find:
-
An Overview with a description of the workflow when provided by the workflow developer
-
External resources links to external resources such as KNIME blog posts, KNIME documentation, or any other interesting link that the workflow developer might want to provide
-
In the section Used extensions & nodes you can see the workflow extensions and nodes, and the KNIME Analytics Platform that has been used to create the workflow
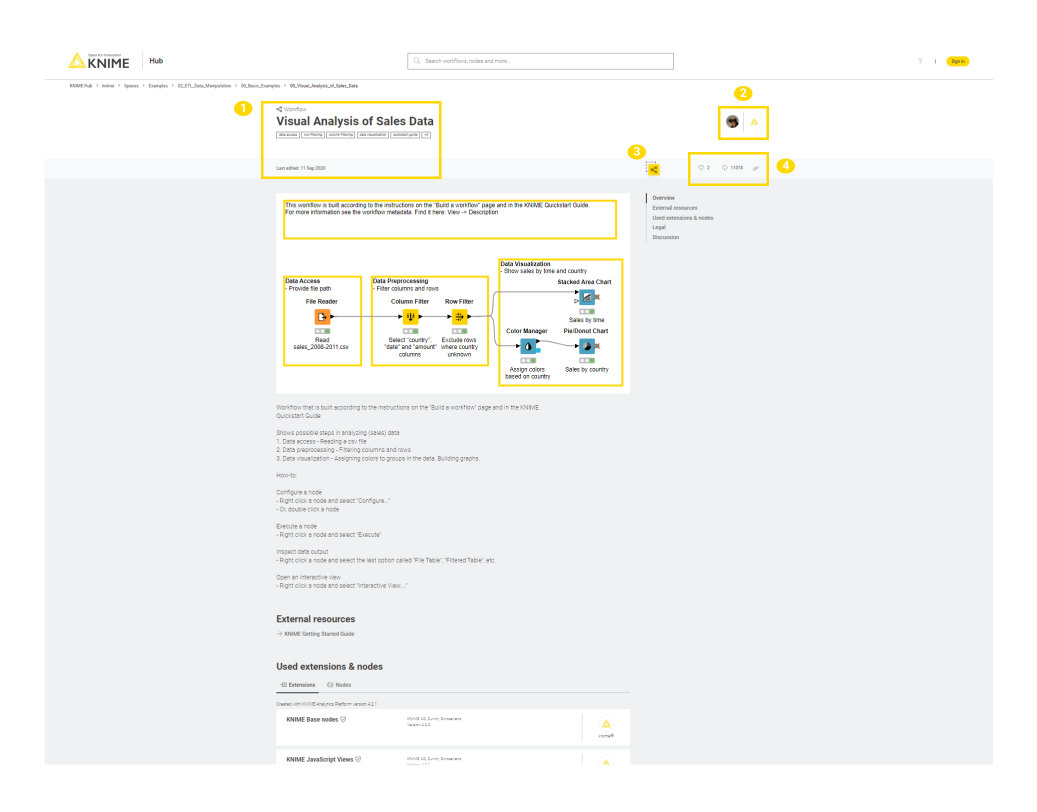 Figure 5. A workflow on KNIME Hub
Extensions
Extensions are collection of nodes that provide additional functionality such as access to and processing of complex data types, the use of advanced algorithms, as well as the use of scripting nodes, and so on.
KNIME Extensions are developed and maintained by KNIME, allowing you to access open source projects and add their functionality to your KNIME workflows. Community Extensions instead include functionality specific to various industries and domains. Some of these community extensions are classified as Trusted Community Extensions, which have been tested for backward compatibility and compliance with the KNIME usage model and quality standards, and Experimental Community Extensions, which come directly from the labs of our community developers. Finally, also Partner Extensions are available which provide additional capabilities offered and maintained by our partners.
All these Extensions are available on KNIME Hub.
An extension page typically has multiple useful information about the extension such as:
-
The extension name and owner, version of the extension
-
The extension drag & drop element: You can drag & drop the element into the Workflow Editor of KNIME Analytics Platform. If the extension is not already installed this will prompt an Install Extension window which allows you to install the extension. See the Drag & drop section for more details on this feature.
-
The extension likes (see the Likes section for more details on this feature), and a link icon to copy the extension short link.
For each extension you can also find:
-
An Overview with a description of the extension when provided
-
Included nodes with a list of all the nodes that are part of the extension and that will be available once the extension is installed
-
In the section Related workflows, you are provided with Workflows that are available on KNIME Hub and that contain the nodes that are part of the extension
-
Finally, in the section Legal & update site, you can have legal information about the copyright and the update site information, with the type of the extension, version number, and the link to the update site
Collections
KNIME Collections on KNIME Hub allow upskilling users by providing selected workflows, nodes, and links about a specific, common topic.
One example of a collection can be found on KNIME Community Hub here.
This collection, for example, contains:
-
Workflow examples:
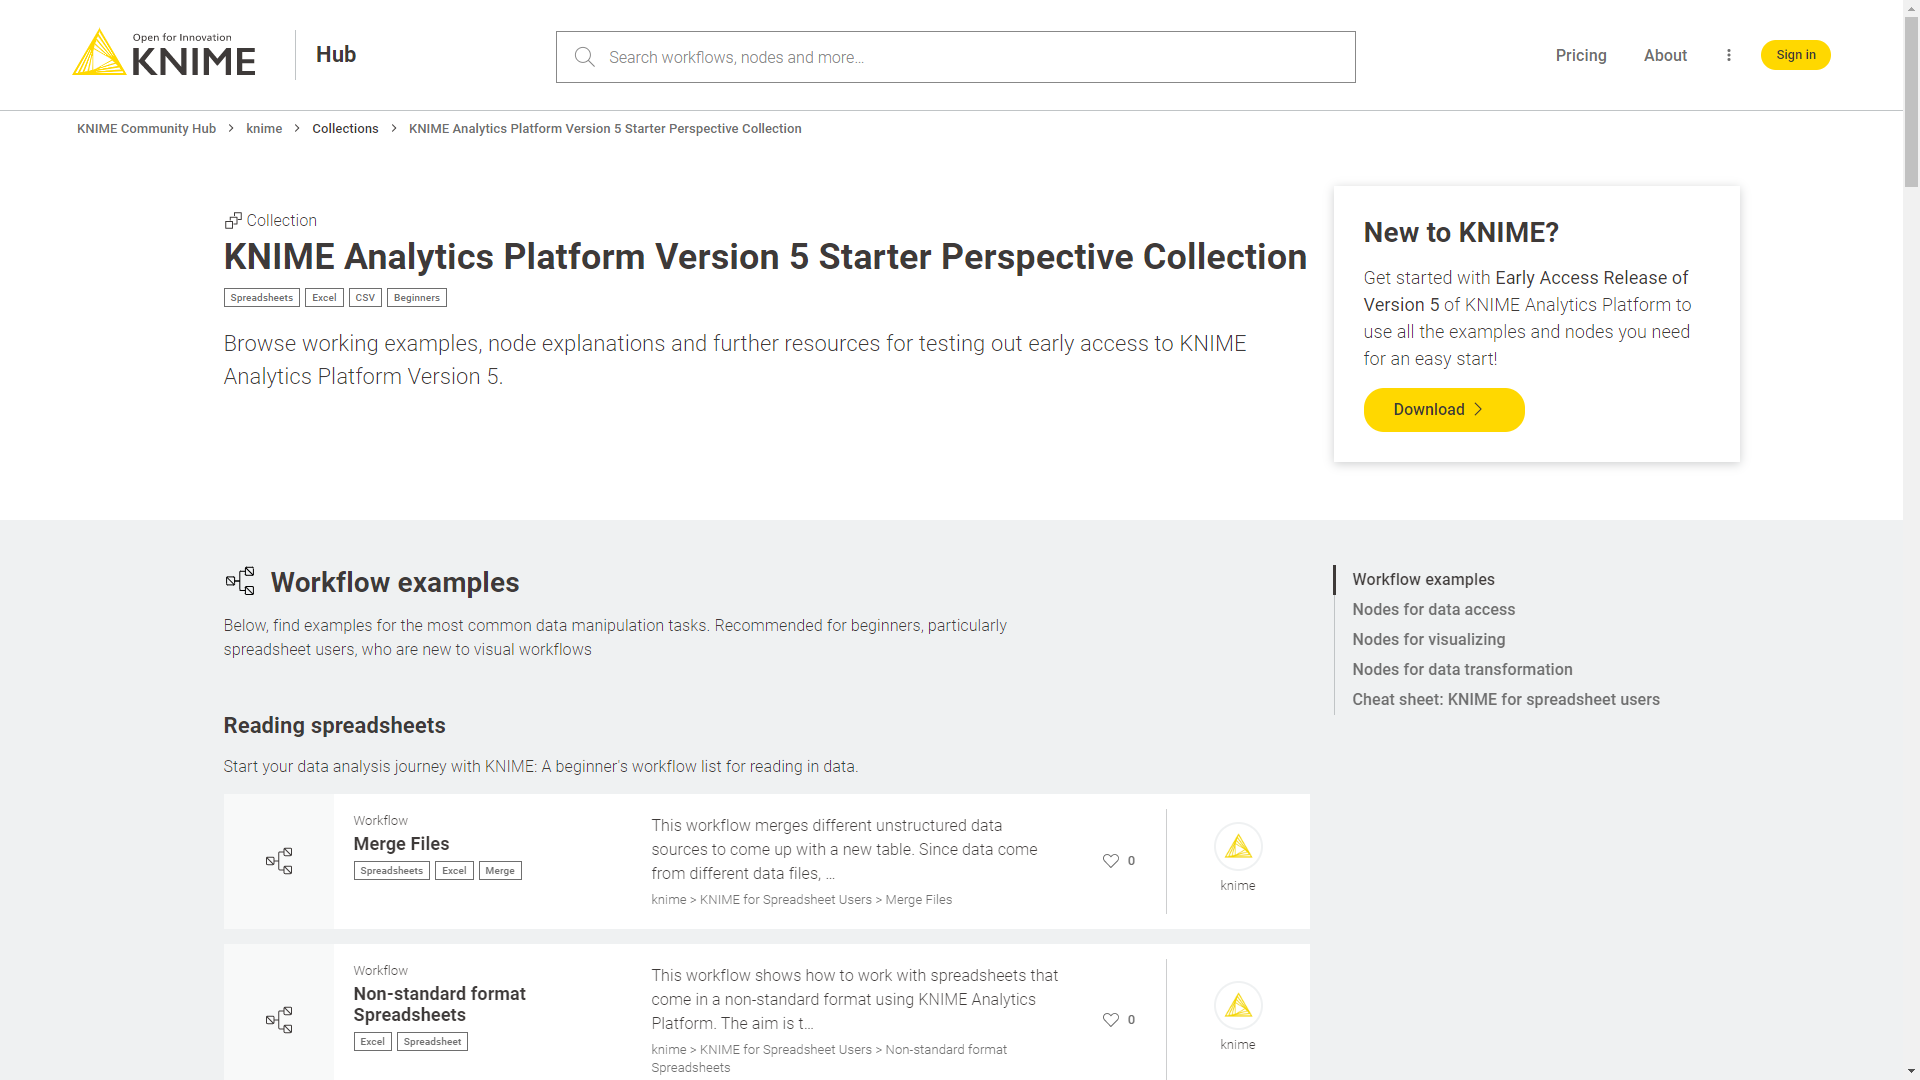 Figure 6. Example workflows in a collection on KNIME Hub
 -
Nodes:
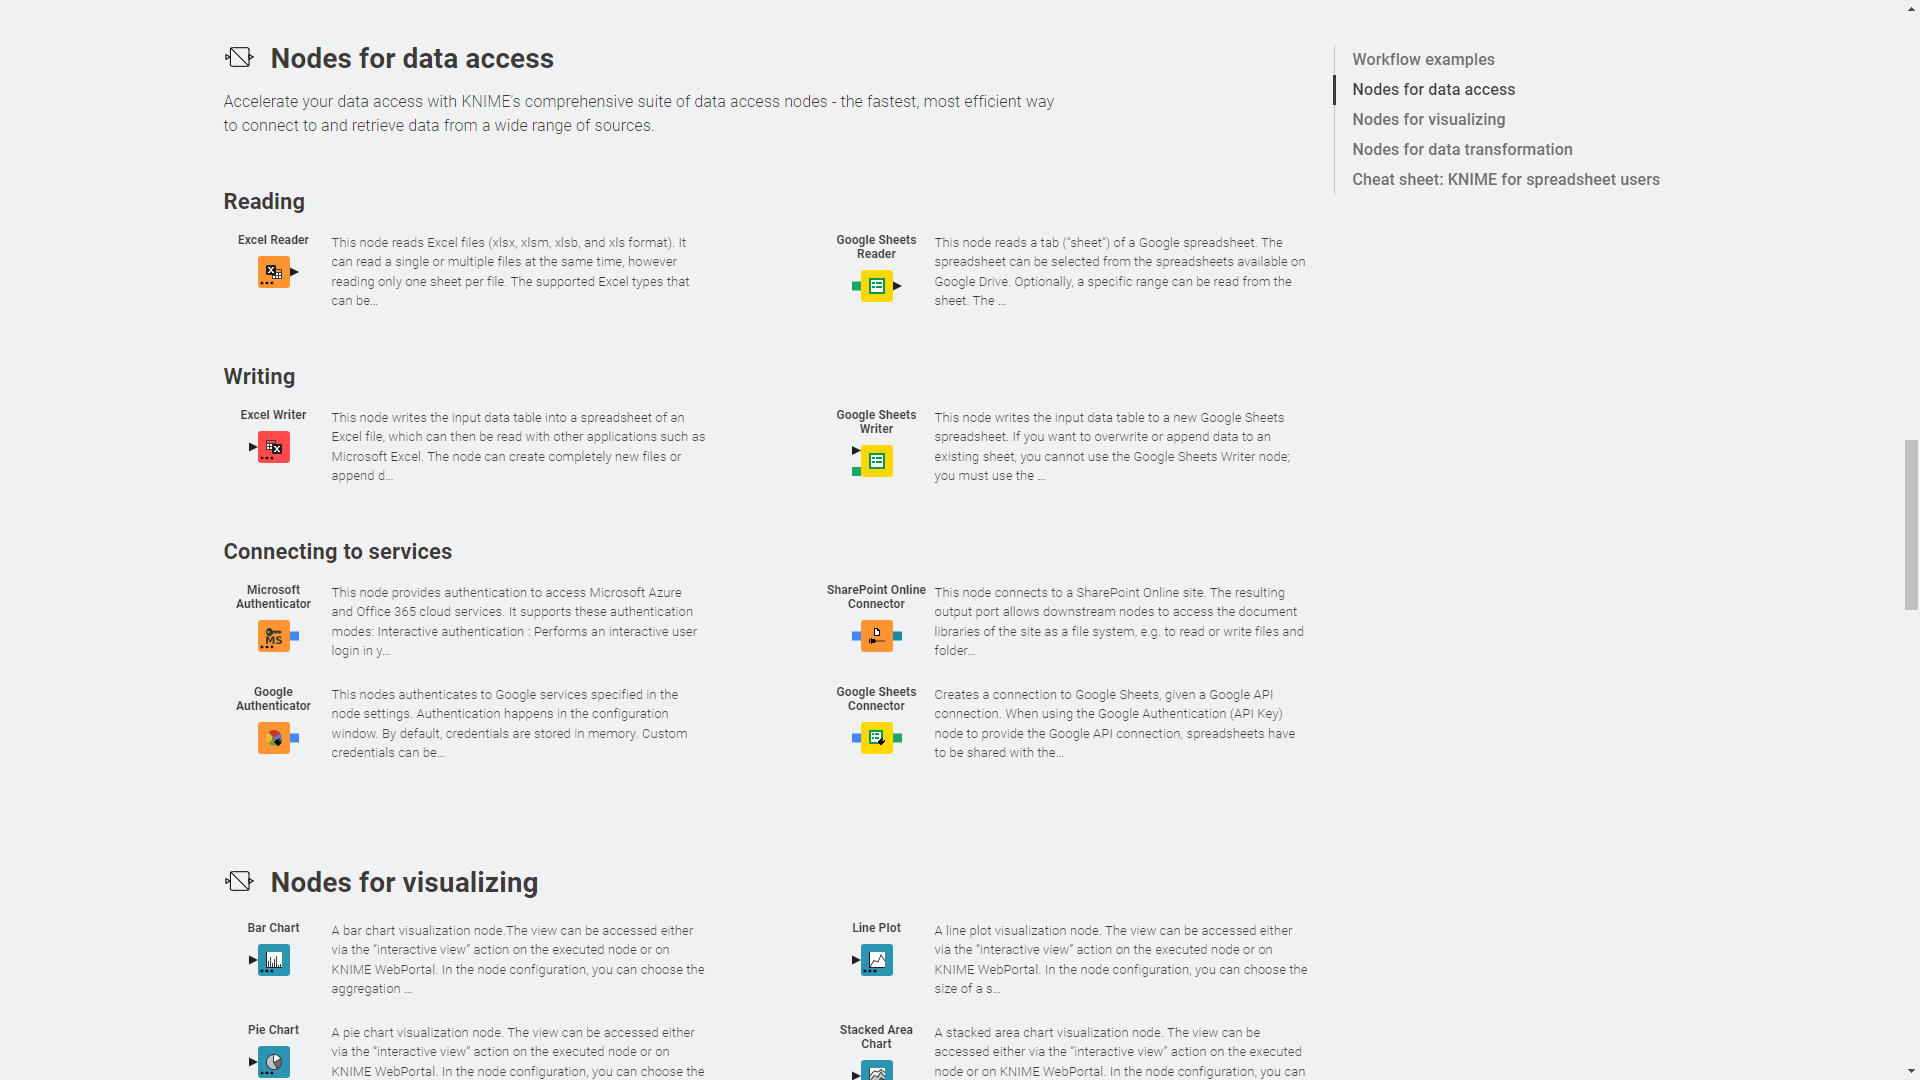 Figure 7. Nodes in a collection on KNIME Hub
 -
Links:
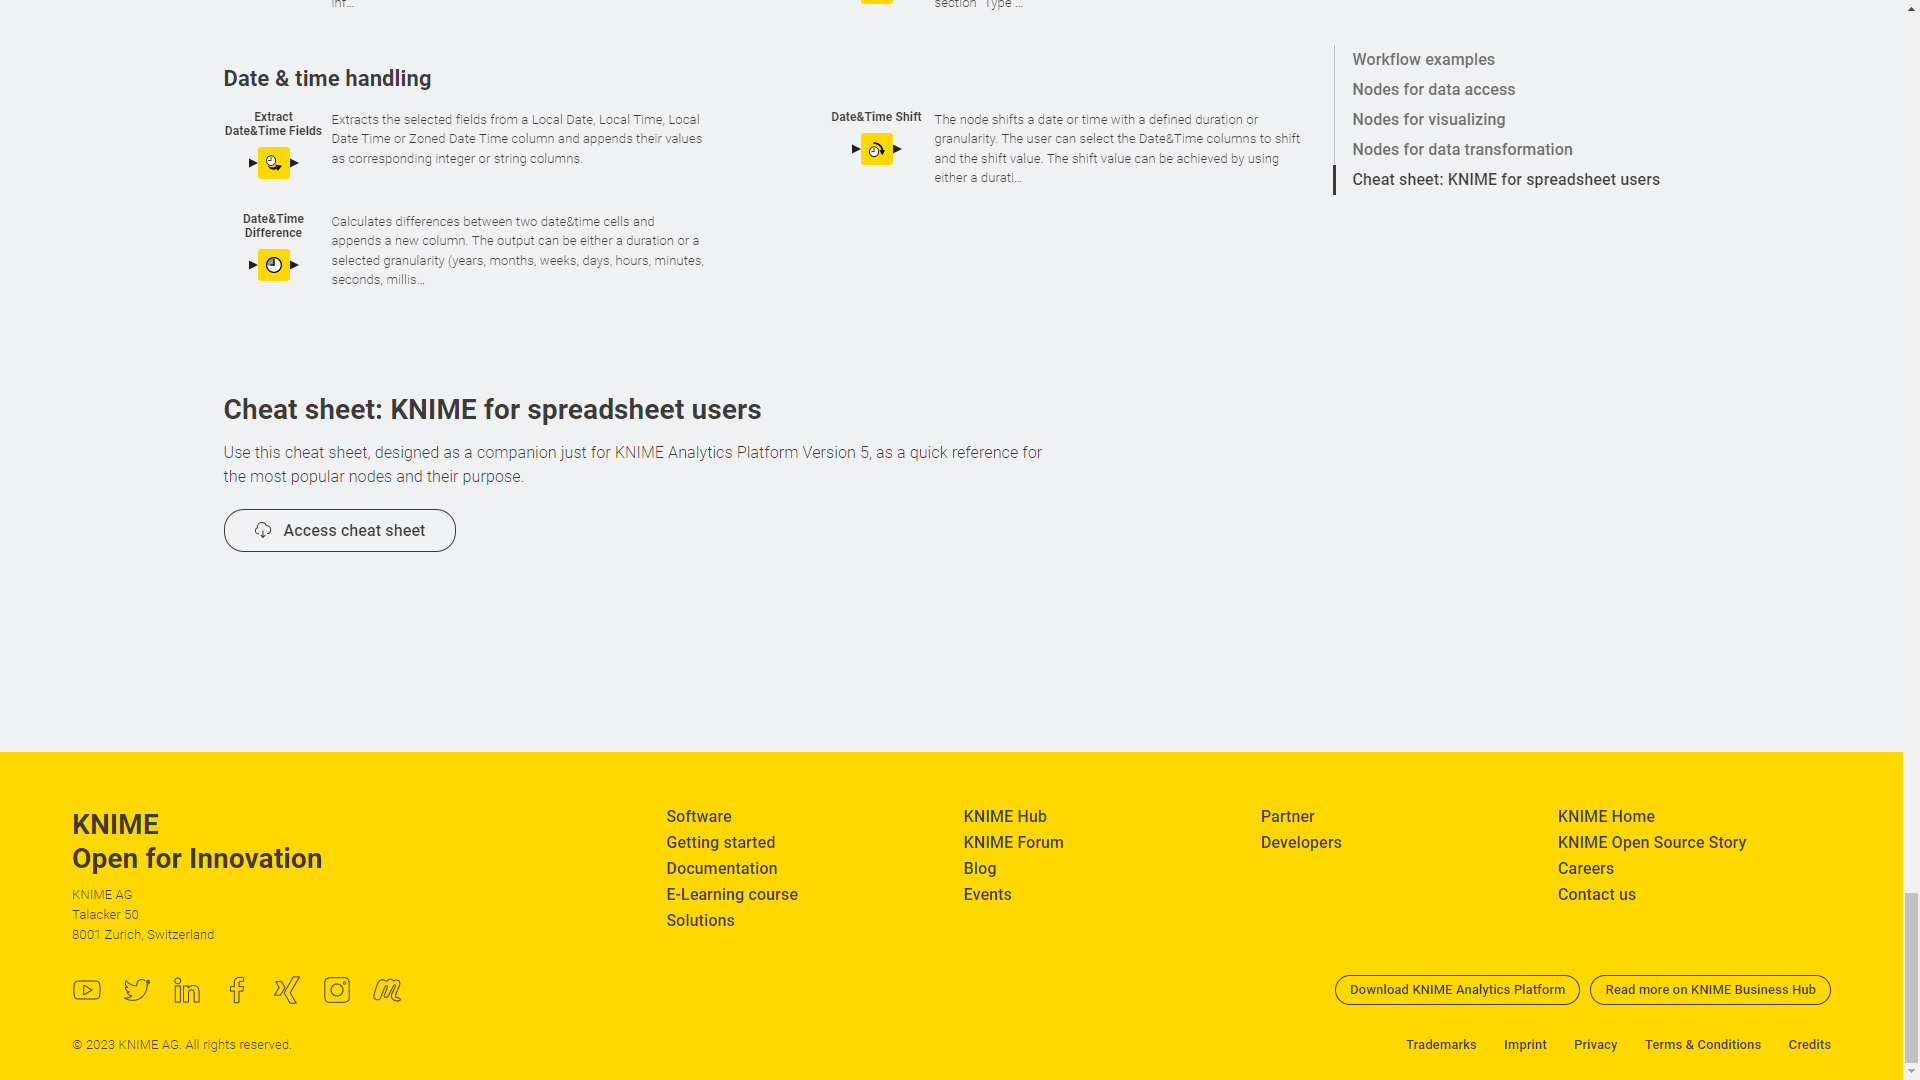 Figure 8. Additional links in a collection on KNIME Hub
Drag & drop
You can drag & drop nodes, components, extensions, and workflows from KNIME Hub to import them into KNIME Analytics Platform and use them right away to build your own workflow, install KNIME Extensions, and execute uploaded workflow into your local installation.
-
Node and components: You can drag & drop a node or a component from KNIME Hub into your Workflow Editor in KNIME Analytics Platform. In case the node is part of an Extension that is not yet installed into your local installation of KNIME Analytics Platform or in case nodes that are part of extensions that are not yet installed are contained in the component, you will be asked if you want KNIME Analytics Platform to search and install the missing extension(s), as shown in Figure 9.
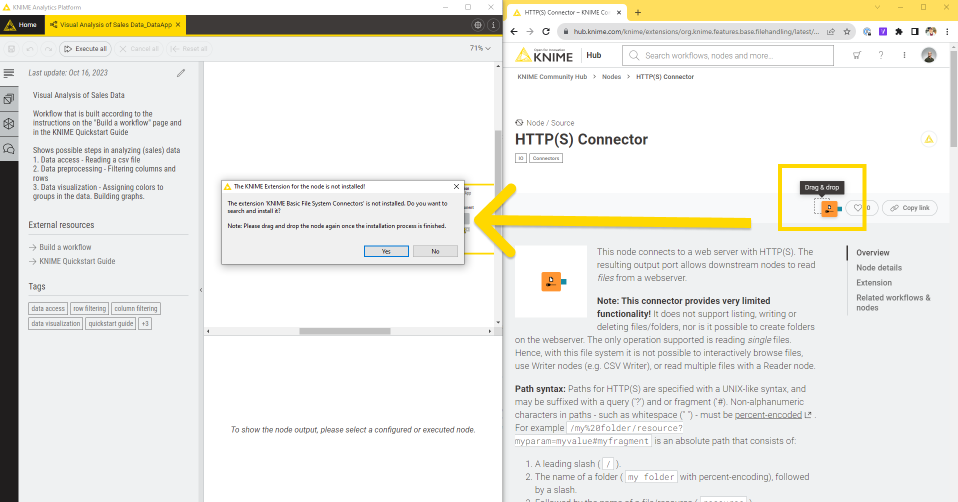 Figure 9. Drag & drop a node from KNIME Hub to KNIME Analytics Platform and install missing extension
 -
Extensions: You can drag & drop a specific extension into the Workflow Editor. KNIME Analytics Platform will search and install it. In order to be able to install the extension the extension’s update site that is indicated at the end of the extension page in the section Legal & update site must be activated in KNIME Analytics Platform.
KNIME Hub as a repository
Not only does KNIME Community Hub serve as a repository for nodes, components, workflows, and extensions, ready to use in KNIME Analytics Platform via an easy drag & drop, but you can also use KNIME Community Hub to share your workflows with the KNIME Community or to store and organize your material in a private space.
Create a user account
First, if you do not have one already, create a KNIME user account. It will grant you access not only to KNIME Hub but also to other KNIME products, such as the KNIME Community Forum.
Go to KNIME Hub, and in the top right corner of the page, click Sign in. Then select Create account. Fill in the required information and click Create account.
After confirming the link sent to your email address, you can sign in with your account. Click the user icon in the top right corner of KNIME Hub and select Profile from the menu to have access to your profile page. Here you can have an overview of the workflows and components you published, the extensions you published in case you have developed any of those, and the likes received. Also, you will have a list of the items you liked on KNIME Hub.
KNIME Hub spaces
From your profile page or by clicking your profile icon and selecting Spaces, you will have access to the KNIME Hub spaces that are linked to your user account. A space is a KNIME Hub repository where you can store and share your workflows and components. When you register and sign in to KNIME Hub, two spaces will be automatically created. These are a private space and a public space, which have different access permissions. You can manage your spaces by changing their names or adding a description to them.
You can upload your items from KNIME Analytics Platform to the spaces you have access to. Moreover, you can create new spaces, both private and public. Finally, you can add contributors to your public spaces. All these functionalities will be explained in the following paragraphs.
Access permissions of spaces
You are the owner of your spaces. Each space is linked and assigned to a specific user.
Spaces can be private or public:
-
A private space is only accessible and manageable through your user account. Here, you can store various types of items like workflows, components, or data.
-
A public space, instead, is visible to the entire KNIME Community, where you can share your workflows and components. Everyone will then be able to download them, drag & drop them to their KNIME Analytics Platform and use it, as well as like your spaces or items, or copy a link to your space and share it with others.
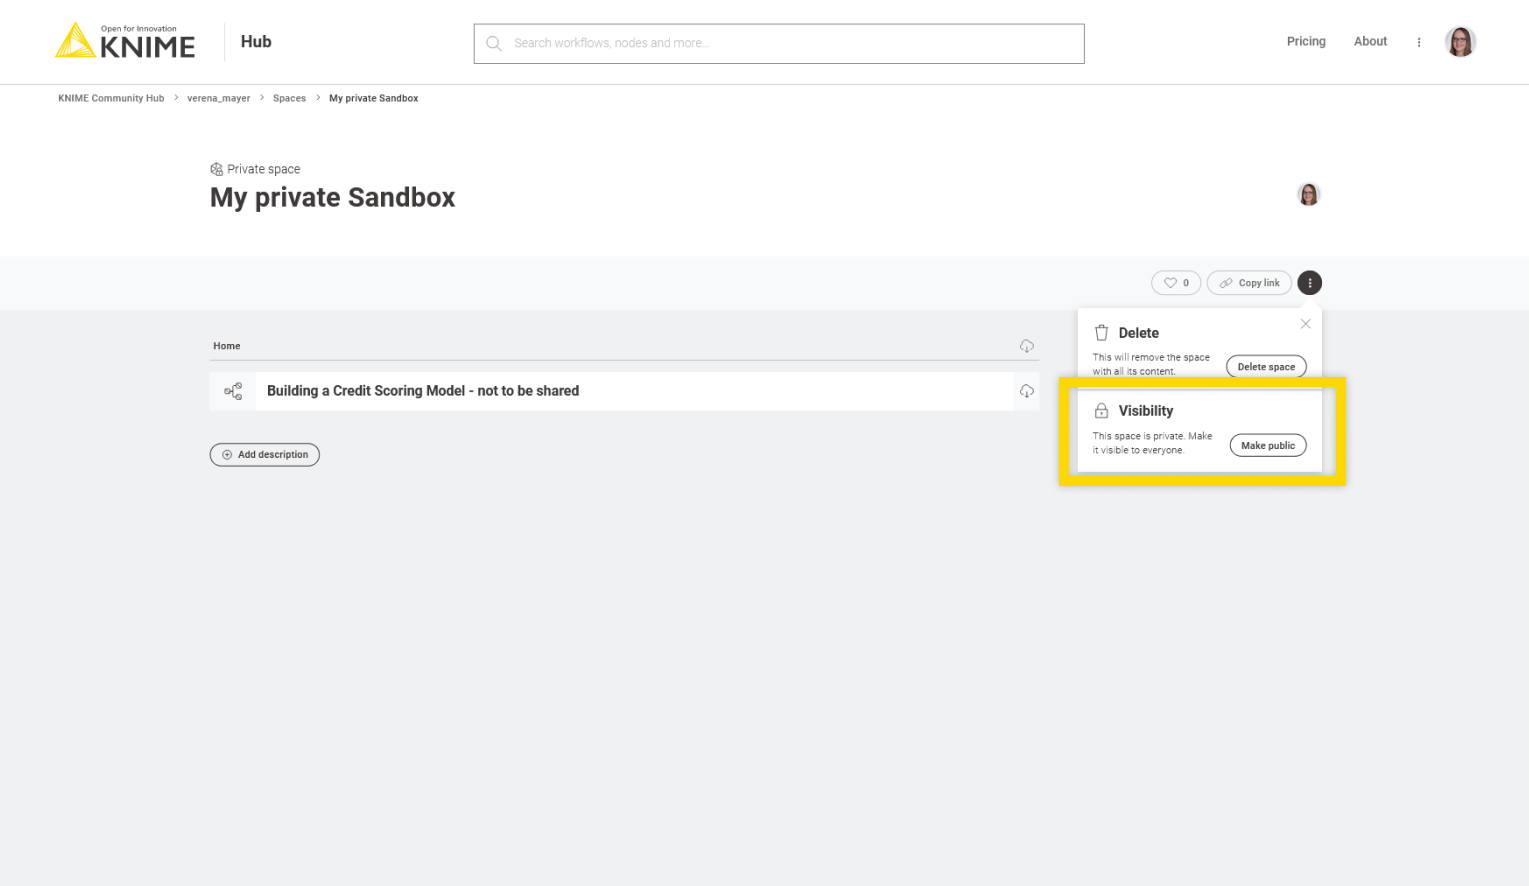
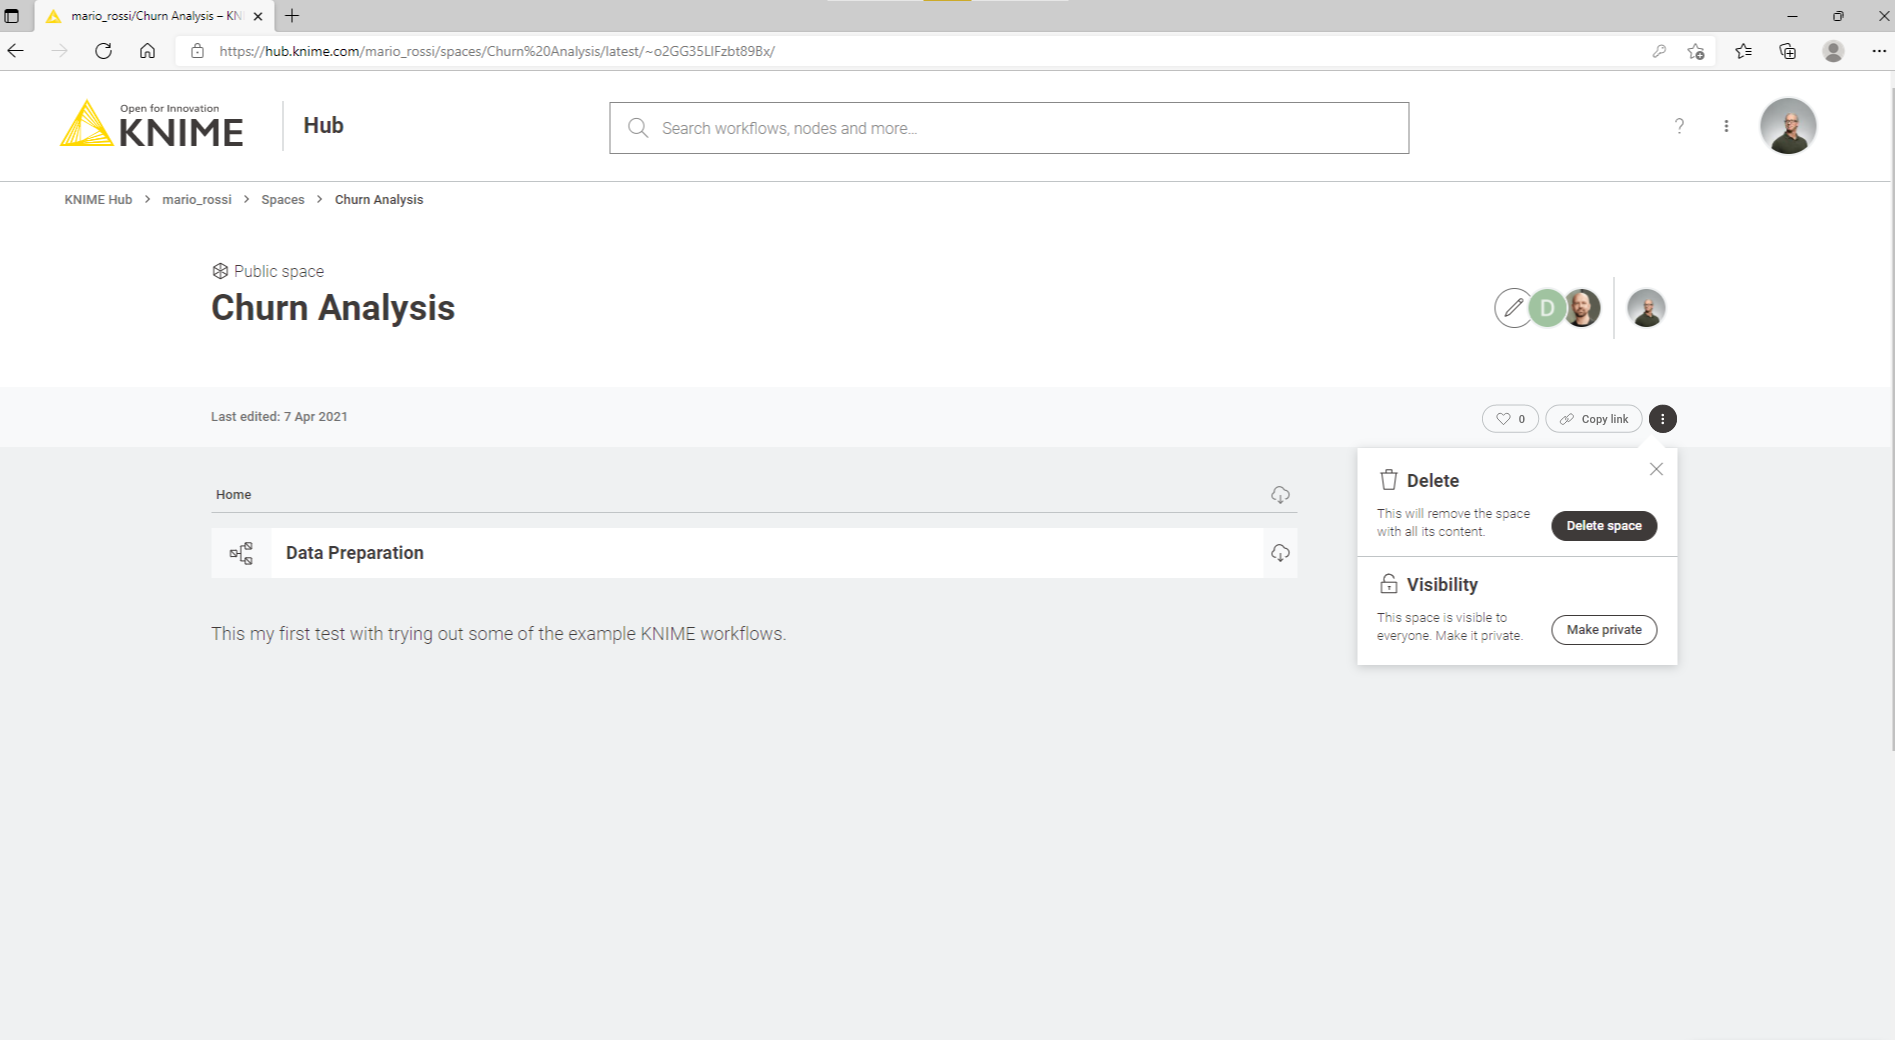
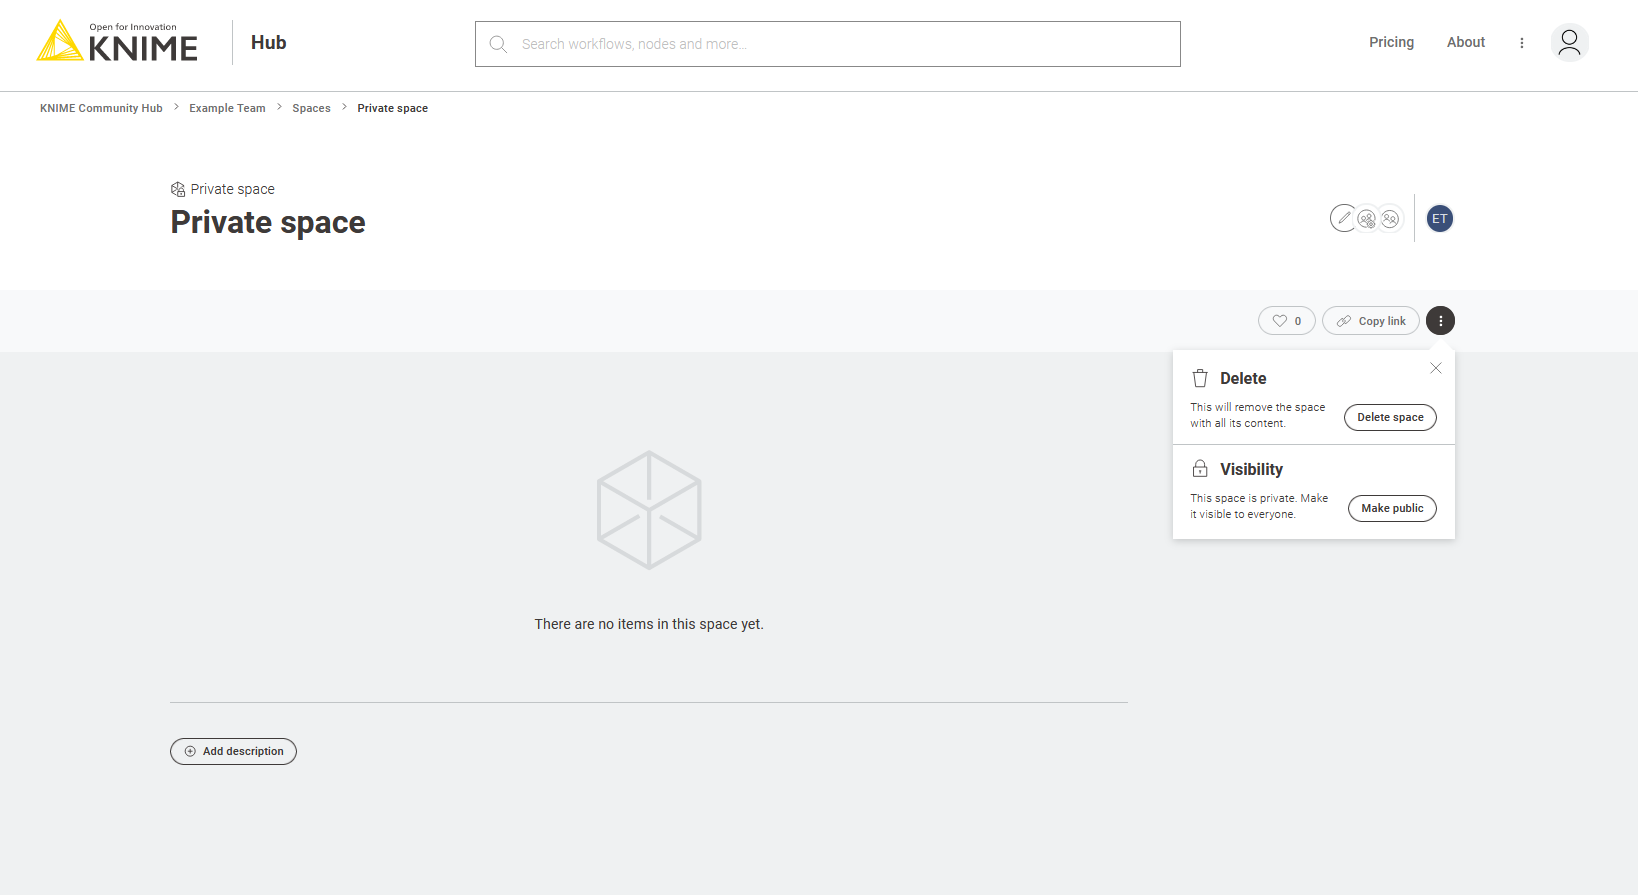
It is also possible to switch a space from private to public and vice versa.
To do so, go to the private space you want to make public, click the ![]() icon
on the top right part of the page, and under Visibility, select Make public (or vice versa, select Make private), as shown in Figure 10.
icon
on the top right part of the page, and under Visibility, select Make public (or vice versa, select Make private), as shown in Figure 10.
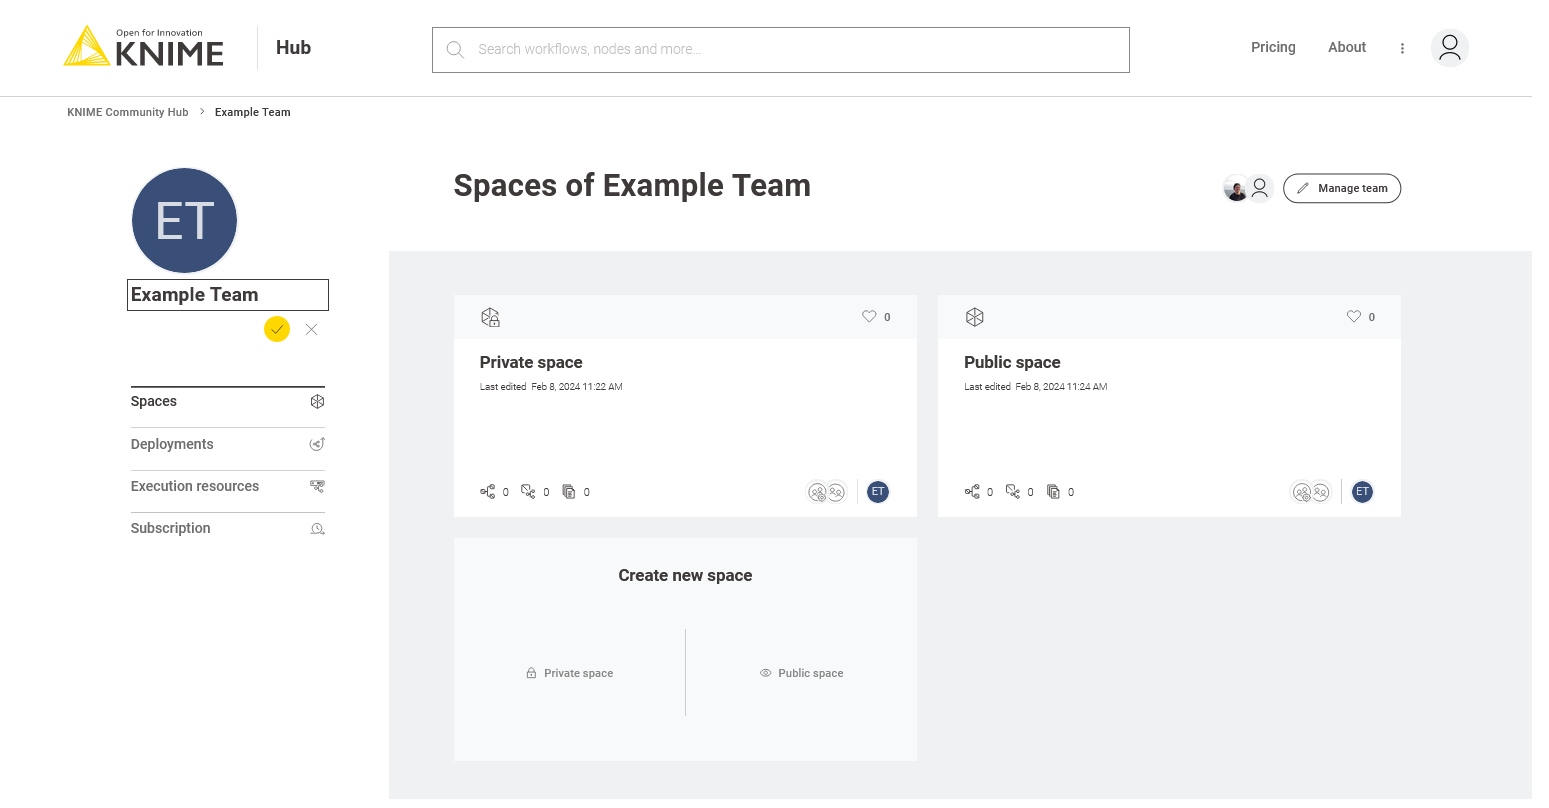
Manage your spaces
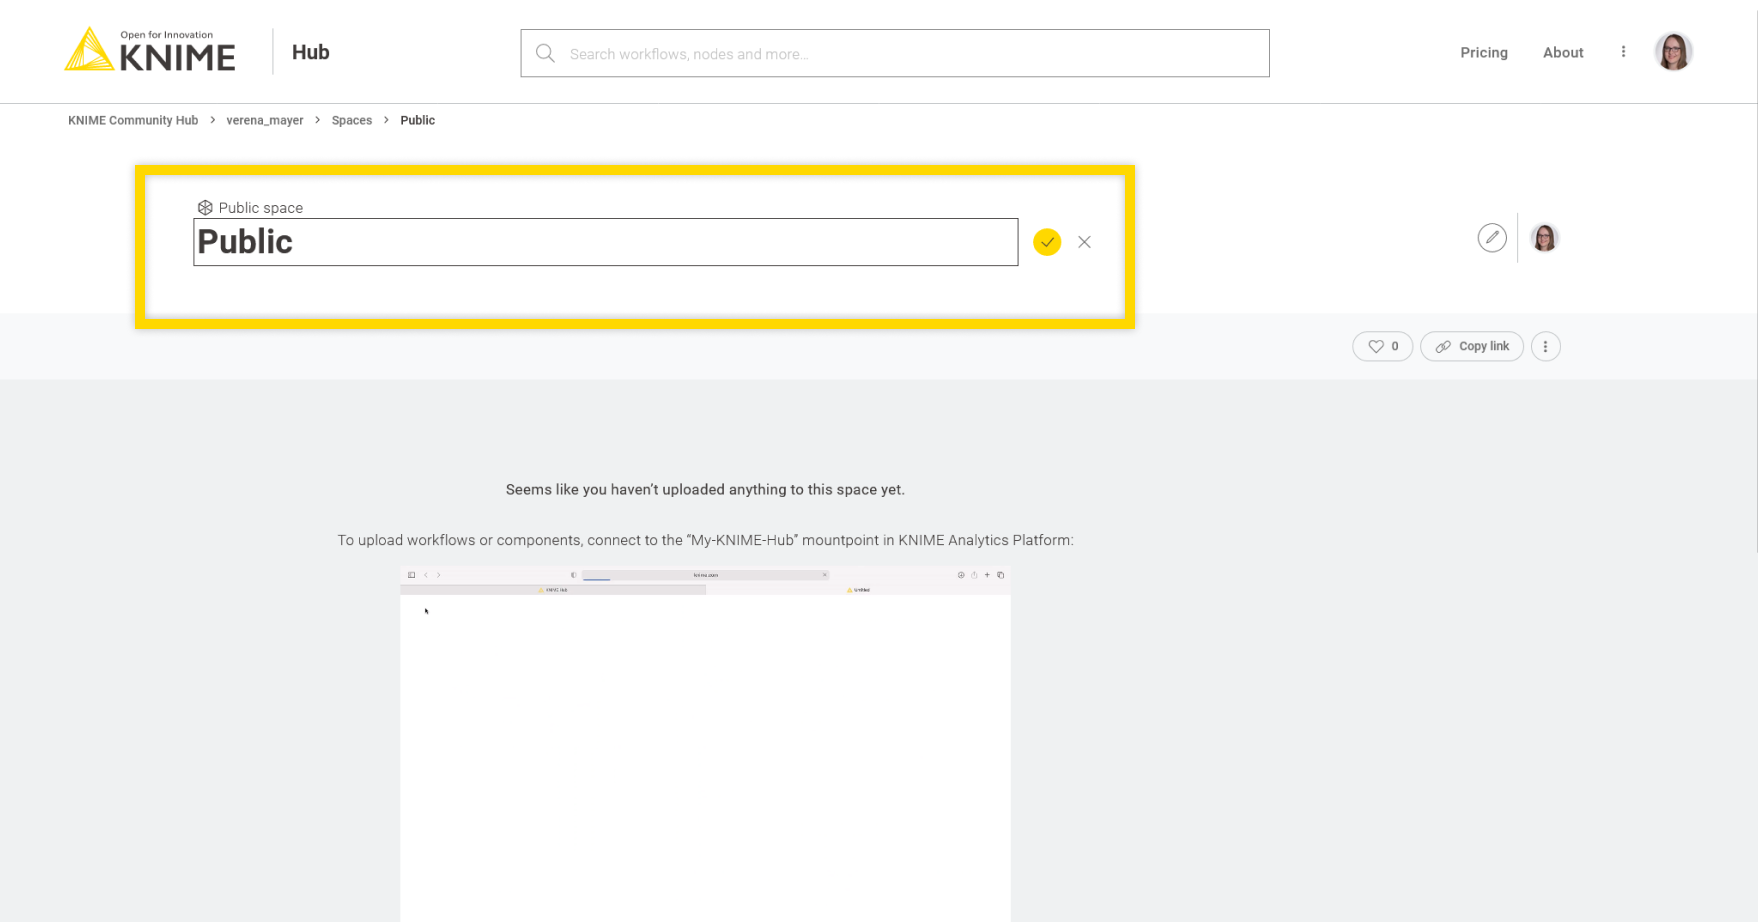
You can manage your spaces at any point in time by going back to the space page.
You can change the space’s name by going to the space page and clicking the title.
Insert the new name in the title field and click the ![]() button or press Enter
to save.
Click the
button or press Enter
to save.
Click the ![]() button instead to discard your changes.
button instead to discard your changes.
You can also add a description to your space by clicking Add description at the bottom
of the space page.
Again, click the yellow tick button or press Enter to save your changes, or the ![]() button to
discard them.
button to
discard them.
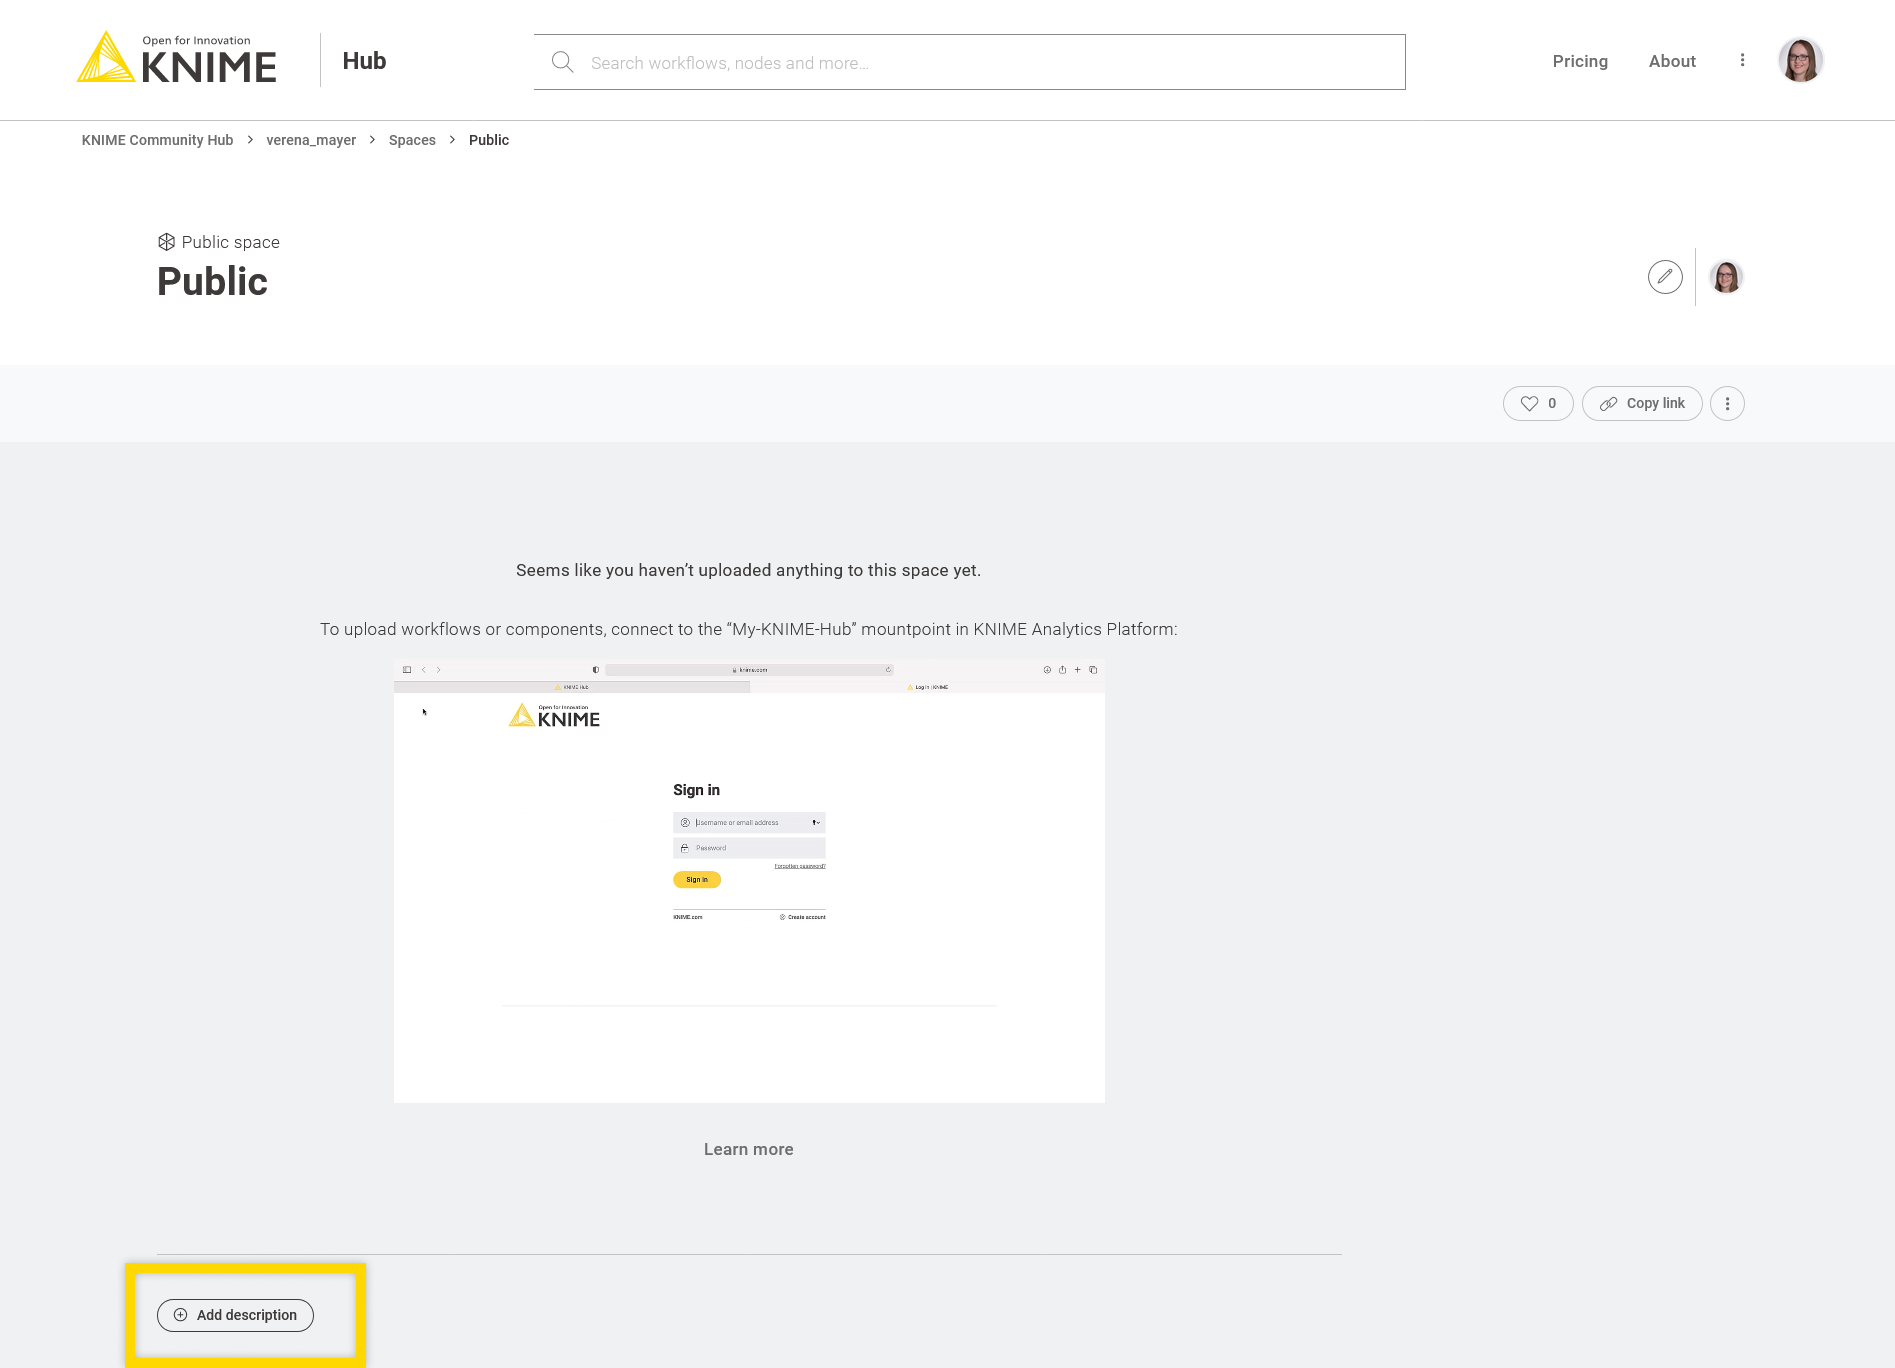
The description will be shown in the overview of your spaces in the corresponding space tile.
Create a new space
You can create a space from your profile’s spaces overview. Here, the spaces you have access to are shown, ordered by the latest update. Go to the last tile Create new space, and select if you want to create a Private space or a Public space. You can choose a name for the space, and the space will be created.
Delete a space
To delete a space, you can go to the space page, click the ![]() icon on the top right
and select Delete space. You will be asked to insert the name of the space.
icon on the top right
and select Delete space. You will be asked to insert the name of the space.
Connect to KNIME Hub
You can access KNIME Hub from the KNIME Hub mount point and upload your workflows and components directly from your local KNIME Analytics Platform instance to KNIME Hub.
KNIME Hub mount point
You can connect to your KNIME Hub account on KNIME Analytics Platform.
To do so, go to the Home page of KNIME Analytics Platform and sign in to KNIME Community Hub.
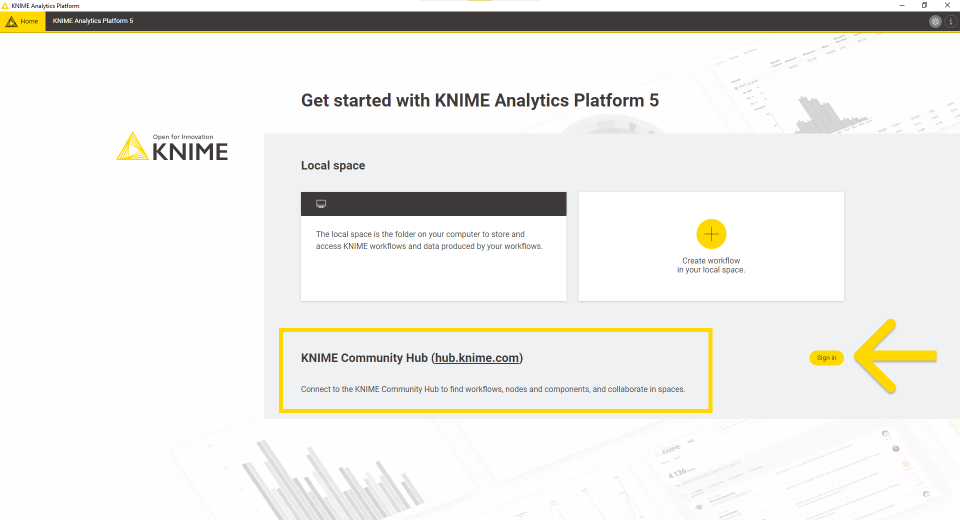
You will be redirected to the sign-in page if you are not connected in the current session already.
Once you are signed in, you will see all your spaces.
Click on a space to access the items within the space. You can perform different types of operations on them:
-
Upload items to your KNIME Hub spaces, download, duplicate, move, delete, or rename your items. More information about this functionality is provided in the next section.
-
Open workflows as local copies or on KNIME Hub. You can find the respective buttons in the toolbar on top.
-
Create folders to organize your items in the space. Click the Create folder button in the toolbar on top.
Upload items
Once you are connected to your KNIME Hub account from KNIME Analytics Platform, you can upload the desired items to your KNIME Hub spaces.
You can upload workflows or components to any of your spaces by right-clicking the item from the space explorer and selecting Upload from the context menu. A window will open where you will be able to select the location where you want to upload your workflow or component.
| Items that are uploaded to a public space will be available to everyone. Hence, be very careful with the data and information (e.g., credentials) you share. |
Version items
When uploading items to a space on KNIME Hub, you will be able to keep track of their changes. Your workflow or component will be saved as a draft until a version is created.
When you create versions of the items, you can then go back to a specific saved version at any point in time in the future to download the item in that specific version.
Once a version of the item is created, new changes to the item will show up as draft.
Create a version of an item
Go to the item you want to create a version of by navigating through KNIME Hub and click Versions.
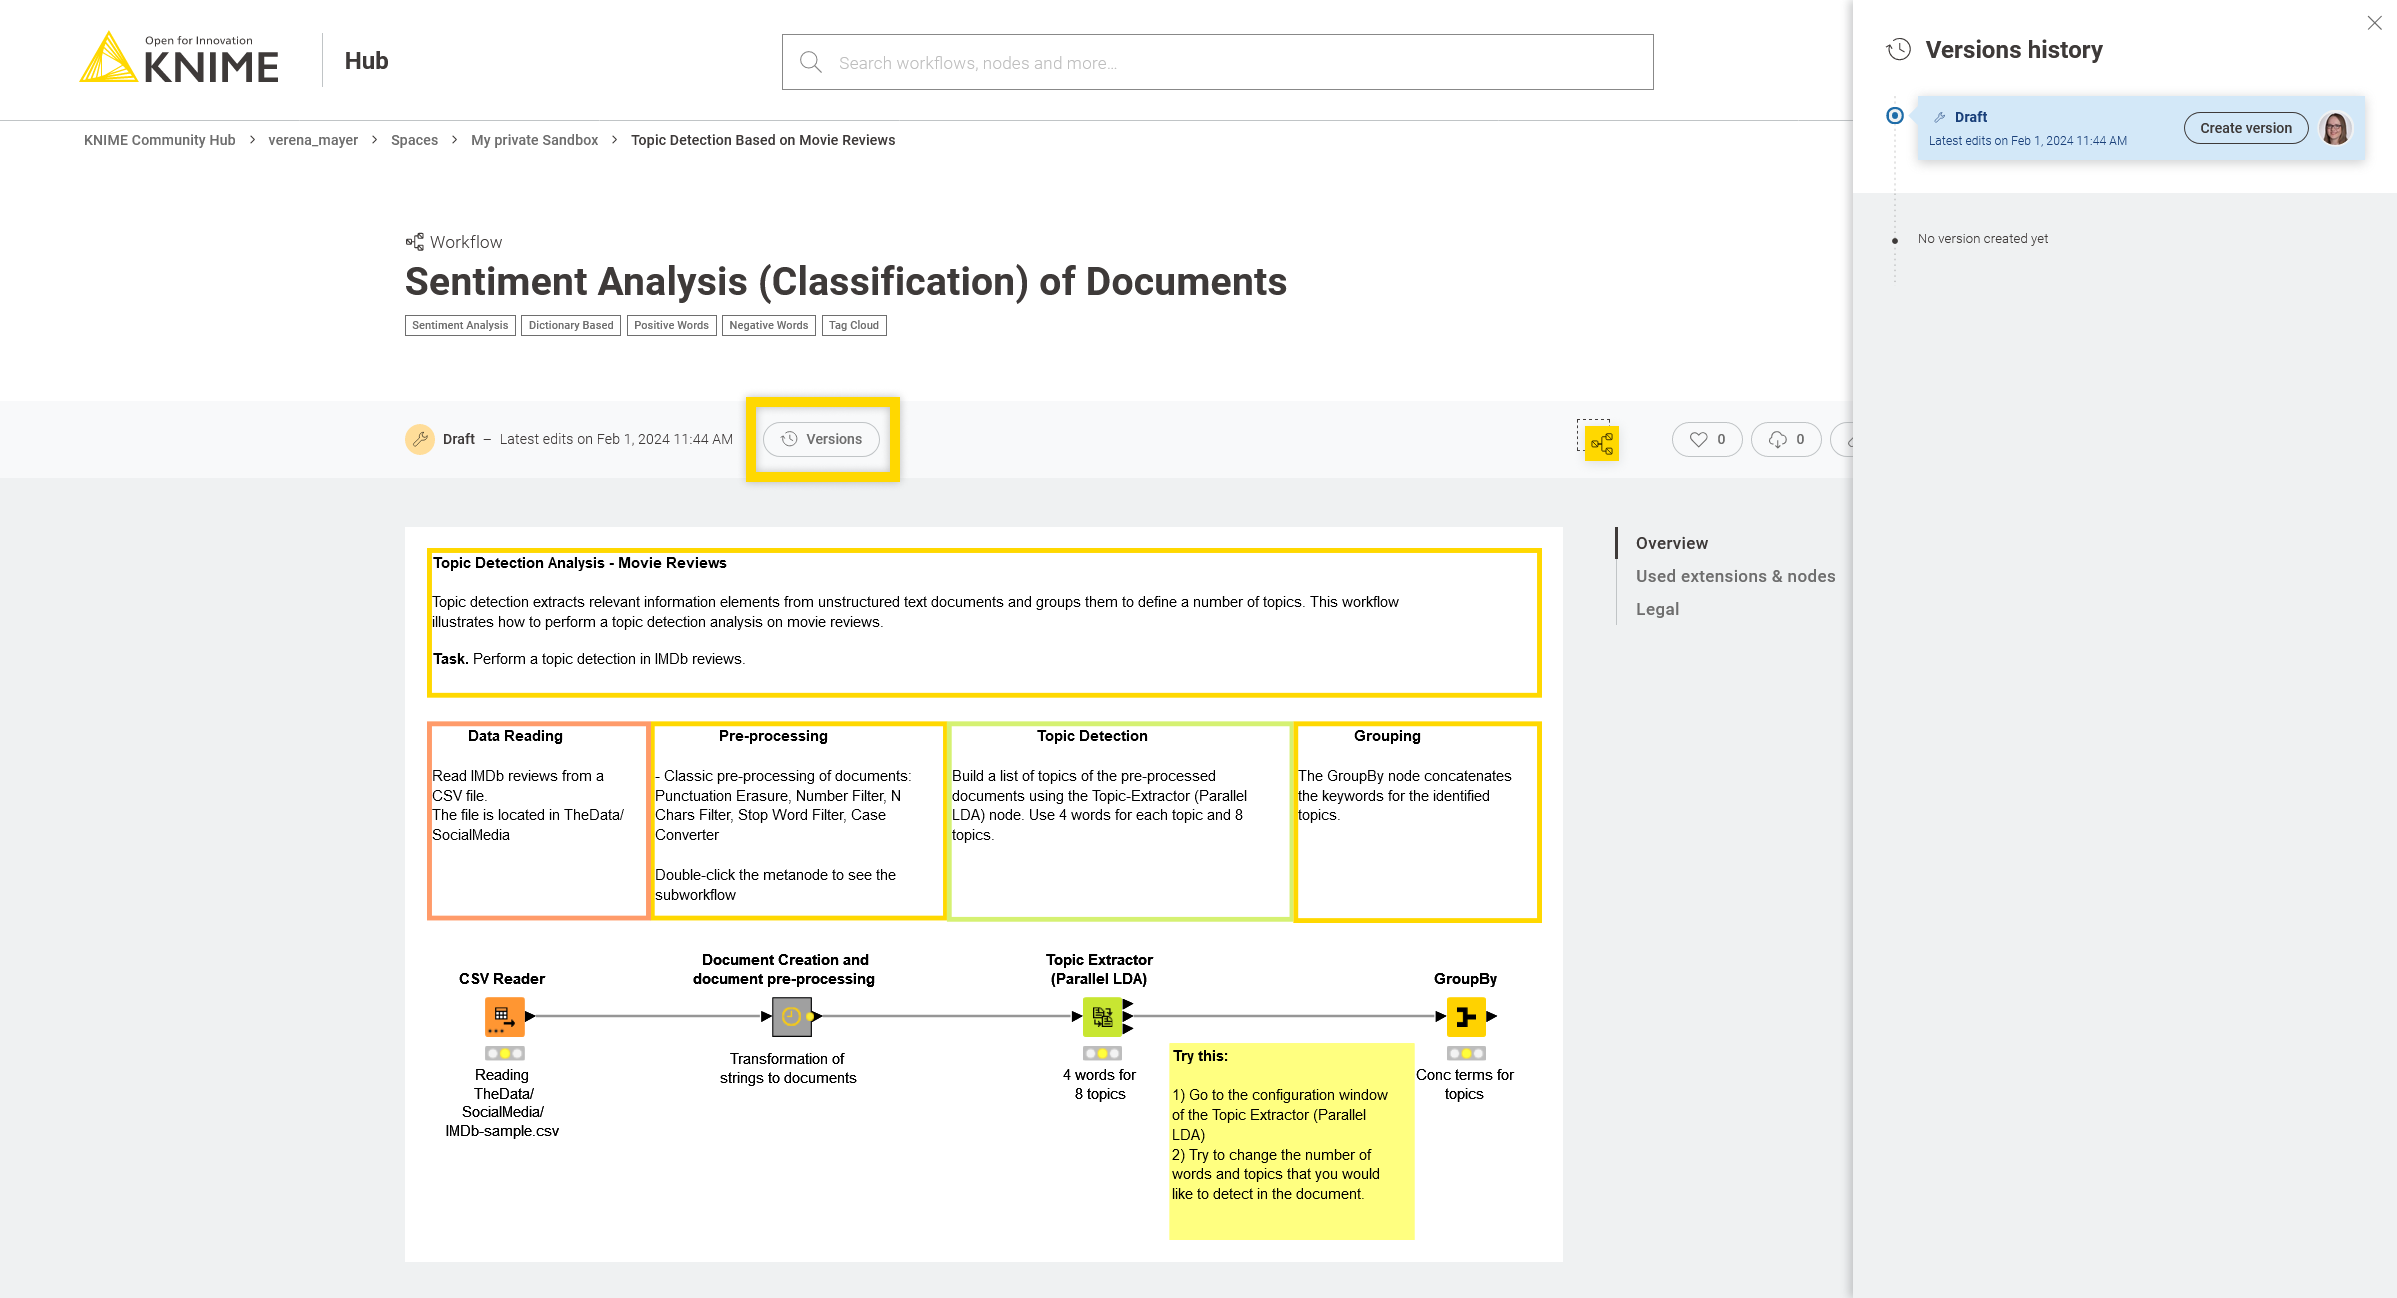
A panel on the right opens where you can see all the versions already created and all the unversioned changes of the item since the last version was created.
Click Create version to create a new version. You can then give the version a name and add a description.
Show a version
In the Versions history panel, click the version you want to see, or click the ![]() icon and select Show this version.
You will be redirected to the item in that specific version.
icon and select Show this version.
You will be redirected to the item in that specific version.
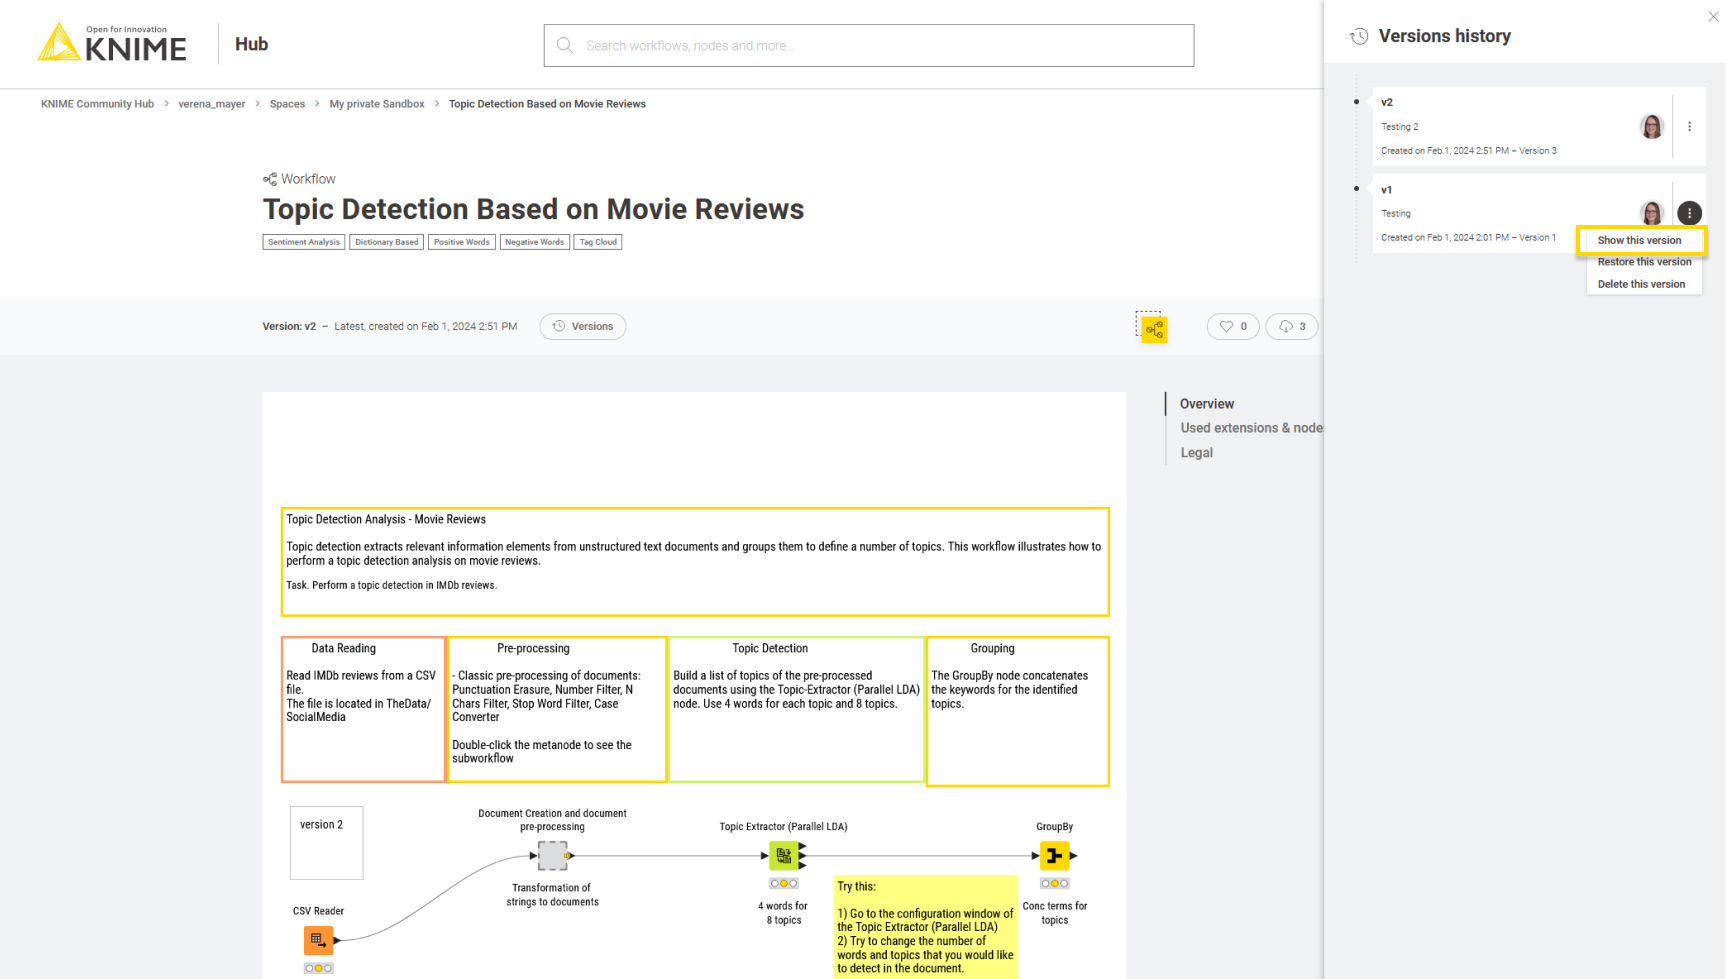
To go back to the latest state of the item, click the selected version to unselect it.
Restore a version
To restore a version that you created, click the ![]() icon in the version tile from the item history and select Restore this version.
icon in the version tile from the item history and select Restore this version.
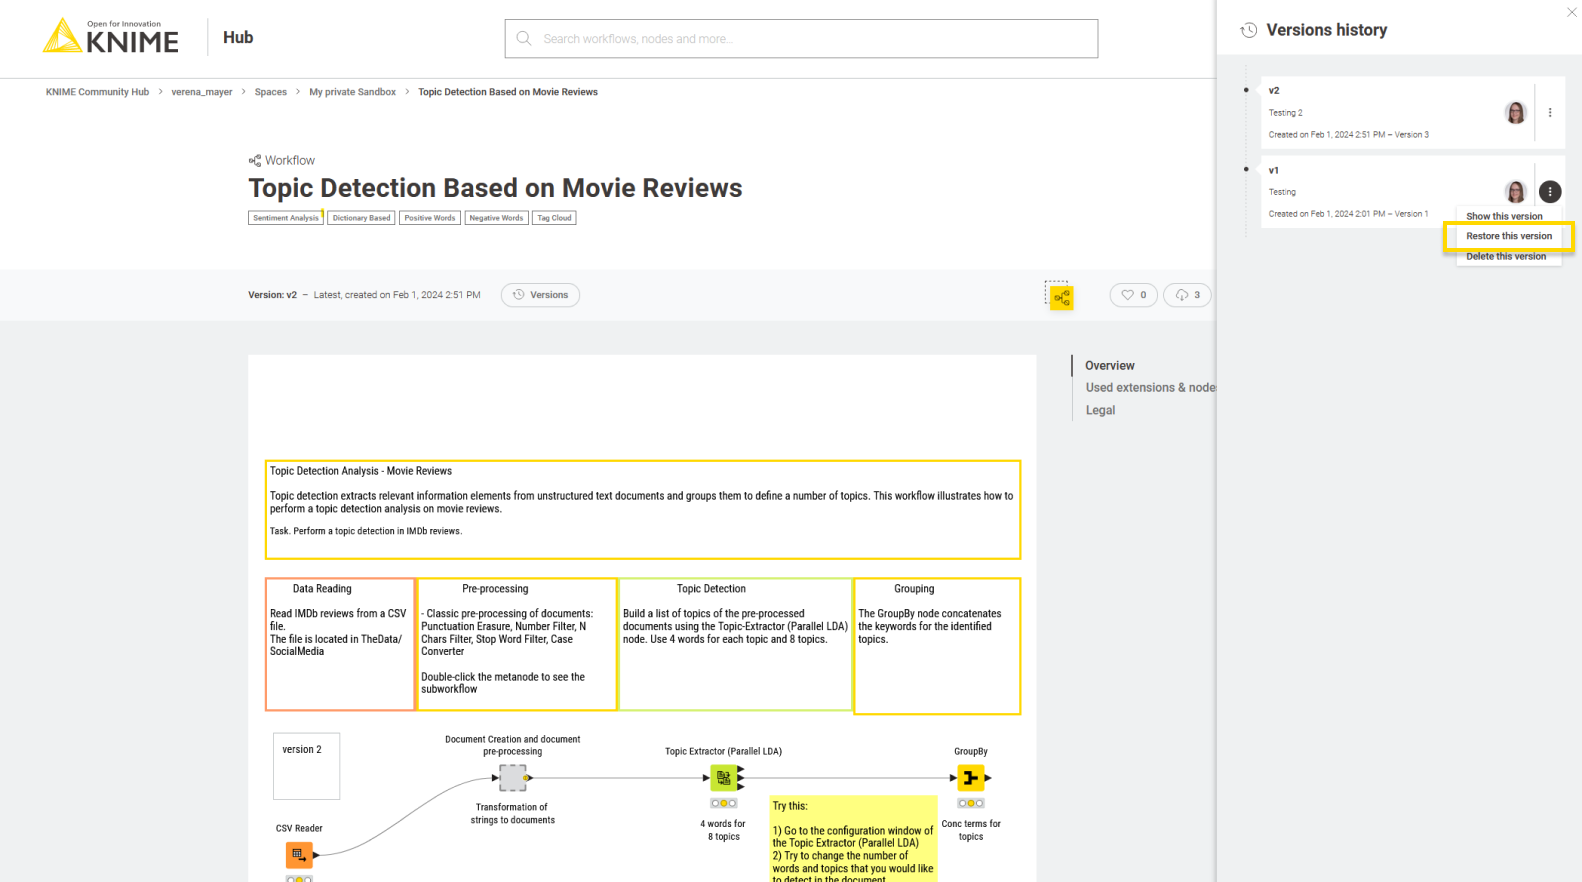
The version will be restored as a draft.
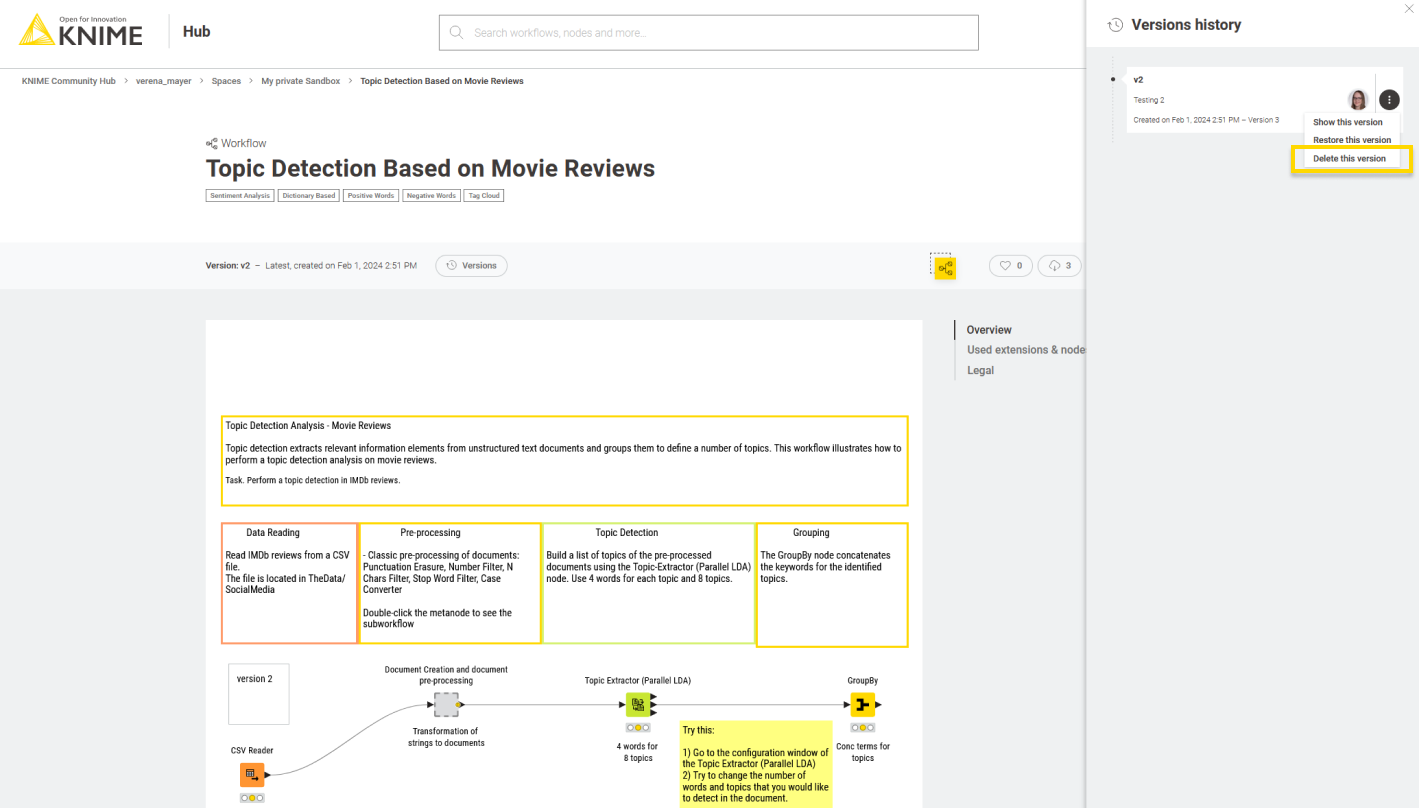
Delete a version
In the History panel, click the ![]() icon for the version you want to delete and click
Delete.
icon for the version you want to delete and click
Delete.
Move items
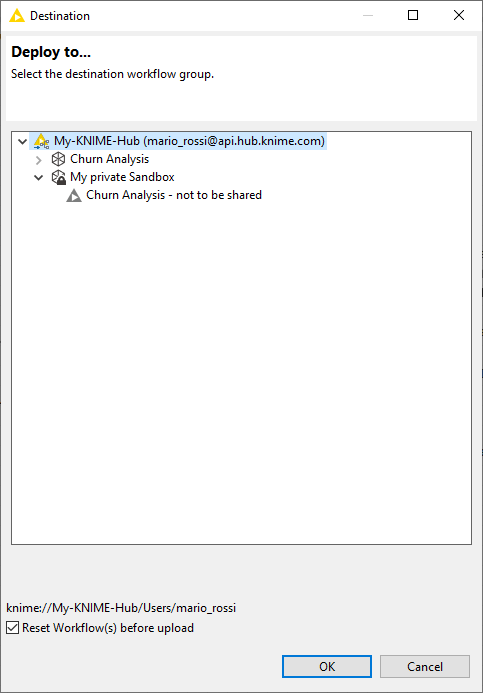
You can move items that you have uploaded to KNIME Hub to a new location within the space that contains the item, or to a different space that you have access to. To do this, you need to be connected to the KNIME Hub mount point on KNIME Analytics Platform. If you want to move items within the same space, drag the item in the space explorer, for example, to a subfolder. To move items from one space to another, right-click the item and select Move to. In the Destination window that opens, select the space to which you want to move the item to.
| These changes will automatically apply to the space on KNIME Hub. |
Delete items
You can also delete items that you uploaded to KNIME Hub. To do so, you can:
-
Connect to KNIME Hub mount point on KNIME Analytics Platform. Right-click the item you want to delete and select Delete… from the context menu
-
From KNIME Hub, sign in with your account and go to the item you want to delete. Click the
 icon on the top right of the page and select Delete workflow.
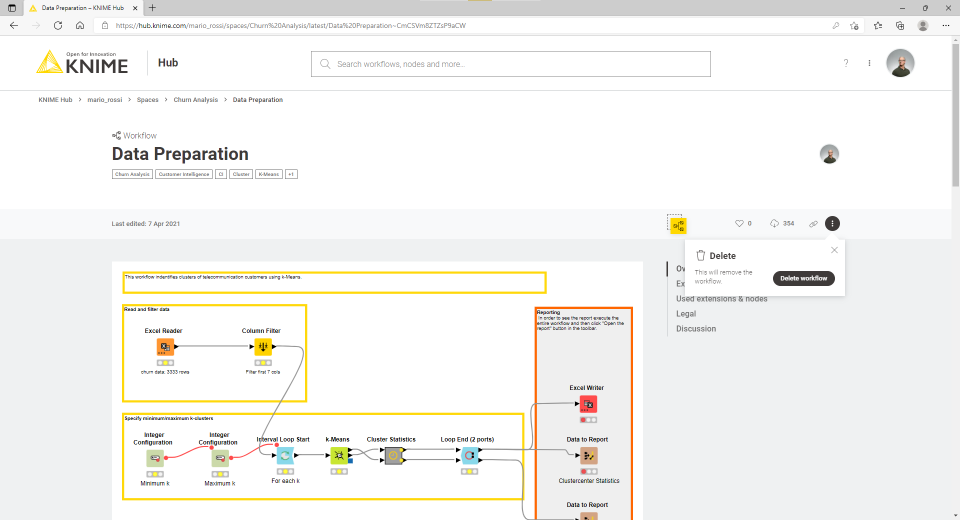 Figure 21. Delete a workflow from KNIME Hub
Community features on KNIME Hub
KNIME Community Hub is also the place where you can interact and collaborate with the KNIME Community.
Once you have created your profile and uploaded your items to your public spaces, you can share them with others, you can remain engaged in other people’s work by liking items. Finally, you can also add other users from the KNIME Community as contributors to your public spaces. They will be able to access your space from their KNIME Hub profile and from their KNIME Hub mount point on KNIME Analytics Platform, download, and upload workflows or components. Add contributors to your spaces to collaborate on a project and keep all workflows always accessible in one place.
Share links to items on KNIME Hub
Go to any workflow, component, space, extension, or node on KNIME Hub and click the Copy link button on the top right, as shown in Figure 22. You will copy to your clipboard a URL short link to the item that you can share with others.
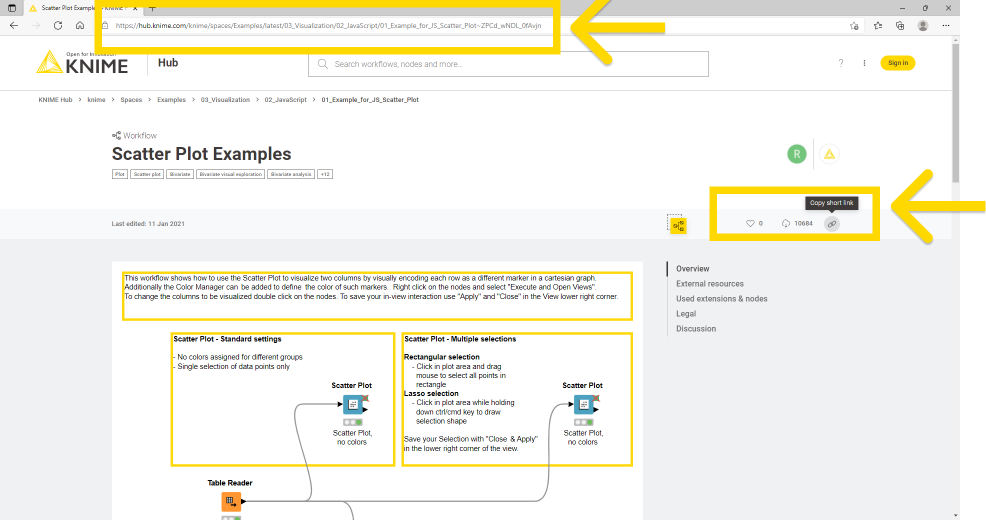
The short link is assigned uniquely to every item that is on KNIME Hub, regardless of its location. This means that even if the item is moved by its owner into a different space, the item will be reachable at the same short link.
The same rule is valid for the URL, which will be redirected to the new location automatically.
Like items on KNIME Hub
If you find an item on KNIME Hub that has been very useful for you or that you particularly like, you can leave a like by clicking the heart icon on the top right of the page. See how much the KNIME Community has been engaged in specific items by looking at the number of downloads and likes that a specific item has received, as shown in Figure 23.
All the items you liked will be shown on your user profile under About.
Contributors
You can add any other user of KNIME Community as a contributor to any of your public spaces.
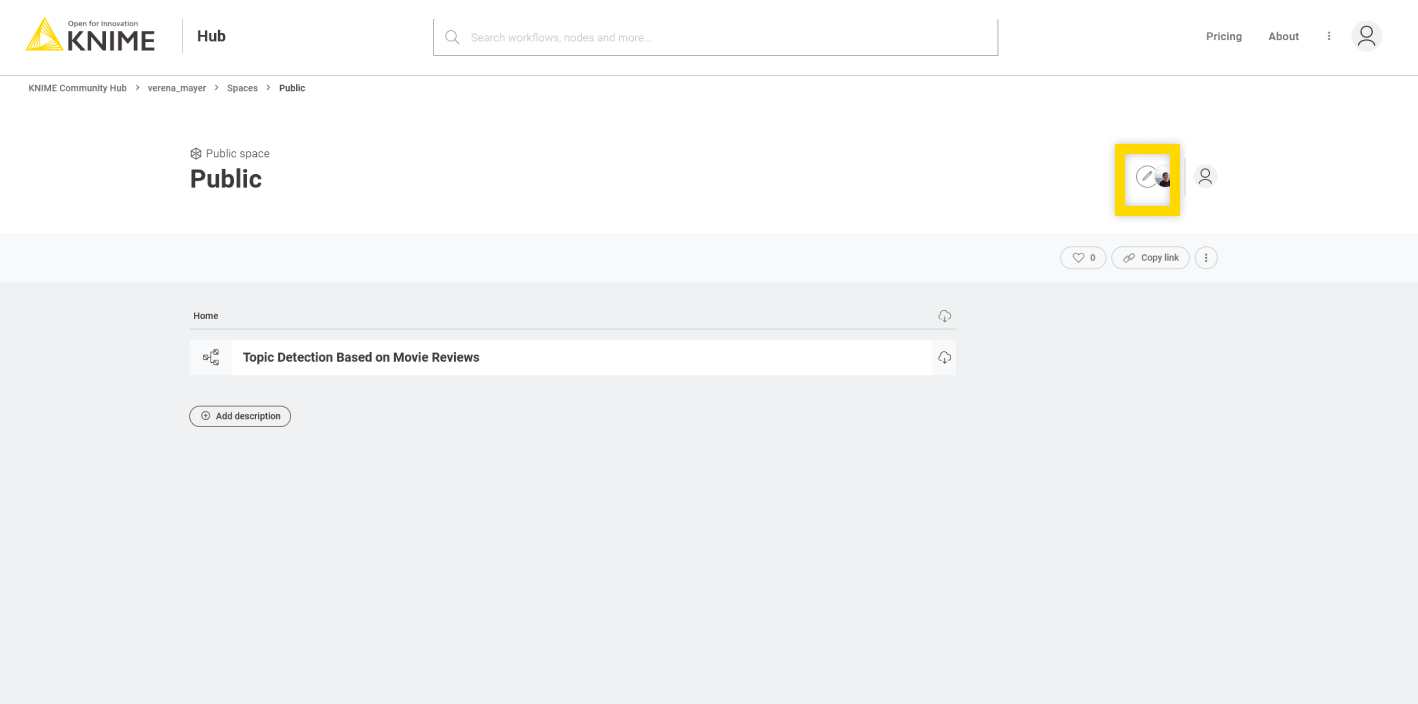
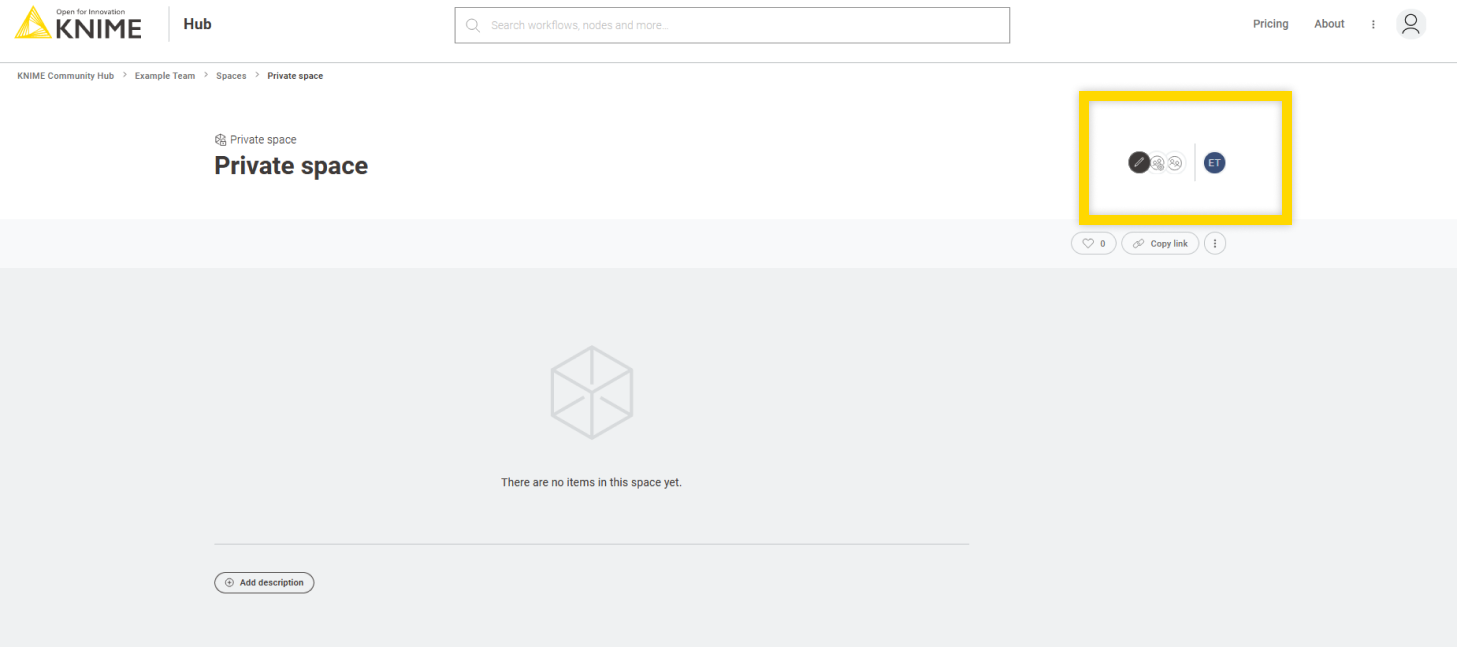
To add a user as a contributor to a public space, go to the space and click the pencil tool close to your profile icon.
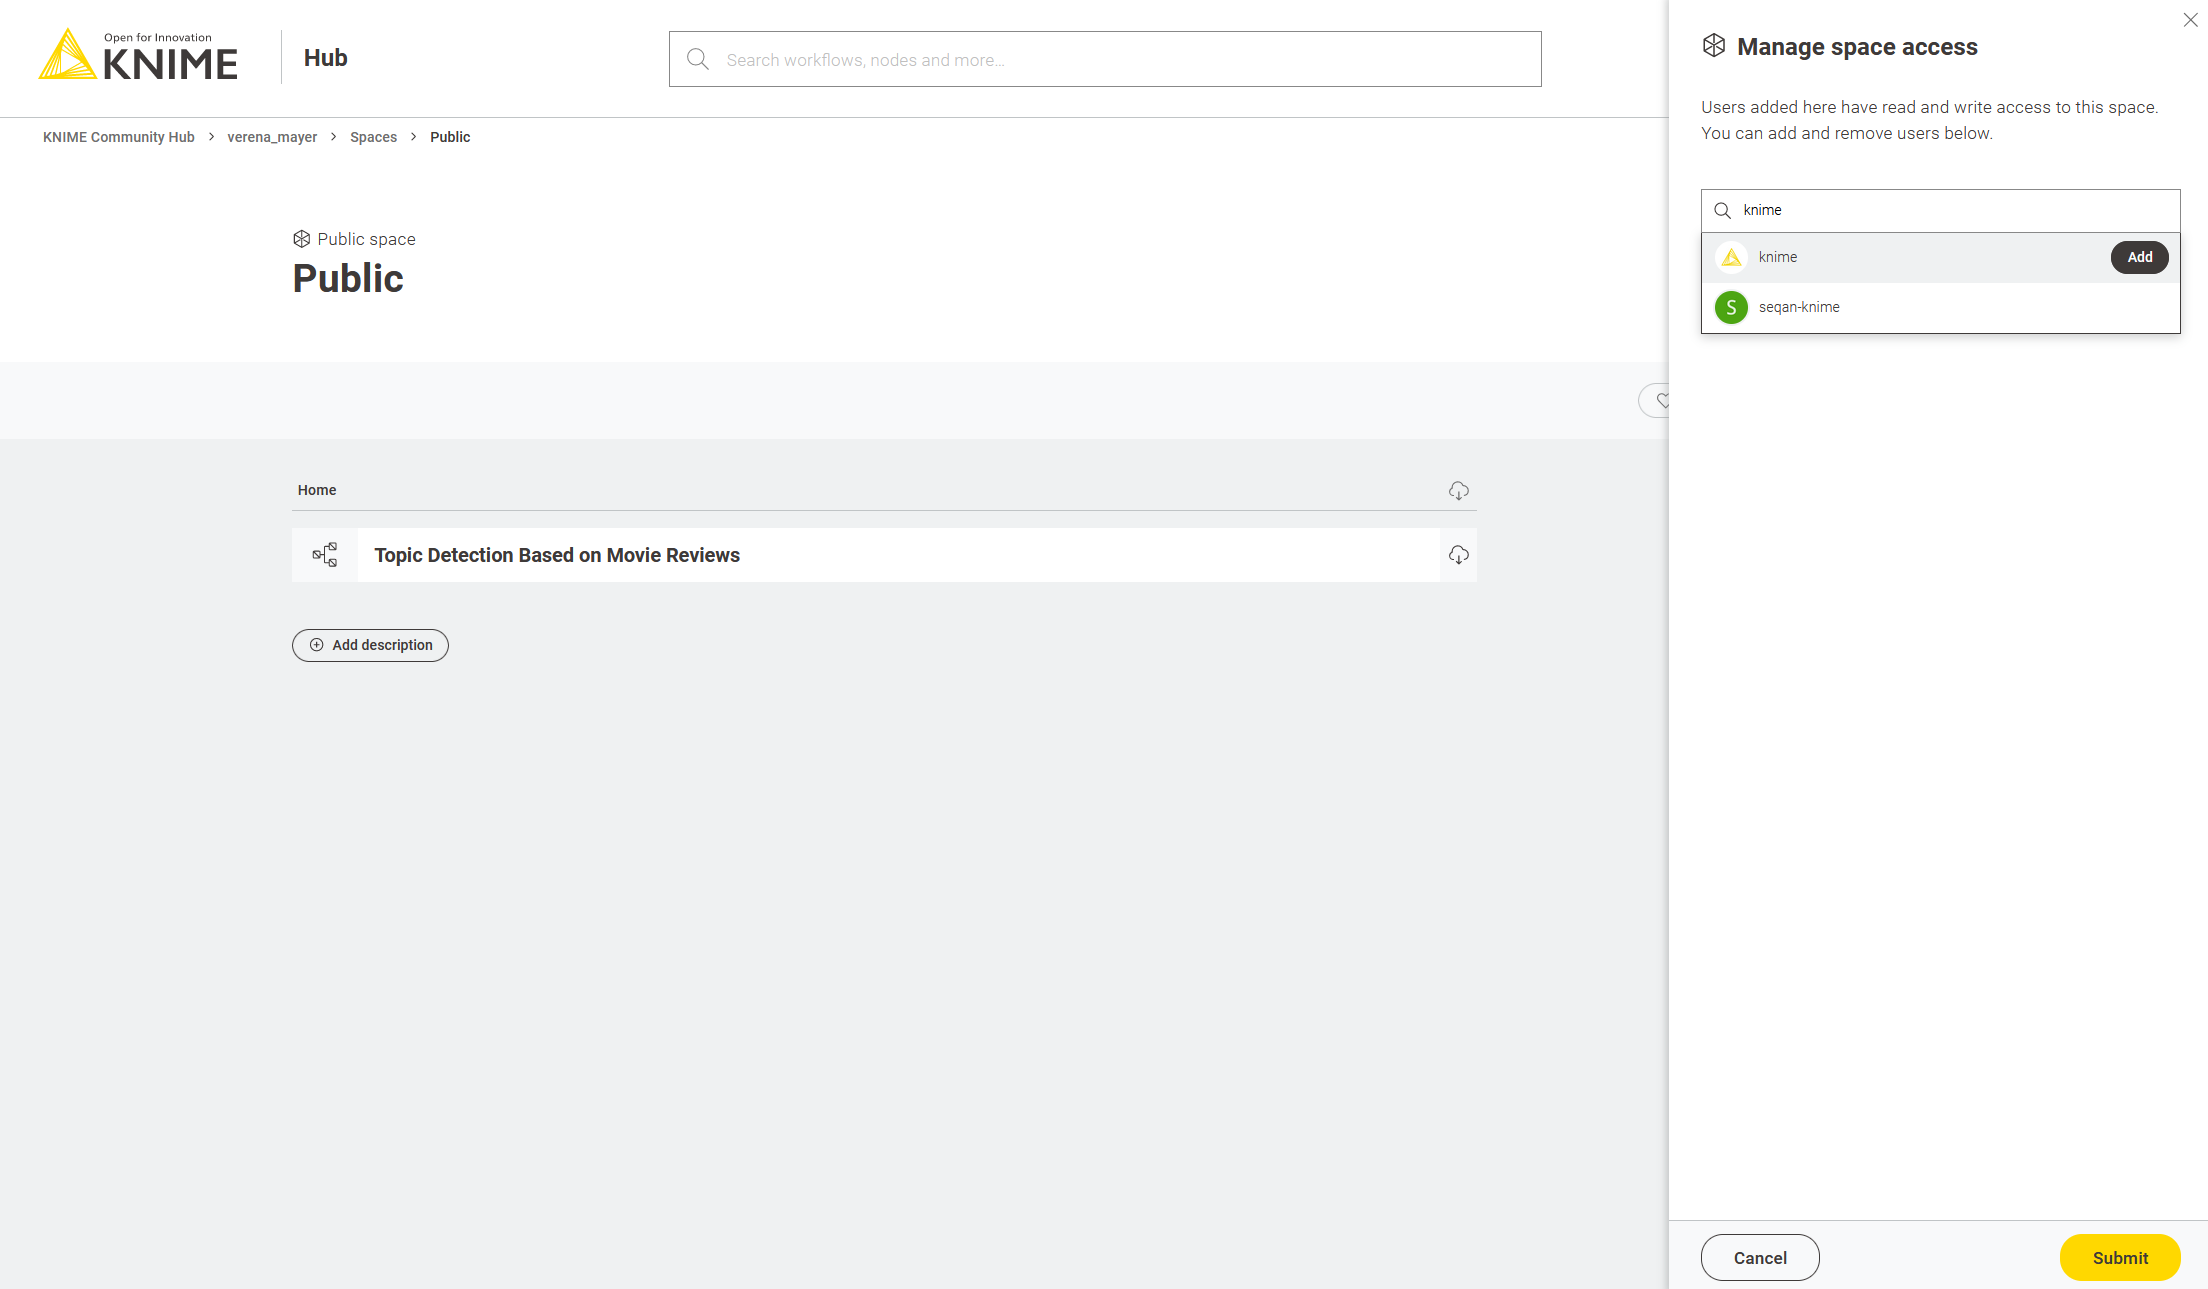
In the Manage space access panel that opens, you can add contributors by inserting their KNIME Hub username. Then click Add and Submit.
In the same panel, you can also manage the contributors. Click on the ![]() icon to
remove a contributor from the space.
icon to
remove a contributor from the space.
When you are added as a contributor to a space, you will be able to see the space under Spaces in your profile page and also listed in your KNIME Hub mount point from KNIME Analytics Platform.
Contributors have edit rights for the space they are added to. They can add and edit workflows or components in the space. They do not have the same rights that the owner of the space has. Only the owner of a space can change the space name or change the space visibility to private.
| Since contributors can only be added to public spaces, they will not have access to the space anymore if the space visibility is changed from public to private. |
Teams
Team plan is a paid service offered on KNIME Community Hub.
This allows you to create a team on KNIME Hub to collaborate on a project with your colleagues. Additionally, you can add execution capabilities to your team. This will allow the team members to schedule and automate the execution of workflows on KNIME Community Hub.
A team is a group of users that work together on shared projects. Specific Hub resources can be owned by a team (e.g., spaces and the contained workflows, files, or components) so that the team members will have access to these resources.
You can purchase a team and choose the size of the team, meaning the number of users that will be able to access the team resources, and the disk space that you need to save your team workflows, data, and components.
The team can own public or private spaces. For more details, see the section Team owned spaces.
The items that are stored in a team’s public space will be accessible to everyone and be presented as search results when searching on KNIME Community Hub. However, only team members will have upload rights to the public spaces of the team.
Also, since only the team members have read access to the items that are stored in a team’s private space, KNIME Community Hub, users that are part of a team can collaborate privately on a project.
You can also add to your team the ability to run workflows and also to schedule the execution of the workflows at specific intervals, easily from the web user interface of KNIME Community Hub.
Create a team
To create a team, you need to subscribe to a Team plan. To do so, sign in with your KNIME Hub account and navigate to Pricing in the top right corner of the page, or go to KNIME Hub pricing page. Here you can proceed with the subscription to the Team plan.
| To subscribe to a Team plan, you need to have a KNIME user account. |
You will be asked to provide the details of the account and your payment information. Then, you can choose your subscription plan. You can choose how much disk storage and how many users you would like to purchase. The basic plan consists of 30GB of disk storage and a total of 3 users. Please note that the subscription will be automatically renewed every month if not canceled, and that users and disk storage can be adjusted later. Your usage will be prorated for the next billing cycle. To change or cancel your subscription, follow the instructions in the section Manage team subscription.
Once you have successfully purchased a team, you can assign it a name and start adding members to your team. The number of members that can be added to the team is limited to the number of users that you purchased.
There are two types of roles a user can be assigned when part of a team:
-
Administrator. A team administrator can:
-
Member. A team member can:
-
View the team page, with members list and spaces
-
The team creator is automatically assigned the administrator role and can promote any of the team members to administrators. In order to do so, please follow the instructions in the section Manage team members.
Team owned spaces
A team can own an unlimited number of both public and private spaces.
-
Team owned public spaces: The items that are stored in a team’s public space will be accessible by everyone and be presented as search results when searching on KNIME Community Hub. Only team members will have upload rights to the public spaces of the team.
-
Team owned private spaces: Only the team members have read access to the items that are stored in a team’s private space. This will then allow KNIME Community Hub users that are part of a team to collaborate privately on a project.
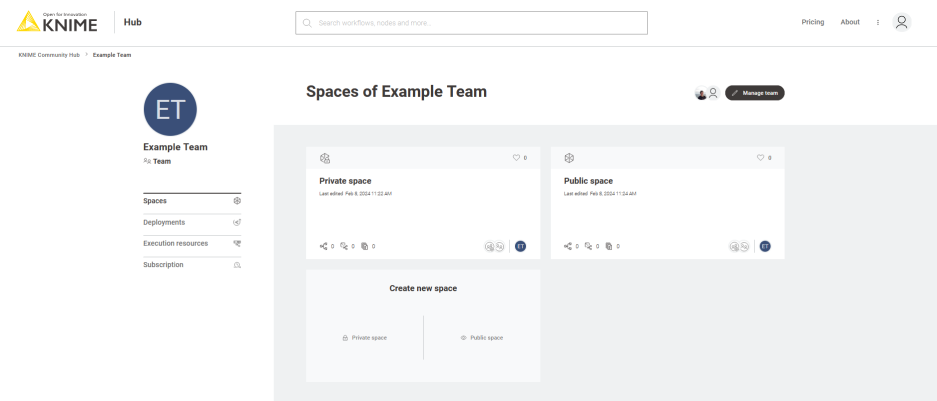
You can create a new space by going to the team’s profile. To do so, click your profile icon in the top right corner of KNIME Hub and select your team. In the tile Create new space, click Private space to create a private space for your team, or Public space to create a public space. You can then change the name of the space, or add a description. You can change or add these also later by going to the relative space page and clicking the space name or Add description button to add a description for the space.
Furthermore, you can change the visibility of the space from private to public and vice versa, or delete the space.
To do so, from the space page, click the ![]() icon, as shown in the image below.
icon, as shown in the image below.
Manage space access
You can also manage the access to a specific space. To do so, navigate to the space and click the ![]() icon.
icon.
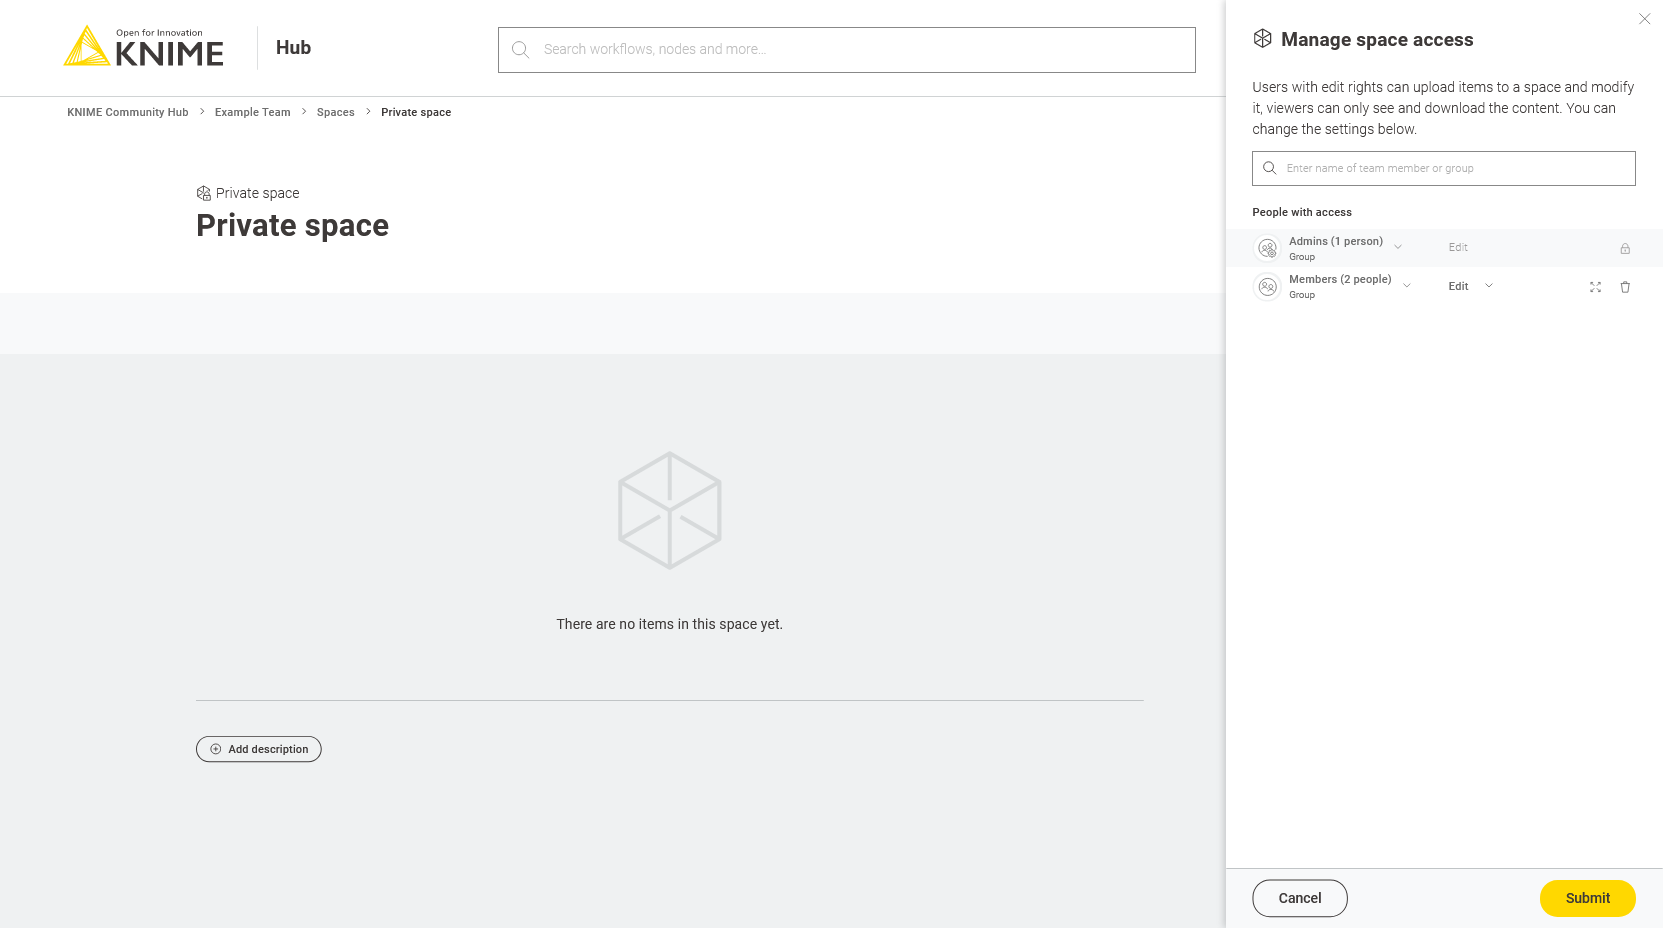
In the Manage space access side panel that opens, you can add other team members. You can change the rights they have on the items in the space - e.g. you can grant them Edit rights or View rights for this space.
Click the ![]() icon to inspect the individual team members and their rights separately.
icon to inspect the individual team members and their rights separately.
Manage team members
You can manage your team by going to the team’s profile. To do so, click your profile icon in the top right corner of KNIME Hub.
In the dropdown menu that opens, you will see your teams. Select the team you want to manage to go to the corresponding team’s profile page.
Here, you can click the Manage team button to open the Manage members side panel, as shown in the image below.

You will see here a list of the team members and their assigned roles.
From here, a team admin can change the roles of the team members. To do so, click the drop down arrow close to the name and select the roles you want to assign to each user.
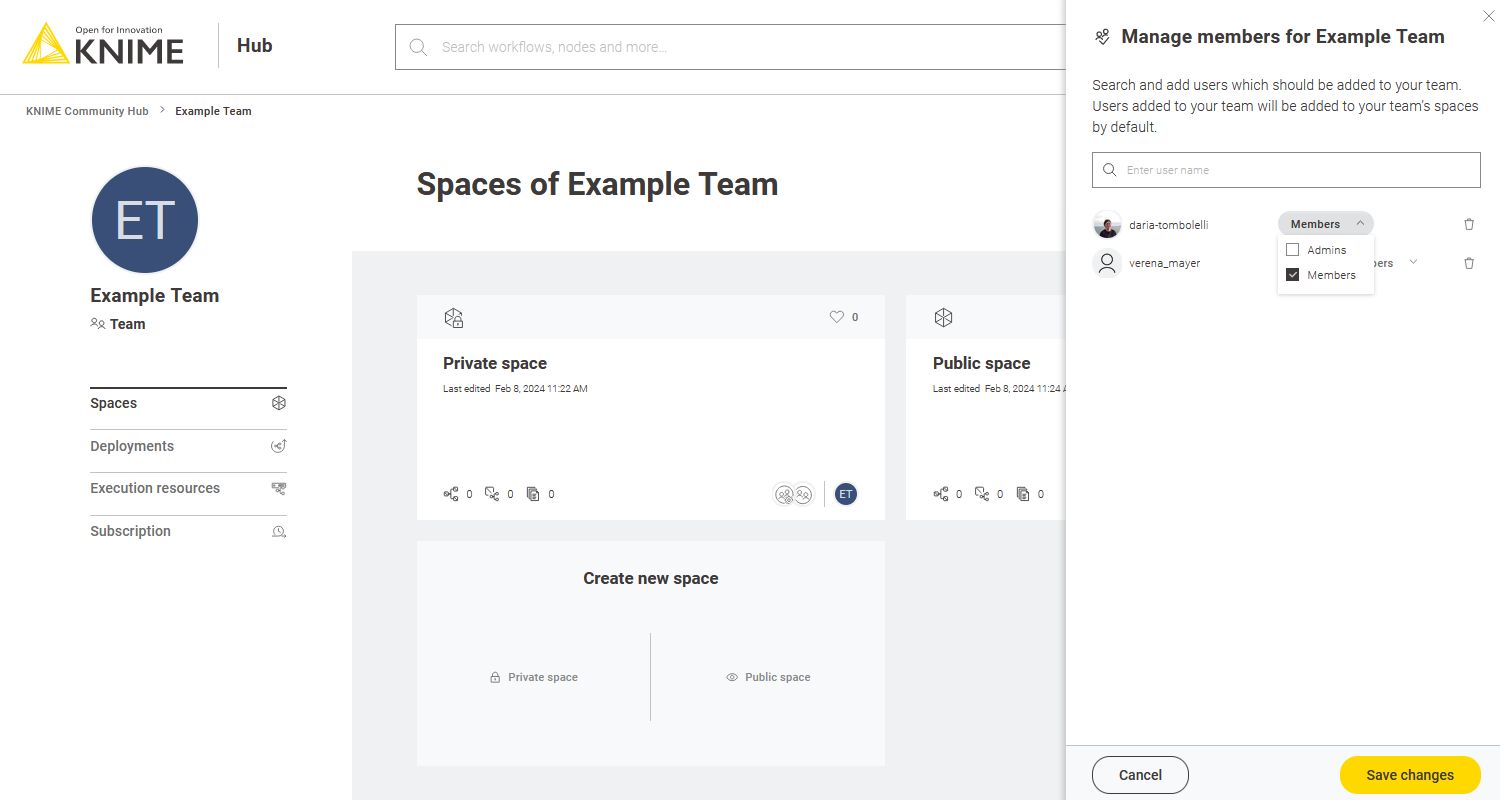
Then click the Save changes button to apply your changes.
Add members to a team
To add a new member, enter the username of the users that you want to add to the team in the search bar in the Manage members panel, then click the Save changes button to apply your changes.
When the maximum number of users allowed by purchase is reached, you will be notified with a message in the Manage members panel. Click the Manage subscription button to purchase more users. Alternatively, you can remove previously added users in order to add new ones.
Delete members from a team
To delete a member, go to the Manage members panel and click the ![]() icon for the user you want to delete.
Then click the Save changes button to apply your changes.
icon for the user you want to delete.
Then click the Save changes button to apply your changes.
Change team name
On the team’s profile page, you can also change the name of the team. To do so, double-click the name of the team under the team logo on the left side of the page.
Insert the new name, and click the ![]() button to confirm.
button to confirm.
Change team profile icon
On the team’s profile page, hover over the team profile icon and click on Upload new to select an image from your local computer.
Manage team subscription
You can manage your subscription on the Subscription page. On the team’s profile page, select Subscription on the side menu to access it.
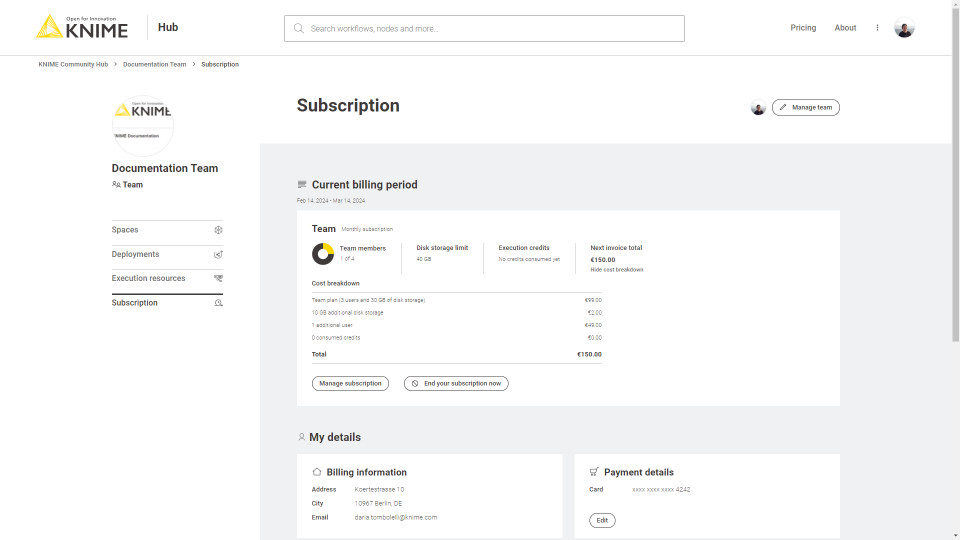
Here you can:
-
Manage subscription: Click Manage subscription to contact KNIME in order to change the number of team members or the disk storage. Your usage will be prorated for the next billing cycle.
Please also allow a minimum of 3 business days for processing the subscription changes.
-
End subscription: Click End your subscription now. This action will take effect after the end of your current billing cycle. Your data will be kept for 30 days and you will be able to re-activate your account in that time period. After 30 days we will delete all your data so it is not recoverable anymore. Once you connfirm with Cancel subscription, your team and its spaces will be deleted.
To re-activate your Team plan please get in contact with us.
-
Inspect your billing information and edit your payment details.
Execution on KNIME Community Hub
Execution allows you to run and schedule your team’s workflows directly on KNIME Hub.
To do this the first step is to configure the resources you need.
As the team admin, go to your team’s page and select Execution resources from the menu on the left. Here you can create an execution context, which contains all the necessary resources to run your workflows.
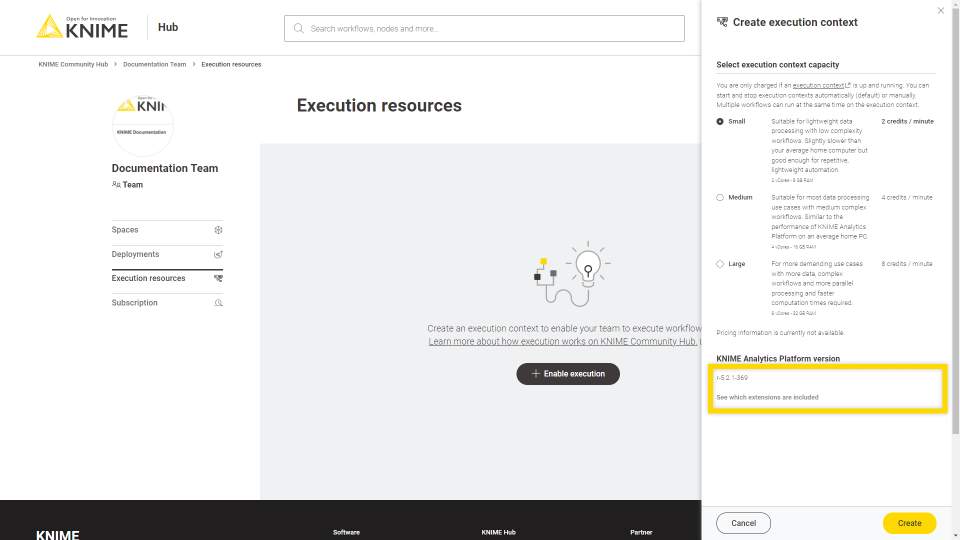
This is how your page will look like the first time you create an execution context.
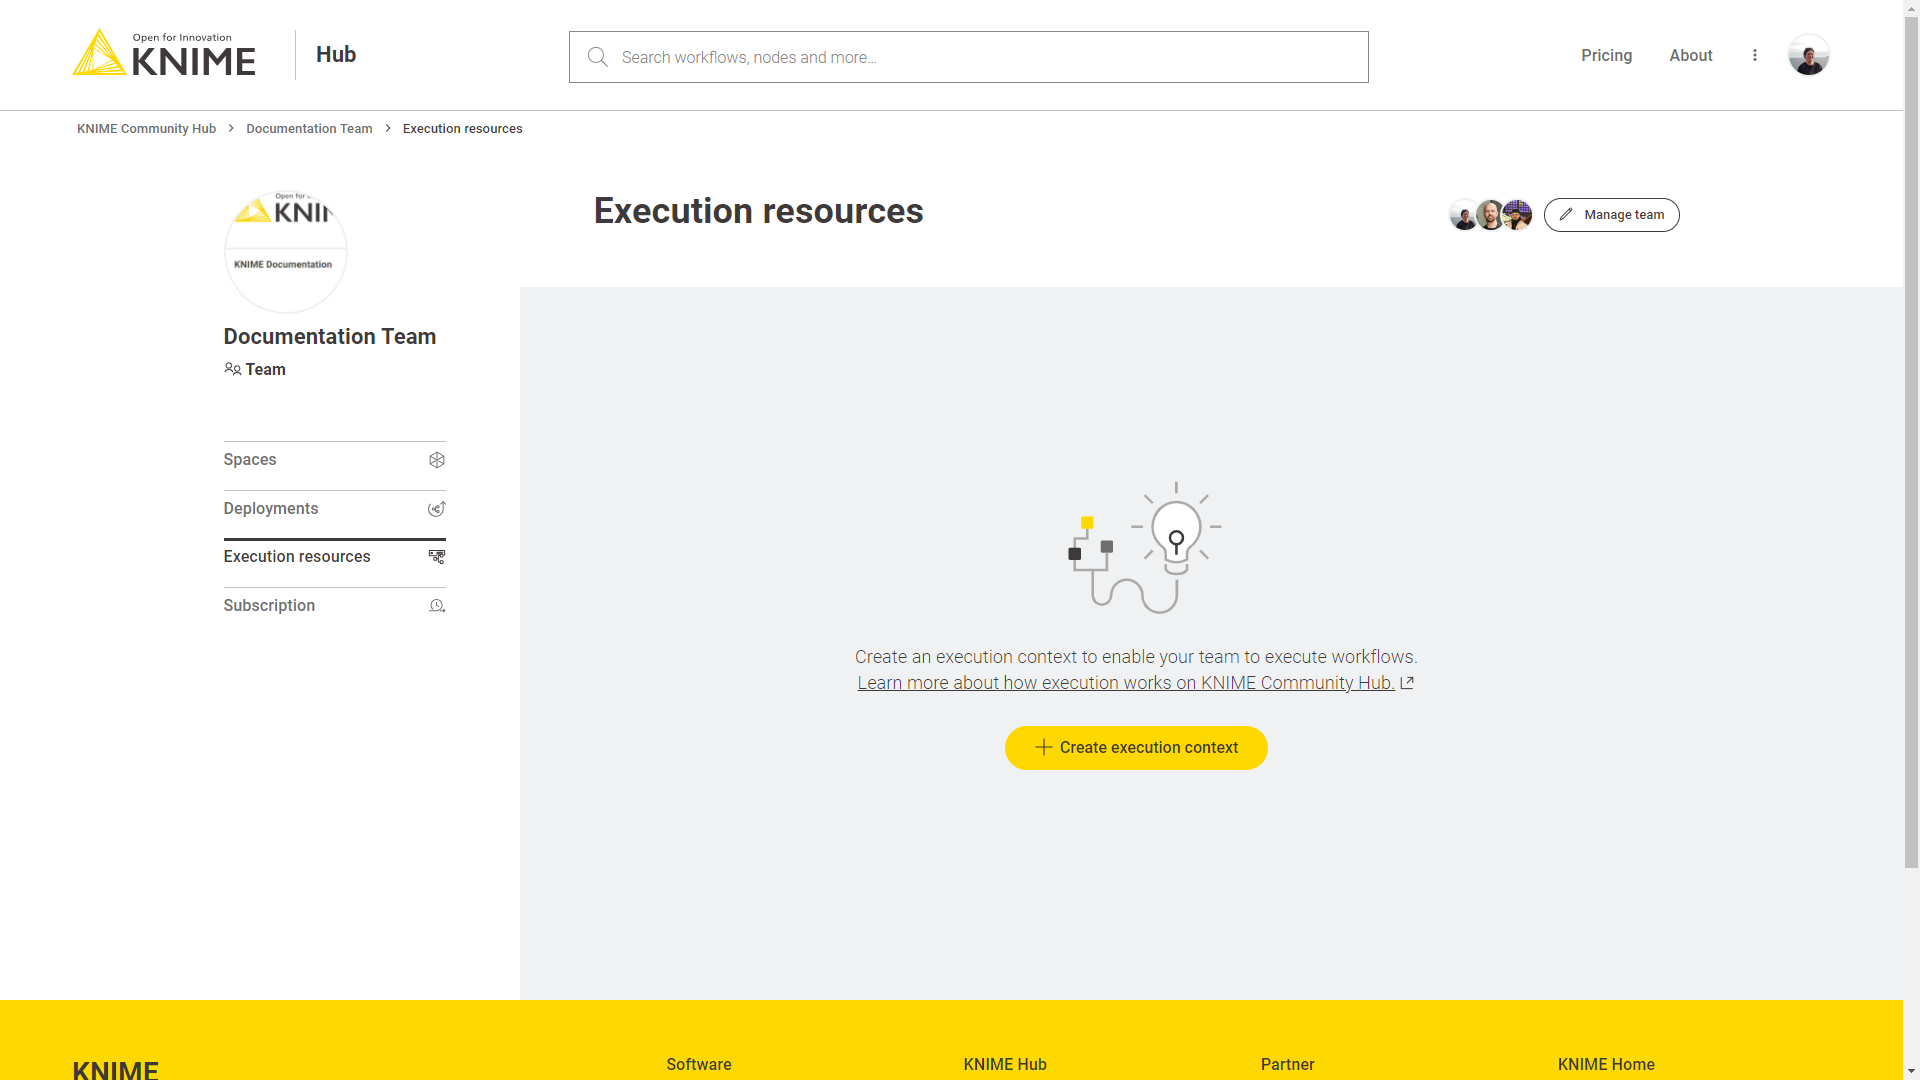
When you click the button to create a new execution context a panel on the right will open.
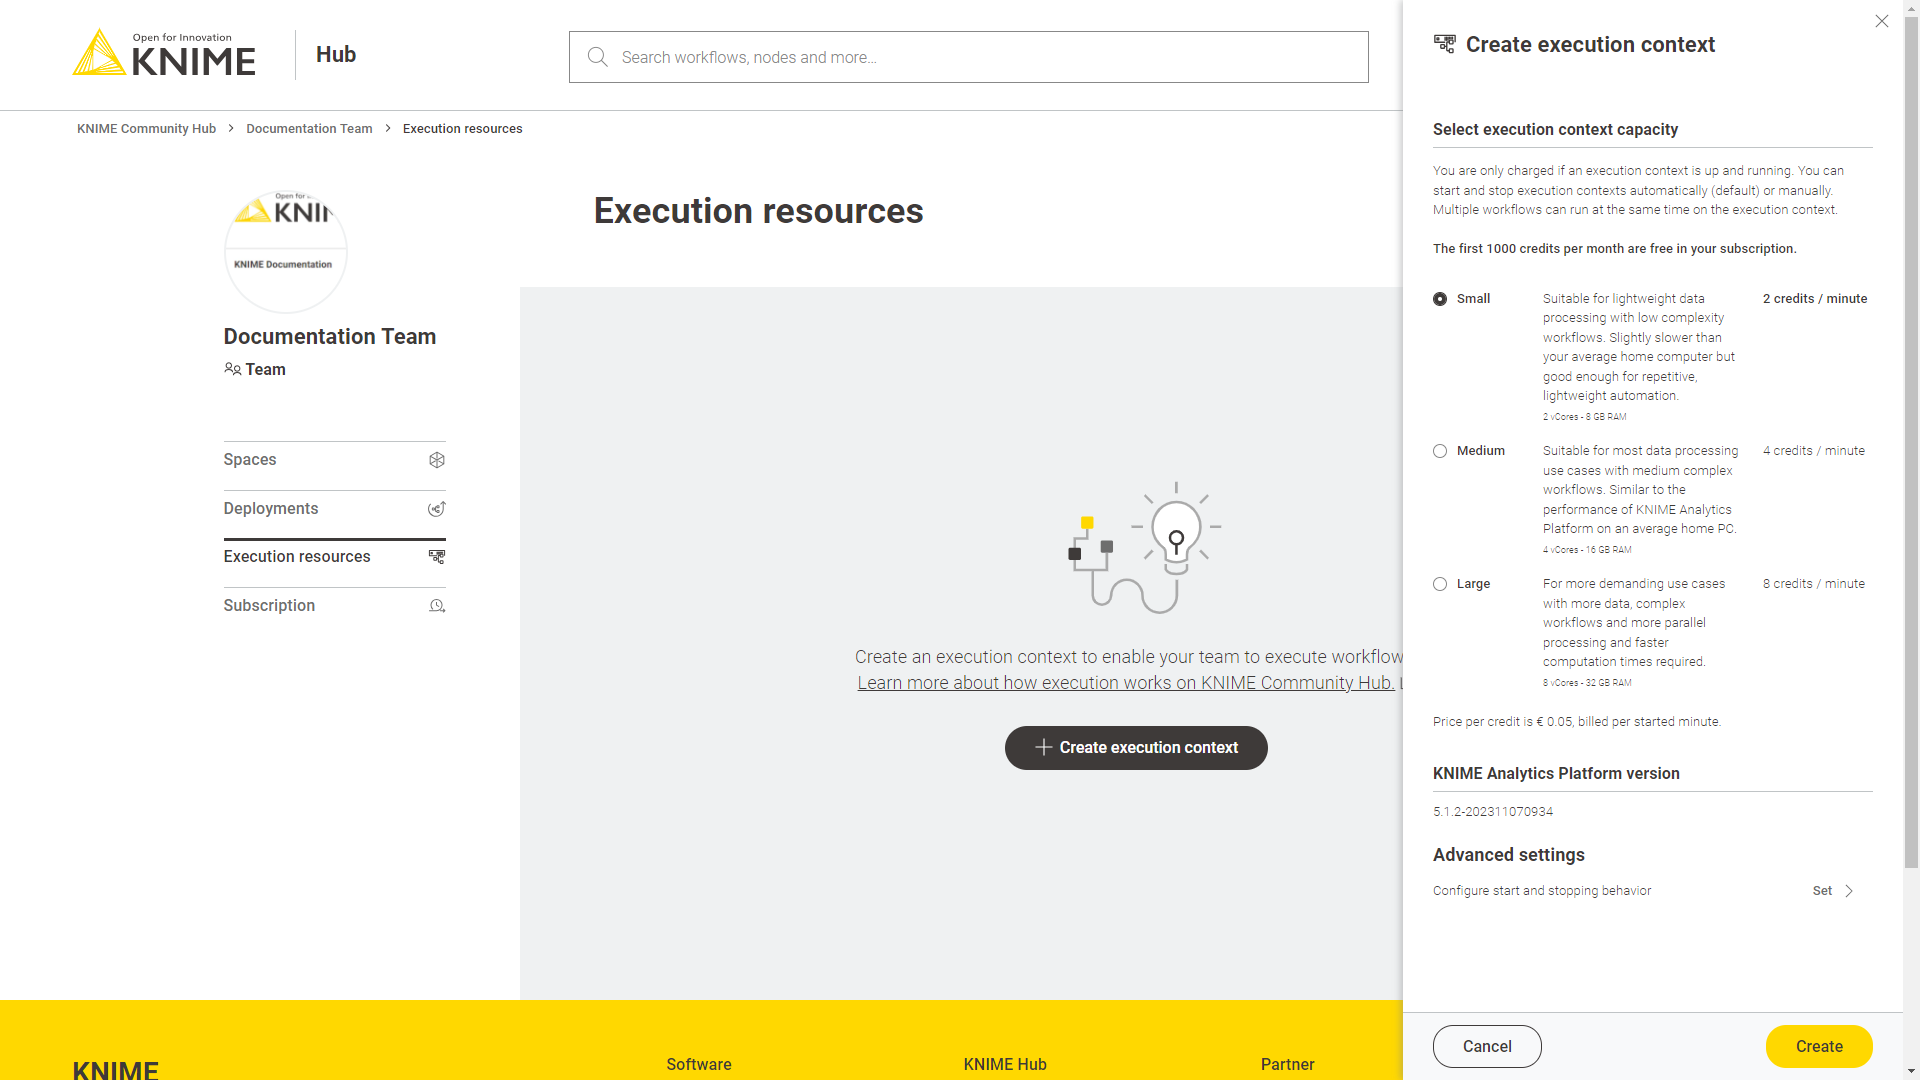
Here you can configure the capacity of your execution context. Select the size of the execution context to decide how performant your workflows execution will be. You and your team members can execute as many workflows as you wish, even in parallel.
We offer three different execution context capacities:
-
Small: Small has 2vCores and 8GB of RAM. This option is suitable for lightweight data processing with low complexity workflows. The execution power would be slightly slower than executing the workflow on your local KNIME Analytics Platform installation, so we recommend this option if you want to perform lightweight automation, e.g. schedule the execution of your workflows.
-
Medium: Medium has 4vCores and 16GB of RAM. This option is suitable for most data processing use cases with medium complex workflows. The performance is similar to a local KNIME Analytics Platform installation.
-
Large: Large had 8vCores and 32GB of RAM. If you have more demanding use cases, with heavier data, complex workflows and you need more parallel processing power with faster computation times you can select this option.
| To have more information on the pricing go the Pricing section. |
You will be charged only when the execution context is running. The execution context will start and stop automatically on demand. This means that it will start automatically when the execution of a workflow starts. The execution context will then stop automatically once all the workflows executions are finished.
Each execution context executor is based on a specific version of the KNIME Analytics Platform provided by us.
Extensions available on an execution context on KNIME Community Hub
All the extensions developed by KNIME are available to run workflows on KNIME Community Hub.
This includes the following extensions:
-
KNIME Executor connector
-
KNIME Remote Workflow Editor for Executor
-
KNIME Remote Workflow Editor
-
KNIME Hub Additional Connectivity (Labs)
-
KNIME Hub Integration
-
KNIME Active Learning
-
KNIME AI Assistant (Labs)
-
KNIME Autoregressive integrated moving average (ARIMA)
-
KNIME Basic File System Connectors
-
KNIME Views
-
KNIME Nodes for Wide Data (many columns)
-
KNIME Big Data Connectors
-
KNIME Databricks Integration
-
KNIME Extension for Big Data File Formats
-
KNIME Extension for Apache Spark
-
KNIME Extension for Local Big Data Environments
-
KNIME Chromium Embeded Framework (CEF) Browser
-
KNIME Integrated Deployment
-
KNIME Base Chemistry Types & Nodes
-
KNIME Amazon Athena Connector
-
KNIME Amazon DynamoDB Nodes
-
KNIME Amazon Cloud Connectors
-
KNIME Amazon Machine Learning Integration
-
KNIME Amazon Redshift Connector And Tools
-
KNIME Conda Integration
-
KNIME Columnar Table Backend
-
KNIME Streaming Execution (Beta)
-
KNIME JDBC Driver For Oracle Database
-
KNIME Microsoft JDBC Driver For SQL Server
-
KNIME Vertica Driver
-
KNIME Database
-
KNIME Data Generation
-
KNIME Connectors for Common Databases
-
KNIME Distance Matrix
-
KNIME Deep Learning - Keras Integration
-
KNIME Deep Learning - ONNX Integration
-
KNIME Deep Learning - TensorFlow Integration
-
KNIME Deep Learning - TensorFlow 2 Integration
-
KNIME Email Processing
-
KNIME Ensemble Learning Wrappers
-
KNIME Expressions
-
KNIME Azure Cloud Connectors
-
KNIME Box File Handling Extension
-
KNIME Chemistry Add-Ons
-
KNIME External Tool Support
-
KNIME H2O Snowflake Integration
-
KNIME H2O Machine Learning Integration
-
KNIME H2O Machine Learning Integration - MOJO Extension
-
KNIME Extension for MOJO nodes on Spark
-
KNIME H2O Sparkling Water Integration
-
KNIME Itemset Mining
-
KNIME Math Expression (JEP)
-
KNIME Indexing and Searching
-
KNIME MDF Integration
-
KNIME Office 365 Connectors
-
KNIME SharePoint List
-
KNIME Open Street Map Integration
-
KNIME SAS7BDAT Reader
-
KNIME Excel Support
-
KNIME Power BI Integration
-
KNIME Tableau Integration
-
KNIME Textprocessing
-
KNIME Twitter Connectors
-
KNIME External Tool Support (Labs)
-
KNIME Google Connectors
-
KNIME Google Cloud Storage Connection
-
KNIME Javasnippet
-
KNIME Plotly
-
KNIME Quick Forms
-
KNIME JavaScript Views
-
KNIME JavaScript Views (Labs)
-
KNIME JSON-Processing
-
KNIME Extension for Apache Kafka (Preview)
-
KNIME Machine Learning Interpretability Extension
-
KNIME MongoDB Integration
-
KNIME Neighborgram & ParUni
-
KNIME Network Mining distance matrix support
-
KNIME Network Mining
-
KNIME Optimization extension
-
KNIME Python Integration
-
KNIME Interactive R Statistics Integration
-
KNIME Report Designer (BIRT)
-
KNIME Reporting
-
KNIME REST Client Extension
-
KNIME Salesforce Integration
-
KNIME SAP Integration based on Theobald Xtract Universal
-
KNIME Git Nodes
-
KNIME Semantic Web
-
KNIME Snowflake Integration
-
KNIME Statistics Nodes
-
KNIME Statistics Nodes (Labs)
-
KNIME Timeseries nodes
-
KNIME Modern UI
-
KNIME Parallel Chunk Loop Nodes
-
KNIME Weak Supervision
-
KNIME Webanalytics
-
KNIME XGBoost Integration
-
KNIME XML-Processing
-
SmartSheet extension
-
KNIME AI Extension (Labs)
-
KNIME Web Interaction (Labs)
-
KNIME Nodes for Scikit-Learn (sklearn) Algorithms
-
Geospatial Analytics Extension for KNIME
-
RDKit Nodes Feature
-
Vernalis KNIME Nodes
-
Slack integration
-
Continental Nodes for KNIME
| To know more about the different extensions see the Extensions and Integrations Guide. |
Manage execution contexts
You can manage the execution context of your team by navigating to your team overview page and selecting Execution resources from the menu on the left.
Here, among other things, you can edit the execution context settings, disable or delete your execution context, or show the details of the CPU usage, the jobs that are running on the execution context and so on.
To do so select the appropriate option in the menu that opens when clicking ![]() in the tile of the execution context.
in the tile of the execution context.
Monitor execution contexts consumption
To monitor your execution consumption and projected costs, you can go to your subscription page.
Go to your team page and select Subscription from the menu on the left.

Execute a workflow
Once the execution context is set up you can run and schedule the workflows that are uploaded to your team’s spaces on KNIME Community Hub. Navigate to a workflow in one of your team’s spaces, you will see a Run button and a Deploy button.
Click Run to simply execute the current workflow directly in the browser. The latest version of your workflow will be executed, or you can select which version of the workflow you want to run. In the side panel that opens you can also enable the workflow actions, for example allowing the system to send you an email when the chose condition is met.
| Be aware that this action will start up your executor, which, once the execution is started will start the billing. |
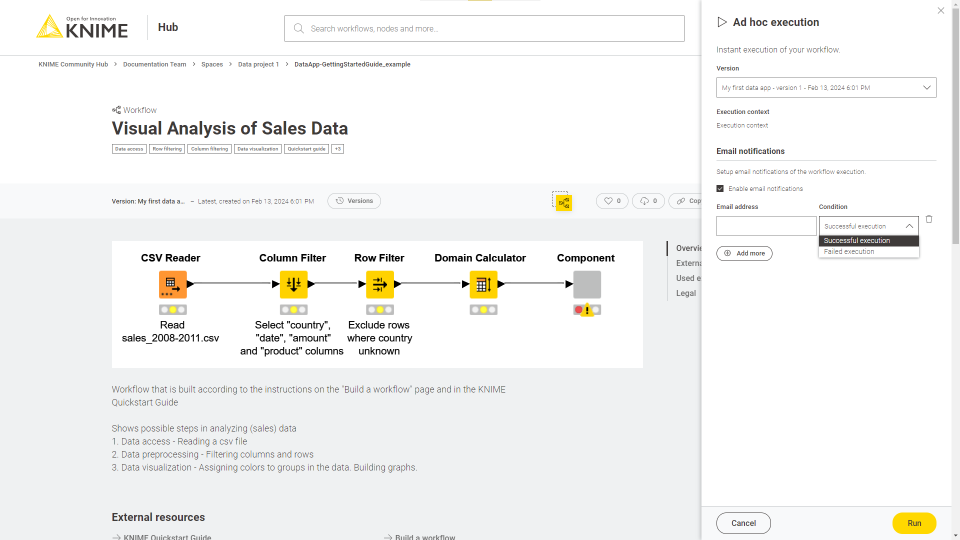
A new tab will open where the result of the workflow execution will be shown. If your workflow is a data app you will be able to interact with its user interface. To know more about how to build a data app refer to the KNIME Data Apps Beginners Guide.
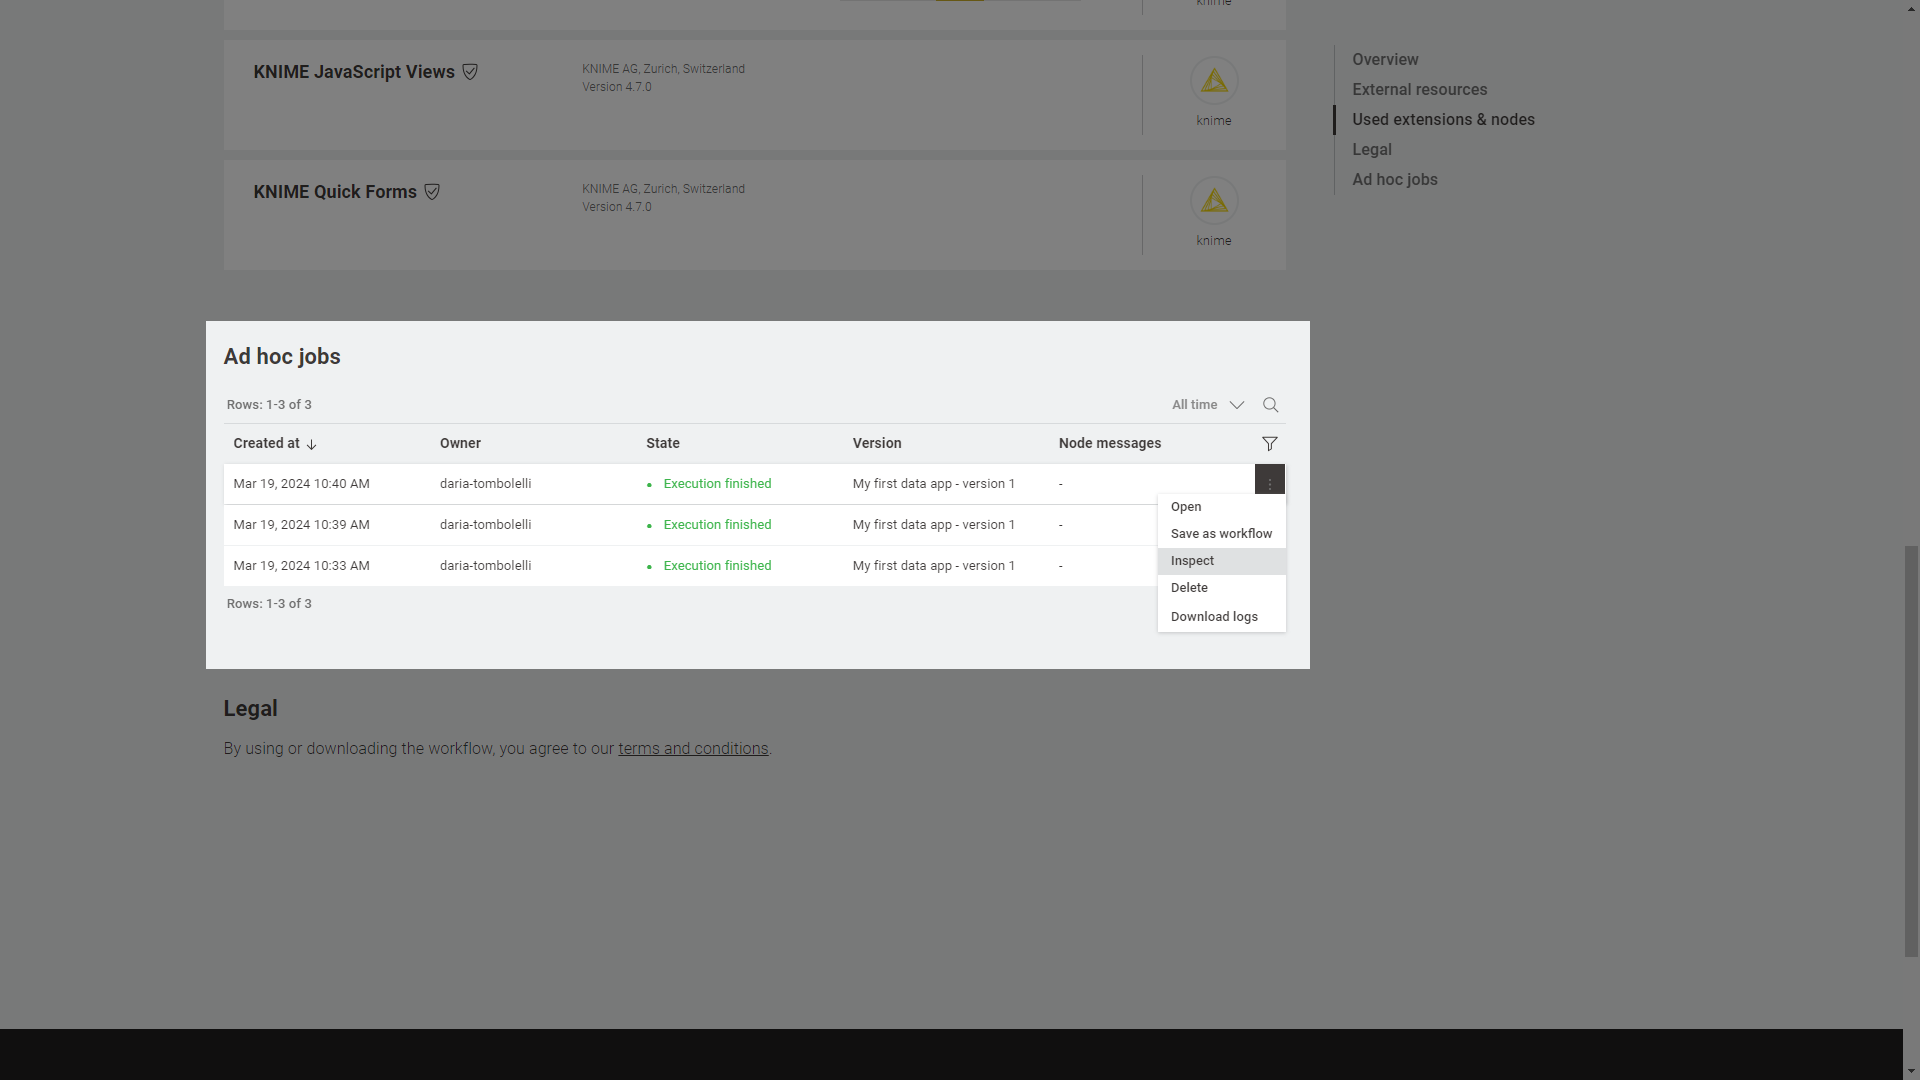
To see all the ad hoc jobs created for a workflow navigate to the workflow page and select Ad hoc jobs from the right side menu.
Schedule a workflow execution
A schedule allows you to set up a workflow to run automatically at selected times.
To create a schedule deployment of your workflow navigate to a workflow in one of your team’s spaces. In order to be able to create a schedule deployment you need to have created at least one version of your workflow. To know more about versioning read the Versioning section of this guide. Once you have your stable version of the workflow, create a version (click Versions → Create version). Now you can click the button Deploy and select Create schedule.
This will open a side panel where you can set up the schedule deployment.
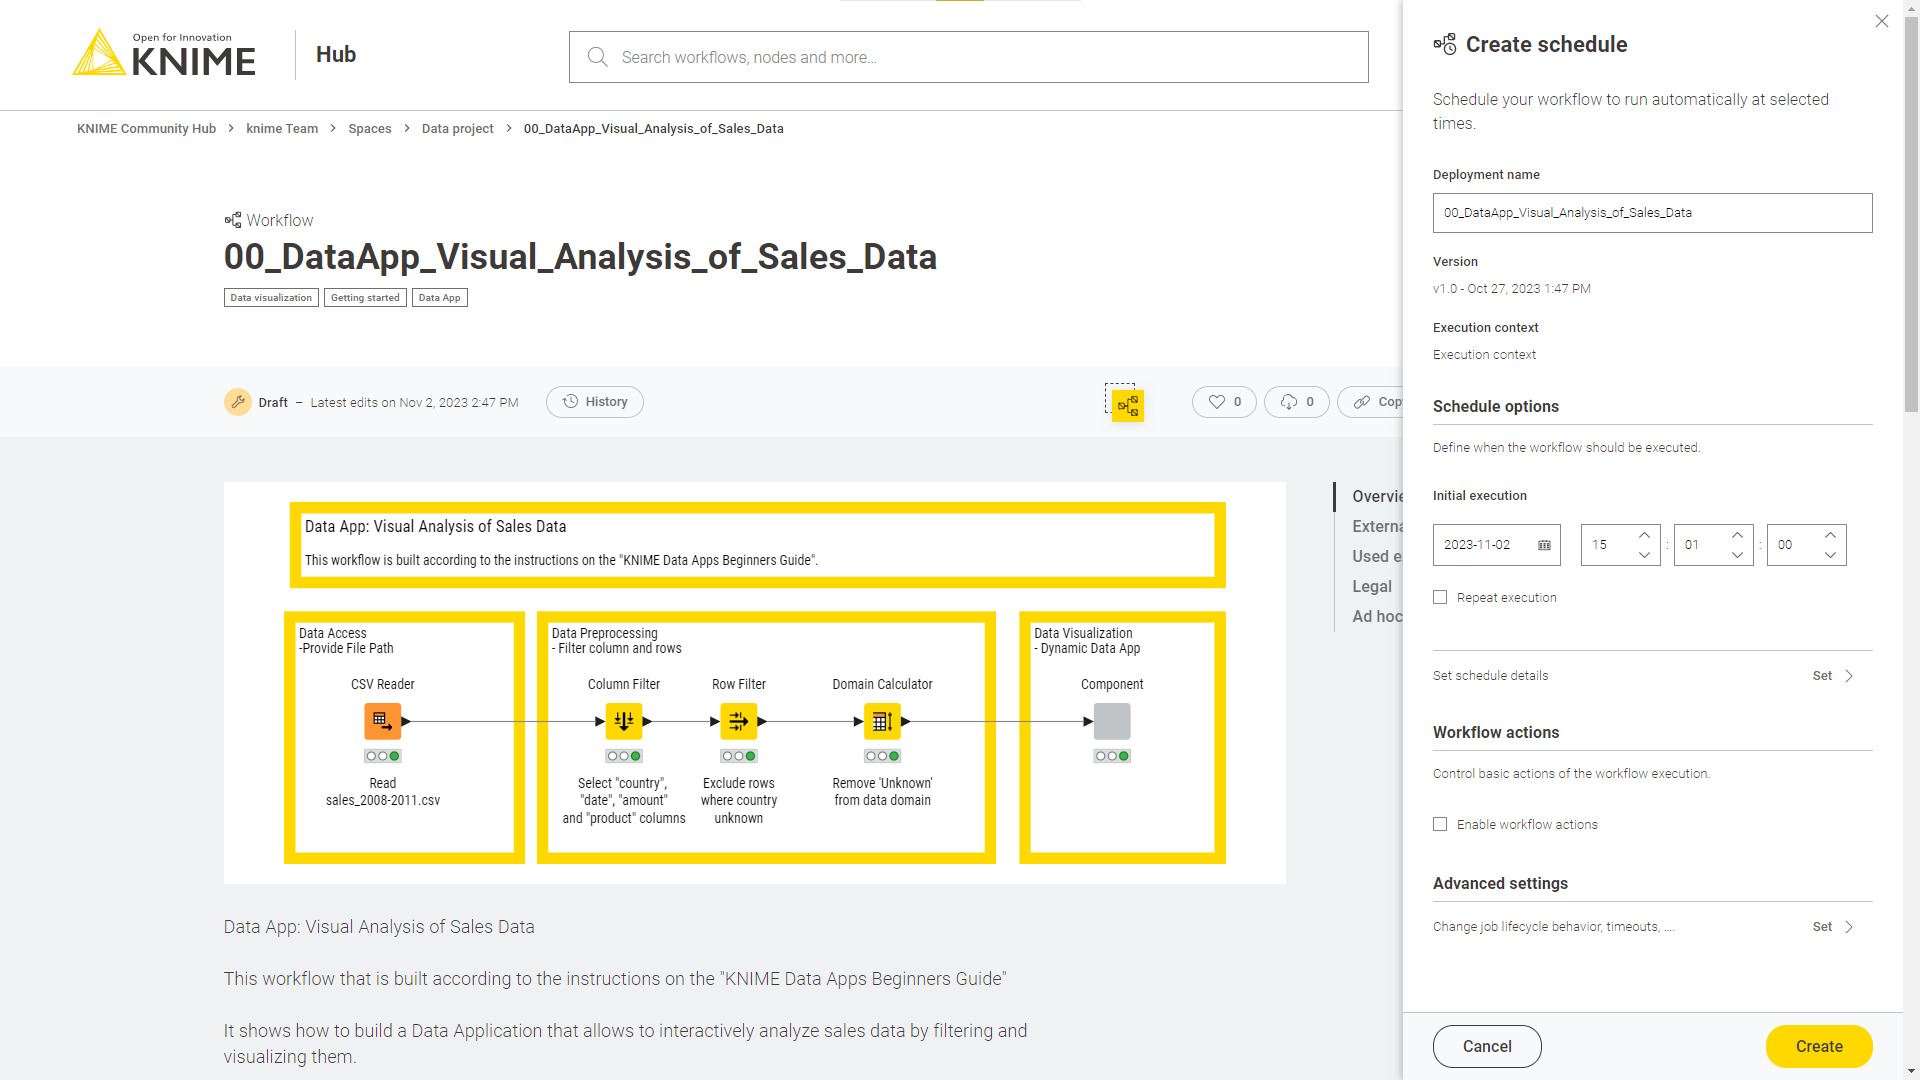
Here you can select a name for your schedule deployment and which version of the workflow you want to schedule for execution.
| To see all the deployments created for a workflow navigate to the workflow page and select Deployments from the right side menu. To see all the deployments created by your team navigate to the team page and select Deployments from the left side menu. |
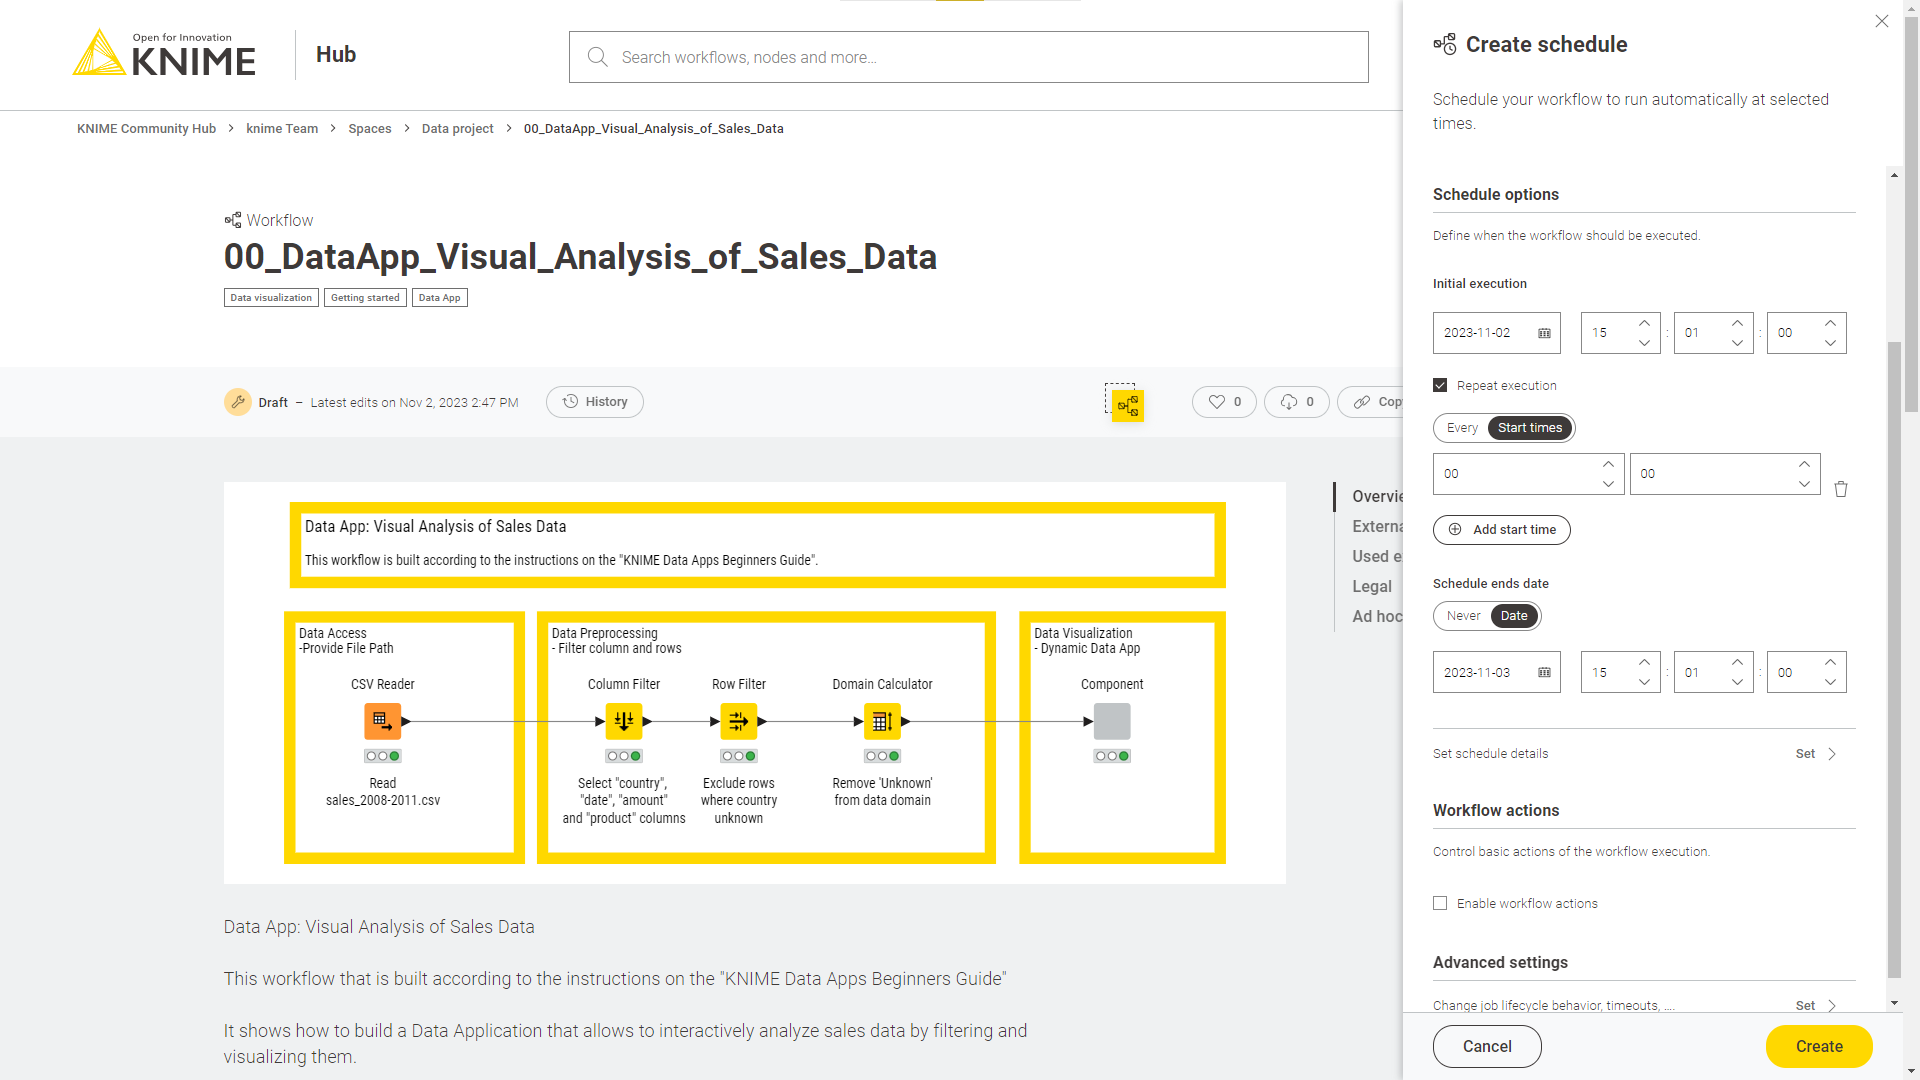
In the section Schedule options you can define when the workflow should be executed:
-
Set up an initial execution, date and time
-
Select Repeat execution to select if you want the workflow to run every specific amount of time (e.g. every 2 hours), or select start times when your workflow will be executed every day at the same time.
-
Set up also a schedule ends date, either to never end or to end in a specific date and time.
Set additional schedule details
You can also set more advanced schedule details.
First, check the option Repeat execution, under Set schedule details, then you can click Set to set up recurring executions, retries, and advanced schedule details.
Click Set and the following panel will open:
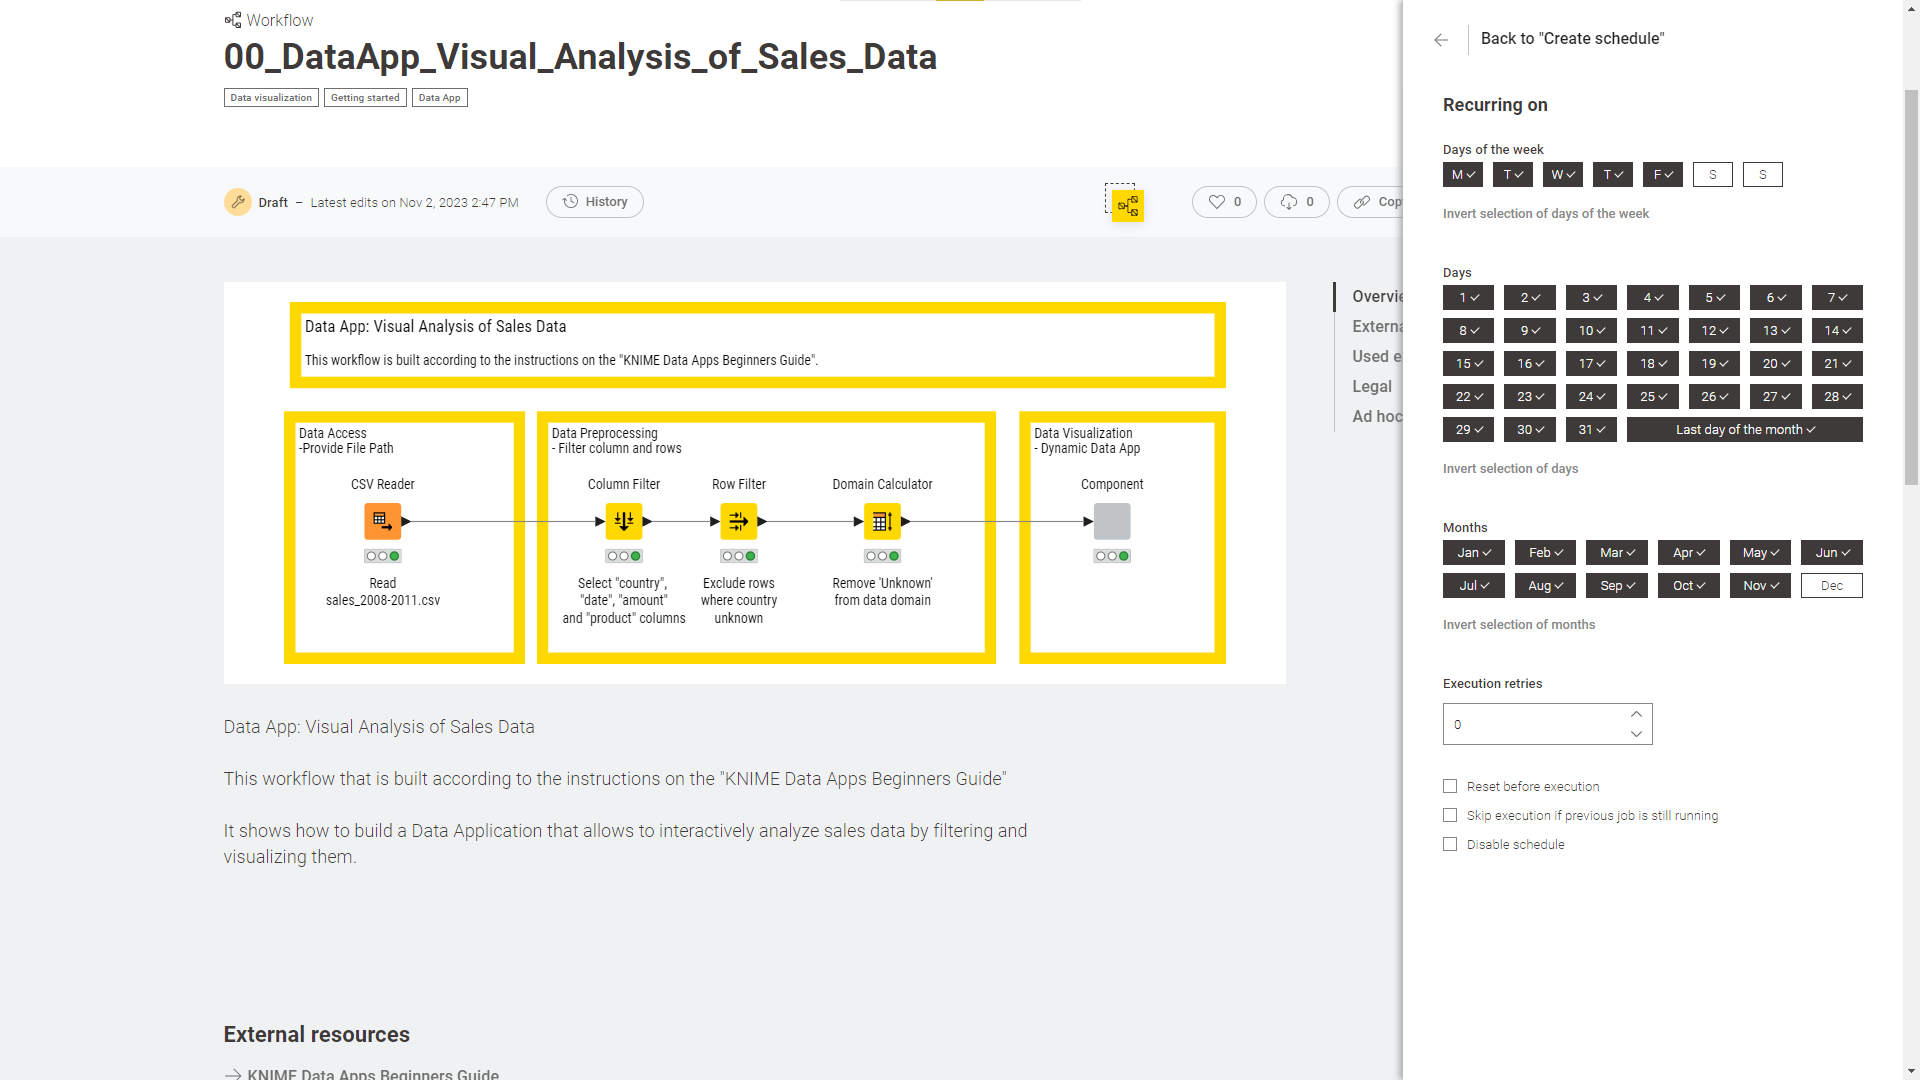
| If you did not check the option Repeat execution, you will only find the set up options for retries and the advanced schedule details. |
The workflow will run when all the selected conditions are met. In the above example the workflow will run from Monday to Friday, every day of the month, except for the month of December.
Finally, in the section execution retries and advanced schedule details you can set up the number of execution retries, and check the following options for the advanced schedule details:
-
Reset before execution: the workflow will be reset before each scheduled execution retries occur.
-
Skip execution if previous job is still running: the scheduled execution will not take place if the previous scheduled execution is still running.
-
Disable schedule: Check this option to disable the schedule. The scheduled execution will start run accordingly to the set ups when it is re-enabled again.
Set advanced settings
Finally, you can select advanced settings for each schedule deployment. Click Set under Advanced settings section to do so.
In the panel that appears you can configure additional set ups:
-
Job lifecycle: such as deciding in which case to discard a job, the maximum time a job will stay in memory, the job life time, or the options for timeout. Particularly important in this section is the parameter Max job execution time: the default setting can be changed according to your needs to keep control over the execution time.
-
Additional settings: such as report timeouts, CPU and RAM requirements, check the option to update the linked components when executing the scheduled job and so on
The values in the fields related to time need the format:
-
PT, which stands forPeriodofTime -
the amount of time, made of a number and a letter
D,H,MandSfor days, hours, minutes and seconds.
For example, PT1H means a period of time of 1 hour, PT168H means a period of time of
168 hours (which is equivalent of 7 days).
Jobs
Every time a workflow is executed a job is created on KNIME Hub.
To see the list of all the jobs that are saved in memory for the ad hoc execution of a specific workflow go to the workflow page and on the right side menu click Ad hoc jobs.
To see the list of all the jobs that are saved in memory for each of the deployments created for a specific workflow, go to the workflow page and on the right side menu click Deployments.
You can expand each deployment with the ![]() icon on the left of the deployment.
icon on the left of the deployment.
Also you can go to your team page and find a list of all deployments created within your team. Also here you can click the ![]() icon corresponding to a specific deployment to see all its jobs.
icon corresponding to a specific deployment to see all its jobs.
On each job you can click the ![]() icon on the right of the corresponding job line in the list and perform the following operations:
icon on the right of the corresponding job line in the list and perform the following operations:
-
Open: For example you can open the job from a data app and look at the results in a new tab
-
Save as workflow: You can save the job as a workflow in a space
-
Inspect: A job viewer opens in a new tab. Here, you can investigate the status of jobs.
-
Delete: You can delete the job
-
Download logs: You can download the log files of a job - this feature allows for debugging in case the execution of a workflow did not work as expected.
Inspect an executed workflow
You can inspect the status of an executed workflow, for example if the workflow execution did not succeed, or the execution is taking a long time.
Click the ![]() icon for the desired job and select Inspect.
icon for the desired job and select Inspect.
Here you can hover over info and error icons at the node’s traffic light, to visualize the message, check where the execution stopped or the status of specific nodes. You can also inspect the data at any node’s output port.
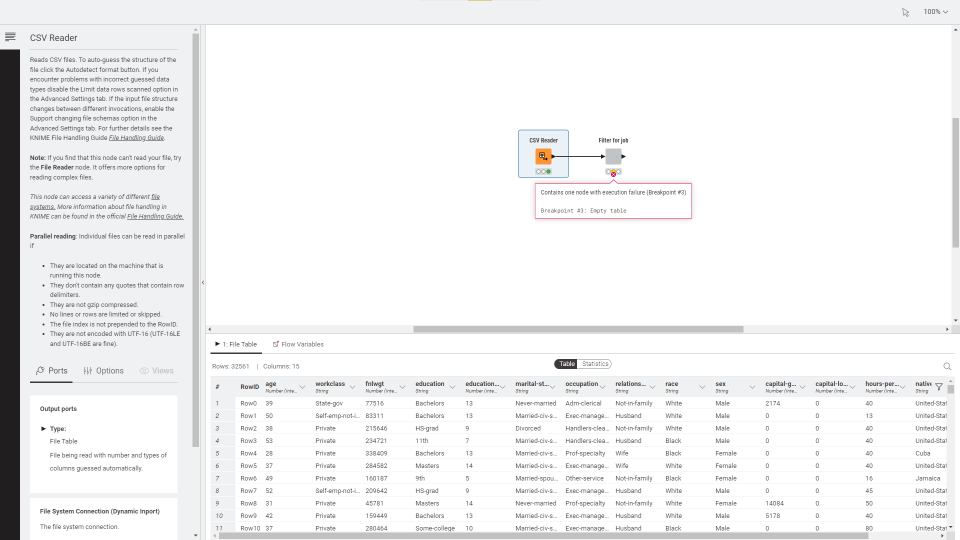
You can also navigate inside components and metanodes and inspect the nodes.

FAQs
What is KNIME Community Hub?
KNIME Community Hub is an online platform provided by KNIME where users can share workflows, components, nodes, and other resources related to data analytics and machine learning. You can access KNIME Hub by visiting the website: https://hub.knime.com/.
Is there a cost to use KNIME Community Hub?
KNIME Hub Personal plan is free to use for all users. This gives you access to all the workflows shared publicly by the KNIME Community, nodes, extensions and collections to help you get started in different topics. Also, it allows to store your own workflows in private spaces and to have access and control to different workflows or components versions, all in one place via the browser. KNIME Hub Team plan instead is a paid service offered on KNIME Community Hub that allows to build a team to collaborate in private on projects, run and automate execution of workflows from .
What is a Team?
A KNIME Community Hub team refers to a group of users who collaborate within the KNIME Hub platform. These teams are formed to work together on projects, share workflows, and exchange knowledge related to data science and analytics using KNIME software. Teams enable seamless collaboration, allowing members to contribute to shared resources, run data applications and automate execution of workflows. Once you have subscribed to a Team plan on KNIME Hub you can invite any member with a KNIME Community Hub account to join your team, until you reach the maximum number of user you selected in your subscription plan. Every team member will then be able to create spaces to collaborate on projects, and upload their workflows by connecting to KNIME Hub via KNIME Analytics Platform.
How do I manage permissions within a team?
As a team owner or administrator, you can manage permissions for team members, including granting or revoking access to specific spaces.
How can I run workflows and what kind of workflows can I run?
To give your team access to execution capabilities you need first to create an execution context. An execution context is a container that contains all the necessary extensions and capabilities that enable you to perform ad-hoc and automated execution of workflows. Depending on the resources that your team will need you can choose different capacities for your execution context.
You can run any workflow you upload to your team’s spaces. You can choose between ad hoc execution, for inspection of the user interface in case you are running a data application, or automated execution, where a workflow is set up to run at specific times or time intervals.
How can I access files stored on different platforms?
With KNIME Analytics Platform you can build workflows that connect to different services. This will allow you to access files from or write them to the available services integrations. Find more about how to build these workflows in the KNIME File Handling Guide.