
Build Your First REST Service
Introduction
REST endpoints provide programmatic access to resources and operations over the web using standard HTTP methods. They enable systems to communicate in a consistent, lightweight way by exchanging data in formats such as JSON or XML. REST (Representational State Transfer) is widely used for building scalable, flexible, and platform-independent web services.
In KNIME Analytics Platform, workflow developers can build such a REST endpoint by using workflows, without coding. They can deploy these workflows to KNIME Hub, where other users can send or retrieve data from that workflow without touching it.
Deploying a workflow as a service means it creates a REST endpoint that can be reached from the outside. For example, a workflow could accept an employee's name as input and return their department and contact information from a data source holding company information.
The aim of this guide is to build your understanding of KNIME Service Deployments and the REST endpoints they create. Note that this guide only covers how to call workflow deployments from external tools.
Things you need before you start
If you haven't done so yet, download and install KNIME Analytics Platform to download the workflow. Additionally, create your KNIME Hub Pro account if you don't have one yet. This will allow you to create your Service deployment on the KNIME Hub and share it with others.
TIP
This guide assumes that you have a basic understanding of how to use KNIME Analytics Platform. If you are new to KNIME, we recommend going through the KNIME Getting Started Guide first.
INFO
KNIME Analytics Platform is free to use forever. For Pro and Team plan pricing and execution credits, please refer to the KNIME Hub pricing page. Finally, you can refer to the KNIME Pro Guide to understand how job execution and billing works in more details.
For this guide you will also need Postman to test the REST endpoint. Postman is a free tool for building and testing API requests. You can sign up for a free account, which is sufficient for this guide.
Build Your First Workflow for a KNIME REST Service
To make a workflow available as a REST endpoint, you need to define how data is passed in and out of it. This is done using Container nodes, which expose workflow inputs and outputs to the REST interface.
There are two types of Container nodes:
There are use cases where a workflow contains only a Container Input node, or only a Container Output node, but for this guide we will use a workflow that contains both.
Container Input Nodes
Container Input nodes define the exact format of the data your workflow expects when it is called through the REST API. Depending on the type of Container Input node, they receive different kinds of data from an external caller and make them available to the workflow. The following are some of the different types of input data that can be received with the according Container Input nodes:
- JSON
- Row
- File
- Variable
Container Output Nodes
Similarly, Container Output nodes define what data is sent back once the workflow is executed. Container Output nodes can send different kinds of data formats. The following data types are available to be sent back to the caller:
- JSON
- Row
- Table
- File
Example: A simple REST Service Workflow
In this guide, we will use a simple workflow as a starting point that receives and sends data in JSON format. You can download the workflow from KNIME Community Hub.
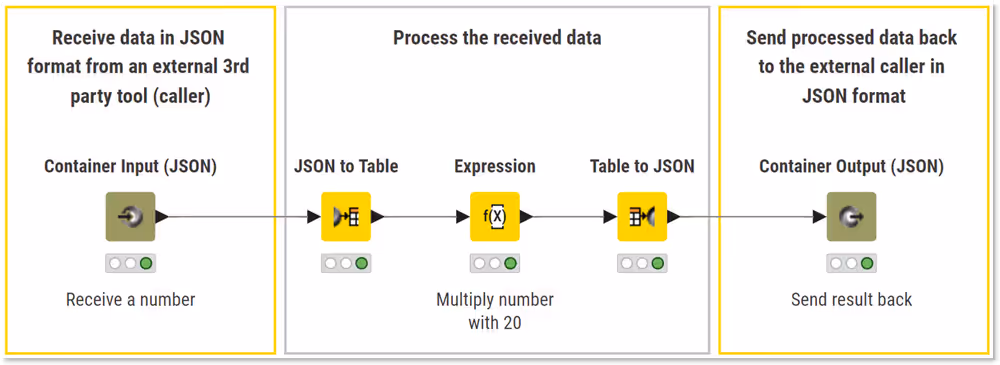
Familiarize yourself with the workflow and look at how the data changes at each step:
- Receive: The workflow accepts a number in JSON format through the Container Input (JSON) node.
- Process: The data is converted to a table, multiplied by 20, and then converted back to JSON format.
- Send: The resulting JSON object is returned to the caller through the Container Output (JSON) node.
The Container Input nodes define the exact format the workflow needs to be called with. This happens by providing default data. For some of the different Container Input nodes this can be done through optional input ports.
In case of the Container Input (JSON) node, the default data needs to be provided manually in the configuration of the node:
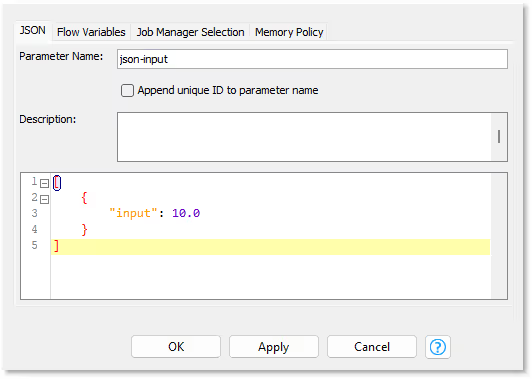
In this case we defined an array (indicated by the square brackets) containing one object with a key:value pair in curly brackets.
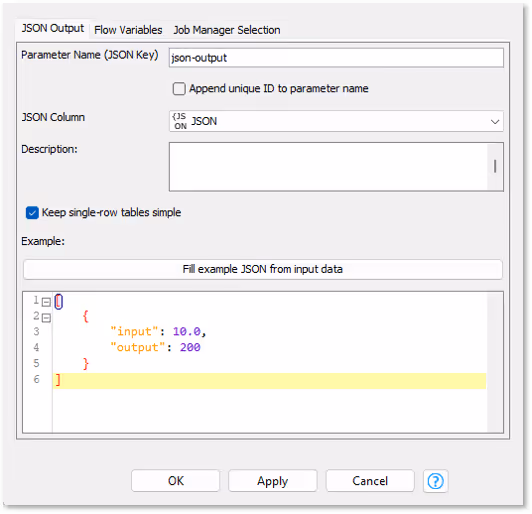
To see the JSON that the Container Output JSON node will send back, click Fill example JSON from input data:
Deploying the workflow as a Service on KNIME Hub
Once you have your workflow ready, you can deploy it as a Service on KNIME Hub. This process turns your workflow into a REST endpoint that can be accessed from external tools or applications.
The deployment process consists of the following main steps:
- Upload the workflow to KNIME Hub.
- Create a version of the uploaded workflow.
- Deploy the workflow as a Service to create a REST endpoint.
- Share the deployment with other Hub users.
- Find the deployment's endpoint information and API documentation.
- Test the deployment directly from the Swagger UI.
- Call the endpoint from an external tool (e.g., Postman).
Each of these steps is described in detail below.
Step 1/7. Upload the workflow to a KNIME Hub
You can upload a workflow to KNIME Hub either directly from KNIME Analytics Platform or via the KNIME Hub web interface.
Upload from KNIME Analytics Platform
To upload a workflow from KNIME Analytics Platform:
- Open the Home page in KNIME Analytics Platform and sign in to your KNIME Hub account. If you're not already signed in, you'll be redirected to the sign-in page.
- Once connected, your Hub spaces will appear in the left-hand side menu.
- In the Space Explorer, right-click the workflow you want to upload and select Upload
- In the dialog that appears, choose the destination space and confirm.

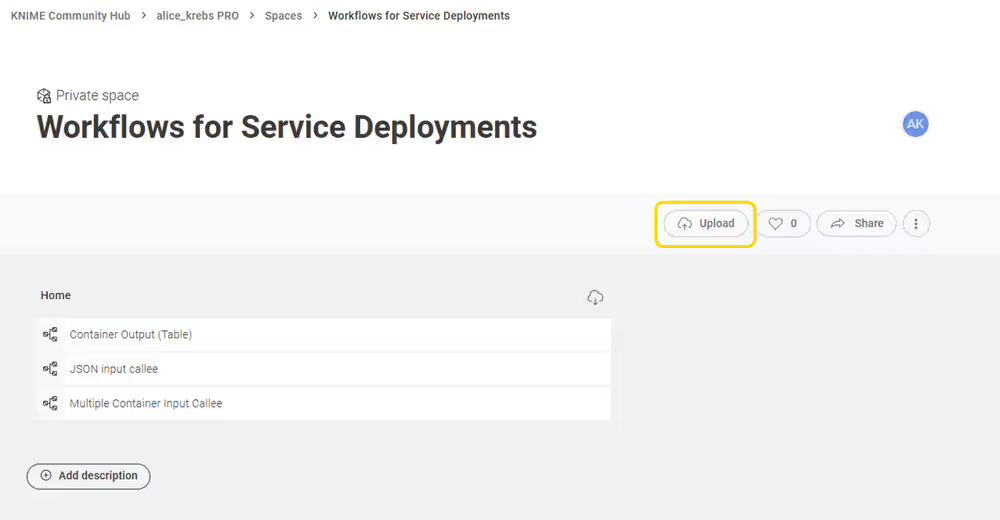
Upload from the KNIME Hub webpage
If you created a workflow locally and you saved it as a .knwf file on your local machine, you can upload that file via the browser:
- Go to the KNIME Hub webpage and sign in.
- Navigate to the space where you want to upload your workflow to.
- Click Upload and select the .knwf file from your local filesystem.
Learn more about uploading in the KNIME Community Hub User Guide.
Step 2/7: Create a version of your workflow on KNIME Hub
Now that your workflow is in a space of your KNIME Hub, you need to create a version of it.
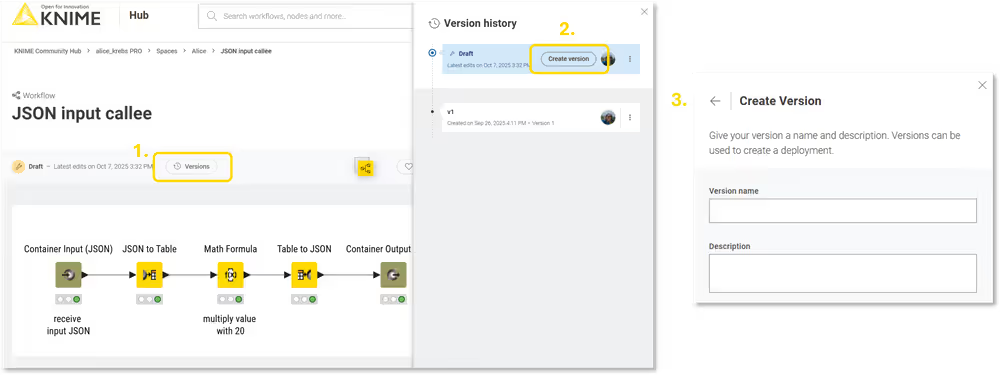
To create a version:
- Open the workflow on KNIME Hub and click History
- In the side drawer that appears, click Create Version
- Provide a name and an optional description of the version, then confirm.
Learn more about versioning in the KNIME Community Hub User Guide.
Step 3/7: Deploy your workflow as a Service
To deploy a workflow as a service:
- Click the Deploy on the right side of the workflow page.
- Select Create service.
- In the side panel that appears, specify the deployment name, the execution context, and the workflow version (if multiple versions are available).
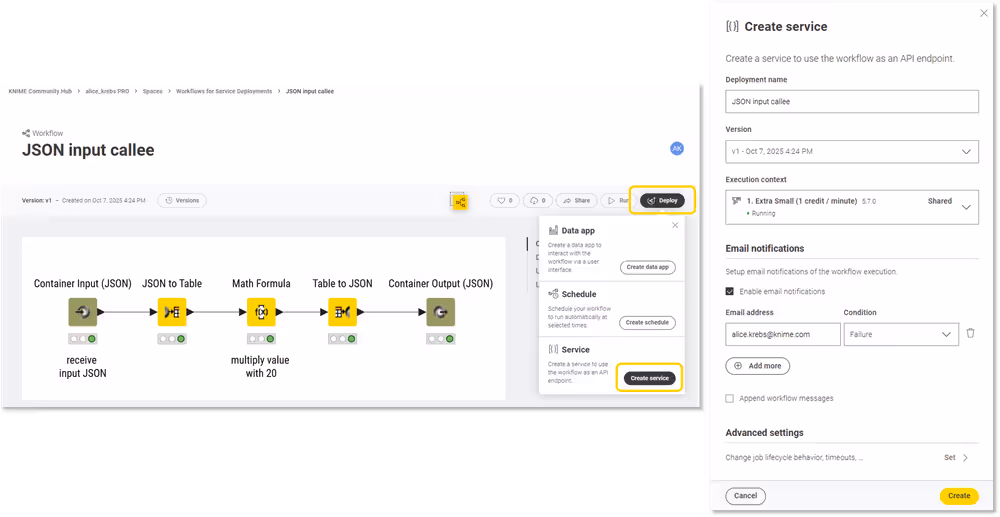
Once you click Create, the deployment is created. You can see it immediately in the list of deployments of this workflow on the workflow page, or on the "Deployments" section within your account's page.
Step 4/7: Share your service deployment
Once the Service deployment has been successfully created, you can also share it with other users of that KNIME Hub instance. This will allow them to also call the REST endpoint that is being created by this service deployment.
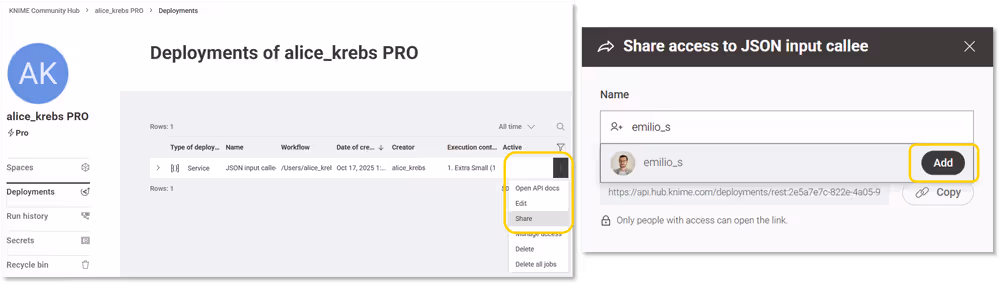
- Click the icon with the three dots on the right side of your deployment.
- Select Share from the menu.
- Start typing to find other users by their user name.
- Click Add to share the deployment with them.
Upon completing these actions, the added users will be able to call the REST endpoint of this Service deployment.
Accessing the service deployment from an external tool
Step 5/7: Find the deployment's endpoint
Before we can send requests to the created REST endpoint, we need to know its URL and understand how the input data should be structured. A tool that is integrated into the KNIME Hub will help us to do so: Swagger UI. Swagger UI is a framework that displays the interactive documentation of an API: what endpoints exist, what data they need, and what (meta)data they return.
To access it:
- Navigate to the deployment of that workflow on KNIME Hub.
- Click the three dots on the right, and select Open API docs.
You can find the deployment either in the "Deployments" section within your account's page, or at the bottom of the workflow page:
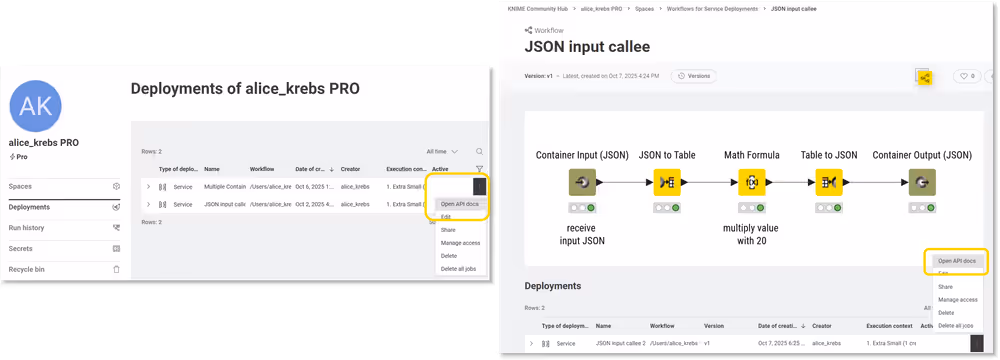
This opens a new browser tab that shows the endpoint's API documentation:
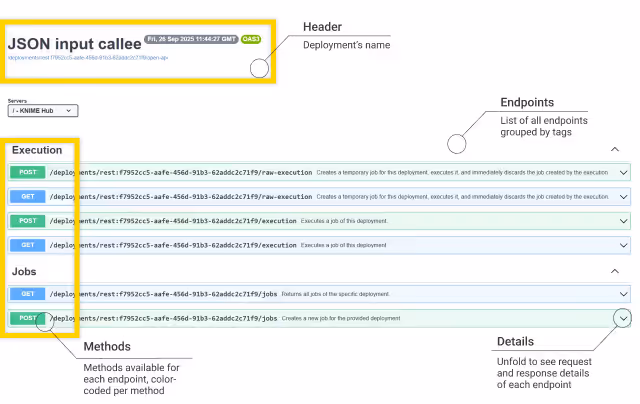
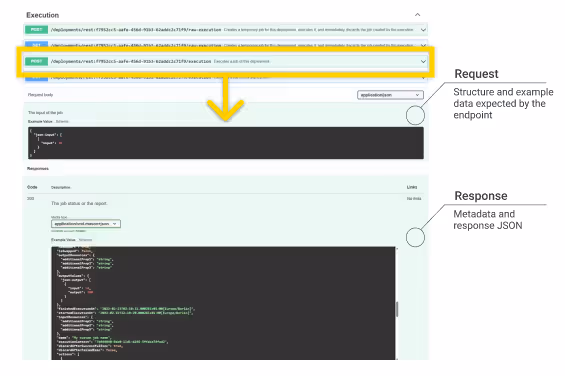
For now we will go with the POST request of the execution endpoint in the Execution group. Expand it to see all the details like the parameters, the example values for the request body and the example response. The response contains a lot of metadata, but also the JSON output from the workflow.
Here the Swagger UI shows the default request body and response data upon successful execution (code 200).
Step 6/7: Test the deployment's endpoint from within the Swagger UI
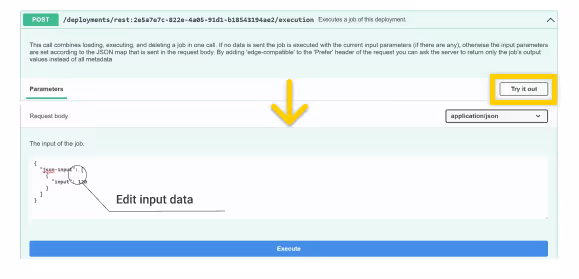
You can already test the function of the service deployment from within the Swagger UI webpage. Stay with the expanded POST Request of the execution endpoint in the Execution group.
- Click Try it out on the top right.
- Change the input of the job by changing the number
- Click Execute underneath
Note that you can only change the input number (the value in the JSON object). Changing any of the key parameters (anything before a colon) will result in an error. Scroll down to see the request URL, the response code and the data returned. Note that it has multiplied the number of your changed input.

Step 7/7: Call the deployment's endpoint from an external tool
Now that you know how to find the API documentation around the deployment's endpoints, the request URL and how the input and output data look like, you can call the endpoint from an external tool. In this guide we chose to go with Postman.
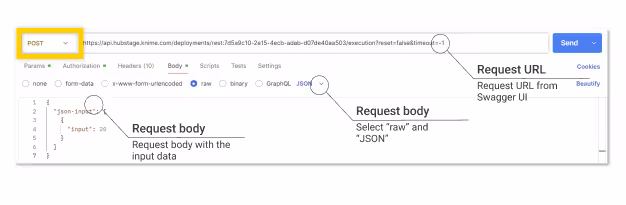
- Create a POST request in Postman
- Paste the request URL from the Swagger UI on top
- Switch to the "Body" tab.
- Paste the JSON body to be sent to the endpoint. Either go with the example data from the Swagger UI or change the number.
One thing is missing, and that is authentication. When you were testing the endpoint in the Swagger UI, you were already authenticated in the backend as you started the Swagger UI from a Hub page to which you have been logged in to. Now when we are calling the endpoint with an external tool, we are not automatically authenticated, hence we still have to provide that. For that we need an application password.
To create an application password in KNIME Hub:
- Click the user icon in the top-right corner.
- Select Settings → Application passwords from the menu on the left.
- Click Create application password and a side panel will show.
- In the side panel, you can give a name to the application password and click Apply. A new application password will be created and shown in the list of application passwords. Copy the ID and the password of the application password you just created so you can use it in Postman.
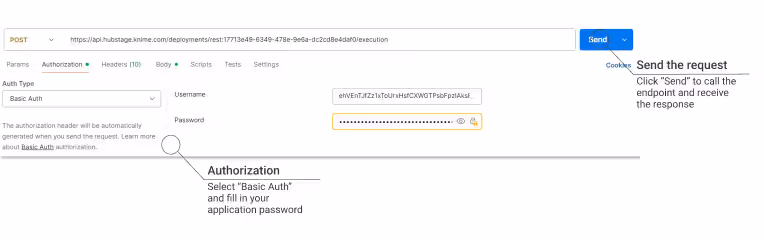
Once you created and copied your application password, you can go ahead with Authorization process in Postman:
- Go to the Authorization tab in Postman
- Choose "Basic Auth"
- Enter the application password
Click Send on the right side to send a request, and get a response that contains the response code, metadata, and the output data of the workflow!
Note that in case you shared the Service Deployment with other KNIME Hub users in Step 4, these users have to create their own personal application password in order to call this service deployment from an external tool.
Glossary
API
An API (Application Programming Interface) is a set of rules that lets different software programs talk to each other. It defines how requests and responses should be made between systems. Basically, it's like a messenger that delivers one program's request to another and brings back the response.
Callee
The callee is the server or service that receives and processes the request. In this guide this relates to the service deployment.
Caller
The caller (or client) is the one that sends the request. In this guide it is Postman, the external tool.
Endpoint
An endpoint is the URL where a REST API listens for requests and provides access to specific data or functionality.
REST
REST (Representational State Transfer) is a way for computers or systems to talk to each other over the internet using rules based on the HTTP protocol. There are four methods available to perform actions:
- GET: read data
- POST: create something new
- PUT: update something
- DELETE: remove something