
Develop a KNIME Extension with Java
Introduction
Quickstart guide describes how to create a new KNIME Extension in Java, i.e. write a new node implementation to be used in KNIME Analytics Platform. You will learn how to set up a KNIME SDK, how to create a new KNIME Extension project, how to implement a simple manipulation node, how to test the node, and how to easily deploy the node in order to make it available for others. Publishing the extension is explained in detail in the following guide: Publish Your Extension on KNIME Community Hub
For this purpose, we created a reference extension you can use as orientation. This KNIME Extension project can be found in the org.knime.examples.numberformatter folder of the knime-examples GitHub repository. It contains all required project and configuration files and an implementation of a simple Number Formatter example node, which performs number formatting of numeric values of the input table. We will use this example implementation to guide you through all necessary steps that are involved in the creation of a new KNIME Extension.
Set up a KNIME SDK
In order to start developing KNIME source code, you need to set up a KNIME SDK. A KNIME SDK is a configured Eclipse installation which contains KNIME Analytics Platform dependencies. This is necessary as Eclipse is the underlying base of KNIME Analytics Platform i.e. KNIME Analytics Platform is a set of plug-ins that are put on top of Eclipse and the Eclipse infrastructure. Furthermore, Eclipse is an IDE, which you will use to write the actual source code of your new node implementation.
To set up your KNIME SDK, we start with an "Eclipse IDE for RCP and RAP Developers" installation (this version of Eclipse provides tools for plug-in development) and add all KNIME Analytics Platform dependencies. In order to do that, please follow the SDK Setup instructions. Apart from giving instructions on how to set up a KNIME SDK, the SDK Setup will give some background about the Eclipse infrastructure, its plug-in mechanism, and further useful topics like how to explore KNIME source code.
Create a New KNIME Extension Project
After Eclipse is set up and configured, create a new KNIME Extension project. A KNIME Extension project is an Eclipse plug-in project and contains the implementation of one or more nodes and some KNIME Analytics Platform specific configuration. The easiest way to create a KNIME Extension project, is by using the KNIME Node Wizard, which will automatically generate the project structure, the plug in manifest and all required Java classes. Furthermore, the wizard will take care of embedding the generated files in the KNIME framework.
The KNIME Node Wizard
Install the KNIME Node Wizard
Open the Eclipse installation wizard at
Help → Install New Software…, enter the following update site location:https://update.knime.com/analytics-platform/5.12/in the location box labelledWork with:.Hit the Enter key, and put
KNIME Node Wizardin the search box. Tick theKNIME Node Wizardunder the categoryKNIME Node Development Tools, click the Next button and follow the instructions. Finally, restart Eclipse.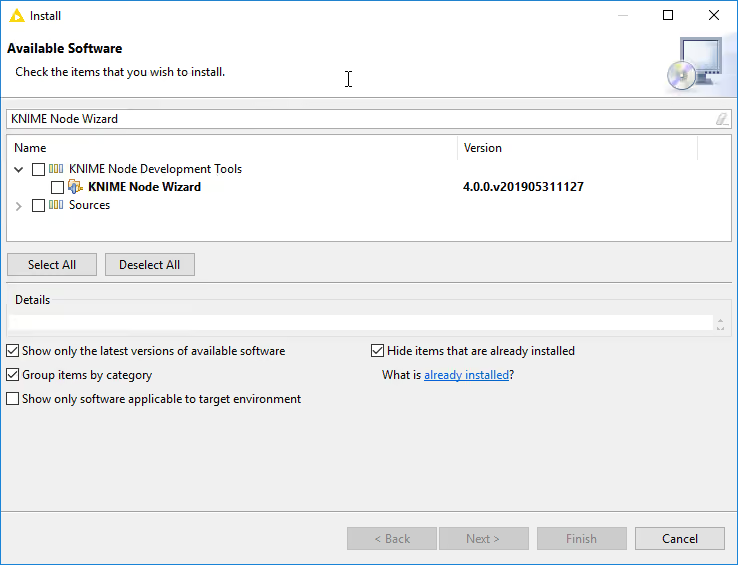
Start the KNIME Node Wizard
After Eclipse has restarted, start the KNIME Node Wizard at
File → New → Other…, selectCreate a new KNIME Node-Extension(can be found in the categoryOther), and hit the Next button.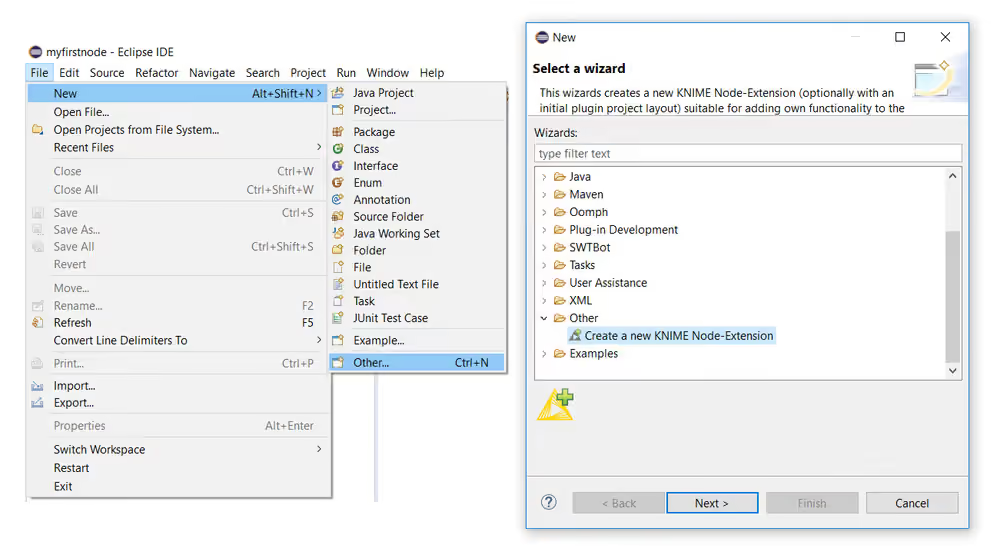
Create a KNIME Extension Project
In the
Create new KNIME Node-Extensiondialog window enter the following values:- New Project Name:
org.knime.examples.numberformatter - Node class name:
NumberFormatter - Package name:
org.knime.examples.numberformatter - Node vendor:
<your_name> - Node type: Select
Manipulatorin the drop down menu.
Replace
<your_name>with the name that you like to be the author of the created extension. Leave all other options as is and click Finish.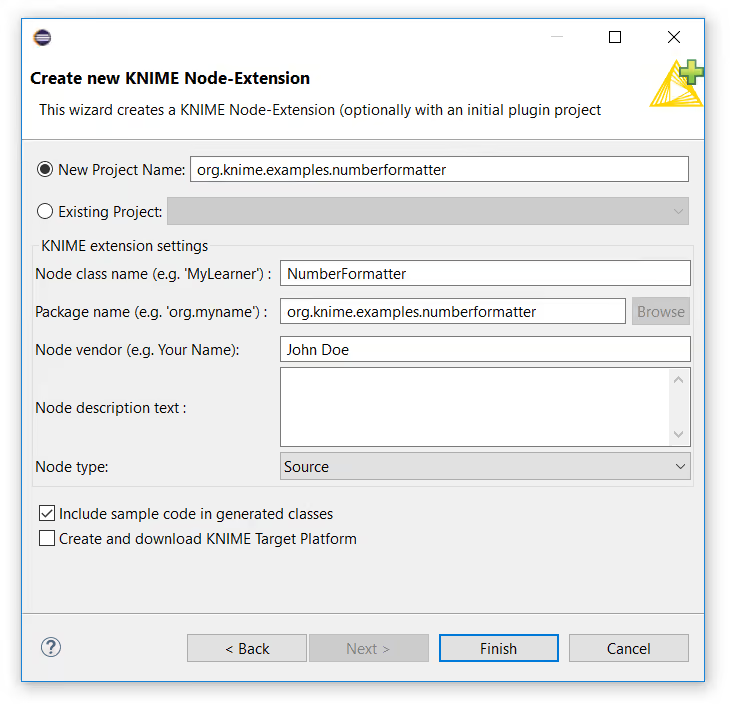
After some processing, a new project will be displayed in the Package Explorer view of Eclipse with the project name you gave it in the wizard dialog.
Make sure that the checkbox
Include sample code in generated classesis checked. This will include the code of the aforementioned Number Formatter node in the generated files.
In the
Package Explorerview of Eclipse (left side) you should now see three projects. The two projectsorg.apache.xmlbeansandorg.knime.sdk.setupwhich you imported in the SDK Setup, and the projectorg.knime.examples.numberformatterthat you just created using the KNIME Node Wizard.- New Project Name:
Test the Example Extension
At this point, all parts that are required for a new KNIME Extension are contained in your Eclipse workspace and are ready to run. To test your node, follow the instructions provided in the Launch KNIME Analytics Platform Section of the SDK Setup. After you started KNIME Analytics Platform from Eclipse, the Number Formatter node will be available at the root level of the node repository. Create a new workflow using the node (see Figure below), inspect the input and output tables, and play around with the node.

The node will perform simple rounding of numbers from the input table. To change the number of decimal places the node should round to, change the digit contained in the format String that can be entered in the node configuration (e.g. %.2f will round to two decimal places,the default value is %.3f). After you are done, close KNIME Analytics Platform.
Project Structure
Next, let’s review the important parts of the extension project you’ve just created. First, we’ll have a look at the files located in org.knime.examples.numberformatter.
The files contained in this folder correspond to the actual node implementation. With the declarative node API, the node is described in Java: it consists of two Java classes — both prefixed with the node class name you provided in the KNIME Node Wizard (e.g. NumberFormatter) — plus the node icon:
NumberFormatterNodeFactory.javaThe
NodeFactoryis the single entry point of the node. It extendsDefaultNodeFactoryand holds a declarativeDefaultNodedefinition built with a fluent API: the node's name, icon, short and full description, input/output ports, its settings class, and its configuration/execution logic are all declared here in Java. The factory is registered via a KNIME extension point in theplugin.xml, so the node is discoverable by the framework and displayed in the node repository view of KNIME Analytics Platform. The node type (Manipulator,Source,Sink, …) you selected in the wizard is set here via.nodeType(...).NumberFormatterNodeParameters.javaThe settings class. It implements
NodeParametersand declares the node's configuration as annotated fields. Each@Widget-annotated field becomes a widget in the node's automatically generated dialog, and the framework persists these fields for you. Itsvalidate()method validates the settings. In the case of the Number Formatter node this is a single text field for the format String. By convention, every class implementingNodeParametersis named...Parameters.default.pngThis is the icon of the node displayed in the workflow editor. The path to the node icon is specified in the factory's
DefaultNodedefinition (the.icon(...)builder step). In this case the icon is just a placeholder displaying a question mark. For your own node, replace it with an appropriate image representative of what the node does. It should have a resolution of 16x16 pixels.
Apart from the Java classes, which define the node implementation, there are two files that specify the project configuration:
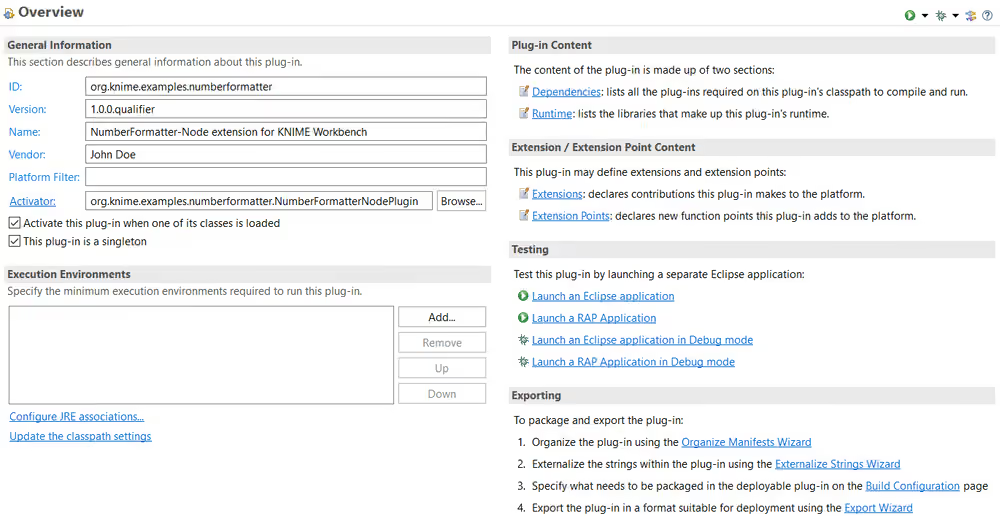
plugin.xmlandMETA-INF/MANIFEST.MFThese files contain important configuration data about the extension project, like dependencies to other plug-ins and the aforementioned extension points. You can double click on the
plugin.xmlto open an Eclipse overview and review some of the configuration options (e.g. the values we entered in KNIME Node Wizard are shown on the overview page underGeneral Informationon the left). However, you do not have to change any values at the moment.
Number Formatter Node Implementation
Once you have reviewed the project structure, we have a look at some implementation details. We will cover the most important parts as the example code in the project you created earlier already contains detailed comments in the code of the implemented methods (also have a look at the reference implementation in the org.knime.examples.numberformatter folder of the knime-examples repository).
Generally, the Number Formatter node takes a data table as input and applies a user specified format String to each Double column of the input table. For simplicity, the output table only contains the formatted numeric columns as String columns. This basically wraps the functionality of the Java String.format(…) function applied to a list of Double values into a node usable in KNIME Analytics Platform.
With the declarative API the whole node lives in NumberFormatterNodeFactory.java. At its heart is a DefaultNode definition, built with a fluent builder:
java
static final DefaultNode NODE = DefaultNode.create()
    .name("NumberFormatter")
    .icon("default.png")
    .shortDescription("Formats the numbers of all Double columns of the input table.")
    .fullDescription("…")
    .sinceVersion(5, 12, 0)
    .ports(p -> p
        .addInputTable("Input table", "The table whose Double columns should be formatted.")
        .addOutputTable("Formatted table", "A table with one formatted String column per Double input column."))
    .model(m -> m
        .parametersClass(NumberFormatterNodeParameters.class)
        .configure(NumberFormatterNodeFactory::configure)
        .execute(NumberFormatterNodeFactory::execute))
    .nodeType(NodeType.Manipulator);
This single definition declares everything the framework needs: the node's name, icon and descriptions, its input and output ports (here one input table and one output table — declared via addInputTable/addOutputTable), its settings class, and its configuration/execution logic. The factory's constructor simply hands this definition to the superclass: public NumberFormatterNodeFactory() { super(NODE); }.
The settings live in NumberFormatterNodeParameters:
java
@Widget(title = "Number format", description = "…")
String m_numberFormat = "%.3f";

@Override
public void validate() throws InvalidSettingsException {
    // throws InvalidSettingsException if m_numberFormat is not a valid pattern
}
Each @Widget-annotated field becomes a widget in the auto-generated dialog. The validate() method is the single source of settings validation. You do not need to write any persistence code — the framework saves and loads the NodeParameters fields for you.
The node's logic is provided as two static methods on the factory, referenced from the model builder above (NumberFormatterNodeFactory::configure / ::execute).
java
static void execute(ExecuteInput input, ExecuteOutput output)The actual algorithm of the node is implemented in the execute method. This method is called after all preceding nodes have executed successfully, ensuring that all input data is available. The input tables are obtained via input.getInTable(0) (one call per node input port as defined in the DefaultNode definition). Each input is of type BufferedDataTable, KNIME's standard for tabular data. The framework manages table persistence, so large datasets are automatically handled and may be flushed to disk if needed.
The ExecutionContext, obtained via input.getExecutionContext(), provides means to create/modify BufferedDataTable objects and report the execution status to the user. The most straightforward way to create a new DataTable is via the createDataContainer(final DataTableSpec spec) method of the ExecutionContext. This will create an empty container where you can add rows to. The added rows must comply with the DataTableSpec the data container was created with. E.g. if the container was created with a table specification containing two Double columns, each row that is added to the container must contain two DoubleCells. After you are finished adding rows to the container close it via the close() method and retrieve the BufferedDataTable with getTable().
This way of creating tables is also used in the example code (see NumberFormatterNodeFactory.java). Apart from creating a new data container, there are more powerful ways to modify already existing input tables. However, these are not in the scope of this quickstart guide, but you can have a look at the methods of the ExecutionContext.
The settings entered by the user in the dialog are read via input.getParameters(), which returns the populated NumberFormatterNodeParameters instance. Once you are done, hand the output to each port via output.setOutData(0, table) — one call per node output port as defined in the DefaultNode definition.
java
static void configure(ConfigureInput input, ConfigureOutput output) throws InvalidSettingsExceptionThe configure method has two responsibilities. First, it has to check if the incoming data table specification is suitable for the node to execute with respect to the user supplied settings. For example, a user may disallow a certain column type in the node dialog, then we need to check if there are still applicable columns in the input table according to this setting. Second, to calculate the table specification of the output of the node based on the inputs. For example: imagine the Number Formatter node gets a table containing two Double columns and one String column as input. Then this method should produce a DataTableSpec containing two DataColumnSpec of type String (the Double columns will be formatted to String, all other columns are ignored). The incoming specification is read via input.getInTableSpec(0) and the calculated output specification is published via output.setOutSpec(0, outputSpec). If the input table has no Double column at all, we attach a warning via output.setWarningMessage(...). If the incoming table specification is not suitable for the node to execute or does not fit the user provided configuration, throw an InvalidSettingsException with an informative message for the user.
We encourage you to read through the code of the above classes to get a deeper understanding of all parts of a node. For a more thorough explanation about how a node should behave consult the KNIME Noding Guidelines.
For deeper dives, the knime-core-ui repository is the single source of truth for the declarative node API:
- Building a node from scratch:
docs/create-new-node - Migrating a legacy node to the modern API:
docs/migrate-node
Deploy your Extension
This section describes how to manually deploy your Extension after you have finished the implementation using the Number Formatter Extension as example. There are two options:
Option 1: Local Update Site (recommended)
The first option is to create a local Update Site build, which can be installed using the standard KNIME Analytics Platform update mechanism.
To create a local Update Site build, you need to create a Feature project that includes your extension. A Feature is used to package a group of plug-ins together into a single installable and updatable unit. To do so, go to File → New → Other… , open the Plug-in Development category, select Feature Project and click the Next button.
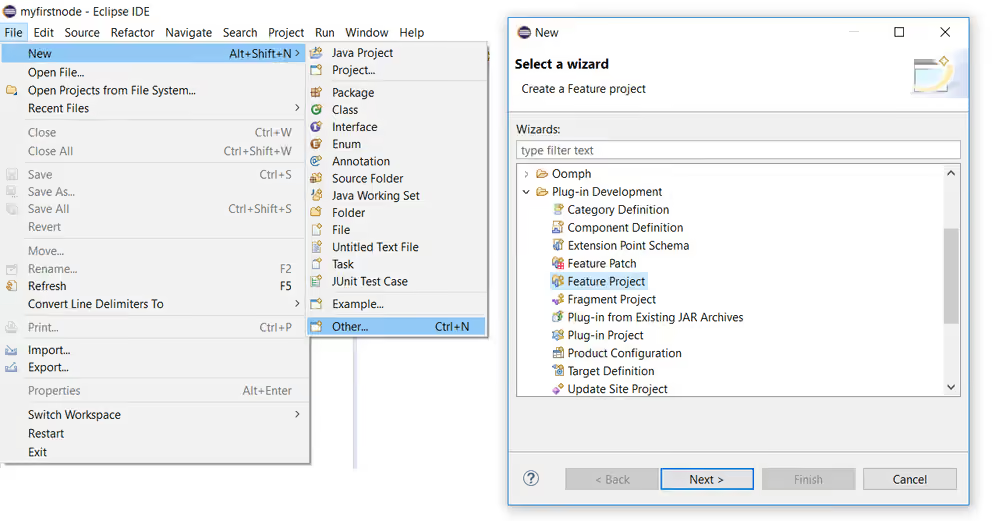
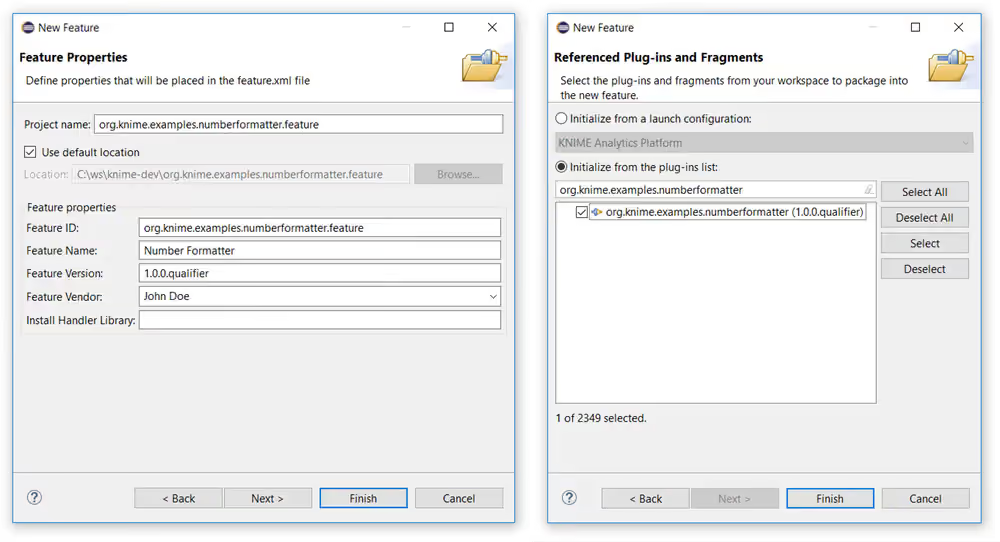
Enter the following values in the Feature Properties dialog window:
- Project ID:
org.knime.examples.numberformatter.feature - Feature Name:
Number Formatter - Feature Version: leave as is
- Feature Vendor:
<your_name> - Install Handler Library: leave empty
Replace <your_name> with the name that you like to be the author of the created extension. Additionally, choose a location for the new Feature Project (e.g. next to the Number Formatter Extension) and click the Next button. On the next dialog choose Initialize from the plug-ins list: and select the org.knime.examples.numberformatter plug-in (you can use the search bar to easily find the plug-in). The plug-ins selected here are the ones that will be bundled into an installable unit by the Feature. Of course, you can edit that list later on. Finally, hit the Finish button.
After the wizard has finished, you will see a new project in your Eclipse Package Explorer with the Project ID you gave it earlier and Eclipse will automatically open an overview of the feature.xml (you can also open this view by double clicking on the feature.xml file located in the Feature Project). The Feature overview looks similar to the plugin.xml overview, be careful not to confuse them. You can view/modify the list of included plug-ins by selecting the Included Plug-ins tab at the bottom of the overview dialog.
Additionally to the information you entered in the Feature Project Wizard, you should provide a detailed Feature description, license and copyright information in the Feature meta data. This can be done by selecting the Information tab at the bottom of the overview dialog. This information will be displayed to the user during installation of the Feature.
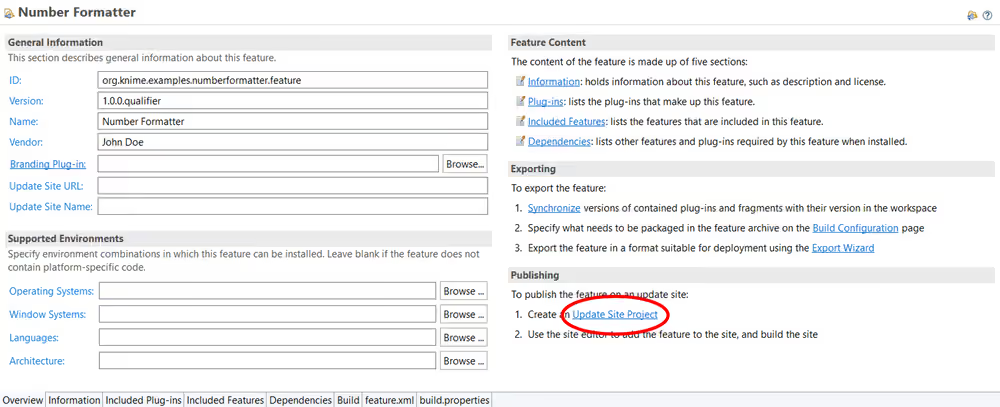
Next, you need to publish the Feature on a local Update Site. For this, first create an Update Site Project by clicking on the Update Site Project link on bottom right corner of the Eclipse overview dialog of the feature.xml (see figure above). This will start the Update Site Project Wizard.
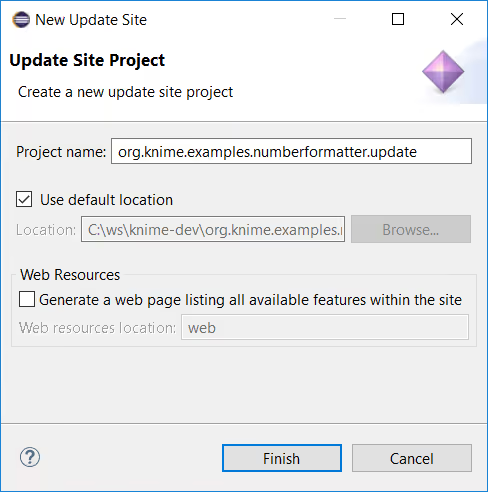
On the shown dialog, enter the following:
- Project name:
org.knime.examples.numberformatter.update
Again, choose a location for the new Update Site Project and click the Finish button. Similar to the Feature Project Wizard, you will see a new project in your Eclipse Package Explorer with the Project name you gave it in the wizard dialog and Eclipse will automatically open an overview of the site.xml called Update Site Map. Again similar to a Feature, an Update Site bundles one or several Features that can be installed by the Eclipse update mechanism.
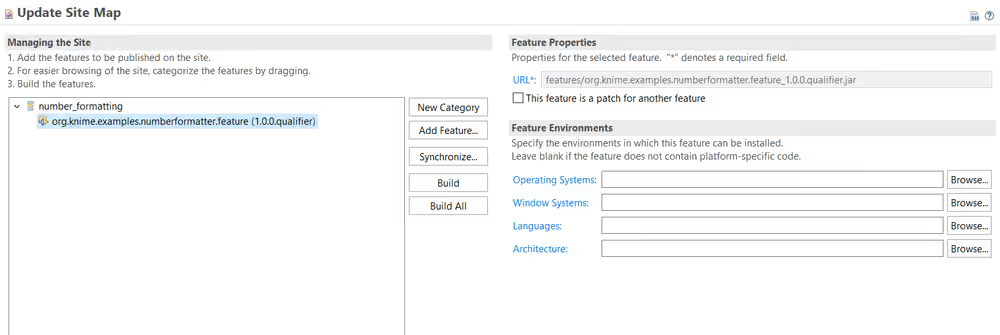
On the Eclipse overview of the site.xml, first create a new category by clicking on the New Category button. This will create a new default category shown in the tree view on the left. On the right, enter an ID like number_formatting and a Name like Number Formatting. This name will be displayed as a category and used for searching when the Feature is installed. Also, provide a short description of the category.
Second, select the newly created category from the tree view and click the Add Feature… button. On the shown dialog, search for org.knime.examples.numberformatter.feature and click the Add button.
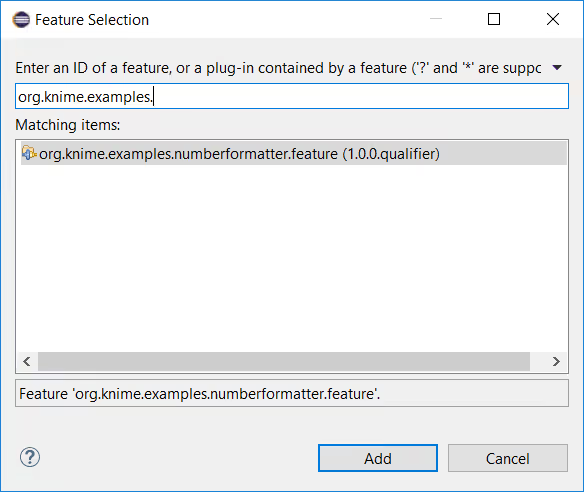
At last, click the Build All button. This will build all Features added to the update site and create an installable unit that can be used to install the Number Formatter Extension into an KNIME Analytics Platform instance.
The building of the Update Site might take some time. You can review the progress in the bottom right corner of Eclipse.
After building has finished, you can now point KNIME Analytics Platform to this folder (which now contains a local Update Site) to install the Extension. To do so, in KNIME Analytics Platform open the Install New Software… dialog, click on the Add button next to the update site location, on the opening dialog click on Local…, and choose the folder containing the Update Site. At last, give the local Update Site a name and click OK. Now, you can install the Number Formatter Extension like any other plug-in.
Now that you have a working extension, why not sharing it with the community? Take a look at the following guide: Publish Your Extension on KNIME Community Hub
Option 2: dropin
The second option is to create a dropin using the Deployable plug-ins and fragments Wizard from within Eclipse. A dropin is just a .jar file containing your Extension that is simply put into the Eclipse dropins folder to install it.
To create a dropin containing your Extension, go to File → Export → Plug-in Development → Deployable plug-ins and fragments and click Next. The dialog that opens will show a list of deployable plug-ins from your workspace. Check the checkbox next to org.knime.examples.numberformatter. At the bottom of the dialog you are able to select the export method. Choose Directory and supply a path to a folder where you want to export your plugin to. At last click Finish.
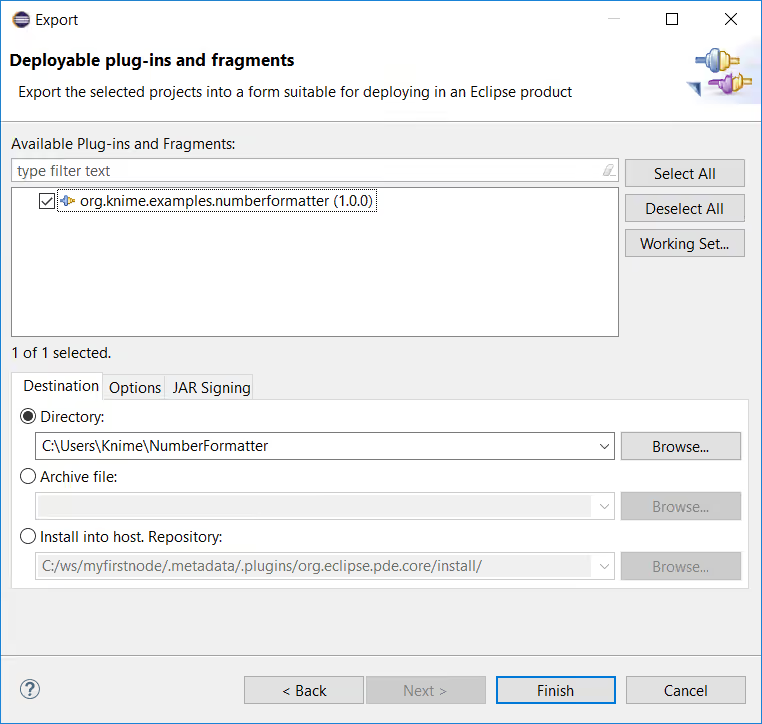
After the export has finished, the selected folder will contain a .jar file containing your plugin. To install it into any Eclipse or KNIME Analytics Platform installation, place the .jar file in the dropins folder of the KNIME/Eclipse installation folder. Note that you have to restart KNIME/Eclipse for the new plugin to be discovered. In this example, the node is then displayed at the top level of the node repository in KNIME Analytics Platform.
Further Reading
- For more information on development see the Developers Section of the KNIME website.
- KNIME source code