
User Guide
Introduction
KNIME Community Hub is a KNIME-managed Hub instance.
It is a central place to collect the common knowledge base among the KNIME Community and it has search functionalities as well as collaboration capabilities.
On KNIME Community Hub you can search for nodes, extensions, components, and workflows made available by the community.
You can use these as blueprints and building blocks in KNIME Analytics Platform, and build workflows to solve your data science use cases.
KNIME Hub can also be used to upload and organize workflows in a central place, and to collaborate with other users on your projects.
Via KNIME Hub you can:
- Find workflows, components uploaded by KNIME Community
- Upload and organize your workflows and components in projects
- Create and manage projects
- Collaborate with other users on your projects
For more information about KNIME Pro or KNIME Team, the paid services offered on KNIME Community Hub that allow you to execute workflows ad hoc or on a schedule, and deploy and share data applications, refer to the KNIME Pro Guide and the KNIME Team Guide.
Search items and use them in KNIME Analytics Platform
You can find the KNIME Community Hub at the following address:
In the browser, you will access the KNIME Hub home page:
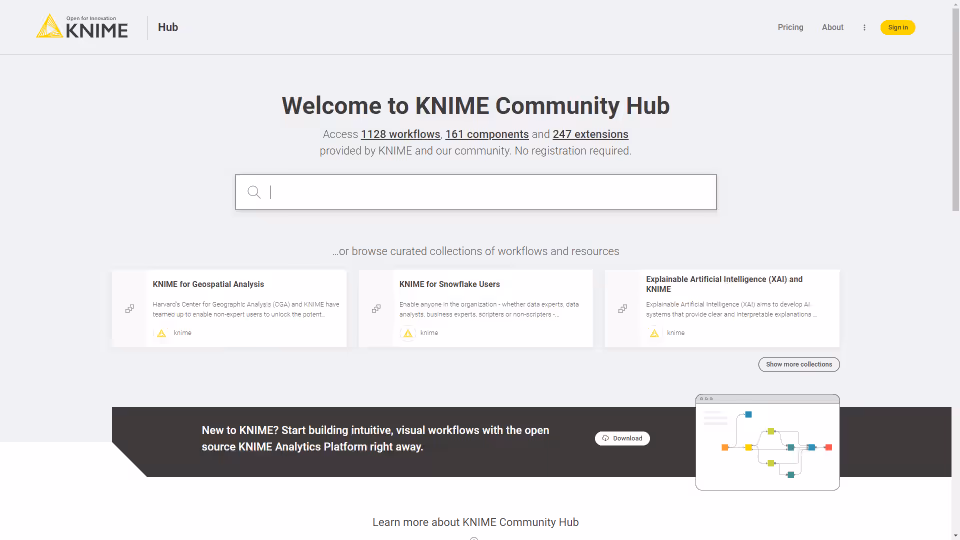
Search
Insert a keyword in the search bar to search among the following items publicly shared by the KNIME Community:
- Nodes
- Components
- Workflows
- Extensions
- Collections
Press Enter to visualize the results.
You will see a list of all the search results in tiles, with:
An icon indicating if they are nodes, components, workflows or extensions
The title
Whether it is a draft or a versioned item (for components and workflows)
Find out more about versioning a workflow or a component in the versioning section.
Tags, when available
A preview of the description, when available
The owner icon for workflows, and extensions
The icon, for nodes and components
On top of the search results list, you can filter the results to list only nodes, components, workflows, extensions, or collections by clicking the respective tab.
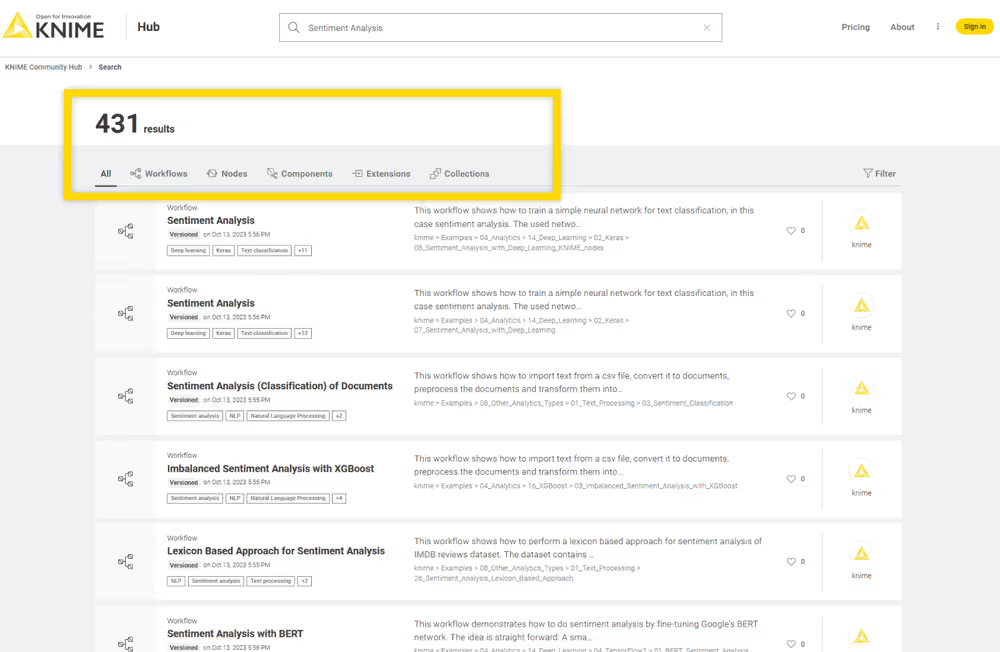
Click on a search result to access the relative page.
When searching for workflows and components, the items that have been versioned will show up higher in rank than draft-only items. This ensures you to be able to easier find versioned workflows and components when searching on KNIME Hub.
Nodes
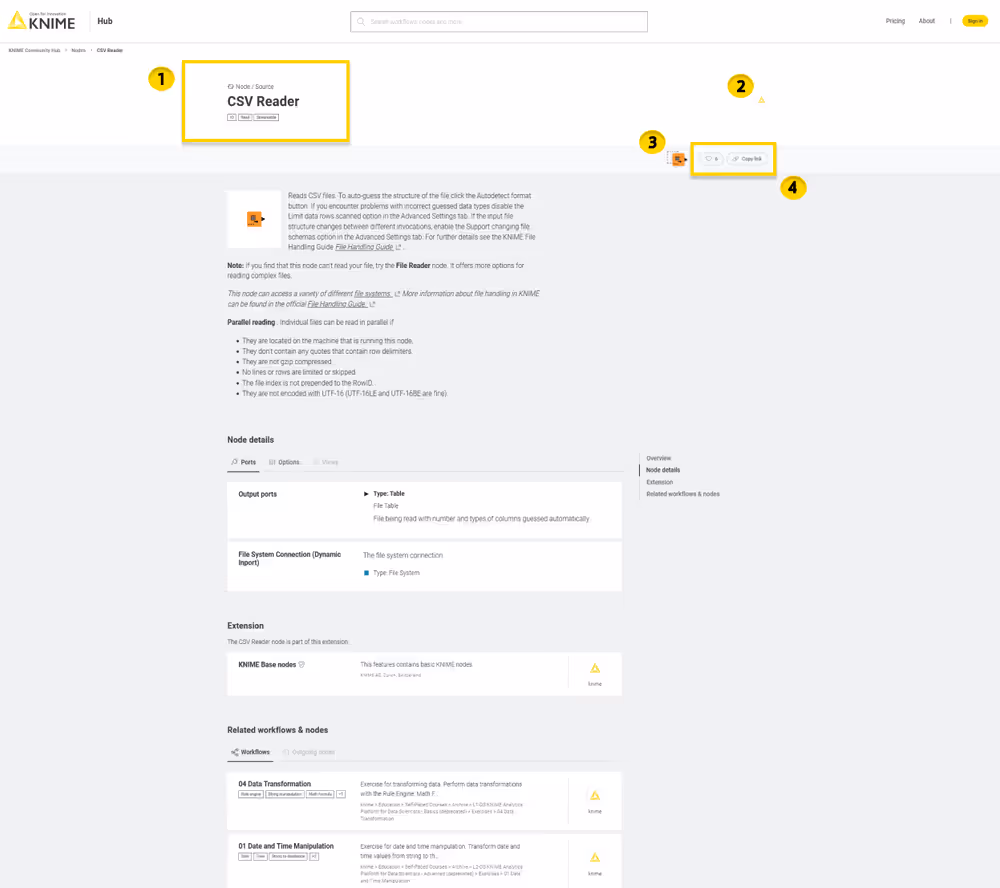
On the node page, you will find:
- The node function, name, and tags
- The node owner
- The node drag & drop element: You can drag & drop the element into the Workflow Editor of KNIME Analytics Platform to use the node directly to build a workflow or a component. See the Drag & drop section for more details on this feature.
- The node likes (see the Likes section for more details on this feature) and a link icon to copy the node short link
For each node you can also find:
- An Overview with a description of the node functionality
- Node details where you can see information about Input and Output node ports, a description of the additional Options, and, when available, the Views that the node is able to produce
- In the section Extension, you can see the node extension and the extension owner
- Finally, in the section Related workflows & nodes you are provided with:
- Workflows that are available on KNIME Hub and that contain the node
- When available, the Outgoing nodes, that are the most popular nodes to follow the node when building a workflow.
Components
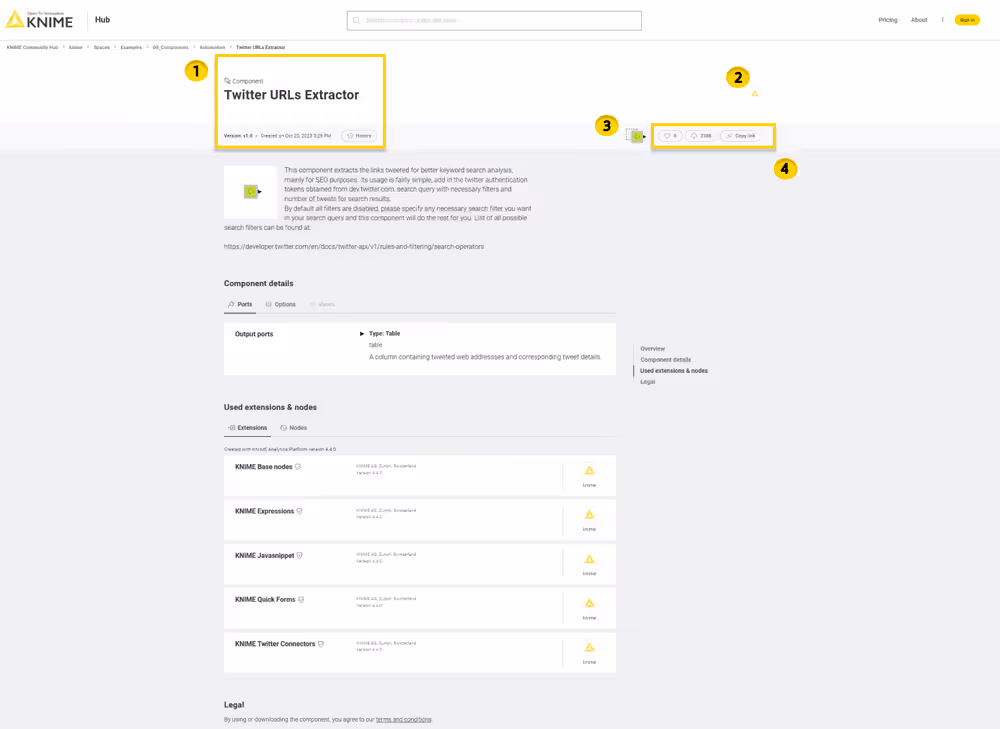
Components really are KNIME nodes that you create to bundle functionality. They have their own configuration dialog and their own composite views. Thus, also in the component page you will find similar information as for nodes.
- The component name, optionally its latest version (see the versioning section for more details on this feature), and last edit date
- The component owner
- The component drag & drop element: You can drag & drop the element into the Workflow Editor of KNIME Analytics Platform to use the component directly to build a workflow. See the Drag & drop section for more details on this feature.
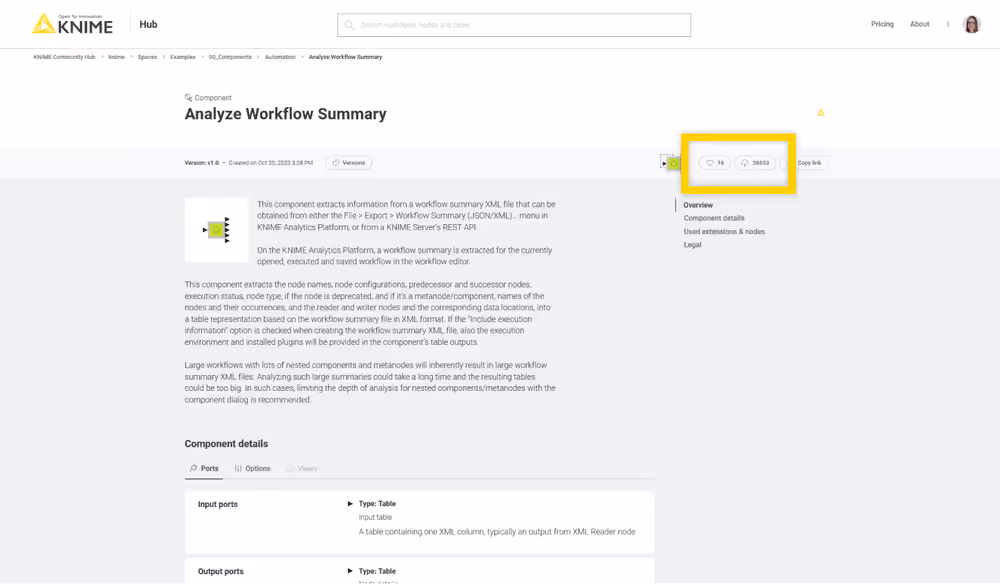
- The component likes (see the Likes section for more details on this feature), the count of downloads, and a link icon to copy the component short link.
For each component you can also find:
- An Overview with a description of the component functionality, if provided by the component owner
- Component details, where you can see information about the component’s Input and Output ports, a description of the additional Options, and, if available, the Views that the component is able to produce
- In the section Used extensions & nodes you can see the component extensions and nodes
- Finally, in the section Related workflows you are provided with Workflows that are available on KNIME Hub and that contain the component
Workflows
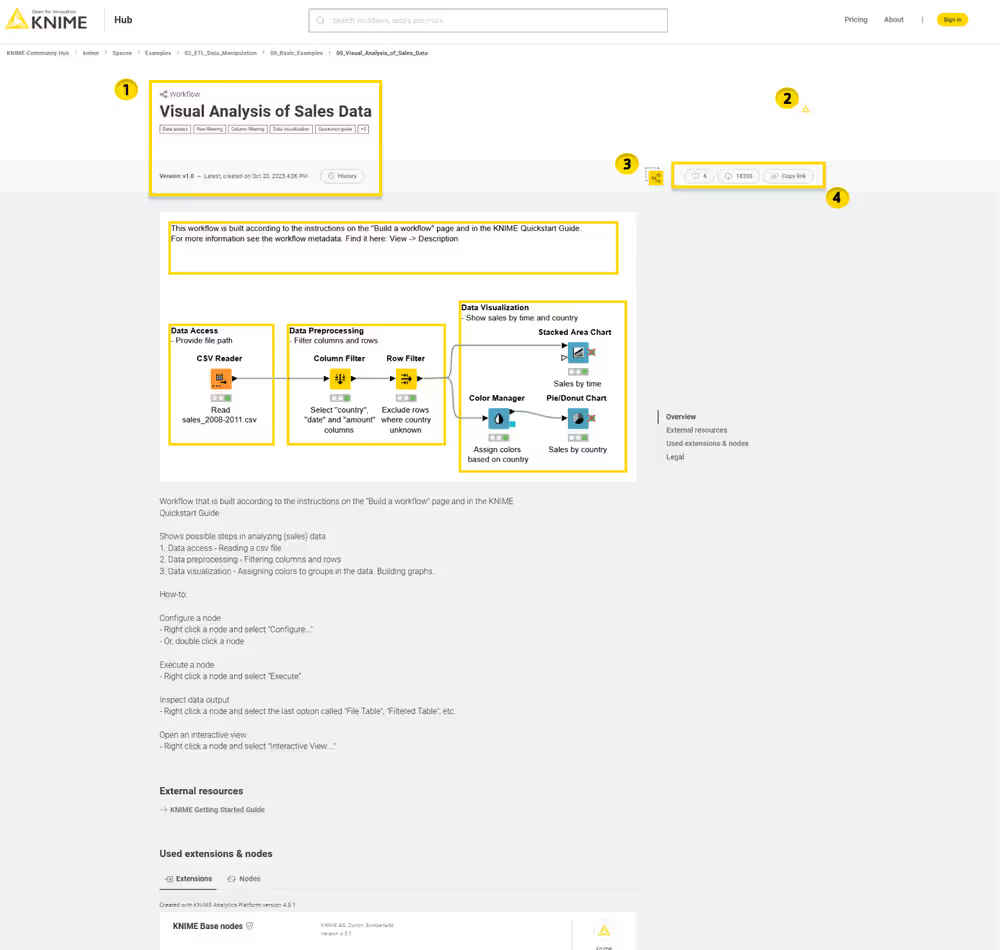
A workflow page typically has multiple useful information about the workflow such as:
- The workflow title, tags, optionally its latest version (see the versioning section for more details on this feature), and its last edit date
- The space owner where the workflow is contained and, if different from the space owner, the workflow developer
- The workflow drag & drop element: You can drag & drop the element in the space explorer of KNIME Analytics Platform. This will prompt an Import window which allows you to import the workflow. See the Drag & drop section for more details on this feature.
- The workflow likes (see the Likes section for more details on this feature), the count of downloads, and a link icon to copy the workflow short link.
For each workflow you can also find:
An Overview with a description of the workflow when provided by the workflow developer
External resources links to external resources such as KNIME blog posts, KNIME documentation, or any other interesting link that the workflow developer might want to provide
In the section Used extensions & nodes you can see the workflow extensions and nodes, and the KNIME Analytics Platform that has been used to create the workflow
Extensions
Extensions are collection of nodes that provide additional functionality such as access to and processing of complex data types, the use of advanced algorithms, as well as the use of scripting nodes, and so on.
KNIME Extensions are developed and maintained by KNIME, allowing you to access open source projects and add their functionality to your KNIME workflows. Community Extensions instead include functionality specific to various industries and domains. Some of these community extensions are classified as Trusted Community Extensions, which have been tested for backward compatibility and compliance with the KNIME usage model and quality standards, and Experimental Community Extensions, which come directly from the labs of our community developers. Finally, also Partner Extensions are available which provide additional capabilities offered and maintained by our partners.
All these Extensions are available on KNIME Hub.
An extension page typically has multiple useful information about the extension such as:
- The extension name and owner, version of the extension
- The extension drag & drop element: You can drag & drop the element into the Workflow Editor of KNIME Analytics Platform. If the extension is not already installed this will prompt an Install Extension window which allows you to install the extension. See the Drag & drop section for more details on this feature.
- The extension likes (see the Likes section for more details on this feature), and a link icon to copy the extension short link.
For each extension you can also find:
- An Overview with a description of the extension when provided
- Included nodes with a list of all the nodes that are part of the extension and that will be available once the extension is installed
- In the section Related workflows, you are provided with Workflows that are available on KNIME Hub and that contain the nodes that are part of the extension
- Finally, in the section Legal & update site, you can have legal information about the copyright and the update site information, with the type of the extension, version number, and the link to the update site
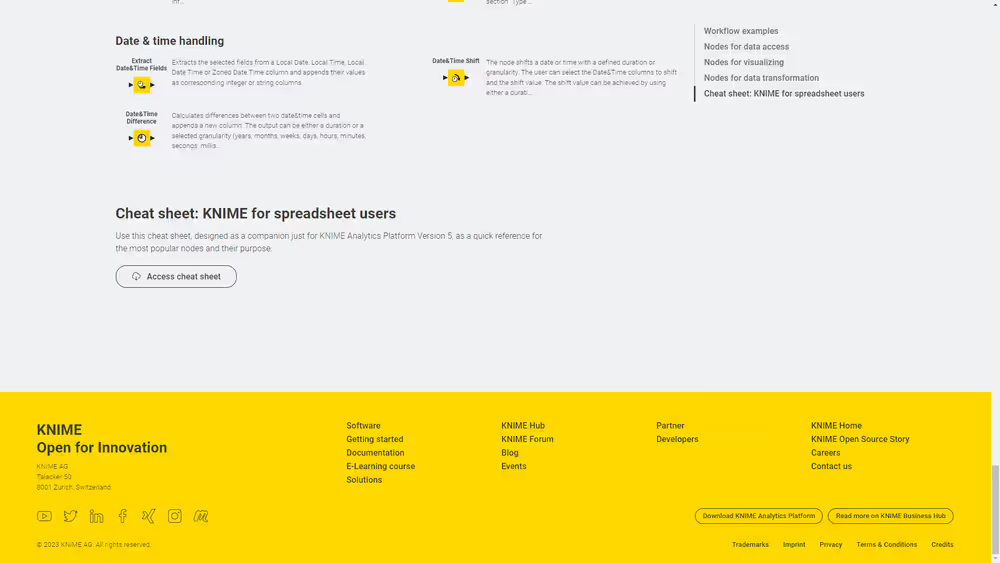
Collections
KNIME Collections on KNIME Hub allow upskilling users by providing selected workflows, nodes, and links about a specific, common topic.
One example of a collection can be found on KNIME Community Hub here.
This collection, for example, contains:
Workflow examples:
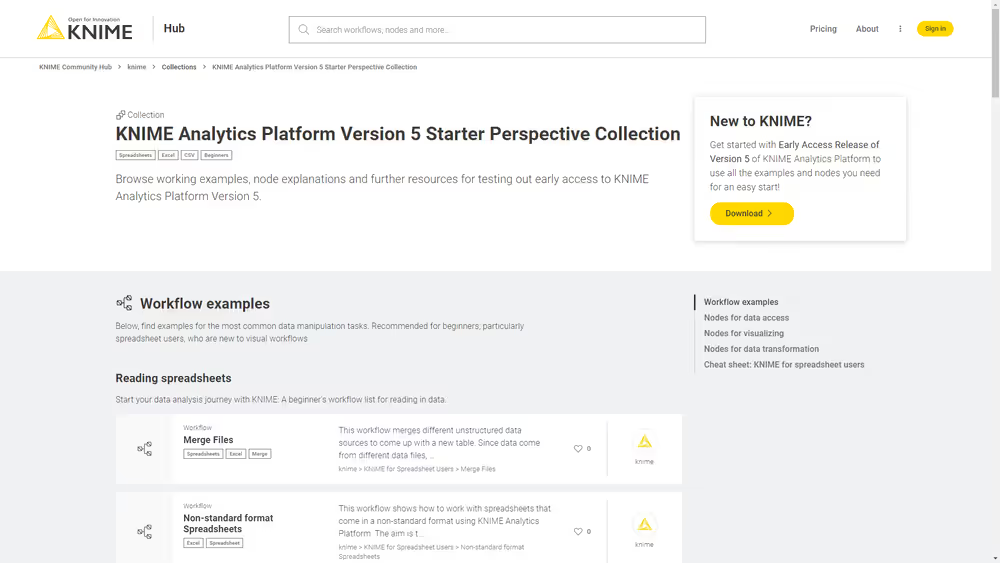
Nodes:
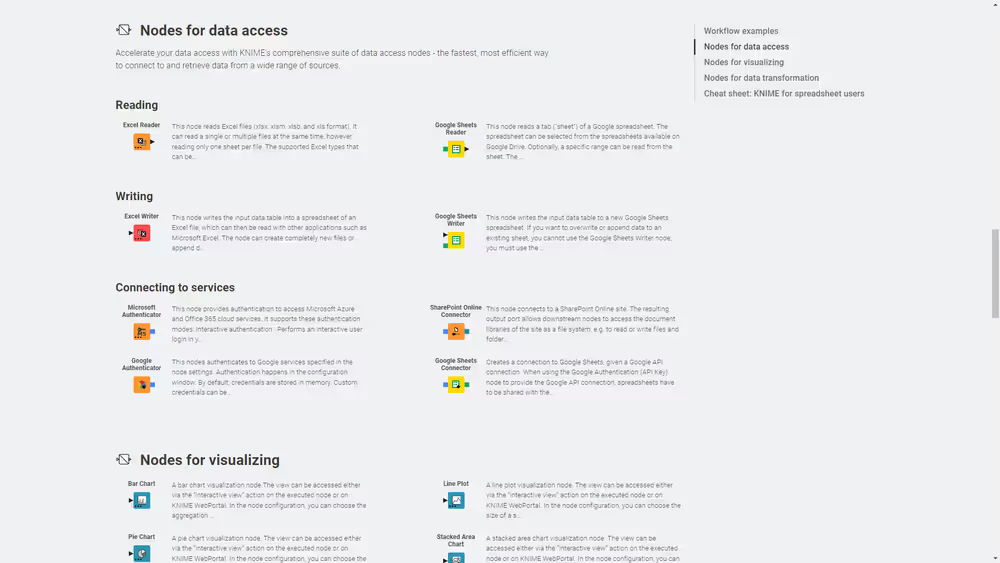
Links:
Drag & drop
You can drag & drop nodes, components, extensions, and workflows from KNIME Hub to import them into KNIME Analytics Platform and use them right away to build your own workflow, install KNIME Extensions, and execute uploaded workflow into your local installation.
Nodes, components, workflows: You can drag & drop a node, a component, or a workflow from KNIME Hub into your KNIME Analytics Platform. In case the node is part of an Extension that is not yet installed into your local installation of KNIME Analytics Platform or in case nodes that are part of extensions that are not yet installed are contained in the component, or workflow you will be asked if you want KNIME Analytics Platform to search and install the missing extension(s).
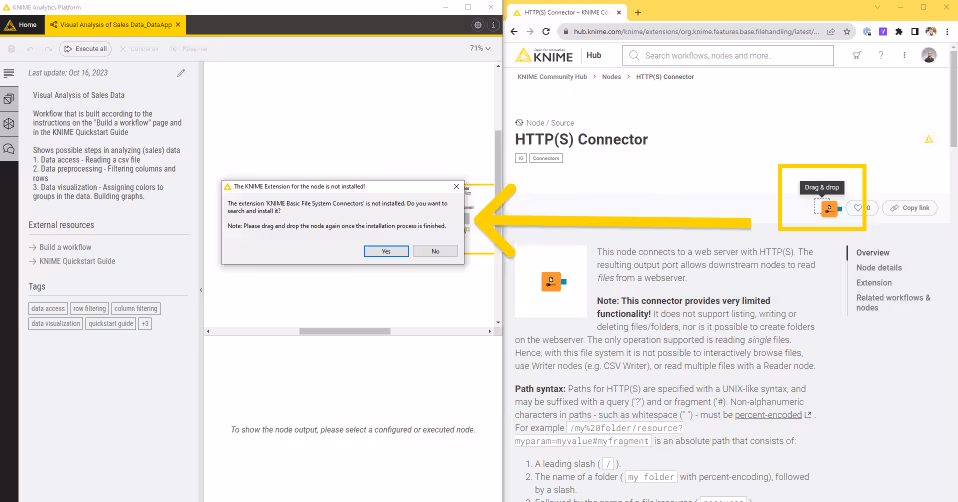
Extensions: You can drag & drop a specific extension into the Workflow Editor. KNIME Analytics Platform will search and install it. In order to be able to install the extension the extension’s update site that is indicated at the end of the extension page in the section Legal & update site must be activated in KNIME Analytics Platform.
In case you have a firewall active you might need to add the following hosts to the firewall whitelist:
https://*.amazonaws.com/
https://*.hub.knime.com
Find more information on the topic here.
KNIME Hub as a repository
Not only does KNIME Community Hub serve as a repository for nodes, components, workflows, and extensions, ready to use in KNIME Analytics Platform via an easy drag & drop, but you can also use KNIME Community Hub to share your workflows with the KNIME Community or to store and organize your material in a private space.
Create a user account
First, if you do not have one already, create a KNIME user account. It will grant you access not only to KNIME Hub but also to other KNIME products, such as the KNIME Community Forum.
- Go to KNIME Hub and click Sign in.
- Then select Create account.
- Select how do you want to continue:
- Continue with Google will redirect you to the Google sign-in page. Follow the instructions on the page to create your account.
- Continue with LinkedIn will redirect you to the LinkedIn sign-in page. Follow the instructions on the page to create your account.
- Continue with Email will ask you to insert your email address. Fill in the required information and click Create account.
After confirming the link sent to your email address, you can sign in with your account.
Click the user icon in the top right corner of KNIME Hub and select your profile from the menu to have access to your profile page. Here you can have an overview of the workflows and components you published, the extensions you published in case you have developed any of those, and the likes received. Also, you will have a list of the items you liked on KNIME Hub.
Change email address
If you want to change the email address of your KNIME user account (which is used for our forum, Community Hub and LearnUpon), then follow this section.
If you have access to your old email address
If you want to keep your Credly badges, follow this guide.
Send an email from your old email address to change-email@knime.com, stating:
KNIME user account:
Old email address:
New email address:
If you lost access to your old email address
Send an email to change-email@knime.com, stating:
KNIME user account:
Old email address:
New email address:
Verification: (e.g. score of your certificates)
Help with Credly badges requested: Yes/No
KNIME Hub spaces
From your profile page or by clicking your profile icon and selecting Spaces, you will have access to the KNIME Hub spaces that are linked to your user account. A space is a KNIME Hub repository where you can store and share your workflows and components. When you register and sign in to KNIME Hub, two spaces will be automatically created. These are a private space and a public space, which have different access permissions. You can manage your spaces by changing their names or adding a description to them.
You can upload your items from KNIME Analytics Platform to the spaces you have access to. Moreover, you can create new spaces, both private and public. Finally, you can add contributors to your public spaces. All these functionalities will be explained in the following paragraphs.
Access permissions of spaces
You are the owner of your spaces. Each space is linked and assigned to a specific user.
Spaces can be private or public:
- A private space is only accessible and manageable through your user account. Here, you can store various types of items like workflows, components, or data.
- A public space, instead, is visible to the entire KNIME Community, where you can share your workflows and components. Everyone will then be able to download them, drag & drop them to their KNIME Analytics Platform and use it, as well as like your spaces or items, or copy a link to your space and share it with others.
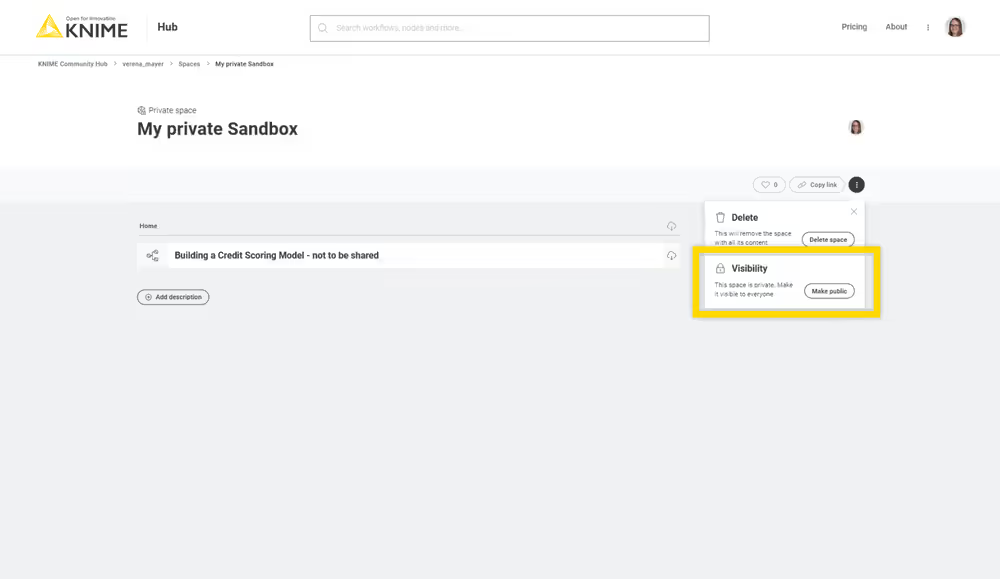
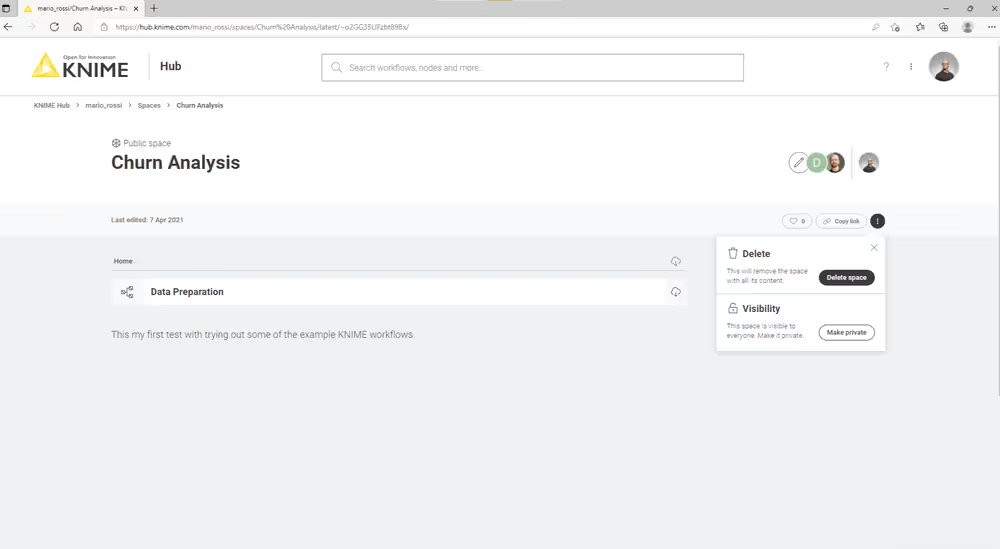
It is also possible to switch a space from private to public and vice versa. To do so, go to the private space you want to make public, click the ![]() icon on the top right part of the page, and under Visibility, select Make public (or vice versa, select Make private).
icon on the top right part of the page, and under Visibility, select Make public (or vice versa, select Make private).
Manage your spaces
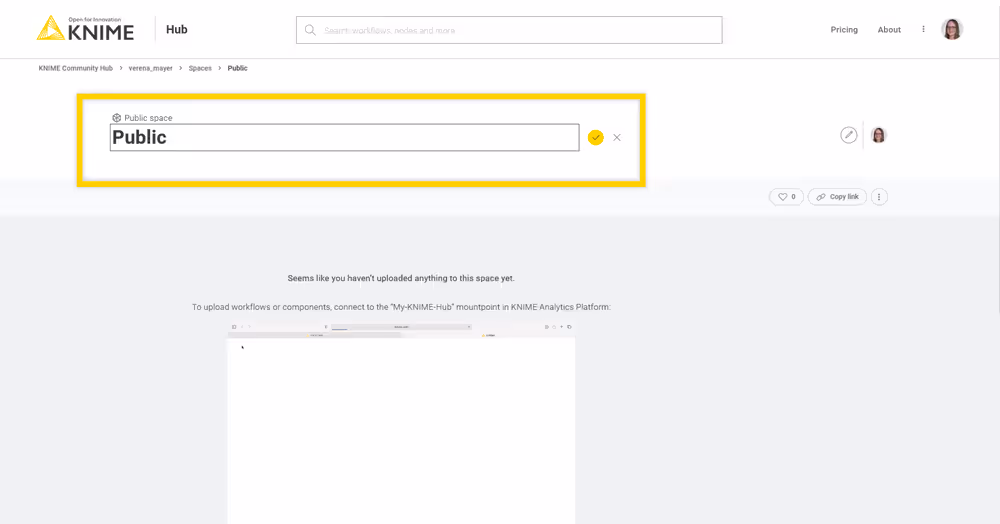
You can manage your spaces at any point in time by going back to the space page. You can change the space's name by going to the space page and clicking the title. Insert the new name in the title field and click the ![]() button or press Enter to save. Click the
button or press Enter to save. Click the ![]() button instead to discard your changes.
button instead to discard your changes.
You can also add a description to your space by clicking Add description at the bottom of the space page. Again, click the yellow tick button or press Enter to save your changes, or the ![]() button to discard them.
button to discard them.
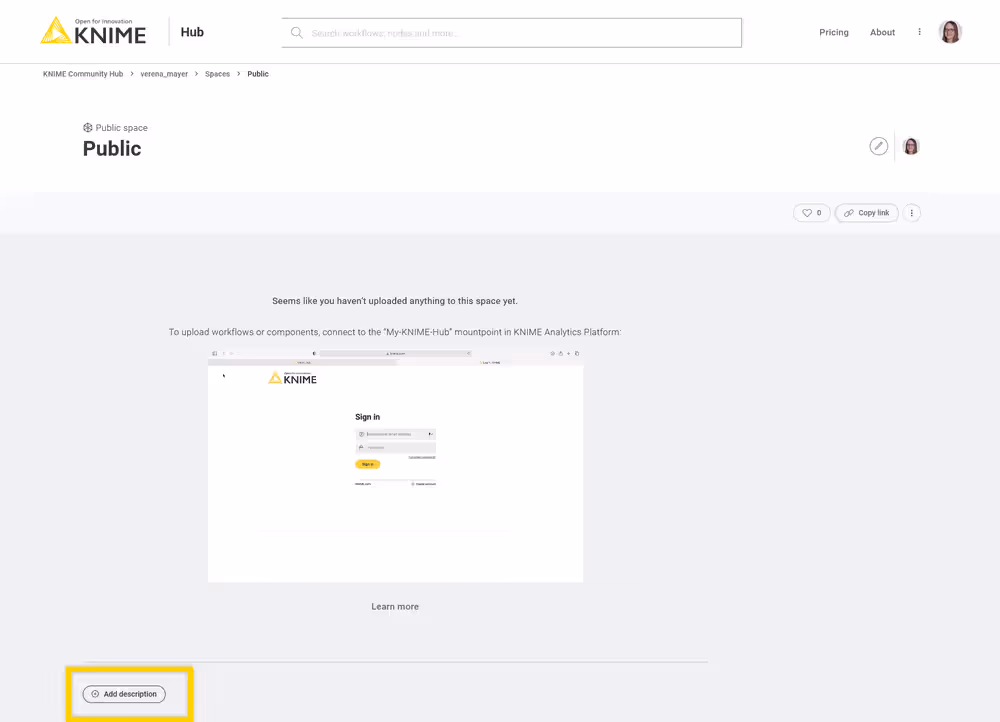
The description will be shown in the overview of your spaces in the corresponding space tile.
Create a new space
You can create a space from your profile’s spaces overview. Here, the spaces you have access to are shown, ordered by the latest update. Go to the last tile Create new space, and select if you want to create a Private space or a Public space. You can choose a name for the space, and the space will be created.
Delete a space
To delete a space, you can go to the space page, click the ![]() icon on the top right and select Delete space. You will be asked to insert the name of the space.
icon on the top right and select Delete space. You will be asked to insert the name of the space.
Connect to KNIME Community Hub and upload workflows
You can upload items to KNIME Hub:
- From the web UI of KNIME Community Hub, if the items are saved on your local computer.
- From a local KNIME Analytics Platform, if the items are on your KNIME Analytics Platform local space.
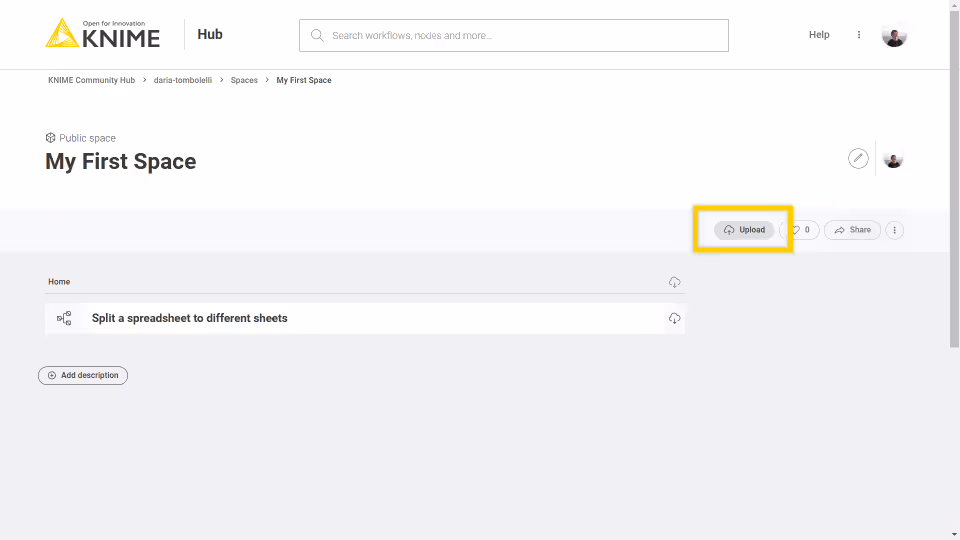
Upload from KNIME Community Hub web UI
Go to KNIME Community Hub, sign in with your username and password, then navigate to the space where you want to upload your workflow (.knwf file) or file to. Click the Upload button and select the file you want to upload to the space from your local filesystem.
Upload from KNIME Analytics Platform
Connect to the KNIME Community Hub from KNIME Analytics Platform: The first step is to connect to your KNIME Community Hub account on KNIME Analytics Platform. To do so, go to the Home page of KNIME Analytics Platform and sign in to KNIME Community Hub.
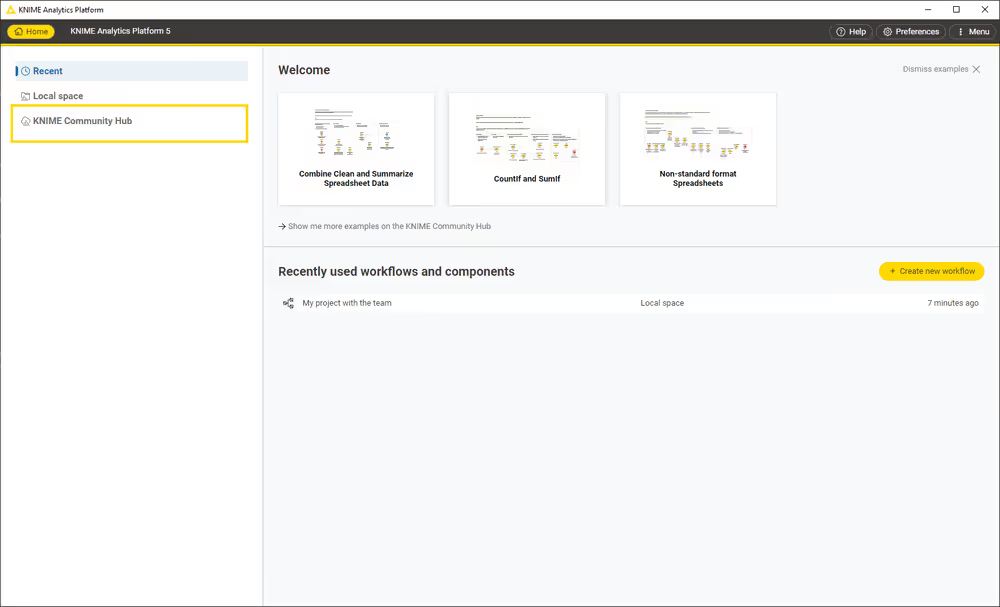
You will be redirected to the sign-in page if you are not connected in the current session already.
Once you are signed in, you will see all your spaces.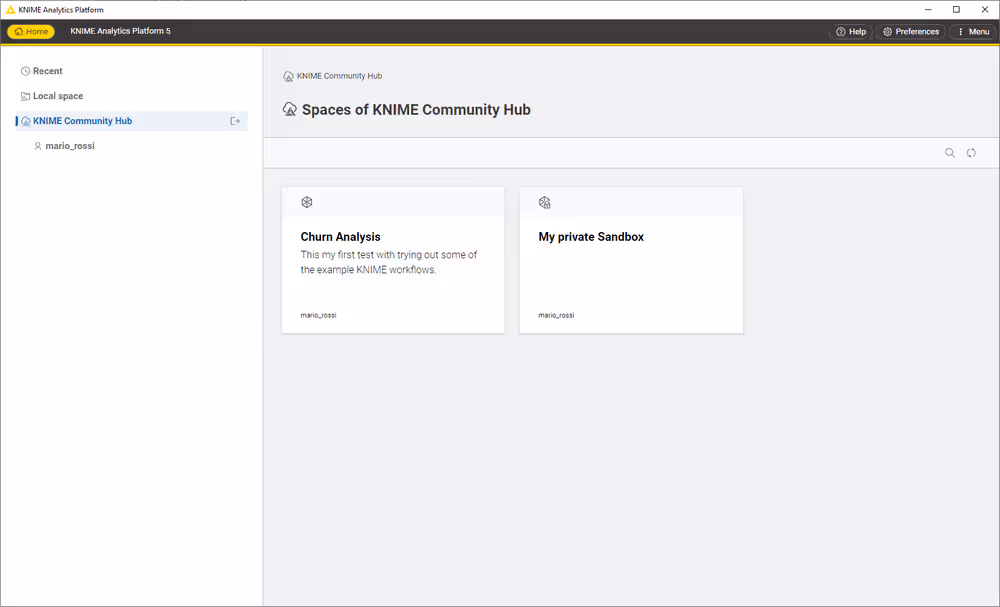
Click on a space to access the items within the space. You can perform different types of operations on them:
- Upload items to your KNIME Hub spaces, download, duplicate, move, delete, or rename your items. More information about this functionality is provided in the next section.
- Open workflows as local copies or on KNIME Hub. You can find the respective buttons in the toolbar on top.
- Create folders to organize your items in the space. Click the Create folder button in the toolbar on top.
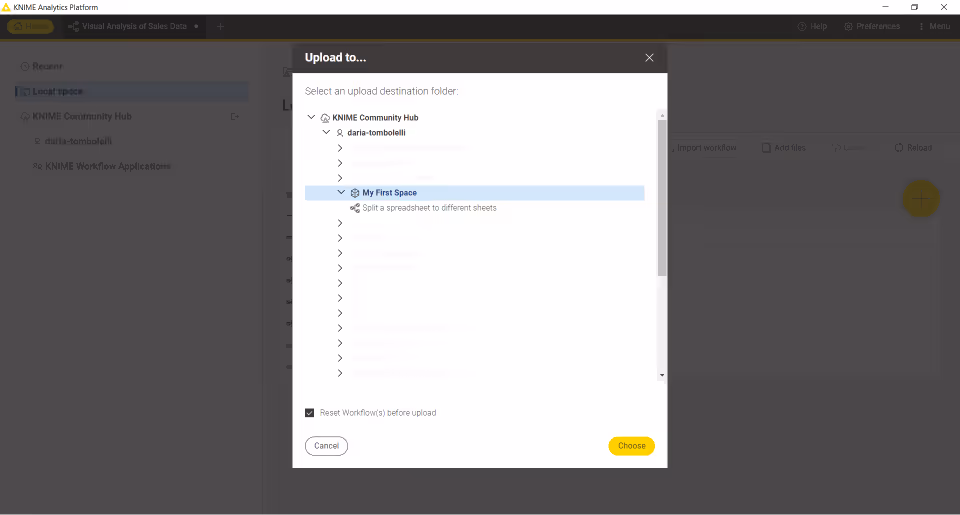
Once you are connected to your KNIME Hub account from KNIME Analytics Platform, you can upload the desired items to your KNIME Hub spaces. You can upload workflows or components to any of your spaces by right-clicking the item from the space explorer in KNIME Analytics Platform and selecting Upload from the context menu. A window will open where you will be able to select the location where you want to upload your workflow or component.
Items that are uploaded to a public space will be available to everyone. Hence, be very careful with the data and information (e.g., credentials) you share.
Version items
When uploading items to a space on KNIME Hub, you will be able to keep track of their changes. Your workflow or component will be saved as a draft until a version is created.
When you create versions of the items, you can then go back to a specific saved version at any point in time in the future to download the item in that specific version.
Once a version of the item is created, new changes to the item will show up as draft.
Create a version of an item
Go to the item you want to create a version of by navigating through KNIME Hub and click Versions.
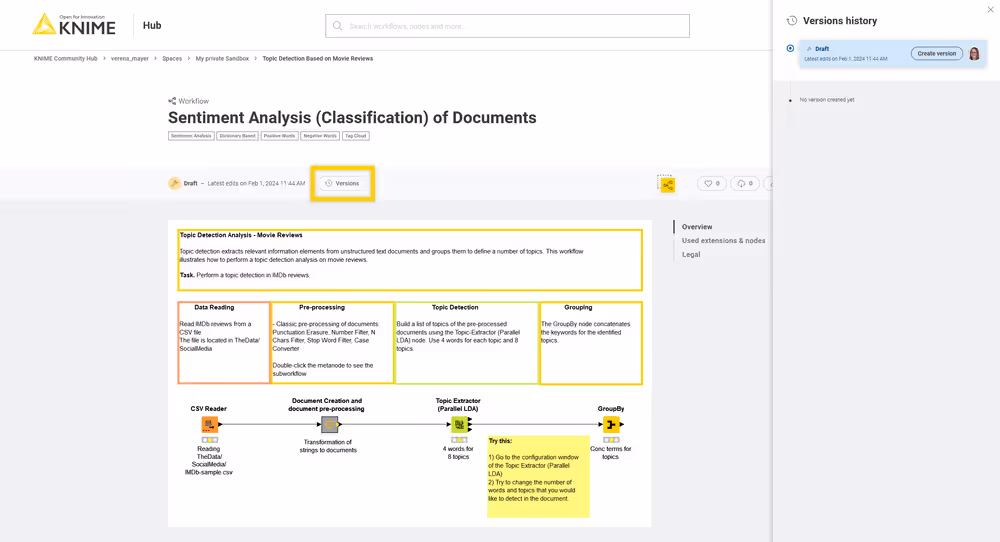
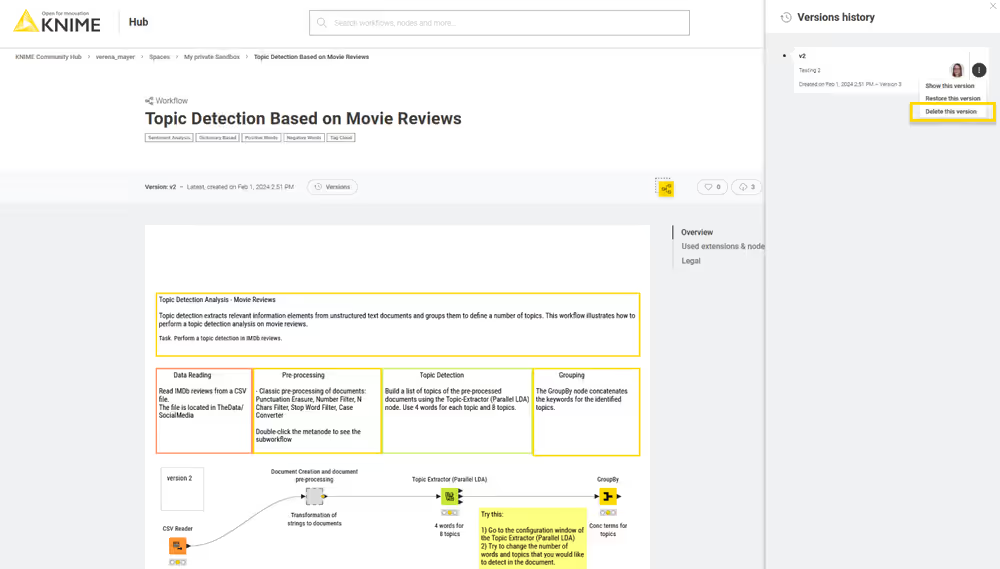
A panel on the right opens where you can see all the versions already created and all the unversioned changes of the item since the last version was created.
Click Create version to create a new version. You can then give the version a name and add a description.
Show a version
In the Versions history panel, click the version you want to see, or click the ![]() icon and select Show this version. You will be redirected to the item in that specific version.
icon and select Show this version. You will be redirected to the item in that specific version.
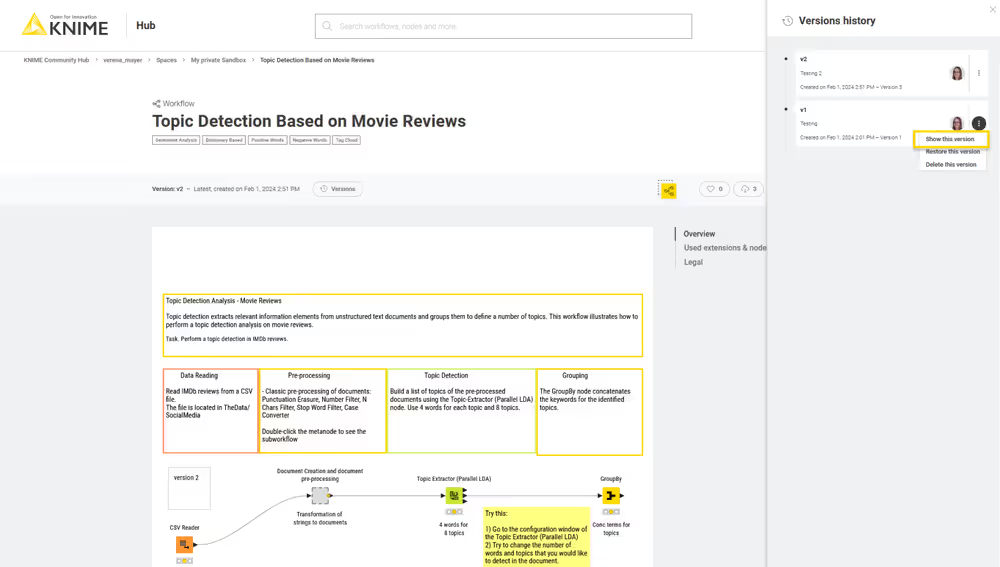
To go back to the latest state of the item, click the selected version to unselect it.
Restore a version
To restore a version that you created, click the ![]() icon in the version tile from the item history and select Restore this version.
icon in the version tile from the item history and select Restore this version.
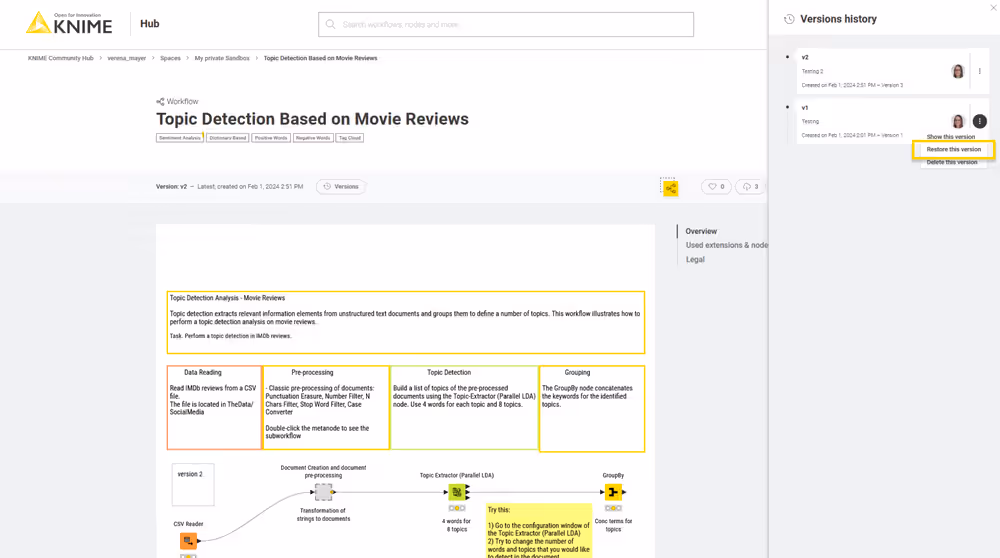
The version will be restored as a draft.
Delete a version
To delete a version that you created, click the ![]() icon for the version you want to delete and click Delete.
icon for the version you want to delete and click Delete.
Move items
You can move items that you have uploaded to KNIME Hub to a new location within the space that contains the item, or to a different space that you have access to. To do this, you need to be connected to the KNIME Hub on KNIME Analytics Platform. If you want to move items within the same space, drag the item in the space explorer, for example, to a subfolder. To move items from one space to another, right-click the item and select Move to. In the Destination window that opens, select the space to which you want to move the item to.
These changes will automatically apply to the space on KNIME Hub.
Delete items
You can also delete items that you uploaded to KNIME Hub.
To do so you can:
- From KNIME Hub, sign in with your account and go to the item you want to delete. Click the
%20scale(3)'%20/%3e%3cline%20x1='0'%20y1='0'%20x2='0'%20y2='0'%20transform='translate(16,%2016)%20scale(3)'%20/%3e%3cline%20x1='0'%20y1='0'%20x2='0'%20y2='0'%20transform='translate(16,%2024)%20scale(3)'%20/%3e%3c/svg%3e) icon on the top right of the page and select Move to bin. This will move the item to the bin, where it will stay for 30 days before being permanently deleted.
icon on the top right of the page and select Move to bin. This will move the item to the bin, where it will stay for 30 days before being permanently deleted.
You can:
- Permanently delete the item from the bin by going to your profile page, selecting Recycle bin from the left-hand menu, and clicking > Delete permanently next to the item you want to delete.
- Restore the item from the bin within the 30 days time frame by going to your profile page, selecting Recycle bin from the left-hand menu, and clicking > Restore next to the item you want to restore.
Community features on KNIME Hub
KNIME Community Hub is also the place where you can interact and collaborate with the KNIME Community.
Once you have created your profile and uploaded your items to your public spaces, you can share them with others, you can remain engaged in other people’s work by liking items. Finally, you can also add other users from the KNIME Community as contributors to your public spaces. They will be able to access your space from their KNIME Hub profile and from their KNIME Hub on KNIME Analytics Platform, download, and upload workflows or components. Add contributors to your spaces to collaborate on a project and keep all workflows always accessible in one place.
Share links to items on KNIME Hub
Go to any workflow, component, space, extension, or node on KNIME Hub and click the Copy link button on the top right. You will copy to your clipboard a URL short link to the item that you can share with others.
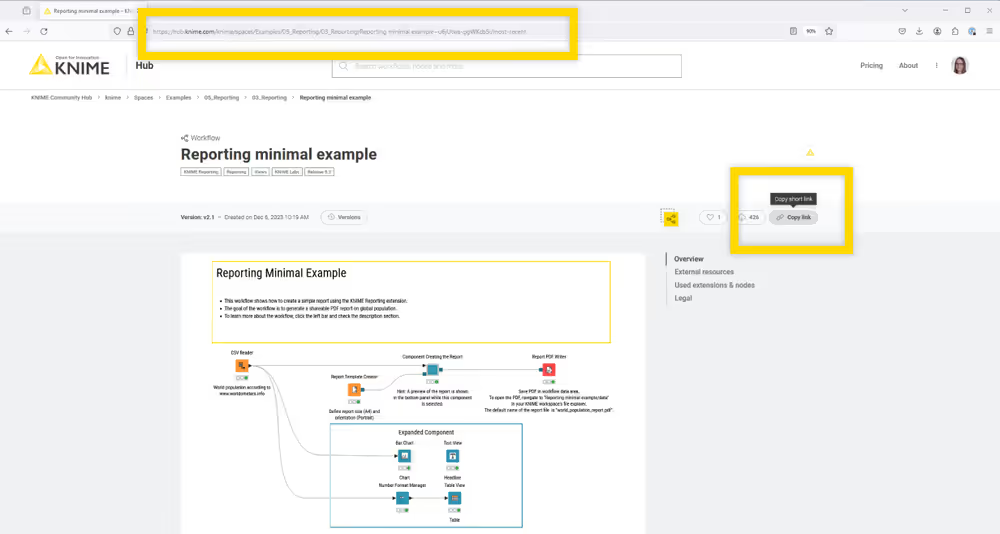
The short link is assigned uniquely to every item that is on KNIME Hub, regardless of its location. This means that even if the item is moved by its owner into a different space, the item will be reachable at the same short link.
The same rule is valid for the URL, which will be redirected to the new location automatically.
Like items on KNIME Hub
If you find an item on KNIME Hub that has been very useful for you or that you particularly like, you can leave a like by clicking the heart icon on the top right of the page. See how much the KNIME Community has been engaged in specific items by looking at the number of downloads and likes that a specific item has received.
All the items you liked will be shown on your user profile under About.
Contributors
You can add any other user of KNIME Community as a contributor to any of your public spaces.
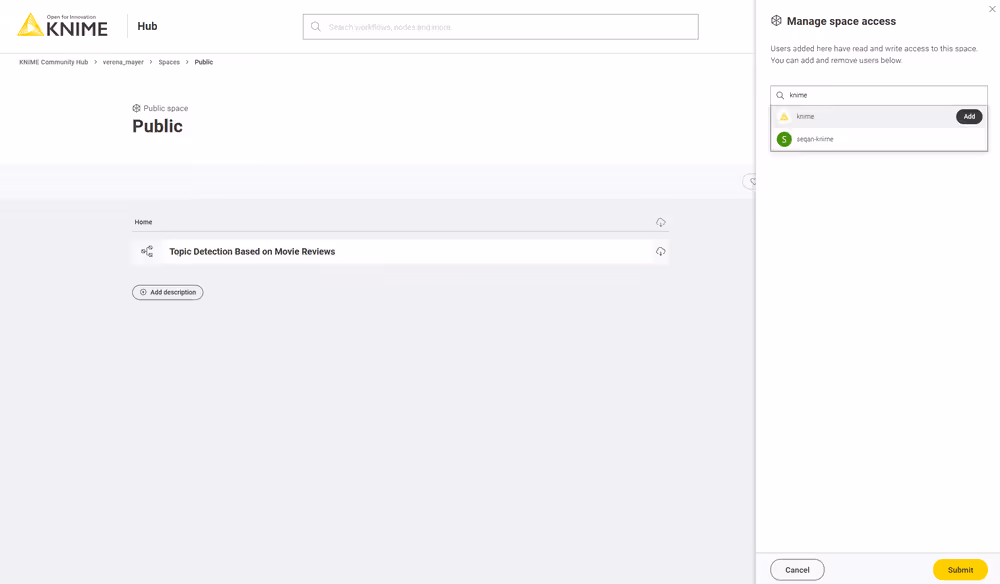
To add a user as a contributor to a public space, go to the space and click the pencil tool close to your profile icon.
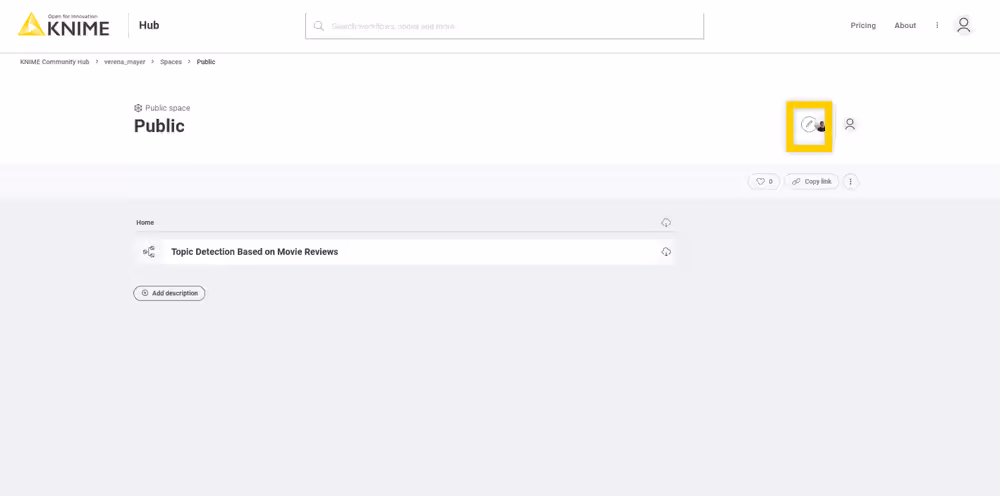
In the Manage space access panel that opens, you can add contributors by inserting their KNIME Hub username. Then click Add and Submit.
In the same panel, you can also manage the contributors. Click on the ![]() icon to remove a contributor from the space.
icon to remove a contributor from the space.
When you are added as a contributor to a space, you will be able to see the space under Spaces in your profile page and also listed in your KNIME Hub from KNIME Analytics Platform.
Contributors have edit rights for the space they are added to. They can add and edit workflows or components in the space. They do not have the same rights that the owner of the space has. Only the owner of a space can change the space name or change the space visibility to private.
Since contributors can only be added to public spaces, they will not have access to the space anymore if the space visibility is changed from public to private.