Overview
KNIME Analytics Platform includes a set of nodes to support several Google Cloud services. The supported Google Cloud services that will be covered in this guide are Google Dataproc, Google Cloud Storage, and Google BigQuery.
KNIME Analytics Platform provides further integration for Google Drive.
Google Cloud Storage
KNIME Google Cloud Storage Connection extension provides nodes to connect to Google Cloud Storage.
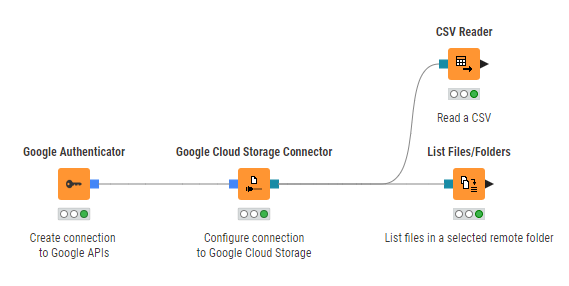
Figure 1 shows an example on how to connect to Google Cloud Storage and work with the remote files.
Google Authenticator
The Google Authenticator node allows you to authenticate with the various Google APIs using an API key file. To be able to use this node, you have to create a project at the Google Cloud Console. For more information on how to create a project on Google Cloud Console, please follow the Google documentation.
Then you need to create a service account and an API key. You can either select JSON or P12 as API key file format (see [fig_select_p12]). The service account email has the format of sa-name@project-id.iam.gserviceaccount.com where sa-name is a unique identifier, and project-id is the ID of the project.
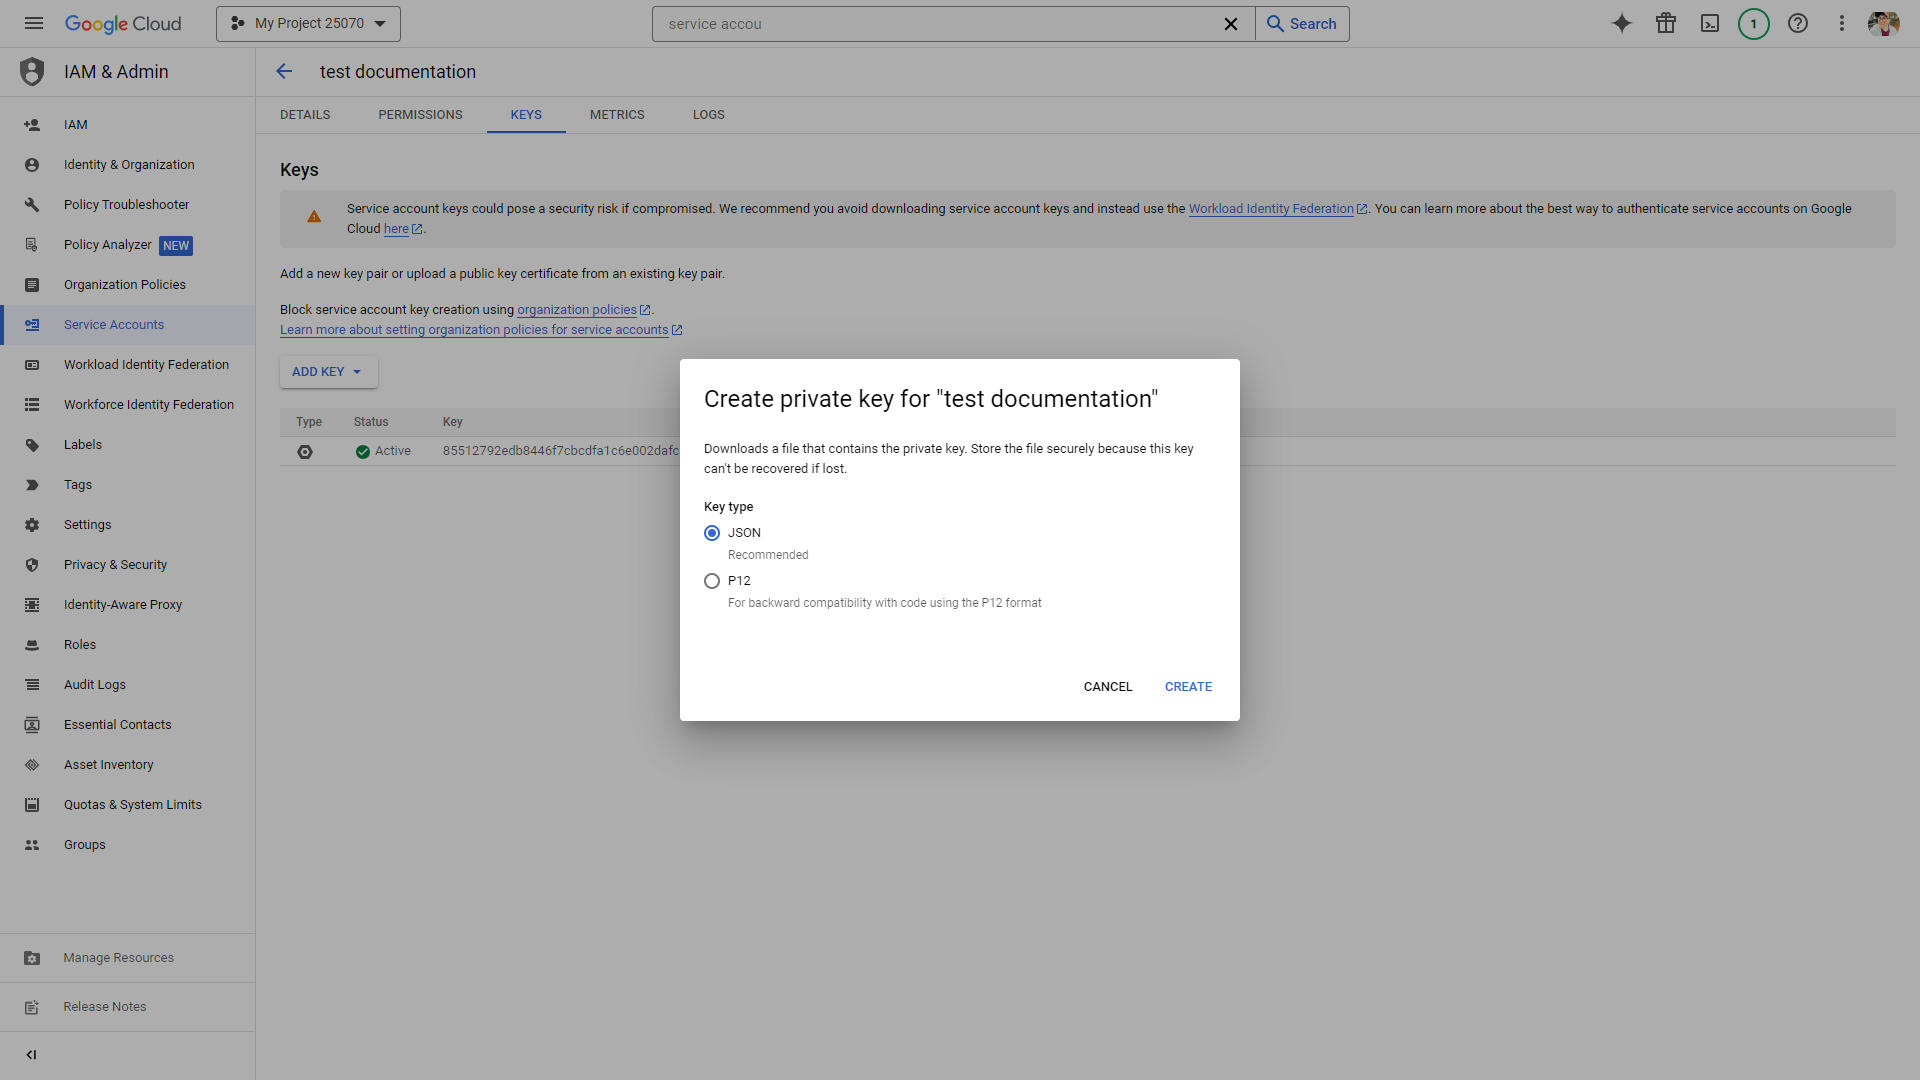
The API key file will be downloaded automatically to your local machine. Note that you should store the file in a secure place on your local system.
Open the Google Authenticator node configuration dialog:
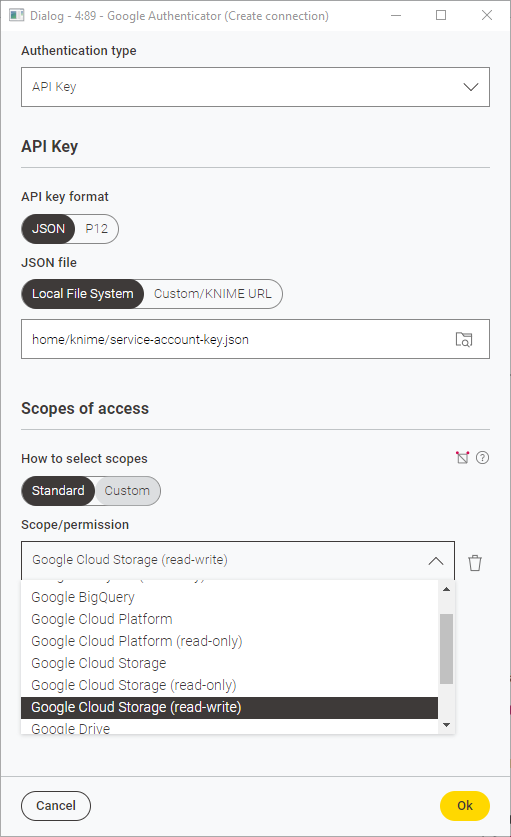
Under Authentication type select Service Account. Now, inside the node dialog, you have to configure the following settings:
-
Select the Authentication key type. You can select either a JSON or a P12 API key type.
-
If you select P12 as the API key type then add your Service account email. If you don’t have one already, please follow the Google documentation on how to create a service account.
-
-
In the node dialog select click the browse button and select the key file.
-
Add the OAuth 2.0 scopes that will be granted for this connection. You should select the scopes depending on the level of access that you need. To do so you can select Standard, click Add Scope and choose a scope among those available in the menu.
To see the corresponding Scope under the Standard list of scopes you need to have installed first the extension. For example, KNIME Google Cloud Storage Connection or KNIME Big Query extension. -
Alternatively, select Custom and add the desired Scope/permission to the field. You can add multiple custom scopes by clicking Add Scope and you can delete the scopes you added by clicking the
icon.
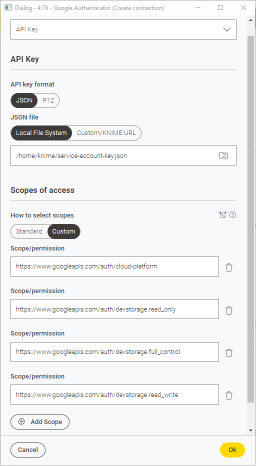 Figure 4. Node configuration dialog of Google Authenticator node - custom scopes
-
| Instead of the Google Authenticator node, you also use the Secrets Retriever node to retrieve the Google secret from the Secret Store. For more details on how to setup a Google secret in the Secret Store, please refer to the KNIME Secrets User Guide. |
Google Cloud Storage Connector
The Google Cloud Storage Connector node connects to Google Cloud Storage and allows downstream nodes to access Google Cloud Storage inside a certain project using the new KNIME file handling nodes.
The node configuration dialog of the Google Cloud Storage Connector node contains:
-
Project ID. This is the Google Cloud project ID. For more information on how to find your project ID, please check out the Google documentation.
-
Working directory. The working directory must be specified as an absolute path and it allows downstream nodes to access files/folders using relative paths, i.e. paths that do not have a leading slash. If not specified, the default working directory is
/.Path syntax: Paths for Google Cloud Storage are specified with a UNIX-like syntax, e.g.
/mybucket/myfolder/myfile. The path usually consists of:-
A leading slash (
/) -
Followed by the name of a bucket (
mybucketin the above example), followed by a slash -
Followed by the name of an object within the bucket (
myfolder/myfilein the above example).
-
-
Normalize paths. Path normalization eliminates redundant components of a path, e.g.
/a/../b/./ccan be normalized to/b/c. When these redundant components like../or.are part of an existing object, then normalization must be deactivated in order to access them properly. -
Under the Advanced tab, it is possible to set the connection and read timeout.
| This node currently only supports the Google Authenticator node for authentication. |
Google BigQuery
KNIME Analytics Platform includes a set of nodes to support Google BigQuery. The KNIME BigQuery extension is available from KNIME Analytics Platform version 4.1.
Setting up KNIME Analytics Platform for Google BigQuery has the following prerequisites:
-
Create a project in the Google Cloud Console. For more information on how to create a project on Google Cloud Console, please follow the Google documentation.
-
Create a service account. If you don’t have one already, please follow the Google documentation on how to create a service account.
-
Download the JDBC driver for Google BigQuery, unzip, and store it in your local machine. Register the JDBC driver on KNIME Analytics Platform by following the tutorial in the KNIME documentation.
Connect to BigQuery
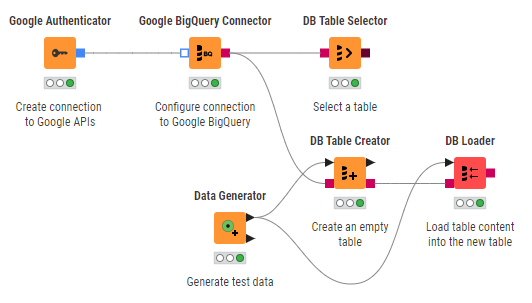
Figure 5 shows how to authenticate using the Google Authenticator node and the Google BigQuery Connector node to establish a connection to BigQuery via JDBC driver. To configure Google Authenticator node, please refer to the Google Authenticator section.
| The Google BigQuery Connector node only supports authentication via a service account or your own OAuth client (For detail see the Google documentation). |
To configure the Google BigQuery Connector node, please check out how to connect to a predefined database in the KNIME documentation. For the hostname in BigQuery, you can specify https://www.googleapis.com/bigquery/v2 or bigquery.cloud.google.com. As the database name, use the project ID you created on the Google Cloud Console.
| For more information on the JDBC parameters tab or the Advanced tab in the node configuration dialog of Google BigQuery Connector node, please check out the KNIME documentation. |
Executing this node will create a connection to the BigQuery database and you can use any KNIME database nodes to visually assemble your SQL statements.
| For more information on KNIME database nodes, please check out the KNIME Database documentation. |
Create a BigQuery table
To export data from KNIME Analytics Platform to Google BigQuery (shown in Figure 5):
-
Create the database schema/dataset where you want to store the table, if it doesn’t exist already. To create a dataset, please check the Google documentation.
-
Create an empty table with the right specification. To do this, use the DB Table Creator node. Inside the node configuration dialog, specify the schema as the name of the dataset that you created in the previous step. For more information on the DB Table Creator node, please check the KNIME documentation.
If the table has column names that contain space characters, e.g. column 1, make sure to delete the space characters because they would be automatically replaced with_during table creation, e.g.column_1and this will lead to conflict, since column names will no longer match. -
Once the empty table is created, use the DB Loader node to load the table content into the newly created table. For more information on the DB Loader node, please check the KNIME documentation.
Google Dataproc
Cluster Setup with Livy
To create a Dataproc cluster using the Google Cloud Platform web console, follow the step-by-step guide provided by Google documentation.
To setup Apache Livy in the cluster, the following additional steps are necessary:
-
Copy the file
livy.shfrom Git repository into your cloud storage bucket. This file will be used as the initialization action to install Livy on a master node within a Dataproc cluster.Please check best practices of using initialization actions. -
During cluster creation, open the Advanced options at the bottom of the page
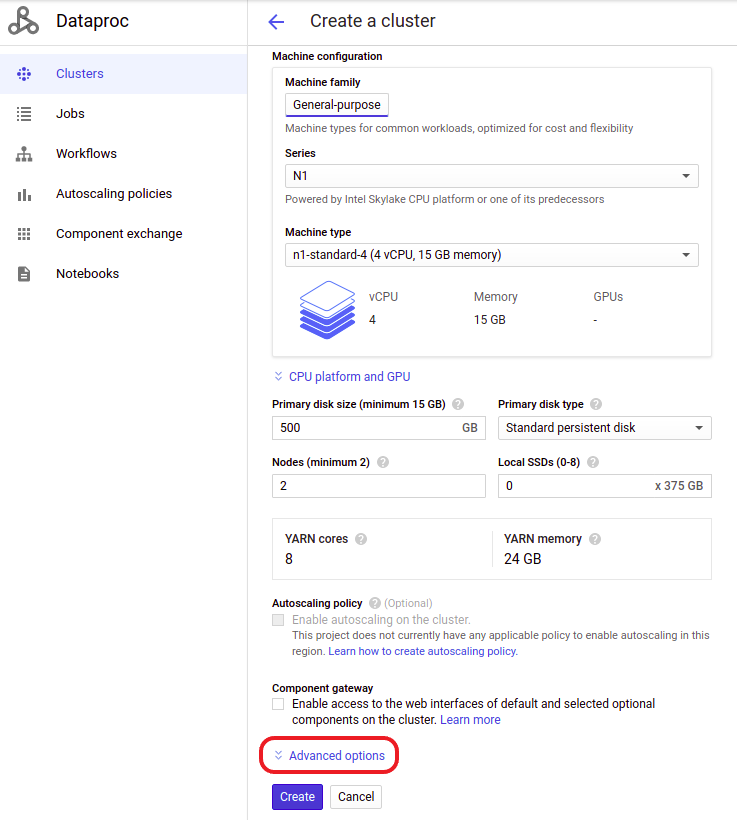 Figure 6. Advanced options in the cluster creation page
 -
Select the network and subnet. Remember the network and subnet for the Access to Livy section.
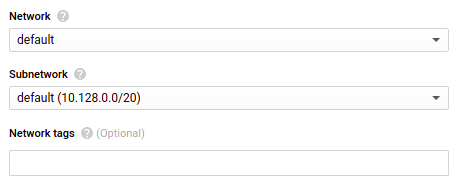 Figure 7. Network and subnet
 -
Select the
livy.shfile from your cloud storage bucket in the initialization actions section Figure 8. Set
livy.shas initialization action -
Configure the rest of the cluster settings according to your needs and create the cluster.
| Apache Livy is a service that interacts with a Spark cluster over a REST interface. It is the recommended service to create a Spark context in KNIME Analytics Platform. |
Access to Livy
To find the external IP address of the master node where Livy is running:
-
Click on the cluster name in the cluster list page
-
Go to VM Instances and click on the master node
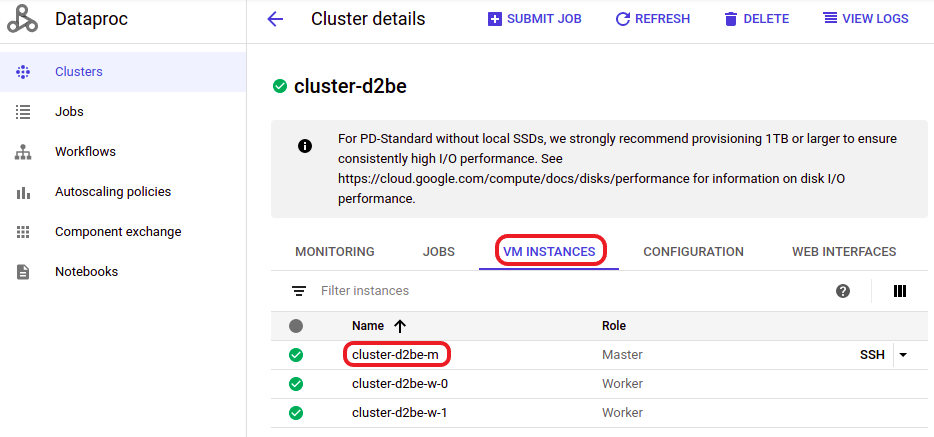 Figure 9. Select the master node in the VM instances list
 -
On the VM Instances page, scroll down to the Network interfaces section. Find the network and subnet that you selected in the previous Cluster Setup with Livy section, and you will find the external IP address of the master node.
 Figure 10. Find the external IP address of the master node
Livy Firewall Setup
To allow access to Livy from the outside, you have to configure the firewall:
-
Click on the cluster name in the cluster list page
-
Go to VM Instances and click on the master node
-
On the VM Instances page, scroll down to the Firewalls section and make sure the checkbox Allow HTTP traffic is enabled
 Figure 11. Check Allow HTTP traffic in the Firewalls section
 -
Next, go to the VPC network page
-
In Firewall section of the VPC network page, select the default-allow-http rule
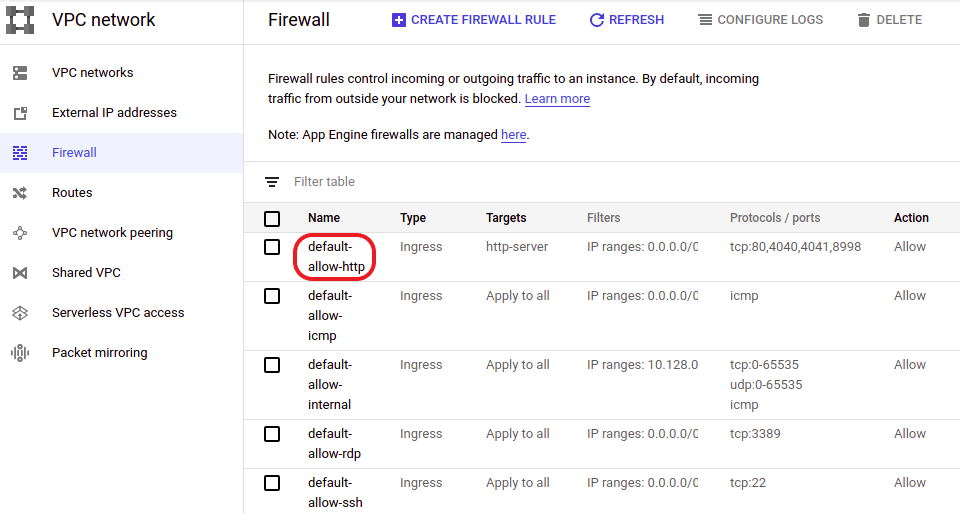 Figure 12. Open the default-allow-http firewall rule
 -
Make sure that
tcp:8998is included in the allowed protocol and ports list, and that your IP address is included in the allowed IP addresses list.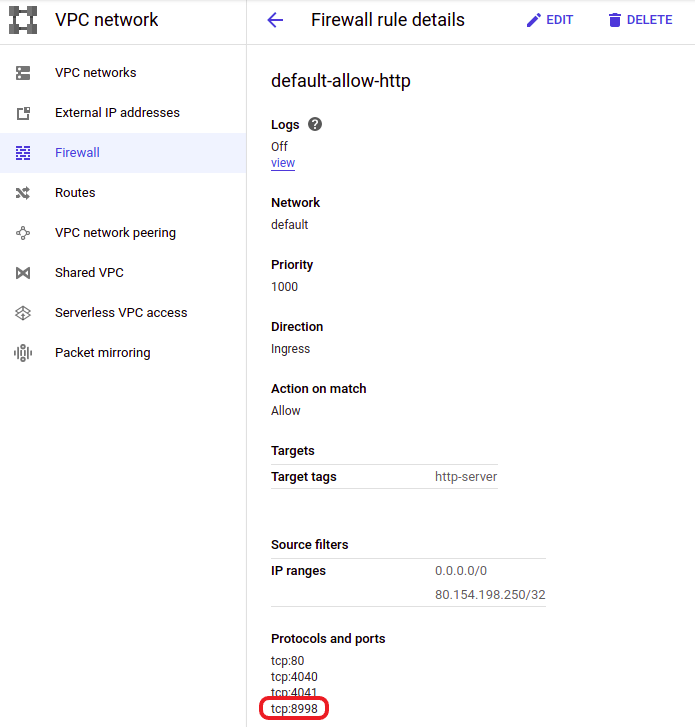 Figure 13. Make sure to allow access to certain ports and IP addresses
Once you have followed these steps, you will be able to access the Dataproc cluster via KNIME Analytics Platform using Apache Livy.
Connect to Dataproc cluster
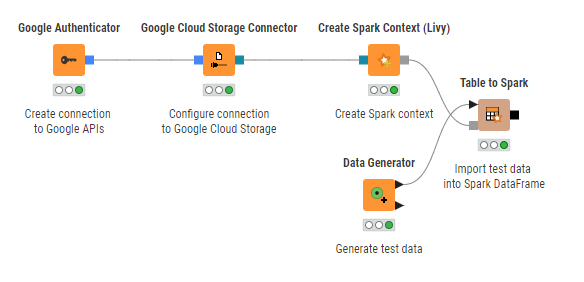
Figure 14 shows how to establish a connection to a running Dataproc cluster via KNIME Analytics Platform. The Google Authenticator node and Google Cloud Storage Connector node are used to create a connection to google APIs and to Google Cloud Storage respectively. For more information on both nodes, please check out the Google Cloud Storage section of this guide.
The Create Spark Context (Livy) node creates a Spark context via Apache Livy. Inside the node configuration dialog, the most important settings are:
-
The Livy URL. It has the format
http://<IP-ADDRESS>:8998where<IP-ADDRESS>is the external IP address of the master node of the Dataproc cluster. To find the external IP address of your Dataproc cluster, check out the Access to Livy section. -
Under Advanced tab, it is mandatory to set the staging area for Spark jobs. The staging area, which is located in the connected Google Cloud Storage system, will be used to exchange temporary files between KNIME and the Spark context.
The rest of settings can be configured according to your needs. For more information on the Create Spark Context (Livy) node, please check out our Amazon Web Services documentation.
Once the Spark context is created, you can use any number of the KNIME Spark nodes from the KNIME Extension for Apache Spark to visually assemble your Spark analysis flow to be executed on the cluster.
Apache Hive in Google Dataproc
This section describes how to establish a connection to Apache Hive™ on Dataproc in KNIME Analytics Platform.
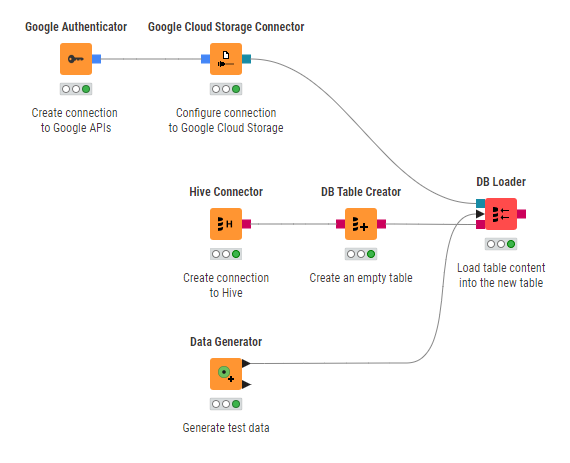
Figure 15 shows how to connect to Hive running on a Dataproc cluster and how to create a Hive table.
The Hive Connector node is bundled by default with the open-source Apache Hive JDBC driver. Proprietary drivers are also supported, but need to be registered first. Follow the guide on how to register a Hive JDBC driver in KNIME documentation.
Once the Hive JDBC driver is registered, you can configure the Hive Connector node. For more information on how to configure the settings in the node configuration dialog, please refer to the KNIME documentation. Executing the node will create a connection to Apache Hive and you can use any KNIME database nodes to visually assemble your SQL statements.
| To enable access to Hive from KNIME Analytics Platform, make sure that the Hive port (10000 by default) is opened in the firewall rules. To configure this, check out the Livy Firewall Setup section and change the firewall rule accordingly. |
