
Develop a KNIME Extension with Python
Introduction
As explained in the Extensions and Integrations Guide, KNIME Analytics Platform can be enhanced with additional functionality provided by a vast array of extensions and integrations. Often, installing an extension adds a collection of new nodes to the node repository of KNIME Analytics Platform.
With the v4.6 release of KNIME Analytics Platform, we introduce the possibility to write KNIME node extensions completely in Python. This includes the ability to define node configuration and execution, as well as dialog definition. A Pythonic API to design those nodes is now available, as well as debugging functionality within KNIME Analytics Platform. This means deploying pure-Python KNIME extensions containing nodes – including their Python environment needed for execution – using a locally built update site is now possible.
In this guide, we offer a tutorial to get you started with writing your KNIME nodes using Python, as well as how to setup a shareable Python extension containing your nodes, together with a complete definition of the API.
Quickstart Tutorial
This section provides an extension template and walks you through the essential development steps to help you get started with using the API.
Prerequisites
Set up
pixi.Pixi is a package management tool for developers that allows you to install and manage the Python packages (conda and pypi) required for your extension. It allows you to keep environments clean and separate for each extension and makes it easy to bundle and distribute your extension with all its dependencies. Note that the use of
pixiis not strictly required, but it is highly recommended. Usingcondais still possible, and the instructions can be found in an older version of this page (e.g., 5.4).To get started with developing Python node extensions, you need to have
pixiinstalled. Go to the pixi website and follow the instructions there. Example installation commands:- For Linux and macOS, execute in a terminal:
curl -fsSL https://pixi.sh/install.sh | sh - For Windows, execute in PowerShell:
powershell -ExecutionPolicy ByPass -c "irm -useb https://pixi.sh/install.ps1 | iex" - Restart your shell or terminal to make sure the
pixicommand is available.
- For Linux and macOS, execute in a terminal:
With
pixiset up, download ourknime-python-extension-templaterepository either as a zip or use it as a GitHub template to create your own new GitHub repository by clicking on theUse this templatebutton on the top right corner of the repository page and clone your new repository to work on it locally.In the
knime-python-extension-templatefolder, you should see the following file structure:
text
.
├── icons
│ │── icon.png
├── src
│ └── extension.py
├── demos
│ └── Example_with_Python_node.knwf
├── knime.yml
├── pixi.toml
├── config.yml
│── LICENSE.TXT
└── README.md- During development, you can edit the source files in any text editor. However, in order to make use of autocompletion for the API, as well as to allow debugging via the
debugpypackage, we recommend using an editor that is able to set environments as the Python interpreter. Here are the setup steps for Visual Studio Code:Download and install Visual Studio Code
Install the Python extension

In the bottom right corner of the editor select the Python interpreter that you want to use during development. After Step 4 of Tutorial 1, you will have the environment available. If you want to start with the default environment you can execute:
bashpixi installwhich will install the provided default environment. You can still add more packages to it later. To select the environment, click on the Python version in the bottom right corner of the editor. A menu will pop up with the available Python interpreters. In the setting "Select Python Interpreter" select the environment
'default':Pixi. If it doesn’t show up automatically, you can also add it manually by clicking on "Enter interpreter path" and selecting thepythonexecutable in the.pixi/envs/defaultdirectory. This will allow you to use the linter and autocomplete features of your IDE. By selecting the environment, you will be able to make full use of autocompletion.
Writing your first Python node from scratch
This is a quickstart guide that will walk you through the essential steps of writing and running your first Python node extension containing a single node. We will use knime-python-extension-template as the basis. The steps of the tutorial requiring modification of the Python code in extension.py have corresponding comments in the file, for convenience.
For an extensive overview of the full API, please refer to the Defining a KNIME Node in Python: Full API section, as well as our Read the Docs page.
Install KNIME Analytics Platform version 5.5.0 or higher.
Go to File → Install KNIME Extensions…, enter "Python" in the search field, and look for KNIME Python Extension Development (Labs). Alternatively, you can manually navigate to the KNIME Labs Extensions category and find the extension there. Select it and proceed with installation.
The
knime-python-extension-templatewill be your new extension. Familiarize yourself with the files contained in that folder, in particular:knime.yml, which contains important metadata about your extension.extension.py, which contains Python definitions of the nodes of your extension.config.yml, just outside of the folder, which contains the information that binds your extension and the corresponding Python environment with KNIME Analytics Platform.
Create a Python environment for your extension containing the
knime-python-basemetapackage, together with the node development APIknime-extensionfor the KNIME Analytics Platform you are using. You can simply do this by running the followingpixicommand in your terminal (also in a terminal window in VS Code):
bash
pixi installThis works, because the pixi.toml file inside the knime-python-extension-template folder contains the required packages for the newest KNIME Analytics Platform version in the default environment.
To install additional packages for your specific use case, we recommend using the conda-forge channel, which is added by default.
bash
pixi add <additional_pkg_name>Test the extension in debug mode inside KNIME. You have two options: the simple debug registration method or the more advanced method with a
config.ymlfile.Simple Debug Registration Method (Recommended)
For the simple method, run the following command in your extension directory:
bashpixi run register-debug-in-knimeThis command automatically configures KNIME to recognize your extension by:
- Searching for KNIME Analytics Platform installations on your system
- Displaying the list of KNIME installations available on the system for the user to select
- Creating a backup of your selected
knime.inifile asknime.ini.bakin the same folder - Appending the debug configuration line
-Dknime.python.extension.debug_knime_yaml_list=<path/to/your/knime.yml>to enable your extension in debug mode
How it works:
The command scans common installation directories for KNIME installations
If multiple installations are found, you'll see a numbered list and need to select the correct one
If you have KNIME installed in a non-standard location, use the
--search-pathargument to specify where to look:bashpixi run register-debug-in-knime /path/to/knime/installationThe search path should not end with a slash
You can also specify the exact path to your KNIME installation directory if needed
After running this command successfully, restart KNIME Analytics Platform and your extension should appear in the node repository. If an extension is registered in this manner, it instructs KNIME Analytics Platform to use the latest changes in the
configureandexecutemethods of your Python node class whenever those methods are called. This is useful during development but may impact node responsiveness. This debug mode only works with an already installed environment, e.g. the default one created bypixi install.Advanced Method with config.yml File
Alternatively, you can manually configure the extension using a
config.ymlfile. Edit theconfig.ymlfile located in the root folder of theknime-python-extension-template(for this example, the file already exists with prefilled fields and values, but you would need to adjust them). The content should be as follows:yaml<extension_id>: src: <path_to_this_repository>/src conda_env_path: <path_to_this_repository>/.pixi/envs/default debug_mode: truewhere:
<extension_id>should be replaced with thegroup_idandnamevalues specified inknime.yml, combined with a dot.For our example extension, the value for
group_idisorg.tutorial, and the value fornameisfirst_extension, therefore the<extension_id>placeholder should be replaced withorg.tutorial.first_extension.The
srcfield should specify the path to the folder where theknime.ymlof your Python extension is located. This is usually the main folder of your extension.For instance,
/Users/Bobby/Development/python_extensions/knime-python-extension-template/srcSimilarly, the
conda_env_pathfield should specify the path to the environment defined in thepixi.tomlfile, created in Step 4. If you use the default environment, that is shipped with theknime-python-extension-template, the path should be/Users/Bobby/Development/python_extensions/knime-python-extension-template/.pixi/envs/default. However, this can be any path to a validpython/condaenvironment.More information about the
pixi.tomlfile andpixiitself can be found in the pixi documentation, which provides detailed guidance on configuring environments and managing dependencies.The
debug_modeis an optional field in theconfig.ymlfile. If set totrue, it instructs KNIME Analytics Platform to use the latest changes in theconfigureandexecutemethods of your Python node class whenever those methods are called. This is useful during development but may impact node responsiveness.We need to let KNIME Analytics Platform know where the
config.ymlis in order to allow it to use our extension and its Python environment. To do this, you need to edit theknime.iniof your KNIME Analytics Platform installation, which is located at<path-to-your-KAP>/knime.ini.
Append the following line to the end of the
knime.inifile, replacing<path/to/your/config.yml>with the actual path to yourconfig.ymlfile:ini-Dknime.python.extension.config=<path/to/your/config.yml>Use forward slashes (
/) for all operating systems, including Windows. Theknime.inifile is located in the installation folder of KNIME Analytics Platform.Start your KNIME Analytics Platform.
The "My Template Node" should now be visible in the node repository.
Import and open the
Example_with_Python_node.knwfworkflow from thedemosfolder, which contains a test node:- Familiarize yourself with the table structure and data.
- Study the code in
extension.pyand compare it with the node you see in KNIME Analytics Platform. In particular, understand where the node name, description, inputs, and outputs are defined in the code. - Execute the node and verify that it produces an output table.
Build your first configuration dialog:
In extension.py, uncomment the definitions of parameters (marked by the ''Tutorial Step 10'' comment). Restart your KNIME Analytics Platform, re-drag your node from the node repository into the workflow, and double-click the node to see the configurable parameters.
Take a minute to compare the names, descriptions, and default values defined in extension.py with what is displayed in the node dialog.
Add your first port: To add a second input table to the node, follow these steps (marked by the "Tutorial Step 11" comment):
- Uncomment the
@knext.input_tabledecorator inextension.py. - Update the
configuremethod to handle the schema of the second input table. - Modify the
executemethod to process data from both input tables.
Restart KNIME Analytics Platform to apply the changes.
- Uncomment the
Add some functionality to the node:
With the following steps, we will append a new column to the first table and output the new table (the lines requiring to be changed are marked by the ''Tutorial Step 12'' comment):
- To inform downstream nodes of the changed schema, we need to change it in the return statement of the
configuremethod; for this, we append metadata about a column to the output schema. - Everything else is done in the
executemethod:- Transform both input tables to pandas dataframes and append a new column to the first dataframe.
- Transform that dataframe back to a KNIME table and return it.
- To inform downstream nodes of the changed schema, we need to change it in the return statement of the
Use your parameters:
- In the
executemethod, uncomment the lines marked by the ''Tutorial Step 13'' comment. - Use a parameter to change some table content; we will use a lambda function for a row-wise multiplication using the
double_paramparameter.
- In the
Start logging and setting warnings:
Uncomment the lines marked by "Tutorial Step 14" in the
executemethod:- Use the
LOGGERfunctionality to log messages for debugging or user information. - Use the
execute_context.set_warning("A warning")to inform users about unusual behavior. - If you want the node to fail, raise an exception. For example:
- Use the
python
raise ValueError("This node failed due to an error.")Congratulations, you have built your first functioning node entirely in Python! You are now ready to explore more advanced features and expand your extension's capabilities.
Python Node Extension Setup
A Python node extension needs to contain a YAML file called knime.yml that gives general information about the node extension, which Python module to load, and what conda environment should be bundled with the extension.
yaml
name: myextension # Will be concatenated with the group_id to form the extension ID
author: Jane Doe
pixi_toml_path: # Path to the Pixi environment toml, from which the environment for this extension will be built when bundling
extension_module: extension # The .py Python module containing the nodes of your extension
description: My New Extension # Human readable bundle name / description
long_description: This extension provides functionality that everyone wants to have. # Text describing the extension (optional)
group_id: org.knime.python3.nodes # Will be concatenated with the name to form the extension ID
version: 0.1.0 # Version of this Python node extension. Must use three-component semantic versioning for deployment to work.
vendor: KNIME AG, Zurich, Switzerland # Who offers the extension
license_file: LICENSE.TXT # Best practice: put your LICENSE.TXT next to the knime.yml; otherwise you would need to change to path/to/LICENSE.txt
#Optional: If you do not have dependencies on other extensions, you do not need feature_depencendies and their entries
feature_dependencies:
  - org.knime.features.chem.types 5.7.0 # If you want to specify the version - note that this specifies the version being greater equal 5.7.0
  - org.knime.features.chem.types # If the version does not matter
The id of the extension will be of the form group_id.name. It needs to be a unique identifier for your extension, so it is a good idea to encode your username or company’s URL followed by a logical structure as group_id in order to prevent id clashes. For example, a developer from KNIME could encode its URL to org.knime and add python3 to indicate that the extension is a member of nodes, which are part of python3.
Feature dependencies: if your extension depends on another extension, you can specify it as a bullet point of feature_dependencies. Optionally, you can add a specific minimum version to it.
Example: You use data types like SmilesValue of the KNIME Base Chemistry Types & Nodes extension in your extension. You have that extension already installed and want to make sure that everybody who uses your extension will also have this extension installed. Then you can go to Help > About KNIME Analytics Platform > Installation Details and check the id of KNIME Base Chemistry Types & Nodes, which is org.knime.features.chem.types.feature.group. Take the id without .feature.group and you have the string of the feature dependency: org.knime.features.chem.types
Note that the pixi_toml_path field, which specifies the path to the pixi.toml file configuration of the environment required by your extension, is needed when bundling your extension. During development, KNIME Analytics Platform uses the environment specified in the config.yml file.
The path containing the knime.yml will then be put on the Pythonpath, and the extension module specified in the YAML will be imported by KNIME Analytics Platform using import <extension_module>. This Python module should contain the definitions of KNIME nodes. Each class decorated with @knext.node within this file will become available in KNIME Analytics Platform as a dedicated node.
Recommended project folder structure:
text
.
├── icons
│ │── icon.png
├── src
│ └── extension.py
├── demos
│ └── Example_with_Python_node.knwf
├── knime.yml
├── pixi.toml
├── config.yml
│── LICENSE.TXT
└── README.md
See Tutorial 1 above for an example.
Development and distribution
As you develop your Python extension, you are able to run and debug it locally by setting the knime.python.extension.config system property in your KNIME Analytics Platform’s knime.ini to point to the config.yml, or in the launch configuration’s VM arguments in Eclipse. See the Registering Python extensions during development and Customizing the Python executable sections at the end of this guide for more information.
In order to share your Python extension with others, please refer to the Bundling your Python Extension Nodes section.
Defining a KNIME Node in Python: Full API
We provide a conda package that includes the full API for node development in Python - knime-extension (see Tutorial 1 for help in setting up your development python environment). To enable helpful code autocompletion via import knime.extension as knext, make sure your IDE of choice’s Python interpreter is configured to work in that python environment when you are developing your Python node extension (see here for help with Visual Studio Code, here for PyCharm, here for Sublime Text, or here for general information on integrating your IDE with conda).
A Python KNIME node needs to implement the configure and execute methods, so it will generally be a class. The node description is automatically generated from the docstrings of the class and the execute method. The node’s location in KNIME Analytics Platform’s Node Repository, as well as its icon, are specified in the @knext.node decorator.
A simple example of a node does nothing but pass an input table to its output unmodified. Below, we define a class MyNode and indicate that it is a KNIME node by decorating it with @knext.node. We then ''attach'' an input table and an output table to the node by decorating it with @knext.input_table and @knext.output_table respectively. Finally, we implement the two required methods, configure and execute, which simply return their inputs unchanged.
python
import knime.extension as knext

@knext.node(name="My Node", node_type=knext.NodeType.MANIPULATOR, icon_path="..icons/icon.png", category="/")
@knext.input_table(name="Input Data", description="The data to process in my node")
@knext.output_table("Output Data", "Result of processing in my node")
class MyNode:
    """Short description is in the first line next to the three double quotes here. It it displayed in overviews when a whole category in the node repository is selected.

    Here begins the normal description: This node description will be displayed in KNIME Analytics Platform.
    """
    def configure(self, config_context, input_table_schema):
        return input_table_schema

    def execute(self, exec_context, input_table):
        return input_table
`@knext.node’s configuration options are:
name: the name of the node in KNIME Analytics Platform.
node_type: the type of the node, one of:
knext.NodeType.MANIPULATOR: a node that manipulates data.knext.NodeType.LEARNER: a node learning a model that is typically consumed by a PREDICTOR.knext.NodeType.PREDICTOR: a node that predicts something typically using a model provided by a LEARNER.knext.NodeType.SOURCE: a node producing data.knext.NodeType.SINK: a node consuming data.knext.NodeType.VISUALIZER: a node that visualizes data.knext.NodeType.OTHER: a node that doesn’t fit any of the other node types.
icon_path: module-relative path to a 48x48 pixel PNG file to use as icon.
category: defines the path to the node inside KNIME Analytics Platform’s Node Repository.
Defining custom port objects
Besides tables, a node can also consume or produce other port objects and it is possible to define custom port objects for your extension. You can do so by extending knext.PortObject and knext.PortObjectSpec with your custom implementation. In order to use these objects in your node, you need to define a custom port type via the knext.port_type function that takes your PortObject and PortObjectSpec classes as well as a human-readable name for your port type and an optional id. Here is an example:
Let’s start with the PortObjectSpec:
python
import knime.extension as knext

class MyPortObjectSpec(knext.PortObjectSpec):
    def __init__(self, spec_data: str) -> None:
        super().__init__()
        self._spec_data = spec_data

    def serialize(self) -> dict:
        return {"spec_data": self._spec_data}

    @classmethod
    def deserialize(cls, data: dict) -> "MyPortObjectSpec":
        return cls(data["spec_data"])

    @property
    def spec_data(self) -> str:
        return self._spec_data
The serialize and deserialize methods are used by the framework to store and load the spec.
Note: The deserialize method must be a classmethod.
The spec_data property is just an example for custom code and you can add arbitrary methods to your spec class as you see fit.
Next we implement the PortObject:
python
import pickle

class MyPortObject(knext.PortObject):
    def __init__(self, spec: MyPortObjectSpec, model) -> None:
        super().__init__(spec)
        self._model = model

    def serialize(self) -> bytes:
        return pickle.dumps(self._model)

    @classmethod
    def deserialize(cls, spec: MyPortObjectSpec, data: bytes) -> "MyPortObject":
        return cls(spec, pickle.loads(data))

    def predict(self, data):
        return self._model.predict(data)
The PortObject class must have a serialize and deserialize method that are called by the framework to persist and restore the object. Again note that deserialize has to be a classmethod.
The predict property is again just an example for custom code that your port object class may contain.
Finally, we create a custom port type to be used as input or output of a node:
python
my_model_port_type = knext.port_type(name="My model port type", object_class=MyPortObject, spec_class=MyPortObjectSpec)The knext.port_type method ties the PortObject and PortObjectSpec together and provides a human-readable name to refer to the custom port type.
It is also possible to specify a custom ID for the port type via the id argument. Note that the ID must be unique. If you don’t provide a custom ID, then the framework generates one of the format your_extension_id.your_module_name.your_port_object_class_name. For example if your extension has the ID org.company.extension and you implement a MyPortObject in the module extension, then the generated ID is org.company.extension.extension.MyPortObject.
Note that there are also connection port objects that can hold non-serializable objects. You can find information about that in the API documentation for knime.extension.ConnectionPortObject.
Check out the next section to learn how to declare your custom port type as input or output of your node.
Node port configuration
The input and output ports of a node can be configured by decorating the node class with @knext.input_table, @knext.input_port, and respectively @knext.output_table and @knext.output_port. An image output port can be added with the @knext.output_image decorator. Additionally, a node producing a view should be decorated with the @knext.output_view decorator.
These port decorators have the following properties:
- they take
nameanddescriptionarguments, which will be displayed in the node description area inside KNIME Analytics Platform; - they must be positioned after the
@knext.nodedecorator and before the decorated object (e.g. the node class); - their order determines the order of the port connectors of the node in KNIME Analytics Platform.
The @knext.input_table and @knext.output_table decorators configure the port to consume and respectively produce a KNIME table. The @knext.output_image decorator configures the port to produce a PNG or SVG image.
If you want to receive or send other data, e.g. a trained machine learning model, use @knext.input_port and @knext.output_port. These decorators have an additional argument, port_type, used to identify the type of port objects going along this port connection. Only ports with equal port_type can be connected. See the previous section to learn how to specify your own port type.
The port configuration determines the expected signature of the configure and execute methods:
In the
configuremethod, the first argument is aConfigurationContext, followed by one argument per input port. The method is expected to return as many parameters as it has output ports configured. The argument and return value types corresponding to the input and output ports are:for table ports, the argument/return value must be of type
knext.Schema. If the return table consists of only one column, the return value can also be of typeknext.Column;for image ports, the argument/return value must be of type
knext.ImagePortObjectSpecwith the appropriate image format configuredfor custom ports, the argument/return value must be of your custom implementation of
knext.PortObjectSpec. If we take the example from the previous section, the type would beMyPortObjectSpec.Note that the order of the arguments and return values must match the order of the input and output port declarations via the decorators.
The arguments and expected return values of the
executemethod follow the same schema: one argument per input port, one return value per output port. For image outputs the returned value must be of the typebytes.
Examples how to use knext.Schema and knext.Column` (see the API):
python
def configure(self, config_context): # no input table
""" This node creates a table with a single column """
ktype = knext.string()

# OR

ktype = knext.int32() # OR knext.double(), knext.bool\_(), knext.list\_(knext.string()), knext.struct(knext.int64(), knext.bool\_()),...

# OR

import datetime
ktype = datetime.datetime
return knext.Column(ktype, "Date and Time")

def configure(self, config_context): # no input table
""" This node creates two tables with two columns each """
ktype1 = knext.string()
import knime.types.chemistry as cet # needs the extension \`KNIME Base Chemistry Types & Nodes\` installed
ktype2 = cet.SdfValue
schema1 = knext.Schema(\[ktype1, ktype2\], \["Column with Strings", "Column with Sdf"\])
schema2 = knext.Schema(\[ktype1, ktype2\], \["Another column with Strings", "Another column with Sdf"\])
return schema1, schema2
All supported types of your current environment can be obtained by printing knime.api.schema.supported_value_types() or knime.extension.supported_value_types()`.
Here is an example with two input ports and one output port. See the previous session for the definitions of MyPortObject, MyPortObjectSpec and my_model_port_type.
python
@knext.node("My Predictor", node_type=knext.NodeType.PREDICTOR, icon_path="icon.png", category="/")
@knext.input_port("Trained Model", "Trained fancy machine learning model", port_type=my_model_port_type)
@knext.input_table("Data", "The data on which to predict")
@knext.output_table("Output", "Resulting table")
class MyPredictor():
    def configure(self, config_context: knext.ConfigurationContext, input_spec: MyPortObjectSpec, table_schema: knext.Schema) -> knext.Schema:
        # We will add one column of type double to the table
        return table_schema.append(knext.Column(knext.double(), "Predictions"))
        # If you want to use types known to KNIME, but that have no dedicated KNIME type, you could use:
        # import datetime
        # return table_schema.append(knext.Column(datetime.datetime, "Date and Time"))

    def execute(self, exec_context: knext.ExecutionContext, trained_model: MyPortObject, input_table: knext.Table) -> knext.Table:
        predictions = trained_model.predict(input_table.to_pandas())
        output_table = input_table
        output_table["Predictions"] = predictions
        return knext.Table.from_pandas(output_table)
Example with two image output ports.
python
@knext.node("My Image Generator", node_type=knext.NodeType.SOURCE, icon_path="icon.png", category="/")
@knext.output_image(name="PNG Output Image", description="An example PNG output image")
@knext.output_image(name="SVG Output Image", description="An example SVG output image")
class ImageNode:
    def configure(self, config_context):
        return (
            knext.ImagePortObjectSpec(knext.ImageFormat.PNG),
            knext.ImagePortObjectSpec(knext.ImageFormat.SVG),
        )

    def execute(self, exec_context):
        x = [1, 2, 3, 4, 5]
        y = [1, 2, 3, 4, 5]
        fig, ax = plt.subplots(figsize=(5, 5), dpi=100)
        ax.plot(x, y)

        buffer_png = io.BytesIO()
        plt.savefig(buffer_png, format="png")

        buffer_svg = io.BytesIO()
        plt.savefig(buffer_svg, format="svg")

        return (
            buffer_png.getvalue(),
            buffer_svg.getvalue(),
        )
Alternatively, you can populate the input_ports and output_ports attributes of your node class (on class or instance level) for more fine grained control.
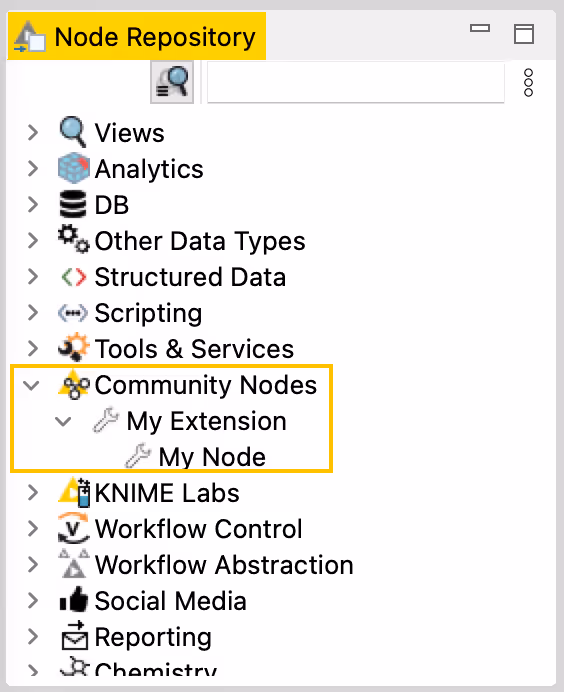
Specifying the node category
Each node in your Python node extension is assigned a category via the category parameter of the @knext.node decorator, which dictates where the node will be located in the node repository of KNIME Analytics Platform. Without an explicit category, the node will be placed in the root of the node repository, thus you should always specify a category for each node.
In order to define a custom category for the nodes of your extension, you can use the knext.category helper function. If autocompletion is enabled in your IDE, you should be able to see the list of the expected parameters of the function, together with their detailed description.
If you are a community developer, you should use the Community Nodes category as the parent category of your Python node extensions. This is done by specifying the path="/community" parameter of the knext.category function:
python
import knime.extension as knext

my_category = knext.category(
    path="/community",
    level_id="extension",
    name="My Extension",
    description="My Python Node Extension.",
    icon="icon.png",
)

@knext.node(
    name="My Node",
    node_type=knext.NodeType.PREDICTOR,
    icon_path="icon.png",
    category=my_category
)
...
class MyNode():
    ...
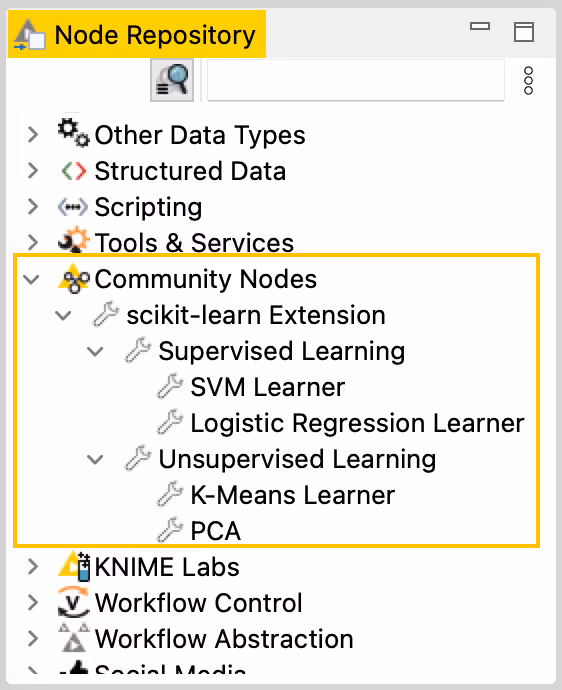
Note that it is possible to further split your custom category into subcategories. This is useful if, for instance, nodes of your extension can be grouped based on their functionality. By first defining a parent category for the node extension, you can then use it as the path parameter when defining the subcategories:
python
import knime.extension as knext

# define the category and its subcategories
main_category = knext.category(
    path="/community",
    level_id="extension",
    name="scikit-learn Extension",
    description="Nodes implementing various scikit-learn algorithms.",
    icon="icon.png",
)
supervised_category = knext.category(
    path=main_category,
    level_id="supervised_learning",
    name="Supervised Learning",
    description="Nodes for supervised learning.",
    icon="icon.png",
)
unsupervised_category = knext.category(
    path=main_category,
    level_id="unsupervised_learning",
    name="Unsupervised Learning",
    description="Nodes for unsupervised learning.",
    icon="icon.png",
)

# define nodes of the extension
@knext.node(
    name="Logistic Regression Learner",
    node_type=knext.NodeType.SINK,
    icon_path="icon.png",
    category=supervised_category
)
...
class LogisticRegressionLearner():
    ...


@knext.node(
    name="SVM Learner",
    node_type=knext.NodeType.SINK,
    icon_path="icon.png",
    category=supervised_category
)
...
class SVMLearner():
    ...


@knext.node(
    name="K-Means Learner",
    node_type=knext.NodeType.SINK,
    icon_path="icon.png",
    category=unsupervised_category
)
...
class KMeansLearner():
    ...


@knext.node(
    name="PCA Learner",
    node_type=knext.NodeType.SINK,
    icon_path="icon.png",
    category=unsupervised_category
)
...
class PCALearner():
    ...
Defining the node’s configuration dialog {#_defining_the_nodes_configuration_dialog}
For the sake of brevity, in the following code snippets we omit repetitive portions of the code whose utility has already been established and demonstrated earlier.
In order to add parameterization to your node’s functionality, we can define and customize its configuration dialog. The user-configurable parameters that will be displayed there, and whose values can be accessed inside the execute method of the node via self.param_name, are set up using the following parameter classes available in knext:
knext.IntParameterfor integer numbers:- Signature:
python
knext.IntParameter(
    label=None,
    description=None,
    default_value=0,
    min_value=None,
    max_value=None,
    since_version=None,
)- Definition within a node/parameter group class:
python
no_steps = knext.IntParameter("Number of steps", "The number of repetition steps.", 10, max_value=50)- Usage within the
executemethod of the node class:
python
for i in range(self.no_steps):
# do somethingknext.DoubleParameterfor floating point numbers:- Signature:
python
knext.DoubleParameter(
    label=None,
    description=None,
    default_value=0.0,
    min_value=None,
    max_value=None,
    since_version=None,
)- Definition within a node/parameter group class:
python
learning_rate = knext.DoubleParameter("Learning rate", "The learning rate for Adam.", 0.003, min_value=0.)- Usage within the
executemethod of the node class:
python
optimizer = torch.optim.Adam(lr=self.learning_rate)knext.StringParameterfor string parameters and single-choice selections:- Signature:
python
knext.StringParameter(
    label=None,
    description=None,
    default_value="",
    enum: List[str] = None,
    since_version=None,
)- Definition within a node/parameter group class:
python
# as a text input field
search_term = knext.StringParameter("Search term", "The string to search for in the text.", "")

# as a single-choice selection
selection_param = knext.StringParameter("Selection", "The options to choose from.", "A", enum=["A", "B", "C", "D"])- Usage within the
executemethod of the node class:
python
table[table["str_column"].str.contains(self.search_term)]knext.BoolParameterfor boolean parameters:- Signature:
python
knext.BoolParameter(
    label=None,
    description=None,
    default_value=False,
    since_version=None,
)- Definition within a node/parameter group class:
python
output_image = knext.BoolParameter("Enable image output", "Option to output the node view as an image.", False)- Usage within the
executemethod of the node class:
python
if self.output_image is True:
# generate an image of the plotknext.ColumnParameterfor a single column selection:- Signature:
python
knext.ColumnParameter(
    label=None,
    description=None,
    port_index=0, # the port from which to source the input table
    column_filter: Callable[[knext.Column], bool] = None, # a (lambda) function to filter columns
    include_row_key=False, # whether to include the table Row ID column in the list of selectable columns
    include_none_column=False, # whether to enable None as a selectable option, which returns "<none>"
    since_version=None,
)- Definition within a node/parameter group class:
python
selected_col = knext.ColumnParameter(
    "Target column",
    "Select the column containing country codes.",
    column_filter= lambda col: True if "country" in col.name else False,
    include_row_key=False,
    include_none_column=True,
)- Usage within the
executemethod of the node class:
python
if self.selected_column != "<none>":
    column = input_table[self.selected_column]
# do something with the columnknext.MultiColumnParameterfor a multiple column selection- Signature:
python
knext.MultiColumnParameter(
    label=None,
    description=None,
    port_index=0, # the port from which to source the input table
    column_filter: Callable[[knext.Column], bool] = None, # a (lambda) function to filter columns
    since_version=None,
)- Definition within a node/parameter group class:
python
selected_columns = knext.MultiColumnParameter(
    "Filter columns",
    "Select the columns that should be filtered out."
)- Setup within the
configuremethod of the node class:
python
# the multiple column selection parameter needs to be provided the list of columns of an input table
self.selected_columns = input_schema_1.column_names- Usage within the
executemethod of the node class:
python
for col_name in self.selected_columns:
    # drop the column from the table
All of the above have arguments label and description, which are displayed in the node description in KNIME Analytics Platform, as well as in the configuration dialog itself. Additionally, all parameter classes have an optional argument since_version, which can be used to specify the version of the extension that the parameter was introduced in. Please refer to the Versioning your extension section below for a more detailed overview.
Parameters are defined in the form of class attributes inside the node class definition (similar to Python descriptors):
python
@knext.node(…)
…
class MyNode:
    num_repetitions = knext.IntParameter(
        label="Number of repetitions",
        description="How often to repeat an action",
        default_value=42
    )

    def configure(…):
        …

    def execute(…):
        …
While each parameter type listed above has default type validation, they also support custom validation via a property-like decorator notation. By wrapping a function that receives a tentative parameter value, and raises an exception should some condition be violated, with the @some_param.validator decorator, you are able to add an additional layer of validation to the parameter some_param. This should be done below the definition of the parameter for which you are adding a validator, and above the configure and execute methods:
python
@knext.node(…)
…
class MyNode:
    num_repetitions = knext.IntParameter(
        label="Number of repetitions",
        description="How often to repeat an action",
        default_value=42
    )

    @num_repetitions.validator
    def validate_reps(value):
        if value > 100:
            raise ValueError("Too many repetitions!")

    def configure(…):
        …

    def execute(…):
        …
Parameter Visibility
By default, each parameter of a node is visible in the node’s configuration dialog. Parameters can be marked as advanced by setting is_advanced=True, which will only show them once the user has clicked “Show advanced settings” in the configuration dialog.
Sometimes a parameter should only be visible to the user if another parameter has a certain value. For this, each parameter type listed above has a method rule. In this method, one can specify a condition based on another parameter, and the effect that should be applied to this parameter when the condition becomes true.
python
@knext.node(args)
class MyNode:
    string_param = knext.StringParameter(
        "String Param Title",
        "String Param Title Description",
        "default value"
    )

    # this parameter gets disabled if string_param is "foo" or "bar"
    int_param = knext.IntParameter(
        "Int Param Title",
        "Int Param Description",
    ).rule(knext.OneOf(string_param, ["foo", "bar"]), knext.Effect.DISABLE)
Currently this only supports conditions where another parameter exactly matches a value. Rules can only depend on parameters on the same level, not in a child or parent parameter group.
See the full API documentation of the rule method here.
Parameter Groups
It is also possible to define groups of parameters, which are displayed as separate sections in the configuration dialog UI. By using the @knext.parameter_group decorator with a dataclass-like class definition, you are able to encapsulate parameters and, optionally, their validators into a separate entity outside of the node class definition, keeping your code clean and maintainable. A parameter group is linked to a node just like an individual parameter would be:
python
@knext.parameter_group(label="My Settings")
class MySettings:
    name = knext.StringParameter("Name", "The name of the person", "Bario")

    num_repetitions = knext.IntParameter("NumReps", "How often do we repeat?", 1, min_value=1)

    @num_repetitions.validator
    def reps_validator(value):
        if value == 2:
            raise ValueError("I don't like the number 2")


@knext.node(…)
…
class MyNodeWithSettings:
    settings = MySettings()

    def configure(…):
        …

    def execute(…):
        …
        name = self.settings.name
        …
Another benefit of defining parameter groups is the ability to provide group validation. As opposed to only being able to validate a single value when attaching a validator to a parameter, group validators have access to the values of all parameters contained in the group, allowing for more complex validation routines.
We provide two ways of defining a group validator, with the values argument being a dictionary of parameter_name : parameter_value mappings:
- by implementing a
validate(self, values)method inside the parameter group class definition:
python
@knext.parameter_group(label=''My Group'')
class MyGroup:
    first_param = knext.IntParameter(''Simple Int'',''Testing a simple int param'', 42)
    second_param = knext.StringParameter("Simple String", "Testing a simple string param", "foo")

 def validate(self, values):
     if values["first_param"] < len(values["second_param"]):
raise ValueError("Params are unbalanced!")- by using the familiar
@group_name.validatordecorator notation with a validator function inside the class definition of the ``parent'' of the group (e.g. the node itself, or a different parameter group):
python
@knext.parameter_group(label=``My Group'')
class MyGroup:
    first_param = knext.IntParameter(``Simple Int'', ``Testing a simple int param'', 42)
    second_param = knext.StringParameter("Simple String", "Testing a simple string param", "foo")

@knext.node(…)
…
class MyNode:
    param_group = MyGroup()

    @param_group.validator
    def validate_param_group(values):
        if values["first_param"] < len(values["second_param"]):
            raise ValueError("Params are unbalanced!")
If you define a validator using the first method, and then define another validator for the same group using the second method, the second validator will override the first validator. If you would like to keep both validators active, you can pass the optional override=False argument to the decorator: @param_group.validator(override=False).
Intuitively, parameter groups can be nested inside other parameter groups, and their parameter values accessed during the parent group’s validation:
python
@knext.parameter_group(label="Inner Group")
class InnerGroup:
    inner_int = knext.IntParameter("Inner Int", "The inner int param", 1)

@knext.parameter_group(label="Outer Group")
class OuterGroup:
    outer_int = knext.IntParameter("Outer Int", "The outer int param", 2)
    inner_group = InnerGroup()

    def validate(self, values):
        if values["inner_group"]["inner_int"] > values["outer_int"]:
            raise ValueError("The inner int should not be larger than the outer!")
Node view declaration
You can use the @knext.output_view(name="", description="") decorator to specify that a node returns a view. In that case, the execute method should return a tuple of port outputs and the view (of type knime.api.views.NodeView).
python
from typing import List
import knime.extension as knext
import seaborn as sns


@knext.node(name="My Node", node_type=knext.NodeType.VISUALIZER, icon_path="icon.png", category="/")
@knext.input_table(name="Input Data", description="We read data from here")
@knext.output_view(name="My pretty view", description="Showing a seaborn plot")
class MyViewNode:
    """
    A view node

    This node shows a plot.
    """

    def configure(self, config_context, input_table_schema):
        pass

    def execute(self, exec_context, table):
        df = table.to_pandas()
        sns.lineplot(x="x", y="y", data=df)
        return knext.view_seaborn()

        # If the node outputs tables, the output view must
        # be the last element of the return value
        #
        # output_table = knext.from_pandas(df)
        # return output_table, knext.view_seaborn()
        #
        # For multiple table outputs use
        # return output_table_1, output_table_2, knext.view_seaborn()
Accessing flow variables
You can access the flow variables available to the node in both the configure and execute methods, via the config_context.flow_variables and exec_context.flow_variables attributes respectively. The flow variables are provided as a dictionary of flow_variable_name : flow_variable_value mappings, and support the following types:
- bool
- list(bool)
- float
- list(float)
- int
- list(int)
- str
- list(str)
By mutating the flow_variables dictionary, you can access, modify, and delete existing flow variables, as well as create new ones to be propagated to downstream nodes.
Versioning your extension
As you continue to develop your extension after the initial release, you might extend the functionality of your nodes by adding or removing certain parameters. With the versioning capabilities of Python-based node extensions for KNIME Analytics Platform, you can ensure backward compatibility for your users.
As seen in the Python Node Extension Setup section, the knime.yml configuration file contains a version field. This allows you to assign a version to each iteration of your extension. How closely you want to follow the semantic versioning scheme is completely up to you, but we do require adherence to the following formatting-related rule: versions must be composed of three non-negative numeric parts separated by dots (e.g. 1.0.0, 0.2.1, etc.).
The version numbers are compared from left to right, i.e. 1.0.1 is newer than 1.0.0, but older than 1.1.0.
When adding a new parameter to a node, you should associate it with the corresponding version of your extension. This is done using the since_version argument that is now available for all parameter types via the appropriate constructor (e.g. knext.IntParameter), as well as parameter groups via the @knext.parameter_group decorator. If not specified, the since_version argument of a parameter or parameter group defaults to 0.0.0, which indicates that the parameter was available from the first iteration of the extension.
A common use-case of extension versioning is to facilitate backward compatibility when opening workflows that were created/saved with an older version of the extension installed on the machine. What KNIME Analytics Platform will try to achieve by default in this case, is to combine the values of the previously configured node settings that are still available in the current version of the extension with the newly added node settings, if any. The latter are then automatically set to their default values, and the node remains configured.
Sometimes the default value for a newly added node should be different than the default value for a node that is loaded as part of an old workflow (for an example see double_param below). In this scenario you can use a DefaultValueProvider instead of the default value. The DefaultValueProvider is a function that given a Version produces the default value of the parameter for that version of the extension. For old workflows it is called with the extension version the workflow was saved with. For new workflows it is called with the current version of the extension.
Here is a minimal functional example of a Python-based extension containing a single node with a single parameter. Since the parameter is available from the initial release of the extension, we can forgo setting the since_version argument:
python
"""
My Extension | Version: 0.1.0 | Author: Jane Doe
"""

import knime.extension as knext

@knext.node(
    "My Node",
    knext.NodeType.SOURCE,
    "..icons/icon.png",
    "/"
)
@knext.output_table("Output Data", "Data generated by this node.")
class MyNode:
    """Short node description.
    Long node description.
    """
    my_param = knext.IntParameter(
        "My Param",
        "My int parameter.",
        42,
    )

    def configure(self, config_context, input_table_schema):
        return input_table_schema

    def execute(self, exec_context, input_table):
        df = input_table.to_pandas()
        df['column1'] += self.my_param
        return knext.Table.from_pandas(df)
During the next few releases of the extension, MyNode is modified with an addition of several new parameters:
python
"""
My Extension | Version: 0.5.0 | Author: Jane Doe
"""

import knime.extension as knext

@knext.node(
    "My Node",
    knext.NodeType.SOURCE,
    "..icons/icon.png",
    "/"
)
@knext.output_table("Output Data", "Data generated by this node.")
class MyNode:
    """Short node description.
    Long node description.
    """
    my_param = knext.IntParameter(
        "My Param",
        "My int parameter.",
        42,
    )
    double_param = knext.DoubleParameter(
        "My Double",
        "Double parameter that strives to be Pi.",
        # For old workflows the value must be 1 to stay backwards compatible
        # but for new workflows we want the default to be 3.14
        lambda v: 1 if v < knext.Version(0, 3, 0) else 3.14,
        since_version="0.3.0",
    )
    string_param = knext.StringParameter(
        "My String",
        "An important string parameter to be turned into a flow variable.",
        "Foo",
        since_version="0.5.0",
    )

    def configure(self, config_context, input_table_schema):
        return input_table_schema

    def execute(self, exec_context, input_table):
        df = input_table.to_pandas()
        df['column1'] += self.my_param * self.double_param
        exec_context.flow_variables['important_string'] = self.string_param
        return knext.Table.from_pandas(df)
Now, if a user whose version of My Extension is 0.5.0 opens a workflow containing MyNode that was configured/saved on a machine where the version of My Extension was, for instance, 0.2.0, the node settings will automatically be adapted to contain the previously configured value for my_param, and the default values for double_param and string_param. If the user were to execute the node without first reconfiguring it, the execute method would use those default values for the corresponding parameters.
Note how the default value of double_param depends on the version in order to ensure that the node’s output does not change if the workflow is of an older version.
If the behaviour/functionality of the node has changed throughout the various releases of the extension, and you would like to require users to reconfigure the node if certain conditions are met, you can use the config_context.set_warning() or exec_context.set_warning() methods in the configure and execute methods of your node respectively to display a yellow "warning" sign in the node status. Additionally, you can raise an exception to further direct the user to reconfigure the node. For example:
python
import knime.extension as knext

@knext.node(
    "My Node",
    knext.NodeType.SOURCE,
    "..icons/icon.png",
    "/"
)
@knext.output_table("Output Data", "Data generated by this node.")
class MyNode:
    """Short node description.
    Long node description.
    """
    my_param = knext.IntParameter(
        "My Param",
        "My int parameter.",
        42,
    )
    double_param = knext.DoubleParameter(
        "My Double",
        "Double parameter that strives to be Pi.",
        lambda v: 1 if v < knext.Version(0, 3, 0) else 3.14,
        since_version="0.3.0",
    )

    def configure(self, config_context, input_table_schema):
        if self.my_param < 10:
            config_context.set_warning("Please reconfigure the node.")
            raise ValueError("My Param cannot be less than 10.")

        return input_table_schema

    def execute(self, exec_context, input_table):
        df = input_table.to_pandas()
        df['column1'] += self.my_param * self.double_param
        return knext.Table.from_pandas(df)
Deprecation of nodes
Sometimes it is not possible to change a node and stay backwards compatible e.g. if an input or output port is added. If you find yourself in this scenario do the following:
- Deprecate the old node by setting the
is_deprecatedargument totruein theknime.extension.nodedecorator. The node is then no longer listed in the node repository but it can still be loaded in existing KNIME workflows in which it then is also marked as deprecated. - Implement a new version of the node that has the same
nameargument in theknime.extension.nodedecorator as the old node.
Don’t change the name of the Python class that implements your old node because this name is used as ID by the Analytics Platform to find the node.
Improving the node description with Markdown
The description of your node, which is displayed in the Description area of KNIME Analytics Platform when a node is selected, is composed of multiple components. These components come from the descriptions you, as the developer, provide when defining the building blocks of the node, such as the input ports or the configuration parameters.
Keep in mind that at the first line of the description docstring, next to the three double quotes, you can provide a short description, which will be shown in the overview when clicking on a category in the node repository of the KNIME Analytics Platform.
By including the markdown Python package in the python environment associated with your node extension, you can make use of Markdown syntax when writing these descriptions to improve readability and the overall look of your nodes' documentation.
Below you can find a list of which Markdown syntax is supported for each node description element.
As KNIME Analytics Platform transitions to the Modern UI, we will work on extending our support for additional Markdown syntax.
Table 1. The supported Markdown syntax for the available node description components
| Element | Node description | Port description | Parameter description | Top-level parameter group description |
|---|---|---|---|---|
| Heading | Yes | No | No | No |
| Bold | Yes | Yes | Yes | Yes |
| Italic | Yes | Yes | Yes | Yes |
| Ordered List | Yes | Yes | Yes | Yes |
| Unordered List | Yes | Yes | Yes | Yes |
| Code | Yes | Yes | Yes | Yes |
| Fenced code blocks | Yes | Yes | Yes | No |
| Horizontal Rule | Yes | Yes | No | No |
| Link | Yes | Yes | Yes | Yes |
| Table | Yes | No | No | No |
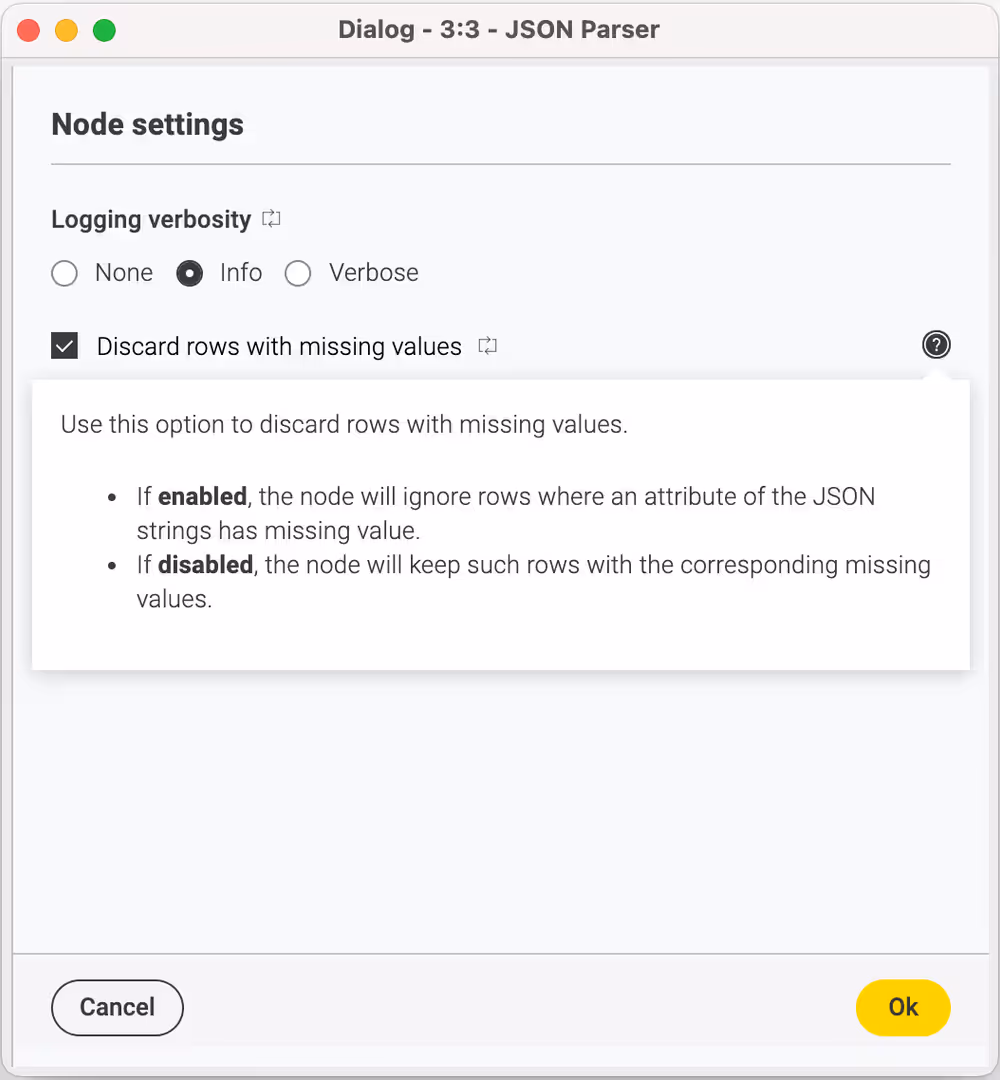
Here is a functional example of using Markdown when writing a Python node:
python
import knime.extension as knext

@knext.parameter_group("Node settings")
class Settings:
    """
    Settings to configure how the node should work with the provided **JSON** strings.
    """

    class LoggingOptions(knext.EnumParameterOptions):
        NONE = ("None", "Logging *disabled*.")
        INFO = ("Info", "Allow *some* logging messaged to be displayed.")
        VERBOSE = ("Verbose", "Log *everything*.")

    logging_verbosity = knext.EnumParameter(
        "Logging verbosity",
        "Set the node logging verbosity during execution.",
        LoggingOptions.INFO.name,
        LoggingOptions,
    )

    discard_missing = knext.BoolParameter(
        "Discard rows with missing values",
        """
        Use this option to discard rows with missing values.

        - If **enabled**, the node will ignore rows where an attribute of the JSON strings has missing value.
        - If **disabled**, the node will keep such rows with the corresponding missing values.
        """,
        True,
    )


@knext.node("JSON Parser", knext.NodeType.MANIPULATOR, "icon.png", main_category)
@knext.input_table(
    "Input table",
    """
    Input table containing JSON-encoded strings in each row.

    Example format of the expected input:
    ```json
    {
        "Konstanz": {
            "population": 90,000,
            "region": "Baden-Württemberg",
            ...
        },
        ...
    }
    ```
    """,
)
@knext.output_table(
    "Parsed JSON",
    "Output table containing columns with the information extracted from the provided JSON string.",
)
class JsonParser:
    """Node for parsing JSON strings.
    Given a table containing [JSON](https://developer.mozilla.org/en-US/docs/Glossary/JSON) strings, this node attempts to parse them and
    outputs the extracted information in a new table.

    | Allowed | Not allowed |
    | ------- | ----------- |
    | JSON | YAML |
    """

    settings = Settings()

    def configure(self, config_context, input_table_schema):
        # configuration routine
        # ...
        return input_table_schema

    def execute(self, exec_context, input_table):
        # execution routine
        # ...
        return input_table
Below is the resulting node description as seen in KNIME Analytics Platform:

The descriptions of individual node parameters can additionally be accessed from within the configuration dialog of the node:
Share your extension
You can share your extension in two ways. One is to bundle the extension to get a local update site which can be shared with your team or used for testing. The other is to publish it on KNIME Community Hub and make it available for the community. Either of the two options need some setup details. In this section, the setup and the two options will be explained.
Setup
To ensure that the users you have shared your extension with are able to utilize its functionality fully and error-free, we bundle the source files together with the required packages using pixi-pack.
The knime.yml file (refer to the Python Node Extension Setup section for an example of this configuration file) contains the information required to bundle your extension, including:
extension_module: the name of the.pyfile containing the node definitions of your extension.pixi_toml_path: the path to thepixi.tomlfile containing the configuration of thepythonenvironment that is used with your extension (see example below).
The template provided in knime-python-extension-template already contains a pixi.toml file with a base python environment. You can use this file as a starting point for your own extension. You can add additional packages to the pixi.toml file with the command:
bash
pixi add <package_name>This will automatically add the package to the pixi.toml file and make sure that the environment works on all platforms. Packages from PyPI (pip) can be added as well by using the command pixi add --pypi <package_name>. However, it should be noted, that pip-source packages are not supported in the bundling pipline. Make sure to only include conda packages (preferred) or pypi wheel packages. If you can’t avoid using a pip-source packages, you can create your own conda package and host it on anaconda.org or a private conda channel. Before including a package as pypi dependency, make sure to check if it is available on conda-forge or other conda channels. If it is, prefer using the conda package.
If you already have a conda environment with the required packages, you can use the command:
bash
conda env export --from-history > env.ymlto generate an env.yml file in which the packages installed in the environment are listed. This will reduce the list of dependencies down to the packages that you have manually installed in the environment. Note that this option does not preserve the list of manually specified channels when installing packages (e.g., conda-forge), so you might have to add them yourself. You can then use this file as a starting point for your pixi.toml file. By using:
bash
pixi init -i <env.yml>you can generate a pixi.toml file that contains the packages listed in the env.yml file. Note however, that this file will not contain the base python environment required for your extension unless you manually add it. However, you can merge the dependencies of the two pixi.toml files.
pixi.toml:
toml
[workspace]
authors = ["Bobby Test <bobby.test@knime.com>"]
channels = ["knime", "conda-forge"]
name = "my-knime-python-extension"
platforms = ["win-64", "linux-64", "osx-64", "osx-arm64"]
version = "0.1.0"

[tasks]

[dependencies]
python = "3.11.*"                     # Base dependency
knime-extension = "{version_ap}"                 # Base dependency
knime-python-base = "{version_ap}"               # Base dependency
scipy = "*"                           # Example dependency added by the user for the extension

[feature.build.dependencies]
python = "3.9.*"                      # Dependency needed for the bundling process
knime-extension-bundling = "{version_ap}"    # Dependency needed for the bundling process

[feature.build.tasks]
build = { args = [{ "arg" = "dest", "default" = "./local-update-site" }], cmd = "python $CONDA_PREFIX/bin/build_python_extension.py . {{ dest }}"} # Command for bundling the extension

[environments]
build = {features = ["build"], no-default-feature = true}   # Environment used for bundling the extension
You can always check if an environment is defined correctly without installing it by running the command pixi lock in the terminal. This will create a pixi.lock file in the same directory as the pixi.toml file, pinning the versions of the packages used in the environment. This file can be used to reproduce the environment on other machines or to share it with other users and will be used during the bundling process. If the pixi.lock file is not created, it means that there is an error in the pixi.toml file. The error message will be displayed in the terminal. Pixi will try to resolve the dependencies for all platforms listed in the pixi.toml, which should be win-64, linux-64, osx-64, and osx-arm64, as extensions should usually be available for all platforms. However, you can also specify different environments for each platform by using the platforms argument when adding a package.
After you adjust the pixi.toml file, you can run the command pixi install to install the packages listed in the pixi.toml file. This will create a new environment in the .pixi/envs/default directory. You can use the path to that directory directly as a python path (for example in VS Code) to run your extension locally. In the setting "Select Python Interpreter" click on "Enter interpreter path" and select the python executable in the .pixi/envs/default directory. This will allow you to use the linter and autocomplete features of your IDE. Alternatively, you can use the command pixi shell to "activate" the environment similar to conda activate <env_name>.
OS-specific environments
Since KNIME Analytics Platform is available on Windows, Linux, and macOS, you should try your best to ensure that your Python extension performs as expected on all platforms. Ideally, by using conda packages made for all platforms. However, this is not always possible, and some packages are only available for specific operating systems. In this case, you need to provide different platform-specific packages in the pixi.toml file. This can be easily done by using the platforms argument when adding a package:
bash
pixi add <package_name> -p <platforms>where <platforms> is a comma-separated list of platforms for which the package During the bundling process, the pixi tool will automatically use the correct package for each platform, and the correct environment will be created for each platform.
Support for Apple Silicon-specific environments is available starting from the 4.7 release of KNIME Analytics Platform. The conda platform name is osx-arm64.
Lastly, a new extension needs a LICENSE.TXT that will be displayed during the installation process.
Option 1: Bundling a Python extension to share a zipped update site
Once you have finished implementing your Python extension, you can bundle it, together with the appropriate python environment, into a local update site. This allows other users to install your extension in the KNIME Analytics Platform.
Follow the steps of extension setup. Once you have prepared the environment used by your extension (meaning a correct and lockable pixi.toml), and have set up the knime.yml file, you can proceed to generating the local update site.
In the pixi.toml we have prepared a dedicated build command for bundling your extension. This command will automatically create a python environment with all the dependencies needed for bundling. Simply run the command:
bash
pixi run build dest=<my_destination>where dest is the destination directory where the update site will be created. to bundle your extension, where <my_destination> is the path to the directory where the bundled extension update site will be created. The command will create a environment with the name build and install all the dependencies listed in the pixi.toml file, including the knime-extension-bundling package. This package contains the necessary tools to automatically build your extension.
Under the hood, this command will install the build environment (if not already) and run the command build_python_extension . <my_destination> in the pixi shell. The . indicates the current directory, which contains the knime.yml file. The <my_destination> is the path to the directory where the update site will be created. build_python_extension is a python script that is included in the conda package knime-extension-bundling. For most use cases, it suffices to run this command to bundle your extension. However, the build_python_extension.py script can also be run directly, allowing for additional options to be passed. All available options can be found by running the command python build_python_extension.py --help in the terminal (with the build environment activated).
By default, the script will bundle the extension for the latest KNIME Analytics Platform version. If you want to bundle the extension for a specific KNIME version, you have to install the corresponding conda package. You can specify the version when you create the environment , e.g. knime-extension-bundling=5.7. When bundling an older version, the environment TOML files must contain the corresponding versions of the knime-python-base and knime-extension packages, e.g.- knime-python-base=5.6 when bundling for version 5.6.
The bundling process can take several minutes to complete. A fast internet connection is advantageous.
Add the generated repository folder to KNIME Analytics Platform as a Software Site in File → Preferences → Install/Update → Available Software Sites
Finally, install it via File → Install KNIME Extensions
The generated repository can now be shared with and installed by other users.
Option 2: Publish your extension on KNIME Community Hub
Once you have finished implementing your Python extension, you can share it, together with the appropriate python environment, on KNIME Community Hub. This allows other users to easily discover, install, and use your extension.
Provide the extension
Follow the steps in extension setup to prepare the pixi.toml file defining your Python environment and the knime.yml file containing metadata about your extension.
Upload your extension to a public Git repository, ensuring that the knime.yml file is located at the top level of the repository. A config.yml file is not needed for publishing.
Here is a recommended project structure:
text
https://github.com/user/my_knime_extension
.
├── icons
│   └── icon.png
├── src
│   └── extension.py
├── demos
│   └── Example_with_Python_node.knwf
├── knime.yml
├── pixi.toml
├── config.yml # not needed for publishing
├── LICENSE.TXT
└── README.md
Write a test workflow
- Install the
KNIME Testing Frameworkin your KNIME Analytics Platform (KAP). This framework allows you to automate the testing of workflows and extensions. - Create a test workflow that validates the functionality of your extension. For more details, refer to this blog post.
- Test your extension against the test workflow: does it validate your functionality and behave as expected?
Contribute
To publish your extension on KNIME Community Hub, follow the steps outlined in the guide: Publish Your Extension on KNIME Community Hub. This guide provides detailed instructions for submitting your extension for review and publication.
Lean back, clean up
- Wait for KNIME to review your submission and provide feedback.
- Once your extension is available on the nightly experimental community extension Hub, test it again using your test workflow. The nightly experimental update site can be accessed at: https://update.knime.com/community-contributions/trunk (Currently, all Python extensions remain on this site.)
- Upload your test workflow to the Community Workflow Server. To do this:
- Open the KNIME Explorer view in KNIME Analytics Platform.
- If you do not have a mount point for the Community Workflow Server, click the button at the top-right of the Explorer view and select Configure Explorer settings.
- Create a new mount point with a custom ID and select KNIME Community Server as the mount point type.
- Log in using your KNIME Forum credentials (you must have
community contributor status). - Create a new workflow group inside Testflows/trunk, give it a meaningful name, and upload your workflow(s) to this group.
When uploading workflows to the Community Workflow Server, ensure that the permissions are set to allow read access for everyone. This ensures that other users can access and test your workflows.
Congratulations! By publishing your extension on KNIME Community Hub, you are contributing to the KNIME community and enabling others to benefit from your work. Thank you for your contribution!
The nightly experimental update site is used for testing extensions before they are officially published. Extensions on this site may be unstable and are intended for testing purposes only.
Customizing the Python executable
Some extensions might have additional requirements that are not part of the bundled environment e.g. in case of third party models. For these extensions, it is possible to overwrite the Python executable used for execution. This can be done via the system property knime.python.extension.config that has to point to a special YAML file on disc. Add it to your knime.ini with the following line:
-Dknime.python.extension.config=path/to/your/config.yml
The forward slash / has to be used on all OS, also on Windows.
The format of the YAML is:
yaml
id.of.first.extension:
  conda_env_path: path/to/pixi.toml
id.of.second.extension:
  python_executable: path/to/python/executable
You have two options to specify a custom Python exectuable:
- Via the
conda_env_pathproperty (recommended) that points to apythonenvironment on your machine. - Via the
python_executableproperty that points to an executable script that starts Python (see Manually configured Python environments section in KNIME Python Integration Guide for more details).
If you specify both, then conda_env_path will take precedence. It is your responsibility to ensure that the Python you specified in this file has the necessary dependencies to run the extension. As illustrated above, you can overwrite the Python executable of multiple extensions.
Registering Python extensions during development
In order to register a Python extension you are developing, you can add it to the knime.python.extension.config YAML explained above by adding a src property:
yaml
id.of.your.dev.extension:
  src: <path_to_this_repository>/src
  conda_env_path: <path_to_this_repository>/.pixi/envs/default
  debug_mode: true
Note that you have to specify either conda_env_path or python_executable because the Analytics Platform doesn’t have a bundled environment for your extension installed. For debugging it is also advisable to enable the debug mode by setting debug_mode: true. The debug mode disables caching of Python processes which allows some of your code changes to be immediately shown in the Analytics Platform. Those changes include:
- Changes to the execute and configure runtime logic.
- Changes to existing parameters e.g. changing the
labelargument. - Other changes, such as adding a node or changing a node description, require a restart of the Analytics Platform to take effect.
- Last but not least, fully enabling and disabling the debug mode also requires a restart.
Other Topics
Logging
You can use the logging Python module to send warnings and errors to the KNIME Analytics Platform console. By going to File → Preferences → KNIME → KNIME GUI, you can choose the Console View Log Level. Each consecutive level includes the previous levels (i.e. DEBUG will also allow message from INFO, WARN, and ERROR to come through in the console, whereas WARN will only allow WARN and ERROR levels of messages).
In your Python script, you can initiate the logger, and use it to send out messages to the KNIME Analytics Platform console as follows:
python
# other various imports including knime.extension
import logging

LOGGER = logging.getLogger(__name__)

# your node definition via the knext decorators
class MyNode:
    # your configuration dialog parameter definitions

    def configure(…):
        …
        LOGGER.debug("This message will be displayed in the KNIME Analytics Platform console at the DEBUG level")
        LOGGER.info("This one will be displayed at the INFO level.")
        LOGGER.warning("This one at the WARN level.")
        LOGGER.error("And this will be displayed as an ERROR message.")
        …

    def execute(…):
        …
        LOGGER.info("Logger messages can be inserted anywhere in your code.")
        …
Gateway caching
In order to allow for a smooth user experience, the Analytics Platform caches the gateways used for non-execution tasks (such as the spec propagation or settings validation) of the last used Python extensions. This cache can be configured via two system properties:
knime.python.extension.gateway.cache.size: controls for how many extensions the gateway is cached. If the cache is full and a gateway for a new extension is requested, then the gateway of the least recently used extension is evicted from the cache. The default value is 3.knime.python.extension.gateway.cache.expiration: controls the time period in seconds after which an unused gateway is removed from the cache. The default is 300 seconds.
The debug_mode: true propertly of config.yml discussed before effectively disables caching for individual extensions. By default, all extensions use caching.
Troubleshooting
In case you run into issues while developing pure-Python nodes, here are some useful tips to help you gather more information and maybe even resolve the issue yourself. In case the issues persist and you ask for help, please include the gathered information.
Please have a look at the KNIME Log.
Have also a look at the troubleshoot section of the Python integration guide.
Find debug information
Resourceful information helps in understanding issues. Relevant information can be obtained in the following ways.
Accessing the KNIME Log
The knime.log contains information logged during the execution of nodes. To obtain it, there are two ways:
- In the KNIME Analytics Platform:
View → Open KNIME log - In the file explorer:
<path-to-knime-workspace>/.metadata/knime/knime.log
Not all logged information is required. Please restrict the information you provide to the issue. If the log file does not contain sufficient information, you can change the logging verbosity in File → Preferences → KNIME. You can even log the information to the console in the KNIME Analytics Program: File → Preferences → KNIME → KNIME GUI.
Information about the Python environment
If conda is used, obtain the information about the used Python environment <python_env> via:
conda activate <python_env>conda env export
If pixi is used, obtain the information about the used Python environment can be found in the pixi.toml and pixi.lock files in the root of the extension folder (see step 5 of the tutorial). The pixi.lock file contains the information about the Python version and the used packages. Alternatively, you can also run the following commands:
pixi infoto get some general informationpixi listto get the list of installed packagespixi lockto make sure thepixi.lockfile is up to date
How to update Python version
In step 4 of the tutorial an environment is created which you use for your extension.
Three modules are specified for the installation:
knime-extensionbrings in all the necessary API files such that you can use code-completion in your editor, if the environment is activated there.knime-python-baseis a metapackage which brings in dependencies like pyarrow and pandas etc, which are necessary for interacting with the KNIME Analytics Platform. If you look at the files on Anaconda.org you see that we provide knime-python-base up to Python 3.11.- Python lets you specify the version. as you can see in 2., the version range made available by
knime-python-baseis 3.8-3.11.
You can create an environment with a more recent Python version as follows:
conda create -n my_python_env python=3.11 knime-python-base knime-extension -c knime -c conda-forge
or simply by updating your pixi.toml file which should contain a line like:
toml
[dependencies]
python = "<desired_python_version>"
knime-python-base = "<desired_knime_version>"
Then run pixi lock to update the pixi.lock file. This will update the Python version in the environment to the desired version.
Develop multiple extensions at once
If you want to develop and test multiple extensions simultaneously in your KNIME Analytics Platform, you can alter the config.yml (see step 5 of the tutorial)to contain the necessary information of additional extensions like this:
yaml
<first_extension_id>:
  src: <path/to/folder/of/first_extension>
  conda_env_path: <path/to/my_python_env>
  debug_mode: true
<second_extension_id>:
  src: <path/to/folder/of/second_extension>
  conda_env_path: <path/to/my_other_python_env>
  debug_mode: true
The indentation is necessary and needs to be the same in every indented line, e.g. 2 or 4 spaces.
Errors during load
If during development you get an error similar to
text
Loading model settigns failed: Parameter missing for key <some_key>then this is probably because you freshly introduced the parameter. Re-executing the node should solve this. Alternatively, drag and drop the node again from the node repository.
During devleopment, you need to drag and drop the nodes always into your workflow whenever you change someting outside the execute or configure method.
Column is of type long, but int was wanted
Due to inconsistencies of the different Operating Systems, integer columns in the output table can be of type long. To prevent that, follow this example:
python
def execute(self, exec_context, input_table):
    import numpy as np
    df = input_table.to_pandas()
    # Let's assume df has a column 'column1'
    df['column1'] = df['column1'].astype(np.int32)
    return knext.Table.from_pandas(df)
LZ4/jnijavacpp.dll/Columnar Table Backend error
On Windows, the following two errors can happen if you have two KNIME Analytics Platform versions open and both use the Columnar table backend. Close both and start only one.
text
ArrowColumnStoreFactory :  :  : Failed to initialize LZ4 libraries. The Columnar Table Backend won't work properly.
java.lang.UnsatisfiedLinkError: java.io.FileNotFoundException: C:...\.javacpp\cache\windows-x86_64\jnijavacpp.dll (The process cannot access the file because it is being used by another process)

ERROR : KNIME-Worker-3-Data Generator 3:18 :  : Node : Data Generator : 3:18 : Execute failed: Unable to create DataContainerDelegate for ColumnarTableBackend.
java.lang.IllegalStateException: Unable to create DataContainerDelegate for ColumnarTableBackend.
	at org.knime.core.data.columnar.ColumnarTableBackend.create(ColumnarTableBackend.java:115)
...
...
...
Caused by: java.lang.UnsatisfiedLinkError: java.io.FileNotFoundException: C:...\.javacpp\cache\windows-x86_64\jnijavacpp.dll (The process cannot access the file because it is being used by another process)
Could not create instance error
The following error can appear if the extension was built with build_python_extension for a newer KNIME Analytics Platform (KAP) version. Run the build_python_extension script with the parameter for the specific KAP version or an older KAP version, e.g. build_python_extension.py --knime-version 5.7.
text
ERROR CoreUtil Could not create instance of node org.knime.python3.nodes.extension.ExtensionNodeSetFactory$DynamicExtensionNodeFactory: Could not initialize class org.knime.python3.nodes.CloseablePythonNodeProxySSL error during execution
If you encounter an SSL error during the execution of a node, this might be due to the use of a self-signed certificate. If other nodes such as the GET Request node work, but the Python node does not, you can configure the Python nodes to trust the same certificates as the KNIME Analytics Platform. To do this, add the following line to your knime.ini file:
ini
-Dknime.python.cacerts=APThis will point the CA_CERTS and REQUESTS_CA_BUNDLE environment variables to a newly created CA bundle that contains the certicate authorities that the KNIME Analytics Platform trusts. The Python nodes will then trust the same certificates as the KNIME Analytics Platform.
Pixi environment restrictions
Since KNIME Analytics Platform 5.5.0 Pixi is used to bundle the python environment needed for the extension. Pixi resolves Conda and pip dependencies at the same time and can be more strict about incompatibilities between conda and pip packages compared to the previous approach with conda-lock. It is generally recommended to use Pixi for new extensions. Existing extensions can be migrated to Pixi by following the migration tutorial. pixi.toml files can be created with the pixi init -i env.yml command, where env.yml is an existing environment file that you used before. The pixi.lock file is created by running pixi lock and contains the resolved dependencies. It is generally recommended to use conda packages for the dependencies and only use pip packages if they are not available as conda packages. It should be noted, that for the bundling process pip source packages are not supported, so you need to use pip wheels or (better) conda packages for all dependencies.
If your extension uses pip source packages you need to migrate them to pip wheels or conda packages and host them on a conda channel or PyPI. For packages that require compilation of native code, these must be built in advance to prevent potential build failures or compatibility issues on user systems. The compilation of native code is not described here. If it’s a pure Python package this can often be done in a few steps. However, the exact steps depend on the package and its dependencies. Here we provide an example of how to migrate a pip source package to a conda package, using grayskull.
bash
# Create a pixi environment for this process
pixi init
pixi add grayskull anaconda-client conda-build pip

# Download the source package
python -m pip download --no-binary :all: --no-deps <package_name>==<version>

# Use grayskull to create a conda package from the source package
grayskull pypi <package_name>.tar.gz
Make sure that the package will be built as a pure Python package. If not already added by grayskull, you can add the following lines to the meta.yaml file in the created conda package folder:
yaml
build:
  noarch: python
Furthermore, make sure that all names are matching. Especially _ and - are often used interchangeably in pip package names. If everything is fine, you can build and upload the conda package to a conda channel. If you don’t have a conda channel yet, you can create one on https://anaconda.org/ or use the anaconda-client to create one.
python
# Create a conda package
conda build <package_name>

# Upload the conda package to a conda channel
anaconda upload /path/to/conda/package.tar.bz2
After the package is uploaded, you can check if it is available on anaconda.org and add it to your pixi.toml file as a conda dependency:
toml
[dependencies]
<package_name> = "<version>"
If your package is a dependency of another package, you need to create a mapping from conda to pip, so that pip and conda packages know that this is the same package as the original pip source package. Otherwise, you will see two versions of the same package in the pixi list output, one as a conda package (the one you just created) and one as a pip package (the original pip source package). To do this, you need to create a file called conda-pypi-map.json, ideally in the root of your extension folder. The file should contain a mapping from the conda package name to the pip package name, e.g.:
json
{
  "<conda_package_name>": "<pypi_package_name>"
}
And then you need to tell Pixi about this file by adding the following line to your pixi.toml file:
toml
[workspace]
conda-pypi-map = { "<channel_name>" = "conda-pypi-map.json" }
More information about Pixi and the mapping can be found in the Pixi documentation. After these steps the extension should bundle without issues and the pip source package should be replaced by the conda package.
Installation Troubleshooting
This chapter addresses common installation challenges associated with our Python-based KNIME Extensions. It provides solutions and advice to help users manage and resolve these issues effectively, aiming for a straightforward setup process.
Offline installation
This entire section is only relevant for KNIME Analytics Platform older than 5.5.0. Newer extensions do not require this procedure and extensions always contain the required Python packages.
For performance, we no longer bundle Python packages in Python-based extensions. Therefore, if you wish to install Python-based extensions in an offline ("air-gapped") environment, please follow these steps in addition to adding an offline update site:
- Install/Run a (temporary) KNIME Analytics Platform on a system that has internet access.
- Install all wanted extensions.
- Navigate to the preferences page "Python-based Extensions" via the cogwheel (or, in the classic UI: File → Preferences → KNIME → Python-based-Extensions) and click "Download required packages for offline installation to". Select an empty folder into which the packages will be saved. After selecting a folder, KNIME will collect the required Python packages and download them to the chosen folder.
- After the download completes, copy this folder to the target offline system.
- On the target offline system set the environment variable
KNIME_PYTHON_PACKAGE_REPO_URLto the folder with the downloaded packages. - Fully close KNIME. After starting up again, KNIME will now use the provided packages for the installation of Python-based extensions.
If you are unsure if this procedure is necessary for the desired Python-based extensions just try to run the installation on the target offline system without setting the environment variable. The installation will fail with an error linking to this documentation section if the steps above are required. Alternatively, run steps 1-3 and check if any packages were downloaded.
Technical detail: Python-based extensions set up a conda environment with the necessary conda and pip packages during installation. These packages are either bundled with the extension or downloaded during installation. If the extension bundles the packages it is possible to install it from a zipped update-site on a system that has no internet access. If the extension does not bundle the packages the extra steps described above are required for an offline installation.
Custom conda environment location in case of Windows long path installation problems
Python-based extensions install a dedicated conda environment containing the Python packages required for this extension. By default, KNIME will create these conda environments at the location: '<KNIME-HOME>/bundling/envs/<EXTENSION-NAME>' for Linux and Mac and '<KNIME-HOME>\bundling\envs\<EXTENSION-NAME>' for Windows. However, it is possible to change the directory where the conda environments are created by setting the environment variable KNIME_PYTHON_BUNDLING_PATH to the desired directory. This can be useful to mitigate installation problems due to the limitation of path lengths in Windows.
Conda environments located at this path will be overwritten when installing an extension with the same name. Also when uninstalling an extension, the conda environment will be deleted.
When changing this environment variable, previously installed extensions that rely on a Python environment may stop working. It is recommended that you only set this variable for new KNIME installations.
Proxy Issues
If you are behind a proxy, you might encounter issues when trying to install Python-based KNIME extensions.
As Python-based KNIME extensions are installed via conda, you need to set the proxy settings in the conda configuration. The conda configuration file is located in the ~/.condarc file. More information about this file can be found in the following tutorial: How to use CondaRC.
To make sure the Python-based extension installation respects your proxy settings, we recommend adding the following lines to the ~/.condarc file:
yaml
proxy_servers:
  http: http://domainname\username:password@proxyserver:port
  https: http://domainname\username:password@proxyserver:port
These will ensure that the proxy settings are correctly set for conda. Proxy settings from KNIME will unfortunately not be propagated for the installation, as this could overwrite the existing proxy settings for conda.
Do not use tabs, there must be a space between http: and [http://…](http://…);. If you don’t need a username and password for the proxy, leave out the username:password.
If you run into the following error:
text
critical libmamba Download error (35) SSL connect error [https://conda.anaconda.org/conda-forge/noarch/<some package here...>]
    schannel: next InitializeSecurityContext failed: Unknown error (0x80092012) - The revocation function was unable to check revocation for the certificate.
try adding ssl_no_revoke: true to your ~/.condarc file. The error means that your proxy is not configured to forward SSL certificate revocation checks.
If none of these tips work, you can also perform an offline installation of the extension as described in: Offline Installation.