
Deploy Business Hub on AWS
Introduction
KNIME Business Hub enables users across different disciplines to collaborate and productionize analytical solutions created using the free and open source KNIME Analytics Platform. A full overview is available here. For an overview of Business Hub use cases, see our solutions page. Additionally, presentations at KNIME Summits and KNIME Data Talks about usage of the KNIME Business Hub can be found here.
This documentation page outlines how to purchase and deploy KNIME Business Hub via the AWS Marketplace. On AWS, this is available via a few Amazon Machine Images (AMIs).
Further Reading
If you are looking for detailed explanations around the additional configuration options for KNIME Business Hub, you can check the KNIME Business Hub Admin Guide.
If you are looking to install KNIME Business Hub, you should first consult the KNIME Business Hub Installation Guide.
For guides on connecting to KNIME Business Hub from KNIME Analytics Platform, please refer to the KNIME Business Hub User Guide.
AWS Deployment Options
KNIME Business Hub can be launched through the AWS Marketplace via the following Amazon Machine Images (AMIs):
For a full list of product offerings, including KNIME Analytics Platform, see here.
The above deployment options are all a single AMI instance, and are most easily launched via the AWS console. If you are familiar with the AWS CLI, you may also use this deployment method.
For a full list of regions supported, check on the specific offering pages for each product.
For self-build deployments on AWS using a custom base image, you should consult the KNIME Business Hub Installation Guide.
Cost Considerations
The costs of running a KNIME Business Hub instance will vary depending on a number of factors. These include the desired workflow execution performance, the amount of data that is planned to be stored, the backup strategy, and planned failover setup. Your KNIME customer care representative would be happy to offer you advice and guidance on how those choices will affect your setup. Below we provide some information on typical setups to give some idea of pricing.
Software Pricing
The software pricing for KNIME Business Hub is defined in the AWS marketplace on the AMI page. For questions regarding obtaining a license for a BYOL instance, please contact KNIME Customer Care.
For any information on software cost refunds, upgrading your software to a higher version, or adding to the existing license, please reach out to support@knime.com.
Hardware Pricing
Hardware pricing is defined by AWS. For more information, refer to the AWS Pricing page.
It is recommended that the user is aware of potential AWS costs and has AWS Service Limits in place to prevent over-consumption. For more information on AWS Service Limits, refer to the Manage service quotas and constraints documentation from AWS.
See below a list of associated billable AWS services:
- EC2
- EBS volume
- Data transfer in/out
- Optional: EC2 instance snapshots
- Optional: EBS storage snapshots
For additional insight regarding software cost refunds, reach out to support@knime.com.
AWS Prerequisites
All things considered, the install via AWS Marketplace should only take an hour at most. All KNIME Business Hub AWS Marketplace offerings are designed as single AMI images containing all software requirements - thus, the admin will not need to access the instance’s OS during the install process.
The person responsible for the deployment of KNIME Business Hub via the AWS marketplace should be familiar with basic AWS functionality surrounding configuring EC2 instances and should have relevant permissions to initiate said instances. For additional information on internal Business Hub administration, refer to the KNIME Business Hub Admin Guide.
If you are provisioning a Business Hub BYOL instance, you will need a license key. To obtain a license key, please contact KNIME Customer Care. If you are installing a Business Hub on AWS without the use of KNIME’s AMIs, refer to the KNIME Business Hub Installation Guide.
IAM Roles and policies
To deploy a KNIME Business Hub AMI, the user will be required to have the IAM roles/policies that allow access to launch EC2 instances and manage EBS volumes. Further rights may be needed to create security groups and VPCs if they are not already created. The application does not require the use of AWS account root privileges.
KNIME AMIs do not generate any IAM roles and policies for KNIME Business Hub nor do they grant public access to any resources. Users can generate the IAM role for the EC2 instance of KNIME Business Hub with necessary access based on their use cases (e.g. S3 access, Redshift access, …).
For more information on AWS-recommended IAM security and policy of least privilege, refer to the AWS Security Best Practices in IAM Guide.
Networking
It is assumed that a VPC with an internet gateway is configured and available. For additional information on networking requirements, refer to the Networking prerequisites section of the installation guide.
Solution Architecture
All KNIME Business Hub Marketplace offerings are composed of a Kubernetes cluster initiated and contained on a single machine in a single subnet of a VPC. Use of an elastic IP is preferred for this initial machine since it simplifies the update/upgrade procedure. For more information on how to link other compute resources to a Kubernetes cluster, refer to the Kubernetes documentation.

Keys and secrets
An SSH key for access to the KNIME Business Hub instance is created or chosen via the AWS Management Console or CLI at instance launch. The admin is responsible for managing this key as per the recommendations set within their organization.
Deployment of the solution does not require creation or management of any stored secrets.
AWS Deployment Guide
This section will go through the following processes:
- Provision your chosen KNIME Business Hub AMI
- Connect to the KNIME Business Hub Admin Console
- Configure the KNIME Business Hub
- Deploy KNIME Business Hub
- Connect to KNIME Business Hub
Provision your chosen KNIME Business Hub AMI
From the EC2 dashboard, click on Launch Instance. This will open the instance configuration process:
Name and Tags
Choose the desired Name you would like for your Business Hub instance and add any additional tags you would like based on your organization cloud requirements (e.g. cost center, owner, …)
For more information on tags, refer to the AWS Tagging Strategy documentation.
Application and OS Images (Amazon Machine Image)
In this section, you will choose a KNIME Business Hub AMI. First, type KNIME into the search bar and select AWS Marketplace AMIs in the filter. Decide the AMI most suitable for your needs and click Select. A dialog will appear asking you to subscribe to said AMI.
Instance Type
The default size on the AMI (m5.4xlarge) is the recommended minimum size for deployment. For more information on how to properly estimate the size needed, refer to the Hardware Requirements section of the KNIME Business Hub Installation Guide.
Key pair (login)
In this section, you will either provide an existing key pair or you can create a new key pair. This key will be used for ssh access to the machine and should be recycled according to your organization’s IT security protocols.
For additional information, please refer to the Rotating AWS KMS keys documentation.
Network settings
Here, you will configure the desired VPC and subnet for the instance. By default, the instance will create and apply a new security group with the following ports open:
- 80 (HTTP)
- 443 (HTTPS)
- 22 (SSH - ADMIN USE ONLY)
- 6443 (kubectl - ADMIN USE ONLY)
- 8800 (KOTS Admin Console - ADMIN USE ONLY)
The default security group opens the above ports for all IPs. It is recommended the admin adjust these values to adhere with their organization’s security best practices. For more information, refer to the AWS Security Best Practices for your VPC.
Configure Storage
By default, one 512 GiB EBS volume is included as a recommended minimum. The installer can increase the size of this volume or add additional if they see fit. By default, these drives are not encrypted. All customer-created data and assets will be stored on this drive.
If a user would like to encrypt the drive, they are able to. Please refer to the Amazon EBS Encryption documentation for more information.
For more information on storage size estimations, refer to the Hardware Requirements section of the KNIME Business Hub Installation Guide.
Advanced Details
None of the advanced details are required to edit. Change these at your own discretion.
If the installer would like to disable Instance Metadata Service Version 1, the solution allows so. Under Metadata version, the installer can choose the option “V2 only (token required)”.
Summary
Choose the number of instances and select Launch Instance. This process should take at most 30 minutes.
Connecting to the KNIME Business Hub Admin Console
After you have successfully provisioned the KNIME Business Hub AMI instance, you will need to connect to the Admin Console to configure the remaining setup of the KNIME Business Hub software.
To access and login to the Business Hub admin console, you will need the following:
- The public IP address of the instance: this will be used as the URL to connect to the Hub Console from your browser
- The AWS Instance ID: this is used as the admin password into the Admin Console. This password can be changed later.
You can find both of these items on the EC2 instance summary page for said instance. You can select the icon next to these fields to copy their value and paste them where needed.
Screenshot below:
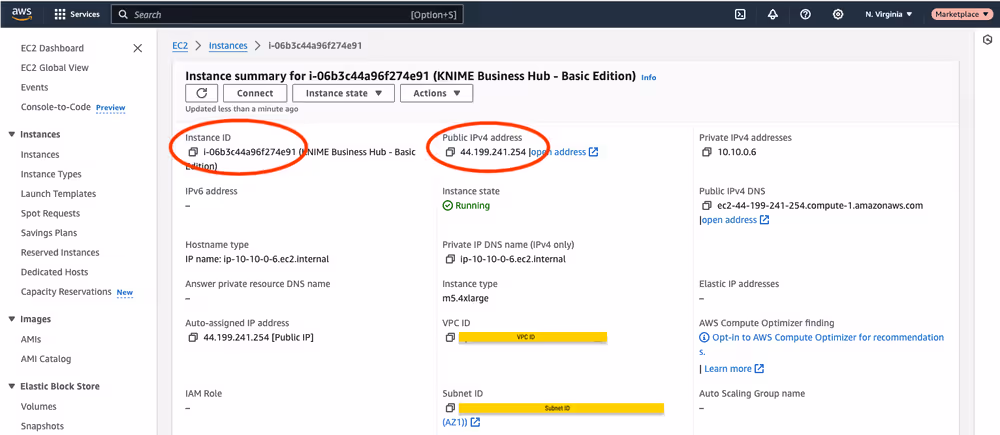
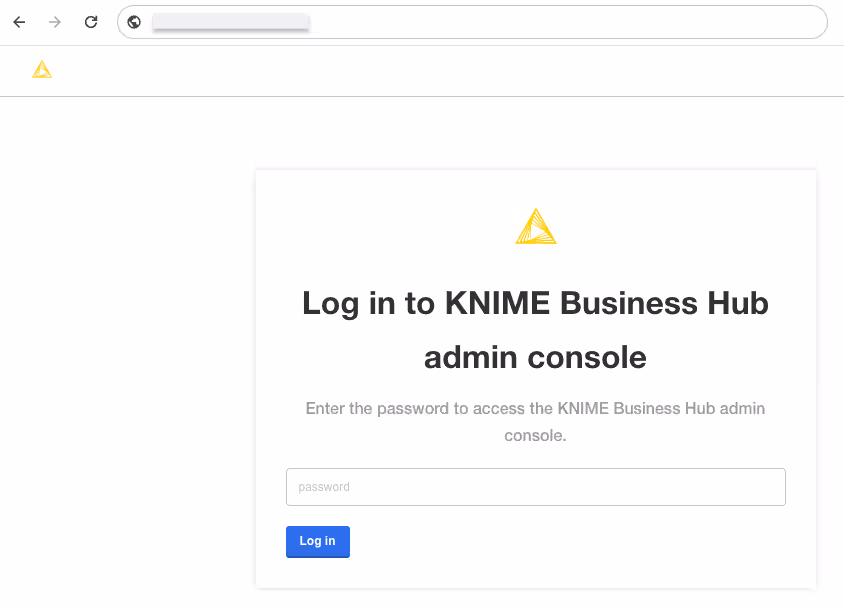
Once you’ve obtained the IP address and the instance ID from the AWS console, open a new browser tab using the URL: <public-ip-address>. Note that it will take several minutes (5-10) for the Admin Console to be available. When you connect to the Admin Console, you should see the following screen. Enter the EC2 instance ID as the password and click the Log in button.
Configuring KNIME Business Hub
After logging into the Admin Console, the Configuration page will be displayed. You can scroll through the page to complete the required configuration tasks. When you have finished all configuration tasks, scroll to the bottom of the page and click on the “Next” button.
For a more detailed description of all the configuration options, refer to the Configure the installation section of the KNIME Business Hub Installation Guide.
Global configuration
Optionally update the Business Hub deployment name and the Hub mount-point ID.
(BYOL Only) - Applying Software License
If you have provisioned the KNIME Business Hub - BYOL Edition, you will need to provide a KNIME Business Hub License. This is a .xml file that contains information needed for your installation. Upload it here by clicking Browse files for KNIME Business Hub License and navigating to the file on your local machine. If you do not have this license and would like to obtain one, please contact KNIME Customer Care.
For more information, see the KNIME Business Hub Installation Guide.
Configuring the Hub URL
You will need to provide a URL to use as the base URL for accessing your KNIME Business Hub instance. A default URL is provided with the value “hub.example.com”. It is advised that you change this URL to one within your own networking domain. For example “hub.<your-company-name>.com”.
For more information, refer to the Configure KNIME Business Hub URLs section of the installation documentation.
Configuring secure browsing (TLS)
By default the Business Hub in AWS is provided without secure browsing configured. To enable secure browsing, TLS needs to be configured. That configuration needs a certificate file and a private key file. These two files will normally be generated by your IT organization.
To enable secure browsing, reference the Configure TLS section of the KNIME Business Hub Advanced Admin Guide.
Initializing Business Hub
Several values can be set that are used to initialize the Business Hub. Scroll to the “Initialization of KNIME Business Hub” section to update the configuration. The only value you are required to set is the Admin password. Ensure to use a secure password and store the password in a secure way. You will need this password to login to the Business Hub as the Hub admin.
Deploying KNIME Business Hub
When all of the configuration tasks have been completed, you are ready to deploy the KNIME Business Hub. Scroll to the bottom of the configuration page and click on the Next button. Once clicked, the Admin Console will wait for the configuration to be stored. Once this is complete, a set of pre-flight checks will be initiated and the console will display the pre-flight check page. Ensure all the pre-flight checks have completed successfully. Scroll to the bottom of the pre-flight check page and click the Deploy button. The deployment of KNIME Business Hub will be initiated and the home page of the Admin Console will be displayed. The deployment of KNIME Business Hub generally takes 10-15 minutes. The Admin Console will display the version of KNIME Business Hub and a spinner indicating the deployment is in progress. Once the deployment has completed, you will be able to connect to your KNIME Business Hub instance.
Connecting to KNIME Business Hub
Open a new browser tab and connect to your KNIME Business Hub instance using the URL you configured earlier. You will be prompted to provide credentials to complete the login process. Use the Hub Admin username and password that was configured. You will be logged in as the Hub Admin and can begin using your KNIME Business Hub.
To get started, refer to the KNIME Business Hub Admin Guide.
Connecting KNIME Analytics Platform to KNIME Hub
KNIME Analytics Platform can connect to the KNIME Business Hub to collaborate with team members on projects and other activities. Refer to the KNIME Business Hub User Guide for instructions to connect the Analytics Platform with your KNIME Business Hub instance.
Routine Maintenance
Software Updates and Patches
The Business Hub Admin Console is used to update KNIME Business Hub to a new version. To do so, you will access the Business Hub Admin Console as described previously. Once connected, follow the update instructions in the KNIME Business Hub Update Instructions. For system-level updates of the EC2 instance, you will need to SSH into the instance. Refer to the Connect to your Linux instance using SSH AWS documentation.
Health Check
To check on the health of the KNIME Business Hub system, connect to the Admin Console where you will find overall system health info.
Backup and Recovery
For information on how to run backup and restorations within the Business Hub Admin Console, refer to the Backup and restore with Velero Snapshots and Kotsadm section of the KNIME Business Hub Advanced Admin Guide.
For extra protection, you can also create EC2 instance snapshots and/or EBS data volume snapshots for backups and recovery.
License Management
Please refer to the Update your KNIME Business Hub license section of the KNIME Business Hub Installation Guide.
Troubleshooting
To troubleshoot problems with the KNIME Business Hub software, please refer to the Support Bundles and Troubleshooting section of the KNIME Business Hub Advanced Admin Guide.
To troubleshoot problems with the EC2 instance, please refer to the Amazon EC2 Troubleshoot documentation.
Support
If you are looking for support for any of our AWS Marketplace products, please first register your product purchase here. Upon completion, we will connect you with our customer care channels.
Release Notes
Relevant changes to KNIME Business Hub software can be found in the release notes.
Relevant changes for KNIME Analytics Platform can be found in the changelogs.