
Migrate from Server to Hub
Introduction
Nearly no code made it from KNIME Server to KNIME Business Hub. KNIME Business Hub, in fact, is built from the ground up on scalable cloud-native architecture, while still providing most of the functionality from KNIME Server.
KNIME Business Hub includes robust collaboration capabilities through introduction of spaces. This allows organizations to share their internal collections of solutions. Users can easily browse through workflows, making it easier to learn more, upskill, and onboard users with or without a license.
KNIME Business Hub also improves the experience of automating execution and deploying data apps and services. Users have a single intuitive frontend where they can share solutions in spaces and set schedules, and ultimately deploy and monitor their models.
While KNIME Business Hub provides most of the functionality from KNIME Server, however, a one-to-one mapping of features between KNIME Server and KNIME Hub is not always possible.
This guide is intended to be an overview of the migration process of your KNIME Server to a KNIME Business Hub instance. The individual steps depend on your setup—there might be features you heavily use, and others you don’t use at all.
For the actual content migration, you are provided a migration workflow, which helps in migrating workflows, snapshots, schedules, components and other items to a KNIME Business Hub and a migration validator, which is designed to scan workflows currently in the selected mount point (KNIME Business Hub, KNIME Server, or local files), examining each node for potential compatibility issues that might arise after the migration process. This guide covers:
- The main feature differences between KNIME Server and KNIME Hub
- How to use the provided migration workflow to migrate your KNIME Server to KNIME Hub, which prerequisites you will need to satisfy, and a step by step user guide through the different pages of the workflow.
- To install a KNIME Business Hub please refer to the KNIME Business Hub Installation Guide - Embedded Cluster or KNIME Business Hub Installation Guide - Existing Cluster.
- To administrate a KNIME Business Hub instance please refer instead to the KNIME Business Hub Administration Guide.
Preparation: KNIME Server vs KNIME Hub concepts
Before migrating content, the KNIME Business Hub needs some initial setup for execution resources, users and teams, which is not covered by the migration workflow.
Users
User management on KNIME Business Hub is handled via keycloak and differs dramatically from the User management on KNIME Server.
- If your KNIME Server installation uses the H2 database you will need to migrate the users manually.
- LDAP and other IdPs are supported by keycloak and KNIME Business Hub. See the KNIME Business Hub Admin Guide on how to Expose external groups inside KNIME Business Hub.
An interesting feature that is introduced with KNIME Business Hub is the usage of application passwords that will provide the users with the ability to provide authentication when using the KNIME Hub REST API, for example when executing deployed REST services. You can find more information on how to create and use application passwords in the Application passwords section of the KNIME Business Hub User Guide. If you use the migration workflow, you will use the application password of a team member (see below) from a team you want to migrate content to in order to authenticate.
Teams
This is a new concept on KNIME Hub, as a successor of KNIME Server Groups. A team is a group of users on KNIME Hub that work together on shared projects. A Team will own specific Hub resources, to which only Team members will have access.
When users are migrated to the Hub one or more teams are created (depending on the type of license or your KNIME Business Hub) and users are assigned to a team. Additionally, each user has a role assigned, which can be the following:
Member role. A team member can:
- View the team page, with members list and spaces
- Create private spaces
- Modify and delete public and private spaces
- Upload/download items to/from public and private spaces
- Delete items from public and private spaces
- Execute Workflows
- Create Data App, Schedule, Trigger, and Service Deployments
Administrator: A team administrator can:
- Do everything a Team member can
- Add/remove users from the team
- Promote team members to admins
- Create execution contexts
- Delete the team
When migrating using the migration workflow you will migrate items from KNIME Server to KNIME Hub to a specific team. For this reason, you will need to access the KNIME Business Hub as a user that has the Member or Administrator role in the specific team.
Spaces and permissions
One core concept of the KNIME Hub is the concept of “spaces”. A space is a collection of items used to organize components, workflows and files. Spaces are intended to organize a team’s work around a specific project or domain and they are owned by a team. Members and admins of the teams have access to the spaces by default, but permissions can be defined for each role or user, i.e. space access permissions can be restricted for certain users in the team.
The roles and permissions assigned to the team members or to the single users can then be assigned by the team admins.
During the migration process we recommend to transfer top level folders on the Server into a space on the Hub. Using the migration workflow described in the following sections you will be able to select one or multiple folders from the Server and to move their content (workflows, snapshots, schedules, components, data files, …) to one or more spaces.
Item Versions
The snapshot feature of KNIME Server relates to item versions on KNIME Business Hub. A version is a snapshot in time of an item on Business Hub and is associated with some metadata (title, description, creator, creation timestamp, …).
An item version history is available to the team members as a list of all the versions that have been created of a specific item.
When using the migration workflow, KNIME Server snapshots can be transferred to the Hub as item versions. Migrated snapshots will bear the title “VX snapshot from KNIME Server”, where the X will be the number of the snapshot (low number: old snapshot; high number: recent snapshot). The item as it resided on KNIME Server will always be versioned by the migration workflow and bear the title “VY from KNIME Server”, Y being the number of KNIME Server Snapshots plus one. The metadata of the KNIME Server Snapshot is given in the Version Description on the KNIME Hub Item Version.
Deployments
On KNIME Server, when a workflow is uploaded to the Server it is automatically possible to execute the workflow as a data app via the KNIME WebPortal, to schedule the execution of the workflows via KNIME Analytics Platform, and to use the workflow as a service to be called either by another workflow or by an external tool.
While it is still possible to do ad hoc execution of workflows, which is intended for one-time usage e.g. during development, an extra step is introduced on KNIME Hub to separate the workflow from its intended usage: Deployments. With KNIME Business Hub, the upload of a workflow to a space on the Hub needs to be followed by the creation of a version and then the creation of the desired deployment. There are different types of deployments on KNIME Business Hub:
- Data app
- Schedule
- Service
- Trigger
Trigger deployments are entirely new, and allow to trigger a workflow when a file was modified, for example, or a new version of a workflow was created.
We provide examples for each deployment, which are explained here.
Since it is not possible to detect a priori whether a workflow is intended as a data app or is executed as a service on KNIME Server, the migration process will need a manual step where the workflows are deployed as data apps or services.
Scheduled workflows instead can be migrated together with their scheduled jobs. Migrating scheduled executions from Server to Hub means that the same workflow will be scheduled on the Hub with the same configuration as on the Server.
By default, those schedules are only created and configured but not enabled. It is recommended to check that a workflow still executes successfully on the Hub before enabling it manually on the Hub. If desired, however, you can change this setting in the migration workflow.
Note that “Call Workflow” and “Save Report” actions as well as configured credentials cannot be migrated to the Hub. They require manual configuration, and the migration workflow will give further instructions if this case arises.
Please note that if you want to migrate the schedule deployments of workflows the team you want to migrate to needs to have access to an execution context.
Workflow Execution
Workflow execution on KNIME Business Hub does still happen on Executors like on the KNIME Server, only that they are wrapped in so-called Execution Contexts. You configure them with similar settings as on the Server (job timeouts, swapping, …). Creation of execution contexts is handled by the Team administrators or the Hub admin, and they can be made available for all teams. Follow this guide on how to set up an execution context. The configuration of the Executor, e.g. the KNIME Analytics Platform version used for execution, the installed extensions and so on, are now bundled into an Executor docker image that can be configured by the KNIME Business Hub Admin, as explained here. Each execution context has the desired executor image assigned when created.
vCores vs Core Tokens
KNIME Server licenses execution capacity in Core Tokens. KNIME Business Hub licenses execution capacity in vCores. These units don't map one-to-one, since they measure different things.
A Core Token on KNIME Server corresponds to one physical, hyperthreaded CPU core, which provides two execution threads. A vCore on KNIME Business Hub corresponds to one logical CPU core — roughly half of a physical hyperthreaded core. For this reason, KNIME prices vCores at half the price of Core Tokens: the same budget buys equivalent execution power on both platforms.
Execution contexts on Hub still provide two threads per vCore by default, so the thread count you see doesn't drop after migration. The number of threads isn't the limiting factor for performance on either platform — the CPU cores allocated to the executor are.
Requirements, prerequisites, and limitations
The KNIME Server to KNIME Hub Migration workflow helps you to migrate the following content from your KNIME Server to a team on the KNIME Business Hub:
- Files and their snapshots (workflows, components, data files, …) and folders will be transferred unmodified while keeping the folder structure.
- Workflow schedules will be configured the same way as on KNIME Server. “Call Workflow” and “Save Report” actions as well as configured credentials cannot be migrated and require manual configuration afterward.
The migration workflow needs to be uploaded to the Server and executed in the WebPortal. It will guide the user through different migration steps.
Requirements
KNIME Server:
- Version 4.16 or higher.
- KNIME Executor version 4.6 or higher.
- The following extensions need to be installed on the Executor:
- Data Generation
- Expressions
- If OAuth is used as an authentication method, the workflow allows authentication via a JSON Web Token (JWT) against the KNIME Server. If this is not allowed, a service account needs to be created in KNIME Server that can be authenticated via Basic Authentication.
- a user with permission to access all the content on the Server that should be migrated to the Hub.
KNIME Business Hub:
- KNIME Business Hub version 1.5 or higher.
- The Server network where the migration workflow will be executed needs to have access to the Hub instance, especially to the api subdomain
https://api.<base-url>.com/. - a user that is a member of the Hub team you are migrating the content to.
Prerequisites
- You need to create an application password on the Business Hub that will be used by the migration workflow.
- If you want to migrate schedules, an execution context is required in the Hub team you are migrating the content to.
- It helps if you are familiar with new concepts on the Hub, see the KNIME Business Hub User Guide.
Limitations
Dependent on your Server setup, there are a few things that cannot be migrated that you should be aware of.
Workflows will be transferred to the Hub unmodified. Generally, a workflow will still run on the Hub the same as on Server. However, if there are resources linked, such as files stored relative to the workflow location, these files must be accessible Hub as well. We recommend to manually check after migration if such workflows still work as expected and, if not, re-configure them. Affected workflows contain e.g.
- reader or writer nodes (e.g. Excel Reader, CSV Writer),
- nodes, that call other workflows (e.g. Call Workflow Service),
The services that Connector Nodes connect to (e.g. Snowflake Connector, Amazon S3 Connector, SSH Connector, …) need to be reachable from the Hub as well. Please re-configure the workflow or reach out to your IT administrator if any connection can not be established.
Workflows that link shared components on the Server: Please reach out to your (technical) account manager on a guide on how to migrate such workflows via support@knime.com.
Scheduled executions on the Server could be configured with
- certain actions that take place after successful or failed execution. In case there were "Call Workflow" or "Save Report" actions configured, those will require reconfiguration on the Hub as workflow and file paths cannot be mapped from Server to Hub. The migration workflow informs you about such cases.
- credentials that are used by the workflow. For security reasons, credentials cannot be migrated to the Hub and need to be reconfigured. The migration workflow informs you about such cases.
The permissions concept changed on the Hub. While on Server, permissions could be set on the file level, on Hub they are set on the space level. If you have fine-granular permissions configured on Server, make sure to give proper space access to other users after migration.
The migration workflow does not perform any kind of user migration.
Execution Resources, i.e. an Execution Context, are not migrated by the workflow, but need to be set up for the team prior to Schedule migration.
Migration Validator
We are providing an additional tool designed to assist you either before or after the migration process, depending on your preferences. This tool helps identify potential issues related to node configurations that could prevent workflows from functioning correctly once they are migrated to the Hub. The tool scans workflows to detect incompatible nodes and configurations. Common examples include:
- Mountpoint-relative paths in nodes such as Excel Reader, which may not resolve correctly after migration.
- Usage of KNIME Server Connector nodes, which are specific to the Server environment and require reconfiguration on the Hub.
- Nodes with hardcoded file paths or dependencies that are not accessible from the Hub.
- REST nodes with endpoint configurations that may need adjustment post-migration.
These incompatibilities are flagged to help you identify and resolve issues before or after migration.
These configurations are known to be incompatible with the Hub environment.
Pre-defined list of incompatibilities
A list of known incompatibilities is preloaded into the tool via Table Creator nodes.
This list categorizes incompatibilities into three main groups:
- Server Nodes (e.g., nodes dependent on server-specific configurations)
- Reader and Writer Nodes (e.g., path dependencies in file readers like Excel, CSV, etc.)
- REST Nodes (e.g., nodes that interact with REST APIs and may require reconfiguration)
The list is flexible and customizable. New incompatibilities can be easily added to the tables if more issues are identified during usage. This allows you to extend and adapt the tool as new cases arise.
Corrective actions and reporting
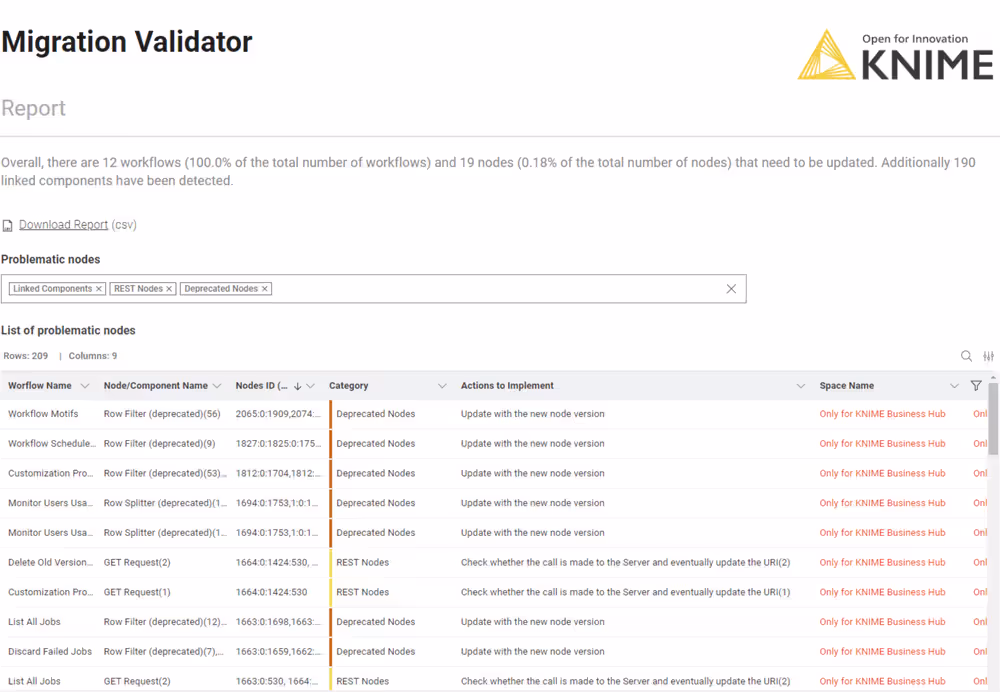
Rather than automatically attempting to fix these issues — a process that would be complex and error-prone — the tool generates a detailed report.
This report includes:
- A list of detected incompatibilities for each node in the workflow.
- Suggested corrective actions for each issue, offering guidance on how to resolve it post-migration.
This approach provides transparency, control, and flexibility for users, enabling them to address issues at their own pace while ensuring a smoother migration process to the Hub.
More details about the workflow will follow in the Applications guide section.
Applications guide
You can download the workflow here.
Upload the “KNIME Server to KNIME Hub Migration” workflow to the Server and run it in the WebPortal.
The workflow guides you through the different steps for the migration from KNIME Server to KNIME Hub, including copying files and folders from Server to Hub spaces and configuring schedules.
After migration, it is recommended to double-check that the content has been fully transferred to the Hub. Also, workflows might not successfully execute anymore and require manual adjustment, e.g. of file paths, or component links.
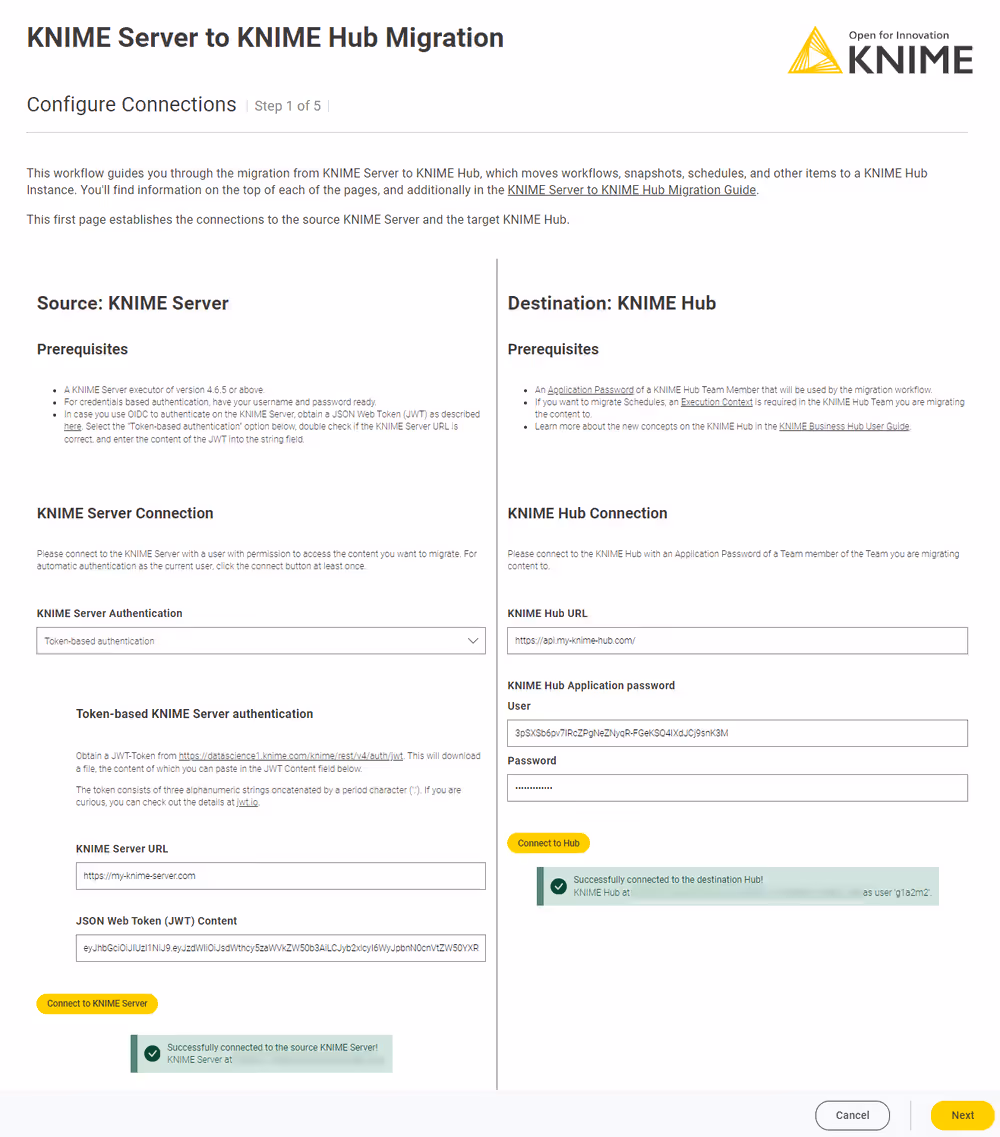
Page 1: Configure Server and Hub Connections
On the first page, you establish connections with both the Server and the Hub.
Usually, the connection to the Server can be configured automatically as the workflow is running on the Server. If not, try the “Connect to Server” button at least once, or switch to “Manual authentication” and enter your credentials. Alternatively, if the Server is configured to do OAuth, you can authenticate via JWT if you select the “Token-based authentication”. Double check the KNIME Server URL and then enter the contents of the file that you download from <knime-server-url>/knime/rest/v4/auth/jwt.
The connection to the Hub requires manual configuration. To do this, you'll need to provide the URL of the Hub and the application password of the Hub user, who is a team member in the destination team. The process of obtaining an application password is described in the KNIME Hub User Guide.
Page 2: Destination and Data Selection
On the second page, you select the destination team and space(s) and the actual data on the KNIME Server you want to migrate to the KNIME Hub.
Team selection
First, you select the team you want to migrate the data to from the list of teams you are a member of. Secondly, you decide on the space(s) you want to migrate to.
Space Selection: Create a space for each selected Folder (default)
With this migration method, you can select several folders on the KNIME Server to migrate to the KNIME Hub. The content of each selected folder will be transferred to a space on the Hub that has the same name as the folder. If a space does not already exist, it will be created, and you can choose if it is private (only visible to team members) or public (visible to anyone who has access to the KNIME Hub). If a space does exist, it will be untouched. Any existing items will be overwritten and new Workflow versions or Component versions will be created. With this option, only folders from the KNIME Server can be selected for migration.
Page 2 of the data app, upper part. Here you select the destination of the migration. On the left side, you select one team from the ones that are available to you. On the right side you choose the space: you can either create a new space for each selected folder, or choose to migrate the selection to a new or existing space. Further, you can select if newly created spaces are private (only visible to team members) or public (visible to anyone on the Hub).
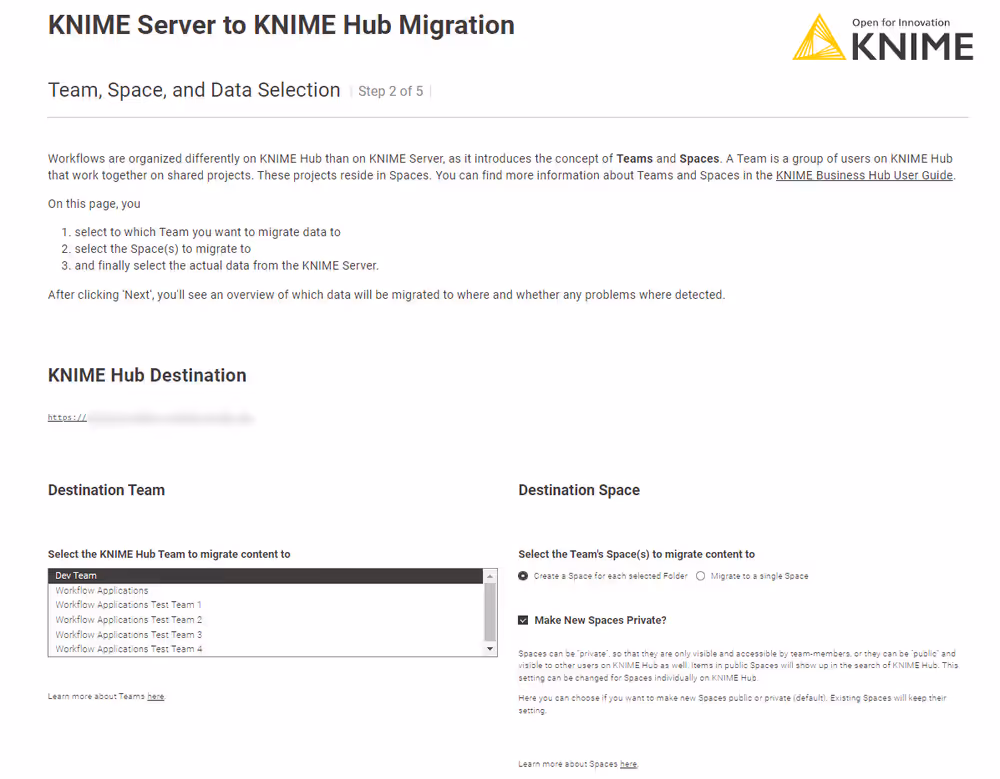
Space Selection: Migrate to a single space
With this migration method, the files and folders from the Server that you select are migrated to a single space on the Hub. This space can be a new one that you can decide on its name and whether it’s private (only visible to team members) or public (visible to anyone who has access to the KNIME Hub). You can also choose to use a space that does already exist. Any existing items will be overwritten and new Workflow versions or Component versions will be created. With this option, folders, workflows and other items can be selected for migration from the KNIME Server.
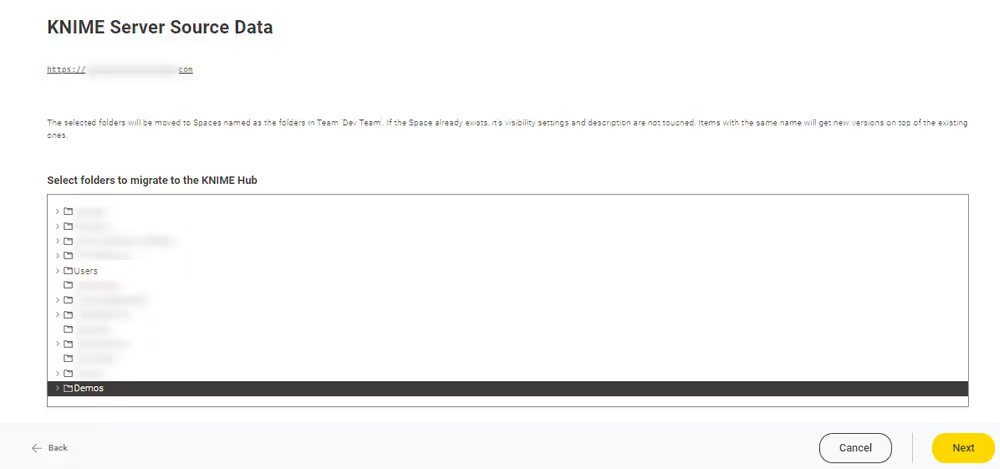
Data Selection
With the file chooser widget at the bottom of the third page, you select the folders and items you want to migrate to the Hub. Note that you can use the Shift- and/or the Ctrl-Keys to select multiple items. Depending on the size of the file system on the KNIME Server, it might take a while until the widget shows up.
Page 3: Fine-tuning
Overview
After selecting the data to migrate, you are presented with an overview of the data that is available for migration, and to which space they will move. Below this overview, you find the possibility to fine tune which items you want to migrate.
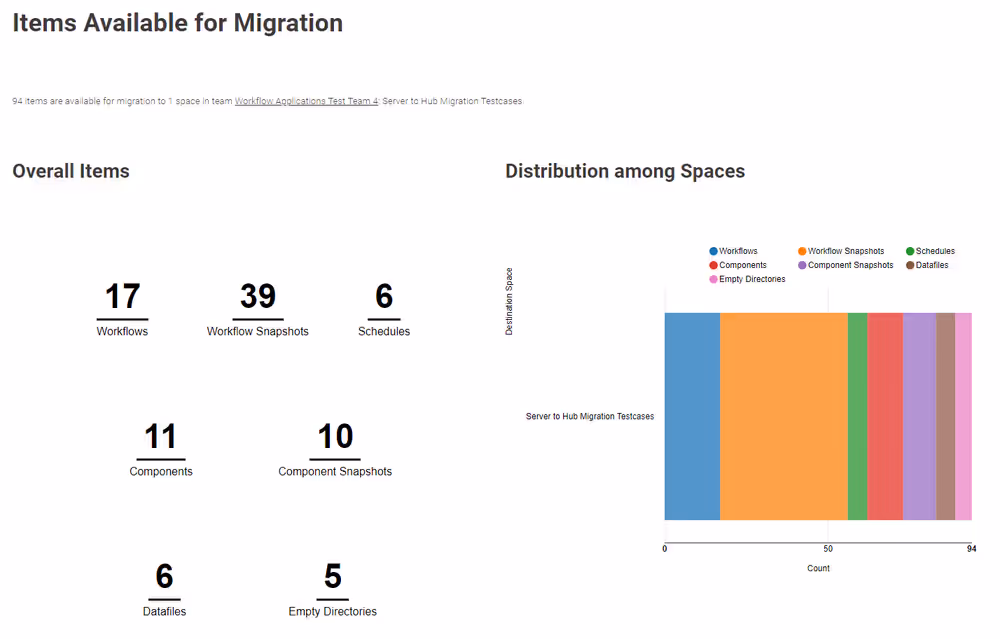
Figure 4. Page 3 of the data app: Overview of the items that will be migrated on the third page of the data app.
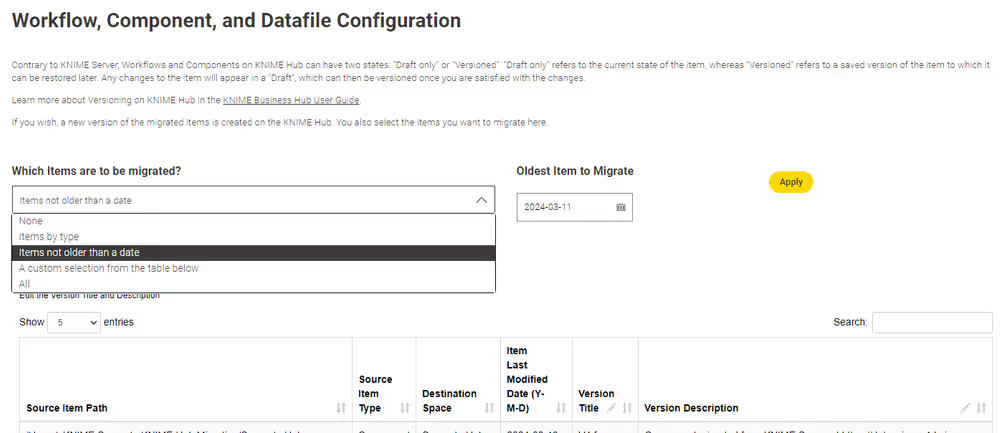
Workflow, Component, and Data File Configuration
To begin with, you can select which of the items you want to migrate. This can be “All” (default), only items of a certain type, those items that are not older than a given date, a custom selection, or “None”. The “age” of an item for the third option is determined by the last time the item was modified on KNIME Server.
Snapshots to Item Versions Configuration
Below the item configuration, you’ll find the migration configuration of KNIME Server snapshots, that will become KNIME Hub item versions. The selection is similar to the items, with the addition of the possibility to migrate “A fixed amount of Snapshots per Item” (default), which allows you to save resources on KNIME Hub by migrating only the latest N snapshots of each item. This will migrate only the latest snapshots, by default the latest 3.
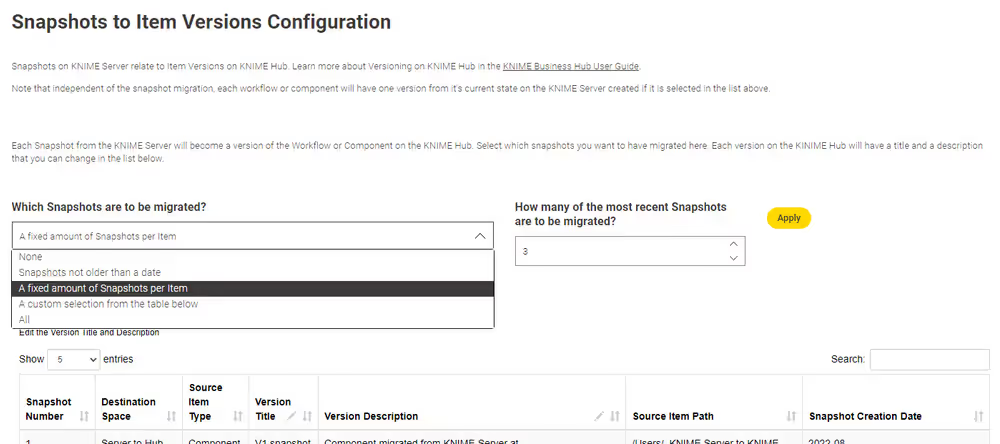
Note that data files could be versioned on KNIME Server, which is not supported on KNIME Hub. Snapshots of data files will not be migrated, and the migration data app will notify you on these cases below the snapshots table.
Schedules to Schedule Deployments Configuration
The final section allows you to configure how you want to migrate schedules from KNIME Server to Schedule Deployments on KNIME Hub: You can select “All” (default), individually selected, or no schedules at all to be migrated. If you select schedules to be migrated, you select their target Execution Context as well as the desired status enabled/disabled status on KNIME Server and KNIME Hub — most likely, you don’t want the schedules to be active on Server and Hub simultaneously.
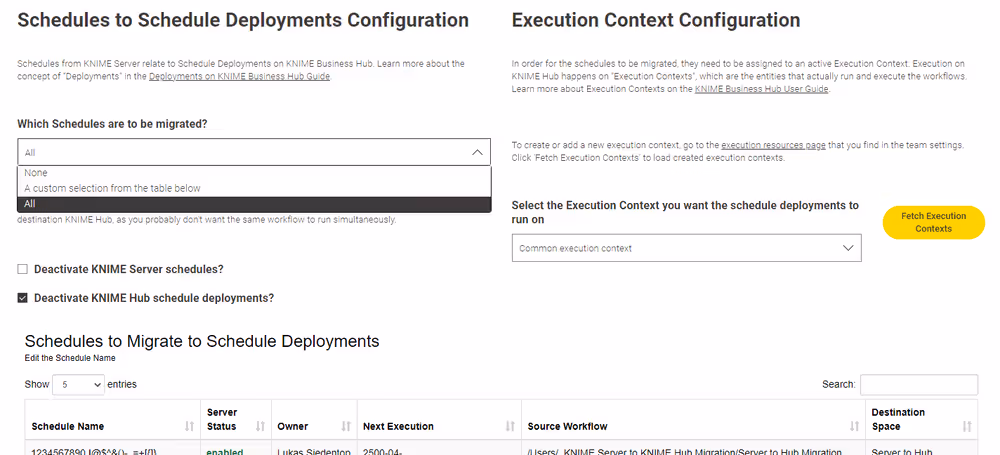
Note that schedules in a team need to have unique names on KNIME Hub. This is why the schedules might be migrated with a different name. You can change the name once the schedule is migrated to the Hub.
With click on the “Next” button, the migration will start. Depending on the network speed, selected amount of data and other factors, this step might take a while.
Note further that Workflows or Components in draft state on KNIME Hub will be overwritten. Existing versions will not be overwritten, though, so in order to keep un-versioned changes, create versions of the items that will be overwritten first.
Page 4: Migration Result
In case there were any errors during the migration, they will show up first. Please try to make sense of the errors, and act accordingly if possible.
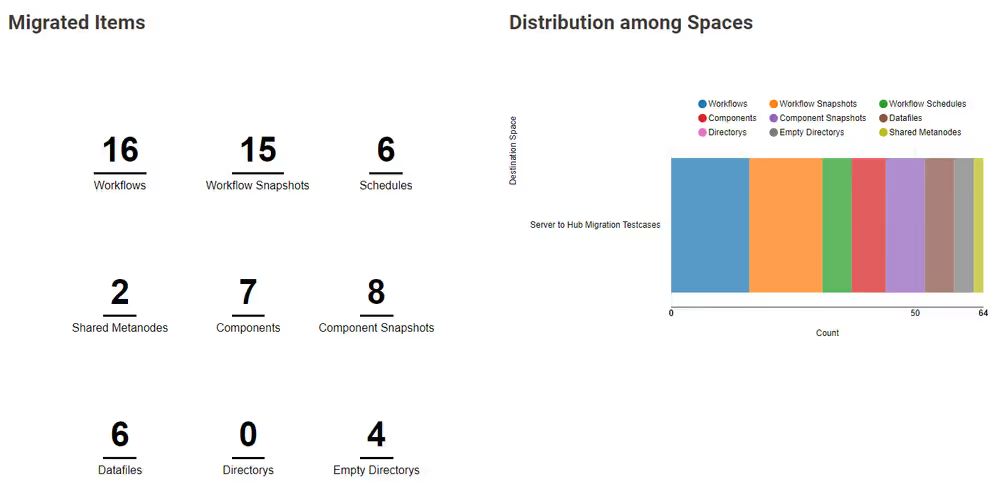
Similar to the Overview prior to the migration, you will then find an overview of the items that were actually migrated. You can tick the “Migrate to more teams?” box to start the migration all over again with the same connection settings when clicking the “Next” button.
 If there were Shared Metanode in the data-selection, a warning is issued, with the possibility to delete them right away, since they are a feature not supported on KNIME Hub. We recommend changing shared metanodes to shared components.
Below the overview, you will find the migrated items in a table, from which you can access the items directly via link.
Finally, the new schedule deployments are linked, and any potential issues that might need attention accordingly. Possible Issues are:
Credentials Configuration
- Schedules with this error will not work as expected: Credentials stored in Credential Configuration Nodes on KNIME Server cannot be migrated to KNIME Hub directly due to security reasons. The schedule was migrated still, but with an invalid password. Please modify the schedule on KNIME Hub accordingly.
Callee not found
- Schedules with this error will most likely not work as expected: Schedules on KNIME Server allowed to call workflows once the base workflow was finished successfully or on error. When the workflow to be called was not found among the data to be migrated, this warning was issued. Note that this feature is only possible to use via REST API on KNIME Hub, and you might want to consider redoing the workflow with Call Workflow Service Nodes.
Schedule Action 'Call Workflow'
- Schedules with this warning are hard to maintain on KNIME Hub: as explained above, the 'Call Workflow' action is only available via REST API on KNIME Hub and you might want to consider changing the setup of the workflow.
Schedule Action 'Save Report'
- Schedules with this warning will save the workflow in a location different from their original configuration: Again, this can only be altered via REST API, and you might want to consider using the successor of BIRT Reporting with KNIME, the KNIME Reporting Extension.

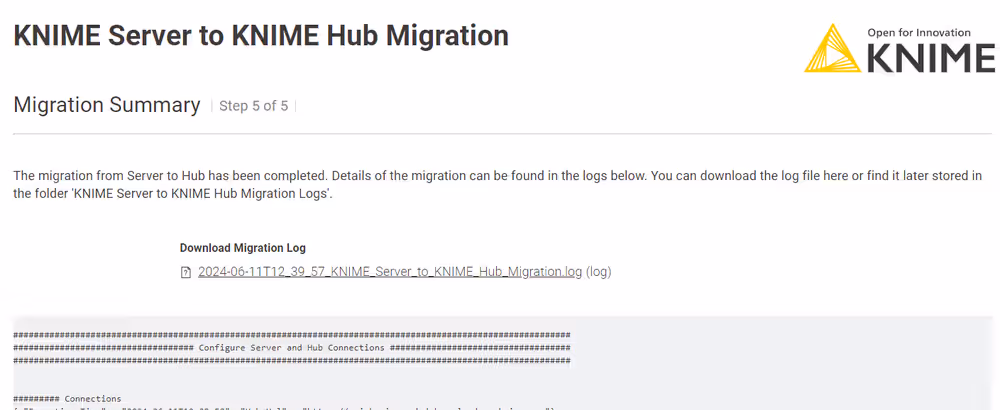
Page 5: Migration Logs
If you didn’t choose to migrate to another team, a click on the “Next” button leads you to the last page. It shows a migration log that was created during the whole migration process. The logs are available for download and are also stored in the “KNIME Server to KNIME Hub Migration Logs” folder next to the migration workflow on the Server.
Migration Validator
This workflow is designed to be run locally or controlled via the Job Viewer.
There are two main workflow parameters on the first level that need to be defined.
First, you need to choose which mount point should be targeted by the analysis. The mount point connector allows you to connect to a Server or a Local space. If you have already migrated all the content using the migration workflow, you can connect to the List of Nodes metanode and run the analysis in the same manner.
In the yellow circle below, the hardcoded incompatibilities are listed in a table that can be easily filled out and modified further. These are grouped by topic. The table also specifies the corrective action to facilitate an estimate of the amount of work to be done as well as provide immediate feedback.
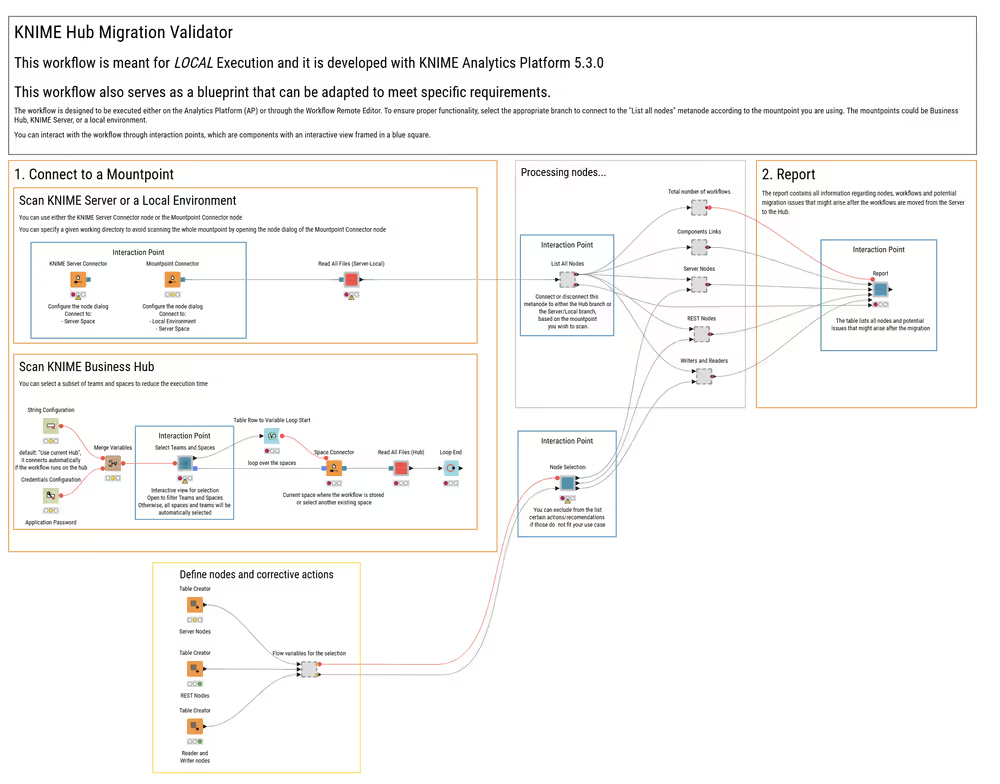
The workflow reads the workflow XML file and extracts a list of nodes and configurations. It then checks for and finds matches with the hardcoded lists of incompatibilities, providing a report at the end:
Wrap up
After the migration workflow is finished, we recommend manually checking if the migration was done as expected.
- Were all spaces created as expected?
- Do the spaces contain all the folders, workflows, and data files as expected?
- Are all items versioned accordingly?
- If you selected to migrate scheduled executions: Have corresponding schedule deployments been created on the Hub?
It is important to understand that workflows have been copied unmodified to the Hub. If a workflow requires certain connections to other systems or relies on files being present in certain locations, it might need manual reconfiguration on the Hub. Check if all workflows, especially ones being deployed on a schedule, do still execute successfully. See also the Limitations section which describes possibly required manual follow-up actions.