Business Hub Admin Guide
Introduction
This guide covers the administration of KNIME Business Hub. The topics covered are intended for the Hub administrator of a KNIME Business Hub instance, either on-prem (customer-managed) or SaaS (KNIME-managed).
Once you have a license you will have access to Hub resources and will be able to customize specific features, as well as give access to these resources to your employees, organize them into Teams and give them the ability to manage specific resources.
On-prem installation
To install a KNIME Business Hub please refer to one of the following guides depending on your installation scenario:
Types of Hub admin roles
On KNIME Business Hub two different types of Hub admin users are available:
- Global Hub admin
- Management admin
Any user with these roles can:
- Create and delete teams
- Allocate execution resources
- Allocate team seats
- Designate the initial team admin
- See users list and delete users
- See license overview page
However, a user with assigned management admin role can not explicitly see a team's private spaces, its deployments, or any jobs.
Hub admin and Team admins
A user guide is also available here, which contains instructions on how to perform team administration tasks. Team admins are designated by the Hub admin, and have control over their team’s allocated resources, can add users to their team, create execution contexts and have an overview of the team’s deployments. In this way the Hub administration tasks are distributed and reallocated to those users that have a better overview of their own team necessities.
Advanced administration tasks
Some advanced IT administration tasks, specifically related to the underlying Kubernetes cluster, are covered in the KNIME Business Hub Advanced Administration Guide.
KNIME Business Hub editions
KNIME Business Hub is available in three different editions:
- Basic
- Standard
- Enterprise
All the features described in this guide are available for all the editions, unless explicitly pointed out.
However, please consider that some of the features might be limited by the resources available for the different editions.
In particular the Basic edition:
- Does not allow consumers
- It only allows 1 execution context, which is created during the installation. It is therefore not possible to create a new one unless the other one is deleted.
- It only allows 1 team. Therefore the creation of a new team is not possible.
For an overview of the available features and resources for different KNIME Hub offerings please refer to the pricing page on the KNIME website.
Users and consumers
- Consumers on KNIME Business Hub have access to specific data apps and services available on KNIME Hub. In KNIME Business Hub Basic edition there are no consumers available. Only logged-in users that are members of the team have access to the workflows, spaces and deployments of the team. Standard and Enterprise edition instead allows consumers. They will have unlimited access to the data apps and services that are shared with them.
- Users on KNIME Business Hub are members of a team and have access to all the workflows, spaces and deployments of their team, and to the public spaces of the other teams. In KNIME Business Hub Basic and Standard edition licenses 5 users are included, while 20 are included for Enterprise edition licenses.
- Unlicensed users, instead, do not have read access to any of the resources of the KNIME Business Hub for Basic and Standard edition licenses, while they have read access in the Enterprise edition licenses.
License management
As a Hub administrator, you allocate and assign license-limited resources to teams. Understanding how user seats and vCores are consumed is essential for effective resource management.
You can view licensing information by navigating to your profile icon and selecting Administration, which takes you directly to the licensing page. Here you'll find your cluster ID, Business Hub version, total licensed users with occupied seats, and available vCores with current usage.
User seat licensing:
- When a user becomes a member of a team, they occupy one license seat
- Users who are members of multiple teams still only occupy one seat
- Consumers who join a team become users and occupy a license seat
vCore licensing:
- Total vCores consumed = vCores allocated to teams + vCores allocated to shared execution contexts
- vCores allocated to a team count against the license regardless of whether they are actively being used
- For shared execution contexts, vCores are calculated as: number of executors × vCores per executor
- Dedicated execution contexts do not count towards the license limit
Create and manage teams
A team is a group of users on KNIME Hub that work together on shared projects. Specific Hub resources can be owned by a team (e.g. spaces and the contained workflows, files, or components) so that the team members will have access to these resources.
Sign in to the KNIME Business Hub instance with the admin user name by visiting the KNIME Business Hub URL.
Then click your profile picture on the right upper corner of the page and select Administration to go to the KNIME Business Hub Administration page. Click Teams in the menu on the left. Here you will be able to see an overview of the existing teams and you will be able to manage them.
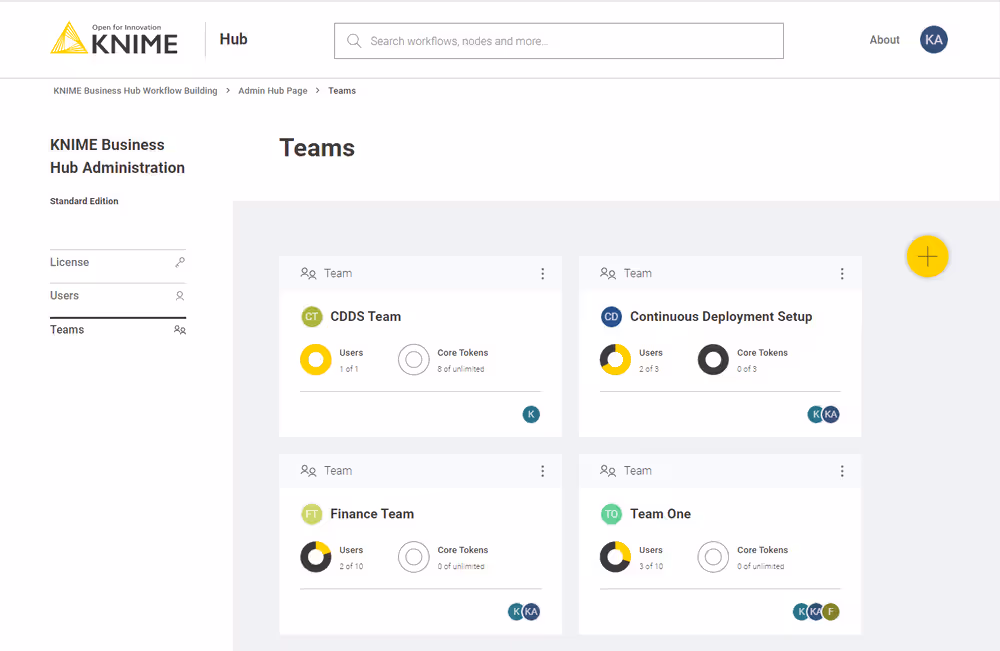
Create a team
To create a new team click the yellow plus button on the right:
After you create a new team you will be redirected to the new team’s page. Here you can change the name of the team. To do so click the name of the team under the team logo on the left side of the page. The name of the team can also be changed at any point in time by the team administrator.
From the team’s page you can:
- Add members to the team
- Change their role to, for example, promote a user to team admininistrator role
Here you might for example want to assign the team to a team administrator. To do so click Manage team and enter the user name of the user you want to assign as a team administrator for the current team. Then click on the role and select Member and Admin. At the same time you might want to delete the Hub admin user name from the team members list. To do so click the bin icon corresponding to that user. Click Save changes to finalize the setting.
Allocate resources to a team
To allocate resources to a team navigate to the KNIME Business Hub Administrator page and select Teams from the menu on the left.
Here you can see an overview of the teams available, their allocated resourced, and of their current usage. Click the three dots on the right upper corner of the card corresponding to the team you want to allocate resources to.
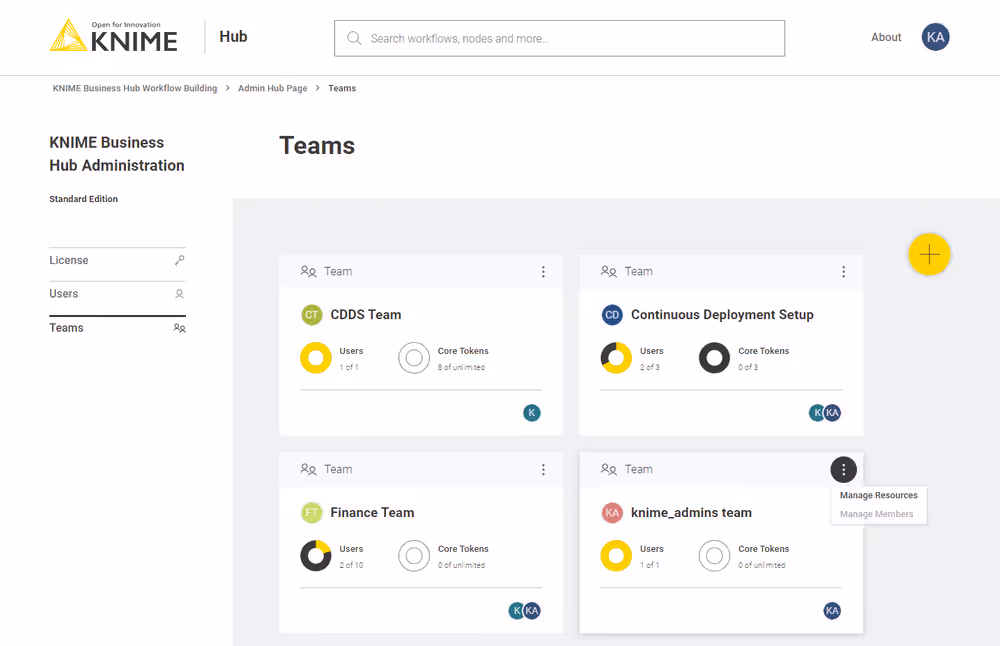
Select Manage resources from the menu. A panel on the right will open where you can select the resources you want to allocate.
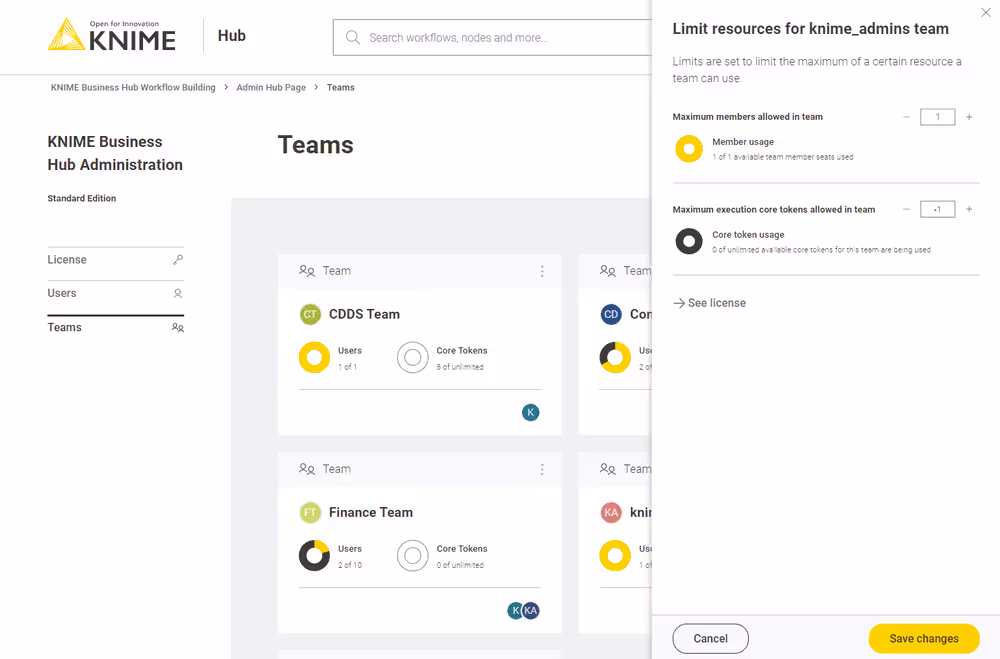
Here you can change:
- The maximum number of members allowed in that team
- The maximum number of execution vCore tokens allowed for that team
Click Save changes when you have set up the resources for the current team.
Manage team members
From the KNIME Business Hub Administration page you can also manage the team members.
Click the three dots on the right upper corner of the card corresponding to the team. From the menu that opens select Manage members. In the side panel that opens you can add members to a team, or change the team members role.
Delete a team
From the KNIME Business Hub Administration page you can also delete a team.
Click the three dots on the right upper corner of the card corresponding to the team. From the menu that opens select Delete. Be aware that this operation will delete also all the team resources, data and deployments.
Execution resources
In the following section you will find an explanation of some of the basic concepts around execution on KNIME Business Hub.
As mentioned in the previous section you as an Hub admin can assign execution resources to each team.
Team admins will then be able to build execution contexts according to the execution resources that you assigned to their team. These execution contexts will then be dedicated specifically to that team.
As an Hub admin you can also create a shared execution context. Once you create one you can share it with multiple teams.
For an overview of all the available execution contexts click your profile icon on the top right corner of the KNIME Hub and select Administration from the drop-down.
You will be then redirected to the KNIME Business Hub administration page.
Here, select Execution resources from the menu on the left.
In this page you can see an overview of All the execution contexts available on the Hub.
From the toggle at the top you can filter to see only a specific type of execution contexts available in the Hub instance.
Select:
- Shared: Shared execution contexts are created by the Hub admin. They can be made available to multiple teams.
- Dedicated: Dedicated execution contexts are created by the team admins for their team. Dedicated execution contexts are exclusively used by a single team.
Each team can by default have a maximum of 10 execution contexts and 10000 jobs. As a KNIME Hub admin you can change these limits via a REST API call like the following:
http
PUT https://api.<base-url>/execution/limits/{scopeId}/{limitKey}where {scopeId} is the team account ID and the {limitKey} is account-execution-contexts or account-jobs respectively.
Create a shared execution context
As an Hub admin you can create a shared execution context and make it available to multiple teams. To do so click the create button ![]() . A side panel opens where you can set up the new shared execution context.
. A side panel opens where you can set up the new shared execution context.
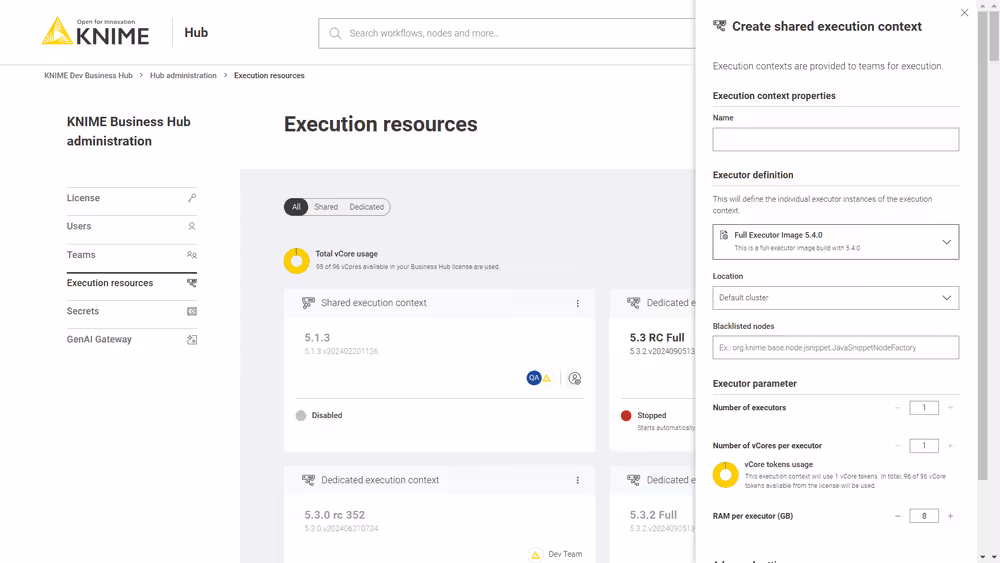
Here you can give the execution context a name, set up which Docker image to use as the executor, give a list of blacklisted nodes, and assign the resources that the execution context will be able to use.
Find more information about how to set up the execution context in the KNIME Business Hub User Guide.
In Advanced settings, you can configure more advanced settings for the execution context.
- Configure start and stop behavior: Configure if the execution context should automatically start and stop by selecting On (the setting is On by default) from the toggle on top. Then you can indicate the desired inactivity time (in minutes) for the execution context to stop. The execution context will start automatically when a queued workflow needs to run and stop automatically when there are no more active or queued workflows.
- Job lifecycle: Here you can decide when to discard a job, the maximum time a job will stay in memory, the job life time, or the options for timeout. The default job maximum execution time is 24 hours. Jobs are deleted after 24 hours.
- Additional settings: Set up the report timeouts, CPU and RAM requirements, and
- Executor heap space limit (in %): Specifies the percentage of container memory available to the KNIME executor. If the container also runs other processes (e.g. Python, R, or Snowflake driver), reducing this percentage can help prevent memory issues.
Settings set up on the deployment level will take precedence over the execution context settings.
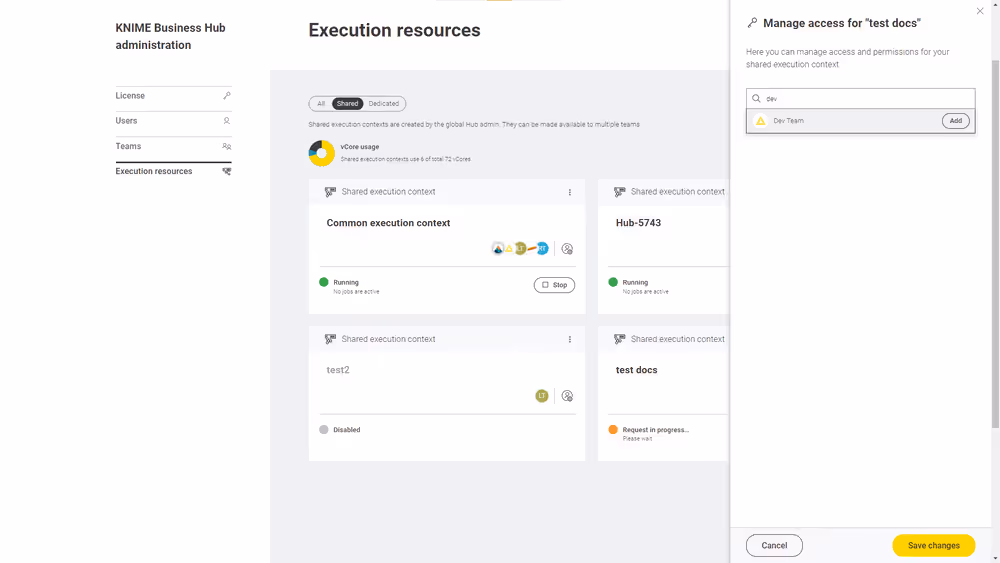
Click Submit to create the execution context. A notification will appear where you can click Manage access to share the execution context with the teams.
At any time you can also manage the access to a shared execution context by clicking the ![]() icon in the corresponding tile and selecting Manage access from the menu.
icon in the corresponding tile and selecting Manage access from the menu.
Manage shared execution contexts
Also from the Execution resources page you can have an overview about the current status of an execution context, which teams have access to it, how many jobs are running and also manage the execution context performing the following operations:
Start and Stop an execution context by clicking the Start/Stop button in the tiles
Click the
%20scale(3)'%20/%3e%3cline%20x1='0'%20y1='0'%20x2='0'%20y2='0'%20transform='translate(16,%2016)%20scale(3)'%20/%3e%3cline%20x1='0'%20y1='0'%20x2='0'%20y2='0'%20transform='translate(16,%2024)%20scale(3)'%20/%3e%3c/svg%3e) icon in the tile and from the menu that opens you can:
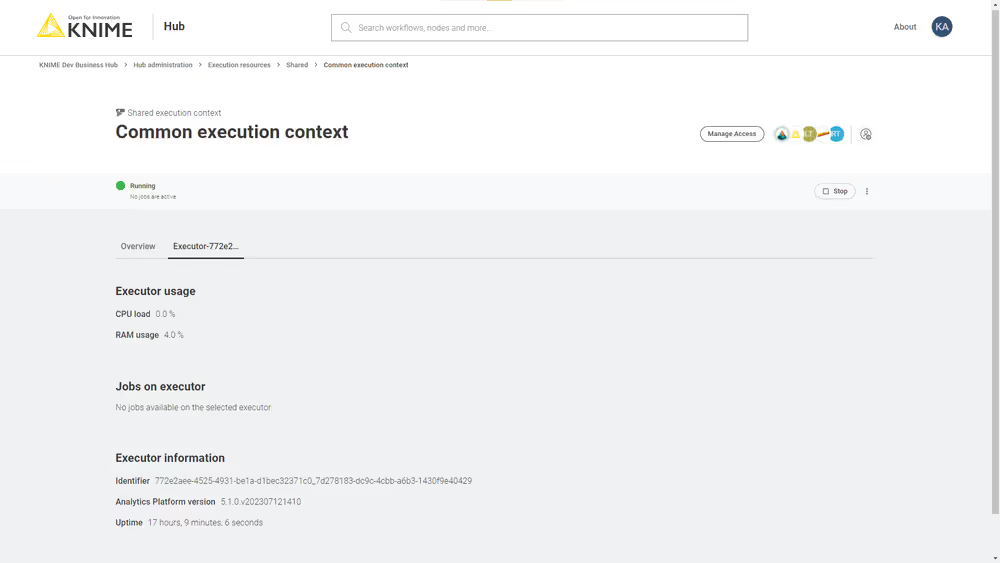
icon in the tile and from the menu that opens you can:Show details: Selecting this option will open a new page with a list of all the jobs that are running on that execution context, the usage of the execution context (e.g. how many vCores are in use) and other information. You can also switch to the specific Executor tab to see more details about the executor.
Edit: You can change the parameters and configurations in the right side panel that opens.
Manage access: Manage the access of teams to a shared execution context.
Enable/Disable: You will need first to delete the jobs associated to the execution context then proceed with disabling it.
Delete: As a Hub administrator you can delete a shared execution context. You will need to first, delete the jobs associated to the execution context then proceed with disabling it. Finally, you can delete the shared execution context.
Download logs: You can download the log files of an execution context - this feature allows for debugging in case the executors are not working as expected. You will download a
zipfile containing a log file for each executor of the execution context. Please note that to be able to download job logs you need an executor based on the following executor Docker images:knime/knime-lts-full:r-5.2.5-593or higher bugfix releases of the 5.2.x release lineknime/knime-lts-full:r-5.3.2-564or higher bugfix releases of the 5.3.x release line
Advanced configuration of execution contexts
Execution contexts can be created and edited also via the Business Hub API.
Find more information on the available configurations in the Advanced configuration of execution contexts section in KNIME Business Hub User Guide.
Settings set up on the deployment level will take precedence over the execution context settings.
Environment variables, application arguments, and VM arguments
One aspect of the advanced configuration of execution contexts is the operation information, configurable via operationInfo in the execution context. Among others, the following configuration parameters can be set within the operationInfo.
- All environment variables set via
envVarsare propagated to the KNIME executor. - Application arguments set via
applicationArgumentsare the same arguments you could also set in theknime.inifile before the line containing-vmargs. In other words, they are different to VM arguments in that they are more general. - VM arguments set via
vmArgumentsare propagated to the JVM running on the executor. The prefix-Dindicates a Java system property.
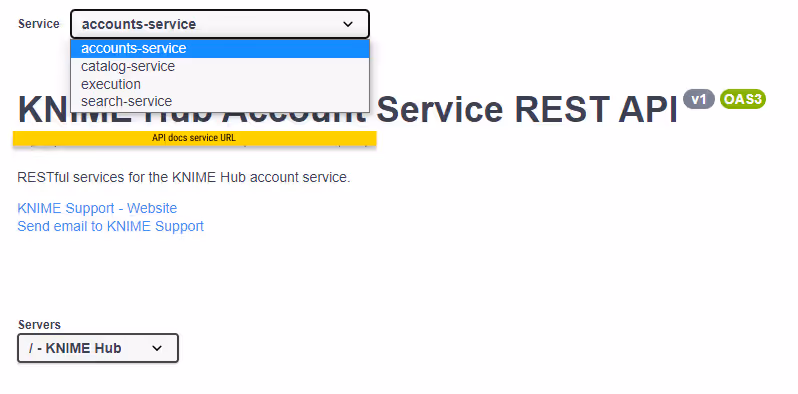
You can refer to the API documentation at the following URL for more details about the different calls you can make to the Execution Contexts endpoint.
http
https://api.<base-url>/api-doc/?service=execution-service#/Execution%20ContextsKNIME Executor Process Watchdog Configuration
The KNIME Executor Process Watchdog helps ensure stable workflow execution by monitoring memory usage of the JVM and external processes (such as Python or Conda). When resource limits are reached, the watchdog takes corrective actions to prevent unexpected crashes. Adjusting these settings can help optimize performance and stability, especially for resource-intensive workflows.
The features described below require specific KNIME Analytics Platform versions:
- Stopping external processes: 5.2.6, 5.3.2, 5.4.0 or newer
- Canceling node execution, native memory trimming, Grafana reporting: 5.5.0 or newer
Features
- Stopping external processes: When memory usage exceeds the configured limit, the executor stops the external process (Python, Conda, etc.) consuming the most memory. This may cause workflow failures but prevents crashes.
- Canceling node execution: If JVM memory usage exceeds 90% of the maximum, the executor cancels all running node executions.
- Native memory trimming: Periodically calls
malloc_trim()to reduce memory fragmentation. Triggered when JVM memory usage exceeds 80%. - Reporting memory usage to Grafana: Reports memory usage metrics to Grafana for debugging.
Configuration
Set the following properties in the vmArguments of the execution context:
-Dknime.processwatchdog.maxmemory=<value>: Maximum memory limit for the executor and external processes. Specify in kilobytes (e.g.,2048000for 2GB) or use-1to disable the watchdog.Default: container memory limit minus 128KB. Since: 5.4.1.
-Dknime.processwatchdog.pollinginterval=<value>Interval (in milliseconds) for memory checks.Default:
250. Since: 5.4.1.-Dknime.processwatchdog.memorytrimintervalms=<value>: Interval (in milliseconds) for callingmalloc_trim(). Set to zero to disable periodic native memory trimming.Default:
60000(1 min). Since: 5.5.0.
Setting
-Dknime.processwatchdog.maxmemory=-1disables all features of the watchdog. This is not recommended, as it may lead to crashes of the executor and workflows.
Terminology
In this section you will find an explanation of some of the basic concepts around execution on KNIME Business Hub.
Executors and execution contexts
An executor is a headless instance of KNIME Analytics Platform that runs workflows behind the scenes. Executors typically run inside lightweight Kubernetes containers with limited memory and CPU. These containers are launched from an executor image, which includes a minimal operating system (Ubuntu), a KNIME Analytics Platform installation, and, if needed, tools like Python or R. KNIME provides base images, but you can customize and extend them to suit your own needs.
An execution context defines how one or more executors behave. It specifies which executor image to use, how much memory and CPU each executor gets, who is allowed to use it (for example, a specific team or all Hub users), and how many executors should be running. You can also configure whether executors start and stop automatically only when jobs are submitted or they need to be started and stopped manually. All executors within the same execution context are treated equally.
When someone runs a workflow, whether it is an ad-hoc execution or part of a deployment, they will be asked to choose an execution context. This defines the environment in which the job runs. One of the executors from the selected context will then pick up and execute the job.
Different states of execution contexts
| State | Description |
|---|---|
| Running | At least one executor is up and ready to handle jobs. If auto-stop is enabled, the execution context will shut down automatically after a configured period of inactivity. |
| Stopped | No executors are running, and no resources are in use. If auto-start is enabled, the context will start up automatically when someone submits a new job. |
| Starting up | Executors are being launched. This involves setting up resources, downloading the container image (if needed), and initializing the executor. It usually takes a few seconds, but could take longer if the image needs to be pulled from scratch. |
| Shutting down | Executors are being stopped. New jobs won't be accepted, but current jobs will finish. If stopped forcefully, all jobs will be canceled immediately. |
| Restarting (updating) | The execution context is being restarted to apply a configuration update. Executors will stop, then restart automatically using the new settings. |
| At full capacity | Executors are running, but all of them are busy. This might be due to a concurrency limit or resource usage (like CPU or memory). Jobs will resume once capacity frees up. |
| Request in progress | A start or stop request is being handled. The state will change once the request is complete. |
| Disabled | The execution context has been disabled and can't be used. |
| Unknown | The current status couldn't be determined. If this doesn't resolve, there may be an infrastructure issue. |
Workflows and Jobs
Whenever a user runs a KNIME workflow, either through ad-hoc execution or a deployment, a job is created. This job consists of a copy of the workflow along with additional metadata such as the creator, permissions, and timestamps. Both the job (managed by KNIME Hub) and the corresponding workflow (executed by an executor) have a state that describes what stage they are in.
Job states
| Job State | Description |
|---|---|
| LOAD_REQUESTED | The job has been submitted to the queue and is waiting for an executor to pick it up. |
| LOADING | An executor is loading the workflow. |
| LOADED | The workflow has been fully loaded by an executor and is ready to run. |
| LOAD_ERROR | The workflow could not be loaded. |
| SWAP_REQUESTED | A request was sent to the executor to swap the job out of memory. |
| SWAPPING | The executor is in the process of swapping the job. |
| SWAPPED | The job was successfully swapped. Its workflow is no longer loaded in an executor but can be reloaded later from the swap area. |
| VANISHED | The job was loaded by an executor but can no longer be found. Usually it is because the executor crashed or was stopped. |
| DISCARD_REQUESTED | A request to discard the job was sent to the executor. |
| DISCARDED | The job was successfully discarded. Its workflow copy and all associated data have been deleted. |
Workflow states
| Workflow State | Description |
|---|---|
| CONFIGURED | The workflow is properly configured and ready to be executed. |
| IDLE | The workflow contains unexecuted nodes that can't currently run. This often requires user interaction such as updating a node's settings. |
| EXECUTING | One or more nodes are actively executing. |
| EXECUTION_FAILED | At least one node failed during execution. |
| EXECUTION_CANCELLED | Workflow execution was canceled by the user or system. |
| EXECUTION_FINISHED | All nodes have been executed. |
| INTERACTION_REQUIRED | The workflow is running as a data app and is waiting for user input. |
| EXECUTION_FAILED_WITH_CONTENT | A data app workflow failed, but some display content is still available to the user in the browser. |
| NOT_EXECUTABLE | The workflow is not ready to run right after loading (similar to IDLE). |
The job and workflow states are not directly shown in the KNIME Hub UI, but are accessible through the Hub API.
Users management
Keycloak, an open source identity and access management solution, is embedded in KNIME Business Hub and is where users are managed in the backend.
However, if you want to see the users that have access to your KNIME Business Hub instance you can go to the KNIME Business Hub Administration page and select Users from the menu on the left. The list shows all users that have already logged into KNIME Business Hub.
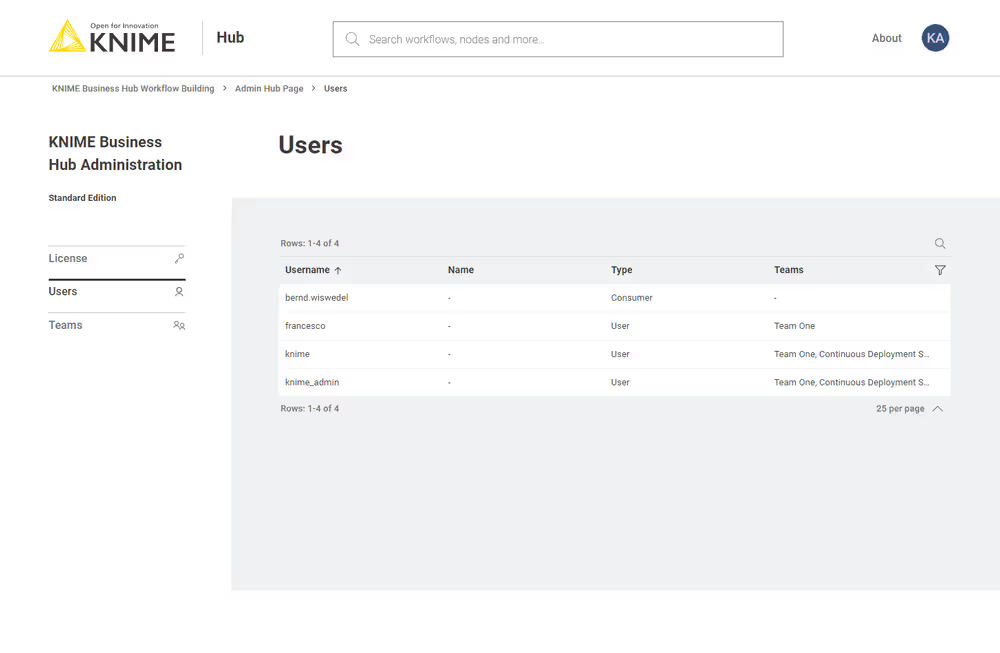
Here you can filter the users based on their team, the type of users and their username and name. To do so click the funnel icon in the users list. You can also search the users by using the magnifier icon and typing the keyword in the field that appears.
Users that only exist in your identity provider are not known to KNIME Business Hub. If you want to create users before they log in, e.g. in order to assign them to groups or share deployments with them, you can provision users with SCIM. See Provisioning users and groups with SCIM (Enterprise and Standard edition only) for details.
Advanced users management
For advanced user management tasks such as deleting a user or making a user Hub admin, you will need to access Keycloak directly.
- For SaaS installations, please contact KNIME support for assistance.
- For on-prem installations, follow the instructions in the KNIME Business Hub Advanced Administration Guide.
Docker executor images
KNIME release types: LTS vs standard releases
KNIME provides two types of releases with different update schedules and support lifecycles:
LTS (Long-Term Support) releases:
- Released every 6 months
- Supported for 2 years with bug fixes and security updates
- Do not receive new features during the support period
- Recommended for production environments that should not be updated too frequently
Standard releases:
- Released every 6 weeks as a rolling release
- Include the latest features, improvements, bug fixes, and security updates
- Supported only until the next release (approximately 6 weeks)
- Each release is production-quality and fully tested
- Recommended for users who want access to the latest features and can update regularly
For KNIME Business Hub executor images, most customers probably want to use LTS releases to reduce maintenance overhead. Thus, this guide primarily focuses on LTS images.
For more information about KNIME’s release strategy, see the KNIME Analytics Platform Release FAQ.
Available Docker executor images
In order to create execution contexts for their teams, team admins will need to select the KNIME Executor that they want to use. They can:
- Select it from a drop-down in the Create execution context panel, if images are registered as explained below.
- Add the Docker image name in the corresponding field in the Create execution context panel, if no image has been registered.
In the first case, further actions need to be taken to populate this panel.
You can add:
One of the Docker executor images made available by KNIME.
- You can do this using the "Executor Image Manager" data application. Follow the instructions in the next section to know how to use the data application.
A customized Docker executor image, e.g. by adding specific extensions or default conda environments.
- You can do this using a data application or manually. Follow the instructions in the Add extensions to an existing Docker image section to do so.
The following Docker executor images are made available by KNIME.
You can have access to:
- Base images of KNIME Executor versions 4.7.4 and higher (see here)
- Full images of KNIME Executor versions 4.7.4 and higher (see here)
For a list of KNIME Extensions included in each image, see Extensions in executor images.
LTS (Long-Term Support) images
Here is a list of the currently available LTS full images (recommended for most customers):
knime/knime-lts-full:r-4.7.4-179knime/knime-lts-full:r-4.7.5-199knime/knime-lts-full:r-4.7.6-209knime/knime-lts-full:r-4.7.7-221knime/knime-lts-full:r-4.7.8-231knime/knime-lts-full:r-5.1.0-251knime/knime-lts-full:r-5.1.1-379knime/knime-lts-full:r-5.1.2-433knime/knime-lts-full:r-5.1.3-594knime/knime-lts-full:r-5.2.0-271knime/knime-lts-full:r-5.2.1-369knime/knime-lts-full:r-5.2.2-445knime/knime-lts-full:r-5.2.3-477knime/knime-lts-full:r-5.2.4-564knime/knime-lts-full:r-5.2.5-593knime/knime-lts-full:r-5.2.6-758knime/knime-lts-full:r-5.3.1-498knime/knime-lts-full:r-5.3.2-564knime/knime-lts-full:r-5.3.3-666knime/knime-lts-full:r-5.3.4-1213knime/knime-lts-full:r-5.4.0-62knime/knime-lts-full:r-5.4.1-169knime/knime-lts-full:r-5.4.2-185knime/knime-lts-full:r-5.4.3-218knime/knime-lts-full:r-5.4.4-316knime/knime-lts-full:r-5.4.5-416knime/knime-lts-full:r-5.5.0-84knime/knime-lts-full:r-5.5.1-154knime/knime-lts-full:r-5.5.2-243knime/knime-lts-full:r-5.5.3-414knime/knime-lts-full:r-5.8.1-52knime/knime-lts-full:r-5.8.2-139knime/knime-lts-full:r-5.8.3-237knime/knime-lts-full:r-5.12.0-114
Standard release images
Standard releases are updated every 6 weeks and contain the latest features. They are supported only until the next release. Consider using these only if you need the latest features and can update frequently.
Here is a list of currently available standard release full images:
knime/knime-full:r-5.7.0-345knime/knime-full:r-5.8.0-398knime/knime-full:r-5.9.0-489knime/knime-full:r-5.10.0-606knime/knime-full:r-5.11.0-625
In order to have access to the [execution context logs](#Manage shared-execution-contexts) for debugging purposes the execution context needs to be based on the following executor Docker images:
knime/knime-lts-full:r-5.2.6-758or higher bugfix releases > of the 5.2.x release lineknime/knime-lts-full:r-5.3.2-564or higher bugfix releases > of the 5.3.x release line- Any new major version released (e.g. 5.4) of the executor will also support this feature
Please note that with the release of 5.2.2 KNIME executors will have HTML sanitization of old JavaScript View nodes and Widget nodes turned on by default. This ensures that no malicious HTML can be output. For more information check the KNIME Analytics Platform changelog.
Manage KNIME Executor images available on the registry
We provide for KNIME Business Hub versions >1.16, the "Executor Image Manager" data app that will help you manage KNIME Executor images as they appear in the list when configuring an execution context.
For older versions of the Hub, please refer to the previous documentation
In the app home page, you can choose one of these five actions:
- Add pre-built Image: Use a prebuilt KNIME-provided image or any other existing image already available in the registry to run the executor.
- Build and add custom Image: Start from a prebuilt KNIME-provided image and extend it with additional extensions, integrations, and advanced settings. This will create a new custom image.
- Build and add from Dockerfile: Provide your own ready-to-use Dockerfile to build a fully custom image from scratch.
- Modify Existing Image: Update the name and the description of an existing executor image
- Delete Existing Image: Delete an existing executor image from the registry, freeing up disk space
Removing images from the list frees up disk space, when images are stored inside the embedded registry.
Each entry consists of a name, a description, the URL to the image and the scope, that determines to which team this entry is available.
The image URL can be set to point to an image that is hosted by KNIME. (Pre-build images) You can select the executor version, and whether it should be a minimal image with only the base extensions installed, or a full image with all trusted extensions installed.
Alternatively, you can build your own custom images and save them to an embedded or external registry by uploading your own Dockerfile or by manually customizing the images to include only the extensions that you wish to use on the executor (Build and add custom Image action).
Add pre-build Image
Select Add pre-built Image to add a new executor image to the list of available executors.
You can select:KNIME Image to select an image from the Public Registry.
- You can then choose if you want to add a Full Image or a Minimal image, and then select the executor version accordingly from the list.
- You can give the entry a name, a description, and select whether you want to make it available for all teams or for specific teams only.
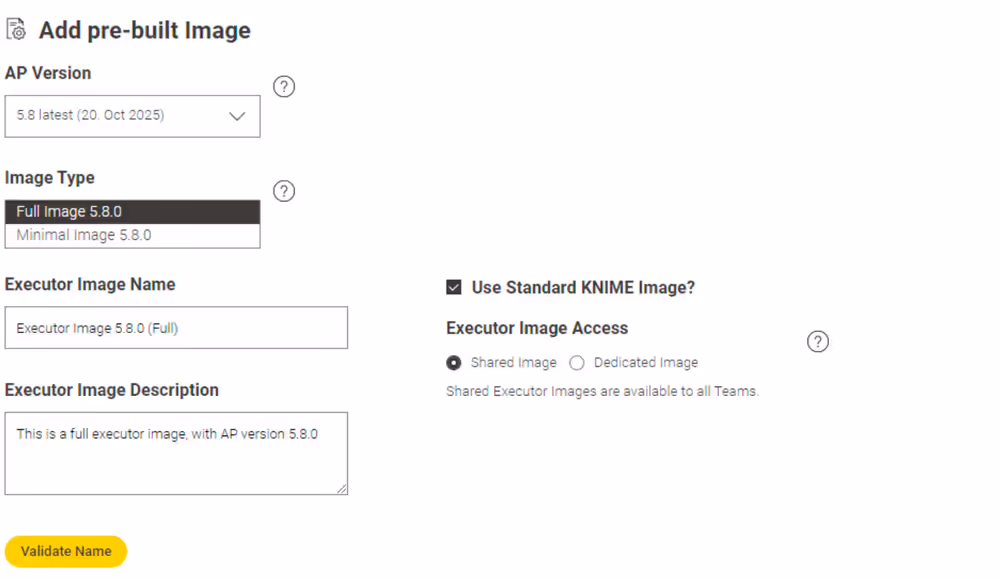
Unselect KNIME Image to be able to add the URL of an image on your own external registry.
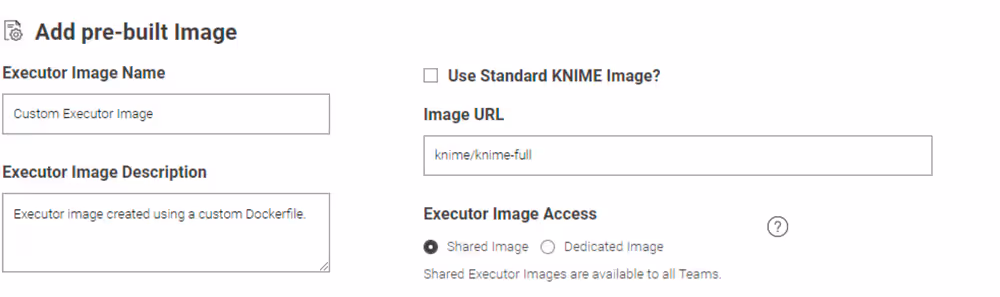
Click Validate Name to check if you gave a unique name to the entry or the entry is based on the same image as an existing entry.
Click Next to apply the changes.
Now, the executor will be available to the team admins to create execution contexts for their team.
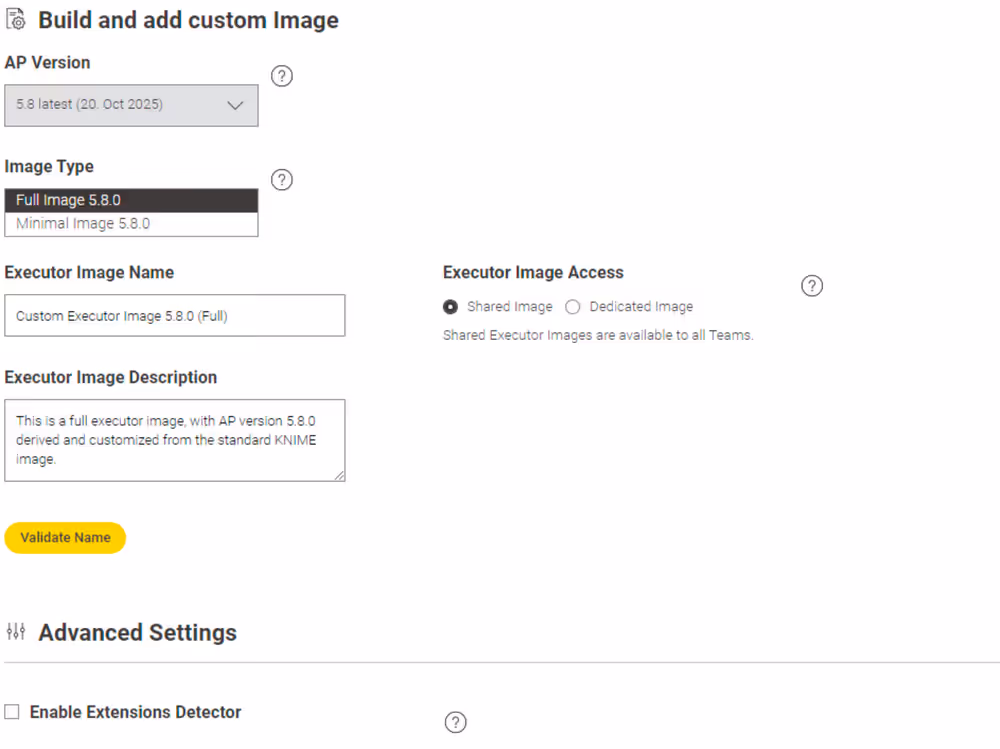
Build and add custom Image
- Select Build and add custom Image to create a custom image and push it to an internal or external registry.
- Select the prebuilt Standard KNIME Image that you want to customize.
- You can give the entry a name, a description, and define the availability.
- Click Validate Name to check if you gave a unique name to the entry.
- This action includes a section of advanced settings where you have more possibilities to customize, for example, the update site, save the image in an external registry, or configure a proxy.
- Click Next to move to the following pages. The app will download the content from your update sites and allow you to select the extensions that you want to install.
- After this step, you will also configure the Python and R environments, give a last review to the final dockerfile and start to build the image.
- When the build is completed, the image will be added to the registry that you specified in the first page.
A dedicated section of the documentation providing more details into this action is available as part of this guide.
Build and add from Dockerfile:
- Select Build and add from Dockerfile
- Use the upload button to upload your custom Dockerfile
- Input the name and/or description of the executor image that you will add
- Click Validate Name to check if you gave a unique name to the entry
- Click Next to inspect the uploaded Dockerfile for a final review and click Next again to start the build
- Once the build is complete, the image will be added to the registry as specified on the first page
Modify Existing Image
- Select Modify Existing Image
- Select the image you want to modify from the single selection widget on the right.
- Change the name and or the description of the image you selected.
- Click Validate Name to check if you gave a unique name to the entry.
- Click Next to apply the changes. You should now see the updated entry in the list.
Image URL and team availability can not be modified since execution contexts that use the image would not be automatically updated, leading to inconsistet states. If you want to update URL or team availability, delete the respective entry first and add a new one.
Delete Existing Image
- Select Delete Existing Image
- Select the image you want to delete from the table on the left.
- Click Next to apply the changes. You should not see the entry in the list anymore.
Removing images from the list will not change execution contexts that are already running. Starting from KNIME Business Hub 1.16, the embedded registry service enables the deletion of images from the internal registry and triggers garbage collection, freeing up disk space.
Add extensions to an existing Docker image
In order to install additional extensions and features to the KNIME Executor image, you will need to first create a Dockerfile, build a Docker image from it, and finally make it available by pushing it to a registry.
You can do this in two ways:
Via one of the action seleactable in the data app provided by us and described in the Build and add custom Image section.
Prerequisites:- The Execution Image Builder needs to be enabled: KOTS Admin Console > Config > Execution Image Builder > check Enable Execution Image Builder.
- You need Hub admin privileges in order to build and push the image. Deploy the data app while configuring it with an application password of the Hub admin to make it available for others, e.g. team admins (the application password is not visible to others that way). If you use the data app not as a Hub admin, you can still create the Dockerfile, but you won’t be able to build and push it to the registry.
Via a manual approach, as described in the Adding extensions manually section, if the Execution Image Builder service is not available. This might be the case for airgapped installations, since the Execution Image Builder service references update sites, base images, and other external resources.
Prerequisites:dockershould be installed.If you need to install
dockerplease make sure not to install it on the same virtual machine (VM) where the KNIME Business Hub instance is installed, as it might interfere withcontainerd, which is the container runtime used by Kubernetes.
Registry prerequisites
Enabling the Image Builder allows to build an execution image in the cluster and to push it to a specified registry.
There are three different possibilities to specify a registry to which the Image Builder can have access:
If you are in an embedded cluster environment and want to use the default Embedded Docker Registry: activate the Embedded Docker Registry by going to KOTS Admin Console > Config > Embedded Registry and check the option Enable Embedded Registry. If you follow the manual approach, have the username and password ready that is defined in the KOTS Admin Console. See also KNIME Business Hub Installation Guide for more information.
If you are in an environment where the embedded registry is not available you will need to create a secret for the registry you want to use and point the Hub to the secret in the Custom Execution Image Pull Secret section of the KOTS Admin Console.
First create a secret and add it to the cluster in the
knimenamespace via the command:kubectl -n knime create secret docker-registry <secret-name> --docker-server=<registry-url> --docker-username=<username> --docker-password=<secret>where
secret-nameis the name of the secret you want to create and<registry-url>is the URL of the registry you want to use.Point the Hub to the secret you added to the cluster. To do so go to the KOTS Admin Console, navigate to the Execution Contexts section and check the option Enable Custom Execution Image Pull Secret. Here under Execution Image Pull Secret add the
<secret-name>from the command above. You will the be able to access the defined registry from the data app. If you are following the manual approach instead, you don’t need to create the secret, but you will only need the URL, username, and password of the registry.
If you are in an airgapped environment instead you will need to specify a registry in the Registry settings tab of the KOTS Admin Console. If you follow the manual approach, have the username and password for this registry ready.
INFO
Building a Docker image requires enhanced container privileges. To be precise, the container needs to run as root with following capabilites:
CHOWNSETUIDSETGIDFOWNERDAC_OVERRIDE
Depending on the size of the image, the build requires a lot of resources and can potentially slow down the KNIME Business Hub during the build time.
Build a custom Dockerfile using the Executor Image Manager data app
We provide the "Executor Image Manager" data app that will help you create the file, build an executor image, and push it to a registry to make it available when creating or editing an execution context. Download the data application, upload it to your KNIME Business Hub instance, and Run it.
TIP
Follow the KNIME Data Apps Beginners Guide for detailed instructions.
The data app consists of five steps, displayed on five pages.
First page: Settings
Select the action "Build and add custom Image" to begin, where you will find the basic settings first.
If you hover over a setting or question mark in the data app, you will find a detailed description of each setting.
This app is intended for Hub admins only.
You proceed by clicking the Next Button.
Second page: Extension selection
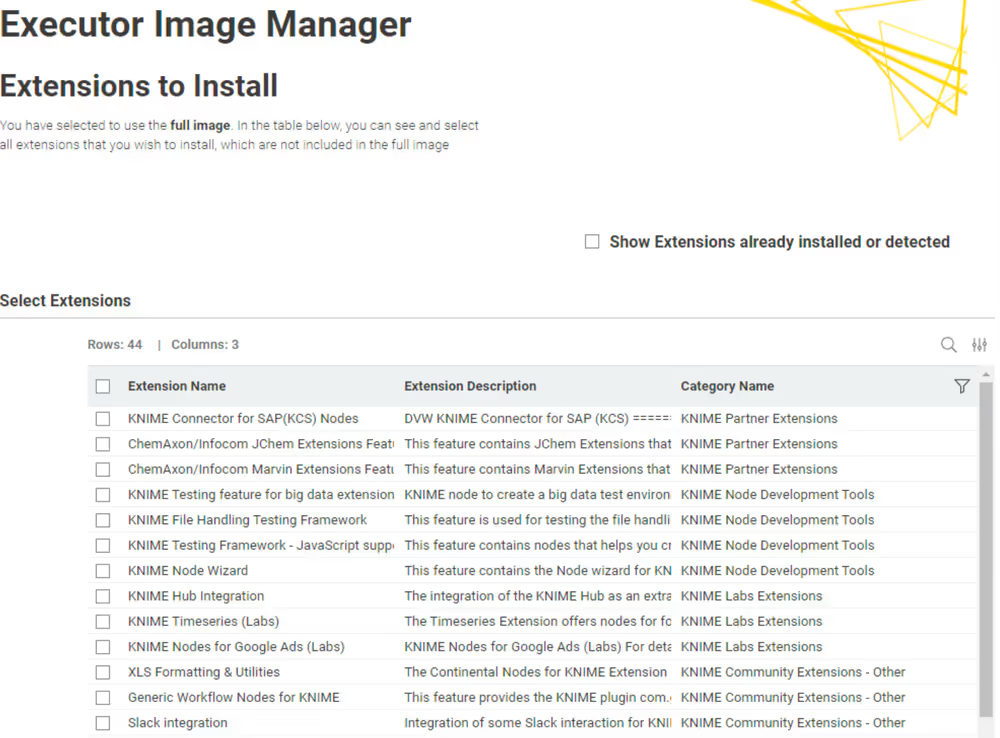
This is the page where you select the extensions you want to install additionally. If you select the checkbox in the top right corner, you will see both the extensions detected automatically (if enabled) and the extensions already installed in the base or full image.
Third page: Integration selection (R, Python)
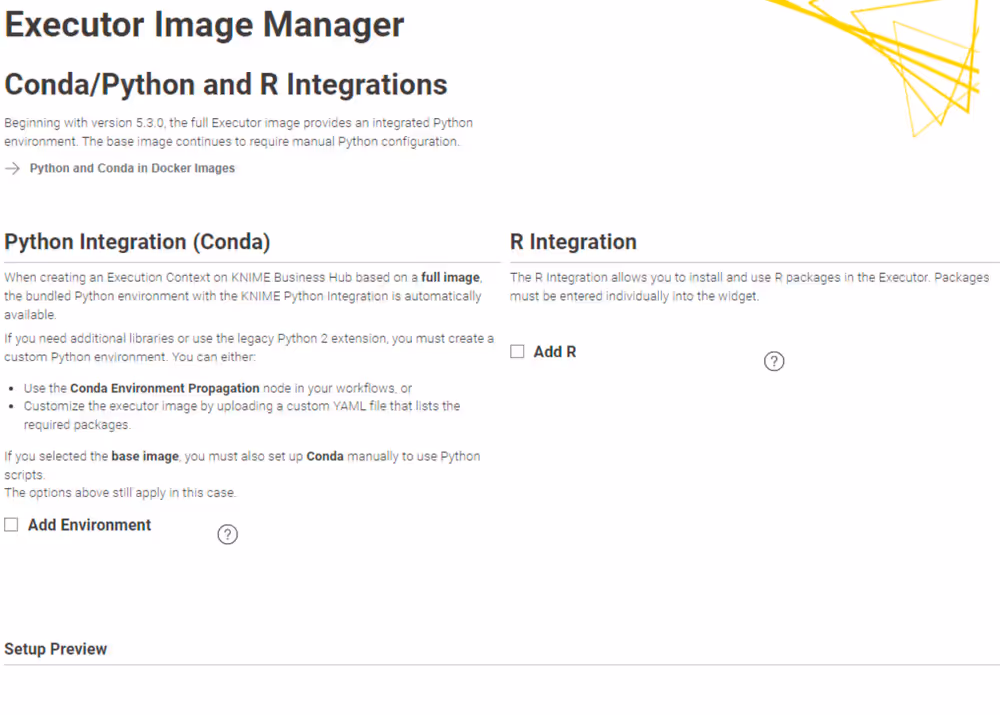
On the third page, you decide on whether to install conda/python, respectively additional default environments to the image, or the R integration.
Python
Learn more about how the KNIME Python Integration works with the KNIME Python Integration Guide.
Executors support three Python environment strategies: the bundled environment, pre-installed custom environments (embedded in the executor image), and on-the-fly environments created at workflow runtime. Pre-installed environments survive executor restarts and require no network access at runtime, making them well-suited for stable, shared workloads and environments where governance matters. On-the-fly environments are more flexible but are lost on restart and require the executor to reach conda and pip repositories at runtime. For a full comparison, see Python Environments on Executors.
If your choice of image type (base or full) does not already include conda (specifically: micromamba as the management software of the virtual environments), you can choose to add it here. You need this, if the workflows you run on this executor contain e.g. a Conda Environment Propagation node.
If conda/micromamba is installed, you can further choose to provide a virtual environment that is already installed on the executor. This has the advantage that after a restart of the executor, the Conda Environment Propagation node executes faster, as the environment does not need to be recreated first. You add an environment by uploading a .yml file, which describes the environment. You can use the following example .yml file and modify it to your needs, e.g. by adding packages (and their versions) that you require:
yaml
name: py311_knime # Name of the created environment
channels: # Repositories to search for packages
  - knime
  - conda-forge
dependencies: # List of packages that should be installed
  - knime-python-base=5.3 # Metapackage for KNIME-connectivity
  - python=3.11 # Specify your desired Python version
  #- your-module (required)=module-version (optional)
To learn more about how to create conda environment files, visit the conda docs. If you want to pre-install multiple conda environments, please edit the Dockerfile manually on the next page of the data app.
If the executor runs in a restricted network without access to public conda channels, add a .condarc file to the executor image to configure private mirrors or proxy credentials. See Conda channel access on the executor.
For KNIME executions prior to version 5.2, the executor needs to know where the conda installation is located so that the execution context can properly access conda. This is done as a final step and is described below.
Unless modified, the path to the conda installation is
/home/knime/miniconda3/, and the path to the environment (see below) is<path to default conda environment dir>=<path to conda installation dir>/envs/<name of the env>.In the full images of KNIME Executor version 5.2 and above, where conda and Python are preinstalled, the path to conda is the same, i.e.
/home/knime/miniconda3/and the paths to the default environments are/home/knime/miniconda3/py2_knimeand/home/knime/miniconda3/py3_knime.
R
You can make R available as an integration if the workflows are expected to contain nodes from the KNIME R Scripting extension. Provide a comma-separated list of additional packages in the provided input field.
Fourth page: Dockerfile review
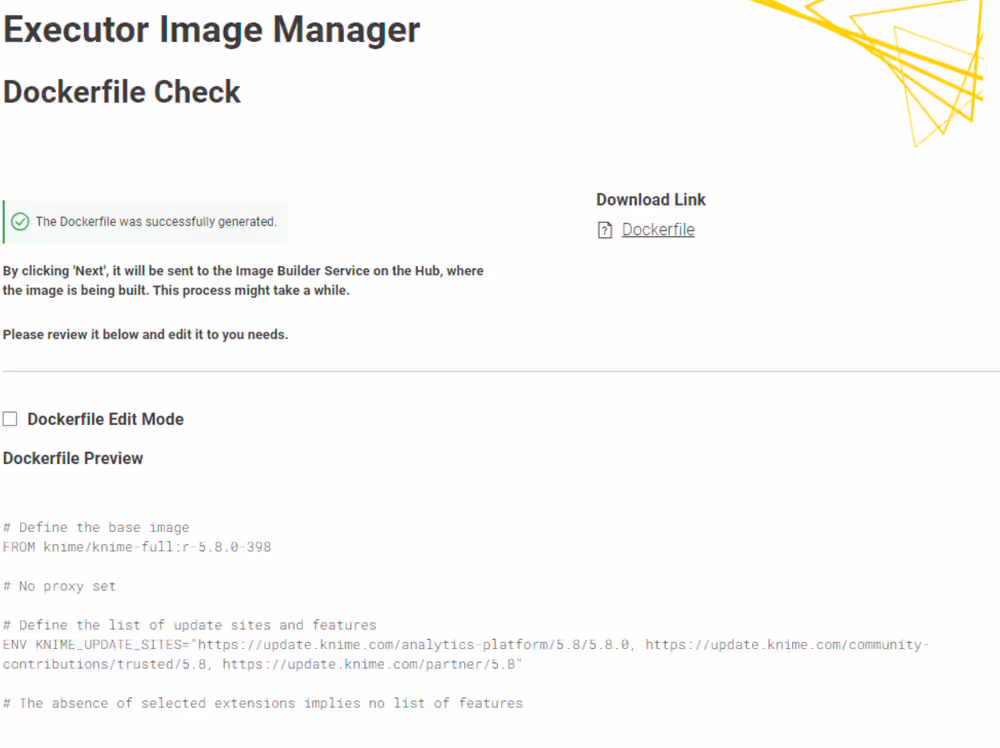
Here you are able to review the Dockerfile and do manual edits, if needed. To do this, enable the Dockerfile Edit Mode, and change the Dockerfile based on your needs.
- If you proceed to the next page, the Dockerfile is sent to the image builder endpoint, where the image is actually built, and then pushed to the executor image list.
Fifth page: Dockerfile building and pushing
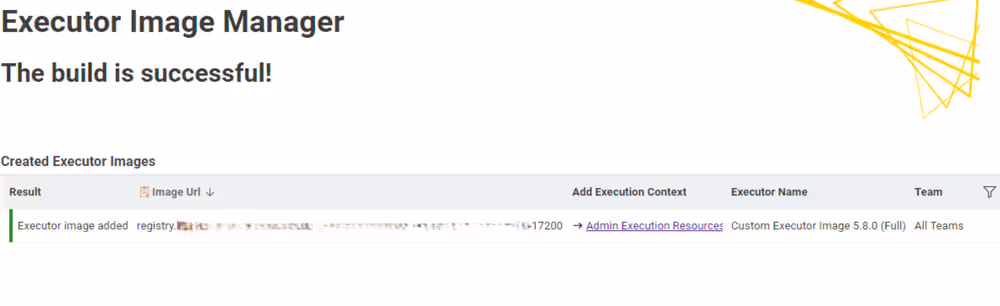
On the final page of the Executor Image Builder, you will see the result of the building process. If no errors occurred during the build, the final image URL will be displayed. After this step, you will be able to select the execution context from the dropdown menu in the Execution Resources panel.
Finally, you can test the execution of a workflow containing a node from the freshly installed extensions or one that uses python.
Adding extensions manually
Instead of using the data app, you can also go through the steps manually. This might be necessary for airgapped installations, as the service that builds the docker image would require access to e.g. update sites and other resources that are referenced in your docker file.
Create the Dockerfile
You can use the example below which demonstrates how to extend an existing executor image with a custom set of update sites and features.
dockerfile
# Define the base image
FROM knime/knime-lts-full:r-5.3.3-666

# Change to root user to be able to install system packages
USER root

# Update/upgrade package manager and install ca-certificates to enable ca certificates that micromamba (for python) is asking for
RUN apt-get update && \
    apt-get upgrade -yq && \
    apt-get install -yq \
        ca-certificates && \
    # cleanup
    rm -rf /var/lib/apt/lists/*

# Change to knime user to handle extensions
USER knime

# Define the list of update sites and features
# Optional, the default is the KNIME Analytics Platform update site (first entry in the list below)
ENV KNIME_UPDATE_SITES=https://update.knime.com/analytics-platform/5.2,https://update.knime.com/community-contributions/trusted/5.2
# Install a feature from the Community Trusted update site
ENV KNIME_FEATURES="org.knime.features.geospatial.feature.group"

# Execute extension installation script
RUN ./install-extensions.sh
The KNIME_UPDATE_SITES environment variable determines the update sites that will be used for installing KNIME Features. It accepts a comma-delimited list of URLs. The KNIME_FEATURES environment variable determines the extensions which will be installed in the KNIME Executor. It accepts a comma-delimited list of feature group identifiers. A corresponding update site must be defined in the KNIME_UPDATE_SITES list for feature groups to be successfully installed. You can get the necessary identifiers by looking at Help → About KNIME → Installation Details → Installed Software in a KNIME instance that has the desired features installed. Take the identifiers from the "Id" column and make sure you do not omit the .feature.group at the end (see also screenshot on the next page). The base image contains a shell script install-extensions.sh which lets you easily install additional extensions in another Dockerfile.
The Executor Image Builder Data App allows you to create a Dockerfile, which you can use as a starting point.
Python
If you want the executor to run workflows with the Conda Environment Propagation node, you need to have conda installed (respectively micromamba or any other conda environment manager).
- KNIME version < 5.2: If you are attempting to build an executor using a KNIME version prior to 5.2, you must explicitly install conda. There are several ways to set up and use Python on KNIME Business Hub Execution Contexts.
- KNIME version >5.2: For versions later than 5.2, the full image includes a bundled Python environment, while the minimal image does not have Python installed.
- If you want to start from the minimal
knimeimage and want to install conda as well as a persisted conda environment, you can adapt your dockerfile based on the following:
dockerfile
# Define the knime minimal base image
# Select other KNIME versions from https://hub.docker.com/r/knime/knime-lts/tags
FROM knime/knime-lts:r-5.3.2-575
# Install the conda Extension to make the conda environment propagation node available,
# as well as the Python Integration for the Python Script and Python View nodes.
# Include further update sites and extension IDs when desired.
ENV KNIME_UPDATE_SITES="https://update.knime.com/analytics-platform/5.3"
ENV KNIME_FEATURES="org.knime.features.conda.feature.group,org.knime.features.python3.scripting.feature.group"
RUN ./install-extensions.sh
# Download and install Miniforge, a miniconda installer configured to use conda-forge only
# Note: '/home/knime/miniconda3' is the default path where KNIME will look for conda.
# If conda is found at a different location, you need to configure KNIME to look for
# conda at that location via a customization location profile. See
# /ap/latest/python_installation_guide/index.html#executor
# for detailed documentation and
# https://hub.knime.com/-/spaces/-/~CbbkOSFJ-SXFfvxn/most-recent/
# for a data app to assist you with customization profiles.
USER root
ENV conda_DIR=/home/knime/miniconda3
RUN apt update && \
    apt install curl bzip2 ca-certificates --yes && \
    apt clean && \
    curl -L -O "https://github.com/conda-forge/miniforge/releases/latest/download/Miniforge3-$(uname)-$(uname -m).sh" && \
    bash Miniforge3-$(uname)-$(uname -m).sh -b -p $conda_DIR && \
    rm Miniforge3-$(uname)-$(uname -m).sh &&
    chown -R knime:knime $conda_DIR
USER knime
# Add conda to the PATH
ENV PATH=$conda_DIR/bin:${PATH}
# Create a new conda environment "my_env" with the knime-python-base package.
# Using EOF to introduce a heredoc. Adopt the lines 36 to 44.
RUN cat <<EOF > /tmp/my_env.yml
name: my_env                # Name of the created environment
channels:                   # Repositories to search for packages
- conda-forge
- knime
dependencies:               # List of packages that should be installed
- knime-python-base=5.3     # Metapackage for KNIME-connectivity
- python=3.11               # Specify your desired Python version
- <your package>=version
EOF
RUN conda env create -f /tmp/my_env.yml && \
    conda clean --all --yes && \
    # (Optional) Initialize conda in this shell, so that "conda activate" works when running the image in a shell
    conda init bash
If you do this and you change the location of the conda installation to anything else than /home/knime/miniconda3, remember to configure the location of conda to use with KNIME in your customization profile as described in the section below.
- In case you want to start from a
knime-fullimage that already has conda and the KNIME Python Integration pre-installed, please adopt your Dockerfile like this:
dockerfile
# Define the knime-full base image
# Select other KNIME versions from https://hub.docker.com/r/knime/knime-lts-full/tags
FROM knime/knime-lts-full:r-5.3.2-575
# Create a new conda environment "my_env" with the knime-python-base package.
# Using EOF to introduce a heredoc. Adopt the lines 7 to 15.
RUN cat <<EOF > /tmp/my_env.yml
name: my_env                # Name of the created environment
channels:                   # Repositories to search for packages
- conda-forge
- knime
dependencies:               # List of packages that should be installed
- knime-python-base=5.3     # Metapackage for KNIME-connectivity
- python=3.11               # Specify your desired Python version
- <your package>=version
EOF
RUN conda env create -f /tmp/my_env.yml && \
    conda clean --all --yes && \
    # (Optional) Initialize conda in this shell, so that "conda activate" works when running the image in a shell
    conda init bash
Learn more about the KNIME Python Integration with the KNIME Python Integration Guide.
In order for the executor to find the conda installation, the execution context needs to know where to find conda. This is done as a final step and is described below.
Unless modified, the path to the conda installation is
/home/knime/miniconda3/, and the path to the environment (see below) is<path to default conda environment dir>=<path to conda installation dir>/envs/<name of the env>.In the full images of KNIME Executor version 5.2 and above, where conda and Python are preinstalled, the path to conda is the same, i.e.
/home/knime/miniconda3/and the paths to the default environments are/home/knime/miniconda3/py2_knimeand/home/knime/miniconda3/py3_knime.
Build a Docker image from the Dockerfile
Once the Dockerfile has been customized appropriately, you can build a Docker image from it by using the following command after replacing <image_name> and <tag_name> with actual values:
docker build -t <image_name>:<tag_name>.
This process can take a few minutes to be completed. In order to check if the new image has been built you can use the command docker images.
Push the Docker image to the Docker Embedded Registry
Finally you can push the image to the Docker Embedded Registry.
- Authenticate against the registry with the credentials obtained from the KOTS Admin Console > Config > Embedded Registry via
docker login --username <username> registry.<base-url>If TLS is not configured, the registry URL must be added as an insecure registry.
- Tag the previously created image with the format of the Embedded Docker Registry
docker tag <old-name> registry.<base-url>/<new_name> - Push the image to the Embedded Docker Registry
docker push registry.<base-url>/<image_name>:<tag_name> - Now the Docker image (e.g.
registry.hub.example.com/knime-full:5.2-with-additional-extension) is available to create an execution context from the Hub UI.
Push the Docker image to the Container Embedded Registry for airgapped installations
For airgap installations you will need to create a custom Docker image and push it to the Container Embedded Registry using containerd command line (ctr).
As Containerd is installed as container runtime in the cluster, you can make use of the ctr commands to pull and push the images into the embedded registry.
Build the image on a machine with access to the internet and installed
docker:docker build . -t registry.<base-url>/<image_name>:<tag_name>Save the Docker image as a
tarfile on the machine where Docker is installed:docker save -o docker.tar <tag_name>Copy the image to the machine where the Hub instance is running
On the machine where the Hub instance is running follow these steps. You can use the
ctrordockercommands. However, be aware that usingdockercommands requires Docker to be installed on the machine.If you use
ctr:- First import the image into
containerd:ctr image import docker.tar - Tag the image:
ctr images tag <old-image_name>:<old-tag_name> registry.<base-url>/<image_name>:<tag_name> - Push the image to the Container Registry:where
ctr images push --user <username> -k registry.<base-url>/<image_name>:<tag_name>-kparameter is to skip the TLS check, and--userparameter is to provide the username for the registry.
- First import the image into
If you use
docker:- First load the image into Docker:
docker load -i docker.tar - Then login to the registry:
docker login --username <username> registry.<base-url> - Tag the image:
docker image tag <old-image_name>:<old-tag_name> registry.<base-url>/<image_name>:<tag_name> - Push the image to the Container Registry:
docker push registry.<base-url>/<image_name>:<tag_name>
- First load the image into Docker:
Now you can verify that the images are available on the Container Registry using the below endpoints:
http://registry.<base-url>/v2/_catalog
http://registry.<base-url>/v2/<repo>/tags/list
Push the Docker image to a non-embedded Registry
For non-embedded registries you will push the image from your local Docker instance to the remote registry, using the authentication required for that particular registry. Then you can use the image name to create the executor images, given that you have added the correct pull secrets to the KNIME Business Hub configuration.
Python and Conda in Docker images
When you create an Execution Context on KNIME Business Hub based on a full build you will have the Python environment bundled with the KNIME Python Integration available. If you need additional libraries or are using the Python 2 (legacy) extension, you need to create a custom Python environment to make them available on the Hub instance.
You can do this in several ways:
- You can use the Conda Environment Propagation node in all your workflows using Python. To get started with the Conda Environment Propagation node, check out the KNIME Python Integration Guide. This has the advantage that no further setup is needed, and you are done with this guide. Any libraries installed using the Conda Environment Propagation node will be removed, however, when the executor restarts and are installed again next time the node executes, so libraries that are used often should be installed as part of the executor Docker image to save time. This is described in the following.
- You can customize the executor image. To do so, you need to create a Docker image with Python, either via the Executor Image Builder data application described above, or by creating, building, and pushing the Dockerfile manually. Be sure to note down the paths where conda was installed, as you will need add them in the
.epffile of the customization profile during the set up of the execution context. The default installation paths are:
<path to conda installation dir>        = /home/knime/miniconda3/
<path to default conda environment dir> = <path to conda installation dir>/envs/<name of the env>- Use a full image of version 5.2 and above, since starting with KNIME Executor version 5.2 the KNIME Python extension is already installed in the Docker images. There are two default environments installed, py2_knime and py3_knime:
py2_knime:yamlname: py2_knime # Name of the created environment channels: # Repositories to search for packages - defaults - conda-forge dependencies: # List of packages that should be installed - python=2.7 # Python - pandas=0.23 # Table data structures - jedi=0.13 # Python script autocompletion - parso=0.7.1 # Jedi dependency this is the last version compatible with 2.7 - python-dateutil=2.7 # Date and Time utilities - numpy=1.15 # N-dimensional arrays - cairo=1.14 # SVG support - pillow=5.3 # Image inputs/outputs - matplotlib=2.2 # Plotting - pyarrow=0.11 # Arrow serialization - IPython=5.8 # Notebook support - nbformat=4.4 # Notebook support - scipy=1.1 # Notebook support - jpype1=0.6.3 # Databases - protobuf=3.5 # Serialization for deprecated Python nodespy3_knime:yamlname: py3_knime # Name of the created environment channels: # Repositories to search for packages - defaults - conda-forge dependencies: # List of packages that should be installed - nbformat=4.4 # Notebook support - scipy=1.1 # Notebook support - pillow=5.3 # Image inputs/outputs - cairo=1.14 # SVG support - ipython=7.1 # Notebook support - numpy=1.16.1 # N-dimensional arrays - python=3.6 # Python - matplotlib=3.0 # Plotting - jpype1=0.6.3 # Databases - pyarrow=0.11 # Arrow serialization - jedi=0.13 # Python script autocompletion - python-dateutil=2.7 # Date and Time utilities - pandas=0.23 # Table data structures - libiconv=1.15 # MDF Reader node - asammdf=5.19.14 # MDF Reader node
If you choose to modify the executor image or use the full build of version 5.2 and above, you further need to set up the execution context for it to know where to find the conda/python installations. This is described in the section below.
Set up the execution context
Once you have created the Docker image with Conda/Python and the desired environments, create an execution context that uses the newly created Docker image.
Now you need to set up and customize the execution context. This process is described in the KNIME Python Integration Guide in detail, and the relevant parts are repeated here.
You specify the paths where the execution context will find the conda installation and environments in a customization profile applied it to the execution context.
- Build the
.epffile by following the steps in KNIME Python Integration Guide and exporting the.epffile. - To export the
.epffile from KNIME Analytics Platform, first switch to classic user interface (you can find the option in the Modern UI under Menu), then go to File > Export Preferences… - Open the file and use only the parts related to Python/conda.
The .epf file could look like the following:
/instance/org.knime.conda/condaDirectoryPath=<path to conda installation dir>
/instance/org.knime.python3.scripting.nodes/pythonEnvironmentType=conda
/instance/org.knime.python3.scripting.nodes/python2CondaEnvironmentDirectoryPath=<path to default conda environment dir>
/instance/org.knime.python3.scripting.nodes/python3CondaEnvironmentDirectoryPath=<path to default conda environment dir>
Find more details on how to setup the .epf file in the Executor configuration section of the KNIME Python Integration Guide.
Now follow these steps to customize the execution context:
Build the
.zipfile containing the customization profile using the.epffile you just created.Upload the customization profile
.zipfile to KNIME Business Hub.Apply the customization profile to the execution context.
You are done, and can test the setup by running a workflow that contains a Conda Environment Propagation node.
Delete a custom Docker image
In this section you can find instructions on how to delete the Docker images that you pushed to the Embedded Docker Registry. This is especially important since the MinIO storage allocated for the registry is, by default, limited to ~30 GB.
To check how much disk space is occupied you can run the command kubectl exec -it -n minio minio-<id> -- /bin/sh -c "df -h" with the correct minio pod id. The /data directory contains the space occupied by the registry.
The first step to delete the custom Docker images is to use the following script:
bash
#!/bin/bash

# exit when any command fails
set -e

registry='registry.<base-url>'

# concatenates all images listed in json file into single line string seperated with blank
echo "Image Name:"
read images
echo "Image Tag (Space seperated for multiple tags or leave empty if all should be deleted):"
read tags
echo "Registry User:"
read user
echo "Registry Password:"
read -s password

for image in $images; do

    if [[ -z $tags ]]
    then
        # get tag list of image, with fallback to empty array when value is null
        tags=$(curl --user $user:$password "https://${registry}/v2/${image}/tags/list" | jq -r '.tags // [] | .[]' | tr '\\n' ' ')
    fi

    echo "DELETING image: " $image
    echo "DELETING tags: " $tags

    # check for empty tag list, e.g. when already cleaned up
    if [[ -n $tags ]]
    then
        for tag in $tags; do
            curl --user $user:$password -X DELETE "https://${registry}/v2/${image}/manifests/$(
                curl --user $user:$password -I \\
                    -H "Accept: application/vnd.docker.distribution.manifest.v2+json" \\
                    "https://${registry}/v2/${image}/manifests/${tag}" \\
                | awk '$1 == "Docker-Content-Digest:" { print $2 }' \\
                | tr -d $'\\r' \\
            )"
            echo "DELETED:" $image "with tag" $tag
        done
        echo "Deleted images. To free disk space run the garbage collection command inside the registry pod: 'bin/registry garbage-collect --delete-untagged /
etc/docker/registry/config.yml'. See documentation at: https://docs.knime.com/2024-06/business_hub_admin_guide/index.html#garbage-collection"
    else
        echo "SKIP:" $image
    fi
done
To run the script you will need:
jq:jqis a lightweight and flexible command line JSON processor that is used to format the JSON output ofcurlcalls. To install it on the machine where you want to run the shell script you can use the following command:bashsudo apt-get update sudo apt-get -y install jq- You will need to adapt the value
registry.<base-url>at the line 6 of the script with the<base-url>of your KNIME Business Hub, e.g. forhub.example.comwill beregistry.hub.example.com. - You will need to know the Embedded Docker Registry username and password.
If your KNIME Business Hub instance does not have TLS enabled, the script will cause SSL certificate issues.
To solve this you can:
- Change the script where a
curlcommand is calling anhttps://endpoint to call anhttp://instead, or - Add
--insecureto each line of the script with acurlcommand.
- Change the script where a
Identify Docker image names and tags
To be able to run the script you will need to know the image names and tags present on the embedded registry that you want to delete. You can for example run the following GET requests against the Docker Registry API. Again you will need to first adapt the <base-url> entries to your specific Hub URL, and use your <username> and <password> for the Embedded Docker Registry.
bash
# listing images on the remote registry
$ curl -u <username>:<password> -X GET registry.<base-url>/v2/_catalog | jq
This should output a list of the Docker Images available:
json
{
  "repositories": [
    "executor-image-name1",
    "executor-image-name2",
    "executor-image-name3"
  ]
}
Then you can run the following command for each Docker Image you are interested in, e.g. executor-image-name1, to retrieve the Image tag:
BASH
# listing tags on the remote registry
$ curl -u <username>:<password> -X GET registry.<base-url>/v2/<executor-image-name>/tags/list | jq
This should output a list of the Docker Image’s tags:
{
	"name": "executor-image-name1",
	"tags": ["tag1"]
}
Run the script
Now you can run the script to delete one or multiple image tags. The script will ask you to provide an Image name, one or more Image tag and the Embedded Docker Registry username and password.
bash
$ ./delete-registry-image.sh

Image Name:
<image-name>
Image Tag (Space seperated for multiple tags or leave empty if all should be deleted):
<image-tag>
Registry User:
<usr>
Registry Password:
<pwd>
Run garbage collection on the registry pod
Since the above script only removes the image tags and manifests, leaving the actual image layers in storage, garbage collection is required to scan the registry storage and remove unreferenced or orphaned layers, reclaiming disk space and fully cleaning up after the deletion.
The garbage collection needs to be performed on one of the registry pods inside the kurl namespace.
You can either use the following commands via kubectl or use your preferred tool to manage the cluster, e.g. OpenLens.
Connect to the cluster where the Business Hub instance is installed
List the pods in the
kurlnamespace to find theregistrypod on which you will run the garbage collectionkubectl get pods -n kurl- Identify the
registrypod and proceed with the next steps - You only need to perform garbage collection on one registry pod in the
kurlnamespace. There is no need to do it for the other registry pods. This is because all the registry pods in the Kubernetes cluster share the same underlying storage.
- Identify the
Next, open a shell into the selected registry pod,
<registry-name>, and ensure you select the correct container- Do not use the
registry-backupcontainer, to avoid risk of data loss - Do not upload an image during garbage collection. If you were to upload an image while garbage collection is running, there is the risk that the image’s layers are mistakenly deleted leading to a corrupted image.
- Do not use the
Run the garbage collection command inside the shell:
kubectl exec -it -n kurl <registry-name> -c registry -- /bin/sh -c "/bin/registry garbage-collect --delete-untagged /etc/docker/registry/config.yml"
After the garbage collection has run through, it takes a while to fully free the disk space. You can speed up the process by restarting the registry and minio pods. To check how much disk space is occupied now run the command kubectl exec -it -n minio minio-<id> -- /bin/sh -c "df -h" with the correct minio pod id again. The /data directory contains the space occupied by the registry.
Even though all tags of an image are deleted, the image is still listed in the MinIO pod under the
minionamespace when running aGETrequest to theregistry.<base-url>/v2/_catalogendpoint. However, these images should not have any tags and therefore they do not occupy disk space anymore.
Clean up the containerd image cache
KNIME Business Hub stores container images in two different locations:
- The cluster internal registry is the source of truth for executor images pushed to it, and for Hub images in airgapped KURL installations. See Run garbage collection on the
registrypod to reclaim disk space there. - The containerd image cache is a local cache on each Kubernetes node that containerd uses to start containers. Deleting images from this cache never affects the cluster internal registry.
If garbage collection on the registry pod doesn't free up enough space, also clear the cached images in containerd. The kubelet on each node automatically runs garbage collection on the containerd image cache once disk usage exceeds its configured thresholds (the default is 80%). Manually trigger this cleanup by running the following command on each node:
bash
crictl rmi --pruneThis command deletes all images that no running container currently uses. If an executor needs a deleted image again, KNIME Business Hub pulls it again from the registry it was originally pulled from, which can delay executor startup.
INFO
Run crictl rmi --prune on every node individually. It only cleans up the node it runs on.
To delete specific images instead of all unused images, use the Container Runtime Interface (CRI) CLI.
Customization profiles
Customization profiles are used to deliver KNIME Analytics Platform configurations from KNIME Hub to KNIME Analytics Platform clients and KNIME Hub executors.
This allows defining centrally managed:
- Update sites
- Preference profiles (such as Database drivers, Python/R settings)
A profile consists of a set of files that can:
- Be applied to the client during startup once the KNIME Analytics Platform client is configured. The files are copied into the user’s workspace.
- Be applied to the KNIME Hub executors of the execution contexts.
Customization profiles can be:
- Global customization profiles that need to be uploaded and managed by the Hub admin. These can be applied across teams via shared execution context or to specific teams.
- Team’s customization profiles, which are scoped to the team, can be uploaded either by a Hub admin or a team admin.
Once uploaded, the customization profile can then be downloaded or used in KNIME Analytics Platform clients and executors.
The access to the customization profile is not restricted meaning that anyone with the link can download it and use it.
Currently, customization profiles can be managed on KNIME Hub via REST or using the dedicated Customization Profile data application.
Structure of a customization profile
A customization profile minimally consists of a folder, named according to the profile name, containing at least one preference file. A preference file is a simple text file with the extension .epf.
Each line in a preference (.epf) file specifies key and value of a setting, separated by =.
<key1>=<value1>
<key2>=<value2>
# ...
If two lines specify identical keys, the value later in the file overrides a value specified earlier.
If the profile folder contains more than one .epf files, the files are read in lexicographic order.
A customization profile may contain additional arbitrary files. These are distributed as part of the profile and can be referenced in .epf files.
Variable replacement
It is possible to use variables inside the preference files (only those files ending in .epf) which are replaced on the client right before they are applied. This makes the Hub-managed customizations even more powerful. These variables have the following format: ${prefix:variable-name}. The following prefixes are available:
env: the variable is replaced with the value of an environment value. For example,${env:TEMP}will be replaced with/tmpunder most Linux systems.sysprop: the variable is replaced with a Java system property. For example,${sysprop:user.name}will be replaced with the current user’s name. For a list of standard Java system properties see the Java documentation. Additional system properties can be defined via execution contexts.profile: the variable will be replaced with a property of the profile in which the current preference file is contained in. Currentlylocationandnameare supported as variable names. For example,${profile:location}will be replaced by the file system location of the profile on the client. This can be used to reference other files that are part of the profile, such as database drivers:org.knime.workbench.core/database_drivers=${profile:location}/db-driver.jar
In case you want to have a literal in a preference value that looks like a variable, you have to use two dollar signs to prevent replacement. For example $${env:HOME} will be replaced with the plain text ${env:HOME}. If you want to have two dollars in plain text, you have to write three dollars ($$${env:HOME}) in the preference file.
Once you use variables in your preference files, they are not standard Eclipse preference files anymore and cannot be imported as they are.
Create a customization profile
Follow the steps below to create a customization profile. You can export the preference file from a KNIME Analytics Platform installation, with the needed configuration.
Then create a folder with the preference file and any additional file that you might need to distribute with the customization profile. Finally, you compress the folder to a .zip format and
- Set up the needed configuration in a local KNIME Analytics Platform installation.
- Export the
.epffile from KNIME Analytics Platform. To do so, first switch to classic user interface (you can find the option in the Modern UI under Menu), then go to File > Export Preferences…. - Open the created
.epffile, and look for the lines related to your needed settings. Remove all other settings (as some contain e.g. local paths on your machine, which will inevitably cause issues when applying to another installation). You can also further modify the file with the customization options below. - Place the
.epffile in a folder, together with any additional files that need to be distributed along the profile (e.g. database drivers). - Create a
.zipfrom that folder.
Finally you can proceed with the next step, and upload the file to the KNIME Hub instance.
When creating a zip file on macOS using the built-in functionality, two files are automatically added that cause the next steps (i.e. applying the profile in KNIME Analytics Platform) to fail. There is a way to prevent creation of these files if creating the
.zipvia command line, see here. If in doubt, use a Windows or Linux machine to create the.zipfile.
The customization profiles on the KNIME Hub instance are going to be accessible without user authentication. Therefore, they shouldn’t contain any confidential data such as passwords.
For further details and an example on how to distribute JDBC driver files, go to the Hub-managed customization profiles section of the KNIME Database Extension Guide.
Customization options
Besides the preferences that are exportable by KNIME Analytics Platform, there are additional settings that can be added to the preference files to customize clients.
Since KNIME Analytics Platform 5.3, some complex settings can be specified in YAML format.
- Create a file
<filename>.ymlin the profile directory. - Reference the file in a preference (
.epf) file by setting the following:where/instance/org.knime.core/knime.core.ap-customization-configuration=${profile:location}/<filename>.yml<filename>.ymlis the name of the YAML file you created.
The YAML file should declare the document version at the beginning of the file, i.e.
version: 'customization-v1.0'. This is to ensure that the document can still be read in the future even if the format changes.
Logging
In KNIME Executors, there are two main logging targets available, namely stdout and stderr (in contrast to the KNIME Analytics Platform). Logs can be downloaded from execution contexts, including the job logs. The log level of job logs is set to WARN.
Using Eclipse preferences (.epf) files bundled in customization profiles, the following preference can be used to set the <log-level> to one of the supported minimum log levels: DEBUG, INFO, WARN, ERROR, and OFF.
This preference configures the log level of the standard output of a KNIME Executor (default is INFO).
/instance/org.knime.workbench.core/logging.loglevel.stdout=<log-level>The standard error of a KNIME Executor is set to the log level ERROR, and is always non-overlapping with the standard output.
Restrict access to nodes
The property path nodes.filter allows to configure a sequence of filters which are evaluated on startup of the KNIME Analytics Platform.
The scope of a filter expresses to what extent access is restricted by this filter.
view: If a node does not match all filters withviewscope, it can be loaded, configured and executed as part of a workflow, but it will not be presented as a choice in the node repository or similar places.use: If a node does not match all filters withusescope, it will not be loaded and will not appear as a choice.
usetakes precedence overview. Meaning that a node that cannot be used can also never be viewed, regardless of whether it matches filters with theviewscope.
Whether a node matches a filter is defined by its predicate, consisting of one or several regular expressions. The regular expression patterns are evaluated against the node factory class name. The value of rule (allow or deny) specifies whether the predicate is applied as-is or inverted.
Examples
- Completely ignore any Java Snippet or Row Filter nodes. Any other nodes are not affected.
version: 'customization-v1.0' nodes: filter: - scope: use rule: deny predicate: type: pattern patterns: - .+JavaSnippet.+ - .+RowFilter.+ isRegex: true - Completely ignore any Java Snippet node. Restrict node repository and related user interface elements to nodes from given modules.
version: 'customization-v1.0'
nodes:
  filter:
    - scope: use
      rule: deny
      predicate:
        type: pattern
        patterns:
          - .+JavaSnippet.+
        isRegex: true
    - scope: view
      rule: allow
      predicate:
        type: pattern
        patterns:
          - org\.<vendor>\.<package>\..+
          - org\.<vendor>\.<package>\..+
        isRegex: true
Custom UI menu entries
In the YAML customization file, use the property ui.menuEntries as illustrated by the following example.
yaml
version: "customization-v1.0"
ui:
  menuEntries:
    - name: "My custom entry"
      link: "https://help.company.com/knime"
    - name: "Another entry"
      link: "https://support.company.com/contact"
These entries will appear in the Help menu revealed by the button at the top-right of the KNIME Analytics Platform user interface.
To configure custom menu entries in the classic user interface, use the following settings in a preference (.epf) file.
/instance/com.knime.customizations/helpContact.buttonText=<label>
If set together with /instance/com.knime.customizations/helpContact.address a button with the provided label will occur under Help in KNIME Analytics Platform. Clicking on the button will, depending on the helpContact.address, either open the default mail client or the default browser with the provided address.
/instance/com.knime.customizations/helpContact.address=<uri>
Sets the address of the support contact, e.g. mailto:support@company or https://company/support.
This option only takes effect in combination with /instance/com.knime.customizations/helpContact.buttonText.
/instance/com.knime.customizations/documentation.buttonText=<label>
Sets the label of the documentation button that can be found under Help in KNIME Analytics Platform. Clicking on the button will open the default browser and navigate to the documentation. If set to - the button will be hidden.
/instance/com.knime.customizations/documentation.address=<uri>
Sets the address of the documentation, e.g. https://company/documentation or file:///sharedSpace/documentation.
By default, the documentation address points to the KNIME Analytics Platform documentation.
Disallow storage of weakly encrypted passwords
You can use the workflow.disablePasswordSaving property to configure whether or not it should be possible to save weakly encrpypted passwords in workflows.
Example
- Prevent the user to save passwords in workflows.
version: 'customization-v1.0'
workflow:
  disablePasswordSaving: true
Enable local file system access by KNIME workflows
When executing a workflow, a preference controls whether nodes can access the local file system of the executor or not. By default, the local file system access is not allowed.
::: WARNING Allowing access to the local file system is not recommended. :::
You can still allow local file system access, by adding the following line to the customization profile of an executor:
/instance/org.knime.filehandling.core/allow_local_fs_access_on_server=trueThis preference affects all nodes that are part of the revised file handling framework. Old nodes that have not yet been ported to the new framework are not affected by this setting.
Disable KNIME AI Assistant on KNIME Analytics Platform client
KNIME Analytics Platform version 5.4.1 and later
If you want to deactivate the AI assistant and hide it from the side panel, you can do so by:
- Setting
kai.disableproperty via customization profile. - Setting the Java system property
-Dorg.knime.ui.feature.ai_assistant=false(see here).
The Java system property will always take precedence over the customization profile.
KNIME Analytics Platform version 5.4.0
If you are using KNIME Analytics Platform of version 5.4.0 the Java system property is not available, therefore you need to set up the corresponding parameter via the customization profile by using the kai.disable property.
KNIME Analytics Platform version 5.3.x or before
If you are using KNIME Analytics Platform of version 5.3.x or before, the setting in the customization profile is not available, therefore you need to set the Java system property in the knime.ini file or via execution contexts.
Example
Disable K-AI on KNIME Analytics Platform via customization profile.
kai: disable: true
Restrict which KNIME Hubs the KNIME AI Assistant is allowed to connect to
The kai.hub.filter property allows you to configure a sequence of filters that are evaluated on startup. These filters determine which KNIME Hubs can be selected as the backend for K-AI on the KNIME AI Assistant preferences page. This is similar to the nodes.filter property but with two key differences:
- Filter target: The filters match the URL host of a Hub (e.g.,
api.hub.knime.comfor the KNIME Community Hub). - Scope: There is no scope property as the filters only control which hubs K-AI is allowed to connect to.
Examples
- Prevent K-AI from connecting to KNIME Community Hub.
version: 'customization-v1.0' kai: hub: filter: - rule: deny predicate: type: pattern patterns: - hub.knime.com isRegex: false - Allow only hubs of a certain domain.
version: 'customization-v1.0'
kai:
  hub:
    filter:
      - rule: allow
        predicate:
          type: pattern
          patterns:
            - .+\.<custom domain>\.com
          isRegex: true
Mount points
See here for more information on mounting, connecting to, and using mount points in KNIME Analytics Platform. Below, you will find configuration options for mount points, using customization profiles.
Disallow use of mount points by host name
These configuration options allow for completely restricting the use of certain mount points. Specifically, disallowed mount points will be unlisted from the KNIME space explorer and cannot be re-added, e.g., via Preferences > KNIME > KNIME Explorer.
- Filter target: The filters match the URL host of a Server or Hub (e.g.,
api.hub.knime.comfor the KNIME Community Hub). - Scope: There is no scope property as the filters only control which URL hosts are allowed for mount points in general.
Examples
- Prevent the user from using KNIME Community Hub.
version: 'customization-v1.0' mountpoint: filter: - rule: deny predicate: type: pattern patterns: - api.hub.knime.com isRegex: false - Only allow a KNIME Hub instance at a custom domain.
version: 'customization-v1.0' mountpoint: filter: - rule: allow predicate: type: pattern patterns: - .+\.<custom domain>\.com isRegex: true - Disallow all remote mount points, leaving only
LOCALavailable.version: 'customization-v1.0' mountpoint: filter: - rule: deny predicate: type: pattern patterns: - .* isRegex: true
Define and exclude default mount points by ID
These configuration options allow defining and excluding default mount points. Note that default mount points are the set of initially-configured mount points when starting KNIME Analytics Platform. For example, setting the defaultMountpoint/enforceExclusion option will not prevent the user from interacting with "excluded" mount points, as these can be re-added afterwards.
/instance/org.knime.workbench.explorer.view/defaultMountpoint/defaultMountpoints=<mount id1>,<mount id2>,…
A comma separated list of default mount points that should be loaded,e.g. LOCAL,EXAMPLES,My-KNIME-Hub. Changes to this list only affects new workspaces, i.e. workspaces which already contain default mount points will still contain them even though they haven’t been defined here. If this option is absent and defaultMountpoint/enforceExclusion isn’t set to true then all default mount points will be added. The current default mount points are LOCAL, EXAMPLES, and My-KNIME-Hub.
/instance/org.knime.workbench.explorer.view/defaultMountpoint/enforceExclusion=<true|false>
If set to true then all default mount point not defined by /instance/org.knime.workbench.explorer.view/defaultMountpoint/defaultMountpoints will be removed on start up. Please note that if you want to use this option, the default mount points you want to include should only be listed in /instance/org.knime.workbench.explorer.view/defaultMountpoint/defaultMountpoints, and not in their full definition like when exporting the preferences.epf file from a KNIME Analytics Platform.
Update Sites
/instance/com.knime.customizations/updateSite.uris=<uri>,<uri>,…
Adds the provided addresses to the update sites.
/instance/com.knime.customizations/updateSite.names=<name>,<name>,…
The names that are shown under Available Software Sites for the provided update sites. Note that the number of names must match the number of provided URIs.
/instance/com.knime.customizations/updateSite.default.disable=<true|false>
Disables the default update sites added by KNIME after a fresh installation or update. If a user enables these update sites again they will remain enabled.
/instance/com.knime.customizations/updateSite.default.forceDisable=<true|false>
Disables the default update sites added by KNIME after a fresh installation or update. If a user enables these update sites again they will be disabled with the restart of their client.
Columnar Backend Memory configuration
The columnar backend makes use of off-heap memory to store data tables. The memory is managed by the columnar backend and is not part of the Java heap (which is configured via the Xmx setting). Therefore, the memory configured for the columnar backend must be taken into account to avoid out-of-memory errors.
Depending on the executor version, different preferences can be set.
KNIME Analytics Platform version 4.7.x
/instance/org.knime.core.data.columnar/knime.core.data.columnar.use-defaults=<true|false>
If true, the other preferences in this section are ignored.
/instance/org.knime.core.data.columnar/knime.core.data.columnar.small-cache-size=<size>
Size of cache for tables smaller than 1MB in MB. Example value: 32.
/instance/org.knime.core.data.columnar/knime.core.data.columnar.data-cache-size=2048
Size of cache for other tables in MB. Example value: 2048.
KNIME Analytics Platform version 5.x
/instance/org.knime.core.data.columnar/knime.core.data.columnar.off-heap-limit=<size>
Total off-heap memory limit in MB. Example value: 2048.
Make sure to configure the memory settings according to the available resources on the executor. Make sure to leave enough memory for the Java heap and other processes running on the executor.
The default configuration for 5.1.0 to 5.1.2 is to use all memory that is not reserved for the Java heap. This configuration is likely to cause the executor to crash with an Out Of Memory Exception. For the default heap size of 60% of the available memory, we recommend setting the off-heap limit to 20% of the available memory.
On executor images before 5.1.2 and 4.7.7, an unfavorable interaction between the JVM and the glibc native memory allocator can cause higher than expected memory usage when using the Columnar Table Backend. Set the environment variable
MALLOC_ARENA_MAX=1to prevent this issue. Also see, Columnar Backend High Memory Usage on Linux.
Proxy configuration
KNIME Analytics Platform has preferences to configure proxies platform-wide. More details on those, including the below-mentioned proxy providers, can be found here.
To distribute proxy configurations to executors, use the following settings in a preference (.epf) file.
/instance/org.eclipse.core.net/proxiesEnabled=<true|false>
If true, proxies are enabled. Setting this to false corresponds to using the Direct proxy provider.
/instance/org.eclipse.core.net/systemProxiesEnabled=<true|false>
If true, the Native proxy provider is active, otherwise the Manual proxy provider is active. All following preferences are only relevant in the context of manually configured proxies.
/instance/org.eclipse.core.net/nonProxiedHosts=<pipe-separated list of excluded hosts>
A pipe-separated list of host names that should permanently be excluded from the manually configured proxies. It usually makes sense to set localhost|127.0.0.1 as default here.
/instance/org.eclipse.core.net/proxyData/<HTTP|HTTPS|SOCKS>/host=<host>
The host name of the proxy server.
/instance/org.eclipse.core.net/proxyData/<HTTP|HTTPS|SOCKS>/port=<port>
The port of the proxy server.
/instance/org.eclipse.core.net/proxyData/<HTTP|HTTPS|SOCKS>/hasAuth=<true|false>
Whether the proxy requires authentication. Proxy credentials cannot be configured in preference (.epf) files but have to be supplied separately, as described below.
Proxy authentication
Configured proxy credentials are persisted in the Eclipse secure storage, which by default is located within the user’s home directory. It is encrypted using a master password.
If a proxy requires authentication (i.e. setting hasAuth=true), the secure storage is queried for that proxy host, in conjunction with the master password. This should work out-of-the-box on Windows, macOS, and Linux. However, KNIME Hub executors need additional configuration.
- The user’s home directory will not be resolved correctly when a KNIME Hub executor runs as system service, since it is not associated to a system user. Hence, the storage location must be configured explicitly as an application argument.
- Usually, either a UI prompt for the master password appears on KNIME startup, or the master password is sourced relative to the user’s home directory. Both are not feasible using a headless executor running as system service. Hence, the master password must also be configured as an application argument.
- Do not forget to restart the executor service after applying the following configuration changes.
Custom secure storage location
By default, the secure storage is stored in ~/.eclipse/org.eclipse.equinox.security/secure_storage where ~ denotes the user’s home directory. In order to configure a custom <storage location>, you have to set the following application argument in the execution context of the KNIME executor.
-eclipse.keyring
<storage location>
Custom secure storage password
To define a custom master password, you first need to disable active master password providers by deselecting all entries in the preferences at General > Security > Secure Storage. If this preferences page is not available for you in KNIME Modern UI, try switching to the preferences in the KNIME Classic UI.
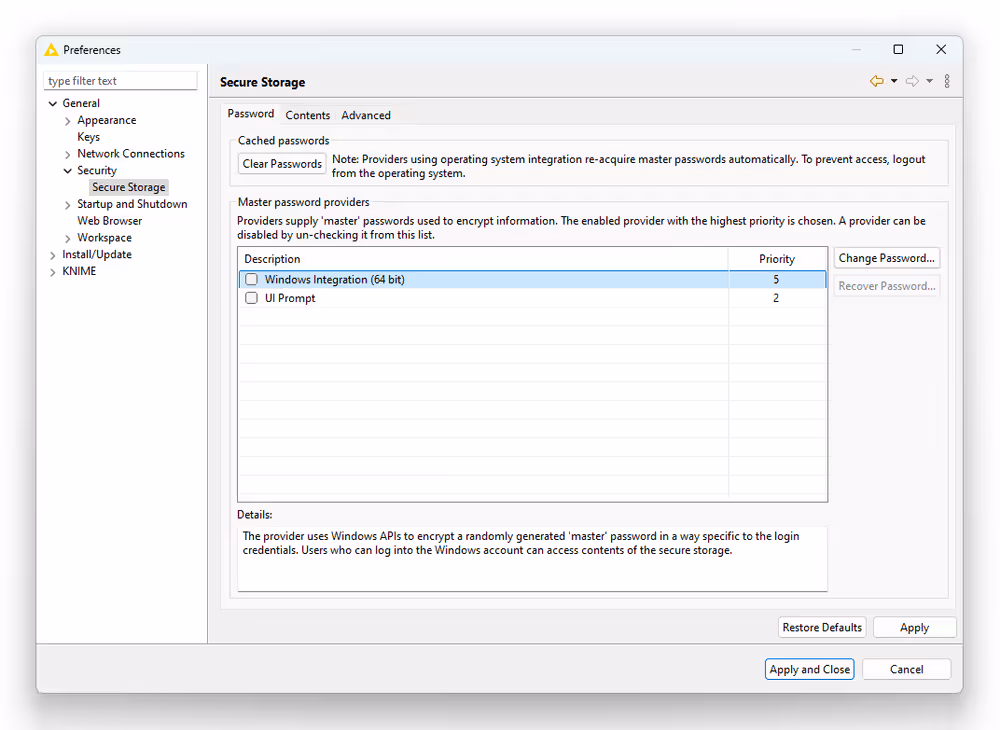
Alternatively — without using the UI — create the file <install-dir>/configuration/.settings/org.eclipse.equinox.security.prefs with the following content. Here, <install-dir> denotes the installation directory of the KNIME Hub executor. This file is generated for you if you disable the master password providers on the preferences page.
eclipse.preferences.version=1
org.eclipse.equinox.security.preferences.disabledProviders=org.eclipse.equinox.security.windowspasswordprovider64bit,org.eclipse.equinox.security.osxkeystoreintegration,org.eclipse.equinox.security.linuxkeystoreintegrationjna,org.eclipse.equinox.security.ui.defaultpasswordprovider
In order to configure a custom <password location>, you again have to set an application argument in the execution context. At this custom location, create a text file containing nothing but your new master password.
-eclipse.password
<password location>
Further details on proxies
More useful proxy configuration options are listed here.
Environment variables as fallback
Starting from KNIME version 5.3, environment variables are supported as fallback when choosing the “Manual” or “Native” proxy provider. This is the format required for the proxy environment variables.
<http|https|socks|all>_proxy=<user>:<password>@<host>:<port>In addition, the no_proxy variable defines a comma-separated list of hosts that are excluded from proxies defined in environment variables. Proxy authentication is directly specified via the user information prefix <user>:<password>@ in the variable value.
Prior to KNIME version 5.3, environment variables were supported as part of the “Native” proxy provider on Linux systems, with the only difference being that all_proxy was not supported there.
Specifically on Linux, we recommend using environment variables in conjunction with the “Native” proxy provider, given that you accept a less secure storage of proxy credentials. This method is simple and independent of users and configuration directories.
Bootstrapping customization profiles behind a proxy
If the profile location of the preferences themselves are hidden behind a network proxy, preferences obviously cannot be used to define the proxy configuration. For this case, the proxy has to be configured as a VM argument in the execution context using Java networking properties. This proxy is independent of proxy configurations mentioned above, and will not be used by the KNIME Hub executor for anything except fetching preference profiles.
- To use the equivalent of the “Manual” proxy provider, add the
-Djava.net.useSystemProxies=falseproperty and the required properties for your proxy configuration (see Java’s documentation). - To use the equivalent of the “Native” proxy provider, add the
-Djava.net.useSystemProxies=trueproperty. Unfortunately, it is a bit unclear what Java defines as system properties. We could not verify that environment variables work on Linux with this method. The Java documentation only provides this information about system proxies.
As stated in the Java SE 17 & JDK 17 docs, on Windows systems, macOS systems, and GNOME systems it is possible to tell the java.net stack, setting this property to true, to use the system proxy settings (all these systems let you set proxies globally through their user interface).
Upload a customization profile
After creating a customization profile, you need to upload it to KNIME Business Hub. You can do it via REST or via data application.
Upload via Data Application
If you have not done so already, on KNIME Business Hub, create an application password for the user uploading the profile.
- For global customization profiles, use a Hub admin user.
- For team-scoped customization profiles, the user can be either a Hub admin or a team admin user.
Download the workflow:
Click here and download the workflow.
Upload the downloaded workflow to your KNIME Business Hub instance.
Deploy the workflow as a data application. You can learn more about how to do it here. In the configuration dialog, you can set the application password and the Hub URL for the user uploading the customization profile.
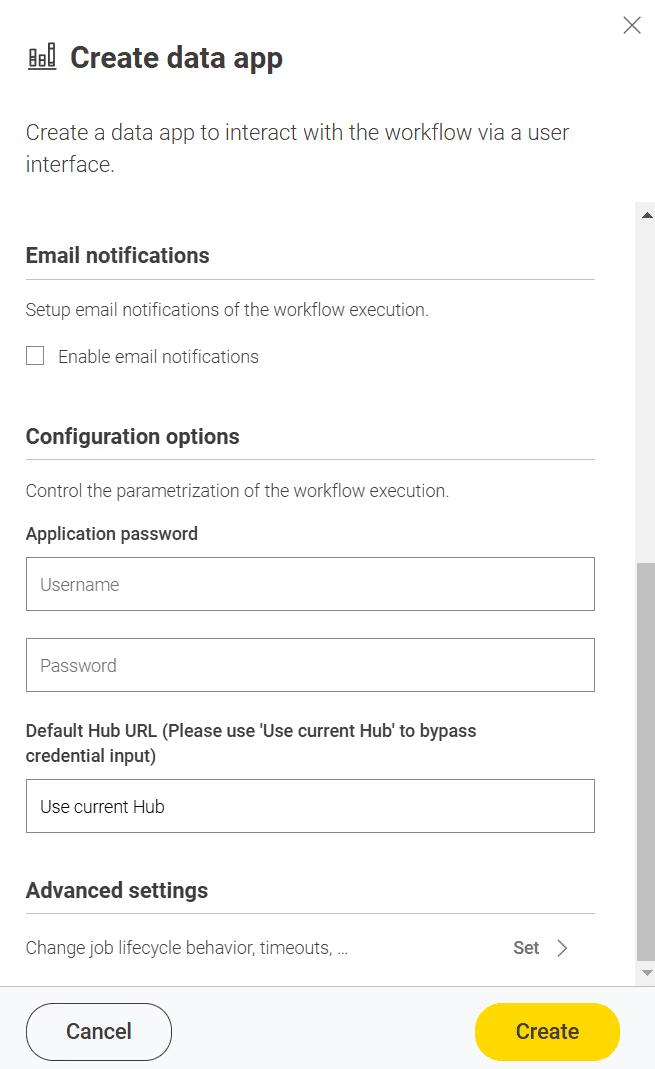
If you set the "Default Hub URL" configuration default value to "Use current Hub," user authentication on KNIME Business Hub will reflect the logged-in user’s permissions.
Since we configured the connection directly in the deployment configuration, the data application will, by default, open on the Customization Profile Operations page with the Upload option selected.
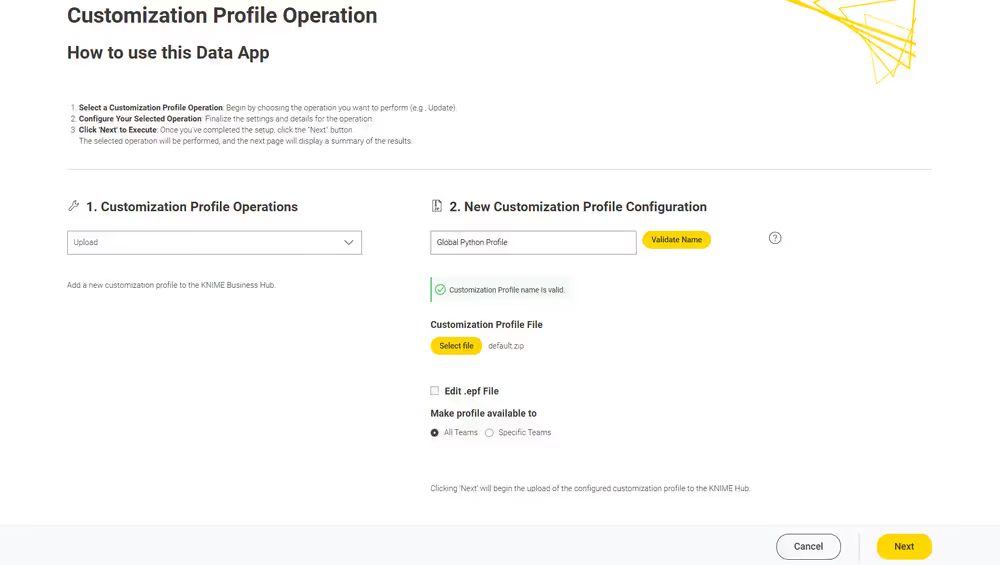
In the section New Customization Profile Configuration, you can configure your customization profile using the following steps:
Name Your Customization Profile: Provide a unique name for the customization profile.
- Use the Validate Name button to ensure no duplicate customization profile names exist, as uploading two with the same name is not allowed.
Upload Your File: Upload your customization profile file. Refer to the documentation for guidance on crafting a valid file.
Edit .epf File (Optional):
- Select the one you wish to edit if the uploaded ZIP file contains multiple
.epffiles. - You can edit content only for files with
.epfand.ymlextensions, as other file types are not editable within this data app.
- Select the one you wish to edit if the uploaded ZIP file contains multiple
Set Customization Type: Specify the type of customization profile:
Hub admin: You can choose the customization profile scope if logged in to the Data App as a Hub admin.
- Global scope: After being uploaded to KNIME Business Hub, the global customization profile can be applied to a shared or a team execution context.
- Team scope: When a customization profile with team scope is uploaded, it can be applied to the team’s executors. It is possible to upload the same customization profile to multiple teams. The Hub admin can upload the customization profile to any team.
Team Admin: If logged in as a team admin, you can only upload the customization profile as a team-scoped type. You can upload the same customization profile for multiple teams. The availability of teams is determined by the permissions of the user who is logged in.
On the Results page, a table displays the results of the customization profile upload operation.
If everything goes well, the column Results will show the value Success in green, indicating the operation was successful. You can now apply it to a KNIME Analytics Platform installation or to a KNIME Business Hub executor.
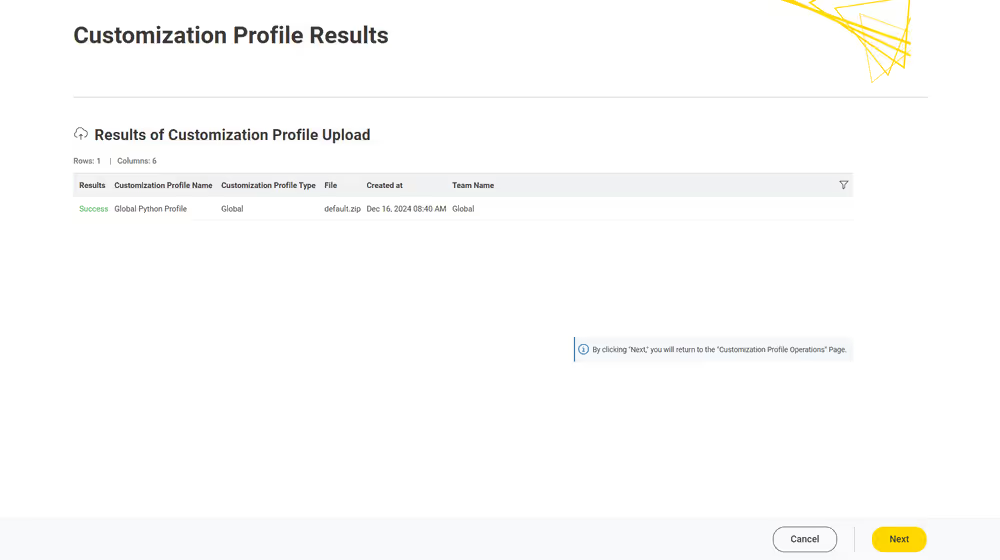
Error Handling: The data application is equipped to identify and display errors encountered during operations, whether they occur while retrieving data from the KNIME Business Hub API or executing actions via the API. Errors are captured both server-side and application-side and are displayed in the "Error Overview" table. This table provides a detailed summary, including:
The API call status code.
The error message.
The specific part of the data application where the error occurred.
Users can consult this table to diagnose issues and take appropriate corrective actions before retrying the operation.
Click Next to finish the operation.You can return to the Customization Profile Operations page to perform additional actions or close the data application directly.
Upload via REST request
If you have not done so already, on KNIME Business Hub, create an application password for the user uploading the profile.
- For global customization profiles, use a Hub admin user.
- For team’s customization profiles, the user can be either a Hub admin user or a team admin user.
Send a
POSTrequest tohttps://api.<base-url>/execution/customization-profileswith the following set up:Authorization: select Basic Auth, using username and password from the created application password
Body: select form-data as request body type and add the following entries:
Add a new key, set content to “File”. Name of the key needs to be “content”. The value of the key is the
.zipfile containing the profile, and the content type isapplication/zip.Add a new key, set content to “Text”. Name of the key needs to be “metadata”.
The value of the key is:
For global customization profiles enter:
{
  "name": "<profile_name>",
  "scope": "hub:global"
}
For team’s customization profiles you first need to obtain the
<team_ID>of the team you want to upload the customization profile to. To do so you can use the followingGETrequest:httpGET api.<base-url>/accounts/identityYou will find the
<team_ID>in the body response underteams:json"teams": [ { "id": "account:team:<team_ID>", "name": "<team_name>", ... } ]Then the value of the key is:
json{ "name": "<profile_name>", "scope": "account:team:<team_ID>" }Set the content type for the second key to
application/json
When using Postman there is no need to manually adjust the headers
Send the request
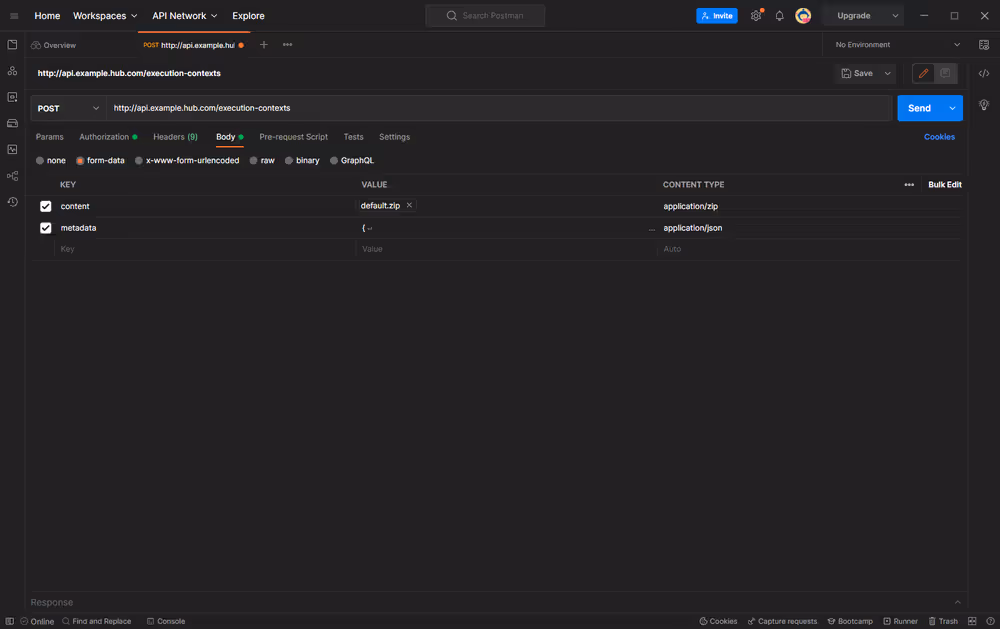
If successful, you will receive a 201 status response. Make note of the created
<profile_ID>, as this will be used to refer to the profile when requesting it.
You can refer to the API documentation at the following URL for more details about the different calls you can make to the Customization Profiles endpoint.
http
http://api.<base-url>/api-doc/execution/#/Customization%20ProfilesApply a customization profile
Apply a customization profile to KNIME Hub executor
Apply via Data App
To apply a customization profile to all executors running in a KNIME Business Hub execution context, we can use the data application. However, the type of user logged in affects the operations that can be performed. Refer to the table below for a comprehensive overview.
| User type | Available customization profiles | Customization profile scope | Applicable execution contexts |
|---|---|---|---|
| Hub admin | All customization profiles uploaded to the KNIME Business Hub instance | Global-scoped Team-scoped | Any execution context (shared or team-specific) Team execution contexts matching the profile's scope |
| Team admin | Only customization profiles uploaded to teams where the user has team admin privileges | Team-scoped only | Team execution contexts within the same scope as the customization profile |
To provide a better understanding of the table, here are some examples to demonstrate its functionality:
A Hub admin can choose one team-scoped customization profile and apply it to any team-scoped execution context within the KNIME Business Hub instance. For instance, the Hub admin can apply Team A’s customization profile to the team-scoped execution context of Team B.
A Hub admin can also select a Global customization profile and apply it to any shared and team-scoped execution context within the KNIME Business Hub instance.
A team admin can only choose team-scoped customization profiles uploaded within the teams with admin rights. For example, they can only apply a customization profile uploaded in Team A within the Team A execution contexts.
Learn how to download the data app from Community Hub, upload and deploy it in KNIME Business Hub, and authenticate with your application password in the Upload a customization profile section.
Select Apply in the Customization Profile Operation menu to apply a Customization Profile.
The table Potential Customization Profile-Context Combinations displays the possible combinations between the customization profiles accessible to the logged-in user and the available execution contexts.
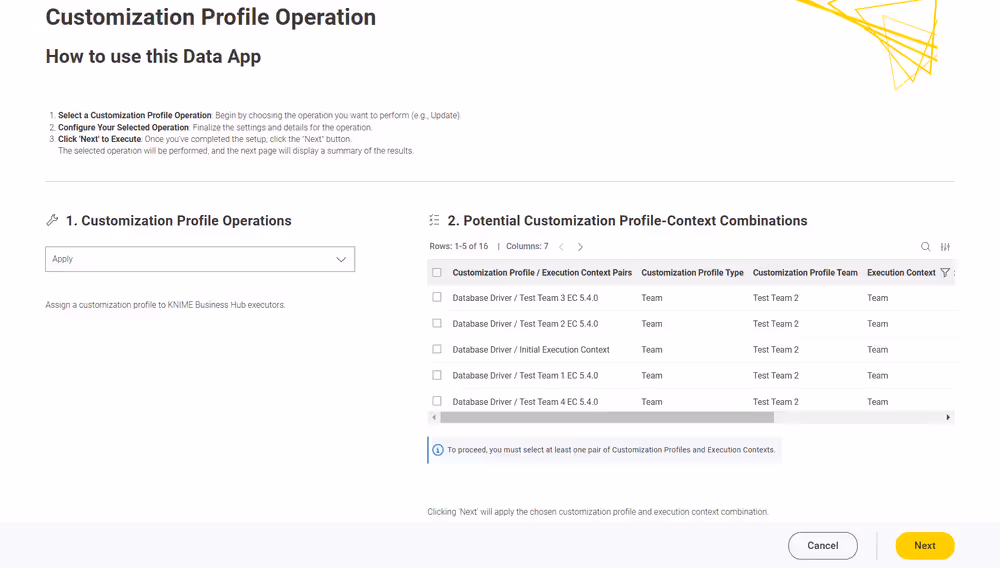
As mentioned above, a Hub admin can apply a team-scoped customization profile to multiple team-scoped execution contexts or a global customization profile to any execution context in KNIME Hub. This may lead to many options, so it’s advisable to use the table filters to narrow down the choices.
Select the desired pair of customization profile and execution context from the table, then click Next.
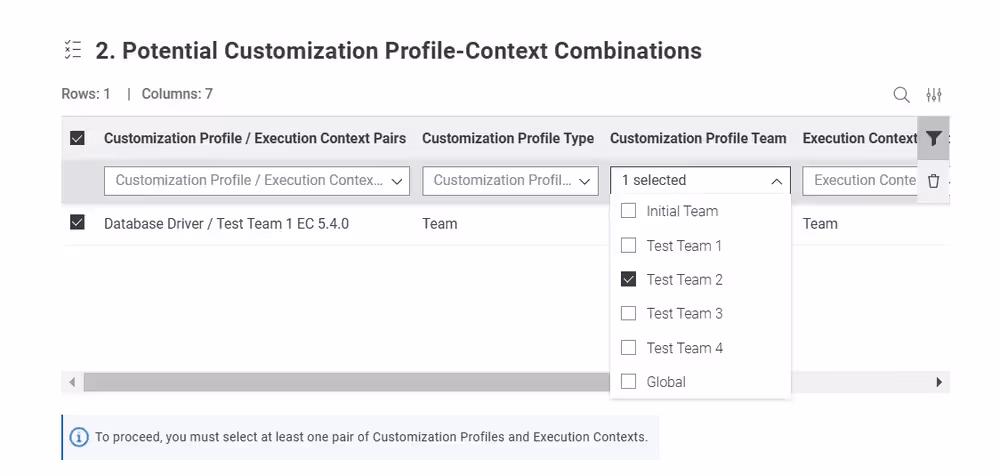
On the Results page, a table displays the results of the customization profile application operation.
If everything goes well, the column Results will show the value Success in green, indicating that your customization profile has been successfully applied to KNIME Business Hub executors for the selected execution contexts.
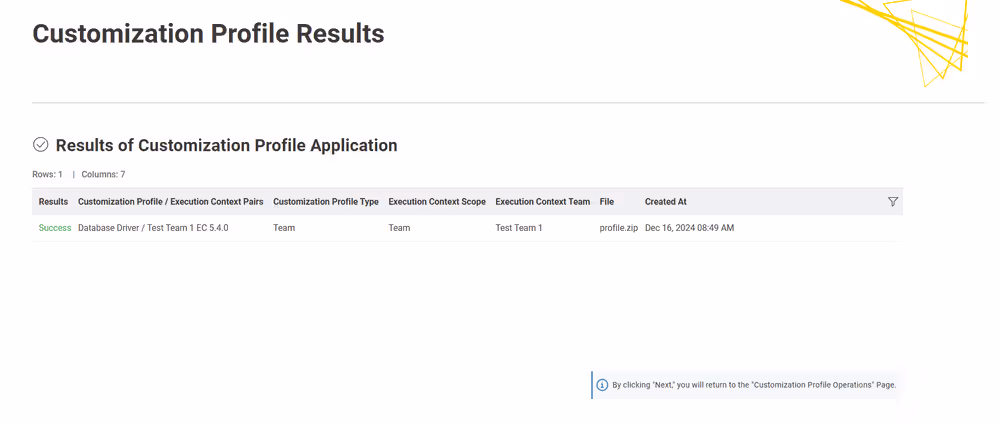
Error Handling: The data application is equipped to identify and display errors encountered during operations, whether they occur while retrieving data from the KNIME Business Hub API or executing actions via the API. Errors are captured both server-side and application-side and are displayed in the "Error Overview" table. This table provides a detailed summary, including:
The API call status code.
The error message.
The specific part of the data application where the error occurred.
Users can consult this table to diagnose issues and take appropriate corrective actions before retrying the operation.
Click Next to finish the operation.You can return to the Customization Profile Operations page to perform additional actions or close the data application directly.
Apply via REST request
In order to apply a customization profile to all executors running in a KNIME Business Hub execution context, you will need to send a request to the execution context endpoint.
First you need to get the execution context ID. To do so you can use the following GET request to get a list of all the execution contexts that are owned by a specific team:
http
GET api.<base-url>/execution-contexts/account:team:<team_ID>If you are a Hub admin you can also
GETa list of all the execution contexts available on the Hub instance with the callGET api.<base-url>/execution-contexts/.
Now you can apply the new customization profile to the selected execution context.
You will need to obtain the <profile_ID> using the following GET request:
- For global customization profiles:http
GET api.<base-url>/execution/customization-profiles/hub:global - For team’s customization profiles:http
GET api.<base-url>/execution/customization-profiles/account:team:<team_ID>Refer to the above section to find out how to get the
<team_ID>.
Then you need to update the execution context by using the following PUT request:
http
PUT api.<base-url>/execution-contexts/<execution-context_ID>You need to select Body > raw > JSON and add the following to the request body:
json
{
  "customizationProfiles": ["<profile_ID>"]
}
This will cause a restart of all executor pods of this execution context, after which the profile will be applied.
At present, this will also terminate all jobs currently running on the executor.
Update a customization profile
It is possible to update customization profiles uploaded to KNIME Business Hub. This can be done even if the customization profile has already been applied to the KNIME Business executor via execution context. You can update two features:
- The customization profile name.
- The customization profile zip file can be overwritten. Refer to the create a customization profile section to learn how to make one.
Update via Data Application
Users can use the customization profile data app to update customization profiles previously uploaded to the KNIME Business Hub.
Depending on the user’s role as a Hub admin or a Team Admin, they can access and update specific customization profiles:
- Hub admin: can update all uploaded customization profiles within the current KNIME Business Hub instance, either team or global-scoped customization profiles.
- Team Admin: can only update team-scoped customization profiles from their own teams.
Learn how to download the data app from Community Hub, upload and deploy it in KNIME Business Hub, and authenticate with your application password in the Upload a customization profile section.
Select Update in the Customization Profile Operations drop-down menu to update a customization profile.
A table titled Overview of Uploaded Customization Profiles will display a list of customization profiles available to the logged-in user. The table includes details such as:
- The type of profile (global or team-scoped).
- The upload location.
- The creation date.
- The file used for the upload.
Only one customization profile can be updated at a time.
After reviewing the table, select the profile you want to update from the "Select Customization Profile" drop-down menu. The format of the selection will appear as a
customization profile name (upload location).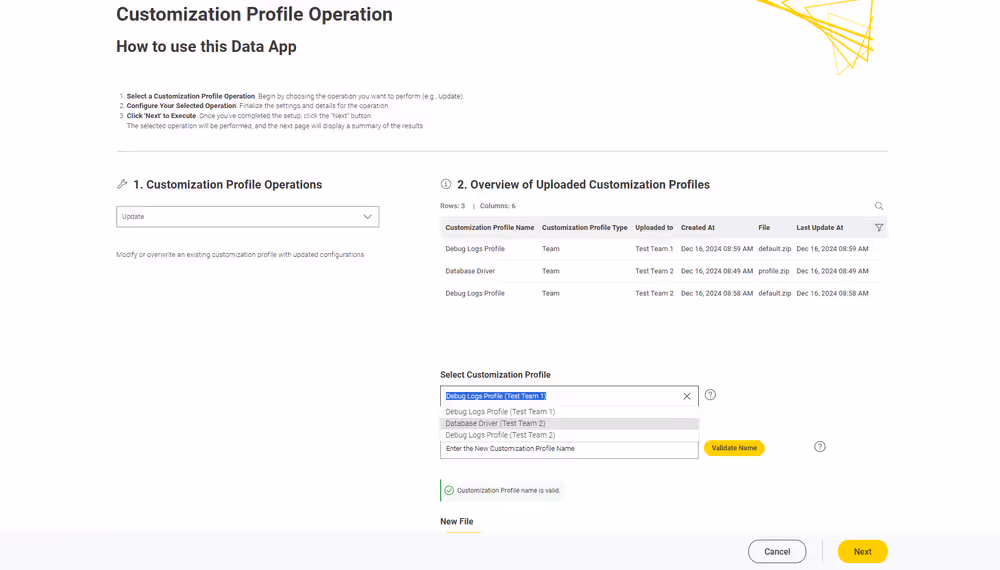
Once a profile is selected, you can:
Assign a new name to the customization profile.
Upload a new ZIP file for the customization profile.
If you choose "Edit .epf file", you can directly edit the content of files with
.epfor.ymlextensions within the data app. Other file types cannot be edited.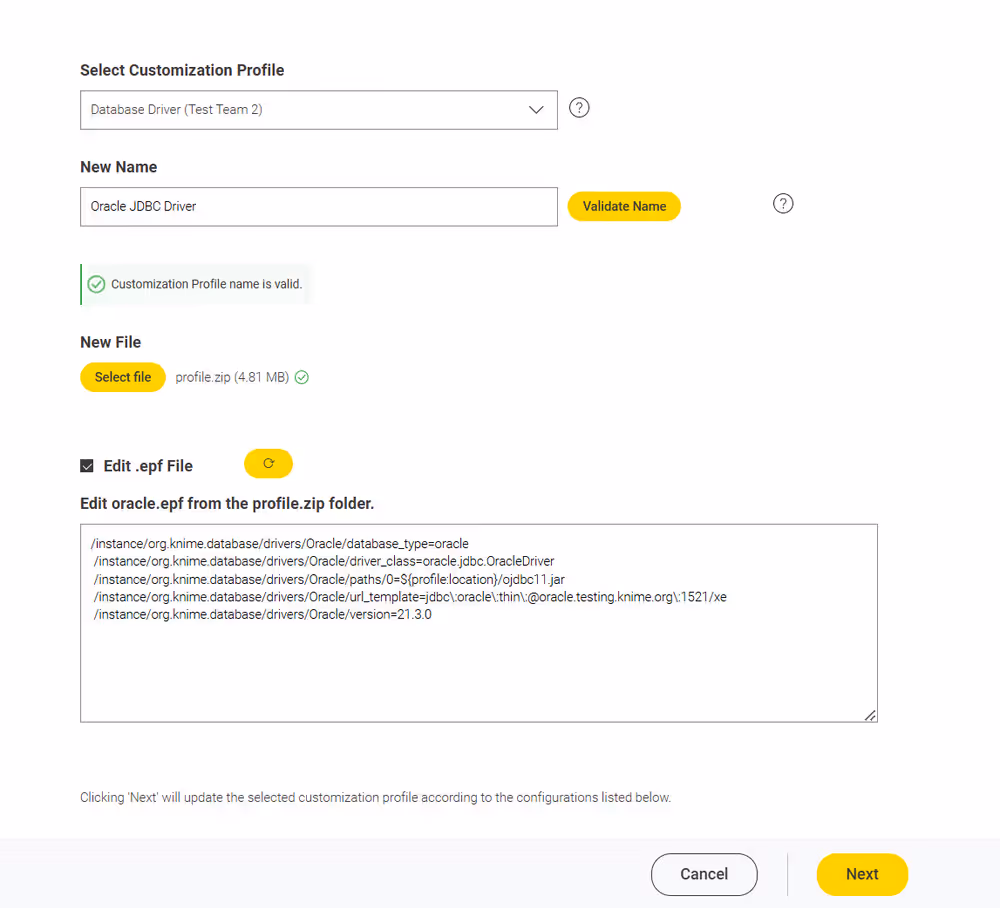
On the Results page, a table will display the outcome of the update operation: If successful, the "Results" column will show Success in green, indicating the update was applied.
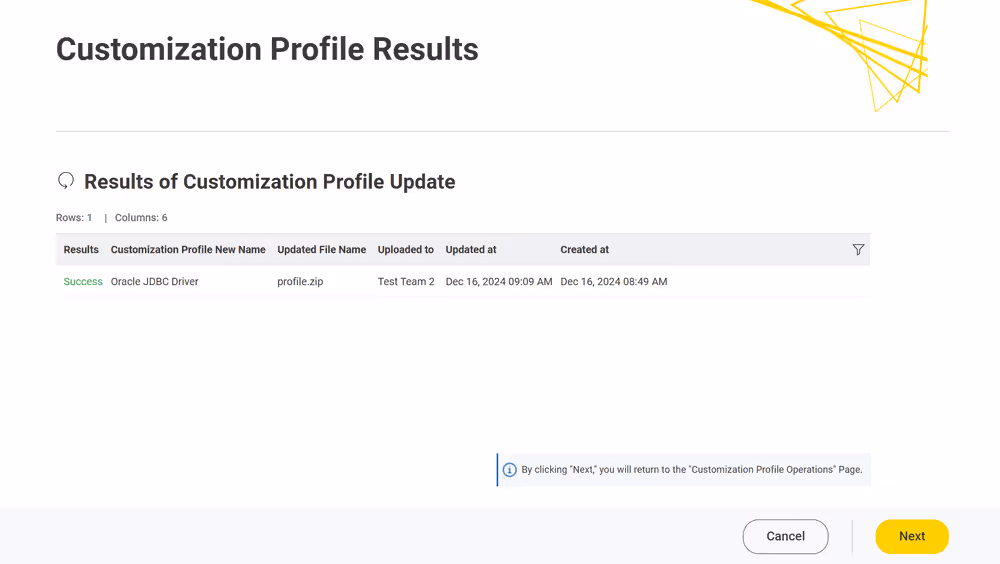
The updated customization profiles will be automatically applied to execution contexts or KNIME Analytics Platform clients using them.
Error Handling: The data application is equipped to identify and display errors encountered during operations, whether they occur while retrieving data from the KNIME Business Hub API or executing actions via the API. Errors are captured both server-side and application-side and are displayed in the "Error Overview" table. This table provides a detailed summary, including:
The API call status code.
The error message.
The specific part of the data application where the error occurred.
Users can consult this table to diagnose issues and take appropriate corrective actions before retrying the operation.
Click Next to finish the operation.You can return to the Customization Profile Operations page to perform additional actions or close the data application directly.
Update via REST request
Updating a customization profile is like replacing an existing profile with a new file and name.
If you want to update a customization profile via REST request, the process is similar to the uploading process. The only difference is that instead of a POST Request, you need to perform a PUT Request and specify the ID of the customization profile.
If you have not done so already, on KNIME Business Hub, create an application password for the user uploading the profile.
- For global customization profiles, use a Hub admin user.
- For team’s customization profiles, the user can be either a Hub admin user or a team admin user.
To begin, you will need to get the list of all uploaded customization profiles on KNIME Business Hub:
You can obtain the
<profile_ID>using the followingGETrequest:For global customization profiles:
httpGET api.<base-url>/execution/customization-profiles/hub:globalFor team’s customization profiles:
httpGET api.<base-url>/execution/customization-profiles/account:team:<team_ID>Updating a customization profile is similar to uploading it via a REST Request. However, unlike uploading, we only need to provide the name and file of the customization profile for updating. So, we don’t need to provide the scope as it remains the same.
- Send a
PUTrequest tohttps://api.<base-url>/execution/customization-profiles/<customization-profile-ID>with the following set up: - Authorization: select Basic Auth, using username and password from the created application password
- Body: select form-data as request body type and add the following entries:
- Add a new key, set content to “File”. Name of the key needs to be “content”. The value of the key is the
.zipfile containing the profile, and the content type isapplication/zip. - Add a new key, set content to “Text”. Name of the key needs to be “metadata”.
- The value of the key is the same for global and team-scoped customization profiles:json
{ "name": "<profile_name>" } - Set the content type for the second key to
application/json
- The value of the key is the same for global and team-scoped customization profiles:
- Add a new key, set content to “File”. Name of the key needs to be “content”. The value of the key is the
- When using Postman there is no need to manually adjust the headers
- Send a
Send the request
Detach a customization profile
It’s important to know that detaching a customization profile is not the same as deleting it. When you detach a customization profile, it isn’t removed from KNIME Business Hub. Instead, it just means that the customization profile won’t be applied to KNIME Analytics Platform or the KNIME Business executors.
However, the customization profile is still available in KNIME Business Hub, so it can be reused again whenever needed.
Detach a customization profile from a KNIME Business Hub executor
Detaching a customization profile applies only to those customization profiles applied to a KNIME Business Hub executor via execution context. Separating a customization profile from its execution context is the prerequisite step to deleting a customization profile from a KNIME Business Hub instance.
Detaching a customization profile from an execution context can also be done if the user no longer wants to apply the customization to the executors.
Detach via Data Application
The data application allows users to detach customization profiles applied to execution contexts in KNIME Business Hub.
For instructions on how to apply a customization profile to an execution context, refer to this section.
The customization profiles available for detachment depend on the user type:
- Hub admin: can detach all applied customization profiles within the current KNIME Business Hub instance, either team or global-scoped customization profiles.
- Team Admin: can only detach team-scoped customization profiles from their own teams.
Learn how to download the data app from Community Hub, upload and deploy it in KNIME Business Hub, and authenticate with your application password in the Upload a customization profile section.
Select Detach from the Customization Profile Operations drop-down menu to begin the detachment process.
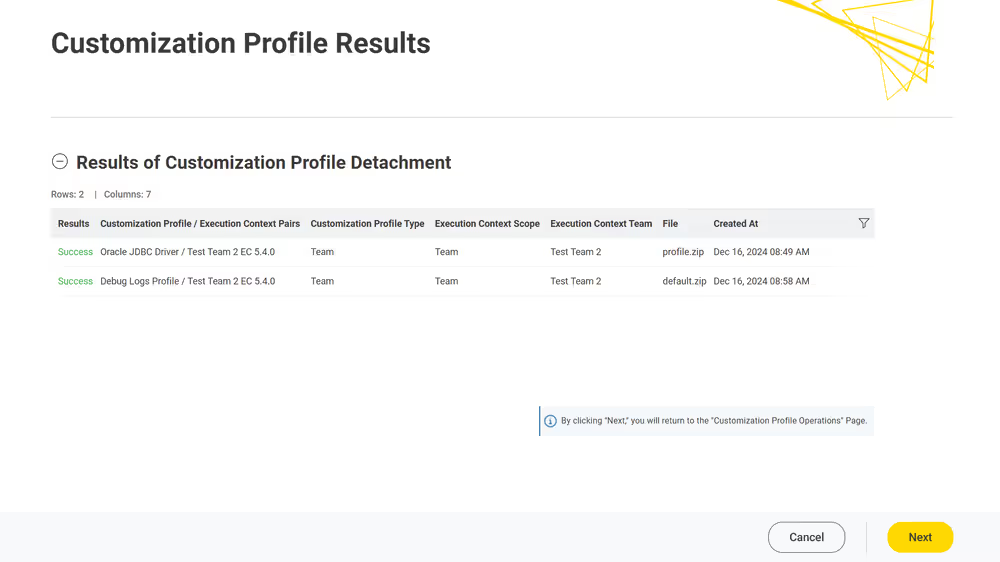
Use the table titled Customization Profiles Attached to Execution Contexts to select the desired customization profile and execution context pairs you wish to detach.
- Hub admins may encounter a large table with all possible combinations available for detachment.
- Use the provided filters to narrow the options, such as by filtering by customization profile upload location or execution context type.
You can select multiple customization profiles for detachment.
Ensure you select at least one customization profile and execution context pair from the table. Once you have made a selection, click "Next" to proceed.
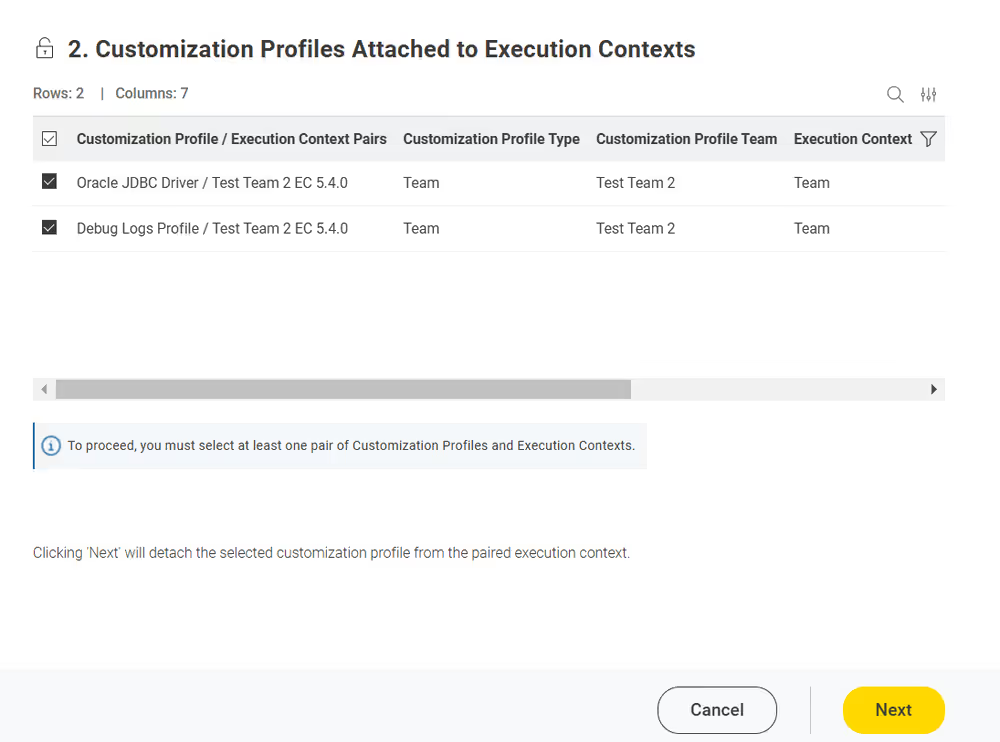
On the Results page, a table displays the outcome of the detach operation: If successful, the "Results" column will show Success in green, indicating the detachment was applied.
Detaching a customization profile from an execution context doesn’t remove it from the Business Hub or other execution contexts using the same profile.
Error Handling: The data application is equipped to identify and display errors encountered during operations, whether they occur while retrieving data from the KNIME Business Hub API or executing actions via the API. Errors are captured both server-side and application-side and are displayed in the "Error Overview" table. This table provides a detailed summary, including:
The API call status code.
The error message.
The specific part of the data application where the error occurred.
Users can consult this table to diagnose issues and take appropriate corrective actions before retrying the operation.
Click Next to finish the operation.You can return to the Customization Profile Operations page to perform additional actions or close the data application directly.
Detach via REST request
You can detach a customization profile from a KNIME Business Hub execution context, which is the inverse of applying it. The steps for detaching a customization profile are similar to applying one.
To detach a customization profile from all executors running in a KNIME Business Hub execution context, you must send a request to the execution context endpoint, not including the customization profile ID that you want to detach.
If you have not done so already, on KNIME Business Hub, create an application password for the user uploading the profile.
- For global customization profiles, use a Hub admin user.
- For team’s customization profiles, the user can be either a Hub admin user or a team admin user.
First, you need to get the execution context ID. To do so, you can use the following
GETrequest to get a list of all the execution contexts that are owned by a specific team:GET api.<base-url>/execution-contexts/account:team:<team_ID>If you are a Hub admin you can also
GETa list of all the execution contexts available on the Hub instance with the callGET api.<base-url>/execution-contexts/.Retrieve the existing customization profiles in the execution context from the above Get Request response. Look for a key in the JSON body similar to:
json"customizationProfiles" : [ "<customization-profile-ID_1>","<customization-profile-ID_2>" ]Now, you can detach the target customization profile from the selected execution context. To do so, you need to update the execution context by using the following
PUTrequest:httpPUT api.<base-url>/execution-contexts/<execution-context_ID>To detach a customization profile, e.g.
<customization-profile-ID_1>, from the target execution context, follow these steps. SelectBody > raw > JSONand ensure you do not include the customization profile you wish to remove. Use the syntax of the request body shown below:
json
{
  "customizationProfiles": ["<customization-profile-ID_2>"]
}- If the target execution context has only one customization profile attached, you can detach it by doing an empty request.json
{
  "customizationProfiles": []
}
Delete a customization profile
Deleting a customization profile from KNIME Business is a straightforward operation, and you can do it either through a REST request or the data application. Please follow the step-by-step guide below to understand how it works.
Please note that the type of user determines which customization profiles they can delete:
- Hub admin: can delete all customization profiles within the current KNIME Business Hub instance, either team or global-scoped customization profiles.
- Team Admin: can only delete team-scoped customization profiles from their own teams.
Deleting a customization profile from KNIME Business Hub requires first detaching it from any execution context where it was applied.
Please refer to the Detach a customization profile from a KNIME Business Hub executor section to understand how to detach a customization profile.
Delete via Data Application
Learn how to download the data app from Community Hub, upload and deploy it in KNIME Business Hub, and authenticate with your application password in the Upload a customization profile section.
Select Delete from the Customization Profile Operations drop-down menu to delete a customization profile from your KNIME Business Hub instance.
Review the table titled Customization Profiles Eligible for Deletion, which lists all customization profiles that can be deleted.
- Only customization profiles that are fully detached from all execution contexts are displayed in this table. Customization profiles still attached to execution contexts are excluded to prevent errors during the deletion process.
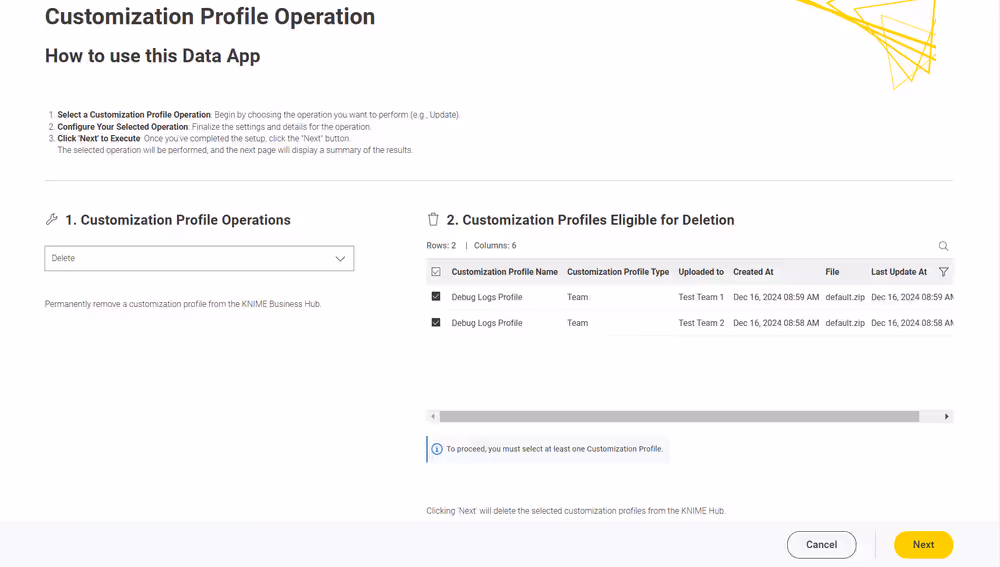
- Only customization profiles that are fully detached from all execution contexts are displayed in this table. Customization profiles still attached to execution contexts are excluded to prevent errors during the deletion process.
Select the customization profiles you want to delete from the table and click "Next."
- You can choose to delete multiple customization profiles at the same time.
Clicking "Next" will immediately delete the selected customization profiles from KNIME Hub. Ensure your selection is accurate before proceeding, as this action cannot be undone.
- You can choose to delete multiple customization profiles at the same time.
On the Results page, a table displays the outcome of the delete operation: If successful, the "Results" column will show Success in green, indicating the deletion was applied.
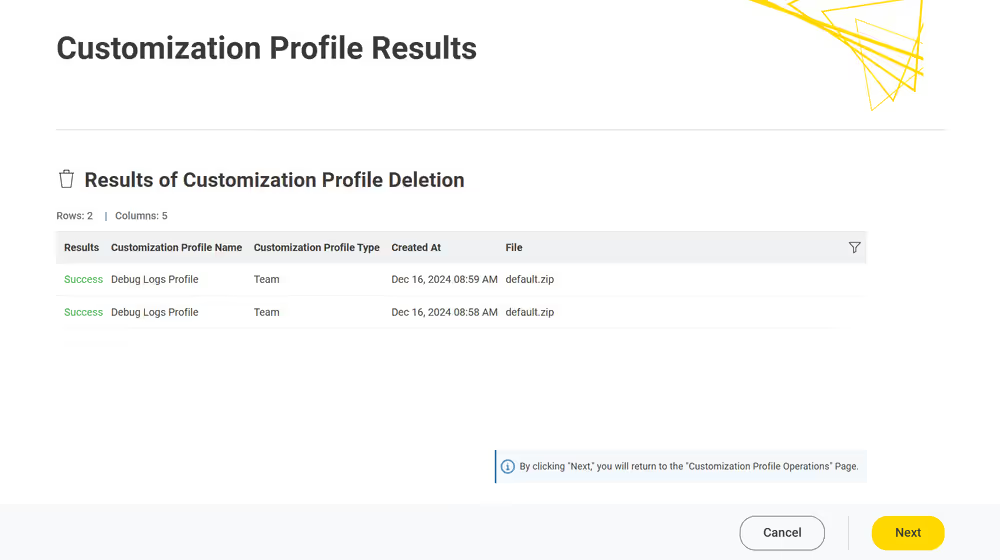
Error Handling: The data application is equipped to identify and display errors encountered during operations, whether they occur while retrieving data from the KNIME Business Hub API or executing actions via the API. Errors are captured both server-side and application-side and are displayed in the "Error Overview" table. This table provides a detailed summary, including:
The API call status code.
The error message.
The specific part of the data application where the error occurred.
Users can consult this table to diagnose issues and take appropriate corrective actions before retrying the operation.
Click Next to finish the operation.You can return to the Customization Profile Operations page to perform additional actions or close the data application directly.
Delete via REST request
Deleting a customization profile from KNIME Business Hub is possible via a REST request.
Below are the steps to accomplish this:
If you have not done so already, on KNIME Business Hub, create an application password for the user uploading the profile.
- For global customization profiles, use a Hub admin user.
- For team’s customization profiles, the user can be either a Hub admin user or a team admin user.
To start, you need to retrieve the list of the uploaded customization profiles to KNIME Business Hub:
You can obtain the
<customization_profile_ID>using the followingGETrequest:For global customization profiles:
httpGET api.<base-url>/execution/customization-profiles/hub:globalFor team’s customization profiles:
httpGET api.<base-url>/execution/customization-profiles/account:team:<team_ID>Refer to the above section to find out how to get the
<team_ID>.Once you have the
<customization-profile-ID>that you want to delete, perform a DELETE Request.- Send a
DELETErequest tohttps://api.<base-url>/execution/customization-profiles/<customization-profile-ID>with the following set up:- Authorization: select Basic Auth, using username and password from the created application password After a successful deletion, you will receive a 20* status code.
- Send a
KNIME GenAI Gateway (Enterprise edition only)
The GenAI Gateway allows team or global Hub admins to centrally configure GenAI models inside of the Business Hub which can then be accessed in KNIME workflows with dedicated nodes. The GenAI Gateway supports chat and embedding models which can be queried using the KNIME Hub LLM Selector and KNIME Hub Embedding Model Selector, respectively. The KNIME Hub AI Model Lister node displays all available models the authenticated user has access to. All nodes use the KNIME Hub Authenticator to connect to the Hub that is running the GenAI Gateway.
INFO
This is a feature of KNIME Business Hub - Enterprise edition.
Installation
For on-prem installations, you will need to enable it first. You can do so in the KOTS admin page by checking the Enable GenAI Gateway checkbox in the KNIME GenAI Gateway section.
TIP
If you have a KNIME Business Hub Enterprise license and the section is not shown, notify your KNIME contact person to update your license.
Model management
Models are managed via the KNIME Business Hub. This section focuses on how to view, create, edit, and organize models within teams or at the Hub admin level.
- To manage team models you have to navigate to the team page you want to manage the models for. Once you are on the team page select GenAI models from the menu on the left.
- To manage Hub admin models you have to navigate to the Hub administration page. Once you are on the administration page select GenAI models from the menu on the left.
The steps for creating, editing, and deleting team and admin models are the same and are described below. Only team admins can create team models and only Hub admins can create global models.
Create a new model
Models are added via the ![]() button which will open a sidepanel where the model configuration can be added. A model requires several key inputs:
button which will open a sidepanel where the model configuration can be added. A model requires several key inputs:
- Name – optional; if left empty, a default name (platform name + model name) is used.
- Platform – required; determines which additional fields appear.
- API key / Secret key – required for most providers (e.g., API key for OpenAI, secret key pair for Amazon Bedrock).
- Model name / Deployment name – required; identifies which model to use.
- Provider‑specific fields – required or optional depending on the provider (e.g., region for Bedrock, deployment name for Azure OpenAI, API Base URL for Hugging Face Hub).
After filling in the required fields, click the Create button to create the model. It will then appear in the models table, which displays all models you have access to, including those shared with your team.
Edit an existing model
To edit an existing model click the ![]() icon on the row corresponding to the model you want to edit, and then click Edit. This will open the edit menu bar where you can adapt the values of the model. To store the changes click the Save changes button. Please note that the the model type cannot be changed once created. To change the model type you need to create a new model.
icon on the row corresponding to the model you want to edit, and then click Edit. This will open the edit menu bar where you can adapt the values of the model. To store the changes click the Save changes button. Please note that the the model type cannot be changed once created. To change the model type you need to create a new model.
Delete a model
To delete an existing model click the ![]() icon on the row corresponding to the model you want to delete, and then click Delete.
icon on the row corresponding to the model you want to delete, and then click Delete.
Manage access to admin and team models
For admin and team models, selecting Manage access from the menu that opens when clicking the ![]() icon allows you to configure who can use or edit the model. The panel that opens lets you search for the team you want to share the model with.
icon allows you to configure who can use or edit the model. The panel that opens lets you search for the team you want to share the model with.
By default:
- Team members have use access only.
- Team admins have full access to models belonging to their team.
- Hub admins have full access to all admin‑level models (models in the admin GenAI models page).
When assigning permissions:
- Use access allows a team to use the model in KNIME workflows via the KNIME Hub LLM Selector or KNIME Hub Embedding Model Selector nodes.
- Edit access additionally allows the team to edit model properties or delete the model.
- Only team admins can create and edit models inside their team.
By default, the users in the team only have an access to use models, no editing allowed. Hub admin has full access to the models in the administration page, and can share those with groups and assign their permission level. Team admins by default has full access to their team models and can manage which teams can access their models. Team members only see models available to their teams or the models that are shared with their team.
Note: User‑level sharing is not supported; models can only be shared at the team level.
Model Platforms
The GenAI Gateway supports different model platforms, each requiring its own configuration details such as API keys, model types, or custom headers. In the following sections we describe the supported model platforms, and what configuration they require.
OpenAI
OpenAI is an AI research and deployment company most widely known for their ChatGPT chatbot. They also offer an API that provides access to their LLMs and embedding models.
- Supports both chat and embedding models.
- It requires the following parameters to be configured:
- Model: The name of the OpenAI model (for example
gpt-4.1,gpt-4o-mini, ortext-embedding-3-small). - API Key: A valid OpenAI API key.
- API Base URL: Custom API base URL (defaults to the standard OpenAI endpoint).
- Model: The name of the OpenAI model (for example
Azure OpenAI
Azure OpenAI provides access to OpenAI's GenAI models with the security and enterprise promise of Azure. It allows to manage details of deployed Azure OpenAI Resources and endpoints. This includes which region of the world the workloads are computed in and which models are deployed. For more details on the different configuration options please refer to the official documentation.
- Supports both chat and embedding models via Azure deployments.
- It requires the following parameters to be configured:
- Model: The Azure deployment name (for example
knime-o4-mini). This is used as the Model value. - API Key: One of the API keys of the deployment.
- API Base URL: The endpoint URL of the deployment. Should point to the Azure OpenAI resource endpoint.
- API Version: The API version of the deployment. Default API version is
2024-12-01-preview.
- Model: The Azure deployment name (for example
Amazon Bedrock
Amazon Bedrock is a service managed by AWS that provides access to a variety of GenAI models from different AI companies (for example Anthropic Claude or Amazon Titan).
- Supports both chat and embedding models.
- It requires the following parameters to be configured:
- Model: The Bedrock model name such as
anthropic.claude-3-5-sonnet-20240620-v1:0oramazon.titan-embed-text-v2:0. - AWS Access Key ID: The ID of the AWS access key to use for authentication.
- AWS Secret Access Key: The AWS secret key to use.
- AWS Region Name: The AWS region (for example
eu-central-1) in which to operate the resources.
- Model: The Bedrock model name such as
Google AI Studio
Provides access to Gemini chat and embedding models via the Google AI Studio API.
- Supports both chat and embedding models.
- It requires the following parameters to be configured:
- Model: The name of the model to configure prefixed with
gemini/(for examplegemini-2.5-flashortext-embedding-004). - API Key: A valid Google AI Studio API key.
- API Base URL (optional): Custom API base URL if required.
- Model: The name of the model to configure prefixed with
Anthropic
Anthropic is an AI company most well-known for their Claude models.
- Supports only chat models.
- It requires the following parameters to be configured:
- Model: The name of the model without any prefix, such as
claude-3-5-sonnet-20240620. - API Key: A valid Antropic API key.
- API Base URL (optional): Custom API base URL if required.
- API Version (optional): If the version is omitted, the gateway uses a default Anthropic version (
anthropic-version: 2023-06-01).
- Model: The name of the model without any prefix, such as
Hugging Face Hub
Hugging Face Hub is the platform for accessing open source GenAI models. It offers two different ways to access models:
Inference Providers
Via its Inference Providers API it provides access to a variety of LLMs and embedding models hosted by Hugging Face.
- Supports only chat models. See the documentation for details.
- It requires the following parameters to be configured:
- Model: The repository of the model (for example
meta-llama/Llama-3.2-3B-Instruct). - API Key: A valid Hugging Face API key.
- API Base URL: The base URL of the Inference Providers API (defaults to
https://router.huggingface.co/v1).
- Model: The repository of the model (for example
Dedicated Inference Endpoints
Hugging Face Hub also supports Dedicated Inference Endpoints as an easy way to quickly deploy a variety of LLMs and embedding models to the cloud of your choice.
- Supports both chat and embedding models.
- It requires the following parameters to be configured:
- Model: The repository of the model prefixed with
huggingface/. - API Key: A valid Hugging Face API key.
- API Base URL: The URL of the deployed endpoint.
- Model: The repository of the model prefixed with
Mistral AI
Mistral AI is an AI company that provides access to their LLMs via an API.
- Supports both chat and embedding models.
- It requires the following parameters to be configured:
- Model: The name of the Mistral model (for example
mistral-large-2512). - API Key: A valid Mistral AI API key.
- API Base URL: Custom API base URL (defaults to the standard Mistral endpoint).
- Model: The name of the Mistral model (for example
Ollama
Ollama is a local-first inference platform that allows running LLMs.
- Supports both chat and embedding models.
- It requires the following parameters to be configured:
- Model: The name of the Ollama model (for example
llama2:13b). - API Key: Not required for local deployments. To access remote Ollama Cloud models, a valid Ollama API key is needed.
- API Base URL: The base URL of the Ollama API (defaults to Ollama Cloud
https://ollama.com).
- Model: The name of the Ollama model (for example
OpenAI API‑Compatible Providers
Targets any endpoint that exposes an OpenAI‑compatible API (for example vLLM, LiteLLM, or other custom servers). Useful when you self‑host or proxy models but still want to reuse the OpenAI request format.
OpenAI's API is also used by a variety of other providers and by a number of inference solution that allow hosting your own model.
It requires the following parameters to be configured:
- Model: The name of the model.
- API Key: A valid API key for the provider if it requires one. For some providers that do not require authentication a placeholder value can be used.
- API Base URL: The base URL of the OpenAI-compatible API. This is required.
Create a collection (Enterprise edition only)
It is possible to create collections on your KNIME Business Hub instance.
KNIME Collections on KNIME Hub allow upskilling users by providing selected workflows, nodes, and links about a specific, common topic.
One example of a collection can be found on KNIME Community Hub here.
This is a feature of KNIME Business Hub - Enterprise edition.
In order to create a new collection page you need to be a Hub admin of your KNIME Business Hub instance.
The creation of a collection is possible via REST API, and a description of the different configurations can be found in your KNIME Business Hub API doc at the following URL:
http
https://api.<base-url>/api-doc/?service=catalog-service#/Collectionse.g. https://api.hub.example.com/api-doc/?service=catalog-service#/Collections.
In order to create a collection the items (i.e. workflows and nodes) that are collected need to be stored and accessible on the same KNIME Business Hub instance where collection is created.
To create the collection you will need then to build a json file with the schema that is available in the API doc in the Collections section, under the POST /collections request description.
The following is an example that would allow you to build a collection, similar to the one available on KNIME Community Hub here.
In the first section you can for example set up a title, a description, a so-called hero, which is the banner image at the top right of the example collection page, and tags:
json
{
  "title": "Spreadsheet Automation",
  "description": "On this page you will find everything to get started with spreadsheet automation in KNIME",
  "ownerAccountId": "account:user:<global-admin-user-id>",
  "hero": {
    "title": "New to KNIME?",
    "description": "Get started with <strong>KNIME Analytics Platform</strong> to import all the examples and nodes you need for spreadsheet automation right now!",
    "actionTitle": "Download",
    "actionLink": "https://www.knime.com/downloads"
  },
  "tags": [
    "Excel",
    "XLS"
  ],
Next you can add different sections and subsections, each with a title and a description, choose a layout, and select the itemType such as Space, Component, Workflow, Node, Extension, or Collection. For each of these items you will need to provide the id under which they are registered in your Business Hub installation.
The id for workflows, spaces, components, and collections can be build by taking the last part of their URL, after the ~, and adding a * at the beginning. For example, the following workflow on the KNIME Community Hub has URL https://hub.knime.com/-/spaces/-/latest/~1DCip3Jbxp7BWz0f/ so its id would be *1DCip3Jbxp7BWz0f. The id for node and extensions instead needs to be retrieved with a REST call, for example to the search endpoint of your KNIME Business Hub instance.
json
  "sections": [
    {
      "title": "Workflow examples",
      "description": "Some subtitle text here. Can have <strong>bold format</strong>",
      "iconType": "Workflow",
      "subsections": [
        {
          "title": "How to do basic spreadsheet tasks in KNIME",
          "description": "Some examples on how to do common things",
          "layout": "SingleColumn",
          "numberOfTeaseredItems": 2,
          "items": [
            {
              "title": "Click Here!",
              "itemType": "Link",
              "absoluteUrl": "https://knime.com"
            },
            {
              "id": "*SJW5zSkh1R3T-DB5",
              "itemType": "Space"
            },
            {
              "id": "*vpE_LTbAOn96ZOg9",
              "itemType": "Component"
            },
            {
              "id": "*MvnABULBO35AQcAR",
              "itemType": "Workflow"
            },
            {
              "showDnD": true,
              "id": "*yiAvNQVn0sVwCwYo",
              "itemType": "Node"
            },
            {
              "id": "*bjR3r1yWOznPIEXS",
              "itemType": "Extension"
            },
            {
              "id": "*QY7INTkMW6iDj7uC",
              "itemType": "Collection"
            }
          ]
        }
      ]
    }
  ]
}
KNIME Business Hub API documentation
Most KNIME Business Hub functionalities are also available via REST API allowing you to perform several actions.
You can access the API documentation by navigating to the following URL:
api.<base-url>/api-docwhere <base-url> is your Business Hub instance URL, e.g. hub.example.com.
Here you can select from the drop-down menu the service you want to use.