
Business Hub Advanced Admin Guide
This guide covers the advanced administration of KNIME Business Hub. The topics covered are intended for the Hub administrator of a KNIME Business Hub instance on-prem (customer-managed).
On-prem installation
To install a KNIME Business Hub please refer to one of the following guides depending on your installation scenario:
- KNIME Business Hub Installation Guide - Embedded Cluster
- KNIME Business Hub Installation Guide - Existing Cluster
- KNIME Business Hub Installation Guide - Existing OpenShift Cluster
Advanced users management
Delete a user
To delete a user:
- Delete the user from the KNIME Business Hub Administration page. Click the three dots and select Delete. You will need to confirm the user deletion in the window that opens by clicking Delete user. Be aware that this action will also delete all data from the deleted user and it will not be possible to restore the user.
- Delete the user from Keycloak. Follow the steps in the next section to access Keycloak and manage users.
Access Keycloak for users management
First you will need to access the Keycloak admin console. To do so you will need the credentials that are stored in a kubernetes secret called
credential-knime-keycloakin the<business-hub-namespace>namespace. To get the required credentials, you need to access the instance the Business Hub is running on and run the following command:kubectl -n knime get secret credential-knime-keycloak -o yamlThis will return a file that contains the
ADMIN_PASSWORDand theADMIN_USERNAME. These files are bothbase64encrypted. In order to get the decrypted username and password, you can run the following commands:echo <ADMIN_PASSWORD> | base64 -d echo <ADMIN_USERNAME> | base64 -dThen go to
http://auth.<base-url>/auth/and log in.
Types of admin roles
On KNIME Business Hub two different types of Hub admins are available:
- Global Hub admin
- Management admin
Any user with these roles can:
- Create and delete teams
- Allocate execution resources
- Allocate team seats
- Designate the initial team admin
- See users list and delete users
- See license overview page
However, a user with assigned management admin role can not explicitly see a team's private spaces, its deployments, or any jobs.
During installation, a user with the Hub admin role is created. After installation is done you can then either change that user's role to management admin, or leave the Hub admin as is, and assign the management admin role to a new user.
In order to do so you can follow the instruction in the next section.
Make a user Hub admin
The operation of promoting a registered user to the role of Hub admin is done in Keycloak.
To promote a user to Hub admin role, follow these steps:
First, access Keycloak admin console by going to
http://auth.<base-url>/auth/and logging in.Follow the instructions in the section Access Keycloak for users management if you need to retrieve Keycloak credentials.
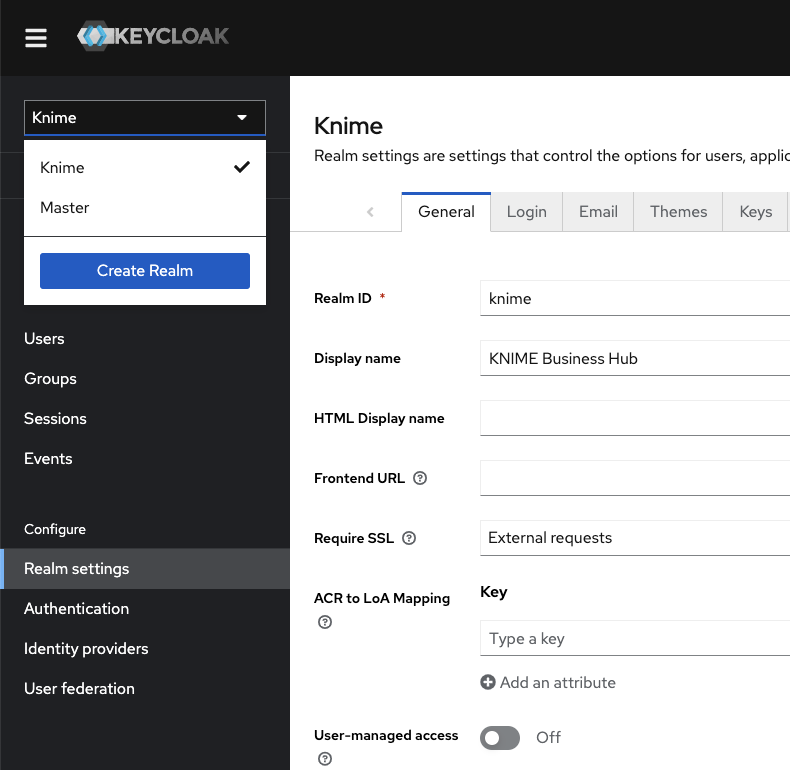
In the top left corner click the dropdown and select the "Knime" realm, if you are not there already.
Navigate to the Users menu and search for the user by name or email:
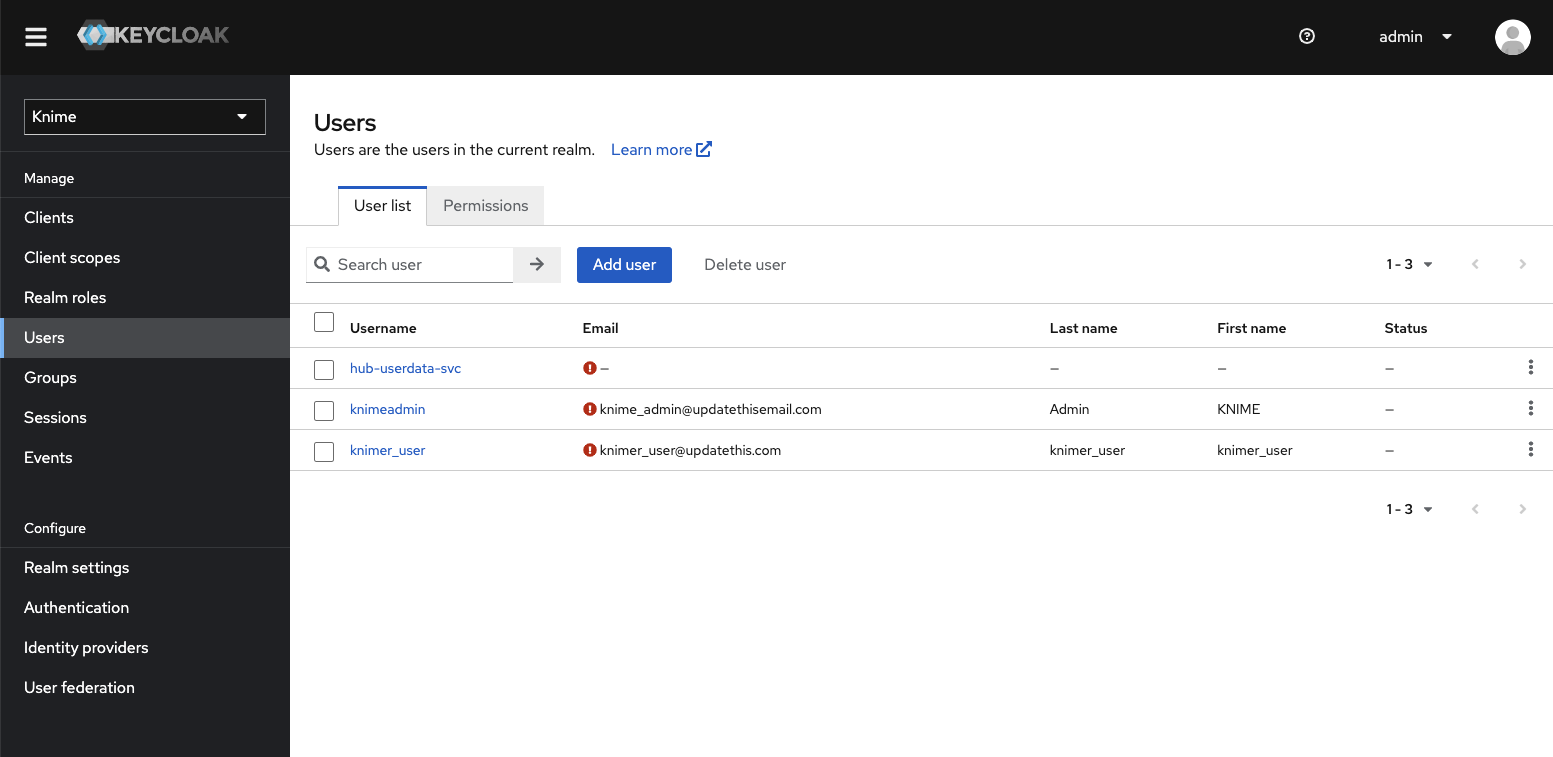
In order for a user to appear in this list, it is necessary that they have logged into your KNIME Business Hub installation at least once.
Click the user and go to the Groups tab. Click Join Group and either expand the hub group by clicking it, or search for "admin". Select the admin group you want (Hub admin or management admin) and click Join:
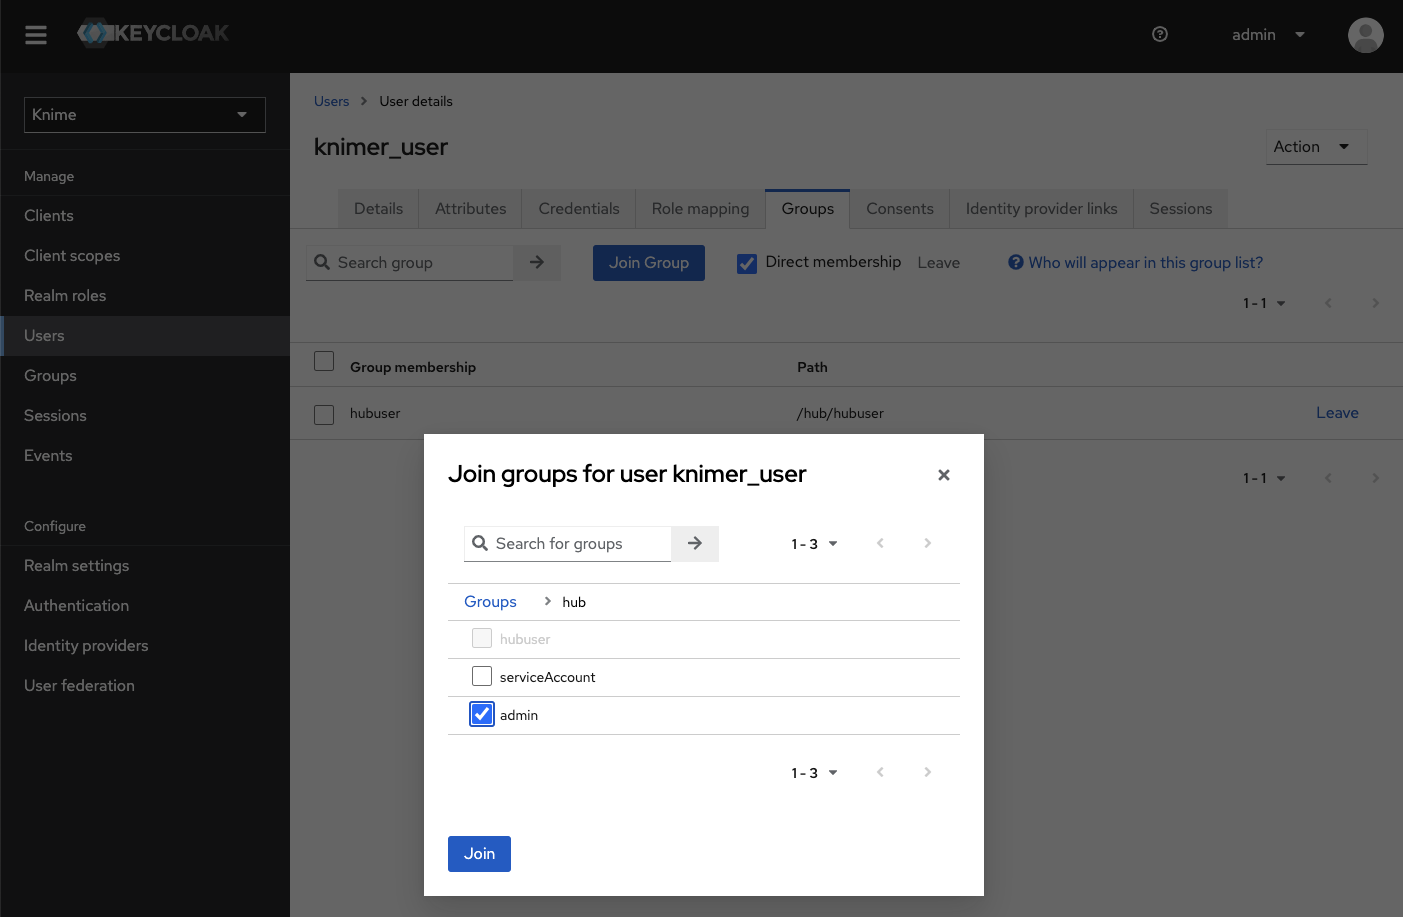
Done. The user now has the role of Hub admin, and can access the admin pages from within the Hub application to e.g., create teams or delete users.
Provisioning users and groups with SCIM (Enterprise and Standard edition only)
The System for Cross-domain Identity Management (SCIM) is an open industry standard for provisioning users and groups from an identity provider to an application. In contrast to authentication protocols such as OpenID/OIDC, a SCIM client in the identity provider actively pushes information about user and groups to the application.
This allows you to create users in KNIME Business Hub without them having to log in first. You can then assign them to teams or share deployments with them. In addition, groups can be provisioned with SCIM as well. They become external groups in KNIME Business Hub. In combination with the nested groups feature they allow you to automatically assign users to teams based on group memberships in the identity provider.
You can enable SCIM on a KNIME Business Hub installation that already contains users. Existing KNIME Business Hub user accounts will be matched with accounts provisioned by SCIM based on the username and e-mail address.
If your usernames in the identity provider are e-mail addresses you likely have created a mapper in Keycloak that removes the domain part because previous KNIME Business Hub releases did not allow usernames to contain the @ character. This has changed for version 1.10 so that SCIM clients can provision users with e-mail addresses as usernames without issues. However, this also means you have to disable/remove the corresponding mapper in Keycloak, otherwise the username created by SCIM does not match the username in the authentication token provided by Keycloak. After you have removed the mapper, existing accounts in KNIME Business Hub will automatically be updated when the user logs in the next time.
We have tested and hence support SCIM with Okta and Microsoft Entra ID as SCIM clients. Other SCIM clients may work as well but as the SCIM protocol is pretty extensive therefore there may be edge-cases which we haven't covered.
Create a SCIM application password
The first step for any kind of SCIM client is to create a dedicated application password with which the SCIM client authenticates against your KNIME Business Hub installation. This must be done by an administrator and can best be performed using the Swagger UI.
Log into your KNIME Business Hub installation as an administrator user.
Open the OpenAPI documentation of the account service functionality, which is available at
https://api.<base-url>/api-doc/?service=accounts-serviceGo to the SCIM section, expand the
POSTrequest box, click Try it out, and then click Execute.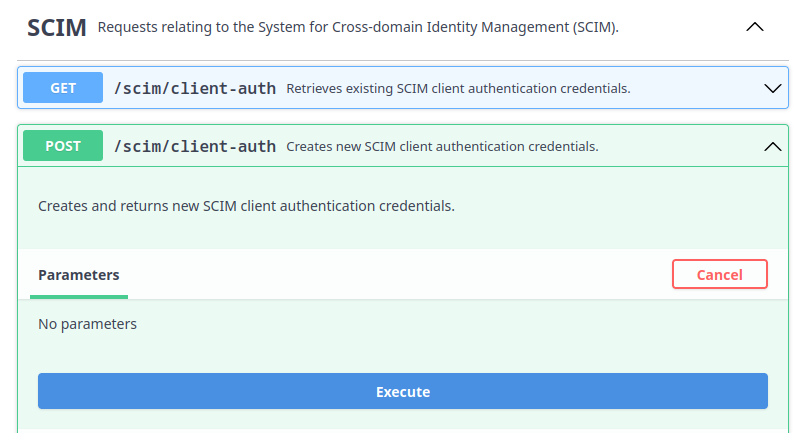
The result will be displayed below the button. It contains a
pwId, apassword, and anauthToken. For Okta as a SCIM client you will need thepwIdand thepassword. For Microsoft Entra ID you will need theauthToken. Please note down these values in a safe place because you will not be able to retrieve them again without deleting and re-creating the SCIM application password.
Configure Okta as a SCIM client
In order to set up Okta as a SCIM client for KNIME Business Hub, follow Okta's documentation about Adding SCIM provisioning to app integrations.
It is currently not possible to add SCIM to an OIDC app integration in Okta. But you can simply create a second integration for your KNIME Business Hub installation that is only responsible for provisioning via SCIM. For this create a SWA app integration as part of Task 1 of the documentation.
When you configure the SCIM Connection of the app integration, provide the following values:
- Use
https://api.<your hub domain>/accounts/scim/v2as the SCIM connector base URL. - Use userName as Unique identifier field for users.
- Select all options for Supported provisioning actions.
- Select Basic Auth as Authentication Mode.
- From the application password created earlier use the
pwIdvalue as Username and thepasswordvalue as Password.
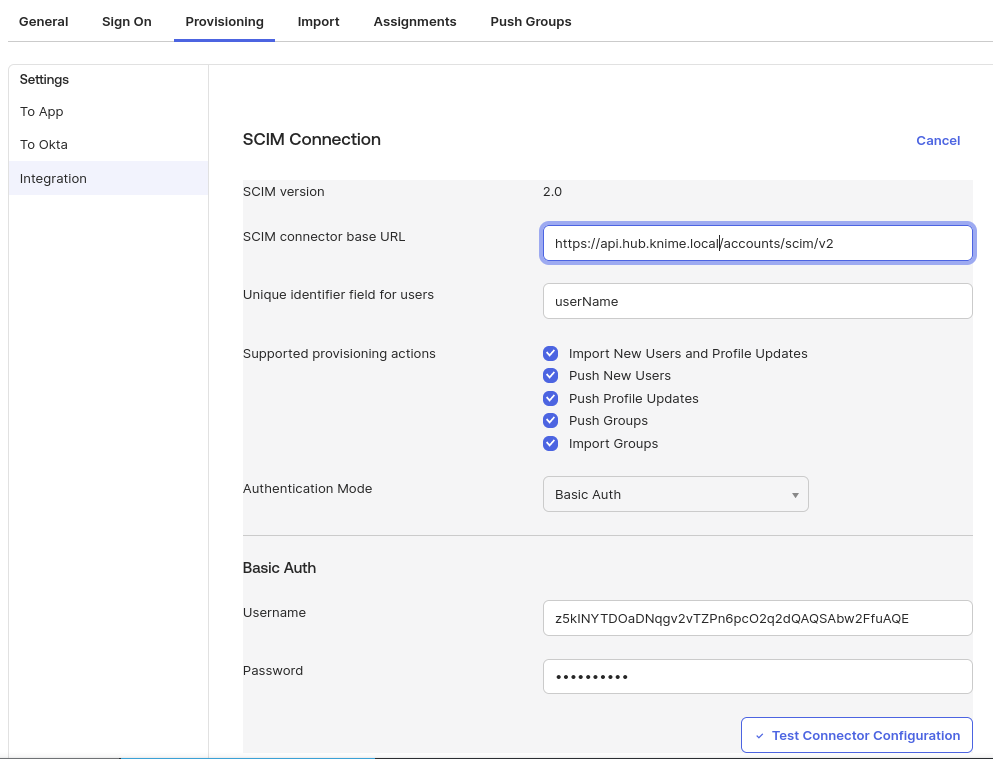
After that you can assign users and/or groups to the application in the Assignments tab. Provisioning of the respective users will start automatically shortly afterwards. Likewise, group provisioning can be configured in the Push Groups tab.
Configure Microsoft Entra ID as a SCIM client
In order to set up Microsoft Entra ID as a SCIM client for KNIME Business Hub, follow Microsoft's documentation about Integrating your SCIM endpoint with the Microsoft Entra provisioning service.
When you configure the Provisioning details of the Enterprise application, provide the following values:
- Use
https://api.<your hub domain>/accounts/scim/v2as the Tenant URL - Use the
authTokenvalue from the application password created earlier as the Secret Token
No changes are required in the Mappings section.
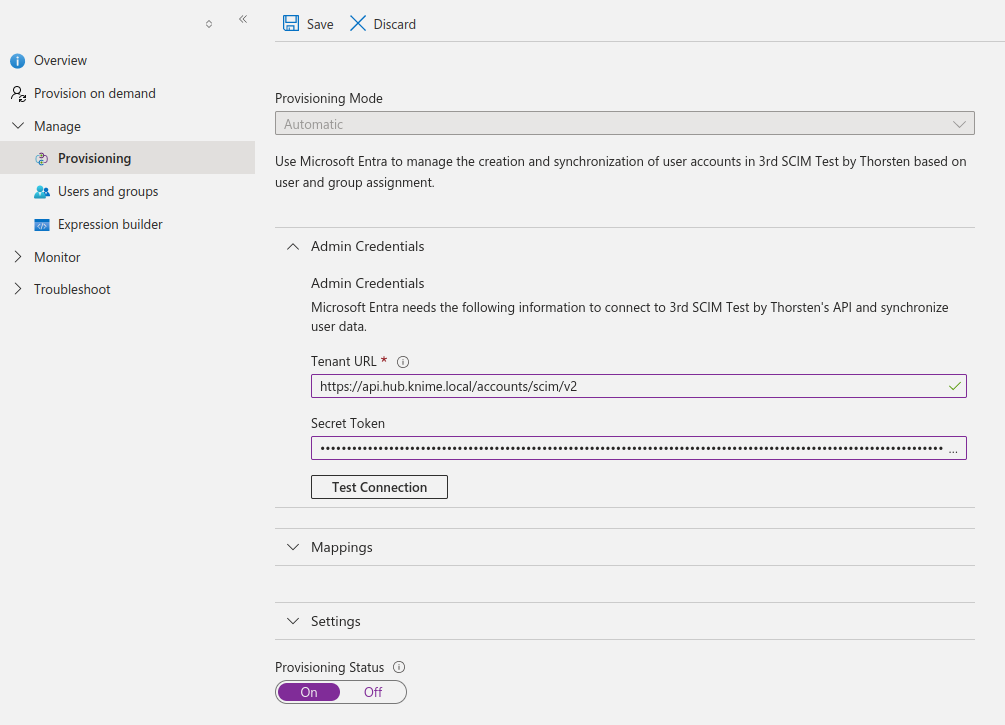
With Entra ID provisioning can take a long time, depending on the number of users and groups. For example, 250 users and 30 groups take about 40 minutes.
If your KNIME Business Hub installation is not reachable by Entra ID due to network restrictions, you can follow Microsoft's instructions about Configuring the connection via the provisioning agent
Assign user to teams based on external groups
If you have provisioned groups from your identity provider to KNIME Business Hub you can use these external groups to manage team memberships. Once changes to group memberships in the identity provider have been provisioned to KNIME Business Hub they will immediately be reflected in team memberships. This also allows you to assign users to teams before they have logged in.
Assigning a consumer account to a team requires a free user seat license. If there are no more unused user seats available in your KNIME Business Hub installation, the assignment will fail. If your license comes with an unlimited number of users this issue will not affect your installation. In case sufficient user seats are available, team sizes are adjusted automatically when using SCIM.
In order to assign team membership based on an external group, you have to add the external group as a nested group to the team's accountMember group.
Currently, you can accomplish this by:
- Using API calls, such as through the Swagger UI that you used to create the SCIM application password.
- By using a dedicated data application deployed in your KNIME Business Hub instance.
Assign users based on external groups via API calls
Follow these steps in order to add an external group as a nested group to a team group:
Find the team's ID. You can search teams by their name and then get the ID from the
idfield in the response.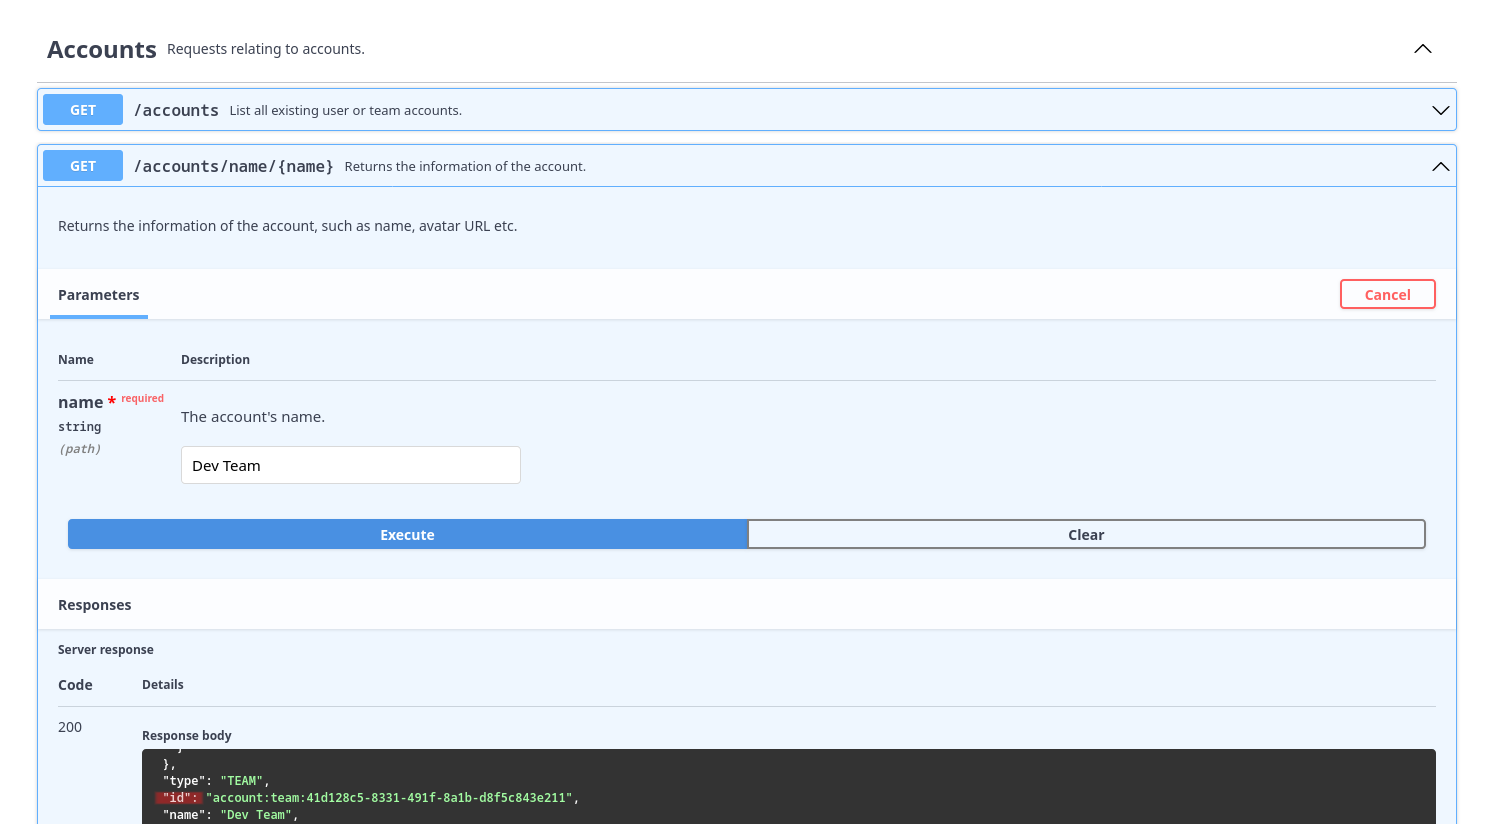
Find the external group's ID. Since the external group's name in KNIME Business Hub may not be exactly the same as in the identity provider, the easiest way is to list all external groups, select the right one based on its
displayName, and note down itsid.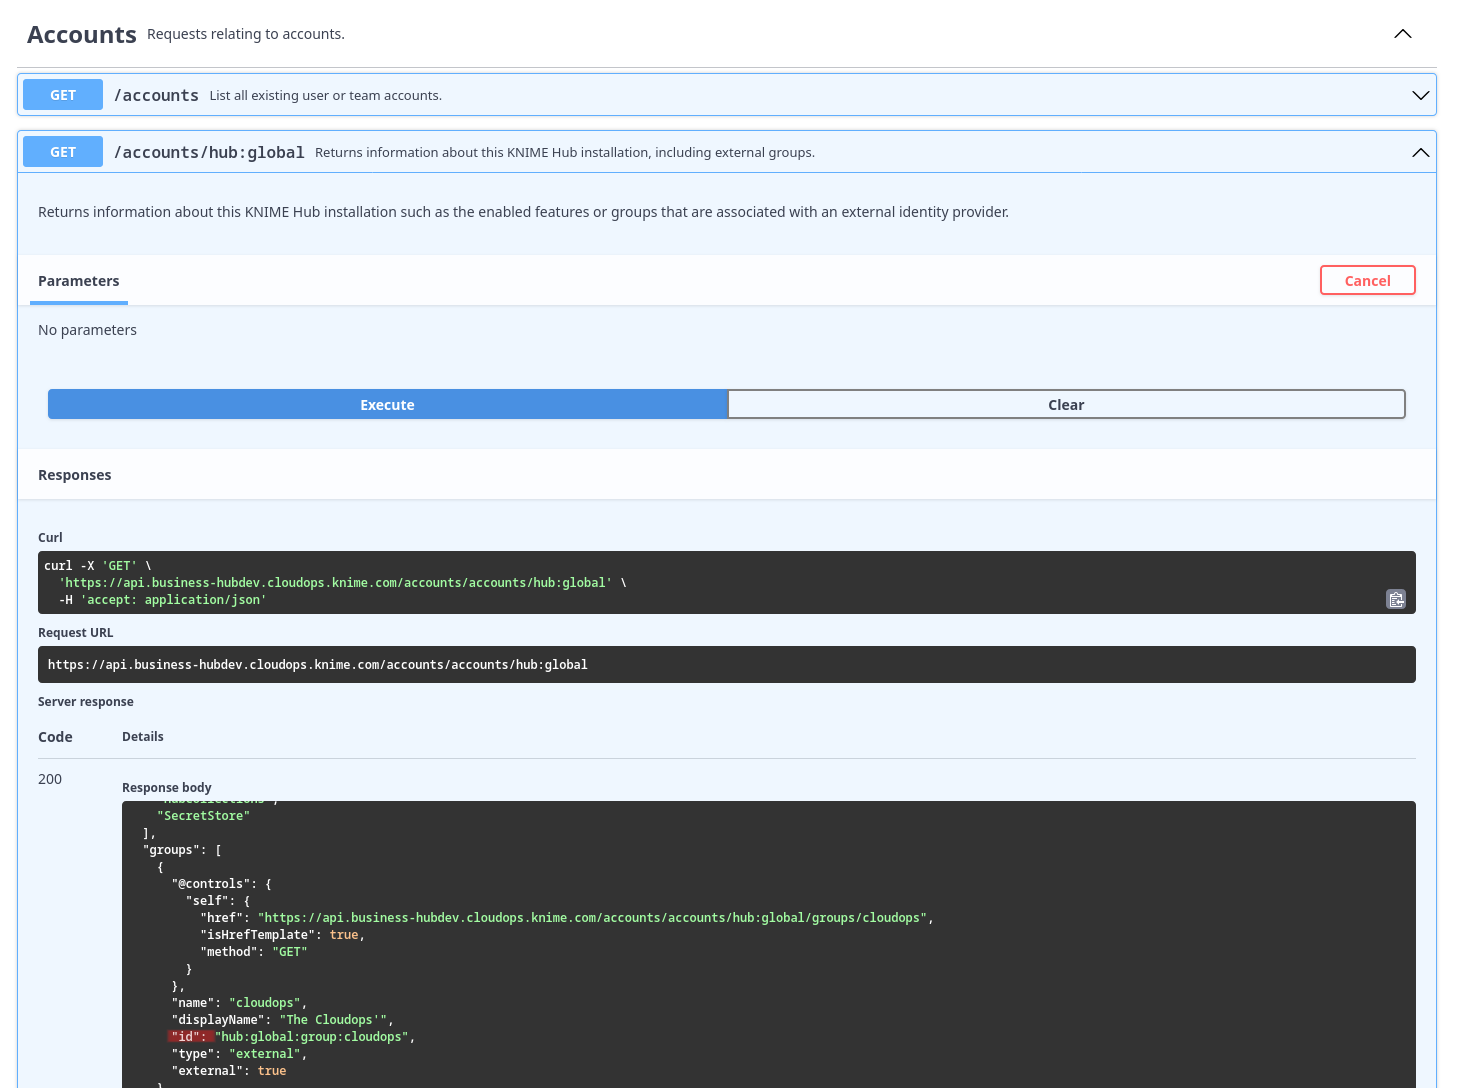
Add the external group as a member to the accountMember group of the desired team.
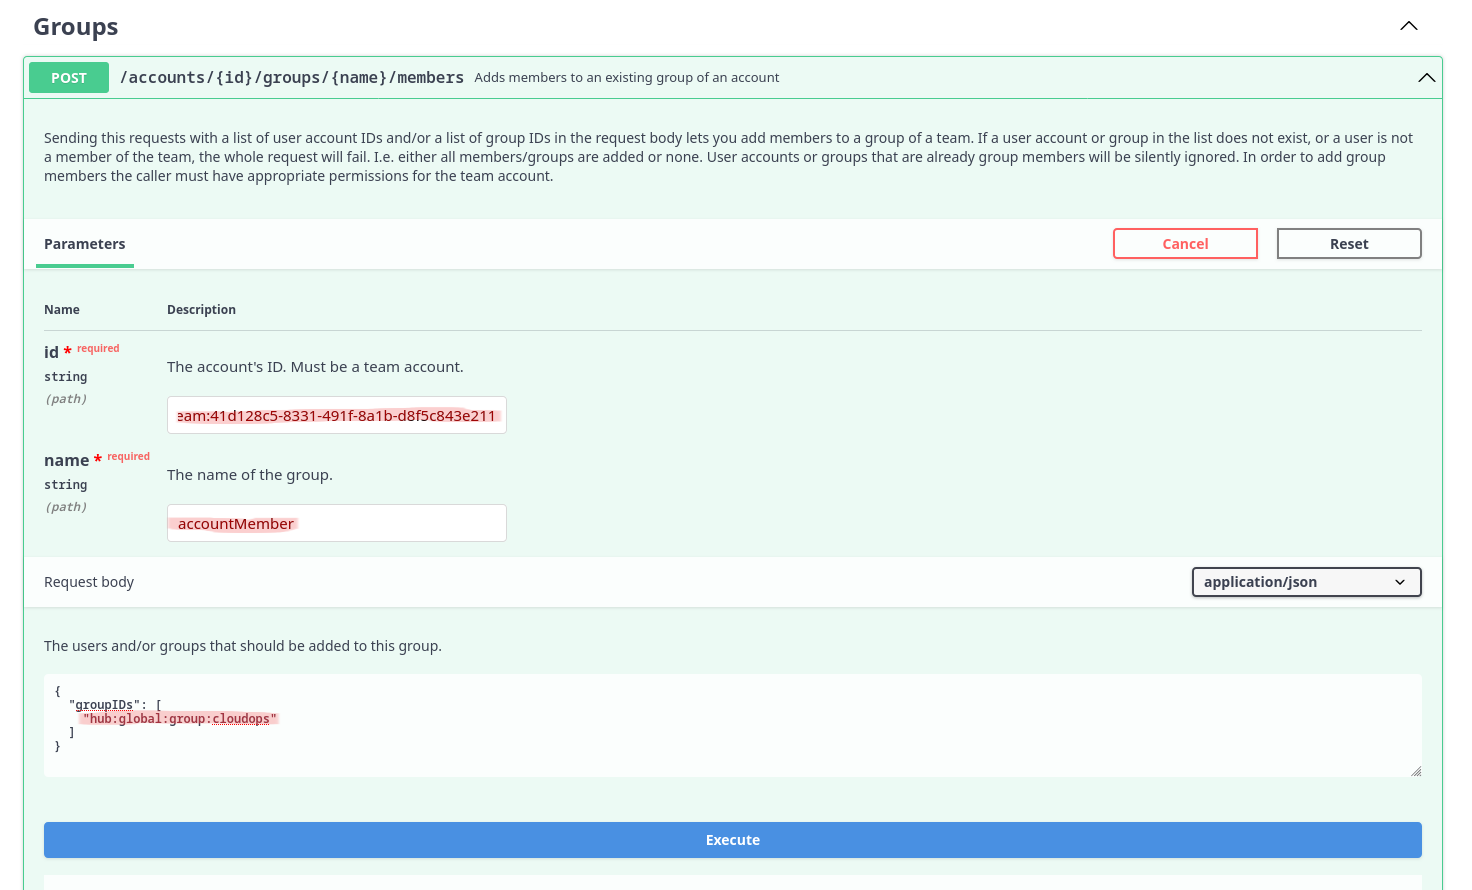
After that, the users in the external group will immediately show up as members of the respective team.
Please note that you must have enough users in your KNIME Business Hub license, otherwise this operation might fail due to unsufficient users. The team size limit will be updated automatically if the external group was provisioned by SCIM.
Assign users based on external groups via Data Application
Before running this application, ensure you have provisioned groups from your identity provider to KNIME Business Hub. Once you have done this, you can use these external groups to manage team memberships.
Data Application specifications
- The aim of this application is to allow Hub admins to manage the assignment and deletion of users to teams based on external groups without having to do it manually.
- Hence, only KNIME Business Hub admins have permission to run this data application.
- When using the data application in KNIME Business Hub, user authentication will align with the logged-in user's permissions, eliminating the need to provide an application password.
Data Application execution
Download the workflow from KNIME Community Hub.
You can find the workflow in the KNIME Community Hub.
Upload the downloaded workflow to your KNIME Business Hub instance via the web UI.
Deploy the workflow as a data application. You can learn more about how to do it here.
Afterward, execute the newly created data application deployment.
External groups - teams mapping
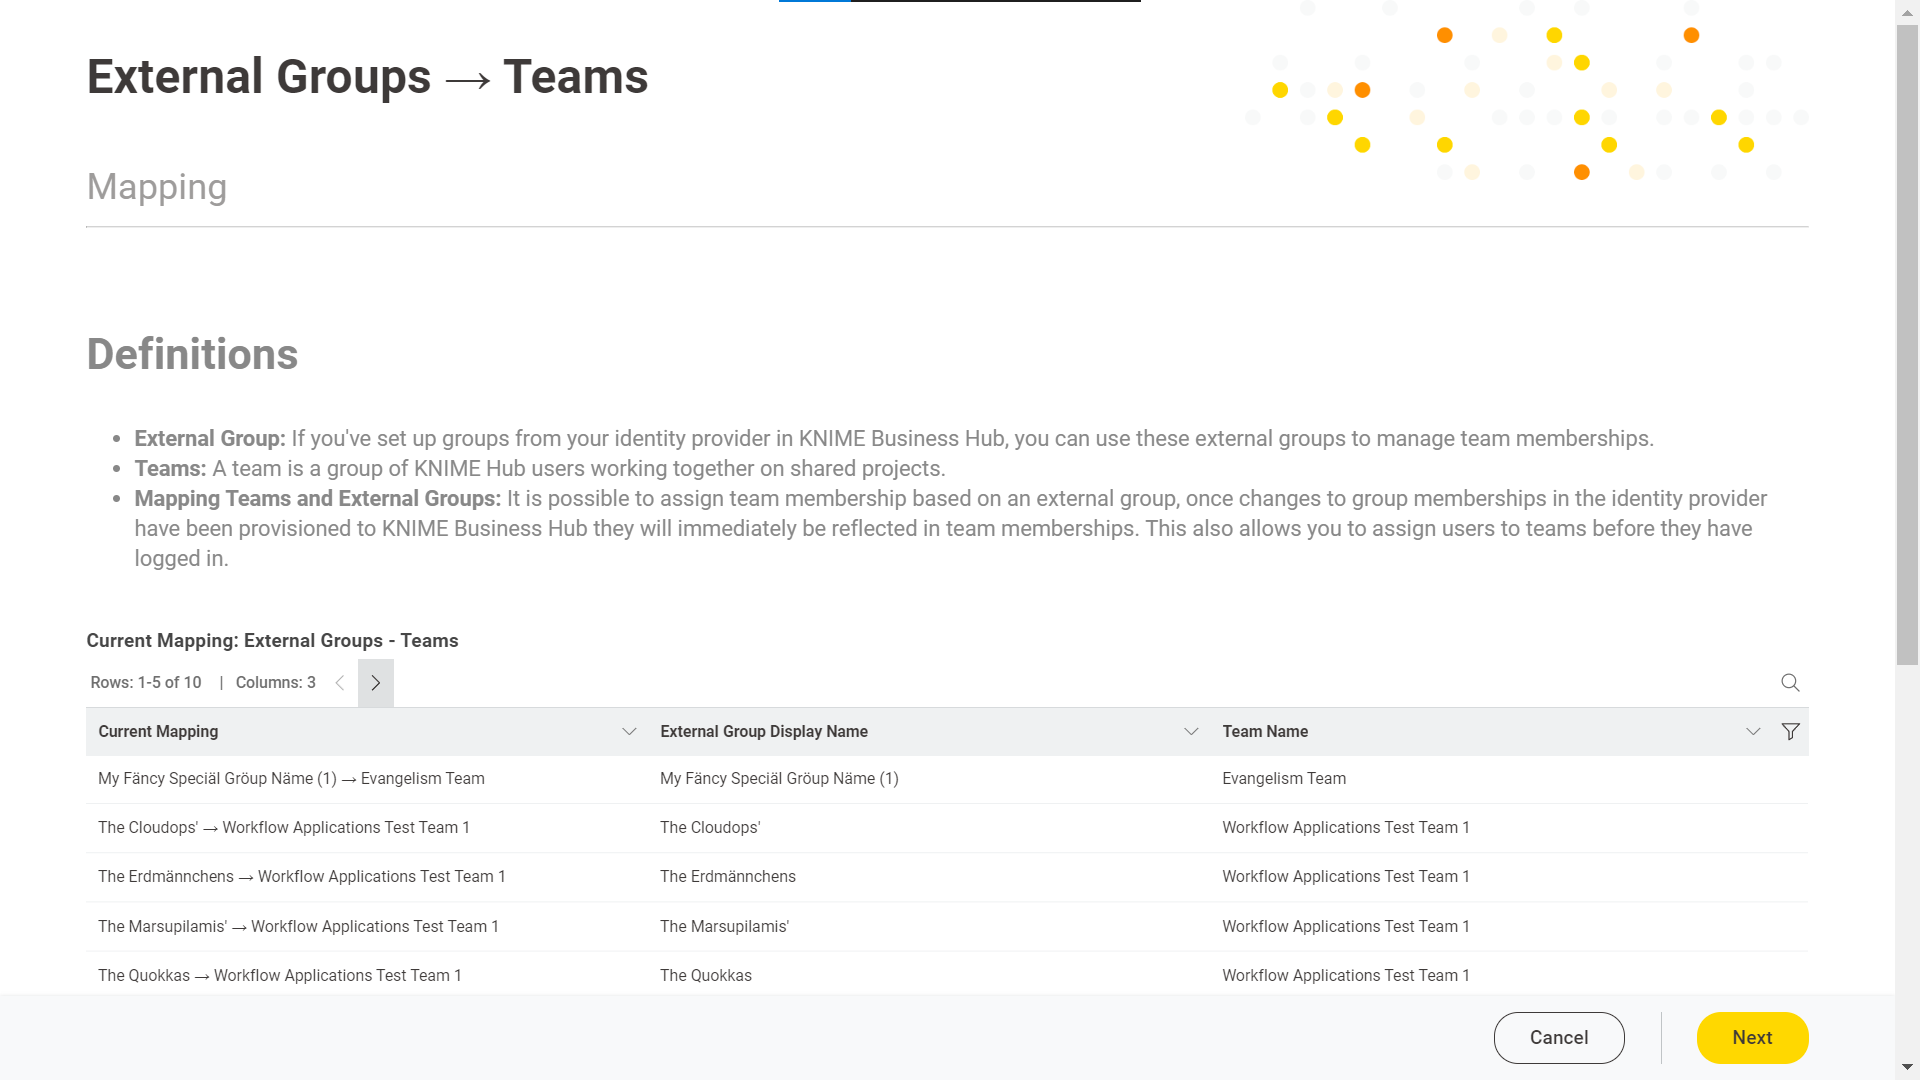
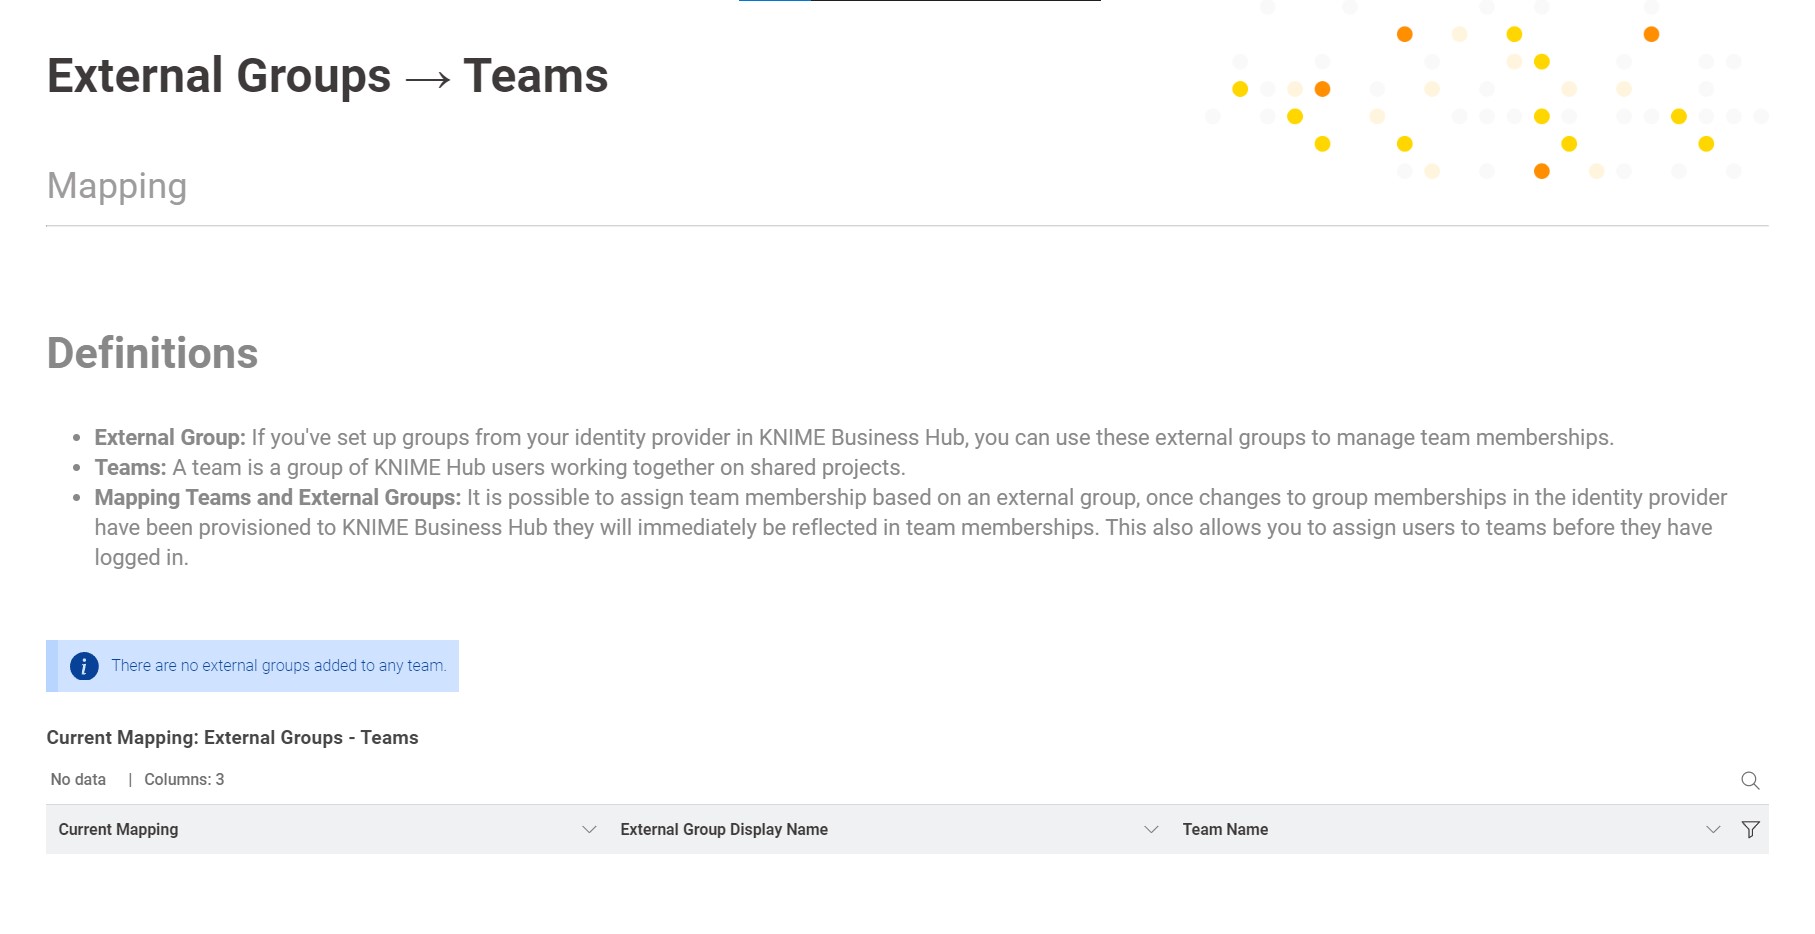
The one-page data application lets the Hub admin of KNIME Business Hub view the current mapping of the external groups and teams and make additions or deletions to modify it.
Current mapping
Below the main definitions is a table with three columns indicating the current mapping, the external groups, and the teams.
You can use the filters to narrow your research by team name or external group for convenience.
Adding external groups to teams
Once you have a clear understanding of the current external groups assigned to teams, you can add new ones.
Choose the "Add external groups to teams" option to complete this task.
a. The central search box allows you to add the "external groups - teams" pairs. b. To ease the research process, if too many options are available, you can copy either the external groups or the team names and paste them into the search box. This will display only items related to the pasted name.
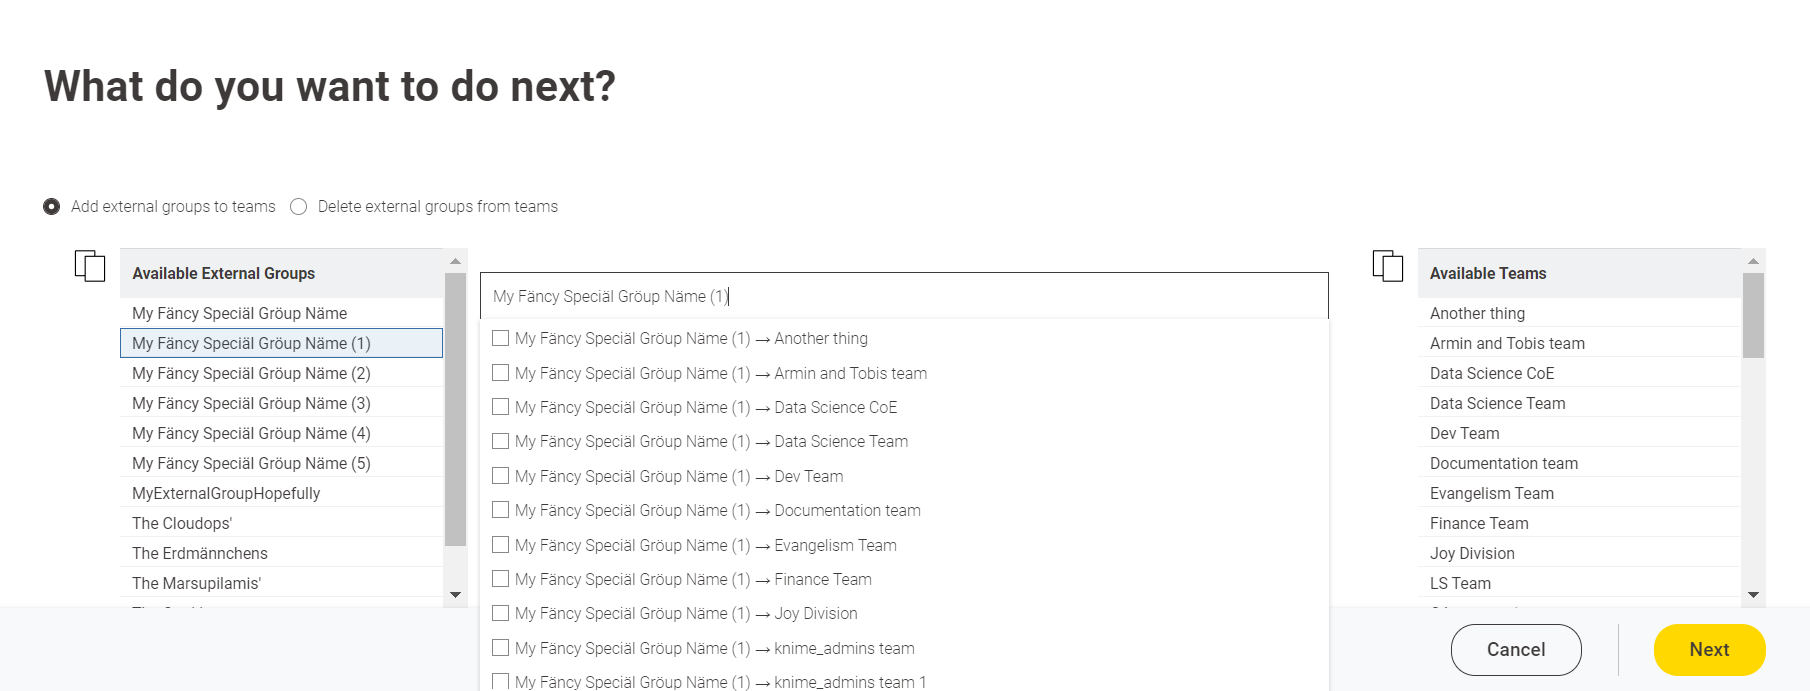
After adding all the desired external groups to the target teams in the search box, click "Next." After a short wait, you will see the same page with the newly added external groups. You can use the table filters to find them.
Afterward, the users in the external group will immediately appear as members of the respective team.
Delete external groups from teams
To detach an external group from a specific team, you can follow these steps:
Select the "Delete external groups from teams" option.
Refer to the "Current Mapping: External Groups—Teams" table to determine which external groups are attached to which teams.
In the search box, enter the name of the external group or team that you want to delete.
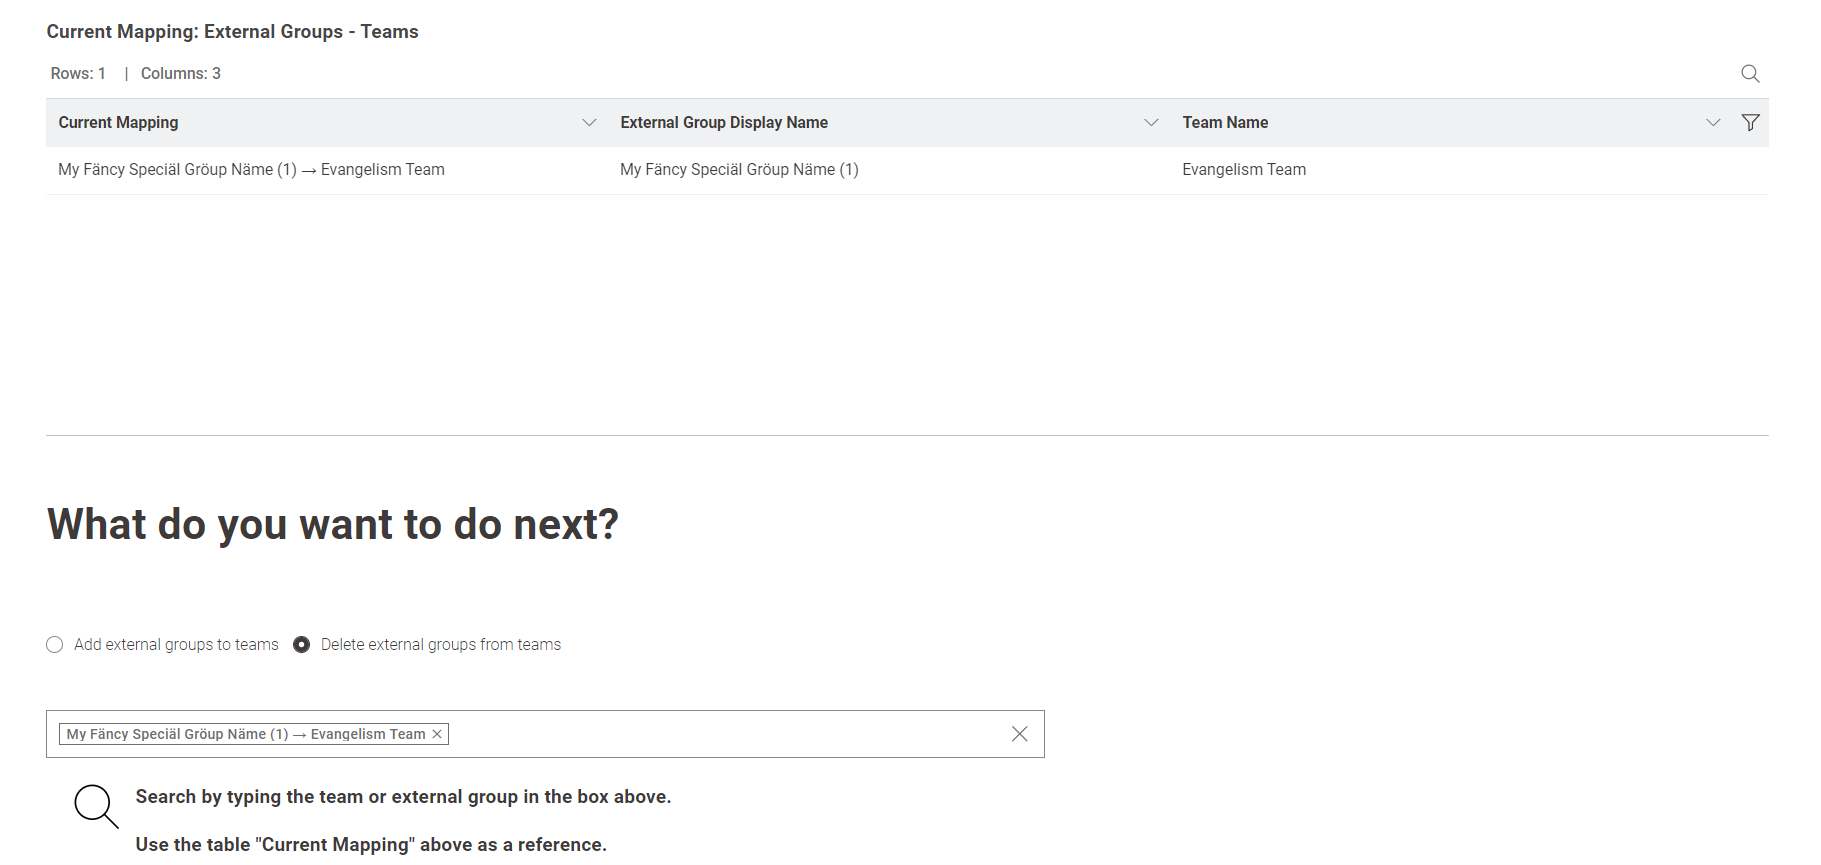
Once you have added all the external groups and their corresponding teams in the search box, click "Next."
After clicking "Next", all the users in the external group will immediately be removed as members of the respective team.
Warnings and errors
The data application may encounter various errors or issues during execution.
If the KNIME Business Hub API responds poorly, the data application has trouble communicating with it via REST requests. If this happens, a clear error message should be displayed to inform the user.
If external groups have yet to be provided for the current KNIME Business Hub, you must follow all the steps provided above before running the data application.
When running the data application for the first time, an information message indicates that no external groups are assigned to any team. To add them, use the search box and click "Next".
Suppose a KNIME Business Hub team admin or member tries to run the data application. In that case, an error message will appear, telling the user that only Hub admins can execute the application.
If you proceed without selecting any item in the search box and click "Next", a warning message will be displayed, prompting you to return to the external groups teams mapping stage by clicking "Next" again.
Expose external groups inside KNIME Business Hub (Standard and Enterprise editions only)
In case you cannot use SCIM, there are two other possibilities for bringing external groups into your KNIME Business Hub installation. As a Global KNIME Hub administrator you can configure groups that are provided via an external identity provider to be exposed inside the KNIME Business Hub instance.
Two possible sources for your external groups are:
- Groups are provided within the access token of your OIDC provider
- Groups are imported from LDAP by federating the login
External OIDC provider
Assume you have an identity provider that provides groups through a groups claim in the access token.
json
{
  ...,
  "groups": [
    "finance",
    "marketing",
    "data"
  ]
}
First you need to configure Keycloak in such a way that it can map these groups to a user attribute. The second step is to add a mapper that maps these user attributes into the Keycloak's tokens.
Your third-party identity provider should have been set up already. Keycloak has to be configured as follows:
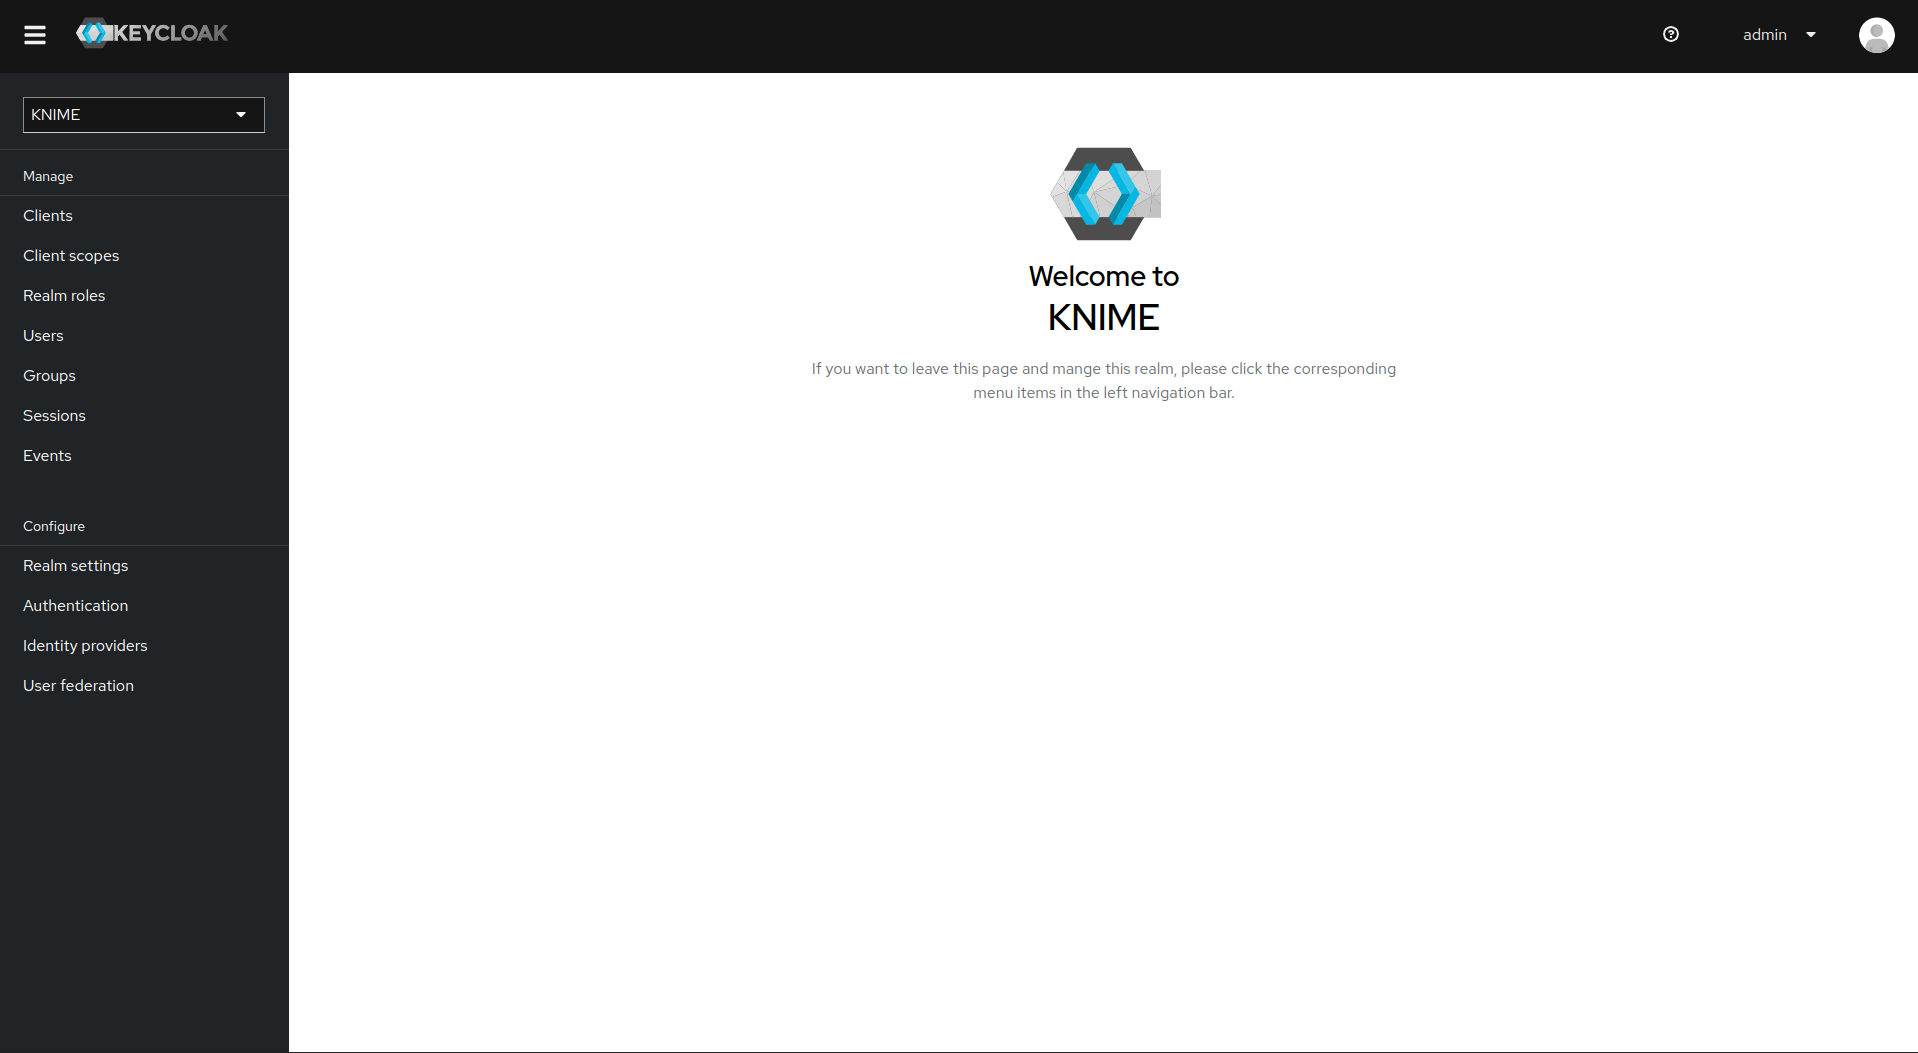
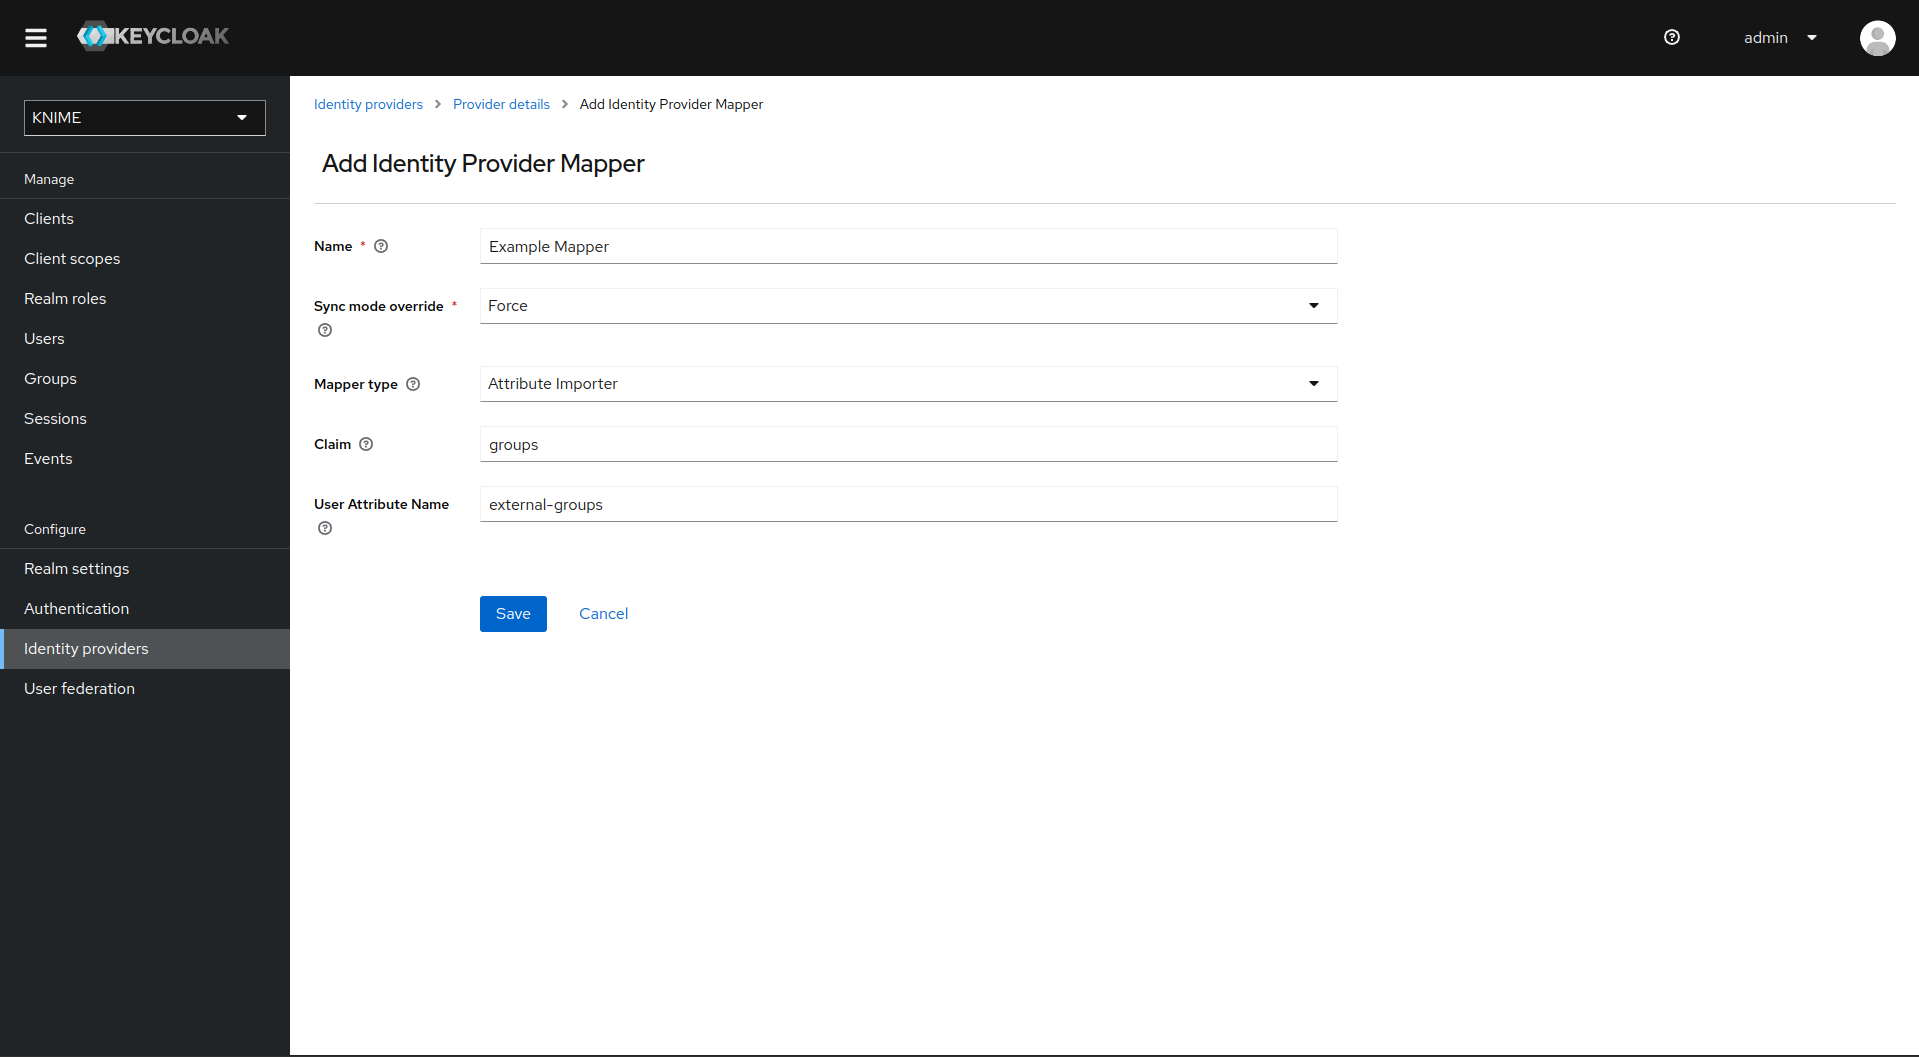
First step is to add an Attribute Importer Mapper.
- In Keycloak select realm Knime in the top left dropdown menu
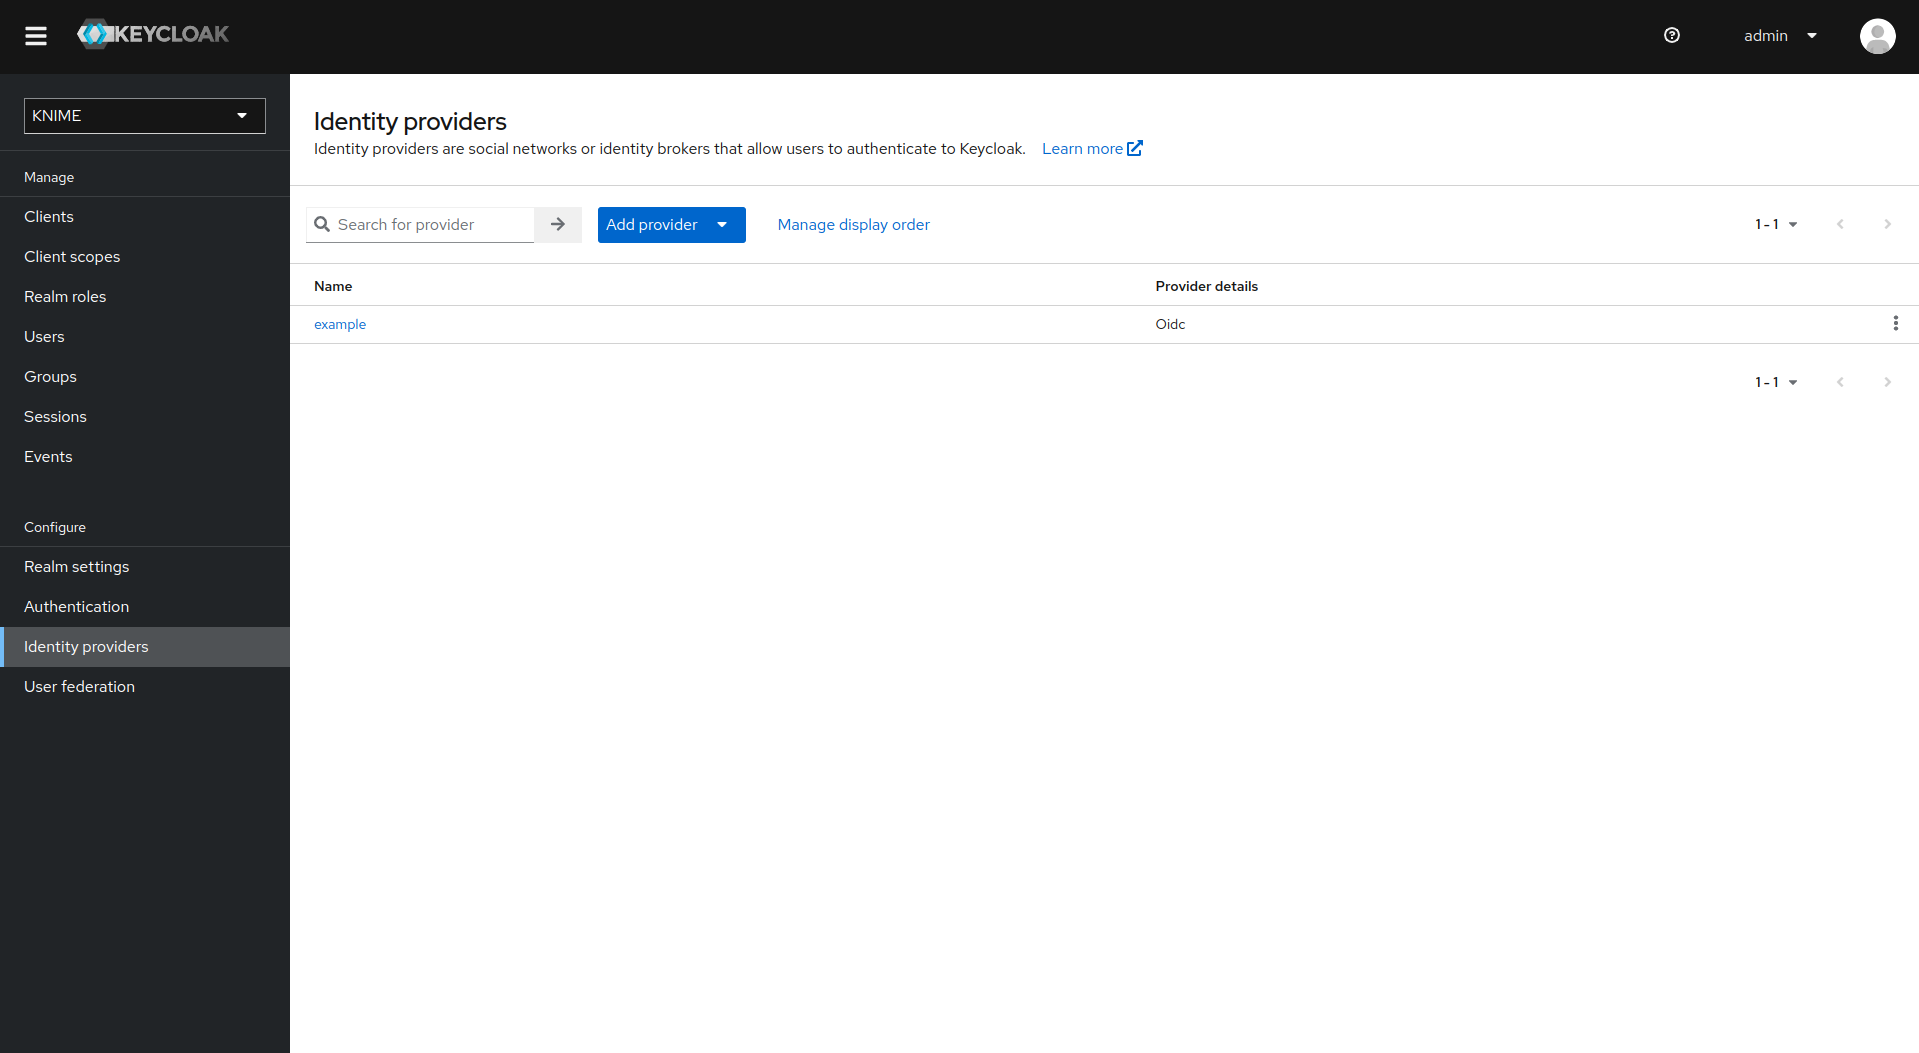
- On the left tab select Identity Providers
- Select your third-party provider
- Switch to the tab Mappers and click on Add mapper
- Provide a name for the mapper and set the Sync mode override to Force to ensure that the user's group memberships are updated upon every login
- Set Mapper type to Attribute importer
- Enter the Claim that contains the external groups in the original token (in our example groups)
- In the User Attribute Name field enter
external-groups - Click on Save
Now, every user in Keycloak who logged in after the mapper has been added will have an external-groups attribute associated like in the following picture:
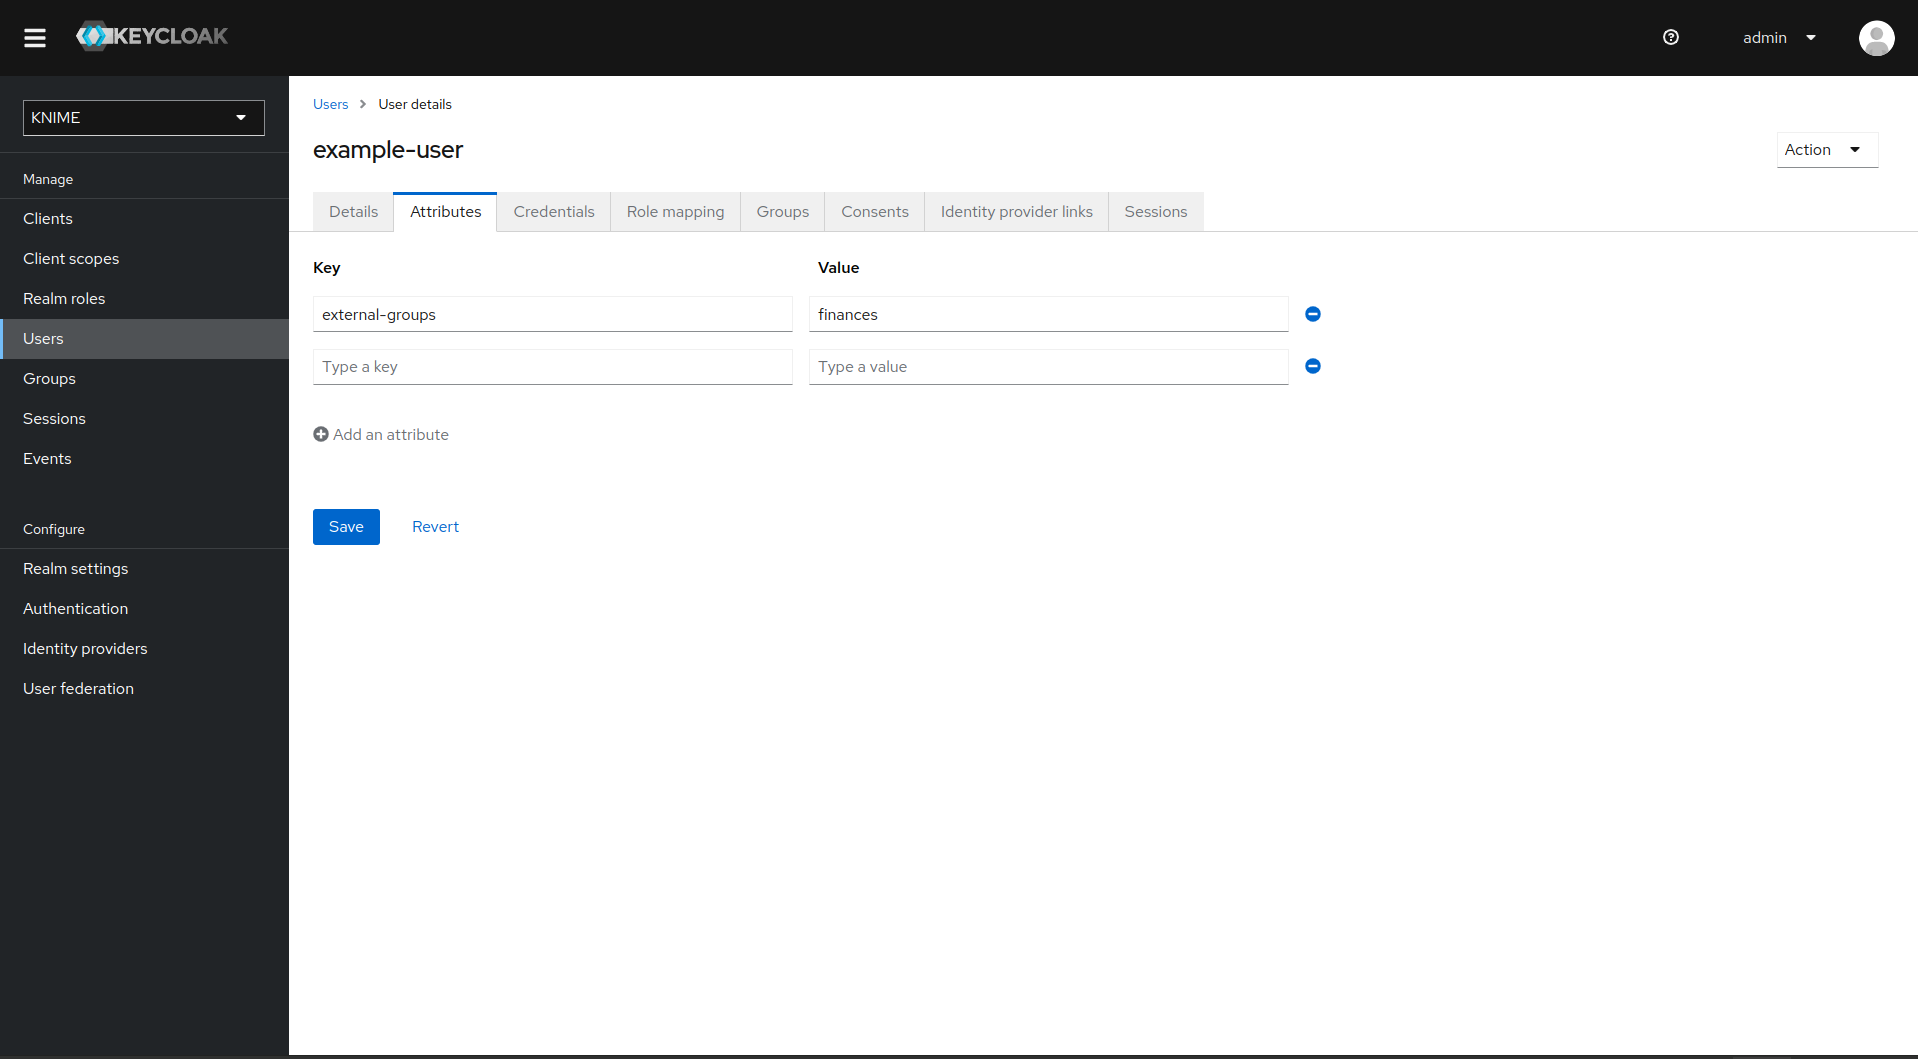
Now, the external groups are known to Keycloak. To expose them inside KNIME Business Hub they need to be mapped into the access tokens issued by Keycloak. For this a second mapper needs to be added, that maps the user attribute external-groups to a claim in the user's access token.
To do this you need to add a client scope, which includes a mapper for the user attribute.
- On the left tab select Client scopes
- Select groups
- Switch to the tab Mappers
- Click on Add mapper > By configuration and select User Attribute from the list
- Provide a name, e.g. external-groups-attribute-mapper
- Set both fields User Attribute and Token Claim Name to
external-groups - Ensure that Add to ID token, Add to access token and Aggregate attribute values are turned off
- Ensure that Add to userinfo and Multivalued are turned on
- Click on Save
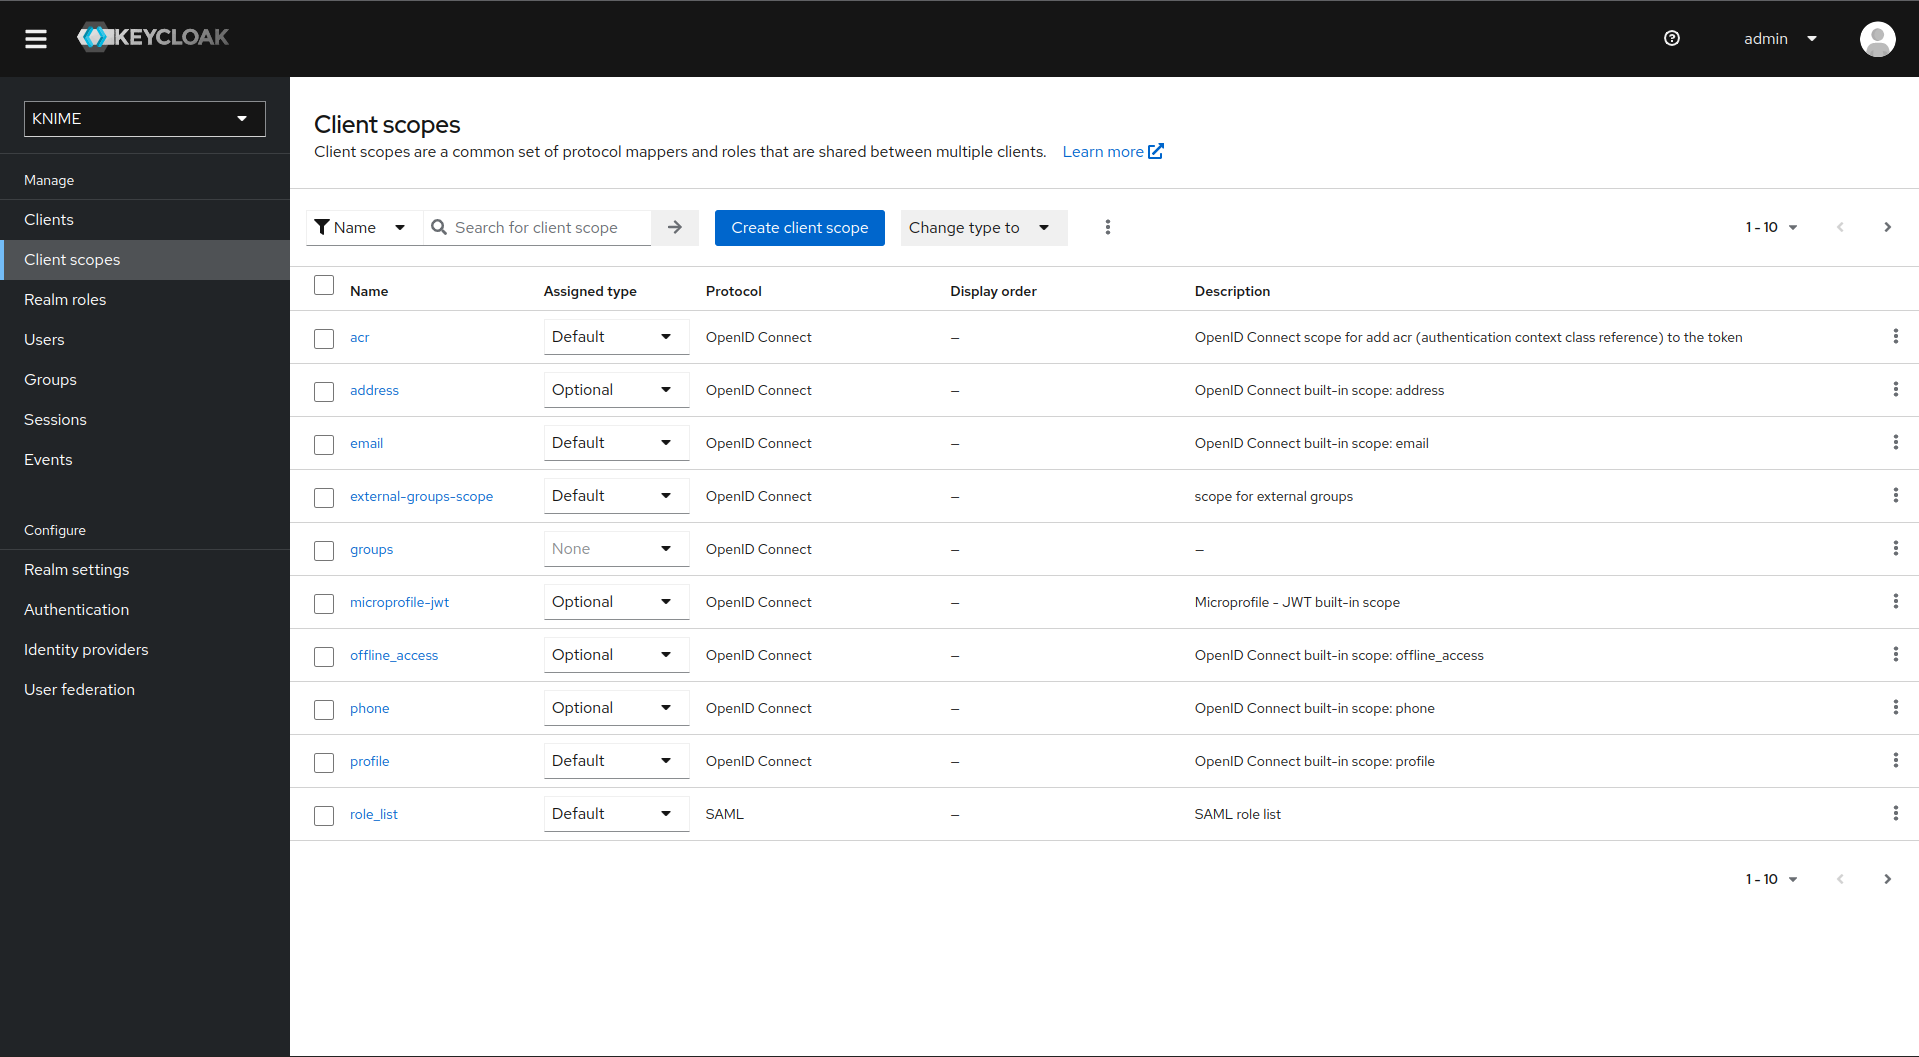
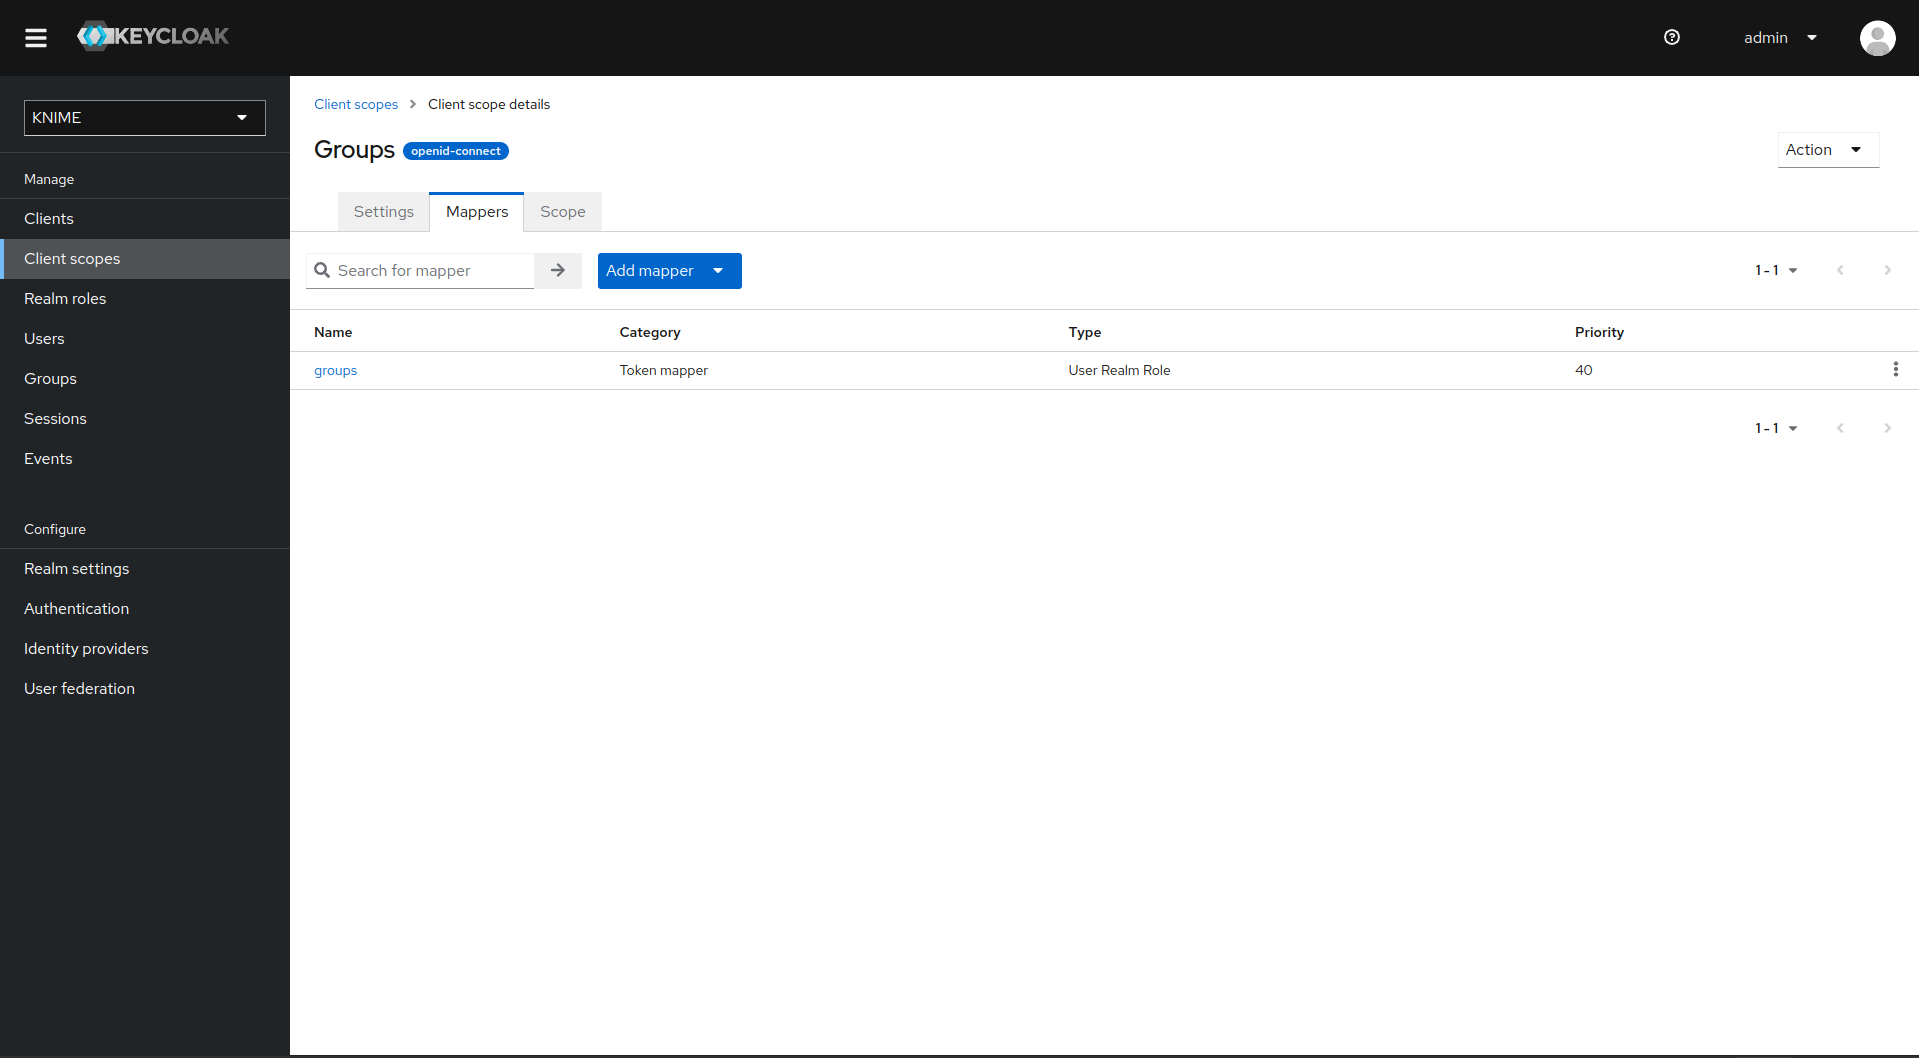
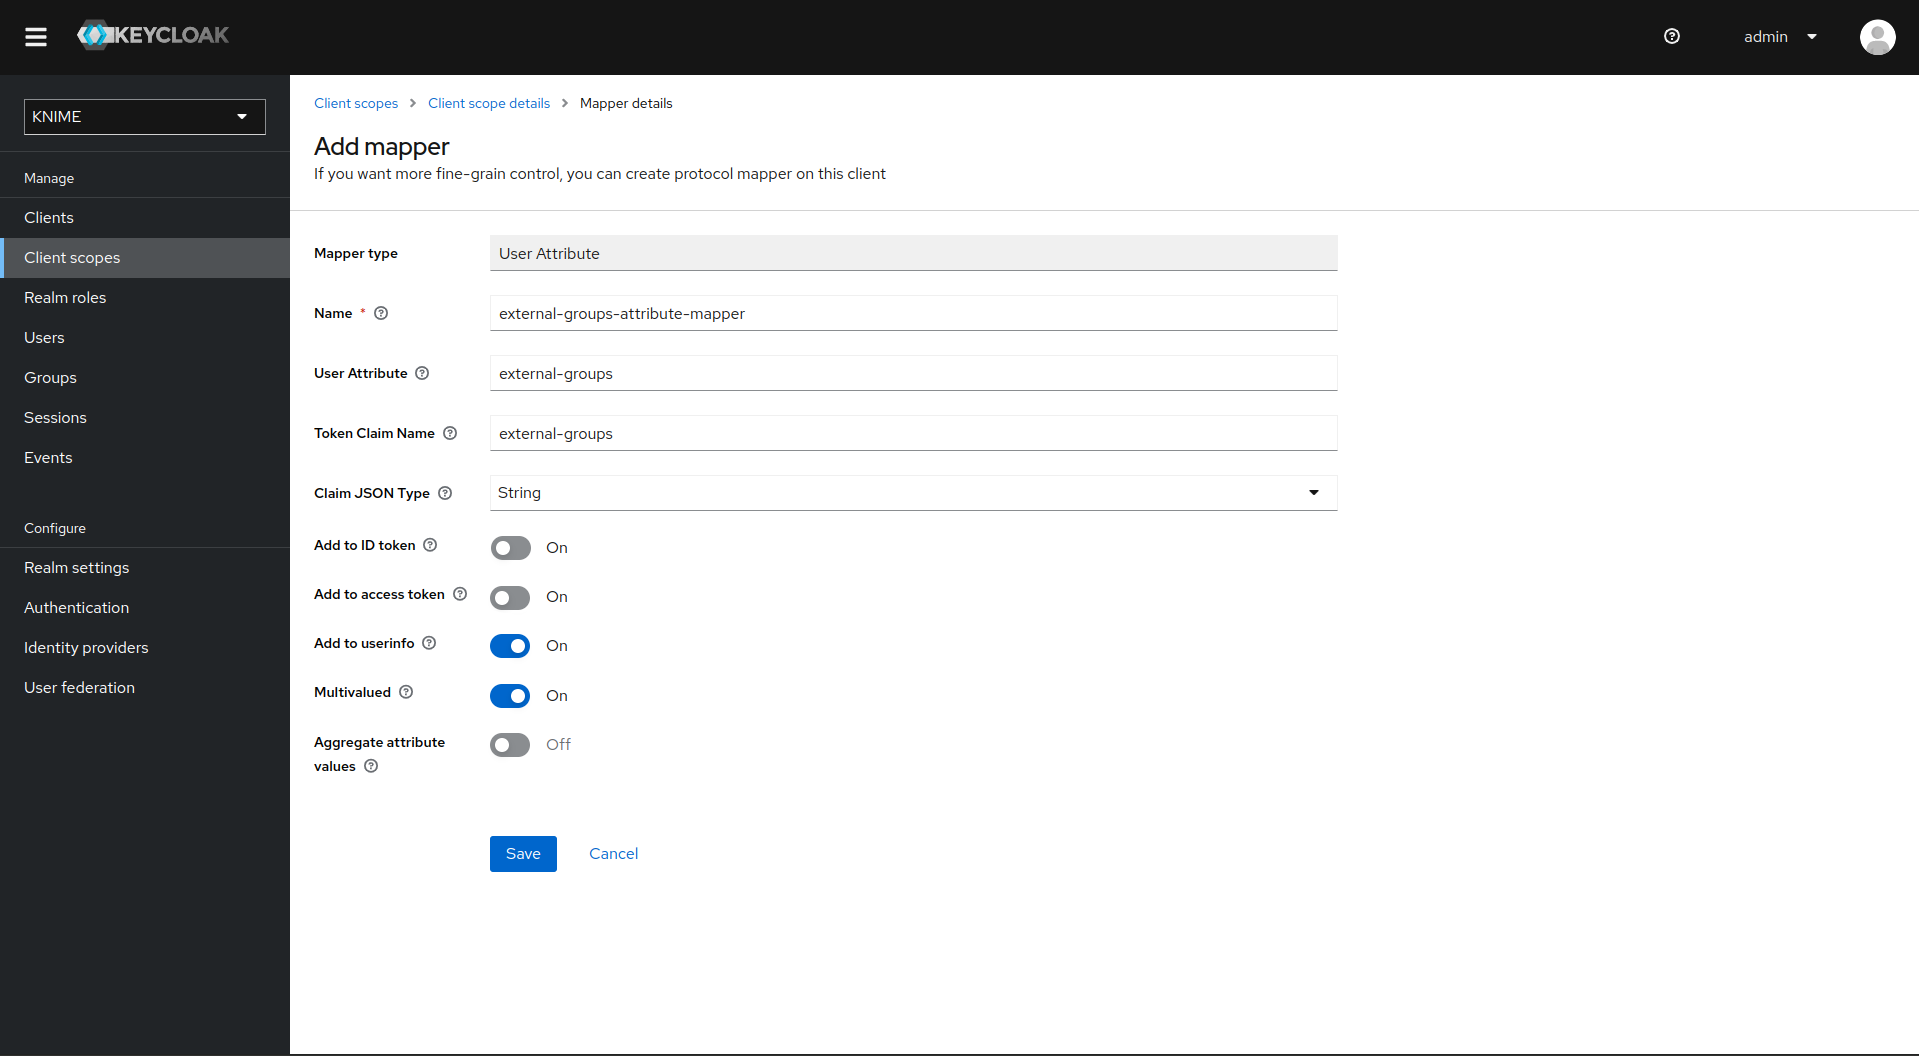
With both mappers in place, the external groups are part of the userinfo response returned by Keycloak. As a result, the external groups are exposed in KNIME Business Hub. To use external groups for permissions and access management, configure them separately through the admin REST API as described in Enable external groups.
LDAP federation
Before proceeding with the following steps you need to have a user federation configured for an LDAP instance.
Once you have configured user federation for an LDAP instance that also supplies external group names, you need to configure mappers that map these groups into the access tokens used inside the Hub instance.
To ensure that groups from Keycloak groups and groups from LDAP are not mixed we recommend to treat external groups as realm roles.
In order to do this we recommend to first create a dummy client for which roles can be created based on the LDAP groups. This will guarantee that any changes will be compatible with future changes to the KNIME Hub client in Keycloak.
To create a new client follow these steps:
- In Keycloak select realm Knime in the top left dropdown menu
- On the left tab select Clients and click Create client
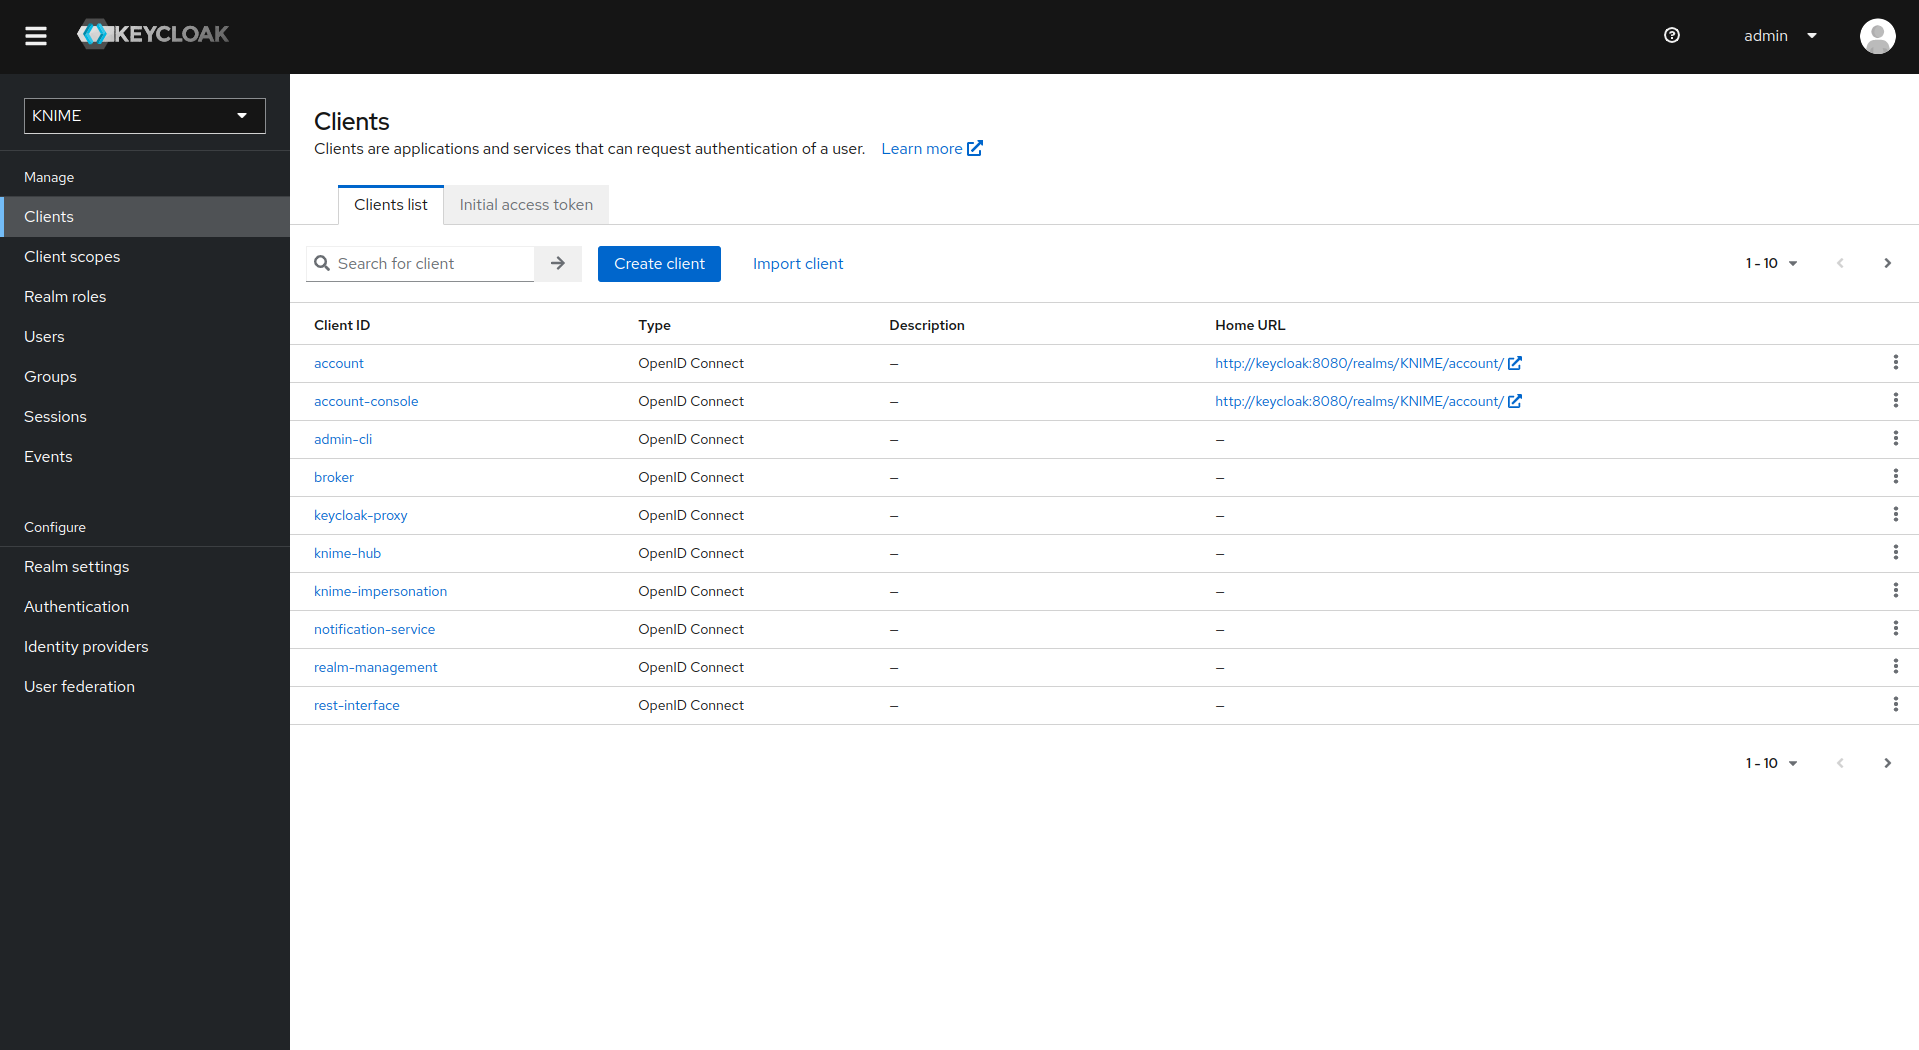
- Set Client type to OpenID Connect
- Enter a Client ID (in our example external-group-client), and a useful Name and Description
- Click on Next
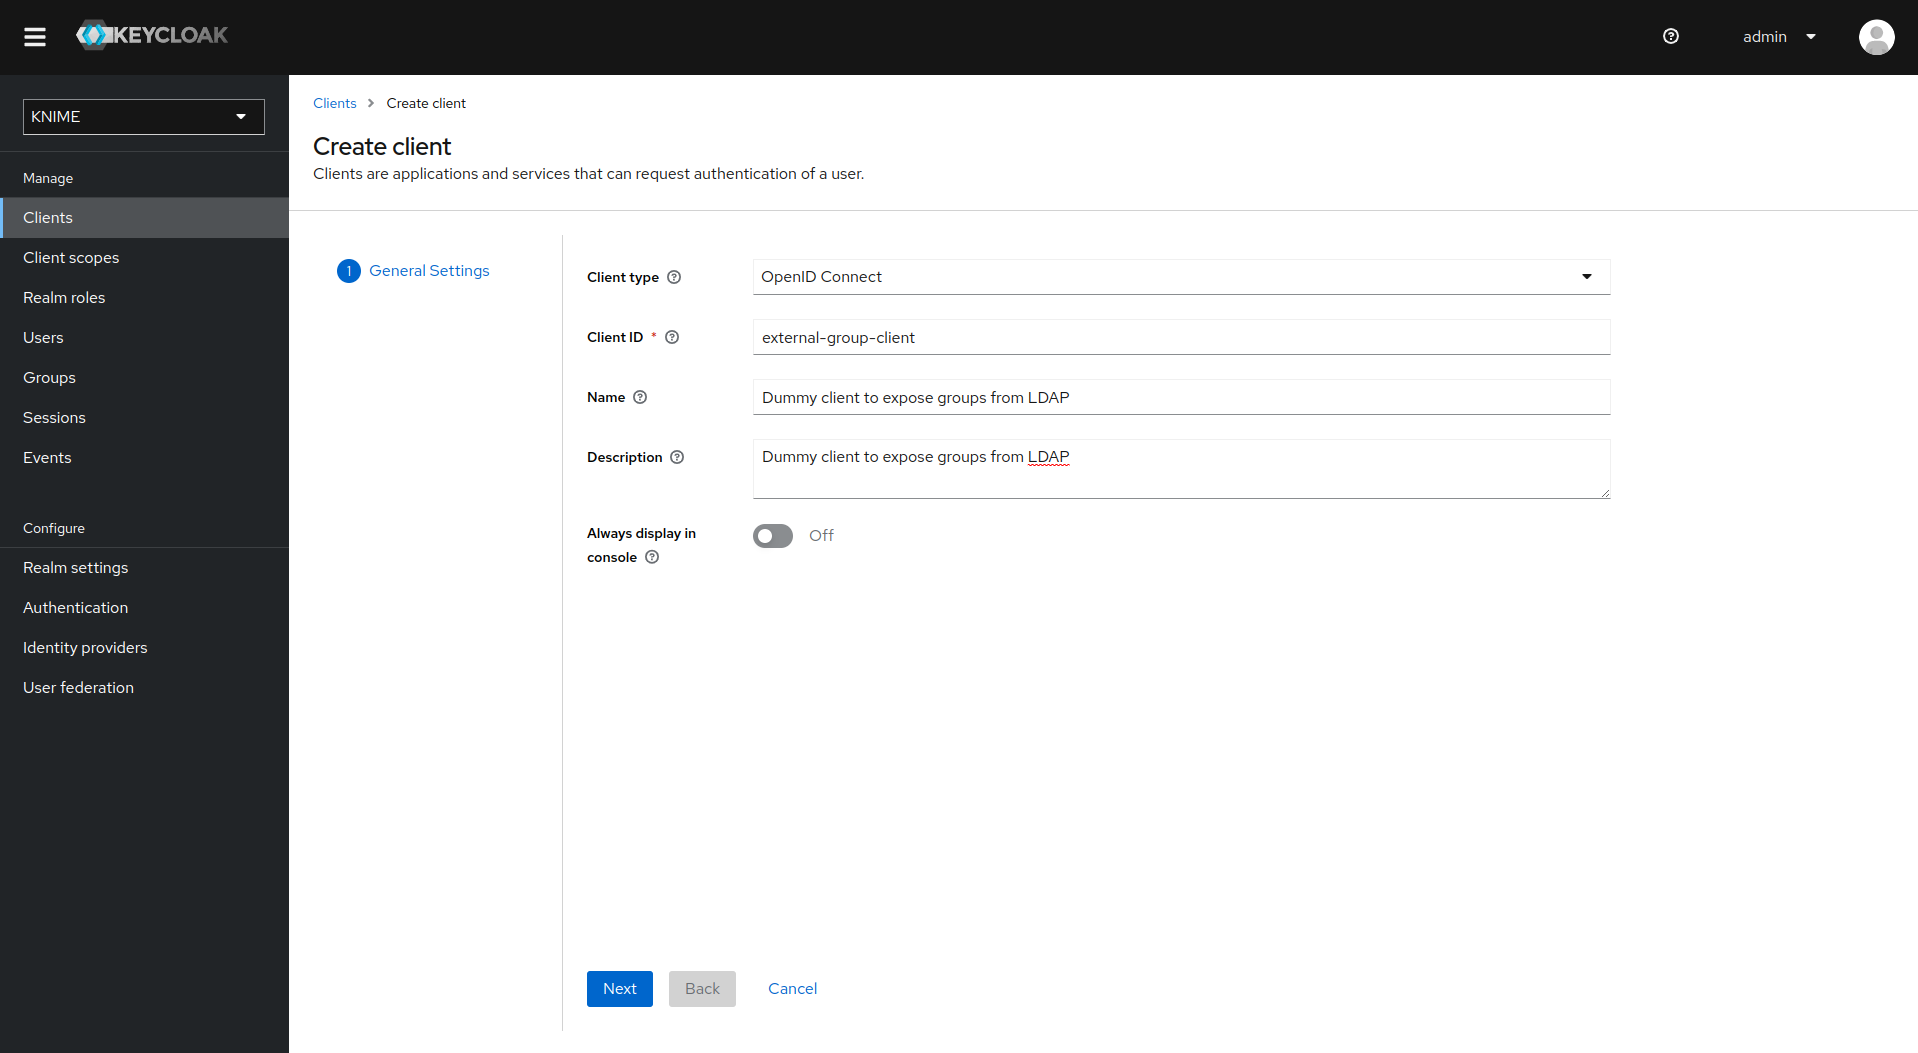
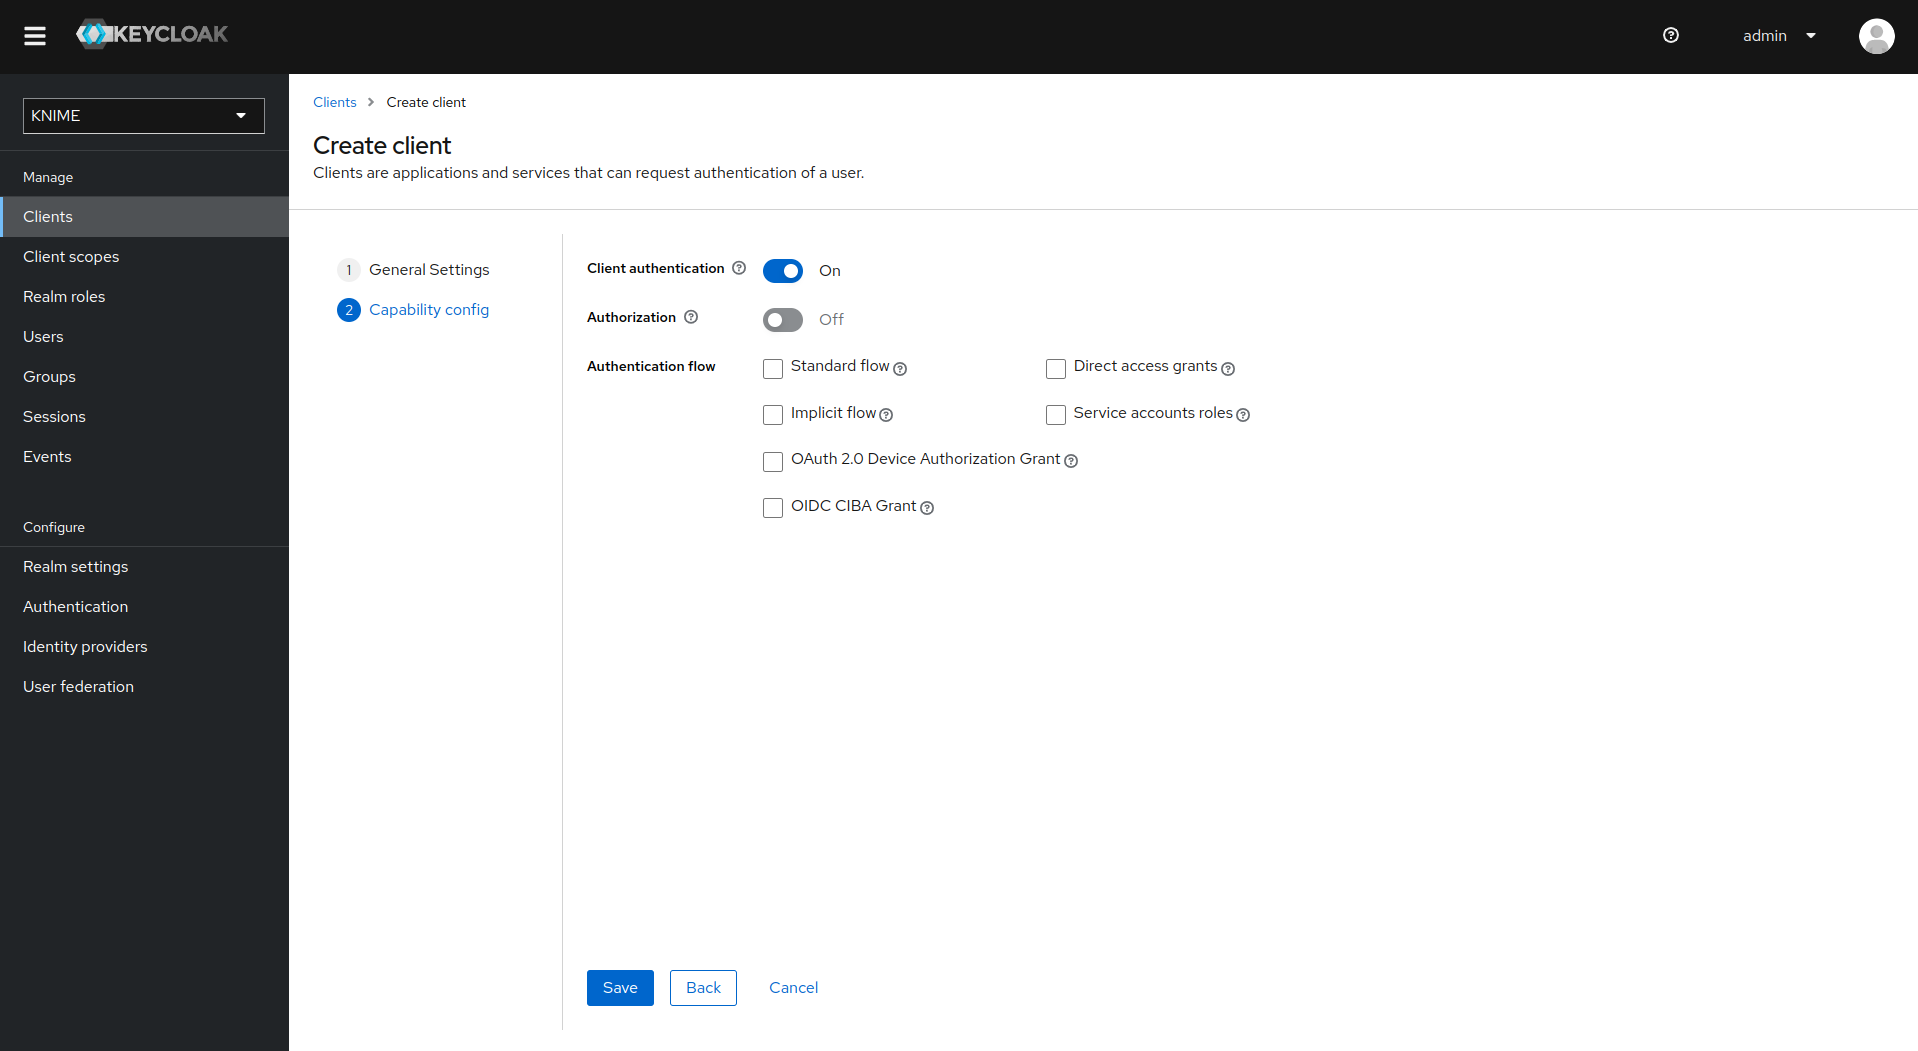
- De-select all checkboxes of Authentication flow in the Capability config section, since this client will not require any capabilities
- Enable Client authentication
- Click on Save
Now that the dummy client is set up, you can proceed to create a mapper that maps the user groups from LDAP to roles inside the dummy client:
- On the left tab select User federation and click on your LDAP configuration
- Switch to the tab Mappers
- Click on Add mapper
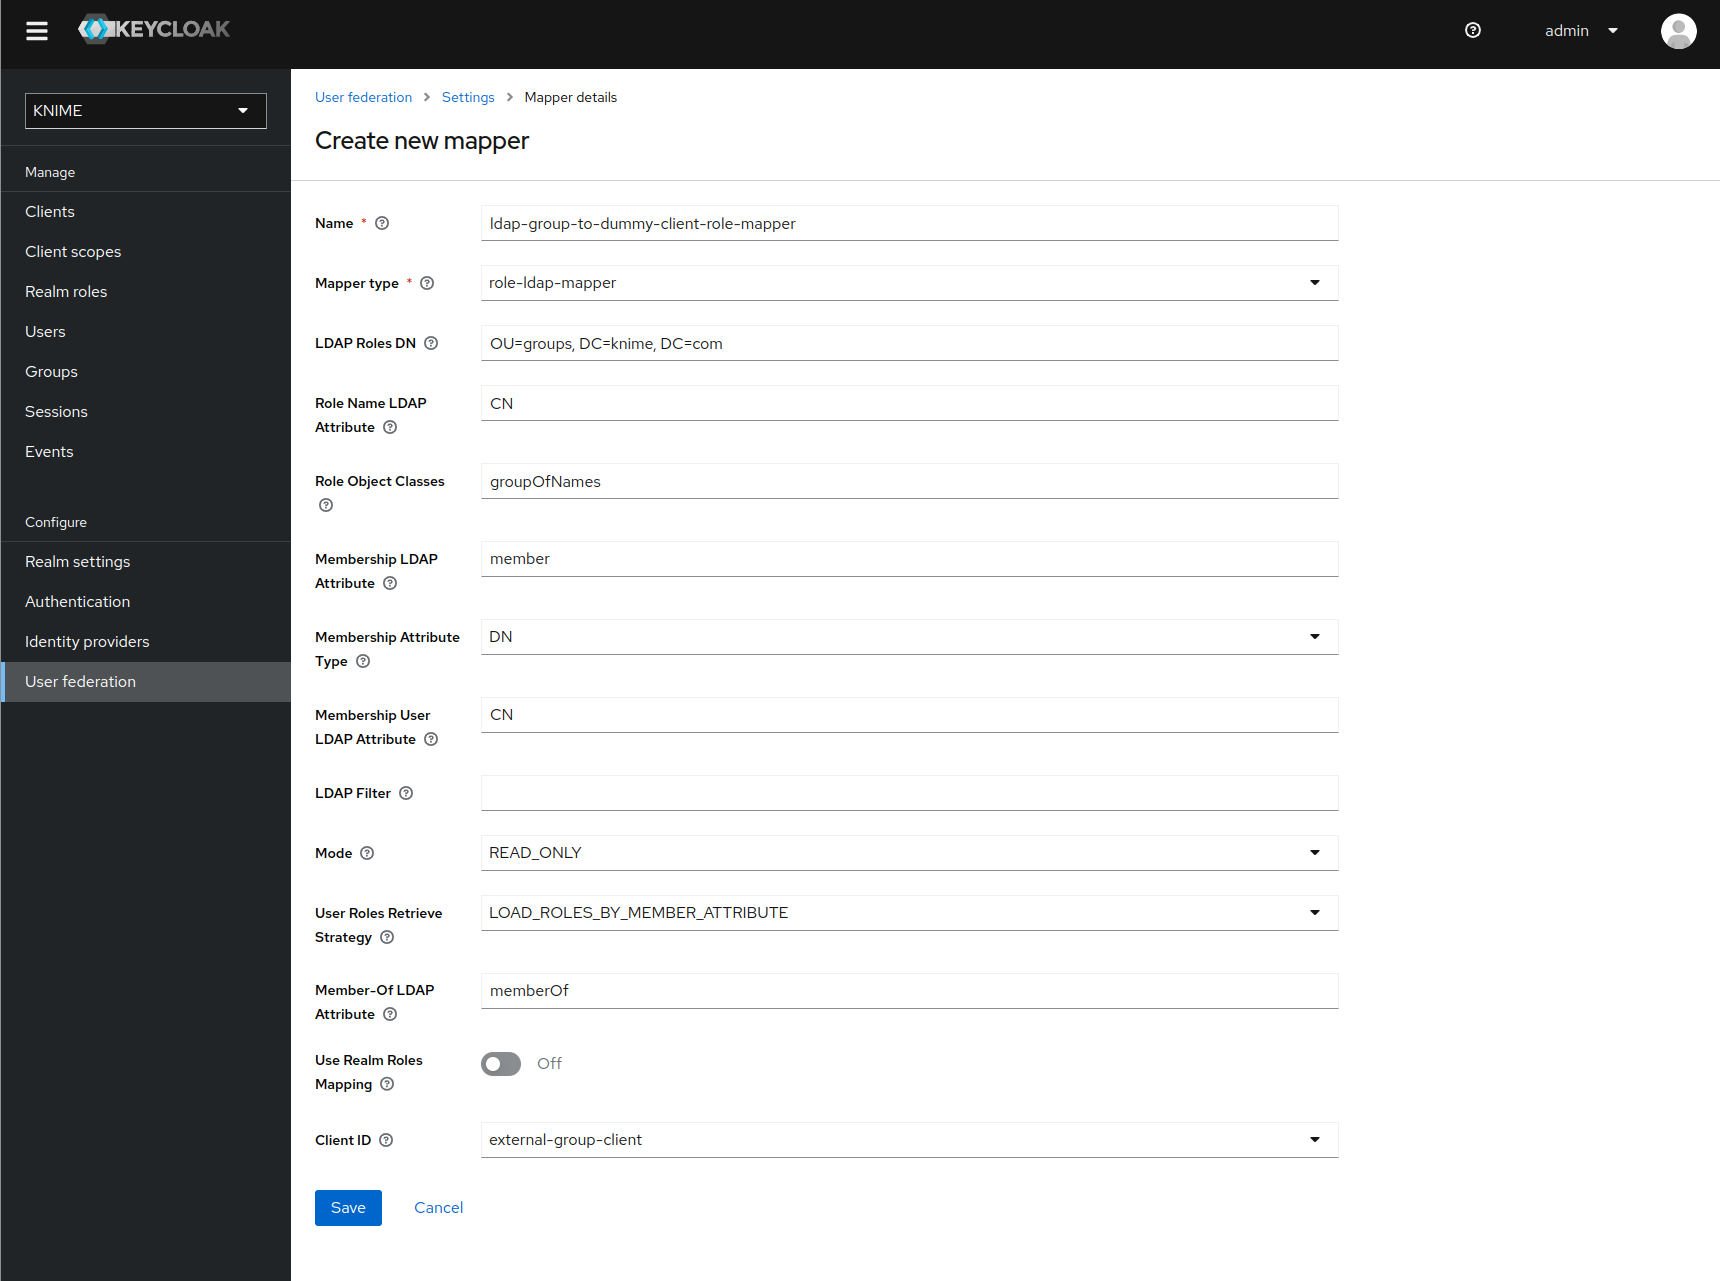
- Provide a name, e.g. ldap-group-to-dummy-client-role-mapper
- Set Mapper type to role-ldap-mapper
- Setup the mapper according to your LDAP
- Disable User Realm Roles Mapping
- Set Client ID to the previously created dummy client (in our example external-group-client)
- Click on Save
Now if a user logs in with the LDAP credentials the user's groups will be mapped to ad-hoc created client roles inside the 'external-group-client'.
Next, you need to create a mapper that maps a user's realm roles from the dummy realm to the access tokens:
- On the left tab select Client scopes
- Select groups
- Switch to the tab Mappers
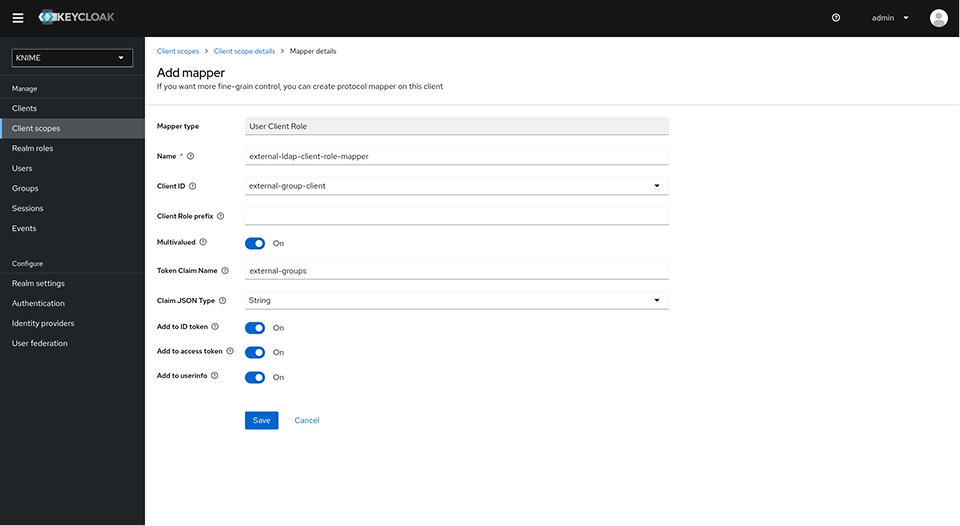
- Click on Add mapper > By configuration and select User Client Role from the list
- Provide a name, e.g. external-ldap-client-role-mapper
- Set Client ID to the previously created dummy client (in our example external-group-client)
- Set Token Claim Name to
external-groups - Set Claim JSON Type to String
- Ensure that Add to ID token, Add to access token, Add to userinfo, and Multivalued are turned on
- Click on Save
Enable external groups
Once you have configured the external groups in Keycloak you need to create the groups that you want to be available inside KNIME Business Hub.
To do so you have to make a PUT request to the corresponding endpoint:
PUT https://api.<base-url>/accounts/hub:global/groups/<external-group-name>where <external-group-name> is the name of the group and it must match the group name in the external identity provider.
You can use the following JSON type body in order to set a display name for the group to be shown on KNIME Business Hub.
json
{
  "displayName": "My Group Display Name",
  "external": true
}
Set up secret store
In order to use secret store in Replicated based installations you, as the Hub admin, have to create a master key in the Hub WebUI. Until the master key has been set up, Hub secrets cannot be created.
As long as the master key hasn't been provided you, as the Hub admin, will see the Set up secrets toast on all pages of the KNIME Hub WebUI. To start the setup process you can either click Go to secrets setup on the toast or navigate to the Administration secrets page. On the secrets page click Set up secrets. This opens a dialog that guides you through the setup steps.
Important
The displayed master key is only visible once and needs to be stored in a safe location to restore the secret keys from a backup.
On existing installations that previously used the legacy secret store backend, once the master key is created the migration from the legacy secret store will start automatically in the background. During this migration, existing Hub secrets remain fully usable.
On fresh installations, no legacy secret store backend is present, so no migration is needed and the secret store becomes fully operational as soon as the master key has been created.
Advanced configuration
This section covers some of the configuration settings that are available for your KNIME Business Hub instance.
The following configurations are available in the KOTS Admin Console and can be changed after the installation and first minimal configuration steps are concluded successfully.
You can access the KOTS Admin Console via the URL and password you are provided in the output upon installation.
Configure networking
In the "Networking" section of the KOTS Admin Console you can:
Deploy an external load balancer for traffic ingress: this feature takes effect only if your cloud provider and kubernetes distribution support automatic load balancer provisioning.
Enable Transport Layer Security (TLS): the encryption protocol that provides communications security is highly recommended especially for KNIME Business Hub instances deployed in a production environment.
WARNING
Enable TLS to run KNIME Business Hub securely and to ensure all features work as expected. Without TLS, some HTTPS-only browser features are not available (for example, copying generated application passwords). Running without TLS can be useful for proof-of-concept or testing purposes, but avoid it in production.
Enable advanced ingress configuration: you can customize the ingress proxy behavior, for example configuring the read/send/connect timeouts.
Enable Custom Certificate Authority (CA) Certificate: Add custom CA certificates. You likely need to enable this option if the TLS certificates used by this KNIME Business Hub installation or any external service you need to communicate with are not signed by a trusted CA, for example self-signed certificates. The certificates entered will be added to all relevant KNIME Business Hub services and executors.
Configure TLS
If you enable the Transport Layer Security (TLS) you need to have a certificate that is valid for all the URLs defined during the installation. We recommend to create a wildcard certificate for <base-url> and *.<base-url>, e.g. hub.example.com and *.hub.example.com.
Check Enable TLS in the "Networking" section of the KOTS Admin Console.
You can choose between four options to configure the TLS certificate:
- Upload your own certificate: Select Upload your own certificate to upload the certificate files. You can usually get a certificate from your company's IT department or Certificate Authority (CA). Another possibility, if you have a public domain name, is to use letsencrypt to obtain a certificate.
Notice that if the certificates added here are signed by private or unknown CA then you need to also enable the Enable Custom Certificate Authority (CA) Certificate option and add the certificates of the CA in the Custom Certificate Authority (CA) Certificate field.
The certificates need to be PEM formatted as required by the Istio Ingress Gateway (see the Istio Gateway TLS documentation and Kubernetes TLS secrets).
You will need:
- An unencrypted private key file
- A certificate file in
PEMformat that contains the full certificate chain.
In the certificate chain, it is important that the certificates are ordered top to bottom as follows:
Server Certificate
Intermediate Certificates
Root Certificate
Existing TLS Secret: Select Existing TLS Secret to specify the name of an existing Secret of type
kubernetes.io/tls.This option is recommended if you have an automatic process that can create and renew
kubernetes.io/tlsSecrets in the cluster, like the cert-manager project.The secret must exist in the same namespace in which the Istio Ingress Gateway is deployed and needs to have keys
tls.crtandtls.key, which contain the PEM formatted private key and full chain certificate.See Kubernetes documentation on TLS secrets and the Istio Gateway TLS documentation for more details.
Handled by the External Loadbalancer: Select Handled by the External Loadbalancer if you have an external load balancer that handles the TLS termination. In this case, the load balancer will be responsible for the TLS configuration.
AWS ACM Certificate (Deprecated): The AWS ACM Certificate option is deprecated and removed entirely as of KNIME Business Hub 1.18.0.
Instead, you should use your own ingress controller to route traffic to the Istio Ingress Gateway. If an external load balancer or proxy is handling TLS termination, use the Handled by the External Load Balancer option instead.
Another option is to set the AWS Certificate Manager (ACM) ARN as an annotation directly on the load balancer. You can find more information in the AWS documentation for ACM.
Configure browser security
The Advanced: Browser Security section of the KOTS Admin Console controls the Content Security Policy (CSP) for data apps.
- Enable Content Security Policy for Data Apps: Turns on the CSP header for data apps. If you disable this option, no CSP header is set.
- Content Security Policy for Data Apps: Specify a custom CSP statement here. Override the default if you use custom JavaScript views or BIRT report generators that load external resources; the default works for all standard KNIME views. For more information about writing a CSP statement, refer to the Content-Security-Policy reference.
- Whitelist URLs for Execution REST API: Sets additional URLs as allowed origins for the CORS policy and the CSRF filter. Use this to allow browser-based apps to call execution REST endpoints, for example for service deployments. Separate multiple URLs with a newline or a space, for example
http://localhost:9000 https://example.webapp.com.
To embed data apps in an iframe, configure the frame-ancestors directive in the CSP statement. If you don't specify this directive, a default setting prevents embedding. Make sure no other part of your infrastructure sets a conflicting frame-ancestors rule, or that it includes the embedding website.
To troubleshoot a blocked resource, open the browser's developer console. A CSP violation names the blocked domain and the directive it violated.
TIP
Clear your browser cache after changing the CSP, or test in incognito or private mode. A cached page can look like the change didn't take effect.
Job viewer feature configuration
With the job viewer users are able to inspect a job at its current state in a browser based read only mode, without the need to open their local KNIME Analytics Platform.
In order for this feature to be available you will need:
- KNIME Analytics Platform 5.2.3 or newer to be used as executor
- Load balancers / proxies in front of Business Hub need to be websocket compatible.
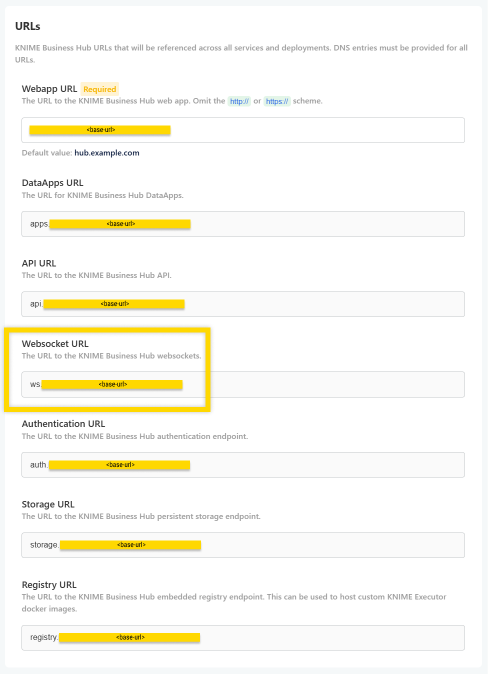
- Additionally, make sure that the DNS entry of the Websocket URL (
ws.<base-url>) is set up correctly. You can find the Websocket URL in the KOTS Admin Console under URLs > Websocket URL.
Configure workflow upload behavior
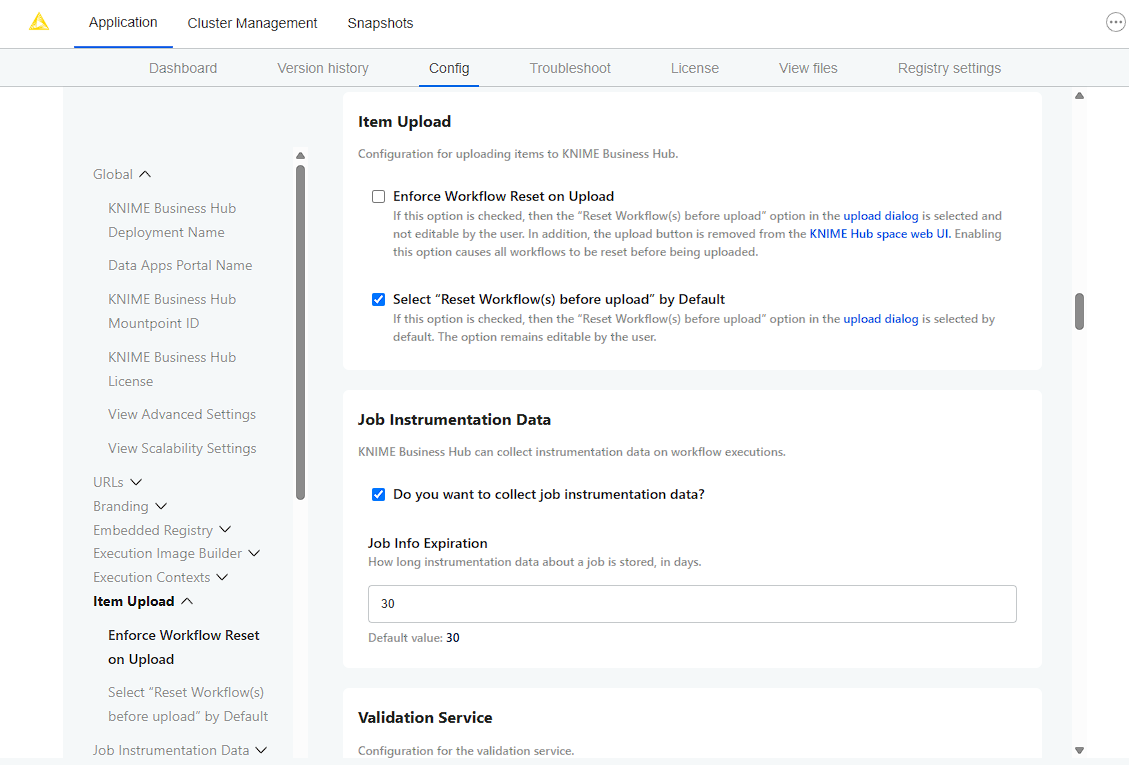
In the KOTS Admin Console, under the Config tab in the Item Upload section, you can configure how workflows are uploaded from your local KNIME Analytics Platform to a KNIME Business Hub instance.
Two settings are available:
- Enforce Workflow Reset on Upload: Forces all workflows to be reset before upload. This cannot be changed by users in the upload dialog.
- Select "Reset Workflow(s) before upload" by Default: Preselects the reset option in the upload dialog, but still allows users to change it.
Depending on how you combine these settings, you will create one of the following experiences for users:
| Enforce Reset | Default Reset | User Experience | User Choice |
|---|---|---|---|
| Yes | No | "Reset Workflow(s) before upload" is checked and cannot be changed. | No (hidden) |
| No | No | "Reset Workflow(s) before upload" is not checked and can be changed. | Yes (visible) |
| No | Yes | "Reset Workflow(s) before upload" is checked by default, but can be changed. | Yes (visible) |
The third scenario is the default configuration: workflows are reset by default before upload, but users can choose to disable this behavior.
Configure Job Instrumentation Data
Starting with KNIME Business Hub 1.17, the Job Instrumentation Data service is always enabled and you can't turn it off. The service stores data about job executions.
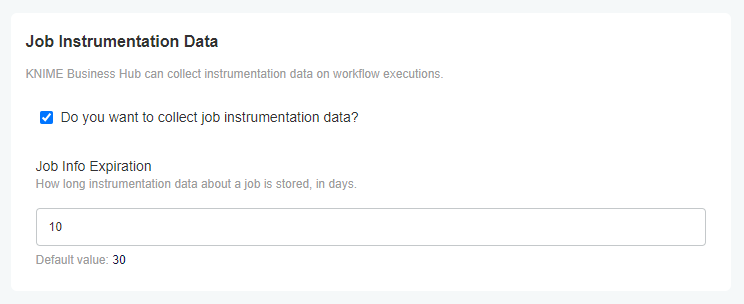
By default, KNIME Business Hub deletes the collected data after 30 days. To change the retention period, go to the Job Instrumentation Data section of the KOTS Admin Console and enter the number of days in the Job Info Expiration field.
You can use the Workflows Jobs Monitoring data application for obtaining insights about the status of workflow executions, usage of execution resources across different teams, or identify faulty jobs.
Installation of AI services
The AI service is a Business Hub feature that enables end-users to connect the AI features of their Analytics Platform (such as the KNIME AI Assistant and Code Generation) to KNIME Business Hub.
The AI service is configured via the KOTS Admin Console.
The configuration consists of the following parts:
- LLM Backend
- Disclaimer & Welcome Messages
- AI Service Q&A Content
- AI History Service
INFO
The AI service is available to all Enterprise Business Hub users, and to licensed users on the Basic and Standard editions.
LLM Backend
Currently, it is possible to configure the AI service to use either OpenAI or Azure OpenAI as backend.
To configure OpenAI as LLM Backend do the following steps:
- Create an OpenAI account
- Generate an API key on the API keys page. It is recommended to create a fresh API key that is used exclusively by the AI service.
To configure Azure OpenAI as LLM Backend do the following steps:
- Create an Azure account and get access to Azure OpenAI
- Create an Azure OpenAI resource to be used by the service and enter it in the KOTS Admin Console. It is recommended to create a separate resource that is used exclusively by the AI service to avoid any interference with other applications.
See the Azure OpenAI documentation to learn how to create a resource.
- Deploy the following models with API version
2024-08-01-previewor newer:- Lightweight model:
gpt-4.1-mini - High intelligence model:
gpt-4.1 - Embedding model:
text-embedding-3-small
- Lightweight model:
See the Azure OpenAI documentation for more details.
Models usage
Refer to this section for the latest details.
The KNIME AI Assistant uses different models depending on the interaction mode.
For Q&A mode:
gpt-4.1-mini(lightweight model) for response generationtext-embedding-3-smallfor embeddings
For Build mode and code generation:
gpt-4.1(high intelligence model)text-embedding-3-smallfor embeddings
This distinction exists because gpt-4.1 is more capable than gpt-4.1-mini, but also much slower to respond and more expensive. If response time and cost are not constraints, gpt-4.1 can also be used for Q&A mode.
INFO
Models with reasoning enabled by default, such as gpt-5, are currently not supported. Other models in the GPT-5 series (gpt-5.1, gpt-5.2, gpt-5.3, gpt-5.4) are supported since reasoning is disabled by default.
Disclaimer & welcome messages
The KOTS Admin Console also allows you to customize the initial messages displayed by the KNIME AI Assistant. The disclaimer is not shown by the KNIME AI Assistant if it is left empty.
In addition to the initial disclaimer, users will be prompted to grant permission when K-AI requests to fetch workflow data in Build mode. This permission is requested per workflow and cannot be configured by administrators. For more information, see the KNIME Analytics Platform User Guide.
AI Service Q&A Content
Enable these options to include workflows and/or components in the Q&A mode of the AI Assistant. The AI Assistant will then be able to answer questions about the public workflows and components available in the Business Hub.
Only public workflows and components are searched, and their descriptions are shared with the selected GenAI provider.
AI History Service
The AI service exposes an endpoint that allows you to retrieve the requests that were made to the AI service via the KNIME AI Assistant. The KOTS Admin Console allows you to configure which Keycloak groups can access the endpoint.
It is recommended to only give access to admins.
The address depends on the hub but it is typically located at https://api.<base-url>/ai-history/kai.
GET requests to this endpoint need to have the authorization header set with a valid bearer token from the Hub.
You have the possibility to filter data by date directly within the endpoint, for instance:
https://api.<base-url>/ai-history/code/python?start_time=2023-12-31T00:00:00&end_time=2024-04-10T00:00:00The format of the parameters start_time and end_time needs to be yyyy-mm-ddThh:mm:ss as in the example above.
The Gen AI Monitoring data app helps you monitor and govern K-AI usage in your KNIME Business Hub instance. Find more information and a step-by-step guide here.
Node affinity
Node affinity makes it possible to ensure that cluster resources intended for a specific task, e.g. execution resources, run on a specific set of nodes. There are two roles that each pod is grouped into: core and execution. Pods in the core group consist of KNIME Business Hub control plane resources, and pods in the execution group relate to execution contexts.
In order to use the node affinity feature in your KNIME Hub cluster, you can apply one or both of the following labels to nodes within your cluster:
hub.knime.com/role=corehub.knime.com/role=execution
To label a node, you can execute the following command (where <node-name> is the name of the node you want to label):
kubectl label node <node-name> hub.knime.com/role=coreFor more information about labeling nodes, see the Kubernetes documentation.
Pods will have to be restarted in order to be rescheduled onto labeled nodes. You can use the following example commands to restart the pods in a live cluster:
kubectl rollout restart deployment -n istio-systemkubectl rollout restart deployment -n <business-hub-namespace>kubectl delete pods -n <business-hub-namespace> --selector app.kubernetes.io/name=knime-hub-executionThis command will restart all execution context pods.
There are a few things to note about the behavior of this feature:
Node affinity uses a "best effort" approach to pod scheduling.
- If one or both of the
hub.knime.com/rolelabels are applied, cluster resources will attempt to be scheduled onto the nodes based on their role. - If no nodes have a
hub.knime.com/rolelabel, pods will be scheduled onto any available node. - If labeled nodes reach capacity, pods will be scheduled onto any available node.
- If a labeled node is shut down, pods will be rescheduled onto other nodes in the cluster with a preference towards using nodes that have a matching label.
- Node affinity for KNIME Business Hub uses the
preferredDuringSchedulingIgnoredDuringExecutionapproach (see the Kubernetes documentation for more details).
- If one or both of the
It is possible to use only one of the labels above, e.g. labeling nodes for the
executionrole but not specifying any node labels for thecorerole.
Usage of taints and tolerations
Taints and tolerations are used to repel or attract pods to or from certain nodes within a Kubernetes cluster.
- A taint is added to one or more node(s) in a cluster. Any pods which do not tolerate the taint will not be scheduled on the node(s) with the taint.
- Tolerations are added to pods, and those tolerations allow the pods to be scheduled on nodes with matching taints.
The Kubernetes scheduler will attempt to match pods to nodes based on taints and tolerations. If no suitable matches are found, the pod will generally not be scheduled. This is commonly used to separate workloads in a Kubernetes cluster.
The official Kubernetes documentation on taints and tolerations can be found here.
How to use taints and tolerations in Business Hub
You can use taints and tolerations in existing cluster deployments. These existing clusters are usually running more than one application. To provide separation of resources between applications, you can taint nodes for specific applications and Hub is required to add tolerations allowing it to be deployed on the customer specified nodes.
Here is an example of how to add a taint to a given node:
## Add a taint to a node.
kubectl taint nodes <node-id> key=value:effect

## Example (core node):
kubectl taint nodes node1 hub.knime.com/role=core:NoSchedule

where:

*   `node1`: is the **name** of the node you want to taint.

*   `hub.knime.com/role=core`: is the **key-value pair** defining the taint.

*   `NoSchedule`: is the **effect**, preventing pods without matching tolerations from being scheduled on the node.
    Refer to the [Kubernetes documentation](https://kubernetes.io/docs/concepts/scheduling-eviction/taint-and-toleration/) for details on the **effects** that are supported.
Deploying KNIME Business Hub with tolerations
Since KOTS is a framework integrated into all KNIME Business Hub deployments, all pods started by KOTS also have to have tolerations added. Otherwise, the KOTS pods will be missing any tolerations and may not be scheduled successfully if all nodes have one or more taint(s).
This is an example of how to use the kots install command to start a Business Hub deployment with the default tolerations applied to KOTS pods (requires the kubectl kots plugin v1.123.0 or higher):
kubectl kots install knime-hub --tolerations hub.knime.com/role:Equal:Core:NoScheduleThis example will cause the toleration specified to be set on the pods started by KOTS, namely kotsadm, minio, and rqlite. Multiple tolerations can be specified on the command line by repeating the --tolerations flag, for example:
kubectl kots install knime-hub \\
--tolerations hub.knime.com/role:Equal:Core:NoSchedule \\
--tolerations hub.knime.com/Project1234:Equal:Value1234:NoSchedule
where:
hub.knime.com/role:Equal:Core:NoSchedulespecifies the toleration for nodes tainted with the key.value pairhub.knime.com/role=Coreand theNoScheduleeffect.hub.knime.com/Project1234:Equal:Value1234:NoSchedulespecifies the toleration for nodes tainted with the key-value pairhub.knime.com/Project1234=Value1234and theNoScheduleeffect.
The tolerations can be customized as needed; see kubectl kots install --help for more information.
Configuring custom tolerations in KOTS Admin Console
The instructions so far have shown how to set tolerations for KOTS pods.
By default, the pods that comprise the KNIME Business Hub application (as of version 1.13.1+) support hub.knime.com/role=core:NoSchedule and hub.knime.com/role=execution:NoSchedule taints for core and execution nodes, respectively. Execution Context pods will have a hub.knime.com/role=execution:NoSchedule toleration whereas all other pods will have a hub.knime.com/role=core:NoSchedule toleration. If customization is needed, the default tolerations configuration can be customized via the KOTS Admin Console.
In order to add custom tolerations to KNIME Business Hub components, enable the View Advanced Settings option in KOTS Admin Console and navigate to the Advanced: Kubernetes Cluster Management section. Then, enable the Enable Custom Tolerations setting.
If any node(s) in the cluster have taint(s) applied to them, it is recommended to review and configure tolerations prior to initial installation in order to ensure that persistent volumes are provisioned on the correct nodes.
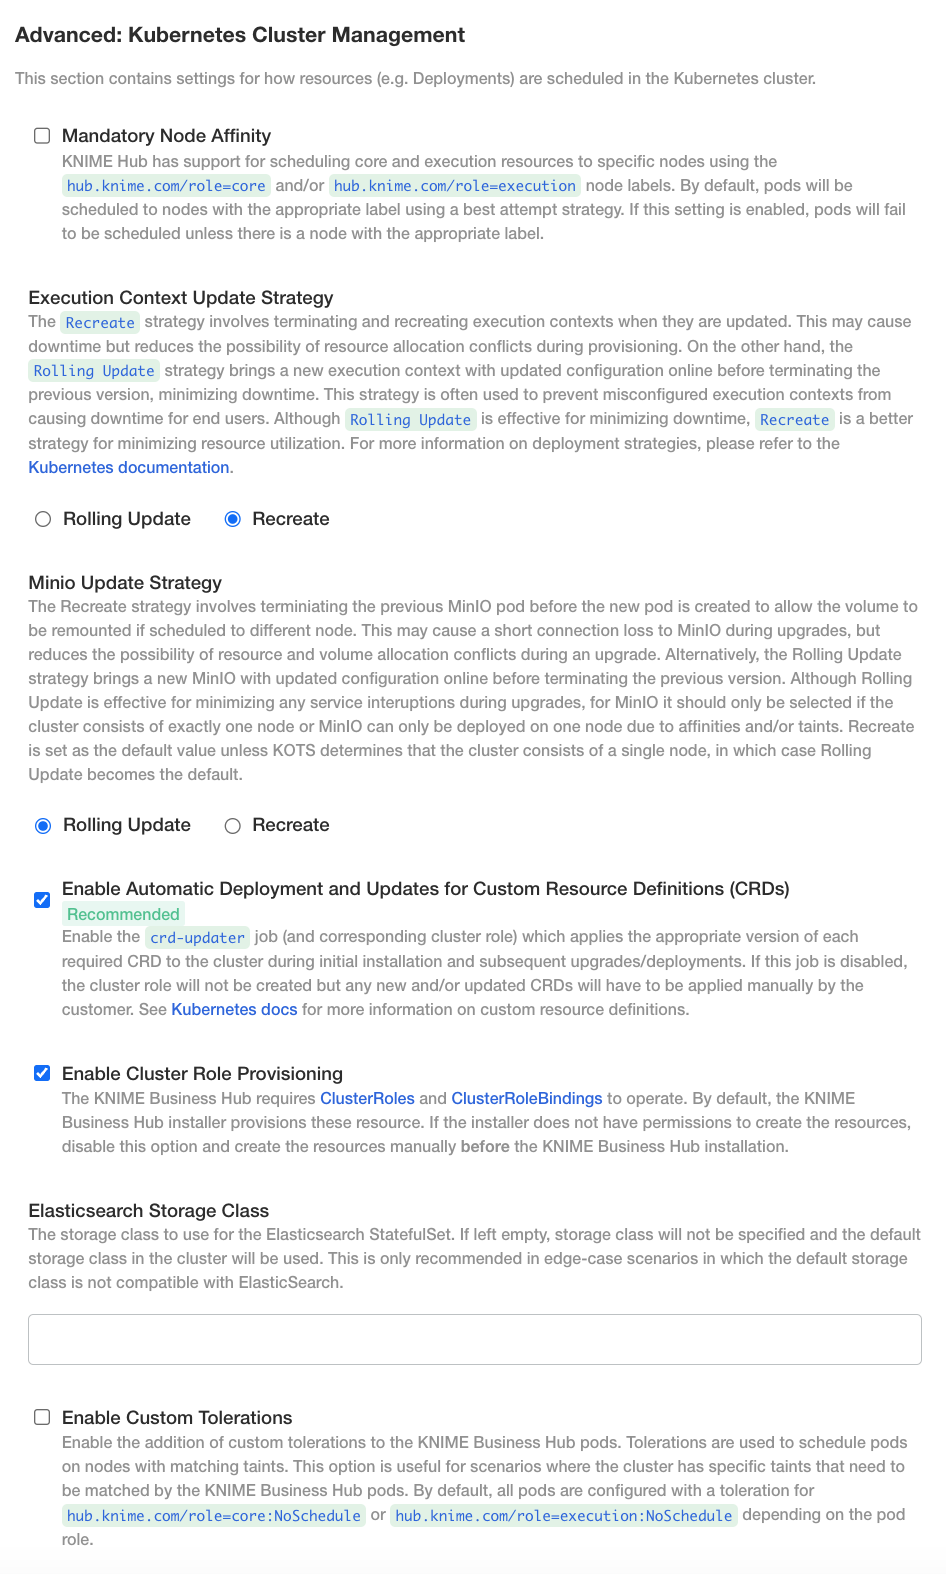
Once you have enabled the Enable Custom Tolerations setting, two new options should be displayed:
- Custom Tolerations for Core Pods
- Custom Tolerations for Execution Pods
This configuration is sensitive to error, so a valid toleration specification must be supplied in order for the deployment to complete successfully. You can customize the toleration that displays by default or add additional toleration(s).
Custom Tolerations for Core Pods:
- key: hub.knime.com/role
  value: core
  operator: Equal
  effect: NoSchedule
- key: hub.knime.com/custom
  value: corecustom
  operator: Equal
  effect: NoSchedule
Custom Toleration for Execution Pods:
- key: hub.knime.com/role
  value: execution
  operator: Equal
  effect: NoSchedule
- key: hub.knime.com/custom
  value: executioncustom
  operator: Equal
  effect: NoSchedule
Scalability options for selected Hub services
KNIME Business Hub comes with preconfigured resources for the various services. These resource allocations will be fine for average sized deployments. Depending on factors like number of users, execution load, and type of usage, it will be necessary to give more resources to certain services.
Enabling scalability options for selected Hub services adds more flexibility in setting scalability and resource usage options for your Hub instance services. Your Business Hub pods will be able to scale according to load in an automatic way.
You can specify resource usage for the following Hub services:
- Accounts
- Catalog
- Execution Rest Interface
- Search
- Websocket Proxy
- Search-sync-service
- Artemis
- Elasticsearch
Additionally, you can enable Postgres read replicas. This option takes load off of the main Postgres instance. The services that are configurted to use read replicas will send all read-only SQL requests to one of the read replicas, allowing Postgres to take on more load.
In order to enable the scalability settings go to the KOTS Admin Console and under the Config tab, go to the Global section and check the option View Scalability Settings.
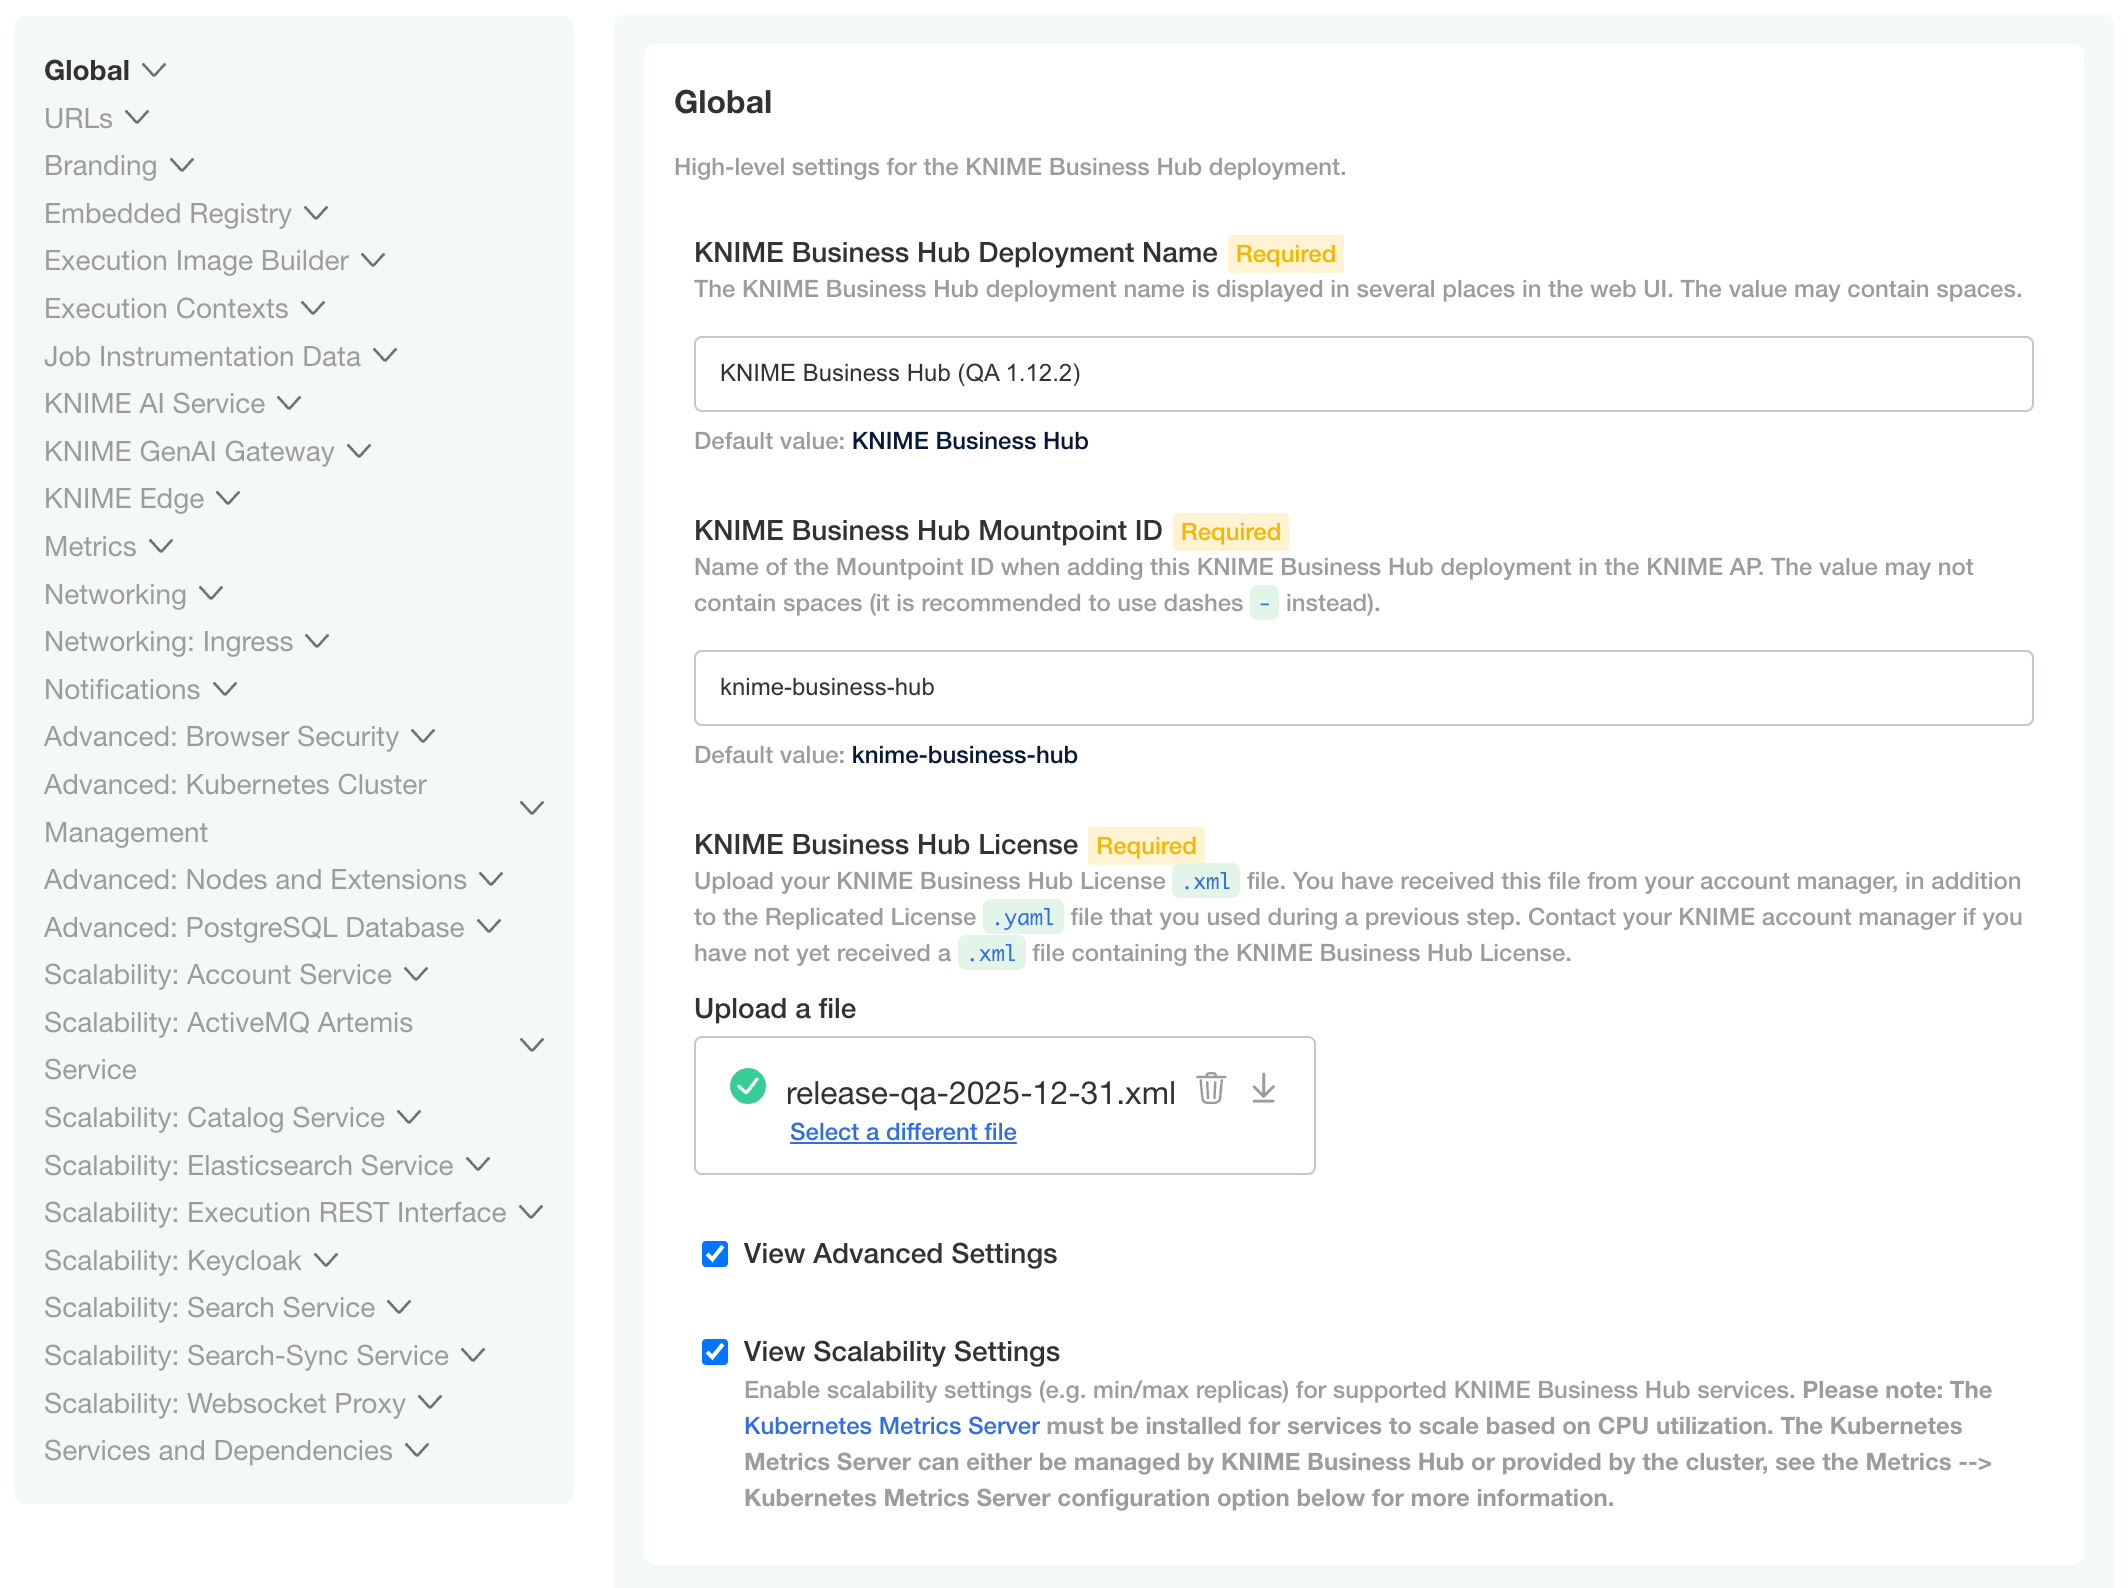
Specify resource usage for Hub services
Once you have enabled the feature by checking the View Scalability Settings option, you can configure the following settings for the desired service:
- Minimum replicas: The lowest number of replicas to deploy.
- Maximum replicas: The highest number of replicas to deploy.
- Target CPU Utilization: The CPU utilization percentage threshold. When CPU usage exceeds this value the system will be triggered to scale up.
- CPU Resources: The CPU resources assigned to a container. This sets the CPU
requests, meaning the guaranteed amount of CPU allocated to the service instance. CPUlimits, meaning the maximum CPU usage allowed, are set equal toresources. - Memory Resources: The memory resources assigned to each instance. This sets the memory
requests, meaning the guaranteed memory allocation. Memorylimits, meaning the maximum allowed memory, are set equal toresources * 1.5.
You can do so from the KOTS Admin Console by going to the Scalability section of each service, e.g. Scalability: Accounts Service for the accounts service and so on. Here you can see an example of how to set up the scalability for the accounts service.
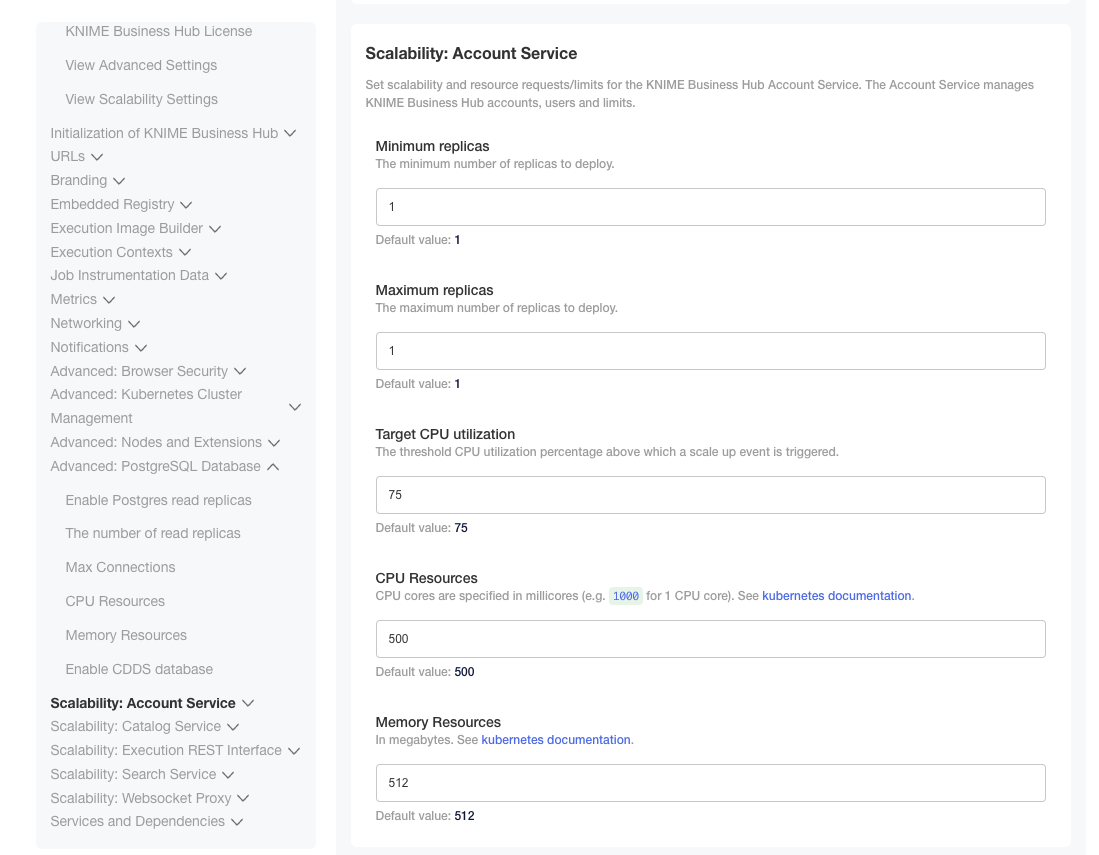
Configure Postgres read replicas
Enabling the Postgres read replicas settings requires one additional step, since this section is hidden by default. In the KOTS Admin Console Config tab, in the Global section, enable:
- View Advanced Settings, and
- View Scalability Settings.
Then navigate to the section Advanced: PostgreSQL Database. Here check the option Enable Postgres read replicas. This will allow you to configure the following settings:
- Number of read replicas: The number of PostgreSQL read replicas.
- Max Connections: The maximum number of concurrent connections that can be established with PostgreSQL.
- CPU Resources: The CPU resources assigned to a container. This sets the CPU
requests, meaning the guaranteed amount of CPU allocated to the service instance. CPUlimits, meaning the maximum CPU usage allowed, are set equal toresources. - Memory Resources: The memory resources assigned to each instance. This sets the memory
requests, meaning the guaranteed memory allocation. Memorylimits, meaning the maximum allowed memory, are set equal toresources * 1.5.
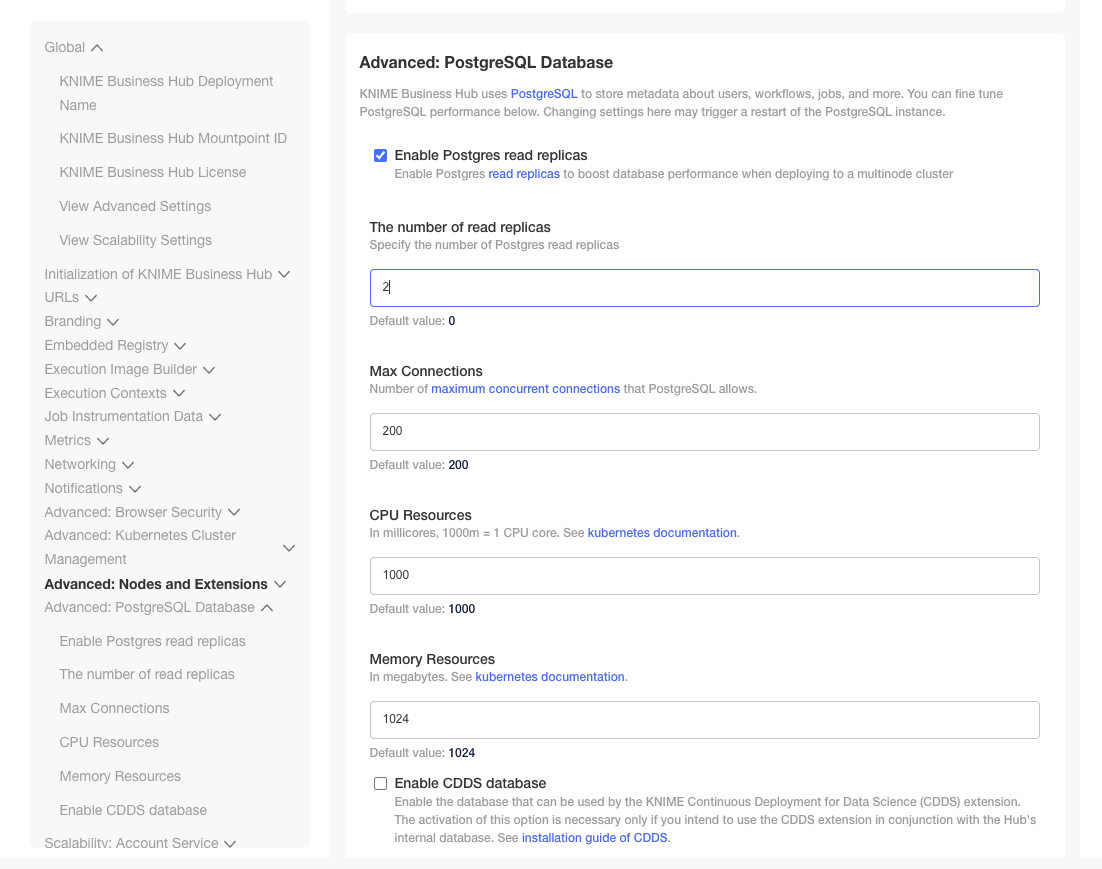
Business Hub metrics via Grafana Dashboards
As an administrator you have access to metrics from Kubernetes, KNIME Business Hub services, and tools like Keycloak and MinIO to understand KNIME Business Hub operations better and troubleshoot performance issues more effectively, via Grafana Dashboards.
In this section you will learn how to enable Prometheus to collect and store metrics and use Grafana Dashboards to consume the collected metrics.
- Grafana is used to visualize metrics collected from your Kubernetes cluster. For embedded cluster installations, Grafana comes preconfigured with dashboards tailored to Kubernetes components like nodes, pods, and services. These dashboards provide out-of-the-box visibility into cluster health, performance, and resource usage, simplifying the monitoring and debugging of KNIME Business Hub. For KNIME Business Hub, Grafana depends on Prometheus and the Prometheus Operator to be available in the cluster.
- Prometheus is a monitoring system that scrapes metrics from Kubernetes components and services. It uses Kubernetes service discovery to automatically find and monitor targets within the cluster, providing a robust and dynamic way to track performance metrics. The Prometheus Operator simplifies and automates the deployment, configuration, and management of Prometheus instances in a Kubernetes cluster. It provides Kubernetes-native custom resources such as Prometheus, ServiceMonitor, and PodMonitor for configuring Prometheus instances. For KNIME Business Hub, the Prometheus Operator operator manages one or more Prometheus instances which scrape and store metrics from various services in the cluster.
For existing cluster installations additional steps are necessary to use monitoring via Prometheus Metrics and Grafana Dashboards, such as installing Prometheus and Grafana and deploying Prometheus Operator. Contact your designated (technical) account manager to know more about monitoring on an existing cluster.
Enabling Prometheus Metrics and Grafana Dashboards
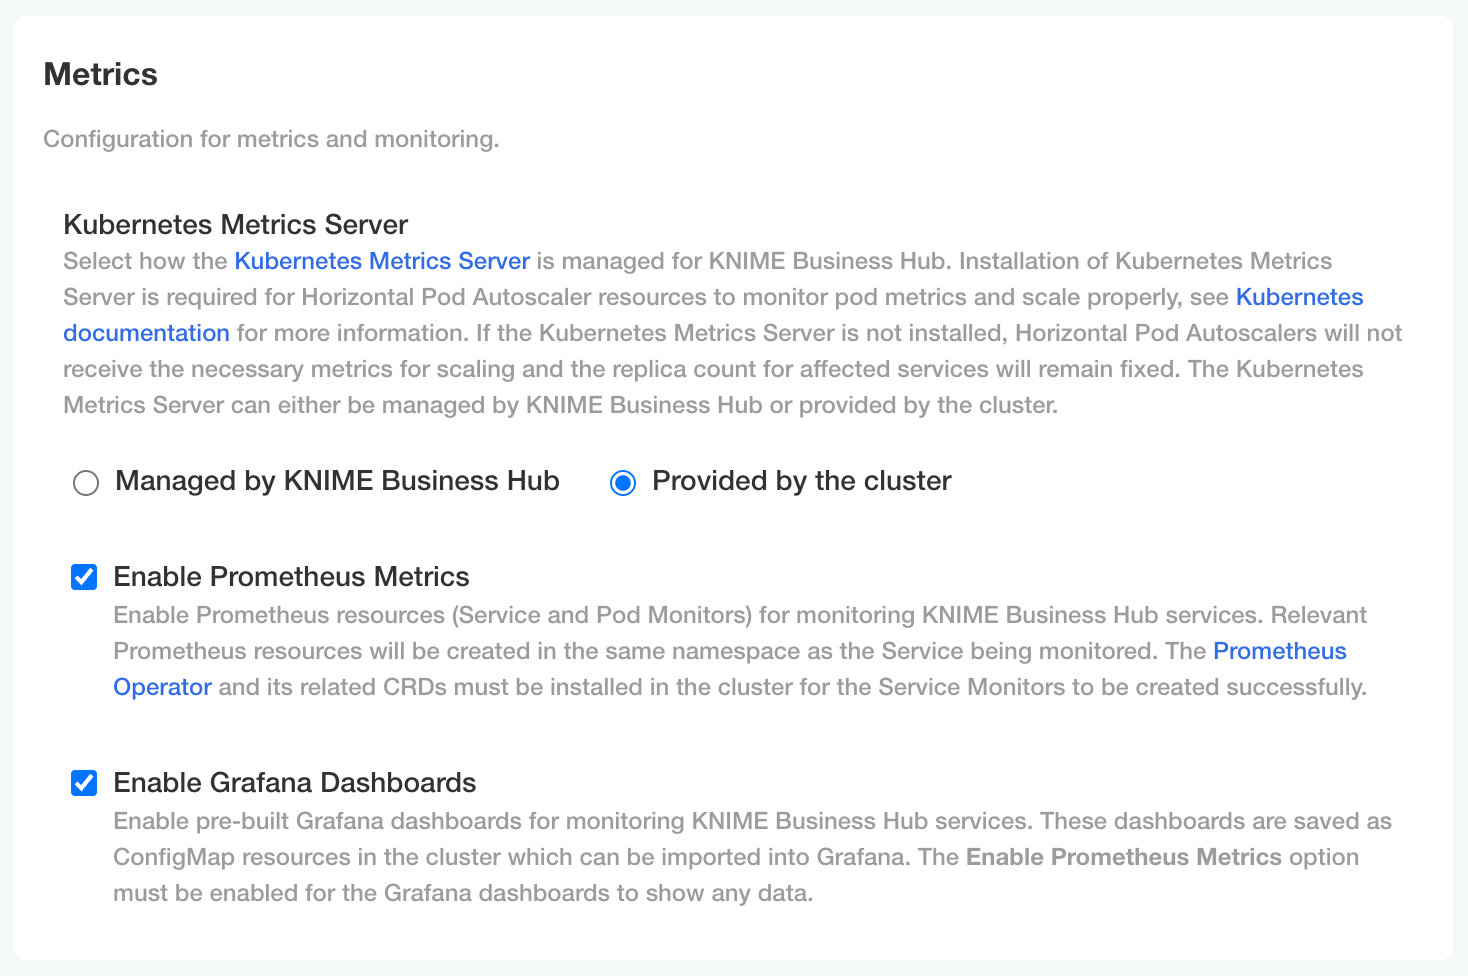
In KOTS Admin Console, under the Metrics section, ensure that the Enable Prometheus Metrics and Enable Grafana Dashboards options are selected. Deploy the configuration changes if needed.
Grafana
Accessing Grafana
To access Grafana follow these steps:
- Retrieve Grafana login credentials: The Grafana login credentials are saved in a Kubernetes Secret (called
grafana-adminfor embedded cluster installations) within themonitoringnamespace. The commands below can be used to retrieve and decrypt the admin username and password.
## Find the name of the Grafana admin credentials secret.
kubectl get secrets -A | grep grafana-admin

## Retrieve Grafana admin username.
## The secret name may be different depending on cluster type and install method.
kubectl get secret -n monitoring grafana-admin -o jsonpath="{.data.admin-user}" | base64 -d

## Retrieve Grafana admin password.
## The secret name may be different depending on cluster type and install method.
## The output will likely show a % character appended to the end, which should be omitted.
kubectl get secret -n monitoring grafana-admin -o jsonpath="{.data.admin-password}" | base64 -d
Access the Grafana Console: In order to access Grafana, the
grafanaservice needs to be port-forwarded tolocalhost. Below is an example command which port-forwards thegrafanaservice tolocalhost:9000.## Find the name of the Grafana service. kubectl get services -A | grep grafana ## Port-forward the Grafana service to localhost:9000. ## The service name may be different depending on cluster type and install method. kubectl -n monitoring port-forward service/grafana 9000:80After port-forwarding the
grafanaservice, the web console should be accessible locally viahttp://localhost:9000. Enter the credentials that were retrieved from thegrafana-adminsecret and login.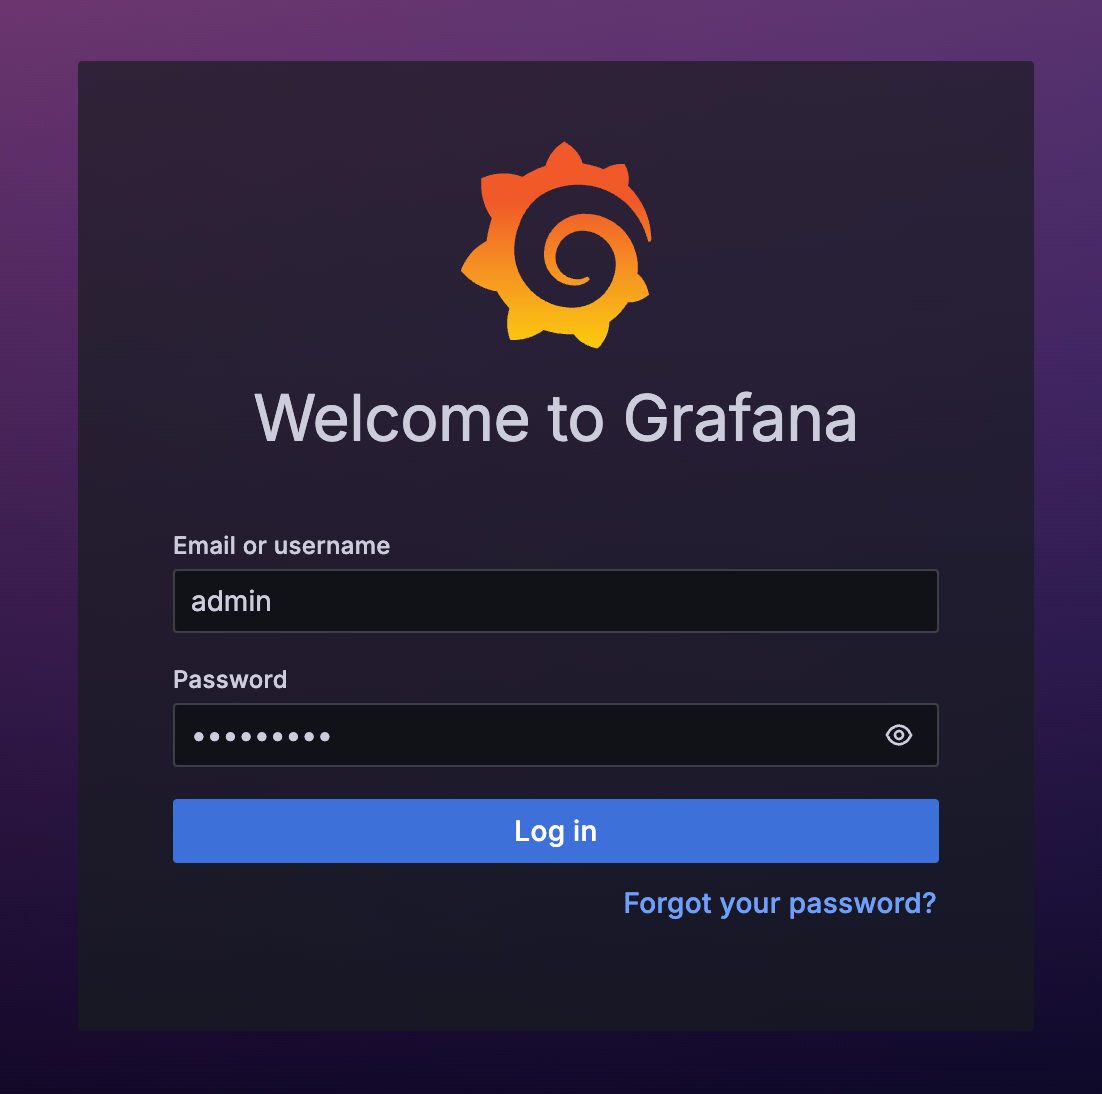
Grafana web console usage
After following the above instructions, you should now have access to the Grafana web console. Navigate to Dashboards on the left-hand sidebar, and multiple dashboards should display. This collection includes a number of dashboards from KNIME Business Hub as well as some generic Kubernetes dashboards sourced from the kube-prometheus-stack Helm chart, which is installed by default as a plugin for KURL clusters.
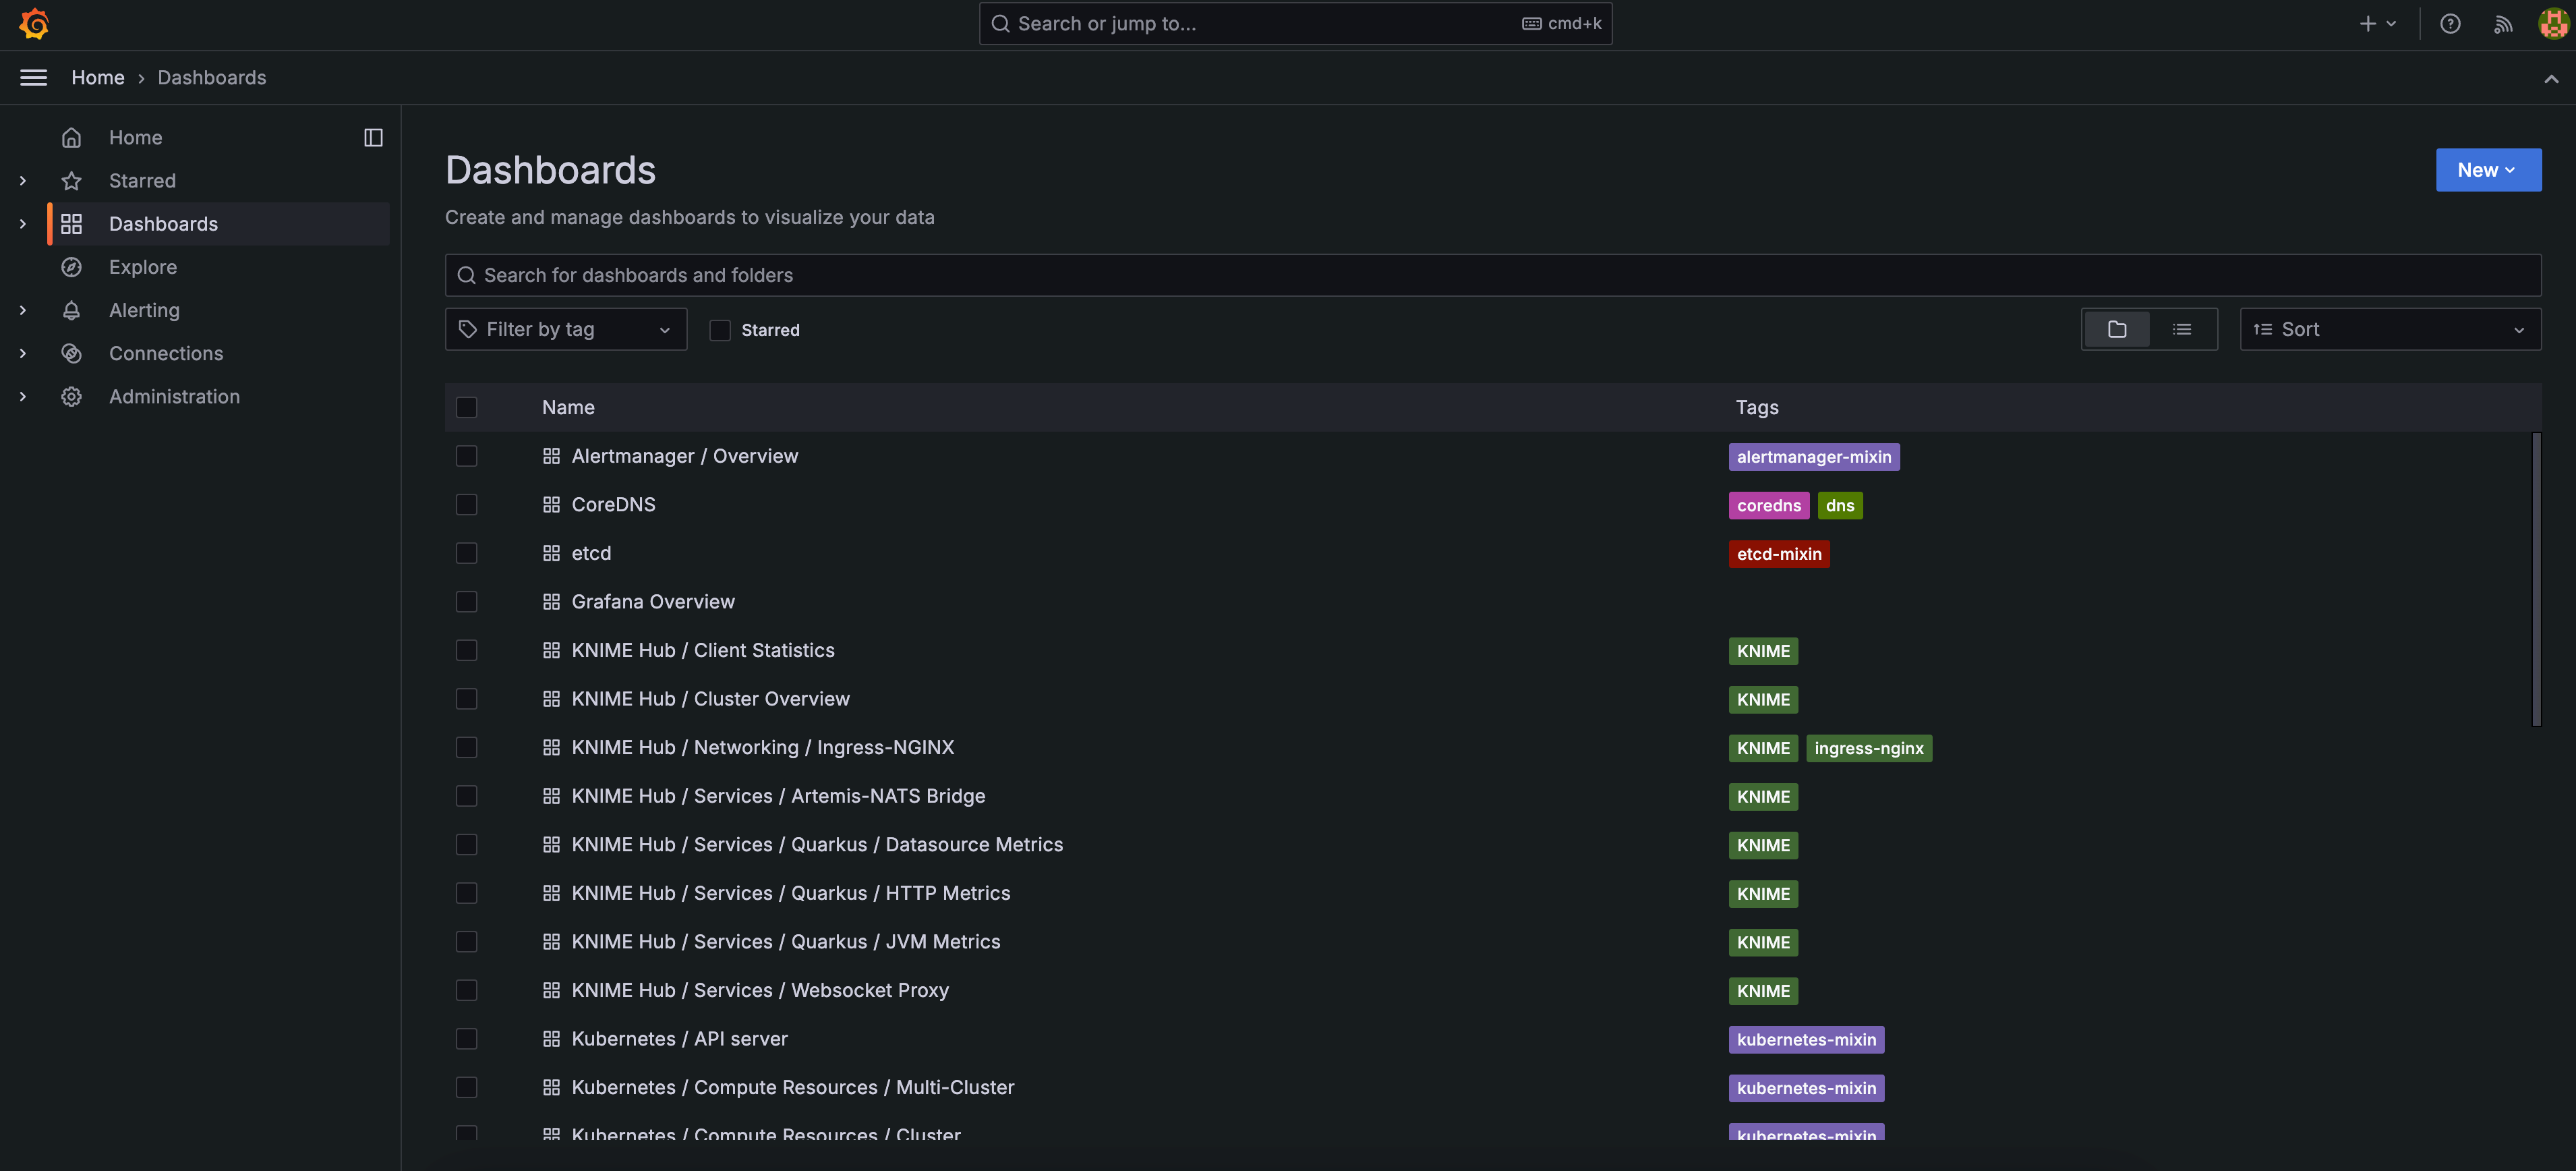
You can optionally use the tag filter control to filter the list of dashboards down to KNIME dashboards only.
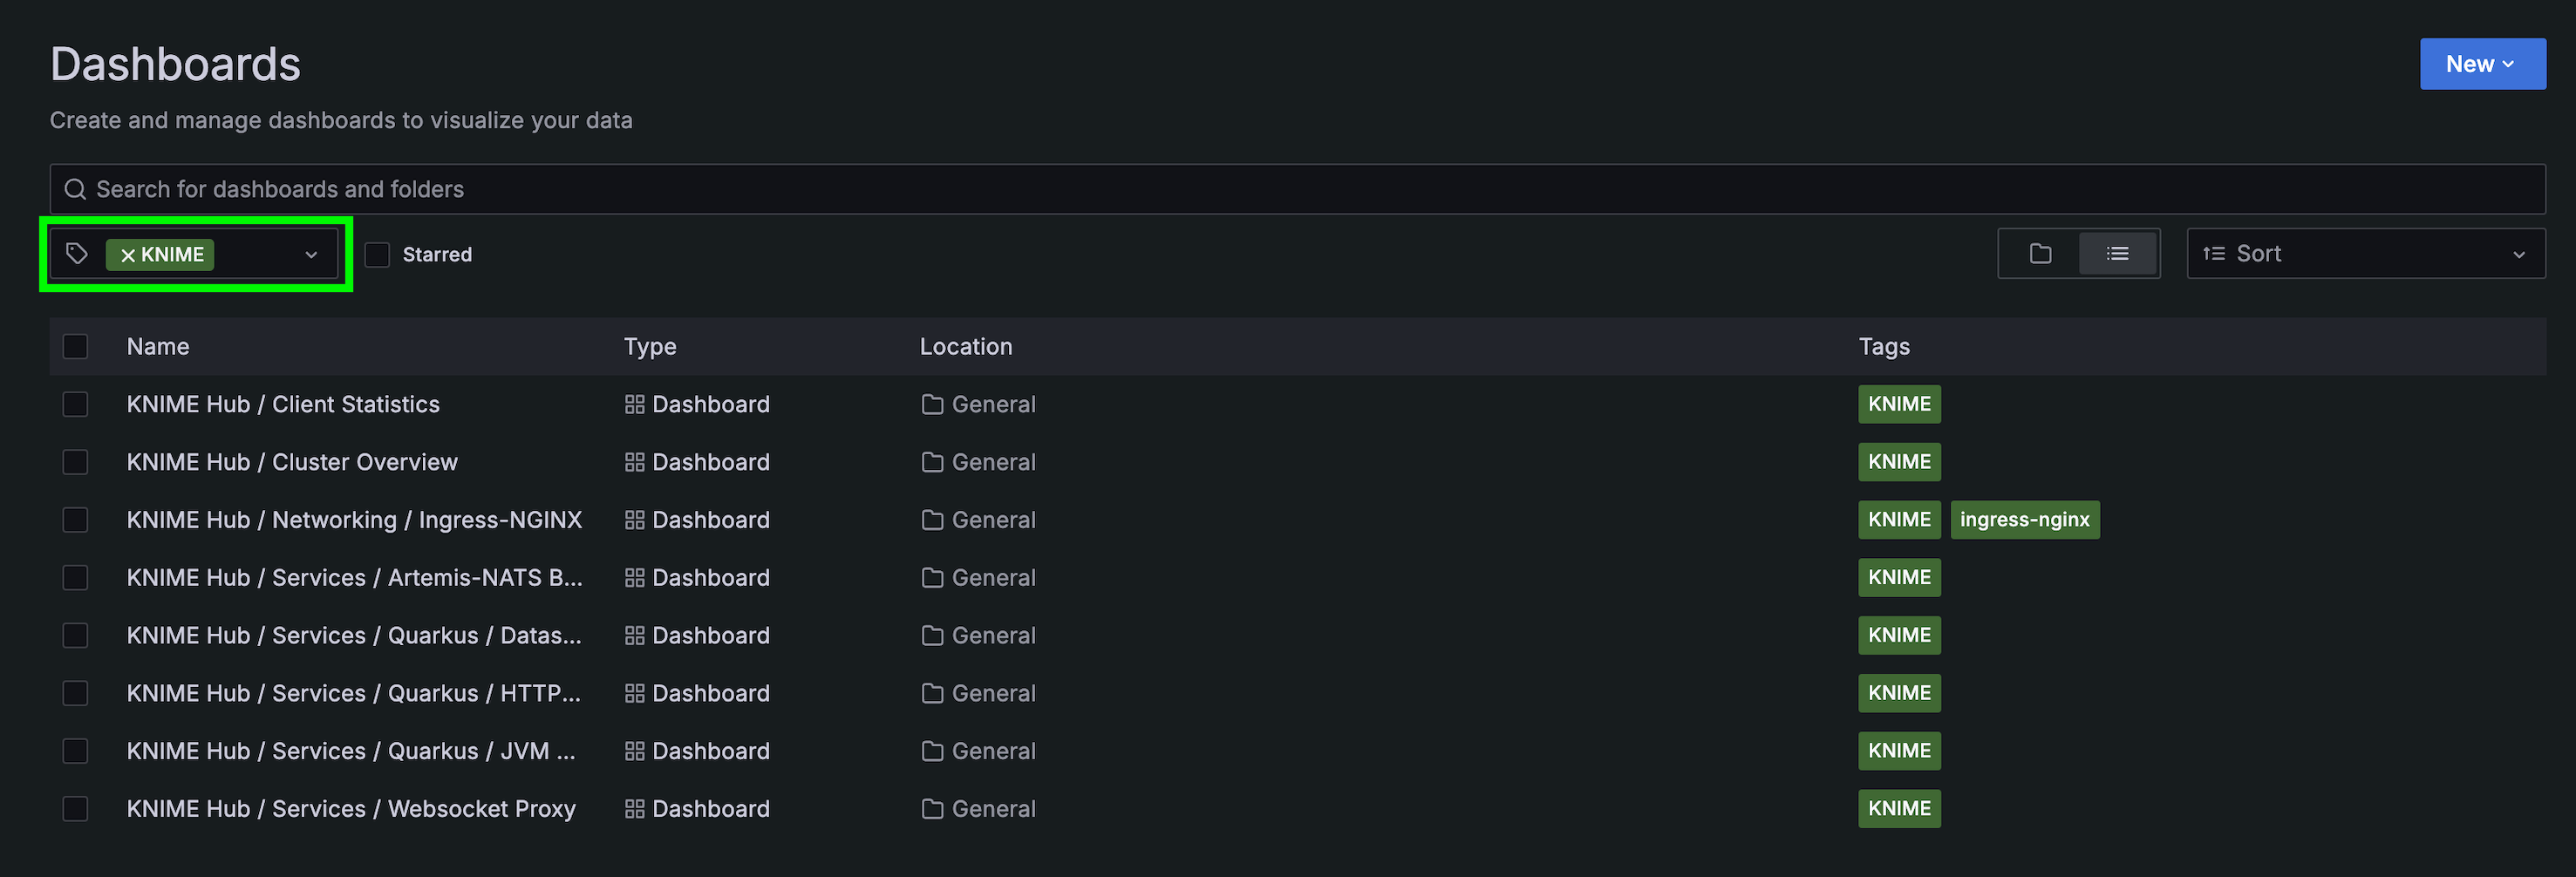
You can then click on any given dashboard to view and interact with it.
See Grafana Docs: Dashboards for more information on using Grafana dashboards.
Each dashboard with the KNIME tag has a Datasource parameter which defaults to “Prometheus”. The Datasource parameter dynamically populates with any compatible Grafana Datasources (must be of type Prometheus). This allows pointing dashboards to a custom datasource with a different name than the default. For any custom datasources, they must be properly configured in order for data to display in the dashboards.
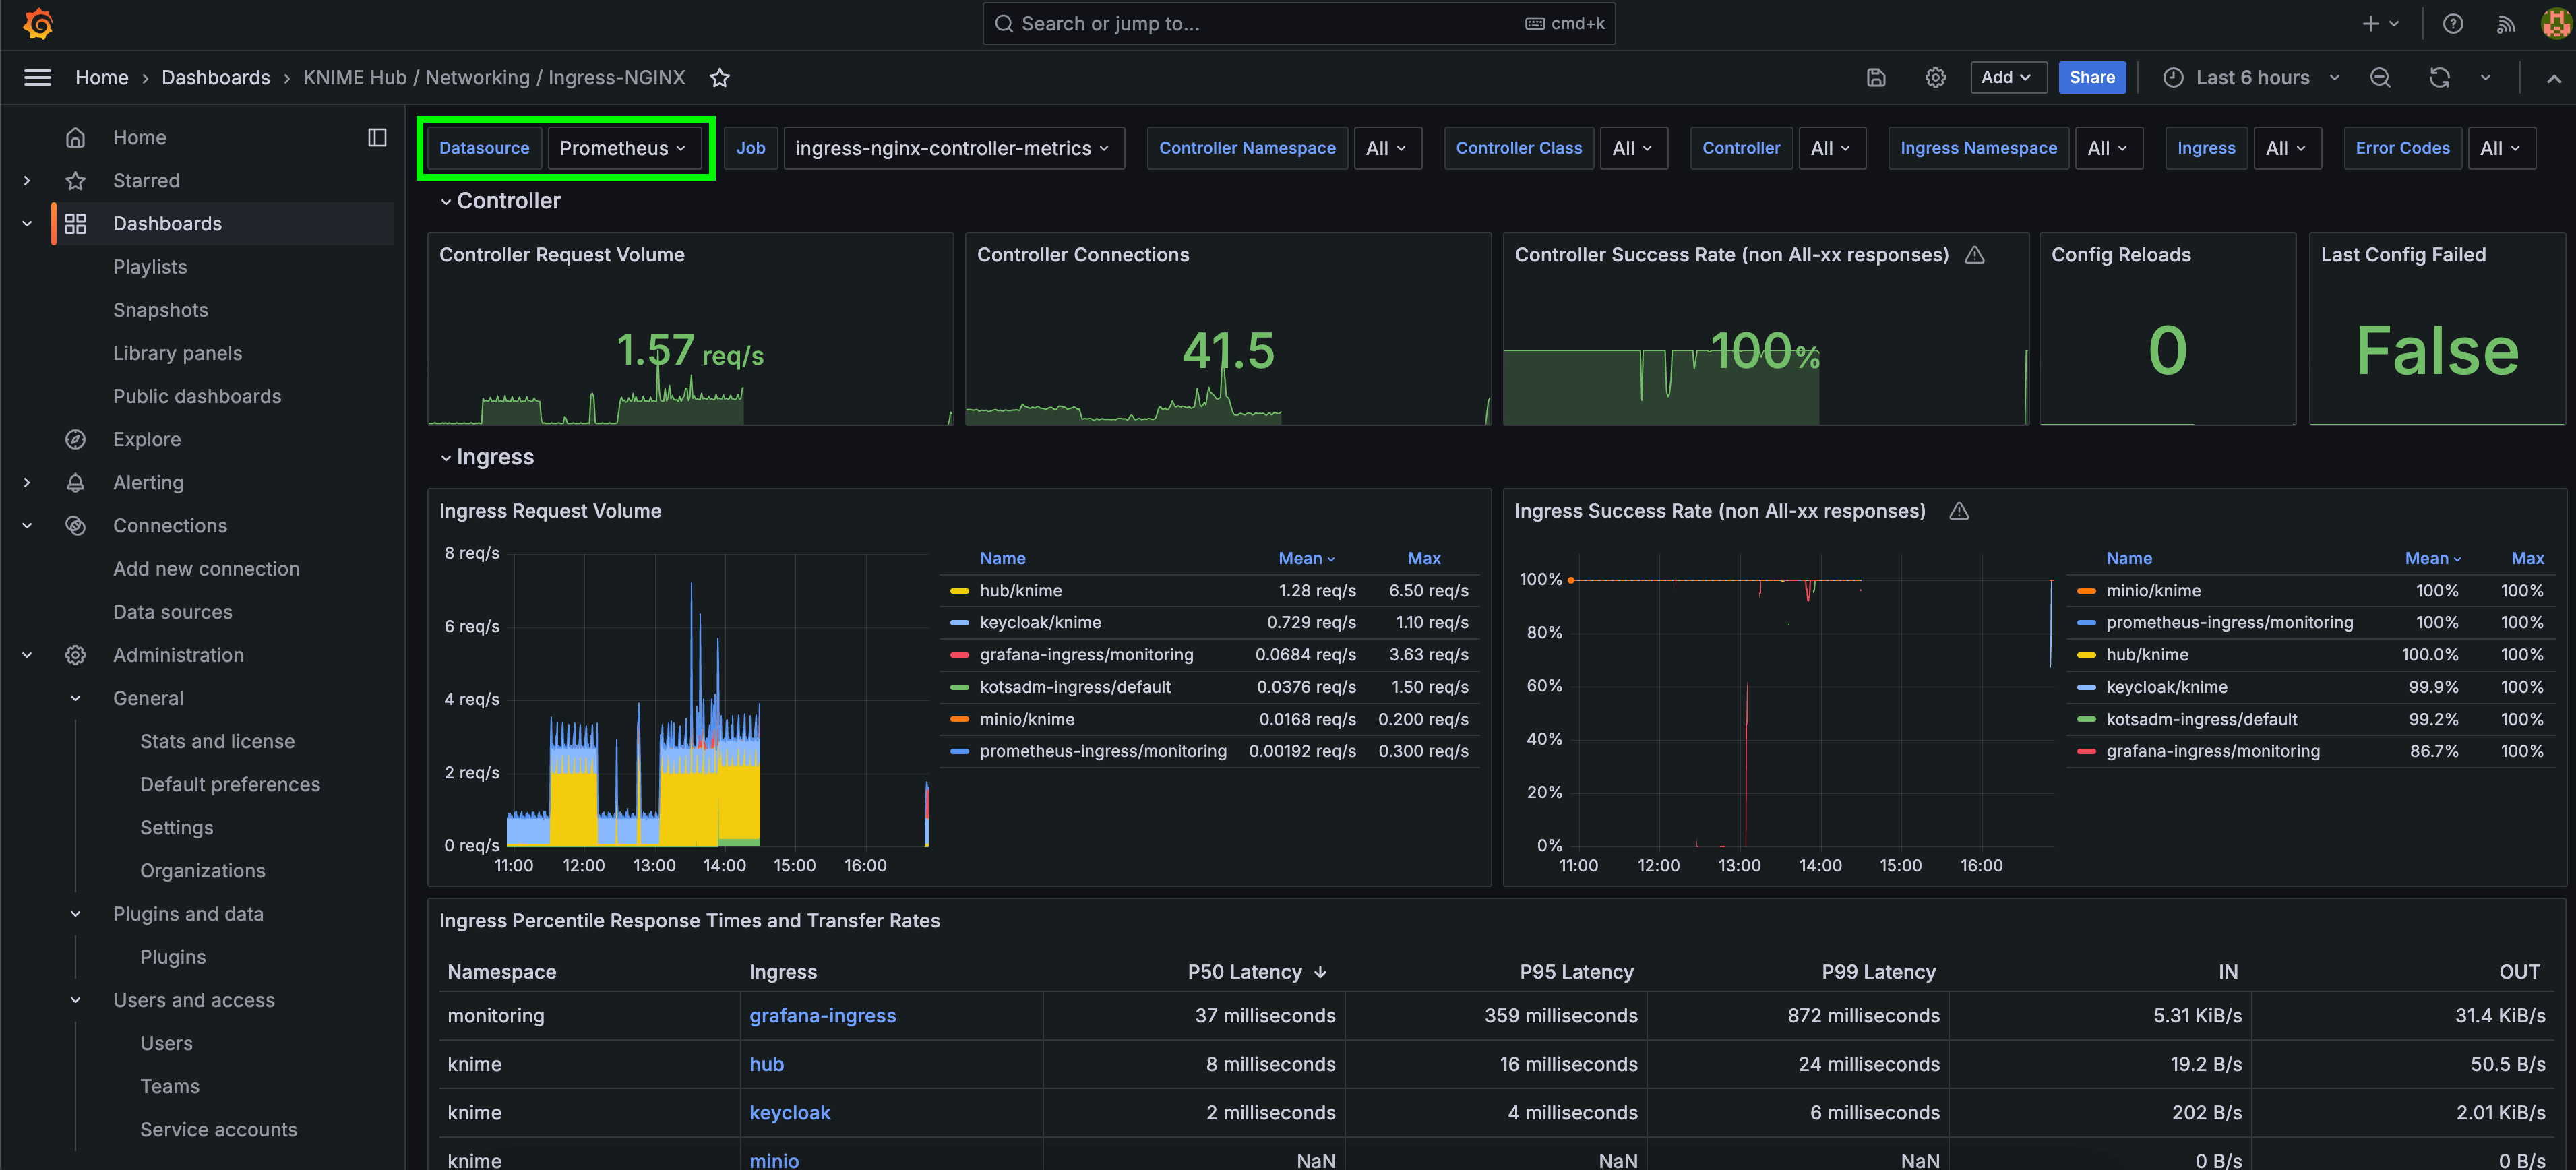
Troubleshooting
Dashboard shows no data: If your dashboard shows no data, it is likely because the Enable Prometheus Metrics option has not been enabled (and deployed) via the KOTS Admin Console.
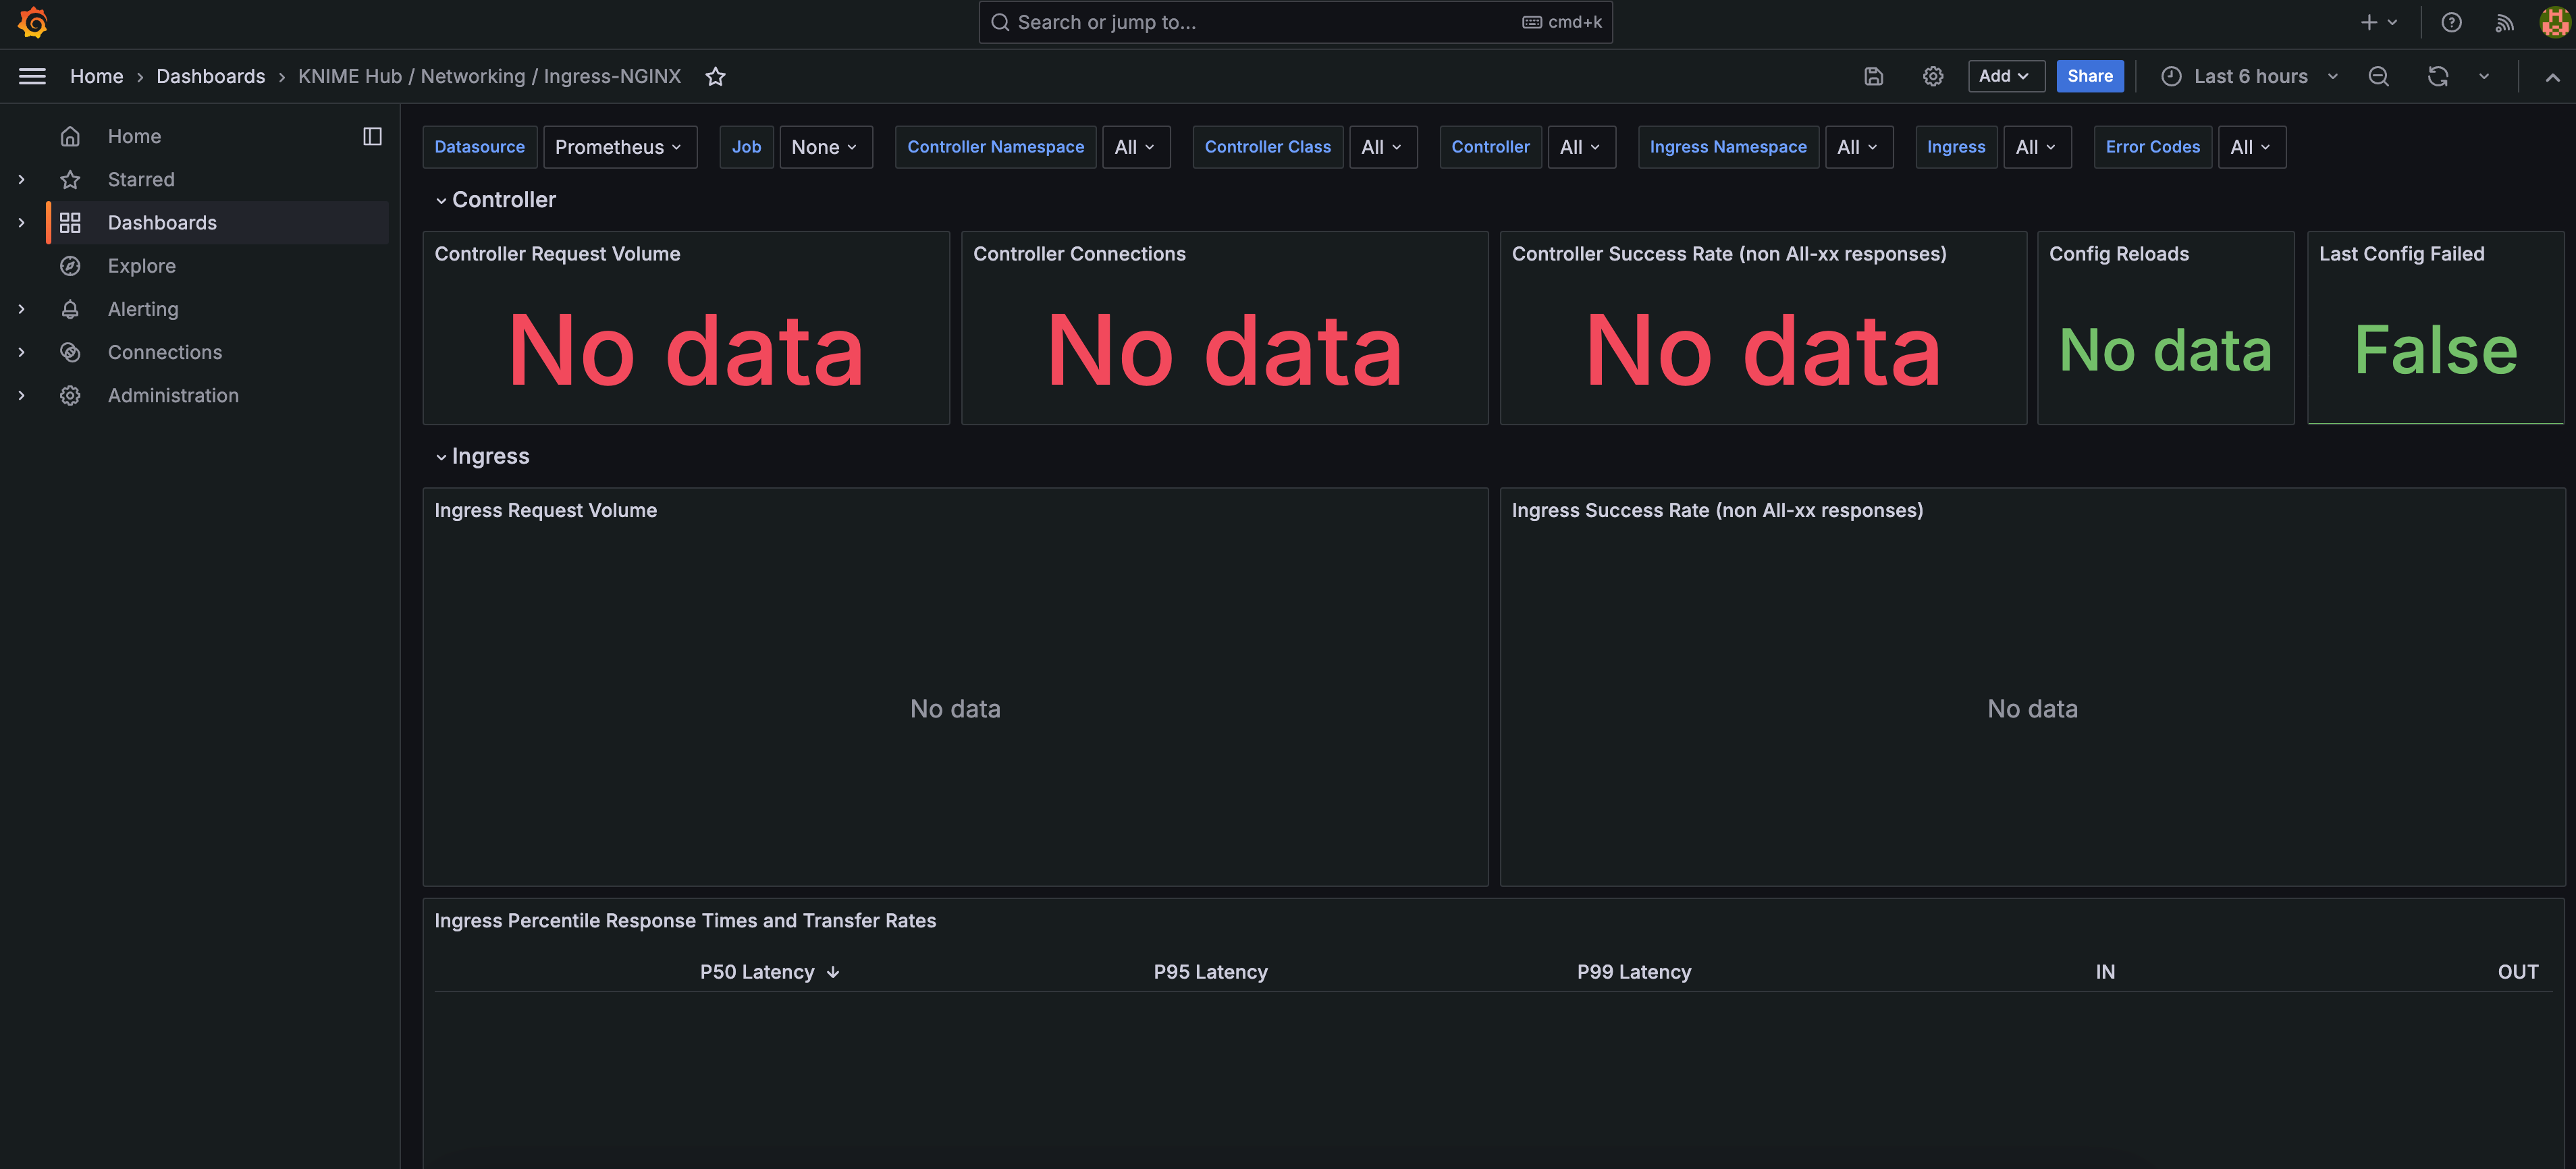
Deployment errors are shown when Prometheus Metrics are enabled: If you attempt to enable the Enable Prometheus Metrics and see deployment errors like the ones below, that indicates that the Custom Resource Definitions (CRDs) for the Prometheus Operator are not installed. For example, you might have an Existing Cluster installation of Business Hub.
Error: UPGRADE FAILED: resource mapping not found [...] no matches for kind "ServiceMonitor" in version "monitoring.coreos.com/v1"
ensure CRDs are installed first
How Grafana Dashboards are saved in KNIME Business Hub
Grafana Dashboards for KNIME Business Hub are saved as Kubernetes ConfigMap resources within the cluster (which contain the JSON configuration of the dashboard). This ensures that accidentally deleting a dashboard from the Grafana web console will not result in a permanent loss of the dashboard. It also ensures that changes cannot be saved directly to the dashboard - however, it is possible to create a copy of the dashboard and edit it freely.
## Search for all Grafana dashboard ConfigMap resources in the cluster.
## Most dashboards are prefixed with \`grafana-dashboard\`.
kubectl get configmaps -A | grep grafana
If you would like to create a custom dashboard for KNIME Business Hub, it is recommended to save it as a ConfigMap resource in the cluster to ensure it is persisted if the Grafana pod is restarted. See Grafana Docs: JSON model for more information on how to retrieve the JSON data for a custom dashboard created in the Grafana web console. Also refer to existing Grafana Dashboard ConfigMap resources as a reference, and note that the
grafana_dashboard="1"label is required for Grafana to recognize your custom ConfigMap.
Auditing
As KNIME Business Hub administrator you can access secret store audit logs to track and analyze user activity. This is essential for identifying potential security issues and ensuring compliance with organizational policies.
For details about the structure and contents of audit log entries, see the Auditing section of the KNIME Secrets User Guide.
Viewing audit logs
You can retrieve secret store audit logs through the events service endpoint of the KNIME Business Hub REST API.
Prerequisites
Before you begin, ensure that you have Hub administrator permissions.
Steps
- Log into your KNIME Business Hub installation as a Hub administrator.
- Open the events service OpenAPI documentation at
https://api.<base-url>/api-doc/?service=events. - Find the
GET /events/adhoc/{resource}endpoint, expand it, and click Try it out. - Set the
resourceparameter toaudit-secret-store. - Leave the remaining parameters empty, or adjust them to your scenario, for example to retrieve all audit logs from the last 24 hours.
- Click Execute to retrieve the matching audit log entries.
To view only the events for a particular secret, add a filter parameter alongside the time range, for example:
json
{ "itemId": "secret:106841c6-3567-4865-9cd2-7390dc9f4d3c" }Audit logs are retained for 60 days.
Support Bundles and Troubleshooting
When generating a support bundle, no data leaves the cluster.
If necessary, you can download the support bundle and send it to KNIME for the purpose of troubleshooting. Contact us by sending an email to support@knime.com. Under extreme circumstances, the KNIME team may forward the support bundle to the Replicated support team for additional help.
When generating a support bundle, a limited amount of information will be automatically redacted (IPv4 addresses, connection strings, etc.). You can configure additional redactions and/or manually redact information prior to sending the bundle. See the Configuring redaction in support bundles section for more details.
KNIME Business Hub is capable of generating support bundles in a standard format, even when the admin console isn’t working. This ensures that users are able to provide all of the necessary information for KNIME to be able to identify the problem and prescribe a solution.
Generating a support bundle (GUI)
In order to help troubleshoot an installation, or to simply inspect the logs of the cluster in a user-friendly format, you will need to generate a support bundle.
Simply open the KOTS Admin Console, navigate to the Troubleshoot pane, and click the Generate a support bundle button to generate a support bundle.
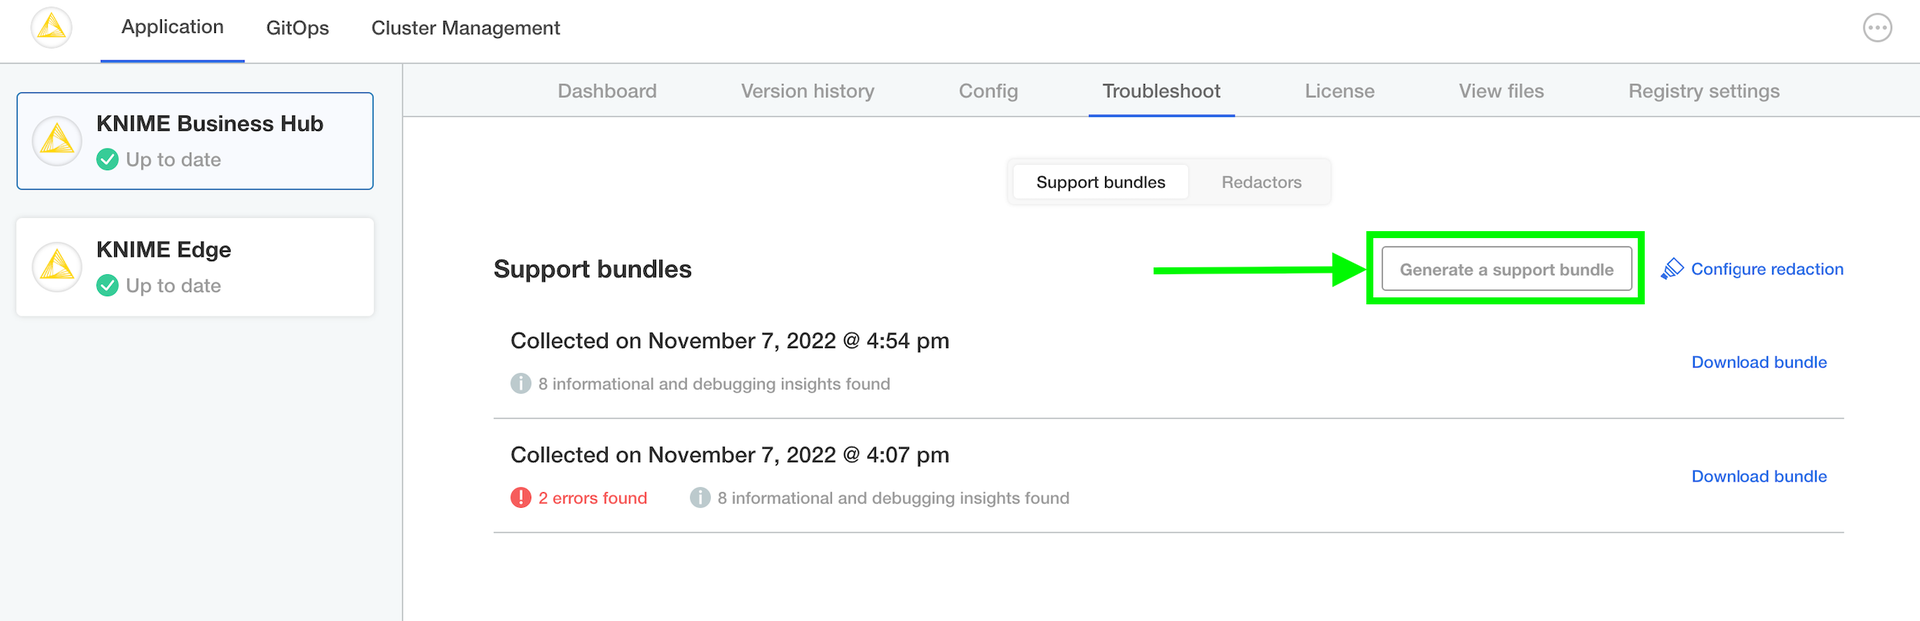
All generated support bundles will display in the list above. Click the Download bundle button to download the bundle(s) you want to share with KNIME, and please see the Configuring redaction in support bundles section for information on how to redact confidential/personal information before sending.
Generating a support bundle (CLI)
See Replicated documentation for instructions on how to generate a support bundle via the Replicated CLI.
Generating host bundles for kURL
See the Replicated documentation for instructions on how to generate host bundles for kURL.
Configuring redaction in support bundles
When generating a support bundle, a limited amount of information will be automatically redacted (IPv4 addresses, connection strings, etc.) but it is not guaranteed to be a comprehensive set of redactions. You may have additional information in your logs or configuration that you do not wish to share with the KNIME engineering team.
One option is to unzip the generated .zip support bundle and manually review/redact information prior to sending the bundle to KNIME. However, there is a lot of information to review and the redaction of certain information can be automated fairly easily. The ideal option is to configure automated redactions via Redactor resources, which will automatically redact information for all future support bundles.
In order to configure automated redactors, first open the KOTS Admin Console. Navigate to the Troubleshoot pane and click Configure Redaction.
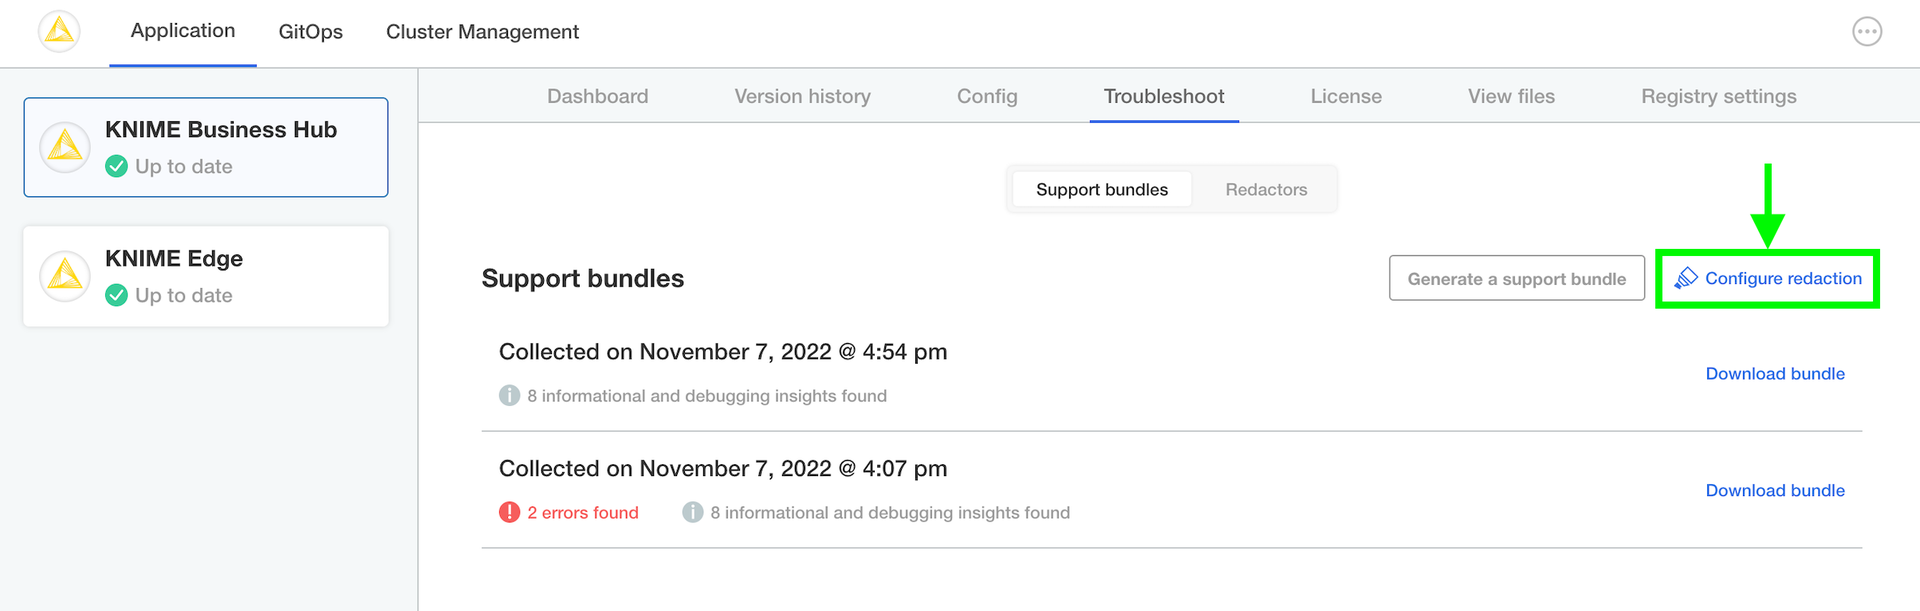
If you have configured your own custom redactions that you feel would be valuable to other users of KNIME Business Hub, please feel encouraged to share the configuration with KNIME so that it can be considered & potentially added to future releases.
See this link and this link for more information.
Inspecting support bundles
There are quite a number of of files generated in a support bundle. Not necessarily every file is useful for every problem. However, by collecting the same information in the same way each time, KNIME can ensure the best quality support possible for customers.
It is possible to inspect a support bundle entirely in the admin console. See below for an example screenshot.
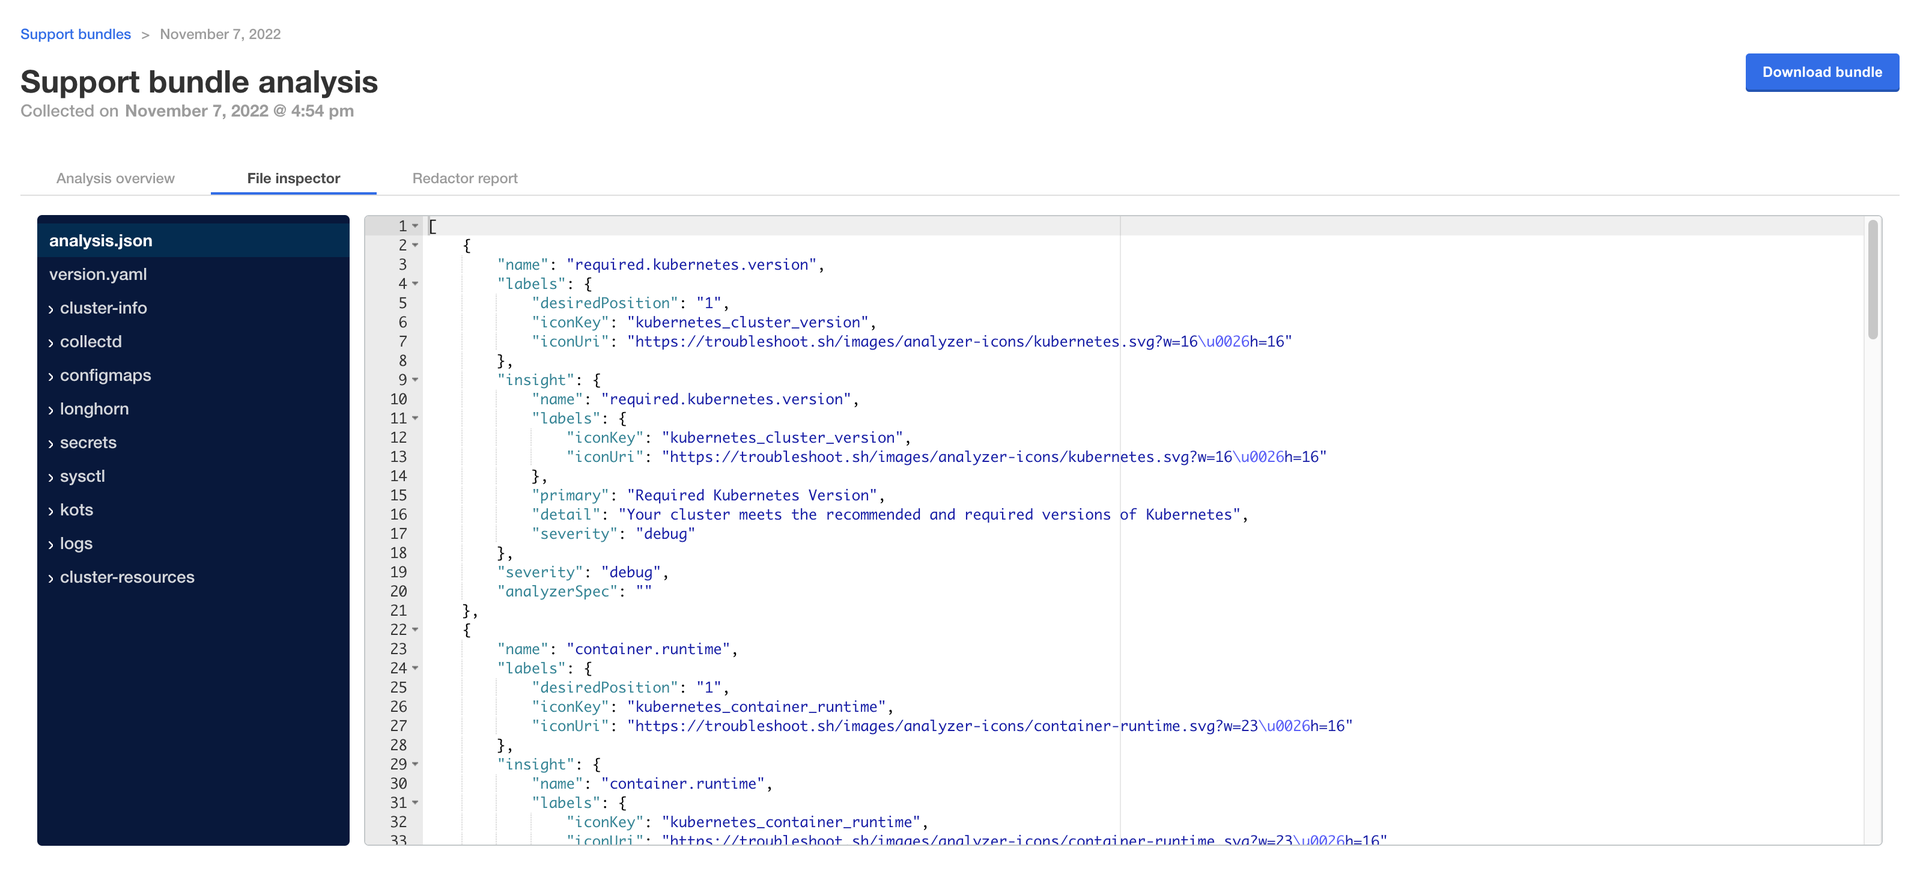
When inspecting a support bundle, several key files and directories provide essential information for troubleshooting.
- The
./analysis.jsonfile collects the highest-level insights possible for the installation, and often the issue and/or resolution may be identified by inspecting the[].name.insight.detailproperty. For example, it might contain entries showing the kotsadm status with details like "At least 1 replica of the Admin Console API is running and ready" along with severity levels. - The
./logsdirectory contains logs of individual pods, with Execution Context logs specifically stored in./logs/execution-contexts. - The
./cluster-resourcesdirectory contains the configuration of each visible resource in the cluster - for instance, to see all pods in the cluster, you would navigate to the./cluster-resources/podsdirectory which contains one file per namespace in the cluster, typically in JSON format showing pod lists and their metadata.
Maintenance operations
Shutting down and restarting a node
You might need to reboot a node if you are performing maintenance on the operating system level of the node, e.g. after a kernel update, rebooting the node will apply the changes.
Before rebooting a node on a cluster managed by kURL, make sure that snapshots completed without errors. To shut down a cluster node, call the shutdown script on the node as elevated user:
/opt/ekco/shutdown.sh
See more documentation on rebooting nodes here.
Otherwise, after a VM restart old pods might be in Failed or Shutdown state.
In case that happens, delete failed pods after the restart with the following command:
kubectl delete pod --field-selector=status.phase==Failed --all-namespacesBackup and restore with Velero Snapshots and Kotsadm
Snapshot backup and restore features are available in Replicated deployments via Velero, a tool for backing up Kubernetes cluster resources and persistent volumes. Velero always backs up Kubernetes configuration and in-cluster persistent volumes. Depending on how KNIME Business Hub is deployed, a snapshot may also trigger backup hooks for the database and object storage:
| Component | When used | Backup behavior during a Velero snapshot |
|---|---|---|
| In-cluster Postgres (Spilo) | External RDS is not enabled | Logical Postgres dumps are created via Velero hooks |
| External AWS RDS Postgres | External RDS backup is enabled | An AWS RDS DB snapshot is created via Velero pre-hook |
| In-cluster MinIO | Offloaded S3 is not enabled | MinIO data is included in the Velero snapshot |
| Offloaded AWS S3 buckets | Offloaded S3 backup is enabled | AWS Backup jobs are started for each configured bucket via Velero pre-hook |
External RDS and offloaded S3 are not restored by Velero or the KNIME restore script—you must restore them in AWS before running the Velero/KOTS restore.
If you use HostPath for Velero backups, make sure you follow the requirements described in the Replicated documentation. This may include setting specific permissions or ownership for your backup directory. For details and the latest instructions, see the Replicated HostPath backup documentation.
One-time snapshots as well as automated scheduled snapshots can be managed from the Snapshots panel within your Kotsadm dashboard at https://<base-url>:8800/app/knime-hub.
Snapshot creation and restoration are disruptive processes. KNIME applications and Replicated admin access may be unavailable during an active backup or restore operation.
Enable external RDS and S3 backup in KOTS
When using an external AWS RDS database and/or offloaded AWS S3 buckets, enable the corresponding backup options in the KOTS Admin Console Config tab (under Advanced):
External AWS RDS Postgres
- Set Postgres provider to Managed by an external provider and configure Advanced: External Postgres (endpoint, credentials, and related settings).
- In Advanced: Configure backups for external AWS RDS Postgres database (AWS RDS only), enable Enable AWS RDS Postgres Database Backups.
- Provide backup credentials in the UI, or enable Manually provide AWS credentials as secrets in cluster namespace and create a secret named
rds-backup-credentialsin the Hub namespace withaccessKeyIdandsecretAccessKeykeys.
Offloaded AWS S3 buckets
- Enable Offload object storage to external provider and configure Advanced: External S3 compatible storage (bucket names and service credentials).
- In the AWS account, create an AWS Backup vault in the region where you will store S3 backups. KNIME Business Hub does not create this vault for you; you must create it in advance (for example via the AWS Backup console or
aws backup create-backup-vault). - In Advanced: Configure backups for offloaded buckets to AWS Backup Vault (AWS S3 only), enable Use AWS Backup Vault for S3 backups.
- Set Backup IAM Role ARN, AWS Backup Vault Name (the vault you created in step 2), and Backup Vault AWS Region.
- Provide backup operator credentials in the UI, or enable Manually provide S3 or Azure Blob Storage credentials as secrets in cluster namespace and create a secret named
s3-backup-credentialsin the Hub namespace withaccessKeyIdandsecretAccessKeykeys.
Save the configuration and redeploy so the Velero agent hooks are active before relying on snapshots for RDS or S3.
IAM permissions for external RDS backup
The Velero pre-hook creates an RDS snapshot and waits until it is available. It uses the RDS endpoint from KOTS (postgres_external_endpoint) and expects a standard RDS endpoint hostname (for example, <db-instance-identifier>.<random>.<region>.rds.amazonaws.com). Snapshots are named with the prefix velero-backup- followed by a timestamp (for example, velero-backup-20260518-143022).
IAM user (cluster credentials)
Attach a policy that allows snapshot creation and status checks on the target instance:
json
{
  "Version": "2012-10-17",
  "Statement": [
    {
      "Sid": "VeleroRDSBackup",
      "Effect": "Allow",
      "Action": ["rds:CreateDBSnapshot", "rds:DescribeDBSnapshots"],
      "Resource": [
        "arn:aws:rds:<region>:<account-id>:db:<instance-name>",
        "arn:aws:rds:<region>:<account-id>:snapshot:velero-backup-*"
      ]
    }
  ]
}
Replace <region>, <account-id>, and <instance-name> with your values. The DB instance identifier is the first hostname label in the endpoint (the segment before the first dot).
Restore (customer responsibility)
Restore the RDS instance from the snapshot in AWS before running the Velero restore. The restored instance must use the same DB instance identifier as before the disaster, so the endpoint in KOTS (postgres_external_endpoint) remains valid.
If you restore to a new instance name or endpoint, update Advanced: External Postgres in KOTS (endpoint and credentials if needed) before the final KOTS redeploy at the end of the restore process. Otherwise Hub services cannot connect to the database.
IAM permissions for offloaded S3 backup (AWS Backup)
The Velero pre-hook starts one AWS Backup job per configured bucket (avatars, customization, execution, and catalog buckets from your external S3 configuration). Each job uses aws backup start-backup-job with your backup vault, the bucket ARN arn:aws:s3:::<bucket-name>, and the Backup IAM Role ARN from KOTS.
Backup service role (Backup IAM Role ARN in KOTS)
Create an IAM role that:
- Can be assumed by the AWS Backup service (
backup.amazonaws.comin the role trust policy). - Has the AWS managed policies AWSBackupServiceRolePolicyForS3Backup and AWSBackupServiceRolePolicyForS3Restore attached (restore is required when you recover data yourself after a disaster).
- Can access the offloaded S3 buckets (the managed policies cover typical setups; confirm bucket policies and AWS Backup vault access for your account).
Enter this role’s ARN in Backup IAM Role ARN in KOTS.
IAM user (cluster credentials — backup operator)
The credentials stored in KOTS or in the s3-backup-credentials secret must be allowed to start and monitor backup jobs. Attach the AWS managed policy AWSBackupOperatorAccess (or an equivalent custom policy that includes backup:StartBackupJob and backup:DescribeBackupJob on the vault and jobs you use).
AWS Backup prerequisites
- An AWS Backup vault must already exist in the region configured in KOTS (see step 2 under Offloaded AWS S3 buckets above). Hub only references the vault name; it does not provision the vault.
- Register each offloaded S3 bucket with AWS Backup for S3.
- Ensure the backup vault allows the backup role to store recovery points.
Restore (customer responsibility)
Recover bucket contents from AWS Backup before running the Velero restore. Restore to the same bucket names configured in KOTS when possible. If bucket names or regions change, update Advanced: External S3 compatible storage in KOTS before the final redeploy.
Creating snapshot backups
First, configure storage for your backups. Navigate to the Snapshots tab of your Kotsadm dashboard. Click the 'Settings' button to edit backup settings where you’ll be able to add a storage target.
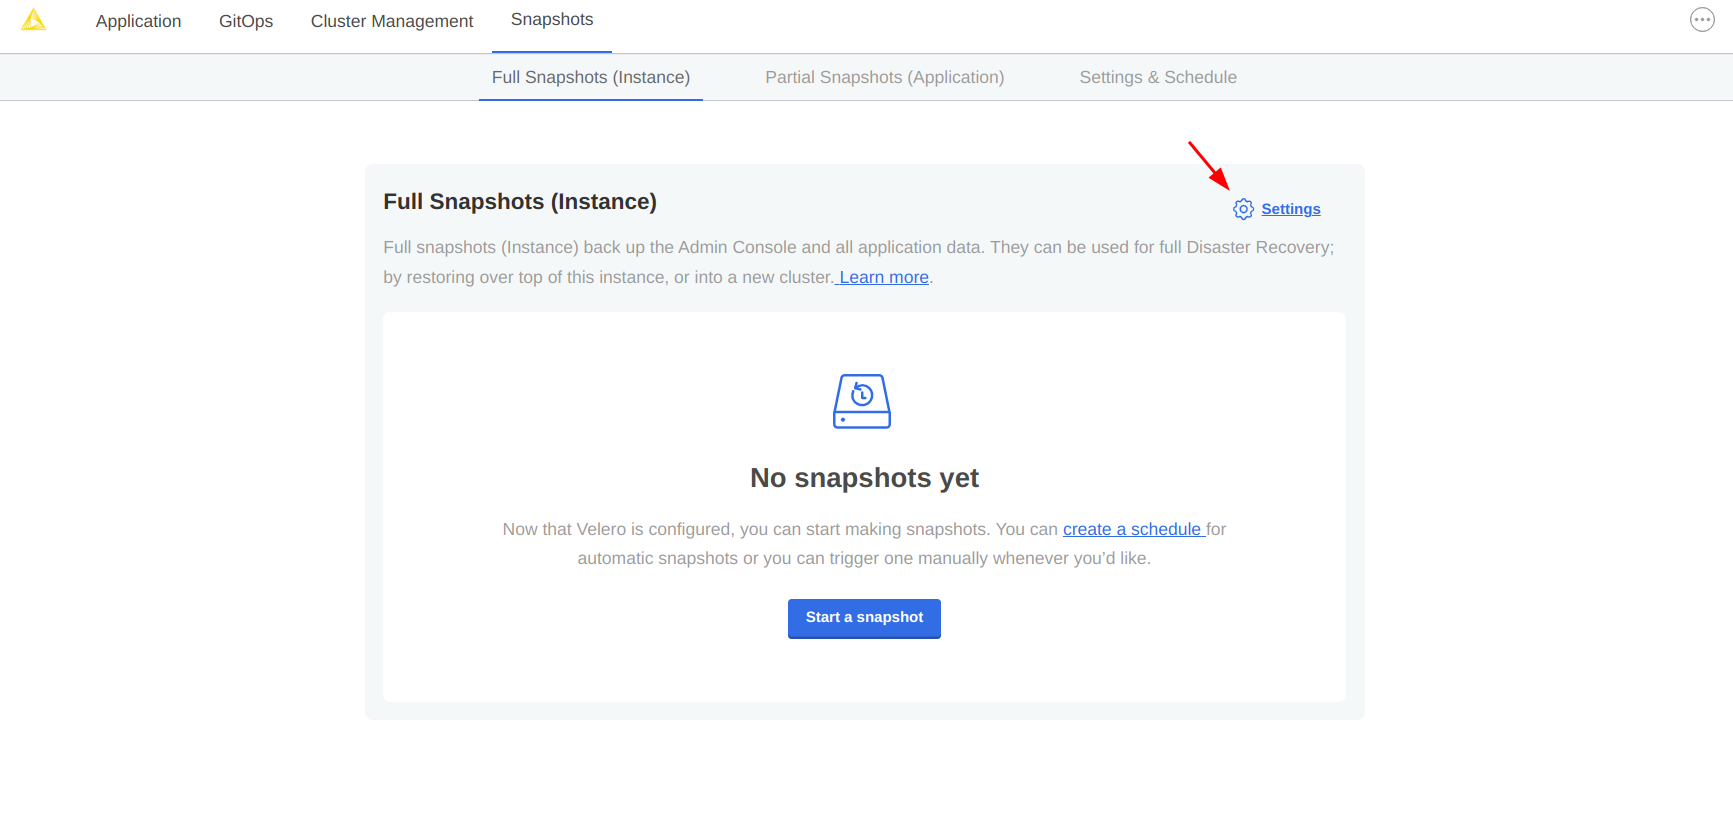
Velero supports local storage (not recommended), Amazon S3, Azure Blob Store, Google Cloud Storage, and S3 API compatible storage endpoints such as MinIO. Select your preferred snapshot storage type from the 'Destination' drop-down menu, and fill in the required fields with parameters specific to your storage endpoint. Click the 'Update storage settings' button and wait for Velero to verify backup storage access.
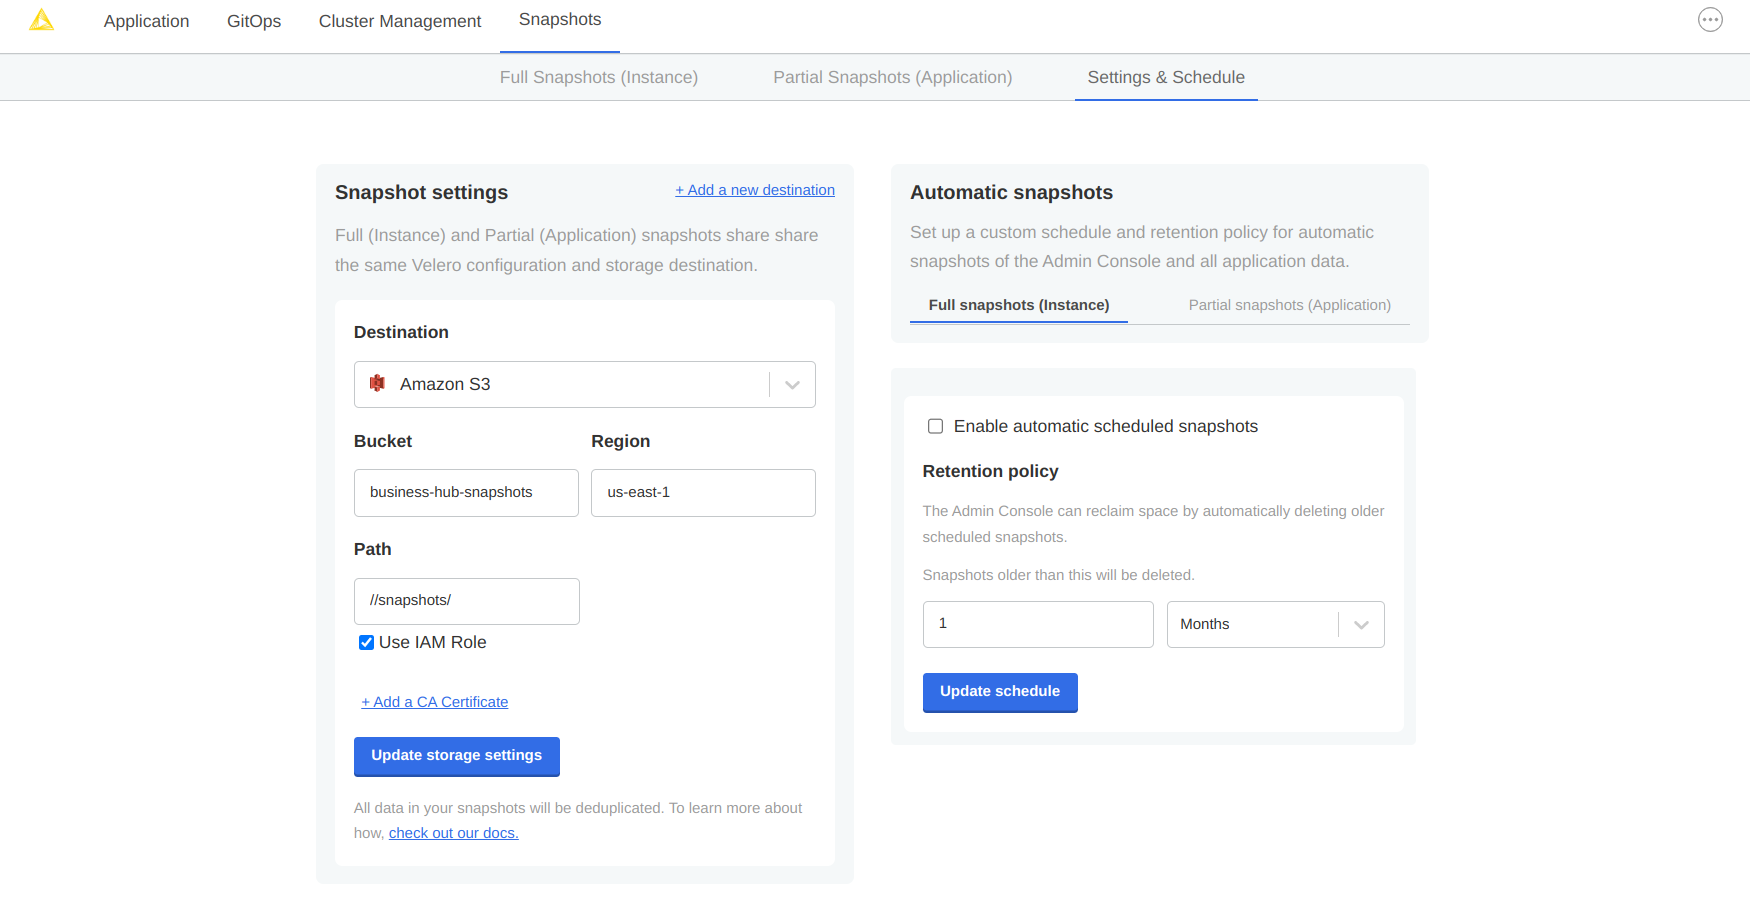
With a valid backup storage configured, you can create a Snapshot of your KNIME deployment by clicking the Full Snapshots tab, and then the Start a snapshot button. This may take a few minutes to complete.
- For in-cluster Postgres, the snapshot includes logical database dumps via Velero hooks.
- If external RDS backup is enabled, the snapshot also creates an RDS DB snapshot (allow extra time; the hook waits until the snapshot is
available). - If offloaded S3 backup is enabled, the snapshot also runs AWS Backup jobs for each configured bucket (allow extra time; large buckets can take significantly longer than the Kubernetes backup alone).
To verify external hook progress, check logs from the Velero agent pods in the Hub namespace (for example, pods named for RDS or S3 backup agents) or inspect AWS RDS snapshots and AWS Backup jobs in the AWS console.
Once your snapshot is complete, from the same Full Snapshots screen, you can click the 'Settings' button to manage snapshot retention, or configure automatic snapshots by checking the Enable automatic scheduled snapshots box and setting a schedule using a CRON expression.
For RDS backups, note the snapshot identifier (prefix
velero-backup-) in AWS; you need it when restoring the database before a Velero restore.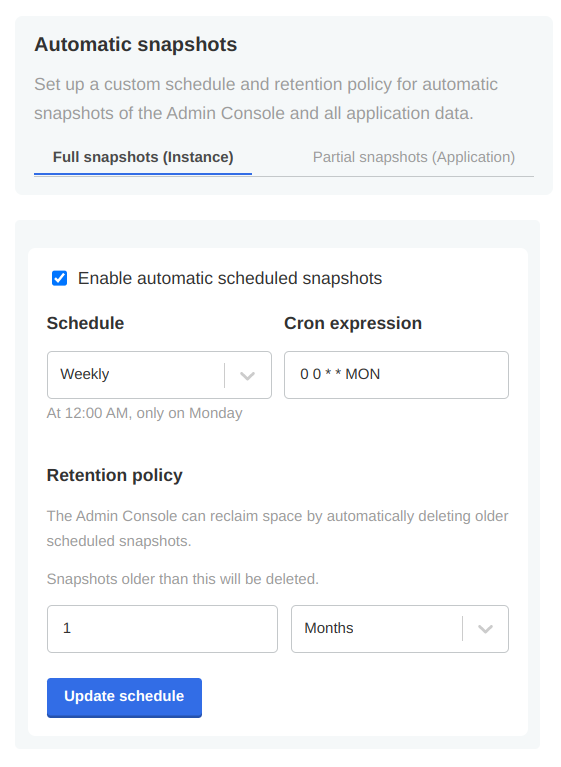
Backup troubleshooting
Velero is installed into the embedded Kurl Kubernetes cluster with default settings and resource allocations.
As the number of objects or overall size of data to be backed up increases, it may eventually occur that the CPU and memory resources allocated for Velero processes are no longer sufficient to successfully complete the backup.
In the event that backup failures are encountered, it is recommended to increase the CPU and memory allocation directly to the Velero’s node agent process via kubectl.
$ kubectl patch daemonset node-agent -n velero --patch \\
'{"spec":{"template":{"spec":{"containers":[{"name": "node-agent", "resources": {"limits":{"cpu": "2", "memory": "2048Mi"}, "requests": {"cpu": "1", "memory": "512Mi"}}}]}}}}}'
The CPU and memory resources and limit values can be adjusted as needed to find sufficient values for backup process. Typically, only the limit values will need to be increased.
At this time, the resource allocation override to Velero will revert after a
Kurlupgrade has been performed. Please ensure any changes to the Velero node agent are reapplied after anyKurlcluster-level upgrades.
Restoring a snapshot in the same cluster
Restore external RDS and S3 before Velero
Complete these steps before running the KNIME restore script or kubectl kots restore. KNIME does not automate RDS or S3 recovery.
AWS RDS
- Identify the RDS snapshot to restore (from AWS RDS console or the
velero-backup-*snapshot created during the Hub snapshot). - Restore the DB instance from that snapshot in AWS.
- Keep the original DB instance identifier so the endpoint configured in KOTS (
postgres_external_endpoint) still resolves. The DB instance identifier is the first hostname label in the endpoint (the segment before the first dot). - If the restored instance uses a different identifier or endpoint, update Advanced: External Postgres in the KOTS Admin Console before the final redeploy step below.
Offloaded AWS S3
- Restore each offloaded bucket from AWS Backup recovery points created during the Hub snapshot (avatars, customization, execution, and catalog buckets).
- Prefer restoring into the same bucket names already configured in KOTS.
- If bucket names, region, or credentials change, update Advanced: External S3 compatible storage in KOTS before the final redeploy.
In-cluster Postgres (Spilo)
No separate AWS step is required; database restore is handled by Velero post-hooks when external RDS backup is not enabled.
Prerequisites:
Kubectl is installed and configured to access the cluster.
Helm is installed and configured to access the cluster. Find more information in the Helm install guide.
KUBECONFIGenvironment variable is set to the correct cluster kubeconfig file.The cluster is running the same version of KNIME Business Hub as the cluster from which the snapshot was taken.
External RDS and S3 (if used): You have already restored the RDS instance and offloaded S3 buckets in AWS from the backups taken at snapshot time (see Restore external RDS and S3 before Velero). Velero does not restore these resources.
Navigate to the list of available snapshot restore points from your Kotsadm dashboard by browsing to Snapshots→ Full Snapshots. From this screen, identify the snapshot instance you would like to use, and take note of the instance ID.
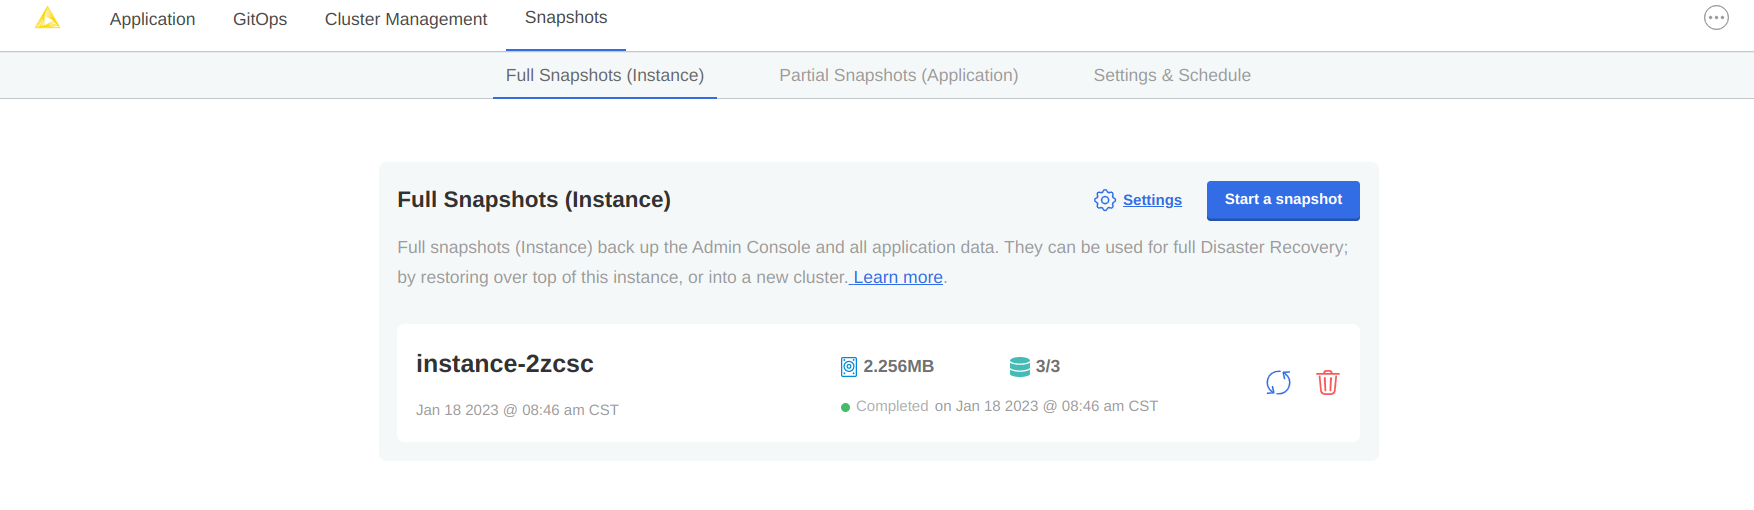
A list of snapshots can also be retrieved by command line:
BASH$ kubectl kots get backups NAME STATUS ERRORS WARNINGS STARTED COMPLETED EXPIRES instance-2zcsc Completed 0 0 2023-01-18 14:46:26 +0000 UTC 2023-01-18 14:46:53 +0000 UTC 29dCaution: highly destructive process
WARNING
This next step is highly destructive and irreversible. It should only be executed if there are backups available in Complete state, to ensure that the cluster can be fully restored.
A restore script is available to automate the restore process. The script will prepare the environment to restore the snapshot to the cluster.
Create a file named
knime-business-hub-restore-1_5.shwith the following content:sh#!/bin/bash cat <<'EOF' _ ______ _ _ ____ _ | |/ / __ )| | | | | _ \ ___ ___| |_ ___ _ __ ___ | ' /| _ \| |_| | | |_) / _ \/ __| __/ _ \| '__/ _ \ | . \| |_) | _ | | _ < __/\__ \ || (_) | | | __/ |_|\_\____/|_| |_| |_| \_\___||___/\__\___/|_| \___| KNIME Business Hub - Restore Script Version 1.5 EOF # --------------------------------------------------------------------------- # Pre-flight checks: required CLIs and an active cluster connection. # --------------------------------------------------------------------------- if ! command -v kubectl >/dev/null 2>&1; then echo "ERROR: kubectl is not installed or not in PATH." >&2 exit 1 fi if ! command -v helm >/dev/null 2>&1; then echo "ERROR: helm is not installed or not in PATH." >&2 exit 1 fi if ! kubectl kots version >/dev/null 2>&1; then echo "ERROR: The 'kots' kubectl plugin is not available. Run 'kubectl kots version' to verify." >&2 exit 1 fi if ! kubectl config current-context >/dev/null 2>&1; then echo "ERROR: No active kubectl context is configured." >&2 exit 1 fi echo "Current cluster connection: $(kubectl config current-context)" # --------------------------------------------------------------------------- # Gather input. # --------------------------------------------------------------------------- # Prompt for the namespace where KNIME Business Hub is installed. read -p "Enter the namespace where KNIME Business Hub is installed (default: knime): " NAMESPACE NAMESPACE=${NAMESPACE:-knime} # Keep a stable reference to the KNIME namespace for the post-restore Keycloak step. HUB_NAMESPACE="$NAMESPACE" # Prompt for the Snapshot ID to restore from. read -p "Enter the Snapshot ID to restore from: " SNAPSHOT_ID # Abort if no Snapshot ID was provided. if [[ -z "$SNAPSHOT_ID" ]]; then echo "ERROR: No Snapshot ID provided. Aborting." >&2 exit 1 fi # --------------------------------------------------------------------------- # Validate the backup before performing any destructive actions. # --------------------------------------------------------------------------- echo "" echo "Checking that backup '$SNAPSHOT_ID' exists..." if ! kubectl get backup "$SNAPSHOT_ID" -n velero &> /dev/null; then echo "ERROR: Backup '$SNAPSHOT_ID' was not found in the 'velero' namespace." >&2 echo "ERROR: Verify the Snapshot ID and ensure the backup exists and is 'Completed' before retrying." >&2 exit 1 fi echo "Backup '$SNAPSHOT_ID' found." BACKUP_STATUS=$(kubectl get backup "$SNAPSHOT_ID" -n velero -o jsonpath='{.status.phase}') echo "Backup status: ${BACKUP_STATUS:-Unknown}" case "$BACKUP_STATUS" in Completed) echo "Backup '$SNAPSHOT_ID' completed successfully." ;; PartiallyFailed) echo "" echo "WARNING: Backup '$SNAPSHOT_ID' has status 'PartiallyFailed'." echo "WARNING: Some items may not have been backed up successfully, and the restore may be incomplete." read -p "Do you want to proceed anyway? (yes/no): " STATUS_CONFIRMATION if [[ "$STATUS_CONFIRMATION" != "yes" ]]; then echo "Operation aborted." exit 0 fi ;; Failed) echo "ERROR: Backup '$SNAPSHOT_ID' has status 'Failed'. Cannot restore from a failed backup. Aborting." >&2 exit 1 ;; *) echo "ERROR: Backup '$SNAPSHOT_ID' has status '${BACKUP_STATUS:-Unknown}', which is not 'Completed'." >&2 echo "ERROR: Wait for the backup to complete or verify the Snapshot ID before retrying." >&2 exit 1 ;; esac # --------------------------------------------------------------------------- # Confirmation. # --------------------------------------------------------------------------- echo "" echo "WARNING: This process is destructive!" echo "Ensure you have a backup and that its status is 'Completed' before proceeding." echo "" echo "The following actions will be performed:" echo " 1. Delete the 'executor-http-proxy' keyvalue from namespace '$NAMESPACE' while the controller is still up." echo " 2. Uninstall the 'knime-hub-persistence' Helm chart from namespace '$NAMESPACE'." echo " 3. Delete the PostgreSQL persistent volume claims." echo " 4. Remove the Keycloak finalizers." echo " 5. Delete the secret-store-kes StatefulSet and its keystore PVC." echo " 6. Delete the Istio Helm secrets (prevents resource conflicts on restore)." echo " 7. Start the restore from Snapshot ID '$SNAPSHOT_ID'." echo " 8. Wait for Keycloak to be redeployed, then reset its admin user password to match the restored secret." echo "" echo "NOTE: After the restore, this script keeps running to complete step 8." echo "NOTE: You must redeploy the application from the KOTS Admin Console when prompted," echo "NOTE: and you must NOT close this terminal until the Keycloak admin reset has finished." echo "" read -p "Are you sure you want to proceed? (yes/no): " CONFIRMATION if [[ "$CONFIRMATION" != "yes" ]]; then echo "Operation aborted." exit 0 fi # --------------------------------------------------------------------------- # Step 1 of 8: Delete the executor-http-proxy keyvalue while the controller is up. # # This resource has a finalizer that only the controller can clear. It must be # deleted now, before any step brings the controller down. If it is deleted # later, the object gets stuck 'Terminating' on its finalizer, the restore # recreates it, and then the controller (once back up) completes the pending # deletion -- removing the freshly restored resource and leaving it missing at # the end. # --------------------------------------------------------------------------- echo "" echo "==> Step 1 of 8: Delete the 'executor-http-proxy' keyvalue" KEYVALUE_NAME="executor-http-proxy" if kubectl get keyvalue "$KEYVALUE_NAME" -n "$NAMESPACE" &> /dev/null; then echo "Deleting keyvalue '$KEYVALUE_NAME' from namespace '$NAMESPACE' (waiting for its finalizer to clear)..." if ! kubectl delete keyvalue "$KEYVALUE_NAME" -n "$NAMESPACE" --wait=true --timeout=120s; then echo "ERROR: Failed to delete keyvalue '$KEYVALUE_NAME' (it may be stuck on its finalizer)." >&2 echo "ERROR: Resolve this before continuing, otherwise the restored resource will be reaped later." >&2 exit 1 fi echo "Keyvalue '$KEYVALUE_NAME' deleted." else echo "Keyvalue '$KEYVALUE_NAME' not found in namespace '$NAMESPACE'. Skipping." fi # --------------------------------------------------------------------------- # Step 2 of 8: Uninstall the knime-hub-persistence Helm chart. # --------------------------------------------------------------------------- echo "" echo "==> Step 2 of 8: Uninstall the 'knime-hub-persistence' Helm chart" RELEASE_NAME="knime-hub-persistence" if helm status "$RELEASE_NAME" -n "$NAMESPACE" &> /dev/null; then echo "Uninstalling Helm release '$RELEASE_NAME' from namespace '$NAMESPACE'..." helm uninstall "$RELEASE_NAME" --namespace "$NAMESPACE" & echo "Ensuring services 'knime-postgres-cluster', 'knime-postgres-cluster-config', and 'knime-postgres-cluster-repl' are deleted from namespace '$NAMESPACE'..." kubectl delete svc knime-postgres-cluster knime-postgres-cluster-config knime-postgres-cluster-repl -n "$NAMESPACE" 2>/dev/null || true else echo "Helm release '$RELEASE_NAME' not found in namespace '$NAMESPACE'. Skipping uninstall." fi # --------------------------------------------------------------------------- # Step 3 of 8: Delete the PostgreSQL persistent volume claims. # --------------------------------------------------------------------------- echo "" echo "==> Step 3 of 8: Delete the PostgreSQL persistent volume claims" PVC_NAMES=$(kubectl get pvc --namespace "$NAMESPACE" | grep pgdata-knime-postgres-cluster | awk '{print $1}') if [[ -n "$PVC_NAMES" ]]; then echo "Deleting persistent volume claims: $PVC_NAMES" for PVC in $PVC_NAMES; do kubectl delete pvc --namespace "$NAMESPACE" "$PVC" if [ $? -ne 0 ]; then echo "ERROR: Failed to delete PVC '$PVC'." >&2 exit 1 fi done else echo "No matching PVCs found. Skipping deletion." fi # --------------------------------------------------------------------------- # Step 4 of 8: Remove the Keycloak finalizers. # --------------------------------------------------------------------------- echo "" echo "==> Step 4 of 8: Remove the Keycloak finalizers" RESOURCE_TYPE="keycloakclient.legacy.k8s.keycloak.org" RESOURCE_NAMES=$(kubectl get $RESOURCE_TYPE -n "$NAMESPACE" -o jsonpath='{.items[*].metadata.name}') for RESOURCE_NAME in $RESOURCE_NAMES; do echo "Removing finalizers from '$RESOURCE_TYPE/$RESOURCE_NAME'..." kubectl patch $RESOURCE_TYPE "$RESOURCE_NAME" -n "$NAMESPACE" -p '{"metadata":{"finalizers":null}}' --type=merge if [ $? -ne 0 ]; then echo "ERROR: Failed to patch '$RESOURCE_TYPE/$RESOURCE_NAME'." >&2 exit 1 fi done # --------------------------------------------------------------------------- # Step 5 of 8: Delete the secret-store-kes StatefulSet and its keystore PVC. # --------------------------------------------------------------------------- echo "" echo "==> Step 5 of 8: Delete the secret-store-kes StatefulSet and keystore PVC" kubectl delete statefulset secret-store-kes -n "$NAMESPACE" --ignore-not-found=true kubectl delete pvc secret-store-kes-keystore-pvc-secret-store-kes-0 -n "$NAMESPACE" --ignore-not-found=true # --------------------------------------------------------------------------- # Step 6 of 8: Delete the Istio Helm secrets for the knime-hub-istio release. # --------------------------------------------------------------------------- echo "" echo "==> Step 6 of 8: Delete the Istio Helm secrets" RELEASE_NAME="knime-hub-istio" ISTIO_NAMESPACE="istio-system" # Collect the exact-matching Helm release secret names. MATCHING_SECRETS=$(kubectl get secrets -n "$ISTIO_NAMESPACE" -o jsonpath='{.items[*].metadata.name}' | tr ' ' '\n' | grep -E "^sh\.helm\.release\.v1\.${RELEASE_NAME}\.v[0-9]+$") if [ -n "$MATCHING_SECRETS" ]; then echo "$MATCHING_SECRETS" | while read SECRET_NAME; do echo "Deleting secret '$SECRET_NAME' from namespace '$ISTIO_NAMESPACE'..." kubectl delete secret "$SECRET_NAME" -n "$ISTIO_NAMESPACE" done else echo "No Helm secrets found for release '$RELEASE_NAME' in namespace '$ISTIO_NAMESPACE'. Skipping." fi # --------------------------------------------------------------------------- # Step 7 of 8: Start the restore. # --------------------------------------------------------------------------- echo "" echo "==> Step 7 of 8: Start the restore from Snapshot ID '$SNAPSHOT_ID'" kubectl kots restore --from-backup "$SNAPSHOT_ID" if [ $? -ne 0 ]; then echo "ERROR: Restore failed. Please contact KNIME Support and provide a support bundle for further assistance." >&2 exit 1 fi echo "" echo "==============================================================" echo "Velero restore completed successfully." echo "==============================================================" # --------------------------------------------------------------------------- # Step 8 of 8: Reset the Keycloak admin user password. # # On restore, Keycloak's Kubernetes resources are re-initialized and a new # 'knime-keycloak-initial-admin' secret is generated. This does not match the # admin user (temp-admin) restored into the database, so the admin password must # be reset to the new secret value once Keycloak is running again. # # Keycloak is NOT deployed yet at this point: it comes up only after you continue # the restore with a redeploy from the KOTS Admin Console. This step therefore # waits for the Keycloak pod to appear and become ready before acting. # --------------------------------------------------------------------------- KEYCLOAK_POD="knime-keycloak-0" KEYCLOAK_SECRET="knime-keycloak-initial-admin" KEYCLOAK_CONTAINER="keycloak" BOOTSTRAP_MGMT_PORT="9100" # must differ from the running server's management port KEYCLOAK_SERVER="http://localhost:8080/auth" # in-pod admin URL (note the /auth relative path) KCADM_CONFIG="/tmp/kcadm.config" # HOME is unset in the container, so kcadm needs a writable config path WAIT_TIMEOUT_SECONDS=1800 # 30 minutes, to allow time for the manual KOTS redeploy POLL_INTERVAL_SECONDS=15 decode_b64() { base64 --decode 2>/dev/null || base64 -D } wait_keycloak_ready() { # Wait for the pod to report Ready, using whatever time is left in the budget. local remaining=$(( WAIT_TIMEOUT_SECONDS - ELAPSED )) (( remaining < 60 )) && remaining=60 kubectl wait --for=condition=Ready "pod/${KEYCLOAK_POD}" \ -n "$HUB_NAMESPACE" --timeout="${remaining}s" } echo "" echo "==> Step 8 of 8: Reset the Keycloak admin user password" echo "" echo "IMPORTANT: Keycloak is not deployed yet. You must now continue the restore" echo "IMPORTANT: by redeploying the application from the KOTS Admin Console." echo "" echo "After the redeploy, Keycloak is re-initialized with a new initial-admin" echo "secret that will NOT match the admin user restored into the database. This" echo "script can wait for Keycloak to come up and reset the admin user's password" echo "to the secret value so the credentials match again." echo "" echo "!!! DO NOT CLOSE THIS TERMINAL until the Keycloak admin reset has completed. !!!" echo "The script must keep running to detect Keycloak and reset the admin user's" echo "password. Closing it now will leave the admin credentials in a mismatched state." echo "" read -p "Wait for Keycloak and reset the admin user now? (yes/no): " KC_CONFIRMATION if [[ "$KC_CONFIRMATION" != "yes" ]]; then echo "Skipping the Keycloak admin reset." echo "You can run the standalone 'keycloak-admin-user-reset.sh' script later to complete this step." exit 0 fi # Wait for the Keycloak pod to be created (it only appears after the KOTS redeploy). echo "" echo "Waiting for Keycloak pod '$KEYCLOAK_POD' to be created in namespace '$HUB_NAMESPACE' (timeout: ${WAIT_TIMEOUT_SECONDS}s)." echo "Trigger the redeploy in the KOTS Admin Console now if you have not already." ELAPSED=0 until kubectl get pod "$KEYCLOAK_POD" -n "$HUB_NAMESPACE" &> /dev/null; do if (( ELAPSED >= WAIT_TIMEOUT_SECONDS )); then echo "ERROR: Timed out waiting for Keycloak pod '$KEYCLOAK_POD' to be created." >&2 echo "ERROR: Once Keycloak is running, run the standalone 'keycloak-admin-user-reset.sh' script." >&2 exit 1 fi sleep "$POLL_INTERVAL_SECONDS" ELAPSED=$(( ELAPSED + POLL_INTERVAL_SECONDS )) done echo "Keycloak pod '$KEYCLOAK_POD' detected." # Wait for the pod to become Ready. echo "Waiting for Keycloak pod '$KEYCLOAK_POD' to become ready..." if ! wait_keycloak_ready; then echo "ERROR: Keycloak pod '$KEYCLOAK_POD' did not become ready in time." >&2 exit 1 fi # Keycloak may restart once shortly after first becoming ready. Give it a moment # to settle, then re-confirm readiness before resetting the password. echo "Keycloak pod is ready. Verifying it stays stable (it may restart once)..." sleep 30 if ! wait_keycloak_ready; then echo "ERROR: Keycloak pod '$KEYCLOAK_POD' did not stabilize after restart." >&2 exit 1 fi # Reset the restored admin user's password to match the regenerated secret. # # 'kc.sh bootstrap-admin user' only CREATES an admin; it cannot update an existing # one, and on restore the admin user (temp-admin) is already present from the # database backup -- so a plain bootstrap fails with a duplicate-key error. # Instead we: # 1. create a throwaway recovery admin (a unique name, so there is no clash), # 2. authenticate kcadm as that recovery admin, # 3. set-password on the real admin user to the secret value (this keeps the # user and its role mappings intact), # 4. delete the throwaway recovery admin(s). echo "Resetting the Keycloak admin user password to match the '$KEYCLOAK_SECRET' secret..." # Read the (regenerated) target credentials from the secret. if ! kubectl get secret "$KEYCLOAK_SECRET" -n "$HUB_NAMESPACE" &> /dev/null; then echo "ERROR: Secret '$KEYCLOAK_SECRET' not found in namespace '$HUB_NAMESPACE'." >&2 exit 1 fi KC_USER=$(kubectl get secret "$KEYCLOAK_SECRET" -n "$HUB_NAMESPACE" -o jsonpath='{.data.username}' | decode_b64) KC_PASS=$(kubectl get secret "$KEYCLOAK_SECRET" -n "$HUB_NAMESPACE" -o jsonpath='{.data.password}' | decode_b64) if [[ -z "$KC_USER" || -z "$KC_PASS" ]]; then echo "ERROR: Could not read the Keycloak admin credentials from secret '$KEYCLOAK_SECRET'." >&2 exit 1 fi # Throwaway recovery admin: the shared prefix lets the cleanup step remove every attempt. RECOVERY_PREFIX="restore-recovery" RESET_OK=false MAX_ATTEMPTS=5 for (( ATTEMPT=1; ATTEMPT<=MAX_ATTEMPTS; ATTEMPT++ )); do echo "Attempt $ATTEMPT of $MAX_ATTEMPTS..." # Use a fresh, unique recovery admin per attempt so 'bootstrap-admin' never # clashes with one left behind by a previous (failed) attempt. RECOVERY_USER="${RECOVERY_PREFIX}-$$-${ATTEMPT}" RECOVERY_PASS=$(head -c 24 /dev/urandom | base64 | tr -dc 'A-Za-z0-9' | head -c 24) # 1. Create the recovery admin. if ! kubectl exec "$KEYCLOAK_POD" -n "$HUB_NAMESPACE" --container "$KEYCLOAK_CONTAINER" -- \ env KC_BOOTSTRAP_ADMIN_PASSWORD="$RECOVERY_PASS" KC_HTTP_MANAGEMENT_PORT="$BOOTSTRAP_MGMT_PORT" \ /opt/keycloak/bin/kc.sh bootstrap-admin user \ --username "$RECOVERY_USER" \ --password:env KC_BOOTSTRAP_ADMIN_PASSWORD \ --optimized; then echo "WARNING: Could not create the recovery admin (pod may be restarting). Retrying..." wait_keycloak_ready || true sleep "$POLL_INTERVAL_SECONDS" continue fi # 2. Authenticate kcadm as the recovery admin. if ! kubectl exec "$KEYCLOAK_POD" -n "$HUB_NAMESPACE" --container "$KEYCLOAK_CONTAINER" -- \ /opt/keycloak/bin/kcadm.sh config credentials --config "$KCADM_CONFIG" \ --server "$KEYCLOAK_SERVER" --realm master \ --user "$RECOVERY_USER" --password "$RECOVERY_PASS"; then echo "WARNING: kcadm login failed (pod may be restarting). Retrying..." wait_keycloak_ready || true sleep "$POLL_INTERVAL_SECONDS" continue fi # 3. Reset the real admin user's password to the secret value. if kubectl exec "$KEYCLOAK_POD" -n "$HUB_NAMESPACE" --container "$KEYCLOAK_CONTAINER" -- \ env KC_NEW_PASS="$KC_PASS" \ sh -c "/opt/keycloak/bin/kcadm.sh set-password --config '$KCADM_CONFIG' -r master --username '$KC_USER' --new-password \"\$KC_NEW_PASS\""; then RESET_OK=true break fi echo "WARNING: set-password failed (pod may be restarting). Retrying..." wait_keycloak_ready || true sleep "$POLL_INTERVAL_SECONDS" done unset KC_PASS RECOVERY_PASS if [[ "$RESET_OK" != "true" ]]; then echo "ERROR: Failed to reset the '$KC_USER' password after $MAX_ATTEMPTS attempts." >&2 echo "ERROR: Reset it manually (recovery admin + 'kcadm.sh set-password') or contact KNIME Support." >&2 exit 1 fi # 4. Remove the throwaway recovery admin(s) created during this run. echo "Cleaning up the throwaway recovery admin user(s)..." RECOVERY_IDS=$(kubectl exec "$KEYCLOAK_POD" -n "$HUB_NAMESPACE" --container "$KEYCLOAK_CONTAINER" -- \ /opt/keycloak/bin/kcadm.sh get users --config "$KCADM_CONFIG" -r master \ -q username="$RECOVERY_PREFIX" --fields id --format csv --noquotes 2>/dev/null | tr -d '\r') if [[ -n "$RECOVERY_IDS" ]]; then while read -r RID; do [[ -z "$RID" ]] && continue if kubectl exec "$KEYCLOAK_POD" -n "$HUB_NAMESPACE" --container "$KEYCLOAK_CONTAINER" -- \ /opt/keycloak/bin/kcadm.sh delete "users/$RID" --config "$KCADM_CONFIG" -r master 2>/dev/null; then echo "Deleted recovery admin '$RID'." else echo "WARNING: Could not delete recovery admin '$RID'. Remove it manually." >&2 fi done <<< "$RECOVERY_IDS" fi echo "" echo "==============================================================" echo "Restore completed." echo "==============================================================" echo "The Keycloak admin user '$KC_USER' password has been reset to match the '$KEYCLOAK_SECRET' secret." echo "" echo "No further manual steps are required. Please verify that the environment is healthy:" echo " - Confirm that all pods in namespace '$HUB_NAMESPACE' are Running and Ready." echo " - Confirm that the KNIME Business Hub UI is reachable and that you can log in." echo "" echo "Refer to the KNIME documentation for any additional verification guidance." exit 0To make the script executable, run the following command:
chmod +x knime-business-hub-restore-1_5.shINFO
Before proceeding with executing the script, ensure that the correct cluster is targeted and that the snapshot storage is accessible from the new cluster. This can be confirmed by running the following command:
kubectl config current-contextor checking / setting theKUBECONFIGenvironment variable.The script can be executed by running the following command:
bash <path to script>/knime-business-hub-restore-1_5.sh.Keep the terminal open
After the restore, the script keeps running and waits for you to redeploy the Hub instance. It then resets the Keycloak admin user password to match the restored secret. Do not close the terminal until the script reports that the restore is complete.
When the script prompts you to, redeploy the Hub instance from the KOTS Admin Console. The script detects when Keycloak is running again and resets its admin user password automatically. Then trigger the restart of all executors by performing any change to each execution context in the Hub UI, such as decreasing or increasing the memory.
TIP
It is recommended to restart all pods after the restore process and the redeployment is completed. This can be done by running the below command: kubectl delete pods --all -n < knime hub namespace >
- Finally, assuming the restore completed without errors, you can verify your Hub installation is functioning as expected.
Restoring a snapshot to a different cluster
Prerequisites:
Kubectl is installed and configured to access the target cluster.
Helm is installed and configured to access the target cluster. Helm install guide
KUBECONFIG environment variable is set to the target cluster kubeconfig file.
The target cluster is running the same version of KNIME Business Hub as the cluster from which the snapshot was taken.
The snapshot storage is accessible from the target cluster.
External RDS and S3 (if used): You have already restored RDS and offloaded S3 buckets in AWS as described in Restore external RDS and S3 before Velero. On a new cluster, ensure KOTS Advanced: External Postgres and Advanced: External S3 compatible storage match the restored AWS resources (especially if RDS instance name or S3 bucket names changed).
Configure the new cluster with the same snapshot storage settings as the original cluster, and ensure that the storage target is accessible from the new cluster.
- If NFS is used as the snapshot storage, ensure that the new cluster has access to the same NFS server and path as the original cluster and that the old cluster is not configured to access it anymore.
- If S3 is used as the snapshot storage, ensure that the new cluster has access to the same S3 bucket as the original cluster.
- If HostPath is used as the snapshot storage, ensure that the new cluster has access to the same HostPath as the original cluster. This can be done by either mounting the same volume or copying the snapshot data to the new cluster and configuring the HostPath volume as the snapshot storage.
Navigate to the list of available snapshot restore points from your Kotsadm dashboard by browsing to Snapshots→ Full Snapshots. From this screen, identify the snapshot instance you would like to use, and take note of the snaphot ID (e.g.
instance-2xcsc).A list of snapshots can also be retrieved by command line:
$ kubectl kots get backups
NAME              STATUS       ERRORS    WARNINGS    STARTED                          COMPLETED                        EXPIRES
instance-2zcsc    Completed    0         0           2023-01-18 14:46:26 +0000 UTC    2023-01-18 14:46:53 +0000 UTC    29d
Caution: highly destructive process
WARNING
This next step is highly destructive and irreversible. It should only be executed if there are backups available in Complete state, to ensure that the cluster can be fully restored.
A restore script is available to automate the restore process. The script will prepare the environment to restore the snapshot to the cluster. Use the same script provided in the previous section.
To make the script executable, run the following command:
chmod +x knime-business-hub-restore-1_5.shTIP
Before proceeding with executing the script, ensure that the correct cluster is targeted and that the snapshot storage is accessible from the new cluster. This can be confirmed by running the following command:
kubectl config current-contextor checking / setting theKUBECONFIGenvironment variable.The script can be executed by running the following command:
bash <path to script>/knime-business-hub-restore-1_5.sh.Keep the terminal open
After the restore, the script keeps running and waits for you to redeploy the Hub instance. It then resets the Keycloak admin user password to match the restored secret. Do not close the terminal until the script reports that the restore is complete.
When the script prompts you to, redeploy the Hub instance from the KOTS Admin Console. The script detects when Keycloak is running again and resets its admin user password automatically. Then trigger the restart of all executors by performing any change to each execution context in the Hub UI, such as decreasing or increasing the memory.
TIP
It is recommended to restart all pods after the restore process and the redeployment is completed. This can be done by running the below command:
kubectl delete pods --all -n < knime hub namespace >Finally, assuming the restore completed without errors, you can verify your Hub installation is functioning as expected.
About the restore script
The restore script automates the process of restoring a snapshot to a cluster. The script performs the following steps:
- Deletes the
executor-http-proxykeyvalue while the controller is still running, so its finalizer clears cleanly. Deleting it later leaves it stuck terminating and removes the restored copy. - Uninstalls the knime-hub-persistence Helm chart by running
helm uninstall knime-hub-persistence -n <knime hub namespace>. - Deletes all PVCs that were created by the knime-hub-persistence Helm chart by running
kubectl delete pvc -n <knime hub namespace> <pvc name>. - Patches all keycloakClient custom resources to remove the finalizer by running
kubectl patch keycloakClient <keycloak client name> -n <knime hub namespace> --type merge --patch '{"metadata":{"finalizers":null}}'. - Deletes the
secret-store-kesStatefulSet and its keystore PVC. - Deletes the Istio Helm secrets with
kubectl delete secretif Istio was deployed as part of knime-hub. This step keeps istiod running during the restore to prevent resource conflicts. - Restores the snapshot to the cluster by running
kubectl kots restore --from-backup <snapshot ID>. - Waits for you to redeploy the Hub instance, then resets the Keycloak admin user password to match the restored
knime-keycloak-initial-adminsecret. On restore, Keycloak generates a new secret that no longer matches the restored admin user, so the password must be reset for the credentials to work.