
Build Better Workflows
Introduction
This guide provides best practices to work efficiently with KNIME Analytics Platform and on KNIME Hub. It shows you how to accelerate, reuse and secure your KNIME workflows. It also provides best practices for updating and monitoring workflows that are shared with your end users.
What is KNIME?
KNIME is a platform for end to end data science. It offers two complementary products: KNIME Analytics Platform and KNIME Hub.
KNIME Analytics Platform
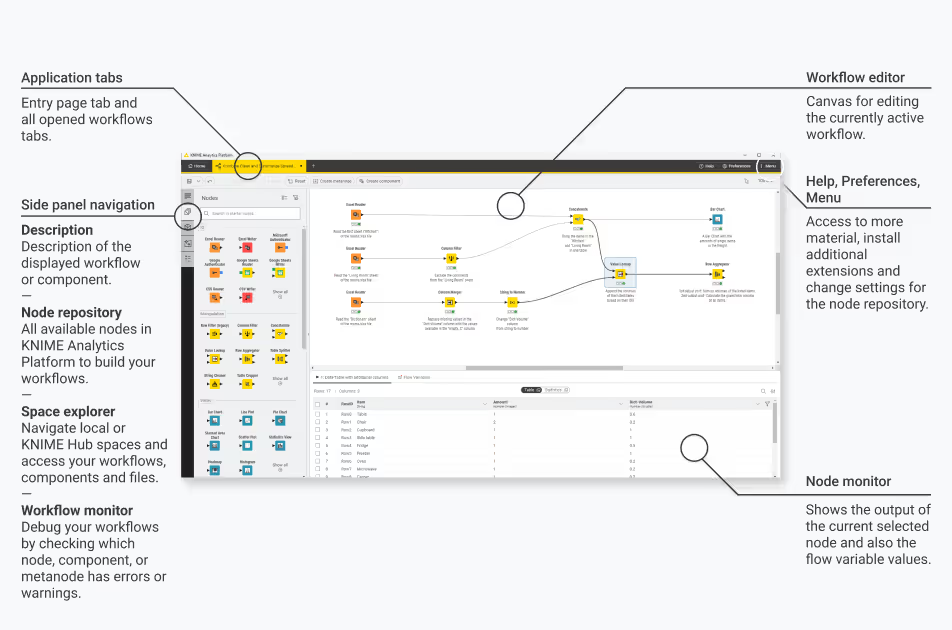
KNIME Analytics Platform is an open source software with a visual interface, which is shown below. It allows users to build data science analyses. Users can access, blend, analyze, and visualize their data, and integrate third-party tools and libraries.
If you haven’t downloaded KNIME Analytics Platform yet, you can do so on the download page.
KNIME Hub
KNIME Hub is the commercial software for collaborating and scaling data science, offered online as KNIME Community Hub or installed into a company’s private infrastructure as KNIME Business Hub.
KNIME Community Hub
On KNIME Community Hub, users can browse working examples workflows of data science solutions, or find nodes and components to use in their KNIME projects. On the Community Hub, collections provide selected workflows, nodes, and links about a specific, common topic. Open source extensions provide additional functionalities such as access to and processing of complex data types, as well as the addition of advanced machine learning algorithms.
Additionally, with Team plan paid services small groups or teams of users can share and collaborate on solutions in private spaces, and run workflows ad hoc as data apps or automate their execution.
KNIME Business Hub
KNIME Business Hub provides the same capabilities for collaboration and sharing – but within a company’s dedicated infrastructure. Teams can share knowledge publicly across their organization or privately with selected users. Additionally, data experts can deploy and monitor their workflows, as well as share analytic models as data apps and services with data consumers.
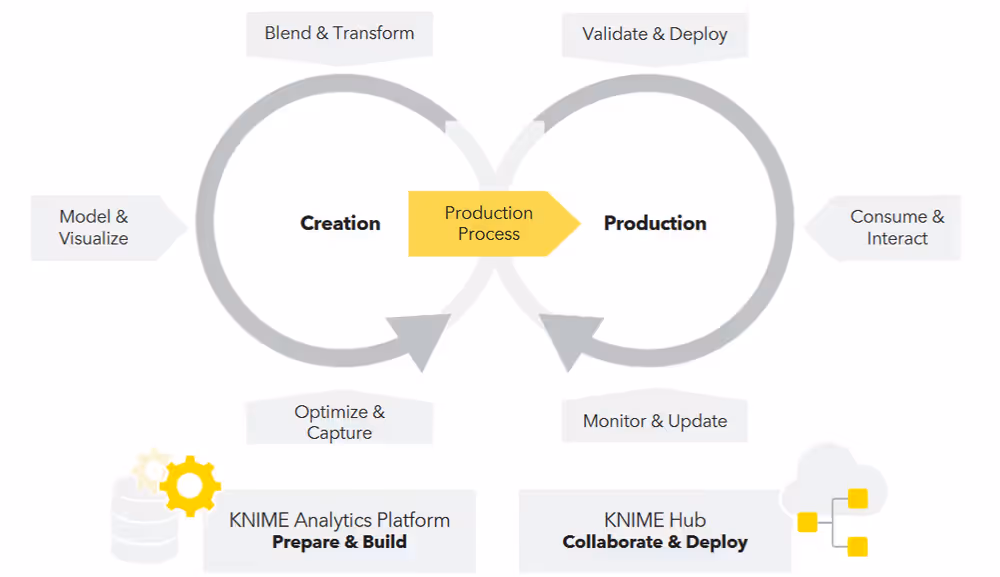
Workflow Design Process: From KNIME Analytics Platform to KNIME Hub
As you start your data project with KNIME, you will create a workflow in the KNIME Analytics Platform that can then be uploaded to KNIME Hub. The KNIME Analytics Platform is how you’ll design your data process via a workflow. Once your workflow is ready, you can upload it to your KNIME Hub instance. There, you can easily automate or deploy it.
Project prerequisites: Before building a KNIME workflow
As with any project, prior to building your workflow, it’s important to understand the scope of the project or use case you’re working with. This checklist can guide you:
Define a goal. What is the purpose of your workflow? What question are you trying to answer with your data? Your goal should be specific and clear. It should be measurable and achievable within a certain time limit. For example: Reduce the churn rate by 15% in the upcoming quarter.
Access your data. What sources are required? Which nodes are essential to access them?
Define your audience. A workflow is rarely just accessed by the person who built it. Ask yourself who consumes the final results. What should their takeaway from your insights? Define a method to share your insights. It should be suitable to convey the data and your conclusions drawn from it. For example, a method could be:
- A scheduled workflow that regularly creates and sends a report
- A scheduled workflow that gets executed regularly to process new data or apply a predictive model?
- A Data App that gets deployed to KNIME Hub
- A predictive model that is accessible via REST API
Outline the structure of your workflow(s). Consider the following questions:
- What is the task of each individual workflow that you want to build?
- If you identify multiple tasks, limit one workflow to one self-contained task.
- What is the input and output of each individual workflow?
- Do your workflows share some parts?
Define the requirements for your workflows. Consider the following questions:
- How fast should the workflow be executed?
- How often should it be executed, etc.?
Define the framework conditions. What hardware and software do you need to meet your workflow’s requirements?
Aims of best practices when working with KNIME
Now that you have defined your project prerequisites, you want to find the best method to handle your workflow.
You will learn what best practices are, why they matter, and how to implement them in your projects using KNIME Analytics Platform and KNIME Hub. This guide will help you get an intuition about what to consider when building, running, or sharing a workflow.
However, if you are taking your first steps with the KNIME Analytics Platform, please start by following the Getting Started Guide.
Make your workflow reusable
Naming conventions
Workflows created in your local KNIME Analytics Platform installation are just like any other file on your computer. You can uniquely identify them by their file name and sort them into folders. Before you dive into the data, consider the following when saving your workflows:
- Use a clear naming convention for your workflows.The file name should describe the task of the workflow. For example: "Read and Preprocess Customer Data" instead of "Project_1". You can also introduce numbers as prefixes.
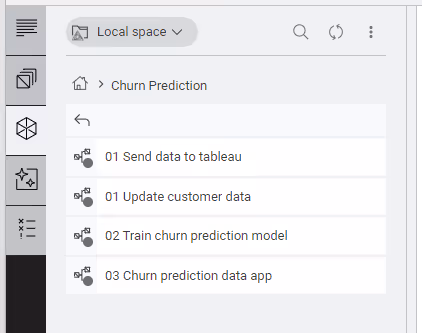
- Remember to limit one workflow to one coherent task. If your use case requires multiple tasks to achieve the final result, group the respective workflows into folders. Choose a folder name that indicates your final goal.
Use relative file paths
KNIME workflows are made to operate on data files. If such a file is saved on your local computer, its absolute path uniquely identifies the location of your data file within your file system, for example, C:\Users\username\Desktop on Windows or /home/user on Linux. However, if you share your workflow with others, e.g. using the KNIME Hub as a repository they will execute it in their local KNIME Analytics Platform installation.
Thus, the link with which KNIME Analytics Platform accesses the data file you provide along with your workflow should be a relative path. This can mean that your path is relative to one of the following:
- Your current workflow: The data is stored in the same folder as the workflow file, e.g.
/workflow_group/my_workflow. - Your current workflow data area: The data is dedicated to and accessible by the currently executing workflow. Thus, the data is stored in a folder that is located inside the workflow folder. For example, a relative path could look as follows:
<knime-workspace>/workflow_group/my_workflow/data/. Thedatafolder contains the files that contain the data. e.g., a.csvfile. For example,<knime-workspace>/workflow_group/my_workflow/data/adult.csv. - Your current Hub space (given that you are signed in to the respective Hub instance from your space explorer).
- A connected file system that you can access with the respective connector node
Alternatively, you can provide a Custom URL along with your data for everyone that you share your workflow with. For example:
\https://example.com/mydata/datafile.csvUsing this option, you can read and write single files, but you cannot move or copy files or folders. However, listing files in a folder, i.e. browsing, is not supported.
Find out more about the KNIME file handling infrastructure in the KNIME File Handling Guide.
Find out more about storing and sharing items on the KNIME Hub in the KNIME Community Hub User Guide.
Document your workflow with node labels and annotations
To make your workflow reusable, you and your team need to be able to quickly comprehend what each part and each node are doing. KNIME node names are self-explanatory. However, to describe how each node operates on your specific data, you can change the node label. Select a node in the workflow editor and double-click below the node to change its label. Here, you can describe what operation it performs on your data.
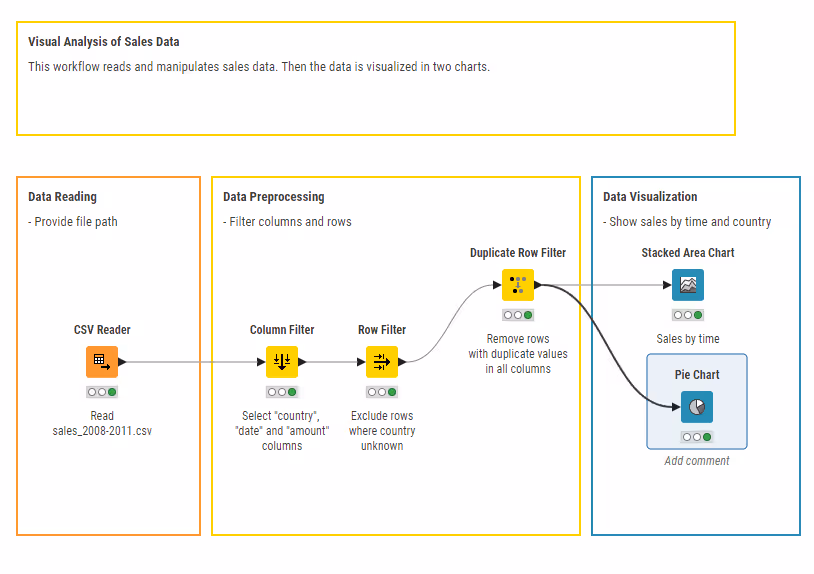
To capture an operation performed by multiple nodes, use a workflow annotation. Right-click anywhere in the workflow editor and select New workflow annotation. You can observe a workflow with both workflow annotations, nodes with node labels, and one node which is selected and does not carry a label yet:
In addition, KNIME provides a K-AI feature that can generate annotations for selected parts of the workflow. When you select one or more nodes and use the Explain with K-AI option, K-AI creates an annotation describing what that part of the workflow does. As with any annotation, you can always edit the generated text to better match your preferred wording and level of detail.
Structure your workflow with components and metanodes
Workflow annotations subsume smaller sub-groups of nodes within a workflow. The more nodes you add to your workflow, the less comprehensible it gets. In larger workflows, you may want to compress nodes into groups represented by a single node. Those can either be components or metanodes.
Metanodes are used solely to structure your workflows more clearly by subsuming many nodes into one. You can take parts of a larger workflow and collapse them into a metanode, hiding that part of the workflow’s functionality.
In addition to the functions of a metanode, a component can be reused on different data that require the same operations performed on them. For example, if you often connect to a particular database, you can create a connector component that contains all the settings options.
To create a component or metanode select at least two nodes, right-click anywhere in the workflow editor, and select either Create metanode or Create component, as explained in this section of the KNIME Components Guide.
To make a component comprehensible to others, document it by adding a description for the expected input and the different setting options (similar to a KNIME node), as explained in this section of the KNIME Components Guide.
To properly exhaust the flexibility of a component, it should:
- Use a small set of consistent inputs and outputs.
- Never rely on sources specific to one data set.
- Not require its users to change any node settings on the inside when adopting it.
You can have your component adjust to different data by adding custom configuration dialogs to access the flow variables inside the component. This allows you and other users of your component to easily customize a component to take variable names from different datasets as inputs. In this respect, components work just like regular KNIME nodes: You provide them with data to which you adjust the node settings. Ultimately, components make frequent data operations faster and easier.
Some components are executed repeatedly, e.g. because they are data apps. To accelerate their execution, perform heavy computations, like processing large amounts of data, outside the component.
As node sub-groups, components and metanodes should be treated like small workflows with respect to their scope. You should assign one single, self-contained and coherent function to one component or metanode.
Learn more about components and metanodes in the KNIME Components Guide.
Share components on the KNIME Hub
After you create a component in a workflow, if you want to reuse it in another workflow, you can copy and paste it into the new workflow. However, in this way, changes to the component in one workflow are not picked up by the others. To make full use of a component’s reusability potential, you can share it on the KNIME Hub. To share a component, right-click it, select Component → Share. By doing so, you can let your collaborators access your changes to a component and also see theirs.
Additionally, by linking a shared component, you can incorporate changes made by others in your local installation. Whenever your collaborators update the component on the KNIME Hub, your KNIME Analytics Platform installation prompts you to update the component. To adapt the update policy, navigate to Preferences → KNIME. Under Component updates, you can set the default update policy to Never, Always, or Prompt.
Find out more about sharing components in the KNIME Components Guide.
Please be aware that if input data are included, they will be accessible to everyone who has access to the component itself. Thoroughly check which type of Hub space you save your components to and whether your data contains sensitive information.
Find out how to handle workflows that involve confidential data, in the security section of this guide.
Some components allow Streaming Execution. Read more about how this feature makes your workflows more efficient in the Streaming Execution section of this guide.
Components for Data apps
You can use components and their composite views to define pages in web application workflows. Once uploaded to KNIME Hub, they can be deployed as Data Apps.
To directly interact with the Data App UI in the browser, you need to implement components with widgets. Widgets allow consumers of your Data App to navigate between its pages. Each page corresponds to a component at the root level of the workflow, containing Widget nodes and View nodes. This means that when you inspect the composite view in KNIME Analytics Platform, you can adjust the parameters in the window that opens.
A component that constitutes a data app is meant to be executed repeatedly. To accelerate its execution and to avoid undesirable consequences, perform heavy computations outside of the component.
Find out more about data apps in the respective section of the KNIME Components Guide, or learn how to create a data app step-by-step in the KNIME Data Apps Beginners Guide.
Capture and invoke workflows
Capture workflow segments
Having many sub-processes in one workflow makes it slow and difficult to maintain and test. In the Structure your workflow with components and metanodes section the advantages of reusable workflow segments are described. Another option for automatically capturing a selection of nodes from a workflow is the KNIME Integrated Deployment Extension.
This feature allows you to:
- Capture core segments of your workflow for reuse
- Save captured segments automatically as workflows with all the relevant settings and transformations included As a consequence, captured segments do not require manual work or changes to be reused. This facilitates deploying and testing relevant parts of a workflow, e.g. custom data preprocessing.
You can use the KNIME Integrated Deployment Extension for variety of use cases, such as:
- Data pipeline deployment
- Model deployment
- Ad-hoc testing
- Workflow summary extraction
In general, you will benefit from:
- Saving time
- Reducing errors
- Increasing compliance
- Optimizing processes
If you want to learn more ways to optimize workflow performance, please refer to the Efficiency section.
To capture a workflow segment, i.e. a selection of nodes, place a Capture Workflow Start node before the first node, and a Capture Workflow End after the last node is to be captured:
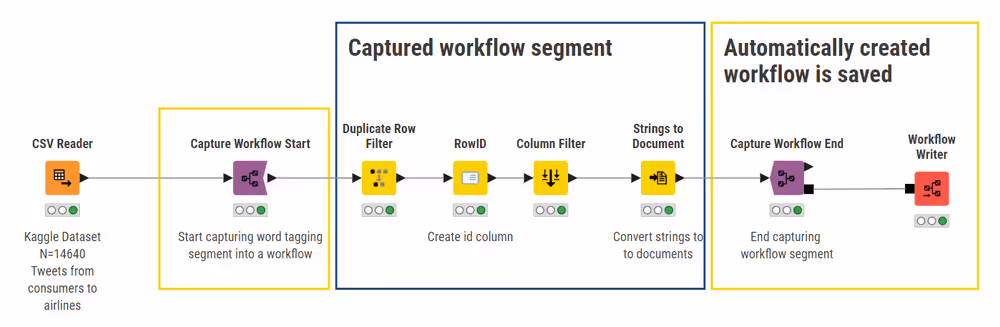
The entire workflow segment within the scope of these two nodes is then available at the workflow output port of the Capture Workflow End node. In the configuration dialog of the Capture Workflow End node, you can store input data that will be used by default when running the captured workflow segment unless you provide a different input. You can also propagate variables defined within the captured segment.
Nodes that have out-going connections to a node that is part of the scope but are not part of the scope themselves are represented as static inputs but not captured.
Finally, to save a captured workflow, you have the following options:
- Write the workflow to a local folder with the Workflow Writer node, as described in the respective section in the KNIME Integrated Deployment Guide.
- Write the workflow to a connected file system by adding a database connector node. See the respective section in the KNIME Integrated Deployment Guide for details.
- Read the workflow inside another workflow with the Workflow Reader node. It reads a single workflow into a workflow port object. Since the workflow will not be executed by this node, add a Workflow Executor node to do so. See the respective section of the KNIME Integrated Deployment Guide for details.
The Workflow Reader node allows you to read a workflow object, even if you do not want to execute it right away. This is useful to analyze the workflow, e.g. with the Workflow Summary Extractor node or, if you want to provide said workflow object to a subsequent node or component as input. The treatment of the workflow object is delegated to the node or component. However, the Workflow Reader cannot access the data area of the workflow that is read, nor does it read partially executed workflows. The whole workflow will be reset. The Workflow Executor node can be useful to execute a workflow object that is the output of a node or component. For example, you could connect the output port of the Workflow Combiner node, which facilitates configuring input/output port connections between workflow segments, to the Workflow Executor. However, the Workflow Executor can only execute a workflow that is captured from the same workflow that the Workflow Executor node is part of.
It is not possible to read KNIME components with the Workflow Reader node.
Finally, if you want to use captured workflows immediately after reading them into another workflow, consider using the Call Workflow Services nodes instead. See the Workflow Services section for details.
Learn more about capturing segments of a workflow in the KNIME Integrated Deployment Guide.
Workflow Services: Invoke workflows within each other
Workflow Services provide nodes that allow a caller workflow to invoke other workflows. Those workflows being called are callee workflows.
Since an ideal workflow performs only one task, this feature allows you to modularize your workflows. Ultimately, it makes workflows faster to execute and easier to understand and maintain. You can use Workflow Services for:
- Sharing data tables, text, models, and other objects between workflows
- Create modular workflows, each of which creates a chart for a report, that are orchestrated by a caller workflow that generates a report that includes all of them
Rather than invoking standardized (but limiting) JSON-based APIs, it is possible to create and connect directly to KNIME native API endpoints. This means that it is possible to share more KNIME data types, beyond what is possible with JSON, e.g., text documents, decision trees, deep learning models, and many more. This is especially useful in workflow orchestration.
To call workflows from external REST clients, please use Container Input/Output nodes. See the respective section in the KNIME Workflow Invocation Guide for details.
The most important nodes regarding Workflow Services are the following from the KNIME Personal Productivity Tools Extension:
- Workflow Input node: It receives a table or any port object from a workflow that calls this workflow, i.e. a caller workflow. Various port types are available.
- Workflow Output node: It sends an object to a caller workflow. Various port types are available.
- Call Workflow Service node: It calls other local and remote workflows. Multiple ports and various ports are available.
In conclusion, the Workflow Input and Output nodes are used to build workflows intended to be called from within another workflow (i.e., using the Call Workflow Service node).
The Call Workflow Service node, in turn, obtains the results for further processing in the workflow. It can be used any time we want a caller workflow to invoke a callee workflow. The workflow will be able to receive inputs via Workflow Input nodes and return outputs which the Workflow Output nodes then collect. The ports of the Call Workflow node are adjusted automatically in accordance with the callee workflow selected in the configuration dialog.
The advantages of Workflow Services are:
- They can adequately access the workflow data area of the callee workflow, which distinguishes them from the Workflow Reader node.
- They leverage the infrastructure of KNIME Business Hub, leading to better scalability.
- They are more efficient than using Workflow Reader and Workflow Executor nodes, when direct workflow execution is the main goal. If you want to learn more ways to optimize workflow performance, please refer to the Efficiency section.
Find out more about Workflow Services in the KNIME Workflow Invocation Guide.
Testing and data validation
Get started with why and how to test
To guarantee that a KNIME workflow, component or workflow segment performs as expected, you should test your workflows regularly. Ultimately, this makes your workflows less error-prone and easier to maintain. This section explains how to leverage KNIME as a testing framework.
Your workflows will not always be faced with the ideal input, nor will they be configured in the right way. Because of that, your workflows should be robust to inputs deviating from norm by breaking in a controllable way. This helps ensure that any future changes continue to pass all of the same tests.
Before testing, you should clearly define your goals. In the case of workflow testing, you can formulate test cases, which state any given situation encountered by your workflow, i.e., what happens when valid data is injected into the workflow, and what errors will be raised, when invalid data is provided.
Possible issues that may occur while testing include:
- Failing for unexpected reasons
- Unexpected error messages
- Wrong output
The reasons could be:
- Invalid inputs, e.g. provided by end users
- Configuration changes
- Changes caused by an update
- Changes in external services
Test and validate in KNIME Analytics Platform
In KNIME Analytics Platform you can create and automate a testing framework for future re-deployments. You can create so-called testflows, which are KNIME workflows that provide controlled test inputs and outputs to a workflow, component, or workflow segment. Test in- and outputs are gold standard data, i.e., they represent small samples of the inputs and results that you expect your workflow to handle.
When test outputs are provided, the testflows then check whether the outputs align with the expected results generated from the test inputs. If they do not, the testflows should raise an alert, which is a response to deviating inputs or unexpected cases. You have already defined those cases as your error test cases, e.g., missing or invalid inputs, unexpected failure, etc.
As a best practice you should never:
- Process the golden data outside your test flow as if it were regular data. This may lead to more unknown errors that you need to identify.
- Make any changes to the golden data.
It is best to keep golden data in a separate folder and to restrict permissions if possible. KNIME Analytics Platform provides nodes that allow you to test the output of your testflows. Although there exist many more, the most commonly used nodes are listed below.
Ensures a certain table structure and table content (schema). As a result, the output table structure should be identical to the specification defined by the user in the configuration dialog. This node forms part of the KNIME Base nodes.
Validates JSON values based on a specified schema. It collects mismatching values so that you can inspect them.
Determines if there is a difference between two tables. It compares the table created by your testflow with a reference table, e.g., a golden table.
Identifies and returns domain and value differences for each row and column in the tables. As opposed to the Table Difference Checker, the node does not immediately fail if the tables differ, but the configuration dialog provides an option to enable failing, too.
The node will compare two files given by flow variable and fails with an exception if the files are not equal. Many similar nodes exist for other types of files, too, e.g., the Image Difference Checker. You can find them on the KNIME Community Hub by searching for the keywords "difference checker".
In the following, you will read about two approaches to create testflows in KNIME Analytics Platform. The nodes listed above can be used in both of them.
In KNIME Analytics Platform you can either use the KNIME Integrated Deployment Extension or the KNIME Testing Framework UI Extension. Both approaches are described in the following. You can choose which one fits best your use case.
KNIME Integrated Deployment
The first option is to create testflows by capturing workflow segments and executing them using the KNIME Integrated Deployment Extension, which is described in the Capture and invoke workflows section.
This option is useful for ad-hoc testing, i.e., executing the captured workflow segments in the same workflow while testing against new data. For execution, you may use the Workflow Executor. First, enclose the segment you want to test into the Capture Workflow Start and Capture Workflow End nodes, as described in the Capture and invoke workflows section of this guide. Then, in the same workflow create multiple workflow branches. Each of them represents a different test case by injecting different data inputs into the captured workflow segments to be tested:
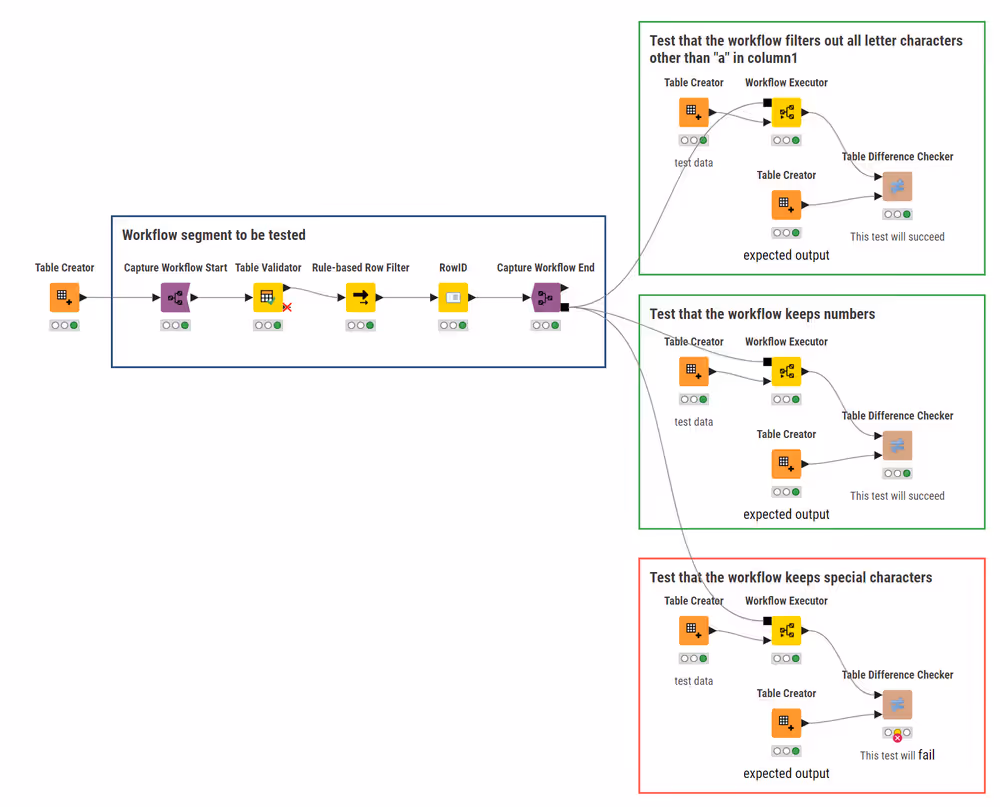
If you only want to test whether your workflow is executing or not, you may insert a Workflow Executor node without any additional input but the captured workflow segment.
To perform an application test, i.e. to test an entire workflow we recommend using the Workflow Services nodes instead.
KNIME Testing Framework UI
The second option for testing your workflows is the KNIME Testing Framework UI Extension. It is a more complex method of creating and executing testflows. You can generate reports which you can view inside of KNIME Analytics Platform.
Your testflow can be as simple or complex as you choose to. The test itself is performed by a validator node such as the Table Validator, which compares the output generated by your workflow against a gold standard. To establish which conditions must be met for the workflow to fail or to succeed execution, you can use the Testflow Configuration node.
Testflow automation
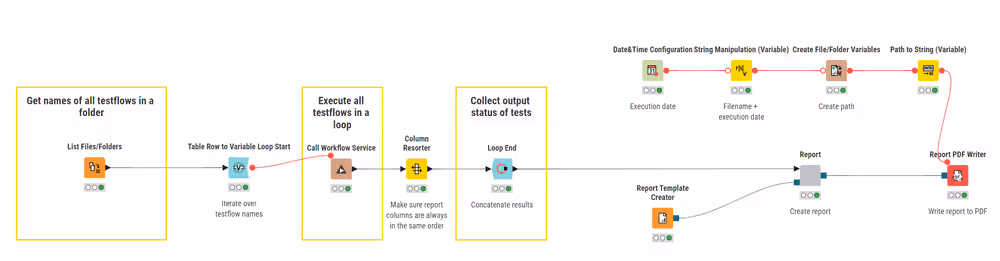
To execute multiple testflows automatically, you can execute a Call Workflow Service node in a loop. You simply iterate over the testflow names, concatenate the results of the reported errors and write them into a report:
Find out more about creating reports in the KNIME Reporting Guide.
This is necessary, because identifying errors with testflows does not automatically mean that the people responsible are informed. The testflow could either fail silently, or the process would even be successfully completed whilst having processed faulty input data.
To be made aware of these errors, you can embed failing nodes in a try-catch framework to catch all the errors. It captures information about failing nodes which can then be stated in the report. On the KNIME Community Hub you can find various nodes to implement this framework.
Try nodes simply indicate the beginning of the try-catch framework. Place them in front of the first node you want to include and connect them to its input port. The Catch Errors node, on the other hand, will be placed after the last node you want to include in your try-catch structure. By connecting the last node to the input port of the Catch Errors node, it will forward the input from the first port if the execution was successful. If execution on the top branch failed (and a matching try node was connected before the failing node) then the input from the second port of the Catch Errors port will be forwarded, and the second variable outport will contain information about the observed error.
After having collected the errors, you can choose from a variety of KNIME nodes to message the responsible people about the issues you identified.
Make your workflow efficient
Efficient file reading
To speed-up your workflow, keep the following guidelines in mind:
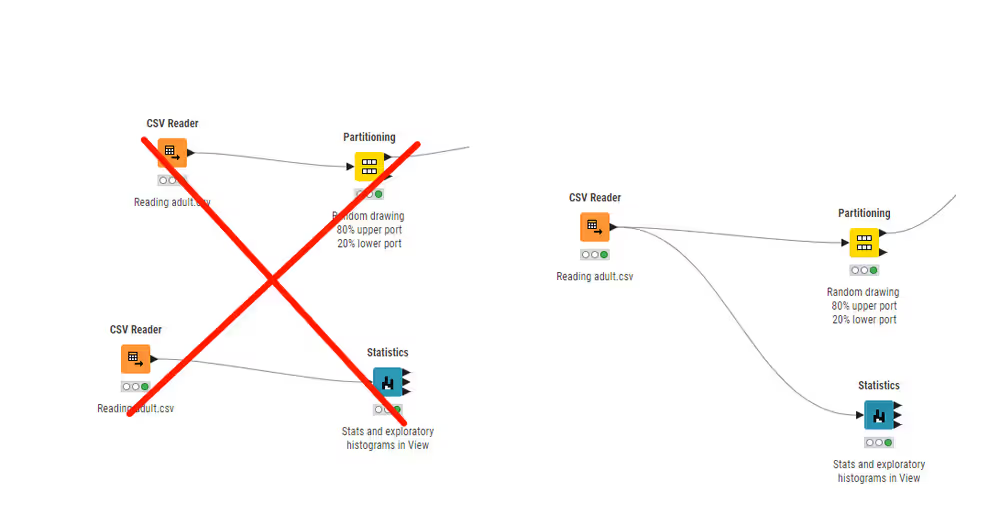
- Avoid reading the same file multiple times, i.e., do not use a Reader node each time you need the same file for different data operations. You can use multiple connections to connect the same Reader node to more than one subsequent node:
- Read multiple files with the same structure with one Reader node. Open the configuration of a Reader node and select the “Files in folder” option in the Settings tab.
- Remove unnecessary data. KNIME Source nodes, like the Reader nodes, offer an option for removing unused or redundant columns. Open the configuration of a Reader node and select the Transformation tab.
Efficient workflow design
When designing a workflow, there are only a few mistakes to absolutely avoid, but many convenient practices that facilitate its usage. Both will be introduced in the following.
An efficient workflow never contains:
- Disconnected nodes or components. Especially, if you want to run that workflow on a KNIME Hub instance, or if you want to call it from another workflow.
- Workflow branches that are not actively needed.
- Large, unused files in the form of components, nodes, or metanodes. They slow down loading, executing, and saving the workflow. In some cases, they even cause the workflow to fail.
To make your workflow run faster, keep the following in mind:
Some data manipulation operations are more computationally expensive than others. KNIME Analytics Platform offers nodes to avoid unnecessarily expensive operations. For example:
- Joins: Joining two tables with the Joiner node to then filter for criteria is slow. Instead, replace a few rows with the Value Lookup node, that compares and matches your data to a dictionary containing your criteria.
- Loops: Depending on your data and iterations, loops may slow down your workflow. Thus, use loops only when absolutely needed. Instead, try Multi Column nodes to operate on strings in multiple columns at once.
Some data types use more memory space on your computer than others. For example, strings occupy more space than integers. Check for columns with the wrong data type, e.g., where numbers are saved as strings.
Redundant data serves no purpose in your data operations. Filter out columns that contain constant values or any information that you will not be using later.
The fastest way to run recurring processes, is to capture, save them and replicate your workflow on (new) data. To learn how, refer to the Capture and invoke workflows section of this guide section of this guide.
Measure performance with KNIME nodes
Like any good project, a good workflow is scalable.
To measure which nodes take the longest to execute in your workflow you can use the Timer Info node. It reports individual and aggregate timing and execution information for all nodes. This allows you to identify weak points in your workflow and track your progress over time.
The Timer Info node is included in the KNIME base installation. Simply drag it anywhere into the workflow that you want to evaluate, and execute it.
Process in memory option
In KNIME Analytics Platform, the GroupBy and Pivot nodes offer the "Process in memory" option. While it does use significant memory, it also brings a notable performance improvement by reducing disk swaps when these nodes are executed. To activate the "Process in memory" option, open the configuration dialog of the GroupBy or Pivot node. Under the tabs Settings > Groups navigate to Advanced settings and select the checkbox Process in memory.
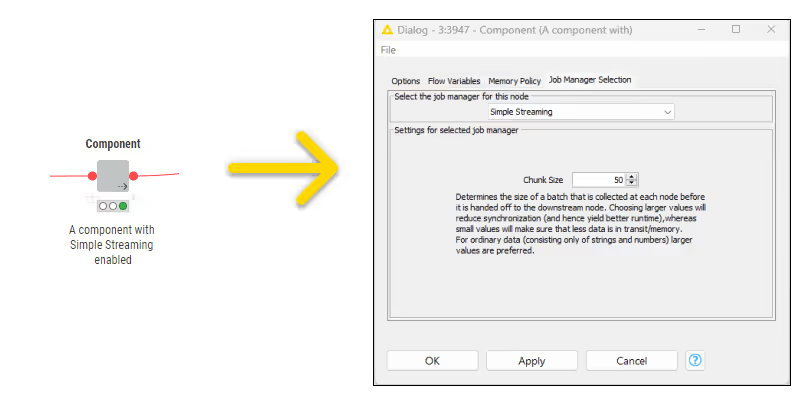
Streaming execution
Some KNIME nodes and components allow streaming execution. You can implement it with the KNIME Streaming Execution (Beta) extension on KNIME Hub.
While the default execution operates node-by-node, in streaming execution nodes are executed concurrently. Each node passes data to the next as soon as it is available, i.e., before the node is fully executed. In particular, all data are divided into a number of batches which are streamed one by one. Especially, when reading or preprocessing data, streaming execution accelerates runtime.
In Streaming Execution intermediate results are not available because no data is cached.
To switch from default to streaming execution, create a component and open its configuration dialog. Open the Job Manager Selection tab in the component configuration dialog. If the streaming execution option is not available for the node you will only see the default option in the menu. In components that allow streaming execution, select the "Simple Streaming" option. The streamable component is now marked with an arrow in its lower left corner.
Streaming execution is not yet optimized to operate with the Columnar Backend. You can adjust your default table backend as described in the Columnar Table Backend section of this guide.
For further reading on Streaming Execution, please consult the respective section in the KNIME Components Guide.
Find out more about how to structure your workflow with components in the section on reusability of this guide.
Columnar table backend
You can use the KNIME Columnar Table Backend extension to accelerate workflow execution. It optimizes the use of main memory in KNIME Analytics Platform by reviewing the underlying data representation, where cell elements in a table are represented by Java objects. Its now different underlying data layer is backed by Apache Arrow which is based on a columnar representation.
The advantages are:
- Simplicity: Simple cell elements (e.g. integers) are not represented as memory-intensive objects.
- Compactness: The data is kept in a more compact form. Thus, more data fits into main memory.
- Controllability: Smaller chunks of data are held (“cached”) in-memory, making the memory footprint of KNIME much more stable. Also, the data lives "off-heap" (a region of memory) where, for you as the user, it is more controllable.
- Compatibility: It is a first step in enabling shared memory with other programming languages such as Python, leading to more performance improvements.and thus, more performance improvements.
You can activate the Columnar Backend by navigating to Preferences > Table Backend.
Setting your table backend to columnar in Preferences will only affect workflows created after making the adjustment. Existing workflows, including the workflow(s) currently opened in your KNIME Analytics Platform, will need to be manually updated.
To adjust the table backend for one specific workflow, e.g., a workflow created before changing your default table backend, navigate to the node description tab in the side panel navigation. Click on the  icon. In the window that opens, in the Table Backend tab, select Columnar Backend from the dropdown menu. The parameters relative to memory usage of the Columnar Backend can be configured under Preferences > Table Backend > Columnar Backend.
The Columnar Backend is not yet optimized to operate with streaming execution. You can adjust your default table backend as described in the Streaming execution section of this guide.
For more details, please refer to the Preferences section of the KNIME Analytics Platform User Guide.
Parallelize branch execution with loops
Another way to speed up workflow execution is parallel computing. You can implement this with loops. They iterate over a certain part of the workflow, e.g. over a workflow branch. Each iteration, a repeated procedure, has different input. Among others, this input can consist of chunks of the data you want to process in KNIME Analytics Platform. These chunks will each be processed in parallel on separate workflow branches.
To get started, you need to have the KNIME Parallel Chunk Loop Nodes Extension installed.
To make use of workflow execution parallelization, you need to first execute your workflow on the KNIME Hub.
After reading the data, and before your first data manipulation, you can add the Chunk Loop Start node. It splits data into equally sized chunks for each iteration. Then it executes the manipulations in the loop body on each chunk in parallel. You can configure either the number of chunks or the number of rows per chunk. At the end of a parallel chunked block, add the Parallel Chunk End node. It collects and concatenates the results from the parallel workflow branches. If the data segment in the loop generates tables with repeated RowIDs, the Parallel Chunk End node adds a chunk index to the RowID.
For more details about loops, please refer to the Loops section of the KNIME Flow Control Guide.
Efficient database usage
KNIME Analytics Platform allows you to access, manipulate and share large amounts of data. The most secure and effective way to store this data is in a (relational) database.
With the KNIME Database Extension, which is already part of every KNIME Analytics Platform installation, you can use the full functionality of any JDBC-compliant database within KNIME. This includes the following database operations:
- Connecting to the database
- Reading from the database
- Generating queries in the database
- Manipulating the database structure, i.e. creating and deleting tables in the database
- Manipulating elements contained in a database table, e.g. deleting or updating values
- Type Mapping, i.e. defining rules for mapping database types to KNIME types and vice versa. Read more about this in the respective section of the KNIME Database Extension Guide.
To connect to the database of your choice, KNIME provides Connector nodes that can be found in different extensions. There are three ways to connect to a database in KNIME:
- Connect to a predefined database that has its own dedicated node in the KNIME Database Extension. Among others, PostgreSQL, MySQL, Microsoft SQL Server, or SQLite have dedicated nodes.
- Connect to a predefined database that has its own dedicated node in another dedicated KNIME extension, which is the case for e.g. the KNIME Amazon Athena Connector[Amazon Athena Connector Extension] or the KNIME Snowflake Integration
- Connect to any other JBDC-compliant database using the generic DB Connector node.
The database-specific connector nodes already contain the necessary JDBC drivers and provide a configuration dialog that is tailored to the specific database. It is recommended to use these nodes instead of the generic DB Connector node, if possible. Find out more about database connectivity in the respective section of the KNIME Database Extension Guide.
Once connected, you can select relations with the DB Table Selector node and read from the database using the DB Reader node.
In addition to reading from the database, you can perform in-database processing, i.e. data manipulation directly on the database, using the KNIME Database nodes, e.g. DB Joiner or DB GroupBy and formulating your query.
Their configuration is similar to the KNIME manipulation nodes. The DB Query Nodes require no SQL coding, since the nodes themselves construct and output a SQL query.
Finally, Database Writing Nodes let you create, update and delete data on the database of your choice. The DB Connection Table Writer node is useful for efficiency and data lineage maintenance, because it creates a new database table based on the input on the SQL query. As a result, there is no need to actually read the data into KNIME Analytics Platform itself. Additionally, the DB Loader node lets you insert rows into an existing DB table, although this is not supported by all databases.
KNIME Analytics Platform also supports NoSQL and non-relational databases like MongoDB(document-oriented), DynamoDB (document-oriented and key-value-based) and Neo4j (graph-based).
To speed-up your workflow with respect to databases, keep the following guidelines in mind:
- Avoid using the DB Connector node more than once when connecting to the same database. Unless you need to open up parallel connections to speed up execution of parallel branches, this practice consumes more computing resources.
- Do not process your data locally. Do it directly on the database whenever possible.
- Always use the DB Connection Closer node at the end of your database processing. It closes a DB Session during workflow execution and will free up database resources as soon as they are no longer needed by the workflow.
The KNIME Database Extension includes nodes for simulating database transactions, such as DB Transaction Start and DB Transaction End. These nodes help group multiple database operations into a single unit, ensuring that either all operations execute or none do. If the transaction is successful, it ends with a commit to the database. If it is not successful, it is rolled back, returning the database to its state at the beginning of the transaction.
This enhances efficiency by:
- Enabling reliable recovery from failures, maintaining database consistency even if execution halts prematurely, avoiding incomplete operations and unclear statuses.
- Ensuring isolation between concurrent programs accessing the database, preventing potential errors in program outcomes.
Find out more about database capabilities with KNIME and what to consider for different database providers in the KNIME Database Extension Guide.
Make your workflow secure
Handle credentials accordingly
When working with confidential data, it’s critical to have the best security measures in place to protect it from breaches and misuse. Protecting sensitive information is essential for regulatory compliance and maintaining the trust of customers and stakeholders.
KNIME Analytics Platform helps by providing various security features. It includes tools to encrypt data, manage user access, and ensure data integrity so you can handle sensitive information.
Credential nodes
To make sure confidential data are not accidentally saved or shared, make sure that you do not save any hard coded information in your nodes and workflows. In detail, this means the following:
- Do not save passwords in plaintext as they are easy to copy.
- Do not hardcode your credentials into nodes.
- Reset your workflow before sharing it anywhere.
You can avoid storing passwords as a part of your workflow on disk by default. Navigate to the knime.ini file in the root of your local KNIME installation, and set Dknime.settings.passwords.forbidden=true.
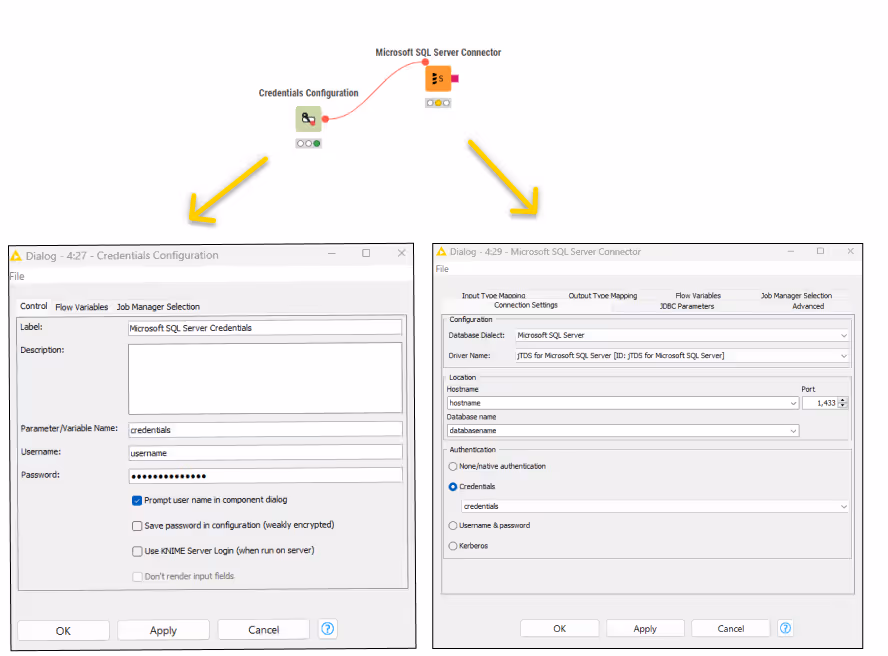
Another option to secure credentials is to encrypt them. The Credentials Configuration or Credentials Widget nodes allow the user to specify credentials at runtime.
Configuration nodes provide input parameters to other nodes in the workflow. They do this through flow variables. This means that if the flow variable output of the Configuration node is connected to another node, that node can access the input parameters set in the Configuration node.
Widget nodes, on the other hand, are displayed as widgets only in the composite views. This means that when you inspect the composite view in KNIME Analytics Platform, you can adjust the parameters in the window that opens.
Using Widget and Configuration nodes to handle credentials means that the user does not need to access the node that performs the action for which the credentials are needed. Instead, the user can access the necessary settings from the outside, without having to change the configuration of the node itself.
You can use Configuration and Widget nodes to securely use database connector, authenticator, and REST nodes. Below, is an example of how a database connector node accesses credentials encrypted in a Credentials Configuration node:
Find out more about Configuration nodes in the respective section in the KNIME Components Guide. The same guide also provides a section on Widget nodes, too.
Cloud credentials
To make your workflows flexible, you can access remote file systems. When connecting to a cloud service such as Microsoft, Google, etc., you should use appropriate connector nodes to securely authenticate. In the configuration dialog of an authenticator node, you can limit the scopes of access that will be granted for this connection. You should select the scopes based on the level of access that you need. The Add scope button allows you to add additional scopes within the cloud service. In addition to the Standard list of scopes, you can add several custom scopes.
In order to see the corresponding Scope under the Standard list of scopes, you need to have installed the extension first.
Handling sensitive data
When you share a workflow, you can choose to save data that was processed along with it. Intermediate results of data manipulation operations are then available even after the workflow is closed. Particularly, when processing confidential data inside your workflows, you should make sure not to include any information that you do not want to share. When working with sensitive data, keep the following in mind:
- Do not save confidential data within your workflow
- Reset your workflow before sharing it unless you have a specific reason not to. That is described in the respective section of the KNIME Community Hub User Guide.
Items that you upload to a space on the KNIME Hub will be available to anyone with access to that space. Therefore, be very careful with the data you share.
Data anonymization
Sensitive data needs to be handled with caution. GDPR (General Data Protection Regulation) stipulates that only anonymized data may be used extensively. As a consequence, you may want to anonymize your confidential data while later being able to re-identify the individual data points in the dataset. This is referred to as pseudo-anonymization. To additionally assess the risks of de-anonymization, you can use the Redfield Privacy Nodes extension for KNIME which uses different algorithms for anonymization and the assessment of re-identification risks.
For basic anonymization (pseudo-anonymization) you can use the Anonymization node. In the configuration dialog, simply choose the identifying attributes, i.e. the columns in your table that contain sensitive information. The Anonymization node hashes the values in the columns using SHA-1. You can also choose between different salting strategies. An advantage of this rather uncomplicated approach is that you can go back to the original data, since the translation table is available at the second output port.
For advanced anonymization, you should rely on hierarchies. You can build them by defining complex binning rules, which convert the unmodified data to completely suppressed data. You can create different types of hierarchies with the Create Hierarchy node. Multiple hierarchies may be applied to the data subsequently. To read more about the hierarchy types, please refer to the Building hierarchies section of the following article: Remain Anonymous with Redfield’s Privacy Extension.
To now apply the rules set to the original data, you need to combine them in the Hierarchical Anonymization node.
To finally assess which risks are posed by your anonymization techniques, add the Anonymity Assessment node. To find out more about the types of risks that the node identifies, please refer to the node page of the Anonymity Assessment node on the KNIME Community Hub.
Secrets: Secure information on the KNIME Hub
Manage and use secrets
Secrets provide a way to centrally store and manage logins to other systems. For example, a secret could be credentials to log into an external database, file system or service. Secrets are owned and managed by a user or team. User secrets are intended for managing personal logins, e.g., john.smith. Team secrets on the other hand are intended for shared logins sometimes referred to as technical or service users, e.g., hr_read_only, that are shared with multiple users.
To manage your personal secrets navigate to your account page and select Secrets from the menu on the left. On your Secrets page you can create, edit and delete your personal secrets. Similarly, to manage your team’s secrets, navigate to the team’s page and select Secrets from the menu on the left. On your Secrets page you can create, edit and delete your personal secrets, as shown in the respective section of the KNIME Secrets User Guide.
Team secrets can only be created by team admins.
Secrets allow you to manage sensitive information like passwords and API keys. Each secret has a unique name, optional description, secret type, and authentication type. Editing a secret allows changes to its values but not its secret nor authentication type; to change the type, a new secret must be created. Deleting a secret requires confirming the secret’s name to avoid accidental deletions. Some secret types, such as OAuth2, require you to log into your account to acquire a session and refresh token. If you are not logged in, these secrets are marked in the secrets table as Not consumable in the status column. Team secrets can be shared with others by managing access rights, which can be set to "Use" or "Edit." These access rights control whether users can only use the secret in workflows or also modify and delete it. Personal secrets, however, cannot be shared with others for security reasons.
Find out more about Secrets in the KNIME Secrets User Guide.
You can access Secrets in your KNIME workflows through the Secrets Retriever node, part of the KNIME Hub Additional Connectivity (Labs) extension.
The Secrets Retriever node requires a connection to a KNIME Business Hub.
The node allows selection of multiple secrets, adjusting its output ports based on the secret types. For security, secrets are not saved with the workflow and must be re-executed each time. The node retrieves secrets using the executing user’s permissions, and if the user lacks rights, an error occurs. Secrets are referenced by internal identifiers, ensuring name changes do not disrupt connections.
Secret types
Secret types in KNIME cater to diverse authentication needs, enhancing workflow security and flexibility. Credentials can be of various types like usernames, passwords or password-only. Thus, secrets accommodate different authentication scenarios such as database logins, etc. The Box secret type facilitates connection to Box for file management, supporting OAuth2-based user authentication. Similarly, the Google secret type enables connection to Google services like Drive or BigQuery. Microsoft secret types extend compatibility to Microsoft/Azure cloud platforms, empowering users to access Office 365, SharePoint, Azure services, and more. Each secret type offers specific authentication methods specific to different use cases. Make sure to choose the suitable secret type for interactive logins or automated workflows. Additionally, the flexibility to specify scopes of access ensures fine-grained control over resource permissions, enhancing security.
Find out more about leveraging Secrets on the KNIME Hub in the KNIME Secrets User Guide. It offers diverse how-to guides which provide systematic procedures to incorporate authentication and access permissions in Microsoft Azure services into KNIME workflows.
Glossary
Workflow annotation
A box with colored borders and optional text that can be placed in a workflow to highlight an area and provide additional information. Right-click on an empty spot in a workflow and select “New workflow annotation” to create a new workflow annotation at that position.
Node label
The text underneath a node. Select the node and click on the text. Then you can edit it and add a description of what the node does.
Workflow description
The description of a workflow that can be edited by the user. Click on the  at the top-right to edit it. The workflow description is also shown in the KNIME Hub when a user opens the workflow’s page.
Hub spaces
The place on the KNIME Hub where workflows, components, and data files are stored. Find out more in the Community Hub User Guide.
Job
Every time a workflow is executed ad hoc or a deployment is executed a job is created on KNIME Hub. More information about jobs can be found here.
(Shared) Component
A workflow snippet wrapped into a single node. A component can have its own configuration dialog and can also be assigned a view. Components enable you to bundle functionality for a particular part of the workflow and allow sharing and reusing. For more information refer to KNIME Components Guide.
Data app deployment
A workflow comprising one or more components that contain view and widget nodes a user can interact with in the browser. A Data App is deployed on KNIME Business Hub. A guide on building Data Apps can be found here.
Schedule deployment
A schedule allows you to set up a workflow to run automatically at selected times. More information is available:
Service deployment
A service deployment allows you to use the workflow as an API endpoint. For more information refer to KNIME Business Hub User Guide.
Workflow Service
A workflow with Workflow Input and Workflow Output nodes that can be called from other workflows using the Call Workflow Service node.