
Connect to Snowflake
Introduction
This guide describes how to work with Snowflake from within the KNIME Analytics Platform. The KNIME Analytics Platform is our open source software for creating data science. Intuitive, open, and continuously integrating new developments, it makes understanding data and designing workflows and reusable components accessible to everyone.
The Snowflake Extension allows you to connect to your Snowflake account to access and manage data directly in Snowflake and if desired sprinkle in some SQL. You can combine data from Snowflake with data from any of the multiple sources supported by KNIME and apply advanced techniques such as statistics, machine learning, model monitoring, and artificial intelligence to make sense of it.
KNIME is a Snowflake Ready Technology having completed a 3rd party technical validation that confirms the KNIME Snowflake Integration is optimized with an emphasis on functional and performance best practices.
This guide will help you to get started and is divided into the following sections:
- Quickstart with Snowflake in KNIME gives a short introduction to KNIME and how to connect to Snowflake
- Working with Snowflake describes Snowflake specific topics such how to connect to Snowflake and accessing Snowflake Marketplace data
- Advanced setup instructions that might be required for special environments such as if your company uses Microsoft Entra ID for authentication.
Quickstart with Snowflake in KNIME
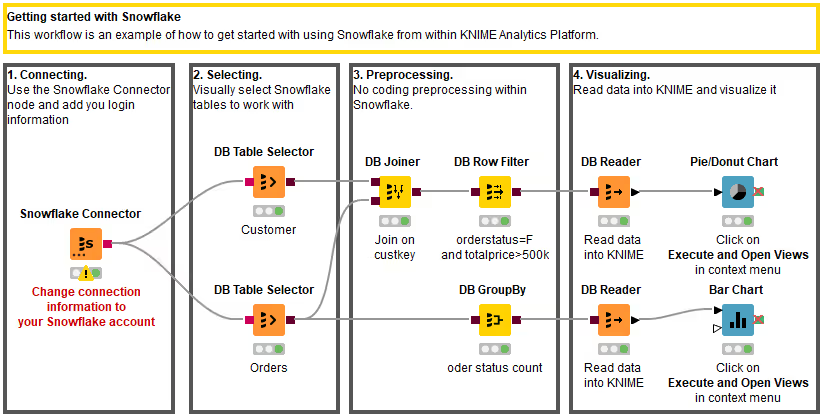
Once you have downloaded and installed the KNIME Analytics Platform you can open the Getting started with Snowflake example workflow in the KNIME Hub by clicking this link, or explore a variety of Snowflake templates for different use cases.
The workflow uses the TPCH sample data, which is shared by default with your account by Snowflake, and performs the following steps:
- Connects to your Snowflake account
- Selects the
CUSTOMERandORDERStable from the sample database - Preprocesses the data without the need to write any SQL
- Joins the two tables and filters all orders that have the
orderstatus=Fand atotalprice>500k - Computes the total number of orders per order status
- Joins the two tables and filters all orders that have the
- Reads the data into KNIME and visualizes it
If you do not have a Snowflake account you can apply for a 30-day free trial.
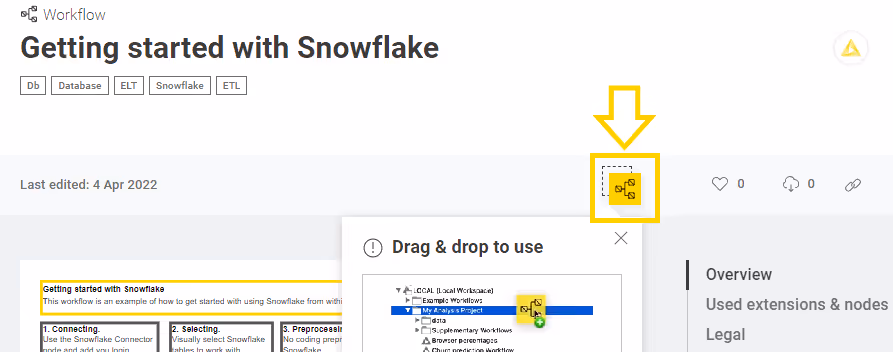
Once the workflow is opened in your web browser simply drag&drop the workflow icon right into the KNIME Explorer on the left hand side of your KNIME Analytics Platform.
If you haven't installed the KNIME Snowflake Integration don't worry, KNIME will prompt you that a node extension is missing and offers you to search and install it automatically. To do so simply click Yes and follow the steps in the installation window by clicking Next.
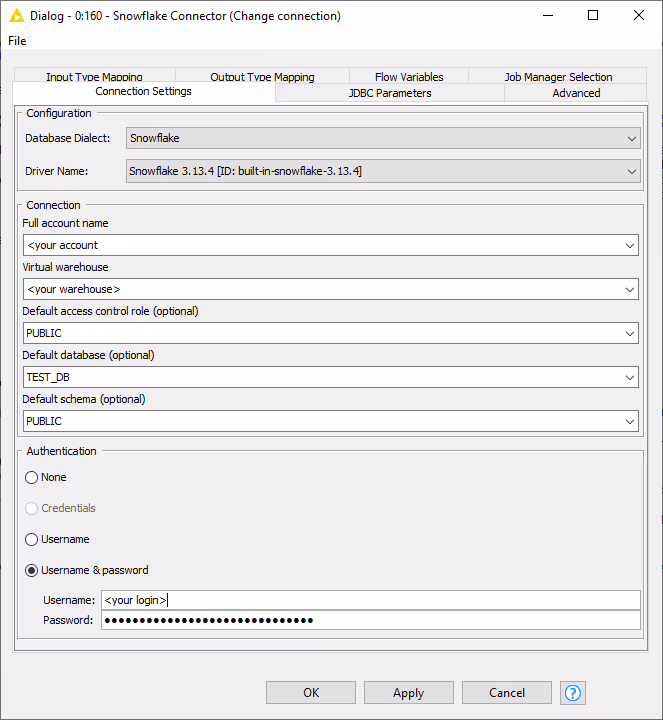
The first thing you need to do is adjust the connection settings of the Snowflake Connector node to point it to your Snowflake account. To do so, double click the node to open its configuration dialog. In the node dialog add your account information as described in the Snowflake Connector node section below. Please notice that the domain .snowflakecomputing.com will be appended automatically to the entered full account name.
Once this is done, you can execute the whole workflow by clicking the Execute all executable nodes button in the toolbar.

Alternatively you can also execute the workflow node by node and inspect the intermediate results as described here via the nodes context menu.
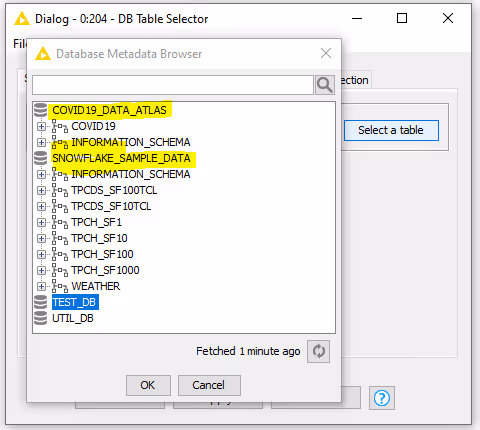
To work with other database tables or views simply double click the DB Table Selector node to open its node dialog. In the dialog click the Select table button. You can use the Database Metadata Browser to select the tables or views you want to work with and click OK. Close the node dialog by clicking OK and execute the node. After executing the node you can open the output port view of the node via the DB Data entry at the bottom of the context menu. Clicking the Cache no. of rows button allows you to have a peak at the data. You can do this at every stage of the workflow to see how your data evolves throughout the workflow.
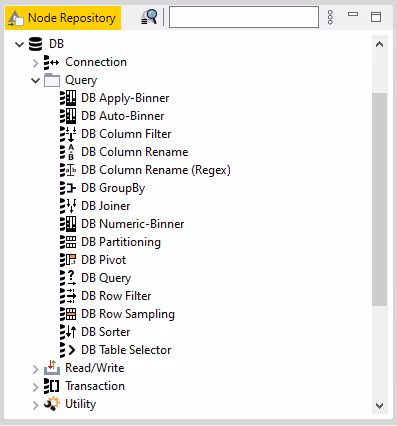
To perform additional transformations simply drag and drop other database nodes onto the workflow editor. The database nodes are located in the DB category of the node repository.
Once a new node is added you can connect it by clicking the output port of the first node and releasing the mouse at the input port of the second node. Open the node dialog by double clicking the node to adjust its configuration. For an explanation of the node and its different configuration options click the question mark at the bottom right of the node dialog to open the node description.
For more details on how to create, manipulate and execute KNIME workflows in general see the KNIME Analytics Platform User Guide. For more information about how to work with the database nodes see the KNIME Database Extension Guide.
Working with Snowflake in KNIME
This section describes how to work with Snowflake from within KNIME Analytics Platform
Extension installation
This is a one-time setup step that you can skip if you have followed the previous section.
Once you have downloaded and installed the KNIME Analytics Platform as described here you need to install the KNIME Snowflake Integration. To do so you have two options:
KNIME Hub:
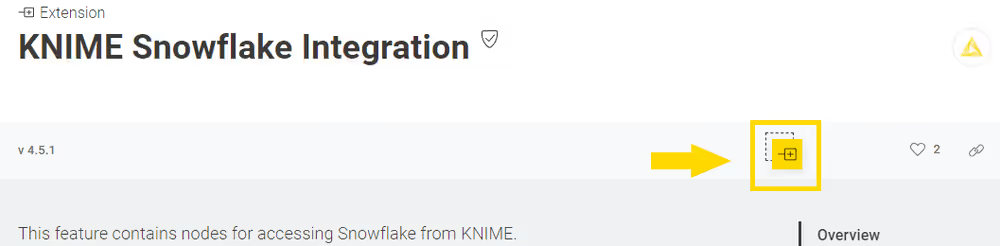
- Open the KNIME Snowflake Integration page by clicking here
- From the extension page drag&drop the squared yellow icon to the workbench of KNIME Analytics Platform. A window will open asking if you want to search and install the extension or integration. Click Yes and follow the instructions.
- Restart KNIME Analytics Platform.
KNIME Analytics Platform:
- Click File on the menu bar and then Install KNIME Extensions…. The dialog shown in the figure opens.
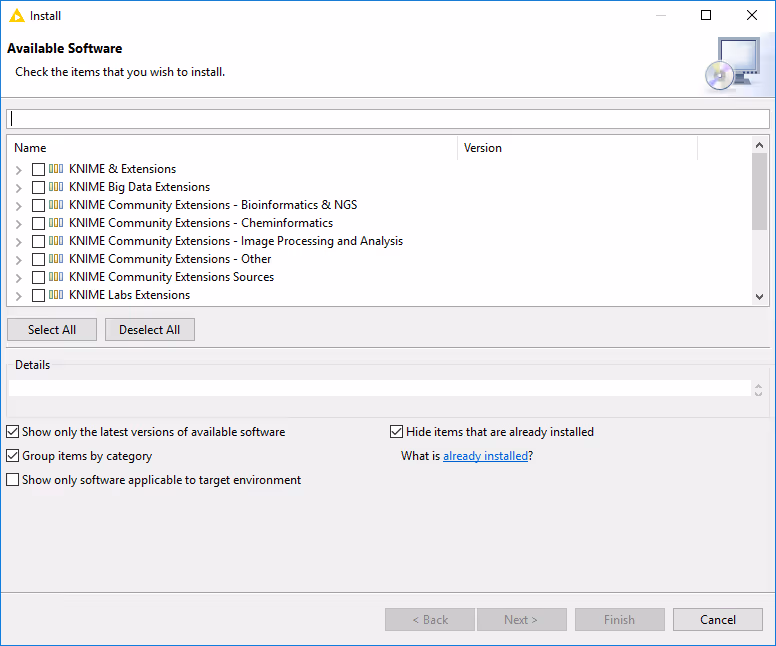
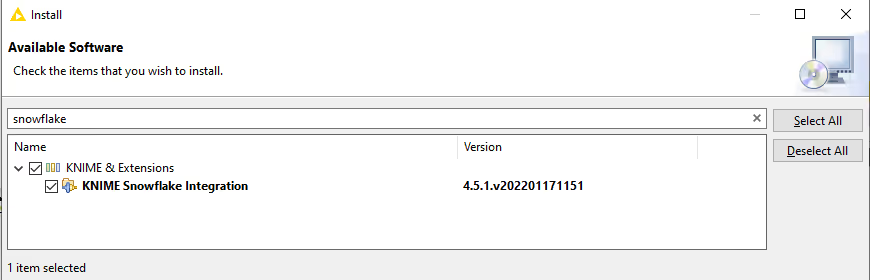
- Select the KNIME Snowflake Integration extension e.g. by typing Snowflake into the search bar at the top
- Click Next and follow the instructions
- Restart KNIME Analytics Platform.
For more information on how to install Extensions and Integrations see the KNIME Analytics Platform Installation Guide.
Snowflake Connector node
Once you have installed the KNIME Snowflake Integration, you can find the Snowflake Connector node in the DB → Connection subcategory in the Node Repository. The Snowflake Connector node creates a connection to the Snowflake database via the Snowflake JDBC driver.
In the configuration dialog of the Snowflake Connector node you need to provide information such as account name, virtual warehouse, and the user credentials. To open the configuration dialog, double-click the node. For the full account name the domain .snowflakecomputing.com will be appended automatically. To use another domain see the Custom Snowflake Domain Name section. Note that your full account name might include additional segments that identify the region and cloud platform where your account is hosted e.g. xy12345.us-east-2.aws, xy12345.us-central1.gcp or xy12345.west-us-2.azure that need to be entered as well.
For more information on the different supported authentication methods see the Authentication section.
Once you have provided all necessary information click OK and execute the node to establish a connection.
After connecting, the
USE WAREHOUSEcommand can be executed with the DB SQL Executor node to set a different database for the session.
Working with Snowflake Data Marketplace Databases
The Snowflake Data Marketplace allows Snowflake users to access curated data from different data providers. Once you have access to a requested database it will show up in the Database Metadata Browse e.g. when clicking the Select a table button of the DB Table Selector node. To access any table or view simply double click its name. The database, schema and table/view name is then automatically entered into the corresponding fields in the node dialog. If you are writing your own statements you might need to qualify each table or view using the database and schema name it is located in.
Uploading large amounts of data to Snowflake
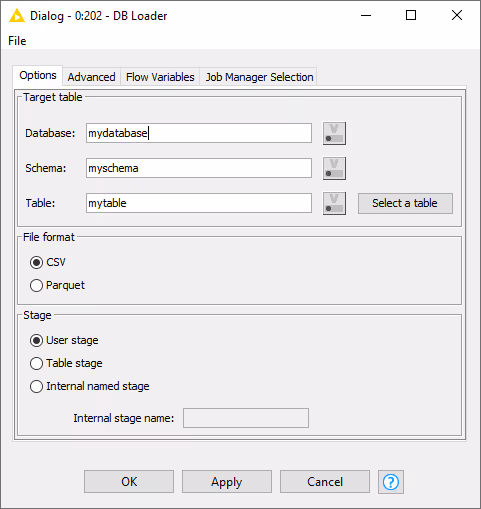
To upload a large amount of data you can use the DB Loader node. The node either writes a CSV or Parquet file into a Snowflake stage prior loading the data into the specified table using the Snowflakes COPY command.
In the node dialog you can specify the existing database table you want to upload the data to. Depending on your use case you can choose between CSV and Parquet as data exchange formats. CSV processing is faster but might cause problems with complex string values whereas Parquet has better type support but is slower to process.
In the stage section select a stage where you have write access to. The uploaded file will be automatically deleted once the data is loaded into the destination Snowflake table.
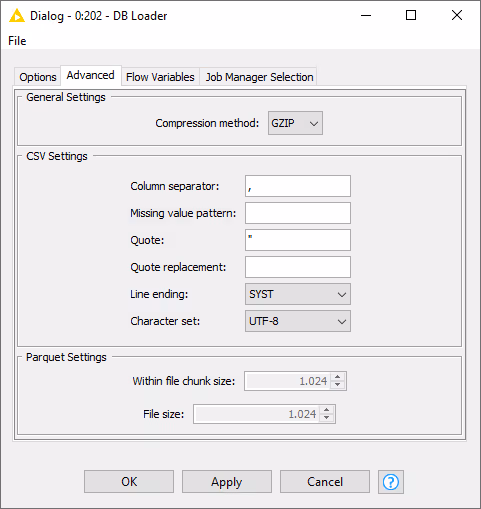
Depending on the selected file format the Advanced tab offers you different options to further define the characteristics of the exchanged file such as the compression method, quote characters or file and chunk size.
H2O Machine Learning Model Push-down
KNIME Analytics Platform supports model push-down into Snowflake. This allows you to perform data prediction within Snowflake without the need to move the data out of Snowflake. Supported are H2O MOJO models that can be learned via the KNIME H2O Machine Learning Integration but also via KNIME H2O Sparkling Water Integration where the model learning is performed at scale within a Spark runtime.
The different Snowflake H2O MOJO Predictor nodes create a temporary User-Defined Function (UDF) in the default database and schema that lives as long as the Snowflake session is not closed. To create the function KNIME uploads the model as well as all required dependencies to a temporary stage created in the default database and schema in Snowflake. To successfully execute the nodes require the USAGE rights on the DATABASE and the SCHEMA.
For more information about the H2O Integration check out the H2O blog post.
The following screenshot shows an example flow that learns a Random Forest model using a local H2O context which is then registered as UDF and used to predict the classes for a database table with previously unseen data. The prediction result is then stored in a Snowflake table. For another example see the following blog post
Authentication
This section describes the different authentication methods that can be used with the KNIME Snowflake Integration.
Multi-factor authentication (MFA)
Multi-factor authentication (MFA) can be used for connecting to Snowflake in a secure way. Snowflake supports MFA with Duo Security, which is managed completely by Snowflake. In order to use MFA with Snowflake you need to install the Duo Mobile application. For further details on how to use Duo multi-factor authentication see Duo User Guide.
Within KNIME you can use MFA in two different ways:
Use the push mechanism. The push mechanism is the default and recommended way to use MFA with Snowflake. To use it in KNIME:
- Enter your username and password in the Authentication section of the Snowflake Connector node dialog.
- Execute the node as normal. During execution the Snowflake driver will automatically send a push notification to your Duo application. Once you have accepted the push notification in the Duo application on your phone the node will continue with the authentication process.
Provide the Duo-generated passcode when configuring the Snowflake Connector node. To use the passcode mechanism you need to:
- Open your Duo application.
- Generate a passcode.
- Once you have the passcode open the node dialog of the Snowflake Connector node.
- Add the passcode parameter to the JDBC Parameters tab of the node configuration dialog with the passcode from Duo as value.

Snowflake OAuth
Snowflake OAuth uses Snowflake's built-in OAuth service to provide OAuth-based authentication. To use this authentication from KNIME you need to:
- Create a custom client integration which is done by creating a SECURITY INTEGRATION. The following is an example of a security integration that can be used with KNIME:
sql
CREATE OR REPLACE SECURITY INTEGRATION KNIME_AP_SNOWFLAKE_OAUTH
TYPE = OAUTH
OAUTH_CLIENT = CUSTOM
OAUTH_CLIENT_TYPE = 'PUBLIC'
ENABLED = TRUE
OAUTH_REDIRECT_URI = 'http://localhost:55055'
OAUTH_ALLOW_NON_TLS_REDIRECT_URI = TRUE
OAUTH_ISSUE_REFRESH_TOKENS = TRUE
OAUTH_REFRESH_TOKEN_VALIDITY = 7776000
OAUTH_USE_SECONDARY_ROLES = NONE
OAUTH_ENFORCE_PKCE = FALSE
COMMENT = 'OAuth client for KNIME Analytics Platform';- Once the integration is created you can use the
DESCRIBE INTEGRATIONcommand to get the details of the integration including theOAUTH_REDIRECT_URI,OAUTH_AUTHORIZATION_ENDPOINTandOAUTH_TOKEN_ENDPOINTwhich you will need later to configure the OAuth2 Authenticator node in KNIME:
sql
DESCRIBE INTEGRATION KNIME_AP_SNOWFLAKE_OAUTH;- In addition you need to execute the
SYSTEM$SHOW_OAUTH_CLIENT_SECRETSfunction to get the client ID and client secret of the integration:
sql
SELECT SYSTEM$SHOW_OAUTH_CLIENT_SECRETS('KNIME_AP_SNOWFLAKE_OAUTH');- Configure the OAuth2 Authenticator node in KNIME with the value of the
OAUTH_CLIENT_IDandOAUTH_CLIENT_SECRET.
Now that you have created the security integration and have the client ID and client secret you can configure the OAuth2 Authenticator node in KNIME. To do this follow these steps:
- Copy the
OAUTH_CLIENT_IDandOAUTH_CLIENT_SECRETfrom the output of theSYSTEM$SHOW_OAUTH_CLIENT_SECRETSfunction call into the username and password field of a Credentials Configuration node. - Connect the output of the Credentials Configuration node to the Flow variable port of the OAuth2 Authenticator node.
- Open the dialog of the OAuth2 Authenticator node and change the Service type in the Endpoints configuration section to Custom. Copy the
OAUTH_AUTHORIZATION_ENDPOINTandOAUTH_TOKEN_ENDPOINTfrom the output of theDESCRIBE INTEGRATIONcommand. - Paste them into the Authorization endpoint URL and Token endpoint URL fields in the Endpoints configurations section.
- In the Client/App configuration select Confidential as type and select the credentials variable created in step 1 for the ID and Secret (flow variable)
- Enter the
OAUTH_REDIRECT_URIvalue from the output of theDESCRIBE INTEGRATIONinto the Redirect URL (should behttp://localhost:XXXXX). - In the Scopes section add any number of scopes that are required for your work in the format
session:role:<role_name>. In addition add the specialrefresh_tokenscope to get a refresh token from Snowflake that allows KNIME to refresh the access token without user interaction. - Click on the Show advanced settings button to be able to tick the Use PKCE option in the Endpoints configuration section if you have enabled proof key code exchange (e.g.
OAUTH_ENFORCE_PKCE = TRUE) in your security integration. - Once everything is configured correctly click the Login button in the node dialog to authenticate with Snowflake using OAuth. This will open up a window in your browser with the usual Snowflake login dialog.
- Click the plus icon of the Snowflake Connector node to add a new input port to the node which needs to be connected to the output port of the OAuth2 Authenticator node.
Microsoft Entra ID
External OAuth is a way to authenticate with Snowflake using an external OAuth provider such as Microsoft Entra ID.
To authenticate via Microsoft Entra ID:
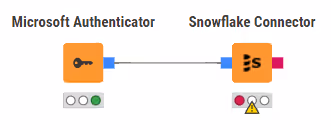
- Add a credential input port to the Snowflake Connector node by clicking on the plus icon of the Snowflake Connector node.

- Connect the output port of the Microsoft Authenticator node with the Snowflake Connector node.
The setup of the Microsoft Authenticator node depends on your Microsoft Entra ID setting. You can request the required information from your Microsoft Entra ID administrator.
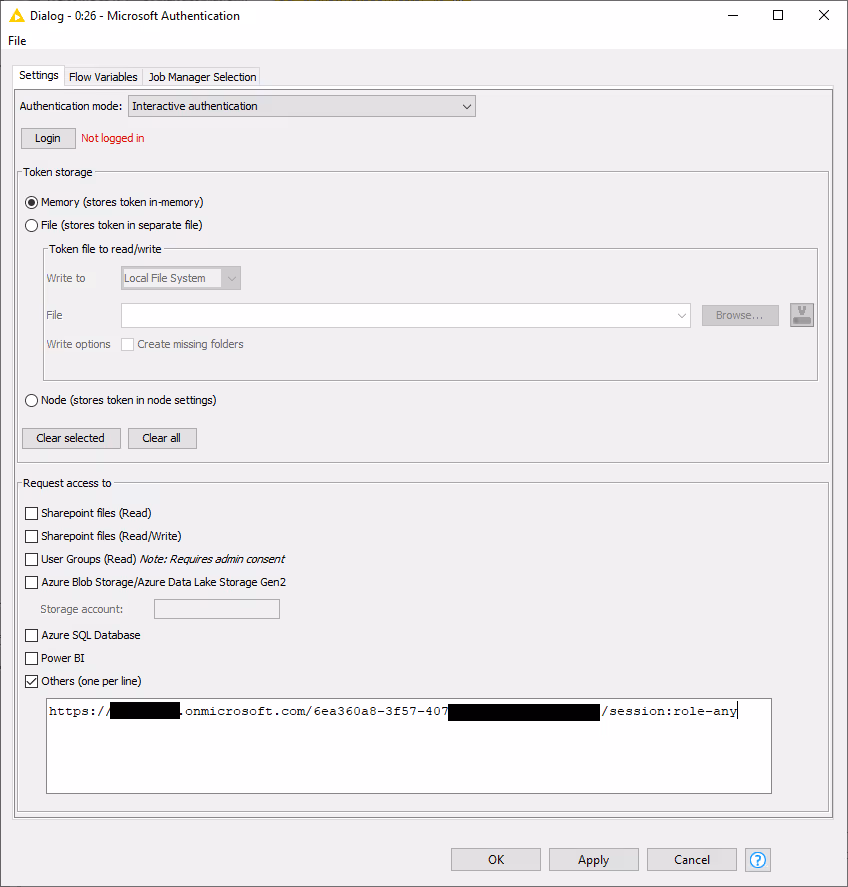
The following images show an example setup of two Snowflake scopes within Microsoft Entra ID.
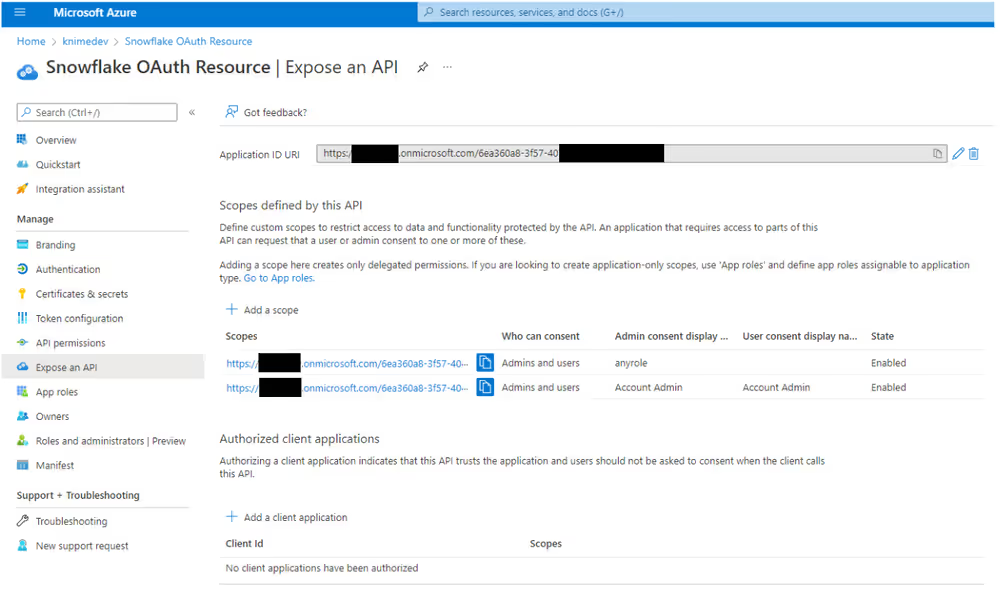
Once you have determined which scopes to use, copy the link (e.g. by clicking the blue clipboard icon next to the url). Then open the node dialog of the Microsoft Authenticator node in KNIME and select Custom as Scope type in the Scopes of access section. Then paste the previously copied scope link into the text field.
For further details about how to set up Microsoft Entra ID authentication and configure the Microsoft Authenticator node see the next section.
Microsoft Entra ID setup
This section is intended for a Snowflake and Microsoft Entra ID administrator.
In order to use Microsoft Entra ID authentication you need to create a new application registration for the Snowflake OAuth Resource in your Microsoft Entra ID as described in Step 1 of the Snowflake documentation. You do not need to create an OAuth Client (Step 2) since KNIME Analytics Platform will be the OAuth client that uses the registered application. However, you will need to register the Snowflake OAuth Resource in Snowflake as described in Step 3 and 4 of the documentation.
Once everything is set up correctly you need to enter one scope of the Snowflake OAuth Resource into the Other field of the Microsoft Authentication node. The scope is a URL that looks like the following:
https://<YOUR_AZURE_ID>.onmicrosoft.com/6ea360a8-3f57-407f-xxxxx-xxxxxxxxxxxx/session:role-anyMulti-tenant
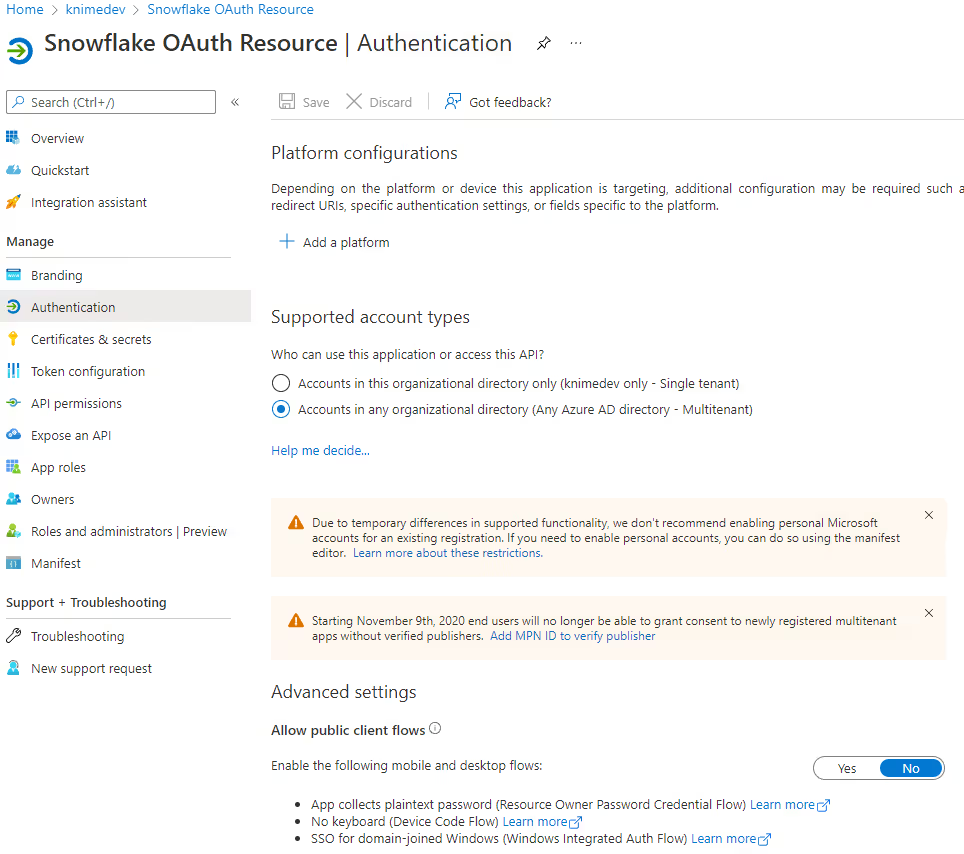
If you get the following error:
"(Snowflake OAuth Resource) is not configured as a multi-tenant application. Usage of the
/commonendpoint is not supported for such applications created after '10/15/2018'. Use a tenant-specific endpoint or configure the application to be multi-tenant."
Enable multitenant authentication for the Snowflake OAuth Resource in you Microsoft Entra ID.
For more details see the Microsoft documentation.
Single-tenant
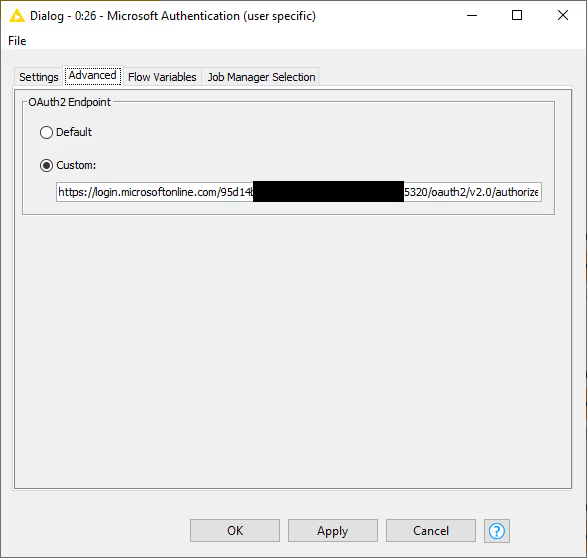
Since version 4.5.2 of the KNIME Analytics Platform the Microsoft Authentication node also supports single tenant authentication by specifying a custom OAuth2 Endpoint.
To specify a custom OAuth2 Endpoint open the node dialog of the Microsoft Authentication node and go to the Advanced tab:
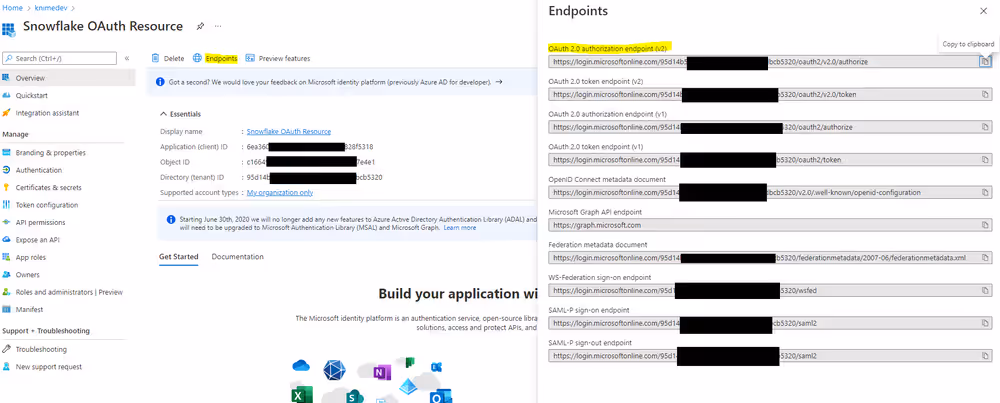
The endpoint can be retrieved from Microsoft Entra ID by clicking the Endpoints entry of the Snowflake OAuth Resource. Just click the clipboard icon of the OAuth 2.0 authorization endpoint (v2) entry in the Endpoints list:
Key pair authentication
Key pair authentication
First of all you will need to generate the key files following Snowflake documentation.
Once you have created the key files, store them in a secure location. You then need to provide the path to the location to the Snowflake Connector node.
From KNIME Analytics Platform version 5.4.0, encrypted key pair authentication works without further configurations of the Analytics Platform. In fact the Java flag and Bouncy Castle library, that were necessary for previous KNIME Analytics Platform versions, are all automatically setup when the Snowflake extension is installed.
To do this follow these steps:
- Provide the location of the key file as a flow variable of the type
pathand inject that to the Snowflake Connector node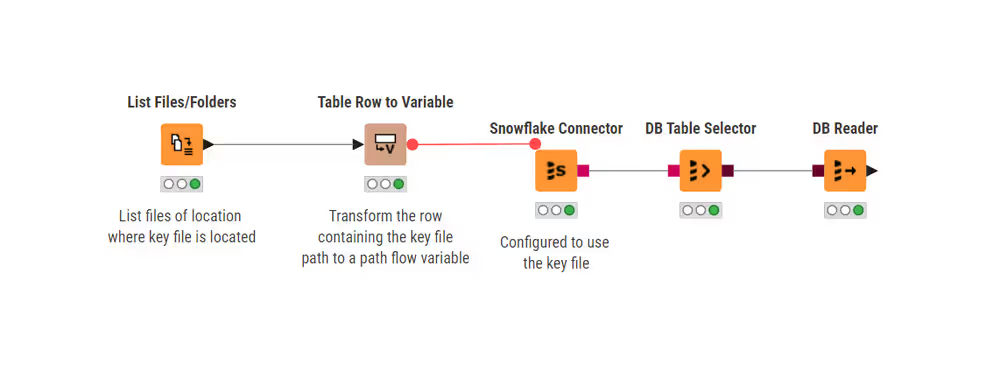
- Configure the Snowflake Connector node:
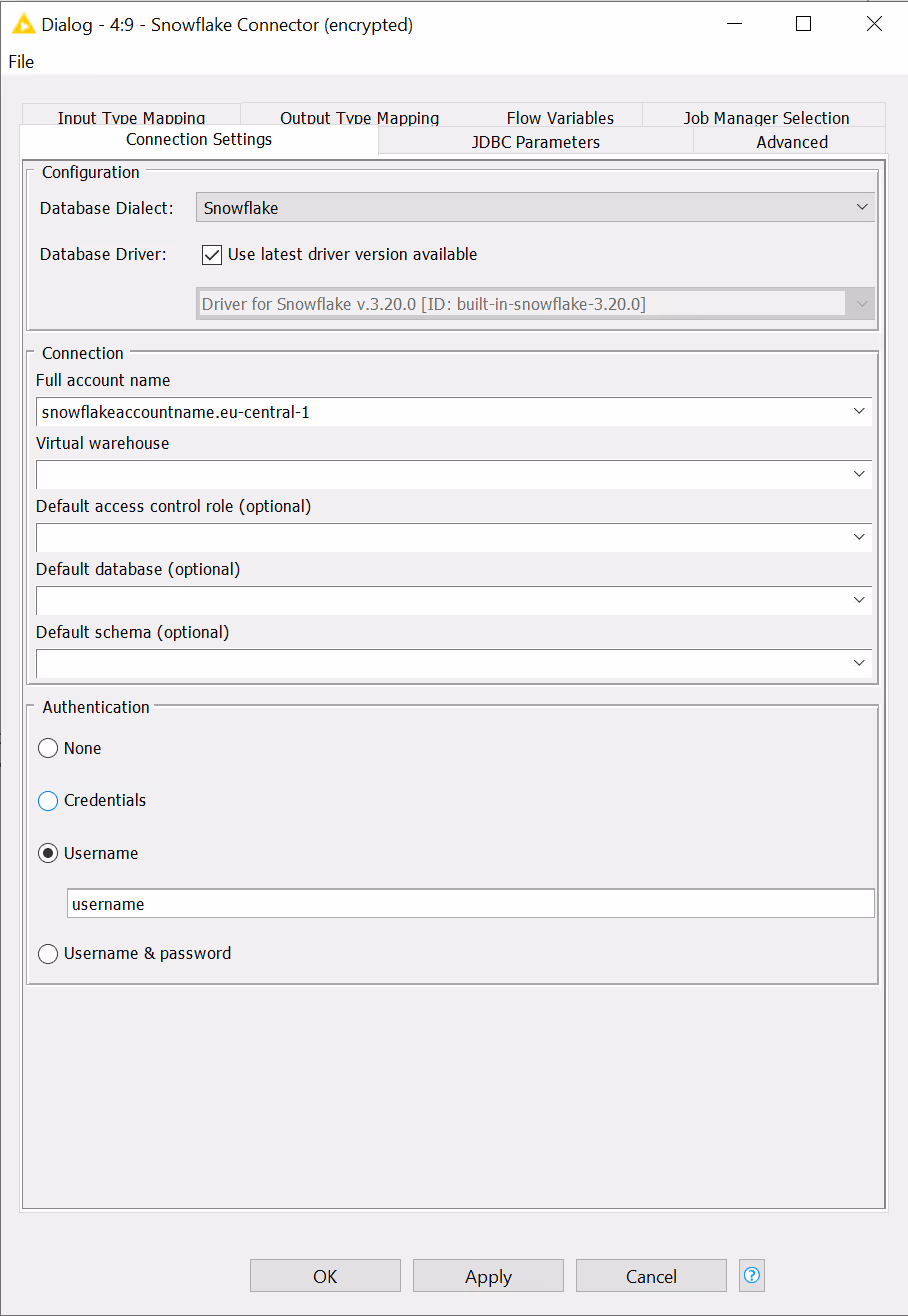
- In the Connection Settings tab of the node configuration dialog:
- In the Configuration section: For encrypted key pair, make sure that the latest driver version available is used (or a driver version >= 3.16)
- In the Connection section: Insert all the necessary options as explained in the Snowflake Connector node section.
- In the Authentication section: select Username and add the username for the key you want to use
- In the JDBC Parameters tab of the node configuration dialog:
- Add a JDBC Parameter with
Name = private_key_file,Type = Path variable to local path, andValuethe path flow variable that points to where the key file is located. Select the flow variable by clicking on the Value field and choose the desired flow variable from the menu. - Add a second JDBC Parameter with
Name = private_key_file_pwd,Type = Literal value, andValue =the password of the key you want to use.
- Add a JDBC Parameter with
- In the Connection Settings tab of the node configuration dialog:
Advanced setup
This section describes optional tasks that are only needed for specific setups and might not be relevant for you.
Register your own Snowflake driver
The KNIME Snowflake Integration comes with a built-in Snowflake driver and is thus ready to go. However because of some special circumstances you might be required to use a particular version of the driver which you can do by manually registering your own JDBC driver.
To register your own Snowflake JDBC driver, you need to download the JDBC driver as described in the Snowflake documentation. Once you have downloaded the single jar file:
- Open KNIME Analytics Platform
- Go to File → Preferences → KNIME → Databases.

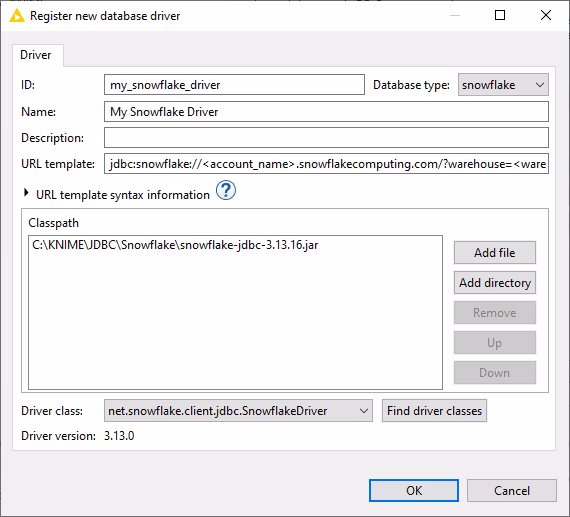
- Click Add. This will open a new database driver window.
- Here, provide the JDBC driver path and all necessary information. To do so enter a unique identifier and name and make sure to select
snowflakeas database type. - Once the database type is selected, the URL template is automatically generated to be compatible with the Snowflake driver and usually does not need to be altered.
- Click Add file and browse for the downloaded driver
jarfile. - Finally click Find driver classes. Then close the dialog by hitting OK.
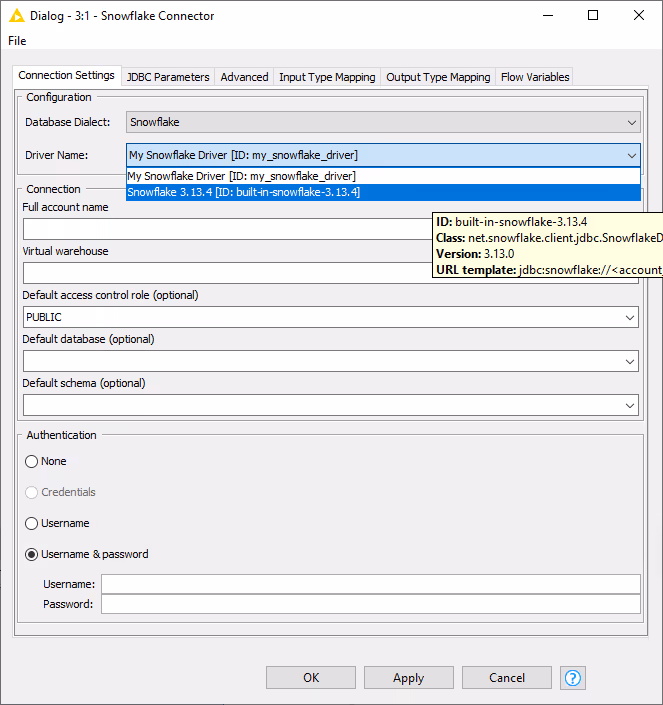
Once the driver is registered you can select it in the Snowflake Connector node.
To set up JDBC drivers on KNIME Hub and KNIME Server, refer to the section JDBC drivers on KNIME Hub and KNIME Server of the KNIME Database Extension Guide.
Custom Snowflake Domain Name
If your Snowflake account is hosted on a custom domain, you can specify it via the Advanced tab of the Snowflake Connector node. This is useful if you are using a custom domain for your Snowflake account, for example, if you are using a Snowflake account hosted in China in which case you would enter snowflakecomputing.cn in the Account domain field. For further details on custom Snowflake domains, see the Snowflake documentation.