
Business Hub AWS Infrastructure Setup Guide
Important
KNIME Business Hub is not responsible for backup/restore operations of external Postgres and S3. AWS cloud services already provide data protection and should be utilized by customers.
This guide provides requirements, example commands and step-by-step instructions for setting up AWS infrastructure to support your KNIME Business Hub deployment. AWS is one of several cloud provider options for hosting KNIME Business Hub, and this guide covers using Amazon RDS for database storage and Amazon S3 buckets for file storage and data persistence.
Note: AWS is an optional choice for KNIME Business Hub deployment. You can also use other cloud providers or on-premises infrastructure. All commands in this guide are examples and should be customized according to your specific requirements, company policies, and infrastructure needs.
Migration Limitation
External RDS and S3 storage are only supported for new KNIME Business Hub installations. Automatic migrations from existing deployments to external storage are not yet supported. If you have an existing KNIME Business Hub deployment, you cannot migrate it to use external AWS storage at this time.
Overview
If you choose to deploy KNIME Business Hub on AWS, this guide covers the setup process for the AWS services that can support your deployment. This guide covers the complete setup process, from initial planning to verification of your AWS infrastructure.
Note: For infrastructure setup, either KURL or existing kubernetes infrastructure is required based on the installation guides (EKS is recommended but not required). This guide assumes you have already setup a Kubernetes cluster on AWS.
AWS Services for KNIME Business Hub
If you decided to offload S3 and RDS while deploying KNIME Business Hub on AWS, the following services can be used to support your deployment:
Database Storage
Amazon RDS (PostgreSQL)
- Provides managed database service with automatic backups
- Stores user accounts, application data, workflow metadata
S3 Storage
KNIME Business Hub requires four dedicated AWS S3 buckets.
Important
When using AWS S3, bucket names must be globally unique across all AWS accounts.
In this guide, we use the naming convention:
$CLUSTER_NAME-<bucket-name>
For example: myhub-catalog-service.
This pattern helps ensure global uniqueness and aligns with the AWS CLI commands shown throughout this guide.
You may use a different naming scheme if desired.
Object Storage Buckets
| Default Bucket Name | Purpose | Access Level |
|---|---|---|
| $CLUSTER_NAME-catalog-service | Workflows and metadata | Private |
| $CLUSTER_NAME-avatars | User profile pictures | Public read |
| $CLUSTER_NAME-execution-jobs | Job execution data and results | Private |
| $CLUSTER_NAME-customization-profiles | User customization settings | Private |
You can customize these bucket names by modifying the corresponding values in the ArgoCD or Replicated configuration.
Access Control
AWS IAM (Identity and Access Management)
- Three dedicated IAM users for secure S3 access
- Each user has minimal required permissions
- IAM Access keys and secrets for service authentication
Prerequisites
Before starting the AWS setup process, verify you have the following:
Required Tools
- AWS CLI installed and configured with appropriate permissions
- Administrative access to create IAM, RDS and S3 resources
Existing Infrastructure
- Kubernetes cluster (EKS recommended but not required) with networking infrastructure (VPC, subnets, security groups) setup based on installation guides (either KURL or existing infrastructure)
- Pre-created Database Subnet Group in the same VPC as your Kubernetes cluster
- Your KNIME Business Hub domain name (e.g., hub.yourcompany.com)
Security Requirements
- All S3 buckets are private by default (except avatars which require public read access)
- Each service has its own IAM user with minimal required permissions
- All data is encrypted in transit and at rest
- Database access is restricted to your Kubernetes cluster security group
Alternative Options: If you prefer not to use AWS, KNIME Business Hub can also be deployed using other cloud providers (Azure, Google Cloud) or on-premises. However, note that AWS S3 and RDS are currently the only supported external storage options and this guide is relying on AWS resources and dependencies.
AWS Setup Instructions
The following sections provide example commands for setting up AWS infrastructure for KNIME Business Hub. You can adjust these commands according to your specific requirements, company policies, and infrastructure needs.
Note: AWS is an optional choice for KNIME Business Hub. The commands shown are examples and can be customized. Adjust instance types, storage sizes, security settings, and other parameters based on your specific requirements.
Storage Limitation: If you need external/offloaded storage, AWS S3 and RDS are currently the only supported options.
Step 1: Configure Environment Variables
Before running the setup commands, configure the following environment variables with your specific values:
bash
# Basic Configuration (replace with your actual values)
export CLUSTER_NAME="your-eks-cluster-name"
export DB_USERNAME="knimeadmin"
export DB_PASSWORD="your-secure-admin-password"
export HUB_ORIGIN="hub.yourcompany.com"

# AWS Infrastructure IDs (replace with your actual values)
export VPC_ID="vpc-xxxxxxxxxxxxxxxx"
export KUBERNETES_CLUSTER_SECURITY_GROUP="sg-xxxxxxxxxxxxxxxx"
export DB_SUBNET_GROUP_NAME="your-pre-created-db-subnet-group"
export AWS_REGION="us-east-1"Important: Replace all placeholder values with your actual values and AWS resource identifiers. You can find these values in the AWS Console or by using AWS CLI commands.
Step 2: Create RDS Security Group
Create a security group that allows PostgreSQL access from your Kubernetes cluster:
bash
# Create security group for RDS
RDS_SECURITY_GROUP_ID=$(aws ec2 create-security-group \
  --group-name $CLUSTER_NAME-rds-sg \
  --description "Allow database access for the KNIME Business HUB Kubernetes cluster" \
  --vpc-id $VPC_ID \
  --tag-specifications 'ResourceType=security-group,Tags=[{Key=Name,Value='$CLUSTER_NAME'-rds-sg},{Key=Owner,Value='$CLUSTER_NAME'}]' \
  --query 'GroupId' --output text)

# Allow PostgreSQL access from the Kubernetes Cluster Security Group
aws ec2 authorize-security-group-ingress \
  --group-id $RDS_SECURITY_GROUP_ID \
  --protocol tcp \
  --port 5432 \
  --source-group $KUBERNETES_CLUSTER_SECURITY_GROUP

echo "Created RDS security group: $RDS_SECURITY_GROUP_ID"
export RDS_SECURITY_GROUP_ID=$RDS_SECURITY_GROUP_IDNote: The security group ID is automatically stored in the RDS_SECURITY_GROUP_ID environment variable for use in subsequent steps.
Step 3: Create RDS Database
Create the PostgreSQL database instance. The following example uses db.m7g.large with 100GB storage, but you can adjust the instance class, storage size, and other parameters based on your requirements:
bash
# Warning! This command uses the RDS Subnet Group created in advance. Please verify and confirm if it was created beforehand and its ID is set under DB_SUBNET_GROUP_NAME.
aws rds create-db-instance \
  --db-instance-identifier $CLUSTER_NAME \
  --db-instance-class db.m7g.large \
  --engine postgres \
  --allocated-storage 100 \
  --engine-version 16.3 \
  --no-publicly-accessible \
  --master-username $DB_USERNAME \
  --master-user-password $DB_PASSWORD \
  --db-subnet-group-name $DB_SUBNET_GROUP_NAME \
  --vpc-security-group-ids $RDS_SECURITY_GROUP_ID
Customization Options: You can modify the --db-instance-class, --allocated-storage, --engine-version, and other parameters to match your performance and cost requirements. Refer to the AWS RDS documentation for available options.
WARNING
Database creation can take 10-15 minutes. Monitor the progress in the AWS Console or wait for the instance to become available before proceeding.
Retrieve Database Connection Details
Once the database is available, retrieve the connection details:
bash
# Get and display the RDS endpoint
RDS_ENDPOINT=$(aws rds describe-db-instances \
  --db-instance-identifier $CLUSTER_NAME \
  --query 'DBInstances[0].Endpoint.Address' \
  --output text)

RDS_PORT=$(aws rds describe-db-instances \
  --db-instance-identifier $CLUSTER_NAME \
  --query 'DBInstances[0].Endpoint.Port' \
  --output text)

echo ""
echo "=== RDS DATABASE CONNECTION INFO ==="
echo "Database Endpoint: $RDS_ENDPOINT"
echo "Database Port: $RDS_PORT"
echo "Database Name: postgres"
echo "Username: $DB_USERNAME"
echo "Password: $DB_PASSWORD"
echo "=== END RDS INFO ==="
echo ""Important: Save these connection details securely. You’ll need them to configure KNIME Business Hub.
Step 4: Create IAM Users
Create IAM users with specific permissions for S3 bucket access:
bash
# Create the users
aws iam create-user --user-name $CLUSTER_NAME-catalog-user
aws iam create-user --user-name $CLUSTER_NAME-accounts-user
aws iam create-user --user-name $CLUSTER_NAME-execution-user

# Get the ARNs for use in S3 bucket policies
CATALOG_USER_ARN=$(aws iam get-user --user-name $CLUSTER_NAME-catalog-user --query 'User.Arn' --output text)
ACCOUNTS_USER_ARN=$(aws iam get-user --user-name $CLUSTER_NAME-accounts-user --query 'User.Arn' --output text)
EXECUTION_USER_ARN=$(aws iam get-user --user-name $CLUSTER_NAME-execution-user --query 'User.Arn' --output text)

# Create access keys and secrets for each IAM user and retrieve AccessKeyId and SecretAccessKey
read CATALOG_ACCESS_KEY CATALOG_SECRET_KEY <<< "$(aws iam create-access-key \
  --user-name $CLUSTER_NAME-catalog-user \
  --query 'AccessKey.[AccessKeyId,SecretAccessKey]' \
  --output text)"

read ACCOUNTS_ACCESS_KEY ACCOUNTS_SECRET_KEY <<< "$(aws iam create-access-key \
  --user-name $CLUSTER_NAME-accounts-user \
  --query 'AccessKey.[AccessKeyId,SecretAccessKey]' \
  --output text)"

read EXECUTION_ACCESS_KEY EXECUTION_SECRET_KEY <<< "$(aws iam create-access-key \
  --user-name $CLUSTER_NAME-execution-user \
  --query 'AccessKey.[AccessKeyId,SecretAccessKey]' \
  --output text)"

# Display credentials (store securely!)
echo ""
echo "=== IAM USER CREDENTIALS ==="
echo "Store these credentials securely for later use:"
echo ""
echo "CATALOG SERVICE USER:"
echo "  Access Key ID: $CATALOG_ACCESS_KEY"
echo "  Secret Access Key: $CATALOG_SECRET_KEY"
echo ""
echo "ACCOUNTS SERVICE USER:"
echo "  Access Key ID: $ACCOUNTS_ACCESS_KEY"
echo "  Secret Access Key: $ACCOUNTS_SECRET_KEY"
echo ""
echo "EXECUTION SERVICE USER:"
echo "  Access Key ID: $EXECUTION_ACCESS_KEY"
echo "  Secret Access Key: $EXECUTION_SECRET_KEY"
echo ""
echo "=== END CREDENTIALS ==="
echo ""
Critical
These access keys are only displayed once. Store them securely as they're required for KNIME Business Hub configuration.
bash
# Optional: Export for later cleanup purposes if needed or planned
export CATALOG_ACCESS_KEY_ID=$CATALOG_ACCESS_KEY
export CATALOG_SECRET_ACCESS_KEY=$CATALOG_SECRET_KEY
export ACCOUNTS_ACCESS_KEY_ID=$ACCOUNTS_ACCESS_KEY
export ACCOUNTS_SECRET_ACCESS_KEY=$ACCOUNTS_SECRET_KEY
export EXECUTION_ACCESS_KEY_ID=$EXECUTION_ACCESS_KEY
export EXECUTION_SECRET_ACCESS_KEY=$EXECUTION_SECRET_KEY
Step 5: Create S3 Buckets
Create the required S3 buckets for KNIME Business Hub data storage. The following examples show standard configurations, but you can customize bucket policies, CORS settings, and other parameters according to your security and compliance requirements:
Catalog Service Bucket
This bucket stores workflow catalogs and metadata:
bash
aws s3 mb s3://$CLUSTER_NAME-catalog-service --region $AWS_REGION

aws s3api put-bucket-ownership-controls \
  --bucket $CLUSTER_NAME-catalog-service \
  --ownership-controls Rules='[{ObjectOwnership=BucketOwnerPreferred}]'

aws s3api put-bucket-acl \
  --bucket $CLUSTER_NAME-catalog-service \
  --acl private

aws s3api put-bucket-versioning \
  --bucket $CLUSTER_NAME-catalog-service \
  --versioning-configuration Status=Enabled

aws s3api put-bucket-cors \
  --bucket $CLUSTER_NAME-catalog-service \
  --cors-configuration '{
    "CORSRules": [
      {
        "AllowedHeaders": ["*"],
        "AllowedMethods": ["PUT", "POST"],
        "AllowedOrigins": ["http://'$HUB_ORIGIN'", "https://'$HUB_ORIGIN'"],
        "ExposeHeaders": ["ETag"],
        "MaxAgeSeconds": 3000
      }
    ]
  }'

# Create bucket policy for catalog service
aws s3api put-bucket-policy \
  --bucket $CLUSTER_NAME-catalog-service \
  --policy '{
    "Version": "2012-10-17",
    "Statement": [
      {
        "Sid": "CatalogReadWrite",
        "Effect": "Allow",
        "Principal": {
          "AWS": "'$CATALOG_USER_ARN'"
        },
        "Action": [
          "s3:AbortMultipartUpload",
          "s3:GetObject",
          "s3:DeleteObject",
          "s3:PutObject",
          "s3:ListMultipartUploadParts"
        ],
        "Resource": "arn:aws:s3:::'$CLUSTER_NAME'-catalog-service/*"
      },
      {
        "Sid": "CatalogBucketAccess",
        "Effect": "Allow",
        "Principal": {
          "AWS": [
            "'$CATALOG_USER_ARN'",
            "'$ACCOUNTS_USER_ARN'",
            "'$EXECUTION_USER_ARN'"
          ]
        },
        "Action": [
          "s3:GetBucketLocation",
          "s3:ListBucket",
          "s3:ListBucketMultipartUploads"
        ],
        "Resource": "arn:aws:s3:::'$CLUSTER_NAME'-catalog-service"
      }
    ]
  }'
Avatars Bucket
This bucket stores user profile pictures and requires public read access:
bash
aws s3 mb s3://$CLUSTER_NAME-avatars --region $AWS_REGION

aws s3api put-bucket-ownership-controls \
  --bucket $CLUSTER_NAME-avatars \
  --ownership-controls Rules='[{ObjectOwnership=BucketOwnerPreferred}]'

aws s3api put-bucket-acl \
  --bucket $CLUSTER_NAME-avatars \
  --acl private

aws s3api put-bucket-versioning \
  --bucket $CLUSTER_NAME-avatars \
  --versioning-configuration Status=Enabled

aws s3api put-bucket-cors \
  --bucket $CLUSTER_NAME-avatars \
  --cors-configuration '{
    "CORSRules": [
      {
        "AllowedHeaders": ["*"],
        "AllowedMethods": ["PUT", "POST"],
        "AllowedOrigins": ["http://'$HUB_ORIGIN'", "https://'$HUB_ORIGIN'"],
        "ExposeHeaders": ["ETag"],
        "MaxAgeSeconds": 3000
      }
    ]
  }'

aws s3api put-public-access-block \
  --bucket $CLUSTER_NAME-avatars \
  --public-access-block-configuration BlockPublicAcls=false,IgnorePublicAcls=false,BlockPublicPolicy=false,RestrictPublicBuckets=false

# Create bucket policy for avatars
aws s3api put-bucket-policy \
  --bucket $CLUSTER_NAME-avatars \
  --policy '{
    "Version": "2012-10-17",
    "Statement": [
      {
        "Sid": "AccountsReadWrite",
        "Effect": "Allow",
        "Principal": {
          "AWS": "'$ACCOUNTS_USER_ARN'"
        },
        "Action": [
          "s3:AbortMultipartUpload",
          "s3:GetObject",
          "s3:GetObjectVersion",
          "s3:DeleteObject",
          "s3:PutObject",
          "s3:ListMultipartUploadParts"
        ],
        "Resource": "arn:aws:s3:::'$CLUSTER_NAME'-avatars/*"
      },
      {
        "Sid": "PublicRead",
        "Effect": "Allow",
        "Principal": {
          "AWS": "*"
        },
        "Action": [
          "s3:GetObject"
        ],
        "Resource": "arn:aws:s3:::'$CLUSTER_NAME'-avatars/*"
      },
      {
        "Sid": "AccountsBucketAccess",
        "Effect": "Allow",
        "Principal": {
          "AWS": "'$ACCOUNTS_USER_ARN'"
        },
        "Action": [
          "s3:GetBucketLocation",
          "s3:ListBucket",
          "s3:ListBucketMultipartUploads"
        ],
        "Resource": "arn:aws:s3:::'$CLUSTER_NAME'-avatars"
      }
    ]
  }'
Execution Jobs Bucket
This bucket stores job execution data and results:
bash
aws s3 mb s3://$CLUSTER_NAME-execution-jobs --region $AWS_REGION

aws s3api put-bucket-ownership-controls \
  --bucket $CLUSTER_NAME-execution-jobs \
  --ownership-controls Rules='[{ObjectOwnership=BucketOwnerPreferred}]'

aws s3api put-bucket-acl \
  --bucket $CLUSTER_NAME-execution-jobs \
  --acl private

aws s3api put-bucket-versioning \
  --bucket $CLUSTER_NAME-execution-jobs \
  --versioning-configuration Status=Enabled

aws s3api put-bucket-cors \
  --bucket $CLUSTER_NAME-execution-jobs \
  --cors-configuration '{
    "CORSRules": [
      {
        "AllowedHeaders": ["*"],
        "AllowedMethods": ["PUT", "POST"],
        "AllowedOrigins": ["http://'$HUB_ORIGIN'", "https://'$HUB_ORIGIN'"],
        "ExposeHeaders": ["ETag"],
        "MaxAgeSeconds": 3000
      }
    ]
  }'

# Create bucket policy for execution jobs
aws s3api put-bucket-policy \
  --bucket $CLUSTER_NAME-execution-jobs \
  --policy '{
    "Version": "2012-10-17",
    "Statement": [
      {
        "Sid": "ExecutionReadWrite",
        "Effect": "Allow",
        "Principal": {
          "AWS": "'$EXECUTION_USER_ARN'"
        },
        "Action": [
          "s3:AbortMultipartUpload",
          "s3:GetObject",
          "s3:DeleteObject",
          "s3:PutObject",
          "s3:ListMultipartUploadParts"
        ],
        "Resource": "arn:aws:s3:::'$CLUSTER_NAME'-execution-jobs/*"
      },
      {
        "Sid": "ExecutionBucketAccess",
        "Effect": "Allow",
        "Principal": {
          "AWS": "'$EXECUTION_USER_ARN'"
        },
        "Action": [
          "s3:GetBucketLocation",
          "s3:ListBucket",
          "s3:ListBucketMultipartUploads"
        ],
        "Resource": "arn:aws:s3:::'$CLUSTER_NAME'-execution-jobs"
      }
    ]
  }'
Customization Profiles Bucket
This bucket stores customization profiles:
bash
aws s3 mb s3://$CLUSTER_NAME-customization-profiles --region $AWS_REGION

aws s3api put-bucket-ownership-controls \
  --bucket $CLUSTER_NAME-customization-profiles \
  --ownership-controls Rules='[{ObjectOwnership=BucketOwnerPreferred}]'

aws s3api put-bucket-acl \
  --bucket $CLUSTER_NAME-customization-profiles \
  --acl private

aws s3api put-bucket-versioning \
  --bucket $CLUSTER_NAME-customization-profiles \
  --versioning-configuration Status=Enabled

aws s3api put-bucket-cors \
  --bucket $CLUSTER_NAME-customization-profiles \
  --cors-configuration '{
    "CORSRules": [
      {
        "AllowedHeaders": ["*"],
        "AllowedMethods": ["PUT", "POST"],
        "AllowedOrigins": ["http://'$HUB_ORIGIN'", "https://'$HUB_ORIGIN'"],
        "ExposeHeaders": ["ETag"],
        "MaxAgeSeconds": 3000
      }
    ]
  }'

# Create bucket policy for customization profiles
aws s3api put-bucket-policy \
  --bucket $CLUSTER_NAME-customization-profiles \
  --policy '{
    "Version": "2012-10-17",
    "Statement": [
      {
        "Sid": "CustomizationReadWrite",
        "Effect": "Allow",
        "Principal": {
          "AWS": "'$EXECUTION_USER_ARN'"
        },
        "Action": [
          "s3:AbortMultipartUpload",
          "s3:GetObject",
          "s3:DeleteObject",
          "s3:PutObject",
          "s3:ListMultipartUploadParts"
        ],
        "Resource": "arn:aws:s3:::'$CLUSTER_NAME'-customization-profiles/*"
      },
      {
        "Sid": "CustomizationBucketAccess",
        "Effect": "Allow",
        "Principal": {
          "AWS": "'$EXECUTION_USER_ARN'"
        },
        "Action": [
          "s3:GetBucketLocation",
          "s3:ListBucket",
          "s3:ListBucketMultipartUploads"
        ],
        "Resource": "arn:aws:s3:::'$CLUSTER_NAME'-customization-profiles"
      }
    ]
  }'
Step 6: Verify Setup
Verify that all resources were created successfully:
bash
# Check RDS Status
aws rds describe-db-instances \
  --db-instance-identifier $CLUSTER_NAME \
  --query 'DBInstances[0].{Status:DBInstanceStatus,Endpoint:Endpoint}'

# List S3 Buckets
aws s3 ls | grep $CLUSTER_NAME
Step 7: Configure KNIME Business Hub in KOTSADM UI with External RDS Postgres and S3
After successfully creating the AWS infrastructure, you need to configure KNIME Business Hub to use the external AWS resources through the KOTSADM UI. This step guides you through the configuration process.
Access KOTSADM UI
- Navigate to your KOTSADM UI (typically accessible at https://your-kotsadm-domain:8800)
- Log in with your administrative credentials
Enable Advanced Settings
Before configuring external RDS Postgres and S3, you need to enable the advanced settings in the KOTSADM UI:
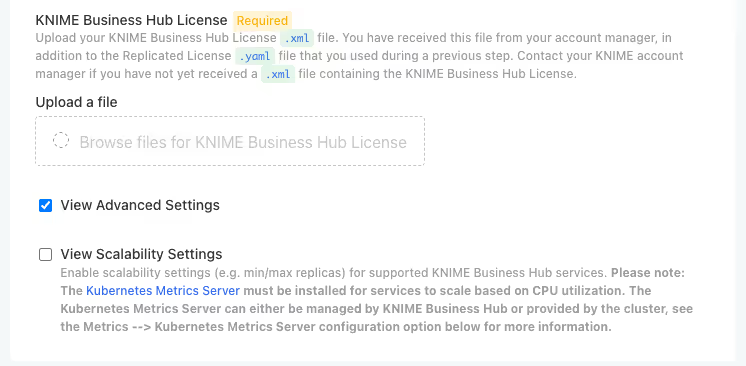
- In the KOTSADM UI, navigate to the Config tab
- Locate the View Advanced Settings checkbox
- Check the View Advanced Settings checkbox to enable advanced configuration options
- This will reveal additional configuration sections including:
- Advanced: Postgres Database
- Advanced: External S3 compatible storage
- Other advanced configuration options
Note: The advanced settings must be enabled before you can configure external PostgreSQL database and S3 storage options.
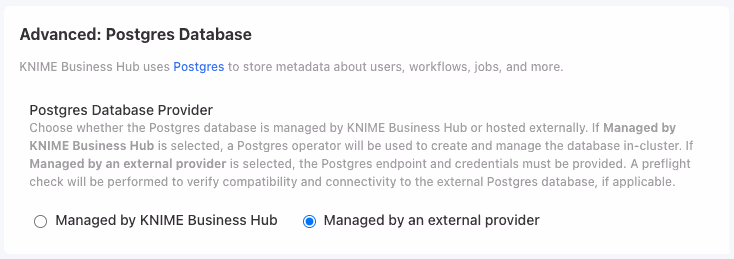
Configure External PostgreSQL Database
- In the KOTSADM UI, navigate to the Config tab
- Look for the Advanced: Postgres Database section
- Select Managed by an external provider as the provider type
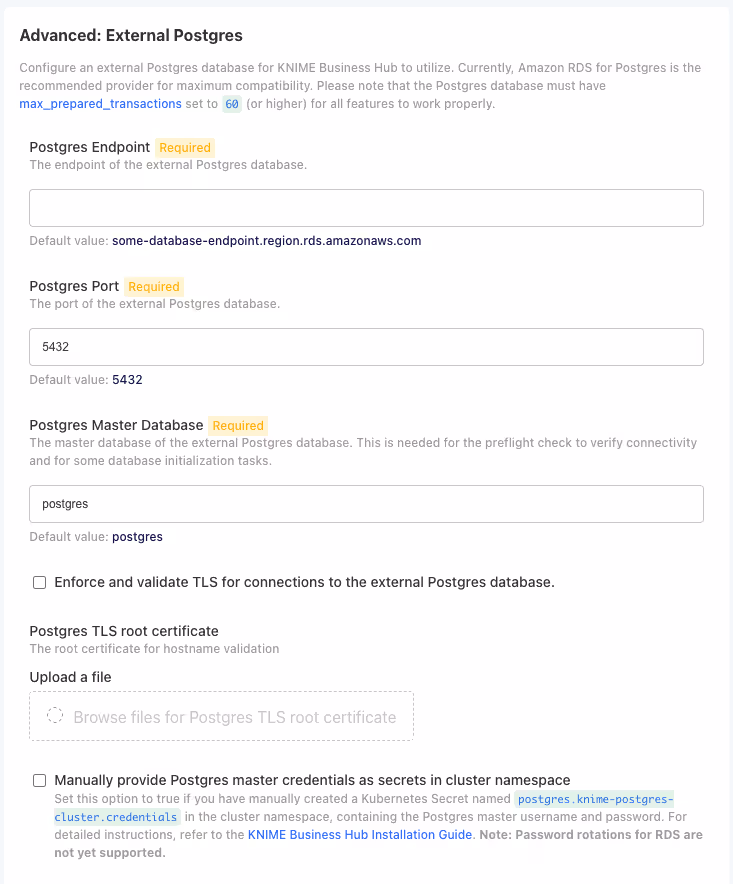
- In the configuration shown below, in Advanced: External Postgres, enter the database connection details from Step 3:
Configuration Fields:
- Host: Enter the RDS endpoint from Step 3 (e.g., rds-name.xxxxxxxxx.region-x.rds.amazonaws.com)
- Port: Enter 5432 (default PostgreSQL port)
- Master Database Name: Enter postgres or your master database name
- Username: Enter the database master username you configured (e.g., knimeadmin)
- Password: Enter the secure master password you set for the database
- SSL Mode: Select require for secure connections (optional)
- Postgres TLS Root Certificate: Upload a TLS Root Certificate provided by AWS (optional)
Configure Database Credentials
You have two options for configuring database credentials:
Option A: Configure Credentials in the UI
You can configure the database credentials directly in the KOTSADM UI:
- Enter the database credentials directly in the configuration fields shown above
- The credentials will be automatically stored as Kubernetes secrets
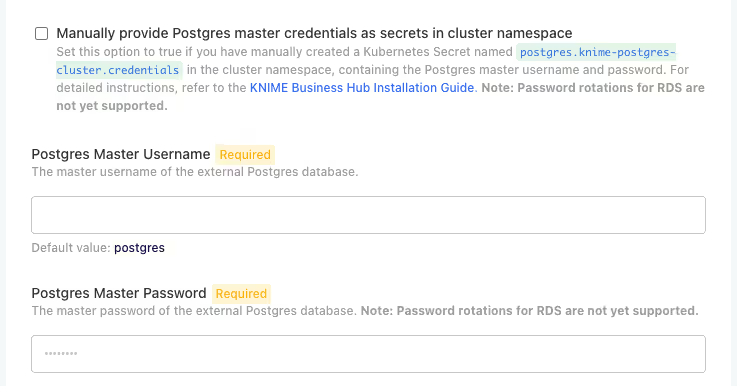
Option B: Manual Secret Creation

Alternatively, you can manually create Kubernetes secrets and reference them in the configuration:
- Navigate to the Advanced: External Postgres section in the configuration
- Enable the Manually provide Postgres master credentials as secrets in cluster namespace option
- Please use the below template to create the secret. Ensure that the secret name and data keys are unchanged and the secret contains the appropriate database connection details from Step 3
bash
cat <<EOF | kubectl apply -f -
apiVersion: v1
kind: Secret
metadata:
  name: postgres.knime-postgres-cluster.credentials
  namespace: <hub-namespace>
type: Opaque
data:
  PGHOST: <rds-endpoint-base64>
  PGDATABASE: <master-db-name-base64>
  PGPORT: <postgres-port-base64>
  PGUSER: <master-username-base64>
  PGPASSWORD: <master-password-base64>
  username: <master-username-base64>
  password: <master-password-base64>
EOF
Replace the placeholders with your values encoded in BASE64:
| Placeholder | Value |
|---|---|
<hub-namespace> | The namespace where KNIME Business Hub is deployed |
<rds-endpoint-base64> | RDS endpoint from Step 3 |
<master-db-name-base64> | Master database name (e.g., postgres) |
<postgres-port-base64> | PostgreSQL port (e.g., 5432) |
<master-username-base64> | RDS master username |
<master-password-base64> | RDS master password |
Note: Both methods achieve the same result. Choose the method that best fits your security and operational requirements.
Configure External S3 Storage
- In the same Config tab, navigate to the Advanced - External S3 compatible storage section
- Select Advanced: Use own S3 as the storage type
- Provide the Storage API and Region
- Provide the name and credential for each S3 bucket
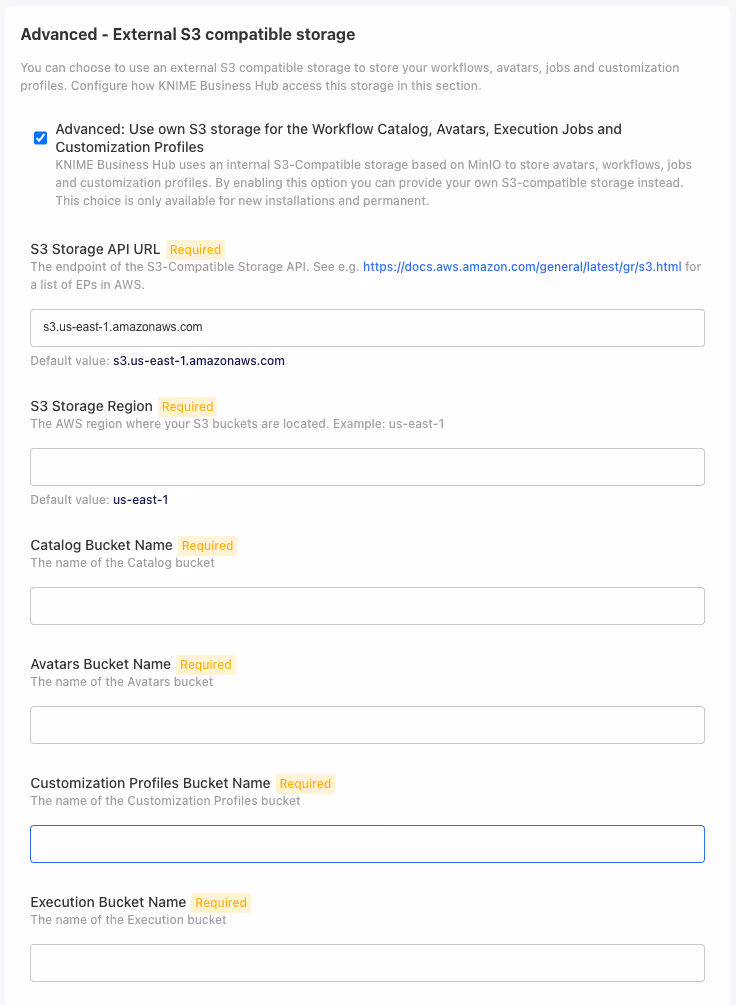
For each S3 bucket, configure:
Catalog Service Bucket:
- Bucket Name: Use the catalog service bucket name from Step 4
- Access Key ID: Use the catalog service access key from Step 4
- Secret Access Key: Use the catalog service secret key from Step 4
Avatars Bucket:
- Bucket Name: Use the accounts service bucket name from Step 4
- Access Key ID: Use the accounts service access key from Step 4
- Secret Access Key: Use the accounts service secret key from Step 4
Execution Jobs Bucket:
- Bucket Name: Use the execution service bucket name from Step 4
- Access Key ID: Use the execution service access key from Step 4
- Secret Access Key: Use the execution service secret key from Step 4
Customization Profiles Bucket:
- Bucket Name: Use the execution service bucket name from Step 4
- Access Key ID: Use the execution service access key from Step 4
- Secret Access Key: Use the execution service secret key from Step 4
Configure S3 Credentials
You have two options for configuring S3 credentials:
Option A: Configure Secrets in the UI
You can configure the S3 credentials directly in the KOTSADM UI:
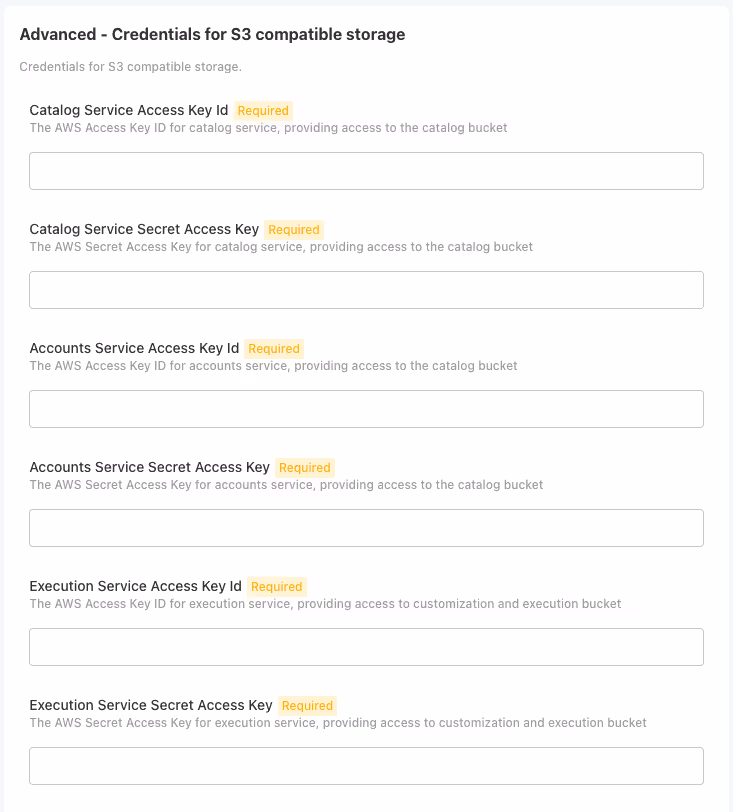
- Navigate to the S3 Credentials section in the configuration
- Enter the IAM user credentials for each service:
Option B: Manual Secret Creation

Alternatively, you can manually create Kubernetes secrets and reference them in the configuration by enabling the following option:
- Navigate to the Advanced - External S3 compatible storage section in the configuration
- Select Manually provide AWS credentials as secrets in cluster namespace
- Create each secret according to the template below. Ensure the secrets contain the appropriate IAM user credentials from Step 4
bash
cat <<EOF | kubectl apply -f -
apiVersion: v1
kind: Secret
metadata:
  name: <bucket-name>-minio-credentials
  namespace: <hub-namespace>
type: Opaque
data:
  accessKeyId: <accessKeyId-base64>
  secretAccessKey: <secretAccessKey-base64>
EOF
Replace the placeholders with your values encoded in BASE64:
| Placeholder | Value |
|---|---|
<bucket-name> | The bucket name from Step 5 |
<hub-namespace> | The namespace where KNIME Business Hub is deployed |
<accessKeyId-base64> | The IAM access key ID for the appropriate service from Step 4 |
<secretAccessKey-base64> | The IAM secret access key for the appropriate service from Step 4 |
Note: Both methods achieve the same result. Choose the method that best fits your security and operational requirements.
Save Configuration, Check Preflights, and Deploy
- Review all configuration settings to ensure they match the AWS resources created in previous steps
- Click Save Configuration to apply the changes
- Wait for preflight checks to finish and check their results
- Proceed with deploying the application if preflights succeeded
Cleanup AWS Resources
If you need to remove all resources created according to this guide, use the following commands:
bash
# Delete RDS instance
aws rds delete-db-instance \
  --db-instance-identifier $CLUSTER_NAME \
  --skip-final-snapshot

# Delete S3 buckets (must be empty first)
aws s3 rb s3://$CLUSTER_NAME-catalog-service --force
aws s3 rb s3://$CLUSTER_NAME-avatars --force
aws s3 rb s3://$CLUSTER_NAME-execution-jobs --force
aws s3 rb s3://$CLUSTER_NAME-customization-profiles --force

# Delete IAM users (must delete access keys first)
aws iam delete-access-key --user-name $CLUSTER_NAME-catalog-user --access-key-id $CATALOG_ACCESS_KEY_ID
aws iam delete-access-key --user-name $CLUSTER_NAME-accounts-user --access-key-id $ACCOUNTS_ACCESS_KEY_ID
aws iam delete-access-key --user-name $CLUSTER_NAME-execution-user --access-key-id $EXECUTION_ACCESS_KEY_ID

aws iam delete-user --user-name $CLUSTER_NAME-catalog-user
aws iam delete-user --user-name $CLUSTER_NAME-accounts-user
aws iam delete-user --user-name $CLUSTER_NAME-execution-user

# Delete RDS security group (you need to wait until the database has finished deletion due to dependencies)
aws ec2 delete-security-group --group-id $RDS_SECURITY_GROUP_ID
Next Steps
After completing the AWS infrastructure setup:
- Save all credentials securely - The IAM access keys and database credentials are required for KNIME Business Hub configuration
- Configure KNIME Business Hub - Use the connection details and credentials in your application configuration
- Set up monitoring - Consider configuring CloudWatch alarms for your RDS instance and S3 buckets
For more information about configuring KNIME Business Hub, refer to the KNIME Business Hub documentation.