
Build a Retrieval-augmented Question Answering Workflow
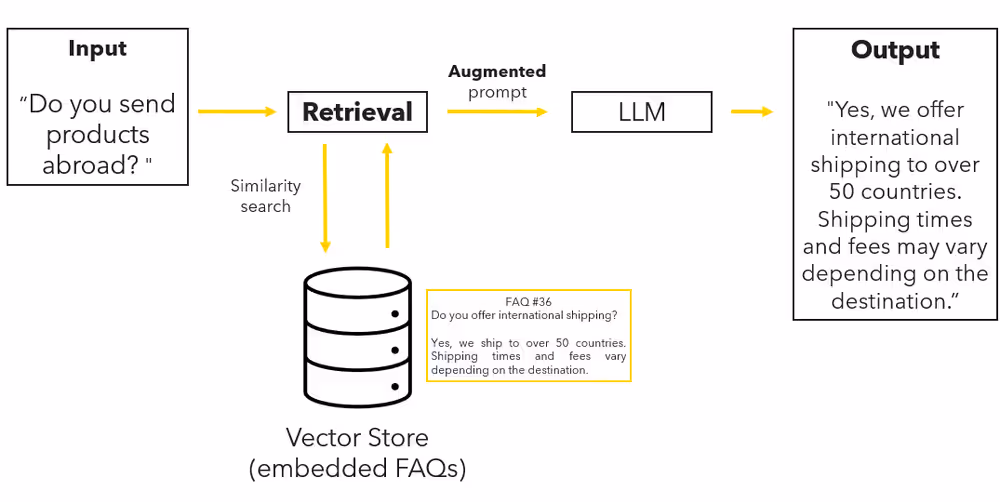
In this tutorial, you build a complete retrieval-augmented generation (RAG) workflow in KNIME.
You will index a small set of product FAQs, retrieve relevant entries for a user question, and use them to generate grounded answers with a language model.
By the end of this tutorial, you will have a working RAG pipeline that you can adapt to your own data.
What you will build
You will create a workflow that:
- Loads a file containing product FAQs
- Selects and authenticates an embedding model
- Generates embeddings
- Stores embeddings in a vector store
- Retrieves relevant document chunks for a user question
- Injects retrieved context into a prompt
- Generates a grounded answer
Prerequisites
Before you start, make sure you have:
KNIME Analytics Platform installed
See: Download and install KNIME Analytics PlatformKNIME AI Extensions installed
See: Install the KNIME AI ExtensionsAn API key for a supported LLM provider
Step 1: Load and prepare the documents
Download the sample dataset of product FAQs:
product_FAQs.csvUse a CSV Reader node to load the file into your workflow.
Step 2: Authenticate and select an embedding model
To generate embeddings, authenticate with your LLM provider:
- Insert a Credentials Configuration node.
- Enter your API key.
- Connect it to the corresponding Authenticator node.
If the authenticator node traffic light turns green, the connection is successful.
Next, select an embedding model:
- Add an Embedding Model Selector node.
- Choose an embedding-capable model (for example,
text-embedding-3-small).
Step 3: Generate embeddings
Convert each text chunk into an embedding vector.
- Connect the chunked text table to the Text Embedder node.
- Select the column containing the text.
- Execute the node.
The output table now contains a new column with embedding vectors. Each row contains a separate embedding vector.
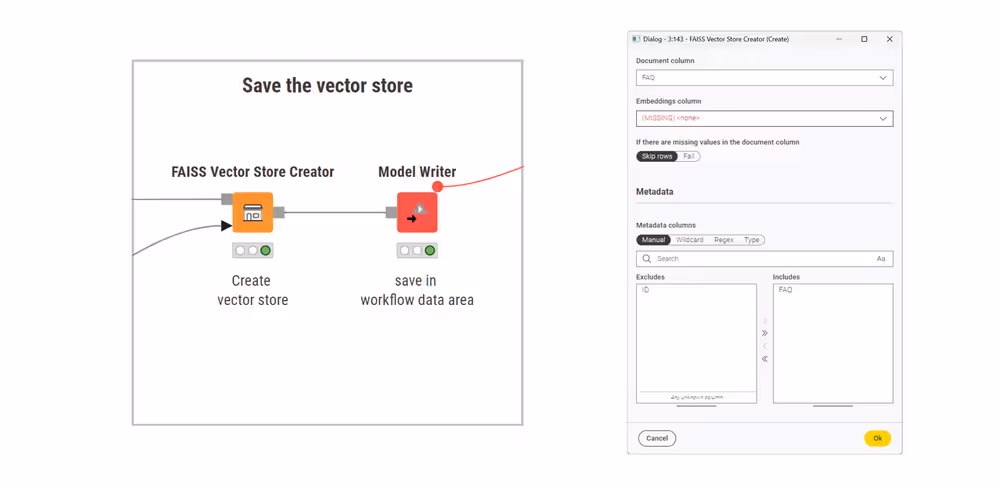
Step 4: Create a vector store
Store the embeddings so they can be retrieved later.
- Insert a FAISS Vector Store Creator or Chroma Vector Store Creator node.
- Connect the table containing embeddings.
- Configure the node to use the embedding column.
- Use a Model Writer node to save the vector store.
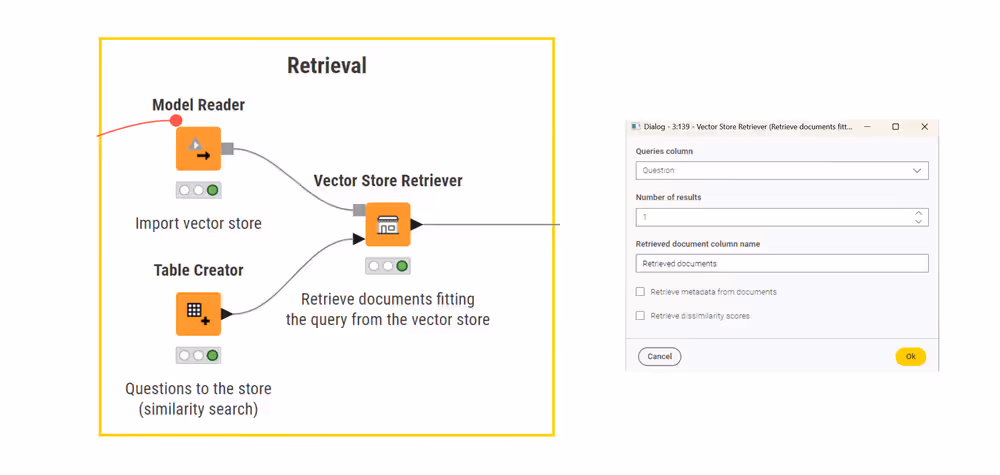
Step 5: Ask a question and retrieve relevant documents
Now retrieve relevant content for a user question.
Create a table containing a user question using the Table Creator node.
The query can be any string; in this tutorial, a single-row table is sufficient.Load the vector store using a Model Reader node.
Connect a Vector Store Retriever node to:
- the table containing the user question, and
- the loaded vector store.
Configure the retriever to return the top k most similar document chunks.
The output is a table containing the document chunks that are most relevant to the user’s question.
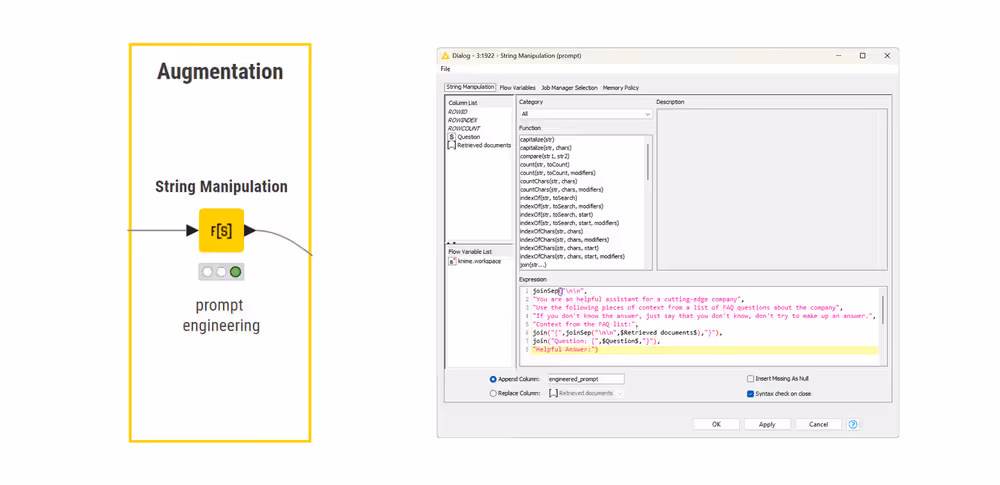
Step 6: Build a prompt with retrieved context
Combine the retrieved text and the user question into a single prompt.
- Use an Expression node to create a new column called
Prompt. - In the prompt, clearly separate context from the question.
Example prompt structure:
text
Use the following context to answer the question.

Context:
{{retrieved_documents}}

Question:
{{user_question}}
This structure makes it explicit to the model which information it should use.
Step 7: Generate the answer
Send the prompt to the language model.
Select a model using an LLM Selector node.
Connect the model input port of the LLM Prompter to the LLM Selector.
Connect the data input port to the table containing the Prompt column.
In the LLM Prompter configuration, select Prompt as the input column.
Execute the node.
The model produces an answer grounded in the retrieved documents.
Result
You now have a complete retrieval-augmented generation workflow.
Each answer is generated using:
- the user’s question
- relevant document chunks retrieved from the vector store
This grounding reduces hallucinations and improves reliability.
➡️ View the complete workflow on KNIME Hub:
Open the finished RAG workflow.
Next Steps
If you want to keep learning about AI and data workflows in KNIME, take one of our free courses and earn a microcredential badge to showcase your skills: