
Build a Restaurant Assistant Agent
In this tutorial, you build an agentic workflow in KNIME that acts as a restaurant assistant.
The agent can answer allergen questions, handle reservation requests, suggest alternative booking dates, and analyze customer reviews. It reasons about user requests and decides which tools to call in order to complete each task.
By the end of this tutorial, you will have a fully working agent that combines reasoning, tools, parameters, and data processing.
What you will build
You will create an agent that can:
- Answer questions about dish allergens
- Handle table booking requests
- Suggest alternative booking dates when no tables are available
- Analyze customer review sentiment from a dataset
Each capability is implemented as a separate tool workflow and gradually added to the agent.
Before you begin
Make sure you have:
- KNIME Analytics Platform installed (see Download and install KNIME Analytics Platform)
- KNIME AI Extensions installed (see Install the KNIME AI Extensions)
- An API key or credentials for your LLM provider
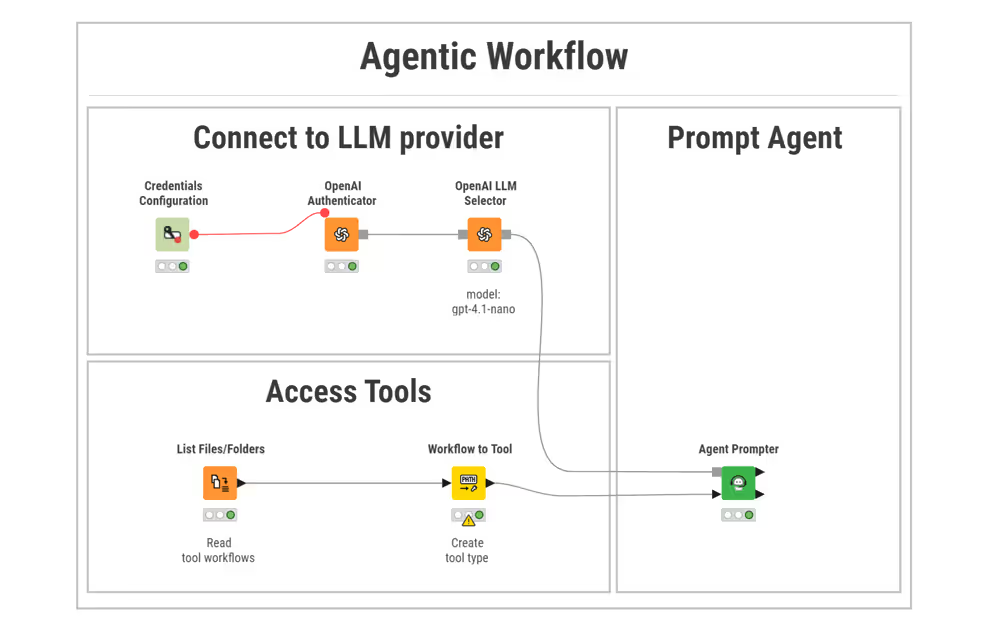
Step 1: Create the agent workflow
First, create the main workflow that hosts the agent:
- Add a Credentials Configuration and enter your API key.
- Connect it to the corresponding authenticator node (for example, OpenAI Authenticator).
- Add an LLM Selector node and choose a chat-capable model.
- Add an Agent Prompter node and connect the LLM Selector.
Configure the Agent Prompter with the following System Message:
You are a restaurant assistant agent. Always reason step by step.
Use your available tools to verify information. Do not guess.
Optionally add a User Message for testing, for example:
Can you book a table for two people for tomorrow evening?At this stage, the agent is connected to an LLM but it has no tools.
Step 2: Tool 1 – Answer allergen questions
This first tool introduces the simplest possible agent–tool interaction: a tool that returns a predefined message for the agent to read and reason about.
The tool does not take parameters and does not process data tables. Its only purpose is to provide allergen information when the agent needs it.
This makes it a good starting point for understanding how tools communicate with an agent.
Create the tool workflow
- Create a new workflow named
allergens_information. - Add a Table Creator node with one row and one column containing allergen information for each dish, for example:
Grilled Chicken: Gluten: No, Dairy: No, Nuts: No
Salmon Teriyaki: Gluten: No, Dairy: No, Nuts: No, Fish: Yes, Sesame: Yes
Vegan Burger: Gluten: Yes, Dairy: No, Nuts: No
This represents the knowledge the agent can retrieve when answering allergen-related questions.
- Add a Tool Message Output node.
This node converts tabular content into a message that the agent can read.
Connect the Table Creator to the Tool Message Output node.
In the Tool Message Output configuration, rename the output parameter to
allergens.
This name helps the agent understand what kind of information the tool returns, especially once multiple tools are available
Describe the tool
The agent decides when to use a tool based on its description. Open the Workflow Info panel and add the following description:
This tool returns allergen information for restaurant dishes.
Use this tool to answer questions such as "Is the vegan burger gluten free?"
Save the workflow. This completes your first tool. View a finished example on KNIME Community Hub: allergens_information.
Step 3: Tool 2 – Handle booking requests
Unlike the previous tool, this one must extract information from the user’s request, such as how many people want to book a table and for which date.
These values are passed to the tool as parameters and used inside the workflow logic.
Prepare the availability data
This tool uses a CSV file to keep track of table availability. Before building the workflow, download the sample file and place it inside your project directory.
➡️ Download restaurant_hours.csv
Create the tool workflow
Create a new workflow named table_availability.
Configure parameters
Start by defining the parameters that the agent can pass to the tool.
Add the following configuration nodes:
- Parameter name:
number_people - Description: Number of people for the booking
- Parameter name:
- Parameter name:
booking_date - Description: Requested reservation date
- Parameter name:
Make sure both configuration nodes include clear names and short descriptions.
The agent uses this metadata to understand what information to extract from the user’s request.
Next, add a Merge Variables node to combine the two parameters. This allows both values to be used together in the filtering logic.
Load table availability data
Use a CSV Reader node to read restaurant_hours.csv.
This is what the data looks like:
| Table ID | Seats | Date | Available |
|---|---|---|---|
| T1 | 2 | 2025-06-24 | Yes |
| T2 | 4 | 2025-06-24 | Yes |
| T3 | 6 | 2025-06-24 | No |
Each row represents a table for a specific date and whether it is available.
Filter available tables
Filter the table using the parameter values:
- keep only rows where:
Seatsis greater than or equal tonumber_peopleDatematchesbooking_dateAvailableis set to"Yes"
At this point, the filtered table represents all tables that could satisfy the booking request.
Handle both possible outcomes
The tool must handle two possible situations: a table is available, or no table is available.
Use an Empty Table Switch node to branch the workflow based on the filtering result.
If matching tables are found
Use a Top K Row Filter to select one available table.
Update
restaurant_hours.csvto mark the table as booked.Use an Expression node to create a confirmation message:
  "The booking for table " + $["Table ID"] +
  " with " + $["Seats"] + " people, on " + $["Date"] +
  " was confirmed!"
Use a Column Filter node to keep only the message column.
If no table is available
Use a Table Creator node to create a fallback message:
No tables are available for the desired date.Use a Column Filter node to keep only the message column.
Return the result to the agent
Join the two branches using an End IF node so that the workflow produces a single output table.
Add a Tool Message Output node at the end of the workflow and set the parameter name to table_availability.
This ensures the tool always returns exactly one message to the agent:
- either a booking confirmation
- or a clear notification that no tables are available
Describe the tool
Open the Workflow Info panel and add the following description:
This tool handles reservation requests by checking table availability.

It accepts two parameters:
- number_people: number of seats requested
- booking_date: reservation date

If a table is available, the tool confirms the booking and returns a message.
If no table is available, it returns a fallback message.
Save the workflow. This completes your second tool. View a finished example on KNIME Community Hub: allergens_information.
Step 4: Tool 3 – Suggest alternative booking dates (fallback logic)
This tool builds on the previous one by proposing alternatives.
- Duplicate the booking tool workflow and rename it
alternative_booking. - Shift the requested date by one day using Date Shifter.
- Check availability for the new date.
- Return a suggestion message if a table is available.
Describe the tool as:
This tool suggests alternative booking dates if the requested date is fully booked.
It checks availability for the following day and returns a suggestion if possible.
Save the workflow and you have completed your third tool.
View a finished example on KNIME Community Hub: alternative_booking.
Step 5: Tool 4 – Analyze customer review sentiment (data layer)
This tool introduces the data layer. Unlike previous tools, it operates on a data table provided by the agent, analyzes the content using an LLM, and returns both a summary message and a transformed dataset.
Prepare the review data
This tool expects a table of customer reviews. Before building the workflow, download the sample file and place it inside your project directory.
The CSV file must contain a single column named Review, with one review per row.
➡️ Download restaurant_reviews.csv
Create the tool workflow
Create a new workflow named classify_reviews.
Define the data input
Add a Workflow Input node.
Describe the content of the expected input table as:
The input table contains online reviews written by the restaurant's customers.The agent itself never sees the data. Instead, it passes the table into the tool, which processes it internally.
Use a dataset to test the tool
During development, you may connect a CSV Reader node to the Workflow Input to test the tool logic locally. When the tool is called by the agent, this input is replaced automatically.
Process the data
Build the data-processing logic inside the workflow:
Use an Expression node to create a prompt for each review, for example:
  "Is the following customer review positive or negative? " +
  "Only return one label in lowercase.\n\n" +
  $["Review"]
Use an LLM Prompter node to classify each review.
- Each row is processed independently.
- The model output is appended as a new column (for example,
Sentiment).
The result is a table where each review is labeled as
positiveornegative.
Build a summary message (communication layer)
To return a message the agent can reason with:
Use a Value Counter node to count how many reviews fall into each sentiment category.
Use a Table Transposer to prepare the counts for message creation.
Use an Expression node to build a summary message, for example:
There are 15 positive reviews and 5 negative reviews.- Use a Column Filter to keep only the message column.
Return results to the agent
Add the following output nodes:
Tool Message Output
- Parameter name:
review_summary - Sends the summary message to the agent
- Parameter name:
Workflow Output
- Returns the enriched table with the
Sentimentcolumn
- Returns the enriched table with the
This allows the agent to:
- reason based on the summary message
- optionally pass the processed data to other tools or workflows
Data privacy
KNIME agents do not read or inspect data tables directly. Instead, all data access happens inside tools. If the agent needs information derived from a dataset, the tool must explicitly convert that information into a message and return it using Tool Message Output. Note that this might:
- expose sensitive information to your LLM provider and
- increase the number of tokens used in the prompt.
Describe the tool
Open the Workflow Info panel and add the following description:
This tool analyzes customer reviews to classify their sentiment.

It expects a dataset with one column named Review.
Each review is classified as positive or negative using a language model.

The tool returns:
- a summary message with the number of positive and negative reviews
- a transformed table including a Sentiment column
Save the workflow. This completes your fourth tool. View a finished example on KNIME Community Hub: classify_reviews.
Step 6: Provide tools to agent
Place all tool workflows in a single folder, for example:
tools/
├─ table_availability.knwf
├─ alternative_booking.knwf
├─ classify_reviews.knwf
├─ allergens_information.knwf
In the agent workflow:
- Use List Files/Folders to scan the folder.
- Use Workflow to Tool to convert workflows into tools.
- Connect the tool list to the Agent Prompter.
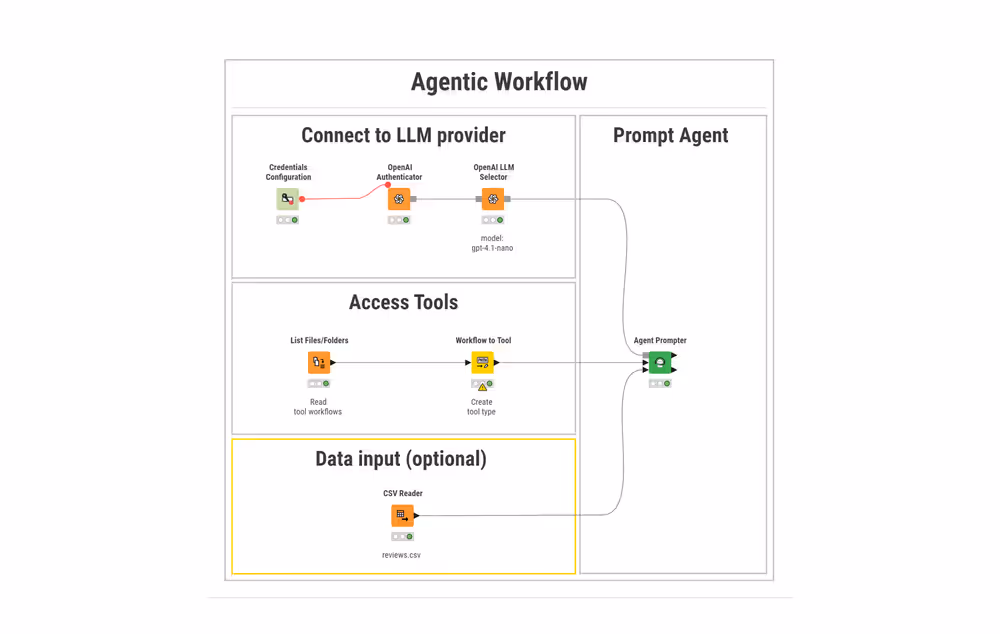
Step 7: Enable data ports for the agent
To allow the agent to process review data:
- Select the Agent Prompter node.
- Add an Input Port and Output Port.
- Connect a dataset containing customer reviews to the input port.
Step 8: Run and debug the agent
Execute the workflow.
The agent:
- reasons about the user request
- selects appropriate tools
- passes parameters or data
- combines tool results into a response
Use the debug view of the Agent Prompter to inspect reasoning and tool calls step by step.
Result
You now have a fully functional restaurant assistant agent that:
- reasons about user intent
- calls tools conditionally
- processes data
- handles fallback logic
- supports interactive chat
Check out a copy of the example you have built on KNIME Community Hub: restaurant_agent.
Next Steps
If you want to keep learning about AI and data workflows in KNIME, take one of our free courses and earn a microcredential badge to showcase your skills: