
Secret types reference
Secrets can have various types such as credentials, access tokens, OAuth2 session tokens or private key files. Each secret type can have various authentication types e.g. the credentials type can be a Username/Password or Password only authentication type. In the following sections we describe the different secret and authentication types, how they are created and represented in Knime workflows.
Secrets Retriever output ports
The output ports of the Secrets Retriever depends on the secret type:
| Secret type | Output port type | Consumed by |
|---|---|---|
| Credentials (Username/Password or Password only) | Flow variable (credentials) | Database connectors, REST nodes, authenticators |
| File | Flow variable (path) | Any node that accepts a file path flow variable |
| Generic OAuth2, Google, Microsoft, Salesforce, Databricks, Box | Credential port | Extension-specific connector nodes |
The Secrets Retriever node aggregates all selected Credentials-type secrets into a single flow variable output port, with one credentials flow variable per secret. By contrast, the node exposes each selected OAuth-based secret through its own dedicated credential output port.
Credentials
Credentials are the most basic types of secrets. They are divided into the two authentication types: Username/Password and Password only. Whereby the Username/Password type stores a username and a password such as a database login and the Password only type stores a password only such as an API key or access token.
Independent of the number of selected credentials secret types the Secrets Retriever node will return a single flow variable output port with a credentials flow variable for each selected credentials secret. To better distinguish the different credentials variables, you can specify the name for each variable in the node dialog.
Credentials variables are supported by a wide range of nodes where they can be assigned in the node dialog to a username and password or token input field via the corresponding flow variable button.
File
The file credential type supports storing of arbitrary files such as api key or certificate files with a maximum size of 10 kilobytes.
Independent of the number of selected file secret types the Secrets Retriever node will return a single flow variable output port with a path flow variable for each selected file secret. To better distinguish the different file variables, you can specify the name for each variable in the node dialog.
Path variables are supported by a wide range of nodes where they can be assigned in the node dialog to a file path via the corresponding flow variable button.
Generic OAuth2
The generic OAuth2 secret type allows you to connect to OAuth2 compliant authentication providers for which we do not have a dedicated secret type, e.g. Facebook, GitHub, Instagram, LinkedIn, Slack, and others. Depending on your use case and grant type you must select one of the authentication types described in the following sections.
For each of the following generic OAuth2 secret types the Secrets Retriever node will return a Credential output port with the OAuth2 access token. Each selected secret will result in a dedicated Credential output port. This port can be used as input for several nodes such as the REST nodes.
Interactive
This type supports the (interactive) OAuth 2.0 Authorization Code grant flow. The auth code flow is used to obtain an access token via an interactive login. For more details on how to log in see the Interactive login section.
This authentication type is only available for personal secrets and not for team and global secrets.
When you set up the auth code flow with your identity provider you need to use the following redirect URI: https://api.<base-url>/oauth2-flows/callback where <base-url> is your Knime URL, e.g. example.knime.com. Note that the hostname must be prefixed with api. in the redirect URI.
For this secret type you can specify:
- Authorization endpoint URL: is the authorization endpoint URL of the OAuth service
- Token endpoint URL: is the token endpoint URL of the OAuth2 service
- Client/App Type: is the application flow type to use either public or confidential
- Client/App ID: is the client/application ID sometimes called API key
- Client/App Secret: is the client/application secret to use (only available for confidential type)
- Scopes of access: is the list of scopes to request for the access token
- Token endpoint request method: is the HTTP method to use when requesting the access token from the token endpoint
- Client/App authentication method: specifies how to transfer Client/App ID and secret to the service endpoints. HTTP Basic Auth is the most common mechanism, but some services expect these values to be part of the form-encoded request body.
- Use PKCE: if selected a Proof Key Code Exchange is performed which improves the security
Client credentials
This type supports the client credentials grant flow. The client credentials grant is used to obtain an access token on behalf of an application/client, without having the context of a user.
For this secret type you can specify:
- Token endpoint URL: is the token endpoint URL of the OAuth2 service
- Client/App ID: is the client/application ID sometimes called API key
- Client/App Secret: is the client/application secret to use
- Scopes of access: is the list of scopes to request for the access token
- Token endpoint request method: is the HTTP method to use when requesting the access token from the token endpoint
- Client/App authentication method: specifies how to transfer Client/App ID and secret to the service endpoints. HTTP Basic Auth is the most common mechanism, but some services expect these values to be part of the form-encoded request body.
- Additional request fields: are any additional request body fields that should be added to the token endpoint request
Username/Password
This type supports the OAuth 2.0 resource owner password credentials (ROPC) grant flow.
The ROPC grant is considered legacy and does not support 2FA/MFA. Usage of this grant is discouraged and the client credentials grant should be used instead.
For this secret type you can specify:
- Token endpoint URL: is the token endpoint URL of the OAuth2 service
- Username: is the username to use
- Password: is the secret to use
- Client/App Type: is the application flow type to use either public or confidential
- Client/App ID: is the client/application ID sometimes called API key
- Client/App Secret: is the client/application secret to use (only available for confidential type)
- Scopes of access: is the list of scopes to request for the access token
- Token endpoint request method: is the HTTP method to use when requesting the access token from the token endpoint
- Client/App authentication method: specifies how to transfer Client/App ID and secret to the service endpoints. HTTP Basic Auth is the most common mechanism, but some services expect these values to be part of the form-encoded request body.
Google
The Google secret type allows you to connect to various Google services e.g. manage your files in Google Drive via the Google Connectors Extension or Google Cloud Storage using the Google Cloud Storage Extension as well as working with your data in Google BigQuery using the BigQuery Extension.
For each of the following Google secret types the Secrets Retriever node will return a Credential output port with the Google access token. Each selected secret will result in a dedicated Credential output port. This port can be used as input for various nodes such as the Google Drive Connector which allows you to manage your files in Google Drive or the Google BigQuery Connector which allows to manage your data in Google BigQuery.
Interactive
This type is used for interactive authentication using your personal Google login.
This authentication type is only available for personal secrets and not for team and global secrets.
Prior creating an interactive secret you need to create an OAuth consent screen and OAuth client ID of type Web application. When you set up the Web application you don't need to specify anything in the Authorized JavaScript origins section. But you have to add the following redirect URI to the Authorized redirect URIs section in the OAuth client ID configuration page https://api.<base-url>/oauth2-flows/callback where <base-url> is your Knime URL, e.g. example.knime.com. For more details about authentication in general and further details how to set up the OAuth consent screen and client id see the Google documentation.
This type requires you to login to Google to obtain a valid access token prior using the secret. For more details on how to log in see the Interactive login section.
For this secret type you can specify:
- Client/App ID file: is the OAuth client ID secret file (see an example file)
- Scopes of access: are the scopes to request during login (for more details see the OAuth2 scopes for Google services section).
Service account
This type is used for a service account which is recommended to use for deployed Knime workflows. For more details on how to setup a service account in Google see the Google documentation.
For this secret type you can specify:
- Authentication key type: is either JSON (recommended) or P12 format
- JSON or P12 file: depending on the selected key type either upload your JSON or P12 key file (See the Google documentation on how to create one)
- Service account email: is the email address of the service account (only available for P12 type)
- Scopes of access: are the scopes to request during login (for more details see the OAuth2 scopes for Google services section)
Standard OAuth2 scopes for Google services
This section lists the different scopes for most common Google services you can access from within a workflow.
For more details and a complete list of all the available scopes see the Google documentation. To use one of the common services mentioned below copy the URL next to the service and paste it into the Scopes of access section of the secret.
- Google Analytics (read-only):
https://www.googleapis.com/auth/analytics.readonly - Google BigQuery:
https://www.googleapis.com/auth/bigquery - Google Drive (read-only):
https://www.googleapis.com/auth/drive.readonly - Google Drive:
https://www.googleapis.com/auth/drive - Google Sheets (read-only):
https://www.googleapis.com/auth/spreadsheets.readonlyandhttps://www.googleapis.com/auth/drive.readonly - Google Sheets:
https://www.googleapis.com/auth/spreadsheetsandhttps://www.googleapis.com/auth/drive.readonly
Microsoft
The Microsoft secret types allow you to connect to the Microsoft/Azure cloud platform with nodes from the following extensions:
- KNIME Office 365 Connectors
- KNIME SharePoint List
- KNIME Azure Cloud Connectors
- KNIME Power BI Integration
- KNIME Snowflake Integration
- KNIME Database (Microsoft SQL Server Connector node)
- KNIME REST Client Extension
For each of the following secret types the Secrets Retriever node will return a Credential output port that contains either an OAuth2 access token, or an Azure Storage credential. Each selected secret will result in a dedicated Credential output port. This port can be used as input for nodes from the above extensions.
Interactive
This type supports an interactive login into the Microsoft/Azure cloud with your Microsoft identity.
This authentication type is only available for personal secrets and not for team and global secrets.
Prior to using the secret, you need to perform an interactive login to obtain a valid access token. Note that at some point the login will expire and a new login is necessary, hence this secret type is not well-suited for scheduled or otherwise automated Knime workflows.
As a prerequisite to configuring the secret, an App in Azure Entra ID (formerly Azure Active Directory) needs to be registered (see Prepare an Azure app for user authentication).
For this secret type you can specify:
- Client/App configuration:
- Select:
- Public if you registered a Public App in Azure Entra ID. This means that you selected "Public client/native (mobile & desktop)" under "Redirect URI" when creating Azure App.
- Confidential if you registered a Confidential App in Azure Entra ID. This means that you selected "Web" under "Redirect URI" when creating Azure App.
- Enter the Application ID of the previously registered Azure App
- Select:
- Scopes of access:
- Specify a list of scopes, which limit what the resulting secret can be used for, e.g. only to access SharePoint; during the interactive login you may have to consent to the requested scopes (for more details see the OAuth2 scopes section).
- Authorization endpoint: either use the default URL, or enter a custom one, which allows to sign into a specific Azure tenant
In technical terms, the login is based on the OAuth 2.0 Authorization Code flow. The interactive login allows Knime to obtain and store temporary access and refresh tokens on behalf of the user. Knime refreshes and returns the acquired access token whenever the secret is used in a workflow. The selected scopes correspond to delegated permissions in Microsoft/Azure. See Prepare an Azure app for user authentication for more information on how to correctly set up an Azure App.
Application/Service principal
This type supports authenticating as an application or service principal in the Microsoft/Azure cloud. This is well-suited for scheduled or otherwise automated Knime workflows, where no user is present to interactively login.
As a prerequisite, an App in Azure Entra ID (formerly Azure Active Directory) needs to be registered. See Prepare an Azure app for application or service principals.
For this secret type you can specify:
- Domain configuration: specify the Azure tenant to access, either in ID format, e.g.
faa16e7e-a95d-4117-b2c7-06ffc6e68acb, or as a domain name, e.g.contoso.onmicrosoft.com - Client ID and secret: enter the client ID and secret of the previously registered Azure App
- Scopes of access:
- Enter a list of scopes to limit what the resulting secret can be used for, e.g. only to access SharePoint (for more details see the OAuth2 scopes section)
In technical terms, the authentication is based on the OAuth 2.0 Client Credentials flow. A new access token is requested whenever the secret is used in a workflow. The selected scopes correspond to application permissions in Microsoft/Azure. Consult Prepare an Azure app for application or service principals for more information on how to correctly set up an Azure App and application permissions.
Username/Password
This type supports authenticating as a user in the Microsoft/Azure cloud. It can be used for scheduled or otherwise automated Knime workflows, where no user is present to interactively login. However, note that this authentication type is discouraged by Microsoft. It does not support accounts with 2FA/MFA and has further limitations.
As a prerequisite, an App in Azure Entra ID (formerly Azure Active Directory) needs to be registered. See Prepare an Azure app for user authentication.
For this secret type you can specify:
- Credentials: specify your Microsoft/Azure username and password.
- Client/App configuration: enter the client ID of the previously registered Azure App
- Scopes of access:
- Enter a list of scopes to limit what the resulting secret can be used for, e.g. only to access SharePoint (for more details see the OAuth2 scopes section)
- Authorization endpoint: either use the default URL, or enter a custom one, which allows to sign into a specific Azure tenant
In technical terms, the authentication is based on the OAuth 2.0 Resource Owner Password Credentials flow. A new access token is requested whenever the secret is used in a workflow. The selected scopes correspond to delegated permissions in Microsoft/Azure. Consult Prepare an Azure app for user authentication for more information on how to correctly set up an Azure App and delegated permissions.
Azure Storage shared access signature (SAS)
This type allows to authenticate against Azure Blob Storage/Data Lake Storage Gen2 with a Shared Access Signature (SAS). A SAS grants restricted and time-limited access to an Azure Storage container or objects within. See here for further documentation.
For this secret type you only need to specify a SAS URL. See Generate an Azure Storage SAS URL.
Azure Storage shared key
This type allows to authenticate against Azure Blob Storage/Data Lake Storage Gen2 with a shared key. The shared key grants unrestricted access to an Azure Storage account and all containers within. For more information consult the Microsoft documentation.
Microsoft/Azure recommends to not use shared key authentication, as it provides unrestricted access to an Azure Storage account and all containers within. Any of the other authentication types in this section can be used instead.
For this secret type you need to specify:
- Storage account: enter the unique name of the storage account
- Shared key: the shared key. See Find your Azure Storage shared key
Standard OAuth2 scopes for Azure services
This section lists the different scopes for most common Azure services you can access from within a workflow. For more details and a complete list of all the available scopes see the Microsoft documentation. To use one of the common services mentioned below copy the scope next to the service and paste it into the Scopes of access section of the secret.
- SharePoint files and list items (Read):
Sites.Read.AllThis permission allows the token to be used for reading files and list items stored on SharePoint Online. Note that access to any specific SharePoint site needs to be additionally granted to the user by that site. - SharePoint files and list items (Read/Write):
Sites.ReadWrite.AllThis permission allows the token to read and write files as well as list items stored on SharePoint Online. This includes creating and deleting files, but not lists. Note that access to any specific SharePoint site needs to be additionally granted to the user by that site. - SharePoint files, lists and list items (Read/Write):
Sites.Manage.AllThis permission allows the token to read and write files, lists as well as list items stored on SharePoint Online. This includes creating and deleting files as well as lists. Note that access to any specific SharePoint site needs to be additionally granted to the user by that site. - User Groups (Read) (Requires admin consent):
Directory.Read.AllThis permission is required to browse the Office 365 groups that the logged in user is a member of, when selecting a SharePoint team site to connect to. Note that this permission can only be granted by an Entra ID admin. - User Groups (Read) (Limited):
User.ReadThis permission is required to browse the Office 365 groups that the logged in user is a member of, when selecting a SharePoint team site to connect to. This permission does not require consent by an admin, but cannot access the human-readable names of Office 365 groups, hence only technical IDs will be displayed. - Azure Blob Storage/Azure Data Lake Storage Gen2: Requests the user_impersonation permission for a specific Azure storage account. This permission allows the token to access data stored in that storage account. Note that access to any specific data in that account needs to be additionally granted to the user, before any access is possible.
- Azure SQL Database: Requests the user_impersonation permission. This permission allows the token to access the Azure SQL API. Note that access to any specific databases/resources needs to be additionally granted to the user, before any actual access is possible.
- Power BI:
Dataset.ReadWrite.AllandWorkspace.Read.All.
Salesforce
The Salesforce secret type allows you to connect to Salesforce by using the nodes from the Salesforce Extension.
For each of the following Salesforce secret types the Secrets Retriever node will return a Salesforce Credential output port with the Salesforce access token. Each selected secret will result in a dedicated Credential output port. This port can be used as input for the Salesforce Connector node which is the starting node to access your data in Salesforce.
Prior to creating one of these secret types you need to create a Connected App in Salesforce with enabled OAuth Settings. In the API (Enable OAuth Settings) section you need to provide the following Callback URL https://api.<base-url>/oauth2-flows/callback where <base-url> is your Knime URL, e.g. example.knime.com. Note that the hostname must be prefixed with api. in the redirect URI. For more information about the used OAuth Authorization Flows in general see the Salesforce documentation.
Interactive
This type is used for the OAuth 2.0 Web Server Flow in Salesforce which implements the OAuth 2.0 authorization code grant type.
This authentication type is only available for personal secrets and not for team and global secrets.
This type requires you to log in to Salesforce to obtain a valid access token prior using the secret. For more details on how to log in see the Interactive login section.
For this secret type you can specify:
- Connected App ID: is the consumer key of the connected application which can be viewed as described here
- Connected App Secret: is the consumer secret of the connected application which can be viewed as described here
- Salesforce Instance: is the Salesforce instance type either Production or Sandbox for testing
Username/Password
This type is used for the OAuth 2.0 Username-Password Flow which is recommended to use for deployed Knime workflows.
For this secret type you can specify:
- Connected App ID: is the consumer key of the connected application which can be viewed as described here
- Connected App Secret: is the consumer secret of the connected application which can be viewed as described here
- Username: is the username
- Password: is the password
- Security Token: is the optional security token
- Salesforce Instance: is the Salesforce instance type either Production or Sandbox for testing
Databricks
The Databricks secret type allows you to connect to various Databricks services e.g. manage your files in Unity Catalog volumes or orchestrate your Spark jobs in the Databricks Runtime. As a starting point for working with Databricks see the KNIME for Databricks Users collection or the KNIME Databricks Integration User Guide.
For each of the following Databricks secret types the Secrets Retriever node will return a Credential output port with the Databricks access token. Each selected secret will result in a dedicated Credential output port. This port can be used as input for the Databricks Workspace Connector which is the starting point to connect to different Databricks services such as managing your files in Unity Catalog volumes using the Databricks Unity File System Connector.
The following sections describe the different supported authentication types. For more details on which authentication type to choose see the Databricks documentation.
Interactive (OAuth2 U2M)
This type is used for interactive authentication using your personal Databricks login. This authentication type is also called OAuth U2M or user-to-machine flow in the Databricks documentation.
This authentication type is only available for personal secrets and not for team and global secrets.
Prior creating an interactive secret you need to create an App connection in your Databricks account console. When you set up the connection enter the following redirect URI into the Redirect URLs section https://api.<base-url>/oauth2-flows/callback where <base-url> is your Knime URL, e.g. example.knime.com. In the Access scopes section select All APIs. If you select the Generate a client secret option, you need to select Confidential as type and enter the client ID and client secret into the corresponding fields of the Client configuration section of your new secret type. Otherwise select Public as type and enter only the client ID. For more details about how to set up App connections via the Databricks CLI or UI see the Databricks documentation.
This type requires you to login to Databricks to obtain a valid access token prior using the secret. For more details on how to log in see the Interactive login section.
For this secret type you can specify:
- Workspace URL: the URL of the Databricks workspace you want to work with, for example https://dbc-a1b2345c-d6e7.cloud.databricks.com
- Client configuration type: Select Confidential if you have selected the Generate a client secret option when creating the App connection in Databricks. Otherwise select Public.
- Client ID: is the Client ID of the created App connection
- Client secret: only available if you choose the Confidential client type and only necessary if you selected the Generate a client secret option when creating the App connection in Databricks
Service Principal (OAuth2 M2M)
This type is used for a Databricks service principal which is recommended to use for deployed Knime workflows. This authentication type is also called OAuth M2M or machine-to-machine flow in the Databricks documentation. For more details on how to create a Databricks service principal see the Databricks documentation.
Personal Access Token
This type is used for workspace users or service principals using a personal access token (PAT). For more details on how to create a personal access token see the Databricks documentation.
Note: Databricks recommends using OAuth instead of PATs for user account client authentication and authorization due to the improved security OAuth has. To use OAuth, select one of the other authentication types.
Box
The Box secret type allows you to connect to Box e.g. in order to manage your files using the Box File Handling Extension. Prior creating one of these secret types you need to create a Platform App in Box. Depending on the selected authentication method of your App you must select one of the authentication methods described in the following sections.
For each of the following Box secret types the Secrets Retriever node will return a Credential output port with the Box access token. Each selected secret will result in a dedicated Credential output port. This port can be used as input for the Box Connector node which allows you to manage your files in Box.
User authentication
This type is used for the user authentication type in Box which supports OAuth 2.0 based user authentication.
This authentication type is only available for personal secrets and not for team and global secrets.
This type requires you to log in to Box to obtain a valid access token prior using the secret. For more details on how to log in see the Interactive login section.
When you set up the Box App you have to add the following redirect URI to the OAuth 2.0 Redirect URI section in the Apps Configuration page https://api.<base-url>/oauth2-flows/callback where <base-url> is your Knime URL, e.g. example.knime.com. Note that the hostname must be prefixed with api. in the redirect URI. For more details on how to set up a User authentication (OAuth 2.0) App see the Box documentation.
For this secret type you can specify:
- Client/App ID: is the client ID of the application specified in the OAuth 2.0 Credentials section of your App Configuration
- Client/App Secret: is the client secret of the application specified in the OAuth 2.0 Credentials section of your App Configuration
Server authentication
This type is used for the server authentication (client credentials grant) which is recommended to use for deployed Knime workflows. For more details on how to set up an application with Client Credentials Grant in Box see the Box documentation.
For this secret type you can specify:
- Client/App ID: is the client ID of the application specified in the OAuth 2.0 Credentials section of your App Configuration
- Client/App Secret: is the client secret of the application specified in the OAuth 2.0 Credentials section of your App Configuration
- Enterprise ID: is the Enterprise ID as displayed in the General Settings page of your App
Prepare your services for use with Knime Secrets
This section explains how to prepare external services so that their credentials, apps, or keys can be stored as secrets and used securely in your workflows.
Prepare an Azure app for user authentication
This how-to describes how to set up an Azure App, so that it can be used with secrets of type Microsoft Interactive and Microsoft Username/Password.
Prerequisites:
- Permission to register apps in Azure Entra ID. Azure admins generally have this permission, but it can also be provided through roles such as the Application Administrator or Application Developer (see here).
Steps:
Log into the Azure Portal
Navigate to Azure Entra ID App registrations
Register a new app:
- Click New registration
- Enter a name, and choose the supported account type (Single tenant in most cases)
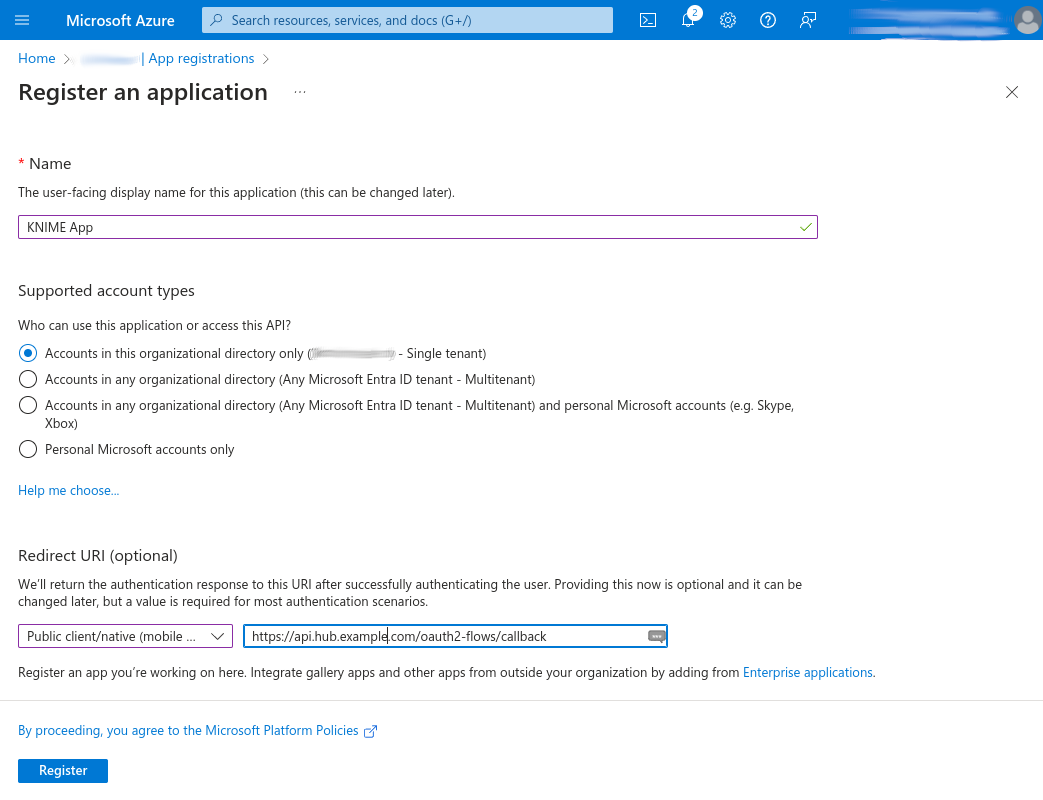
- Under Redirect URI:
- Select the platform called either:
- Web, or
- Public client/native (mobile & desktop)
- Enter
https://api.<base-url>/oauth2-flows/callbackwhere<base-url>is your Knime URL, e.g.example.knime.com.Note that the hostname must be prefixed withapi.in the redirect URI. d. Click Register
- Select the platform called either:
Add delegated permissions:
- In your app, navigate to API permissions
- Click Add a permission to add the necessary permissions that the app should have. For example, to allow read/write access to SharePoint choose Microsoft Graph Delegated permissions Sites Sites.ReadWrite.All. The required permissions depend on how you plan to use the app in Knime workflows (for a list of common scopes see the OAuth2 scopes section).
- Click Add permissions
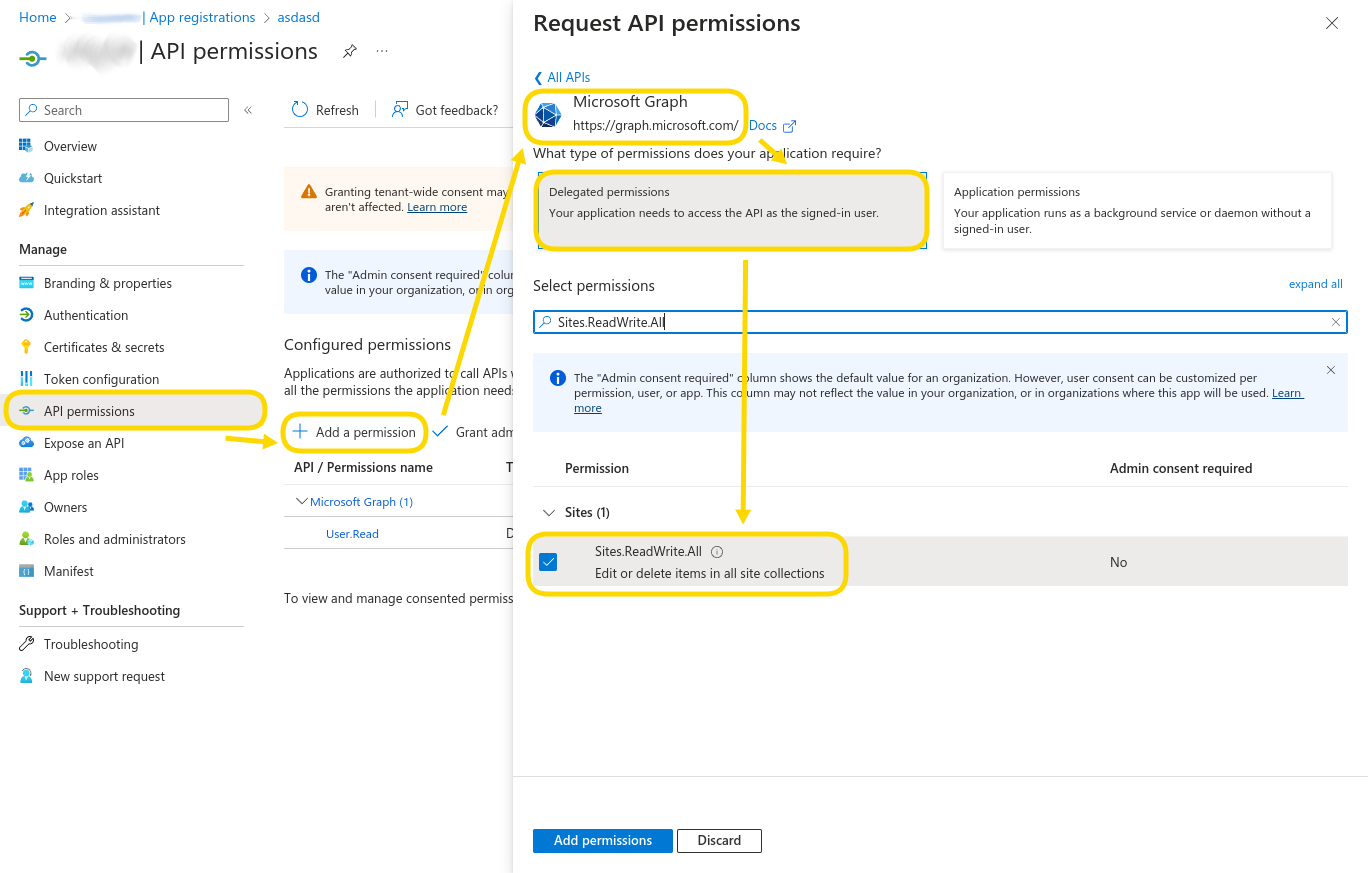
- If shown, click Grant admin consent for to give admin consent for all added API permissions. In this case users will not be prompted for consent during interactive authentication anymore.
Only if you need to use the app with secrets of type Microsoft Username/Password (discouraged):
- In your app, navigate to Authentication → Allow public client flows
- Set the slider to Yes
- Click Save
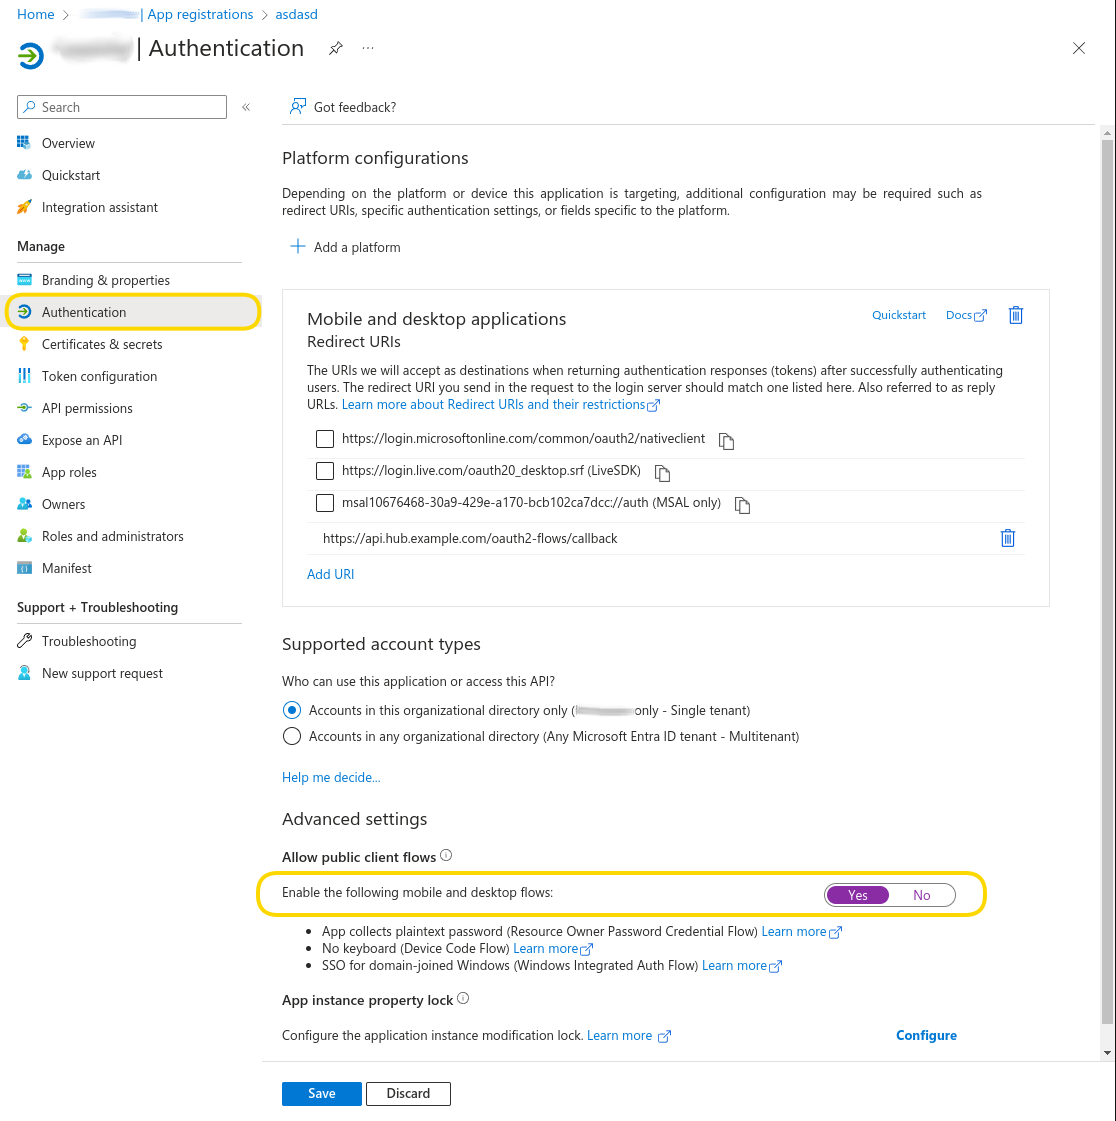
- Navigate to API permissions, add all required API permissions and consent to them as in step 6 above.
Retrieve the application ID:
- In your app, navigate to Overview
- Copy the Application (client) ID
In your secret(s):
- Paste the application ID into the Client/App ID field
API permissions, also called scopes, act as a upper limit on what can be done with the acquired access token. On top of that, most services in the Microsoft/Azure platform impose additional permission checks based on the user's roles and groups. Examples are SharePoint permissions or Azure RBAC.
Prepare an Azure app for application or service principals
This how-to describes how to set up an Azure App, so that it can be used with secrets of type Microsoft Application/Service principal.
Prerequisites:
- Permission to register apps in Azure Entra ID. Azure admins generally have this permission, but it can also be provided through roles such as the Application Administrator or Application Developer (see here).
Steps:
Log into the Azure Portal
Navigate to Azure Entra ID → App registrations
Register a new app:
Click New registration
Enter a name, and choose the supported account type (Single tenant in most cases). A redirect URI is not required.
Click Register
Add application permissions:
In your app, navigate to API permissions
Click Add a permission to add the necessary permissions that the app should have. For example, to allow read/write access to SharePoint choose Microsoft Graph → Application permissions → Sites → Sites.ReadWrite.All. The required permissions depend on how you plan to use the app in Knime workflows (for a list of common scopes see Standard OAuth2 scopes for Azure services).
Click Add permissions.
Click Grant admin consent for to give admin consent for all added API permissions.
Create an application secret:
In your app, navigate to Certificates & secrets ? Client secrets
Click New client secret
Enter a description and expiry
Click Add
Copy the Value of the newly created client secret, as it is only shown once after creation.
Retrieve the application ID:
In your app, navigate to Overview
Copy the Application (client) ID
In your secret(s):
Paste the application ID into the Client/App ID field
Paste the client secret into the Client/App Secret field
API permissions, also called scopes, act as a upper limit on what can be done with the acquired access token. On top of that, some services in the Microsoft/Azure platform impose additional permission checks based on roles and group memberships of the service principal. An example of this is Azure RBAC.
Generate an Azure Storage SAS URL
This how-to describes how to create an Azure Storage SAS URL, so that it can be used with secrets of type Azure Storage shared access signature (SAS). A SAS URL grants restricted and time-limited access to an Azure Storage container or objects inside a container.
Prerequisites:
- Permission to create SAS URLs, depending on the type of SAS to create. See here for an overview.
To create an Azure Storage SAS URL for a container
Log into the Azure Portal
Navigate to Storage Accounts → Your Account → Containers → Your Container → Shared access tokens
Enter signing method, permissions and expiry information
Click Generate SAS token and URL
Copy the Blob SAS URL
In your secret(s): Paste the copied Blob SAS URL into the SAS URL field
The steps to create SAS URL for a specific object inside a container are similar. Navigate to the object, click on it and then choose Generate SAS.
Find your Azure Storage shared key
This how-to describes how to locate the shared key of an Azure Storage account, so that it can be used with secrets of type Azure Storage shared key. Such a key grants unrestricted access to an Azure Storage account and all containers within.
Prerequisites:
- Permission to view the account keys of the Storage account. Several roles as described here allow to view account keys.
The shared key for an Azure Storage container can be found as follows:
- Log into the Azure Portal
- Navigate to Storage Accounts → Your Account → Access keys
- Copy one of the shown keys
- In your secret(s): Paste the copied key into the Shared key field