
SCIM provisioning
The System for Cross-domain Identity Management (SCIM) is an open industry standard for provisioning users and groups from an identity provider to an application. Unlike authentication protocols such as OpenID/OIDC, a SCIM client in the identity provider actively pushes user and group information to the application.
SCIM lets you create users in your Knime instance before they log in. You can then assign them to teams or share deployments with them. Groups provisioned with SCIM become external groups in Knime. Combined with the nested groups feature, external groups let you automatically assign users to teams based on group memberships in the identity provider.
You can enable SCIM on a Knime instance that already contains users. Existing Knime user accounts match with accounts provisioned by SCIM based on the username and e-mail address.
If usernames in the identity provider are e-mail addresses, you likely created a mapper in Keycloak that removes the domain part, because previous Knime releases did not allow usernames to contain the @ character. Version 1.10 removed this restriction, so SCIM clients can provision users with e-mail addresses as usernames. This means you must disable or remove the corresponding mapper in Keycloak — otherwise the username created by SCIM does not match the username in the authentication token Keycloak provides. After you remove the mapper, existing accounts in Knime Business Hub update automatically the next time the user logs in.
Knime tests and supports SCIM with Okta and Microsoft Entra ID as SCIM clients. Other SCIM clients may work, but the SCIM protocol is extensive and some edge cases may not be covered.
Create a SCIM application password
The first step for any SCIM client is to create a dedicated application password that the SCIM client uses to authenticate against your Knime instance. An administrator must complete this step, best performed using the Swagger UI.
Log into your Knime instance as an administrator user.
Open the OpenAPI documentation of the account service functionality, available at
https://api.<base-url>/api-doc/?service=accounts-service.Go to the SCIM section, expand the
POSTrequest box, click Try it out, then click Execute.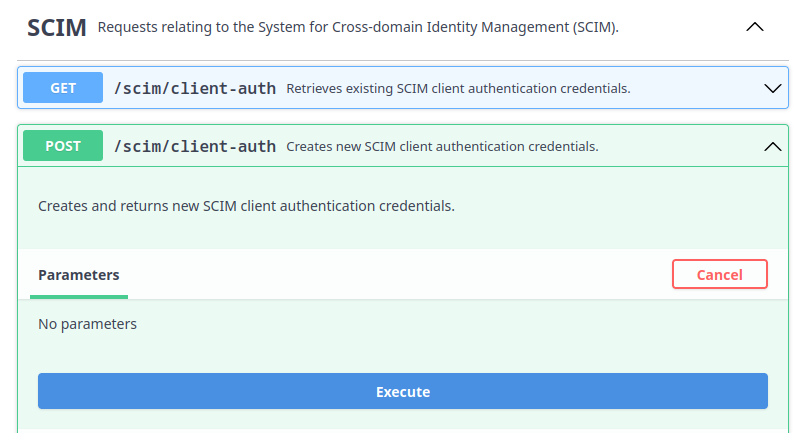
The result appears below the button. It contains a
pwId, apassword, and anauthToken. For Okta as a SCIM client, you need thepwIdand thepassword. For Microsoft Entra ID, you need theauthToken. Note down these values in a safe place — you cannot retrieve them again without deleting and re-creating the SCIM application password.
Configure a SCIM client
Okta
To set up Okta as a SCIM client for Knime, follow Okta's documentation about Adding SCIM provisioning to app integrations.
Okta does not currently support adding SCIM to an OIDC app integration. Instead, create a second integration for your Knime instance that is only responsible for provisioning via SCIM. Create a SWA app integration as part of Task 1 of the Okta documentation.
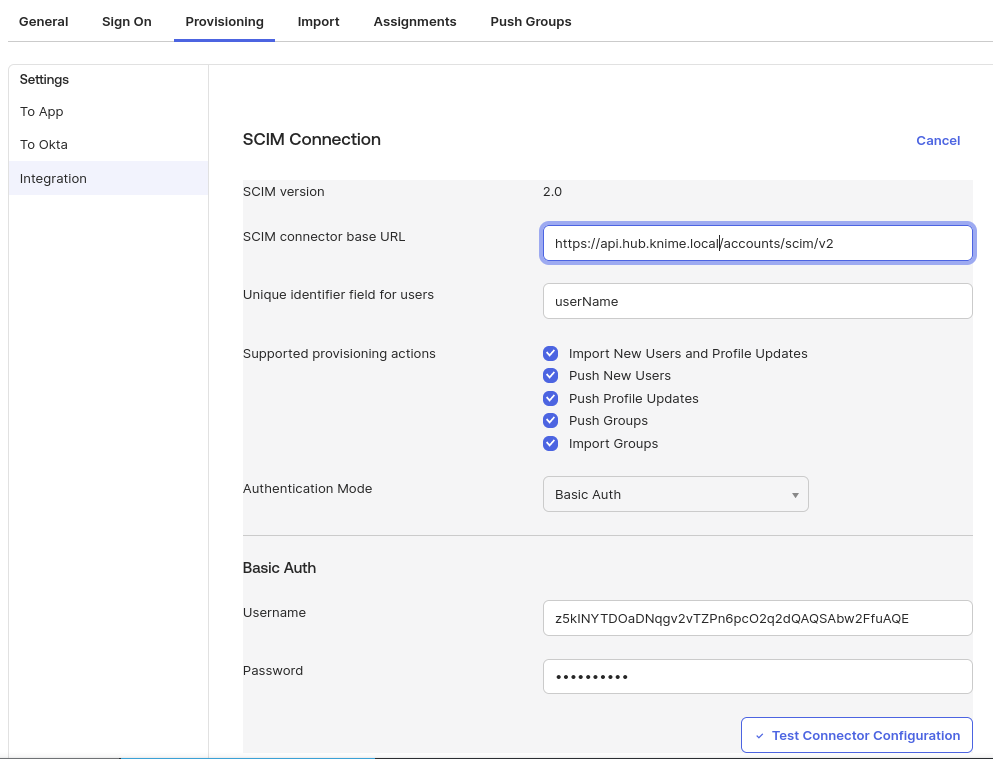
When you configure the SCIM connection of the app integration, provide the following values:
- Use
https://api.<your hub domain>/accounts/scim/v2as the SCIM connector base URL. - Use userName as the unique identifier field for users.
- Select all options for supported provisioning actions.
- Select Basic Auth as the authentication mode.
- From the application password created earlier, use the
pwIdvalue as the username and thepasswordvalue as the password.
After that, assign users and groups to the application in the Assignments tab. Provisioning of the respective users starts automatically shortly afterwards. Configure group provisioning in the Push Groups tab.
Microsoft Entra ID
To set up Microsoft Entra ID as a SCIM client for Knime, follow Microsoft's documentation about Integrating your SCIM endpoint with the Microsoft Entra provisioning service.
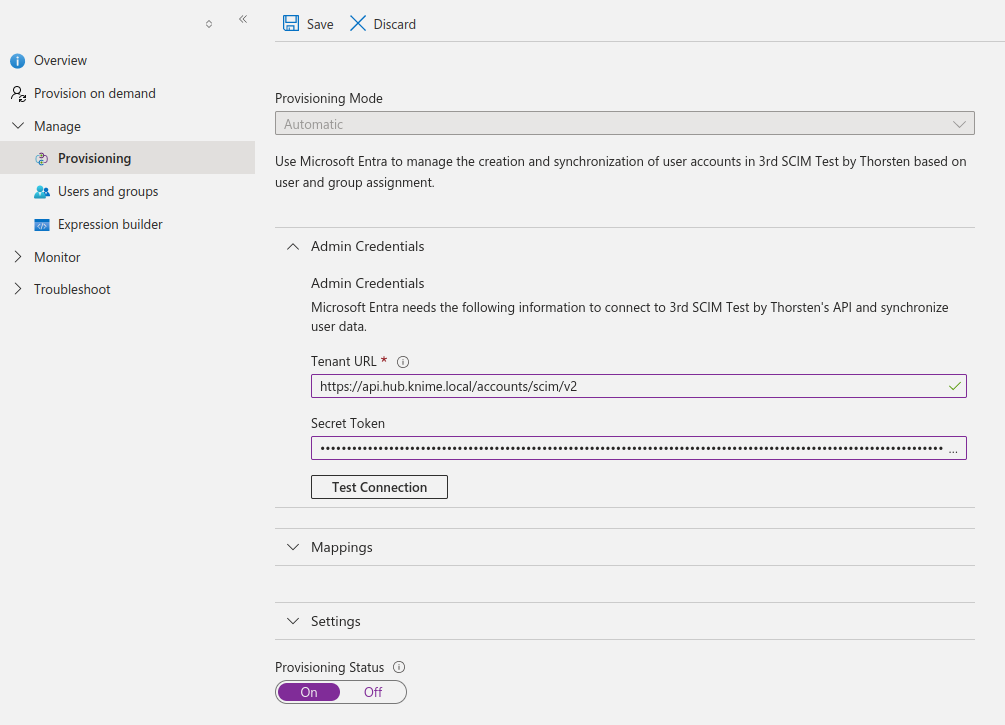
When you configure the provisioning details of the enterprise application, provide the following values:
- Use
https://api.<your hub domain>/accounts/scim/v2as the tenant URL. - Use the
authTokenvalue from the application password created earlier as the secret token.
No changes are required in the Mappings section.
Provisioning time
With Entra ID, provisioning can take a long time depending on the number of users and groups. For example, 250 users and 30 groups take about 40 minutes.
If your Knime instance is not reachable by Entra ID due to network restrictions, follow Microsoft's instructions about configuring the connection via the provisioning agent.
Assign users to teams based on external groups
If you provisioned groups from your identity provider to Knime, you can use these external groups to manage team memberships. Once group membership changes in the identity provider are provisioned to Knime, they immediately reflect in team memberships. This also lets you assign users to teams before they log in.
Assigning a consumer account to a team requires a free user seat license. If no unused user seats are available in your Knime instance, the assignment fails. If your license includes an unlimited number of users, this does not affect your installation. When enough user seats are available, team sizes adjust automatically when using SCIM.
To assign team membership based on an external group, add the external group as a nested group to the team's accountMember group. Do this in one of two ways:
- Using API calls, such as through the Swagger UI used to create the SCIM application password.
- Using a dedicated data application deployed in your Knime instance.
Assign users based on external groups via API calls
Follow these steps to add an external group as a nested group to a team group:
Find the team's ID. Search teams by their name, then get the ID from the
idfield in the response.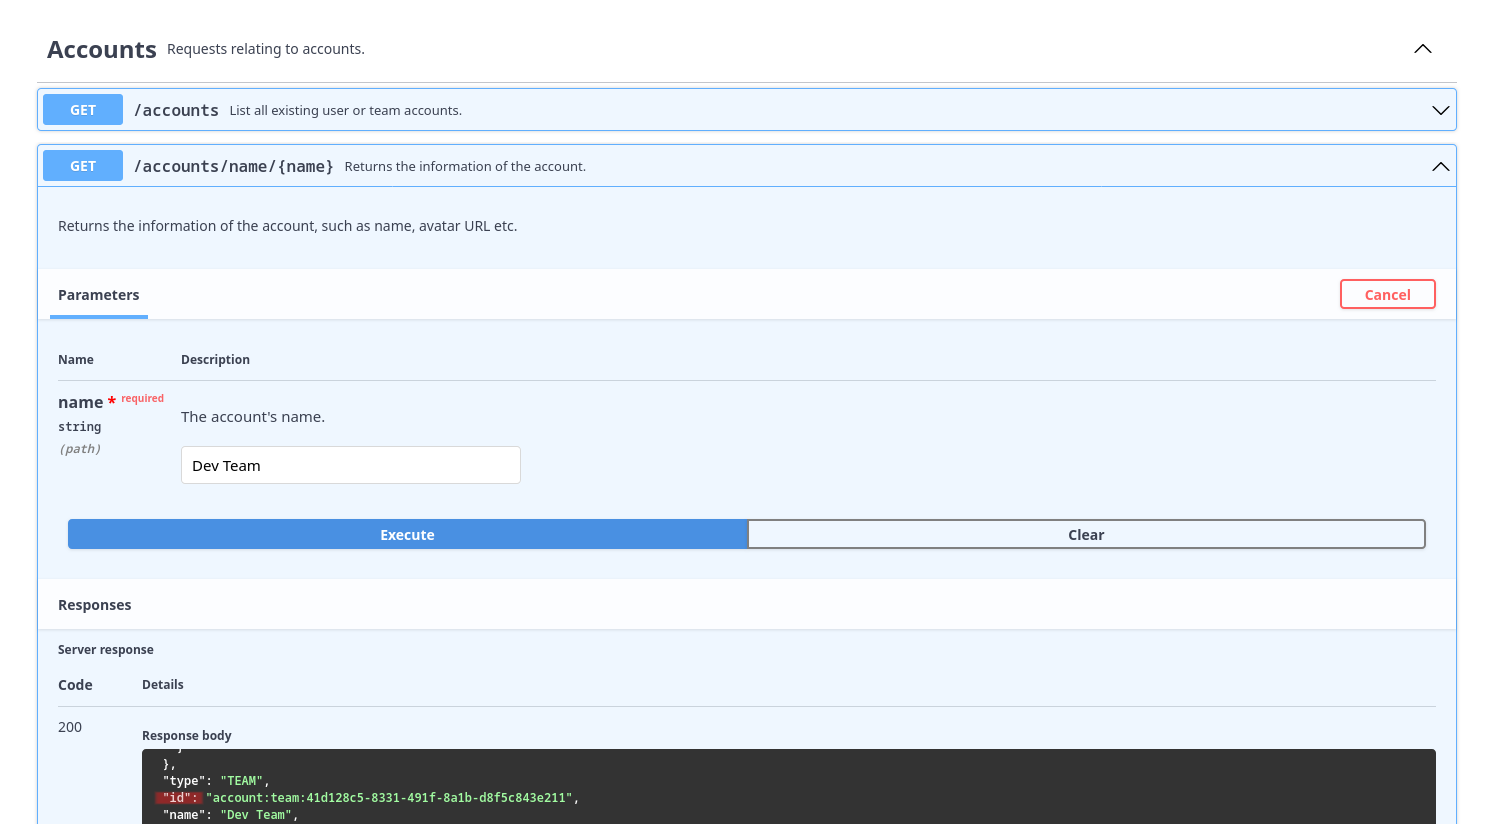
Find the external group's ID. Since the external group's name in Knime may not exactly match its name in the identity provider, list all external groups, select the right one based on its
displayName, and note down itsid.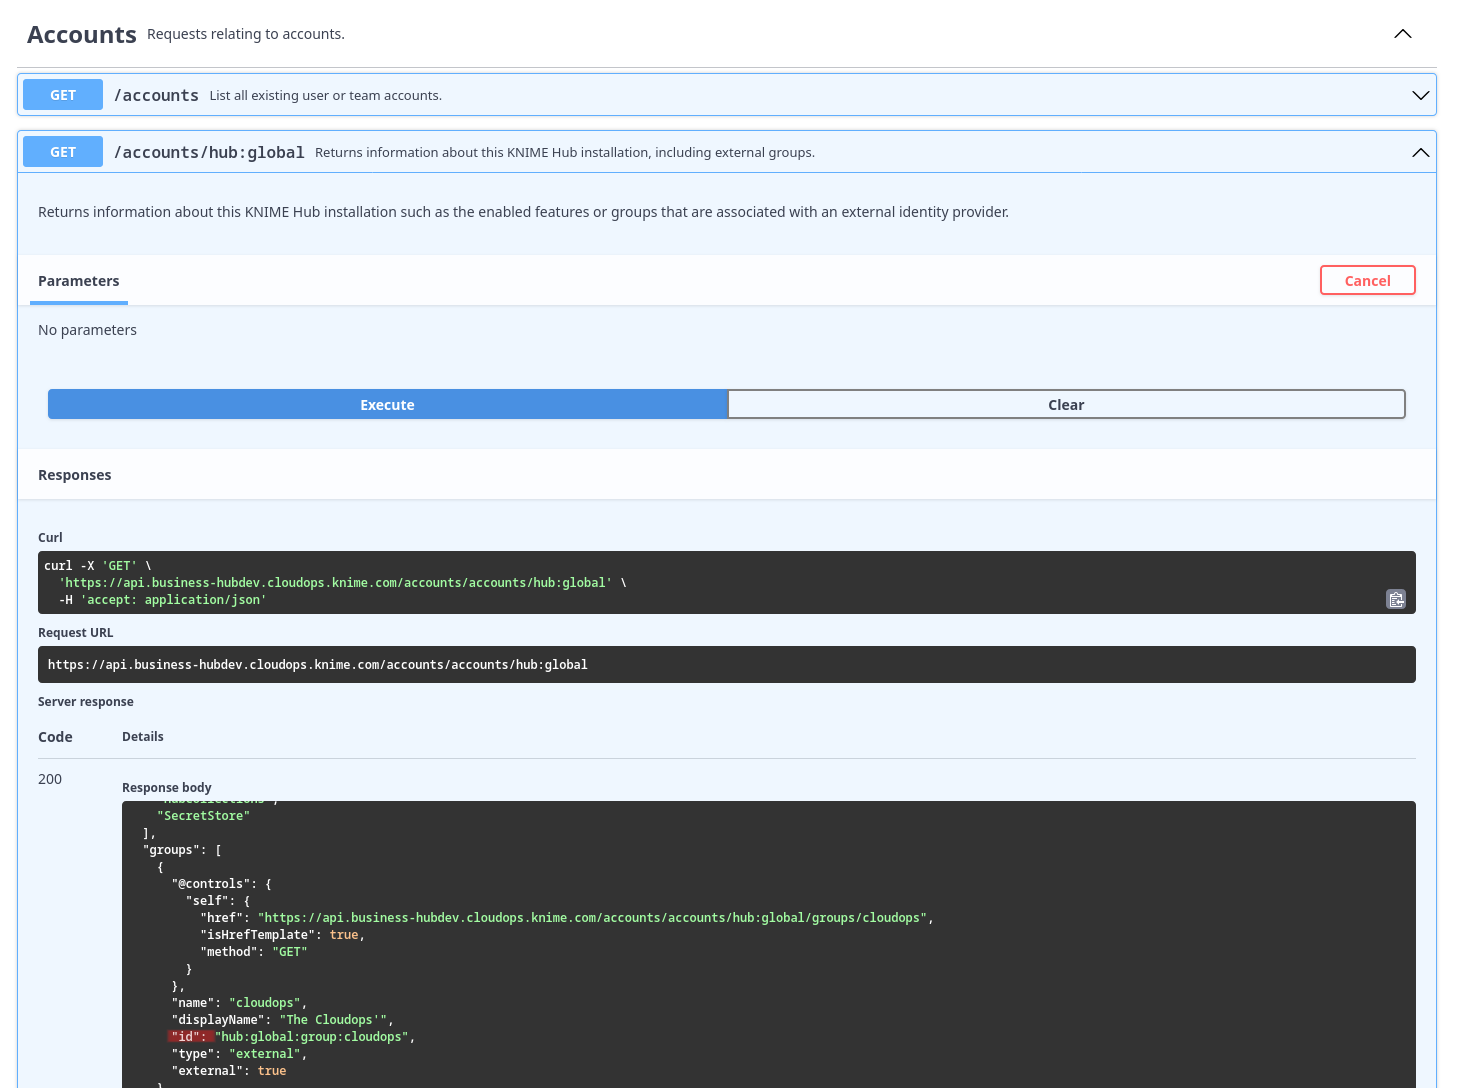
Add the external group as a member of the accountMember group of the desired team.
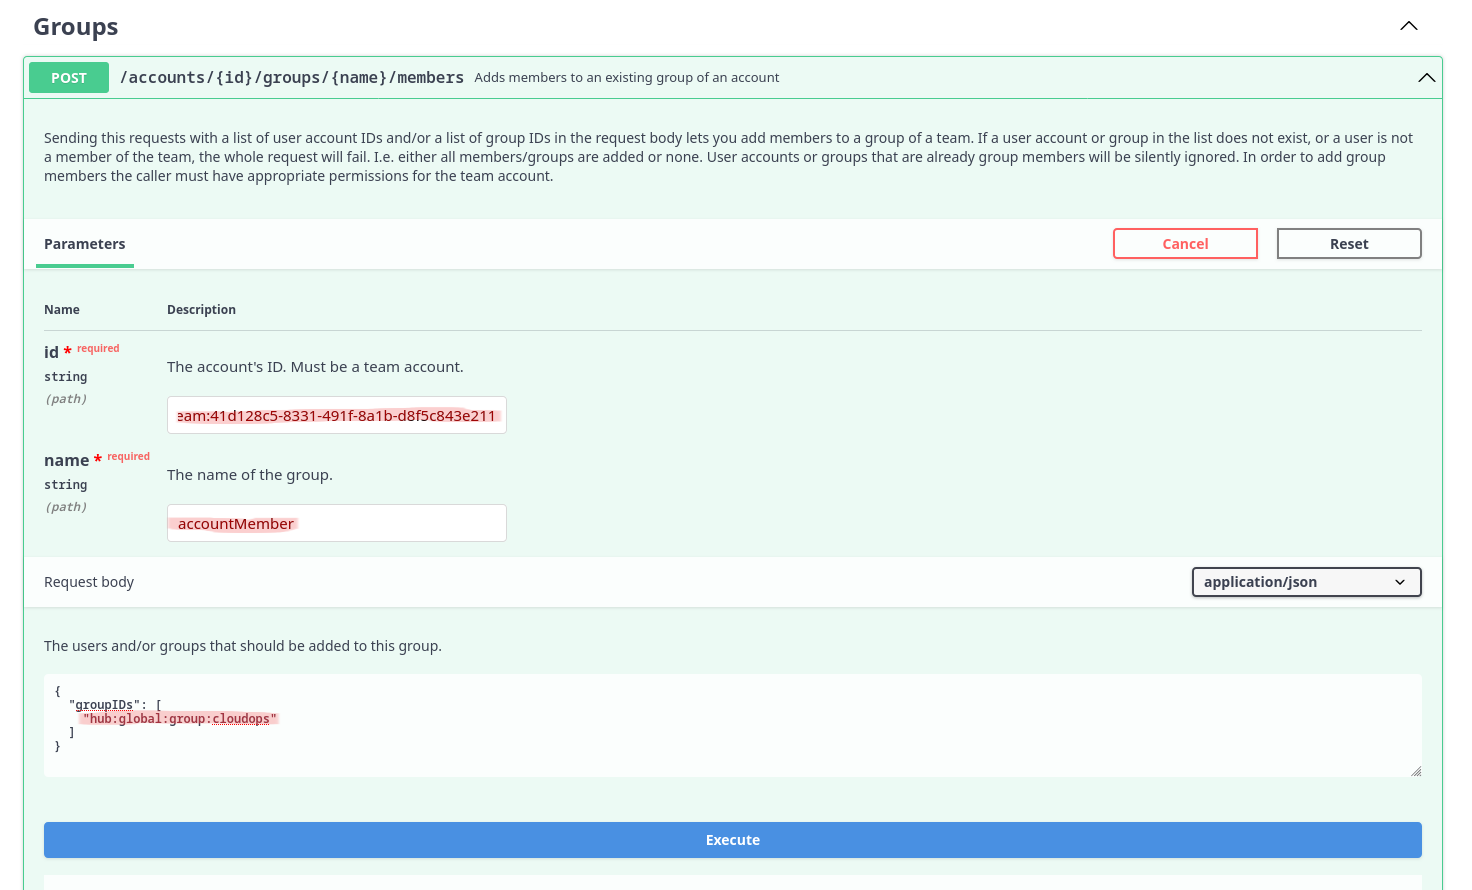
After that, users in the external group immediately appear as members of the respective team.
User seat limits
You must have enough users in your Knime license, otherwise this operation might fail due to insufficient users. Knime updates the team size limit automatically if SCIM provisioned the external group.
Assign users based on external groups via data application
Before running this application, ensure you provisioned groups from your identity provider to Knime.
This data application lets global admins manage the assignment and removal of users to teams based on external groups, without doing it manually. Only global admins have permission to run this data application. When you use the data application in Knime, user authentication aligns with the logged-in user's permissions, so you do not need to provide an application password.
Deploy the data application
- Download the workflow from the Knime Community Hub.
- Upload the downloaded workflow to your Knime instance via the web UI.
- Deploy the workflow as a data application. Learn more about deploying data apps.
- Execute the newly created data application deployment.
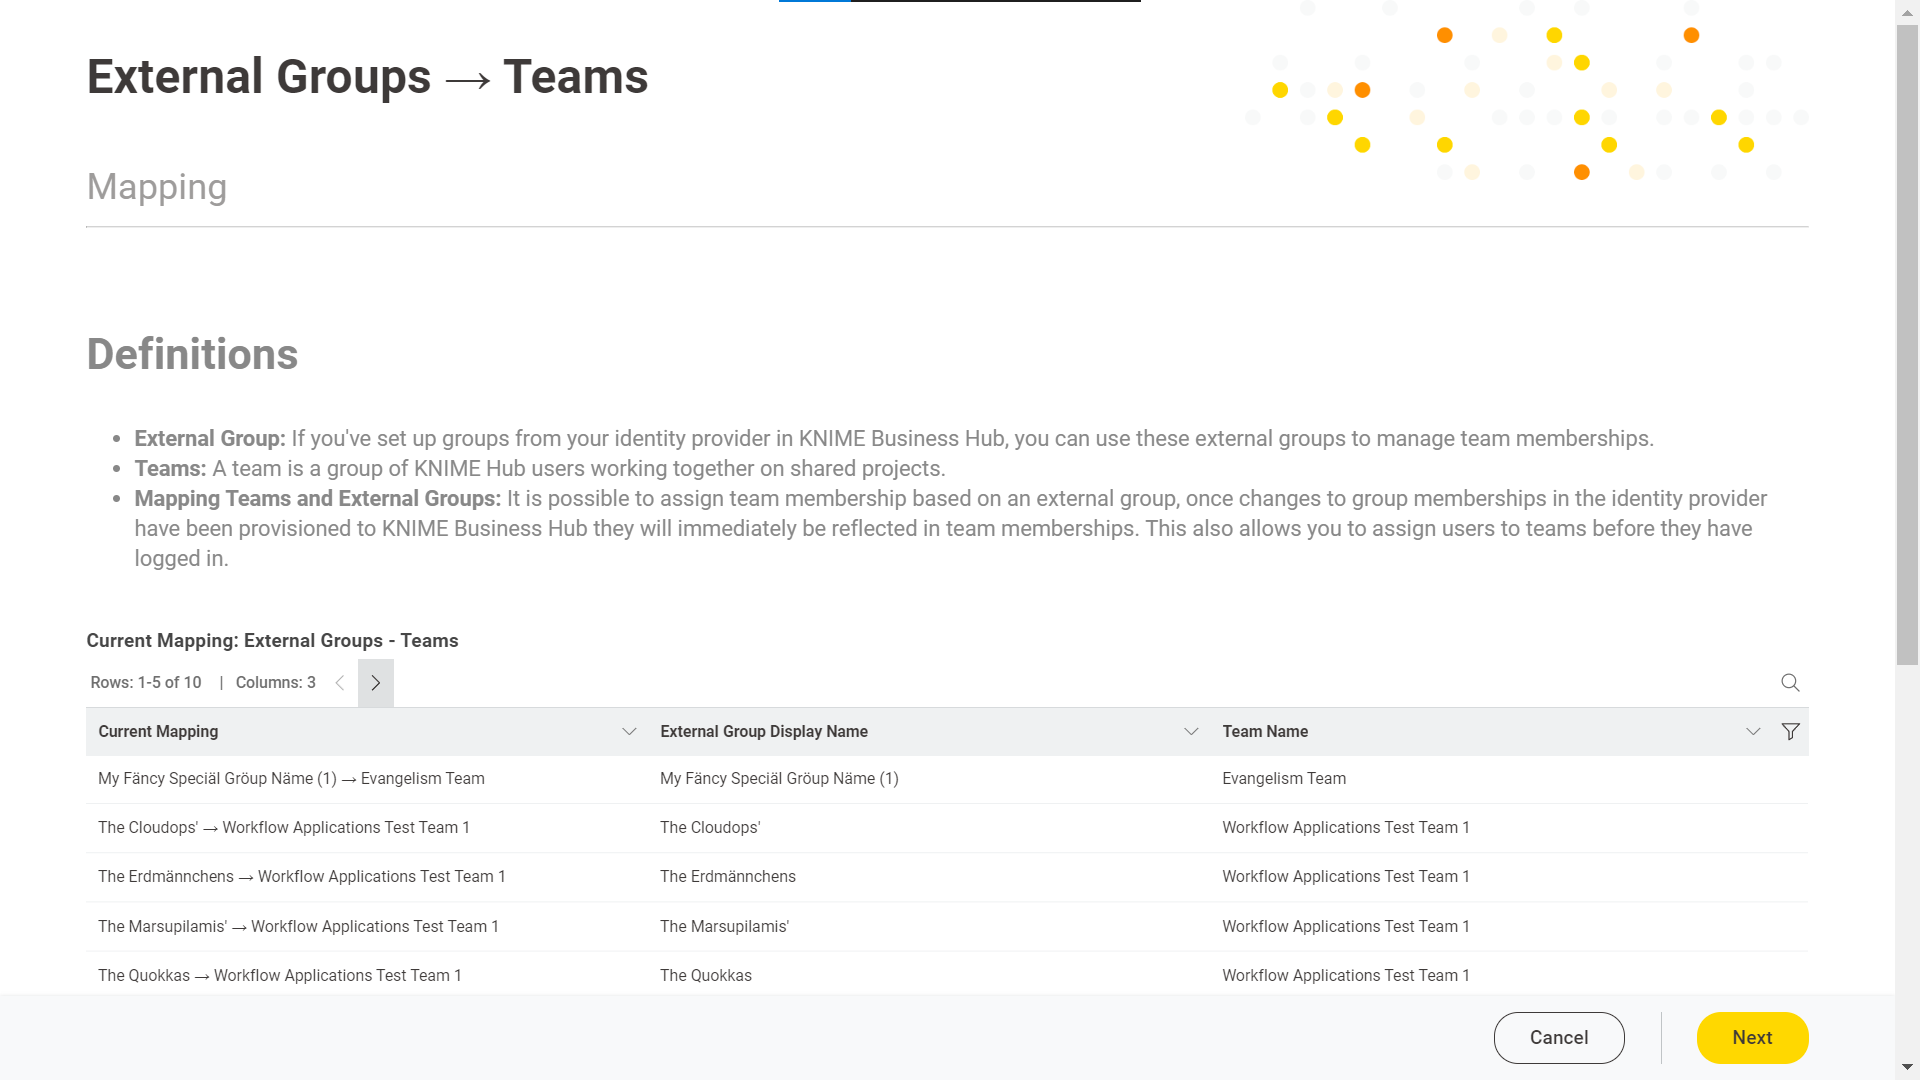
View the current external groups - teams mapping
The one-page data application shows the current mapping of external groups and teams, and lets you add or remove mappings.
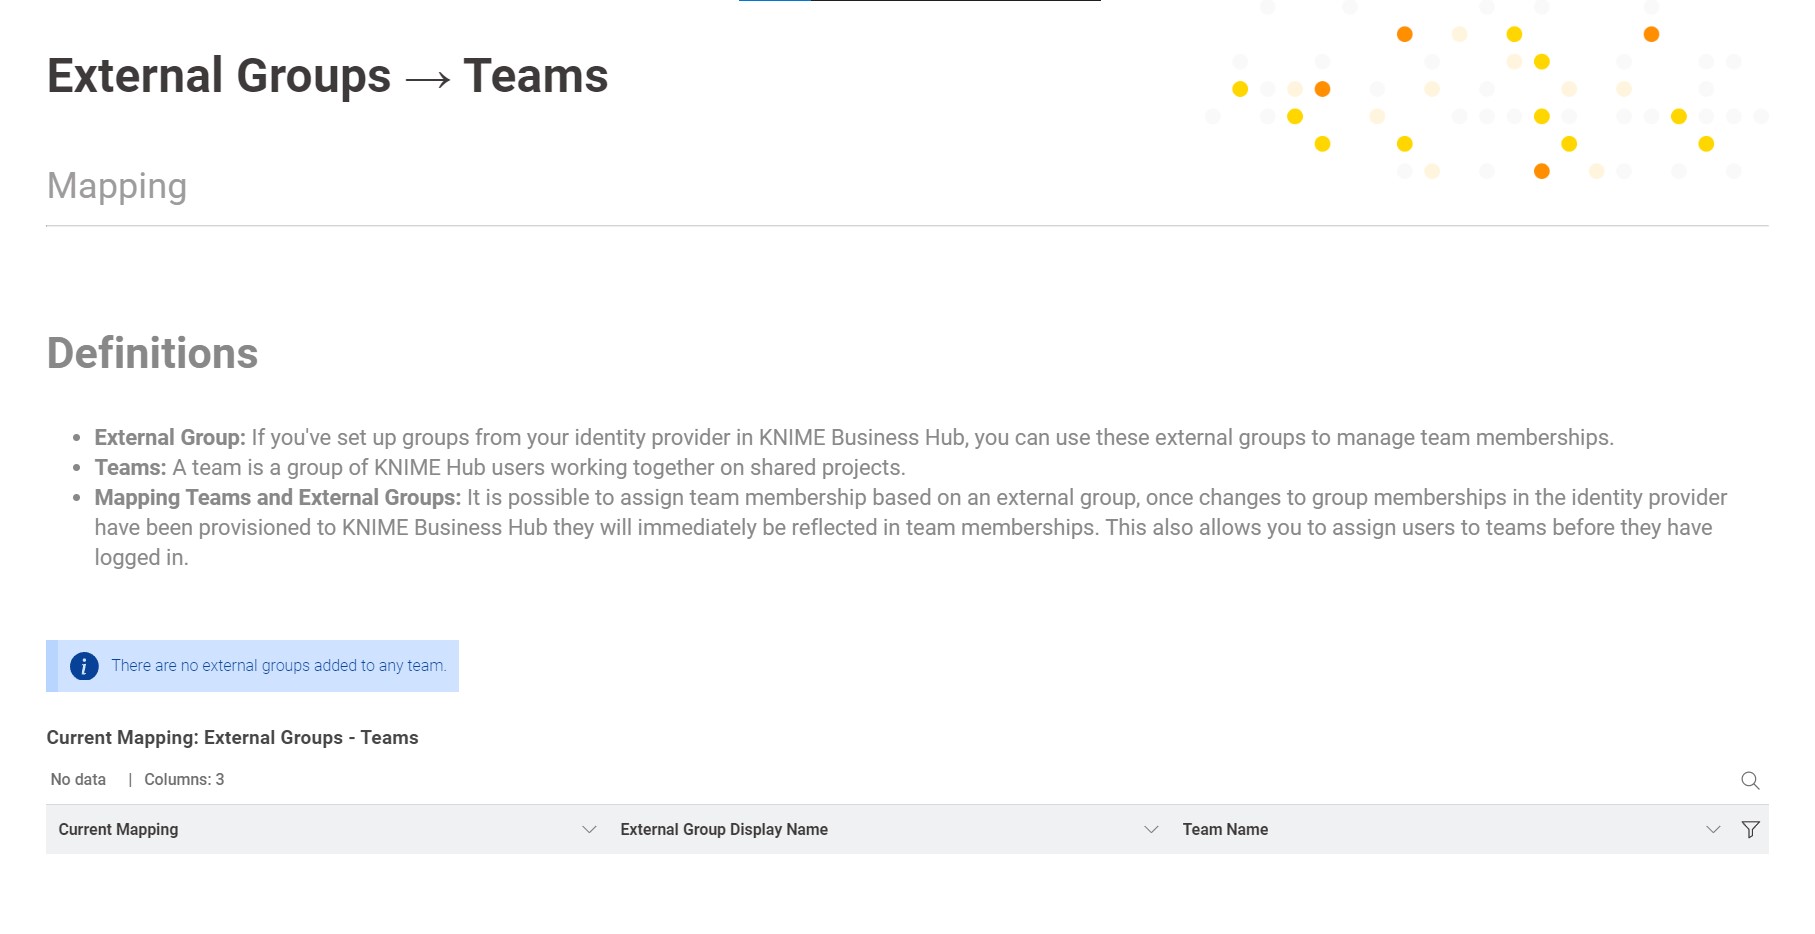
Below the main definitions is a table with three columns showing the current mapping, the external groups, and the teams. Use the filters to narrow the table by team name or external group.
Add external groups to teams
Select Add external groups to teams.
Use the central search box to add external group - team pairs. If too many options are available, copy either the external group or team name and paste it into the search box to filter to related items.
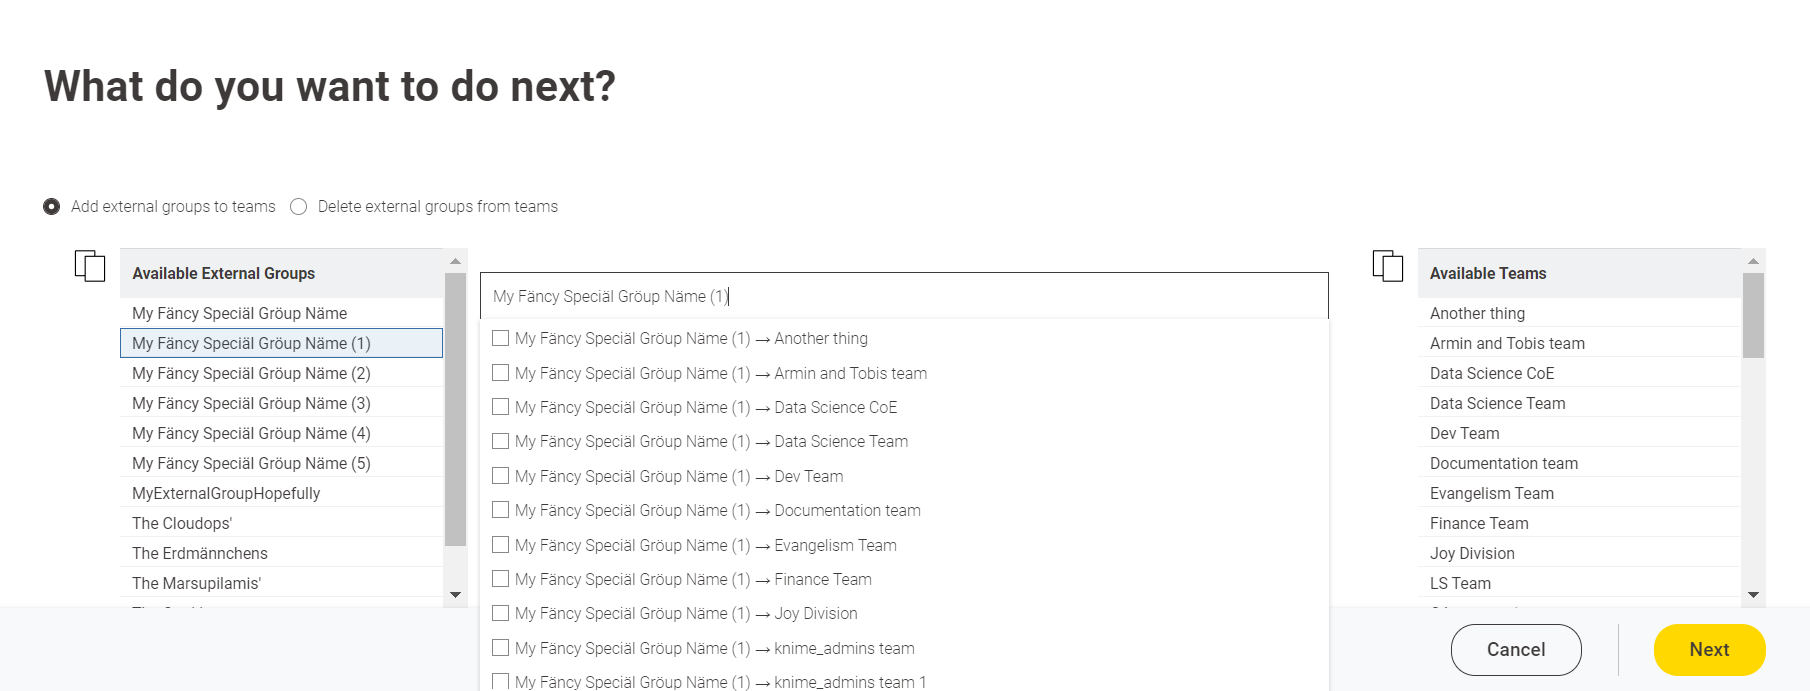
After adding all the desired external groups to the target teams, click Next. After a short wait, the same page shows the newly added external groups. Use the table filters to find them.
Users in the external group immediately appear as members of the respective team.
Delete external groups from teams
Select Delete external groups from teams.
Check the current mapping table to determine which external groups are attached to which teams.
In the search box, enter the name of the external group or team you want to delete.
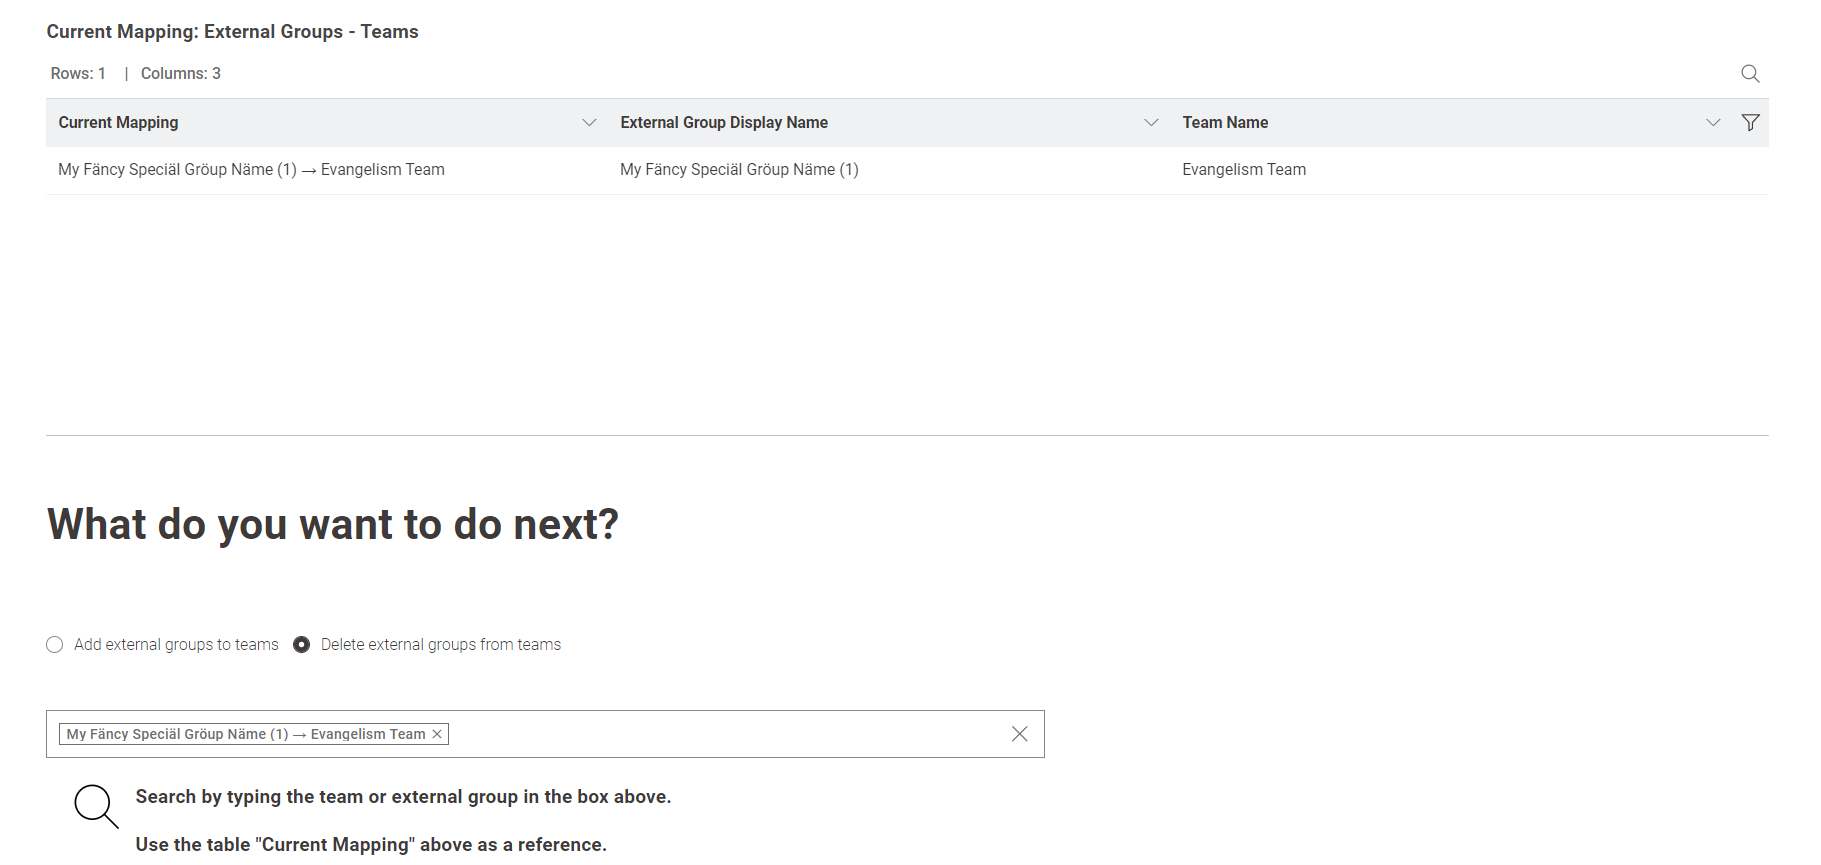
After adding all the external groups and their corresponding teams, click Next.
After you click Next, all users in the external group are immediately removed as members of the respective team.
Warnings and errors
The data application may show these messages during execution:
If the Knime REST API responds poorly, the data application displays a clear error message describing the REST communication issue.
If you have not yet provisioned external groups for the current Knime instance, complete the steps in Assign users to teams based on external groups before running the data application.
When you run the data application for the first time, an information message states that no external groups are assigned to any team, as shown below. Add them using the search box and click Next.
If a team admin or member tries to run the data application, an error message states that only global admins can execute it.
If you click Next without selecting any item in the search box, a warning message prompts you to return to the mapping stage and click Next again.